sensor MERCEDES-BENZ SPRINTER 2015 MY15 Operator’s Manual
[x] Cancel search | Manufacturer: MERCEDES-BENZ, Model Year: 2015, Model line: SPRINTER, Model: MERCEDES-BENZ SPRINTER 2015Pages: 334, PDF Size: 5.94 MB
Page 64 of 334
Tow-away alarm
Operation A visual and audible alarm is triggered if the
inclination of the vehicle changes when the
tow-away alarm is armed. This can be the
case if the vehicle is raised on one side, for
example.
Arming/disarming The tow-away alarm is automatically armed
approximately 20 second
s after you lock the
vehicle.
The tow-away alarm is automatically deacti-
vated when you unlock the vehicle.
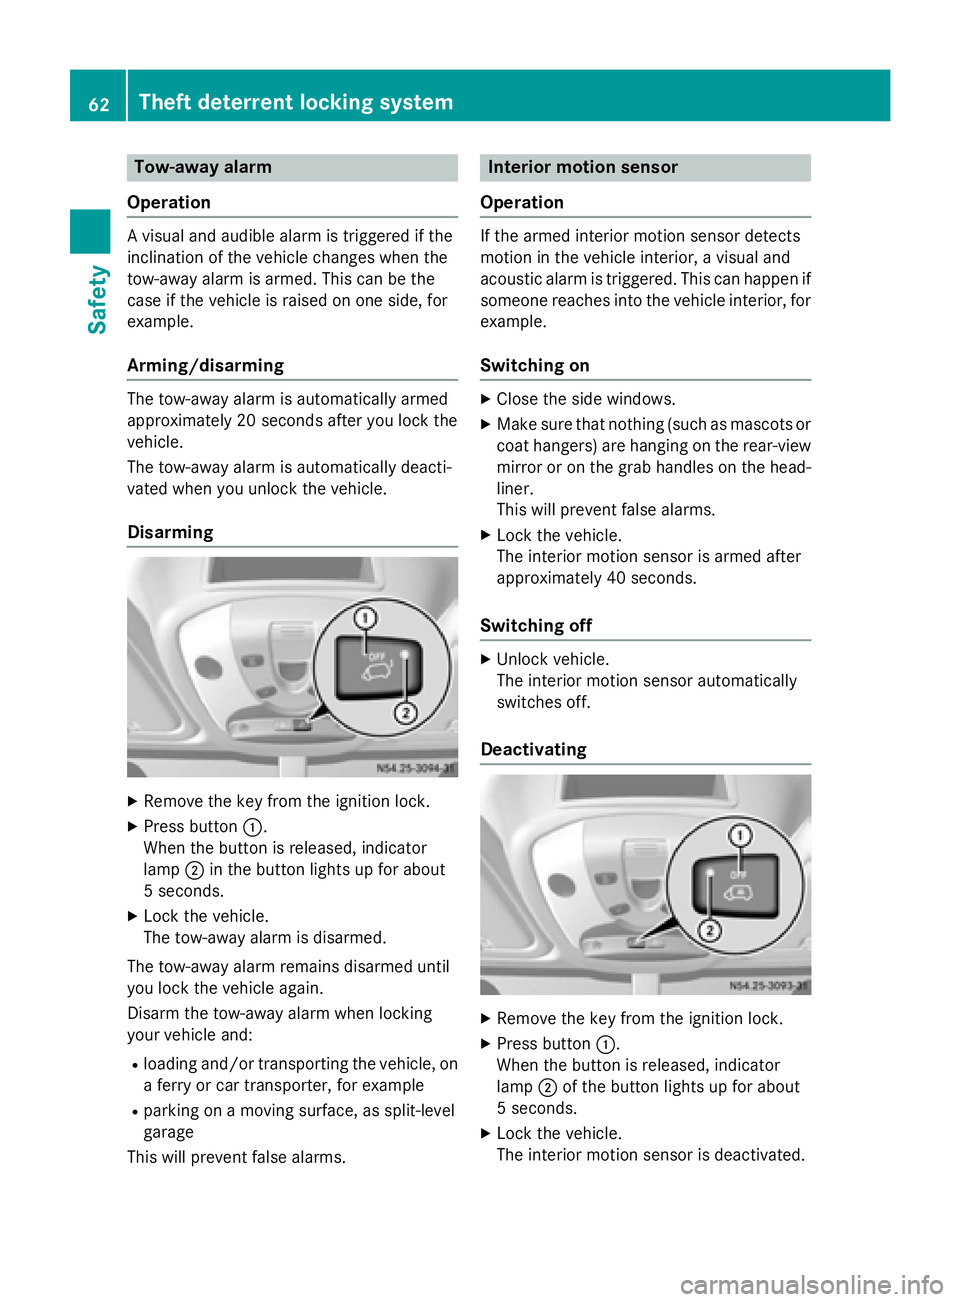
Disarming X
Remove the key from the ignition lock.
X Press button 0043.
When the button is released, indicator
lamp 0044in the button lights up for about
5 second s.
X Lock the vehicle.
The tow-away alarm is disarmed.
The tow-away alarm remains disarmed until
you lock the vehicle again.
Disarm the tow-away alarm when locking
your vehicle and: R loading and/or transporting the vehicle, on
a ferry or car transporter, for example
R parking on a moving surface, as split-level
garage
This will prevent false alarms. Interior motion sensor
Operation If the armed interior motion sensor detects
motion in the vehicle interior, a visual and
acoustic alarm is triggered. This can happen if
someone reaches into the vehicle interior, for example.
Switching on X
Close the side windows.
X Make sure that nothing (such as mascots or
coat hangers) are hanging on the rear-view
mirror or on the grab handles on the head- liner.
This will prevent false alarms.
X Lock the vehicle.
The interior motion sensor is armed after
approximately 40 seconds.
Switching off X
Unlock vehicle.
The interior motion sensor automatically
switches off.
Deactivating X
Remove the key from the ignition lock.
X Press button 0043.
When the button is released, indicator
lamp 0044of the button lights up for about
5 seconds.
X Lock the vehicle.
The interior motion sensor is deactivated. 62
Theft deterrent locking systemSafety
Page 65 of 334
The interior motion sensor remains deactiva-
ted until you lock the vehicle again.
Deactivate the interior motion sensor when
locking your vehicle:
R with people or animals remaining inside
R with the side windows remaining open
R when transporting it on a ferry or car trans-
porter, for example
This will prevent false alarms. Theft deterrent locking system
63Safety Z
Page 95 of 334
This is not possible in countries where day-
time running lamps are a legal requirement.
The daytime running lamps function must be
activated using the on-board computer:
R vehicles with steering wheel buttons
(Y page 192)
R vehicles without steering wheel buttons
(Y page 183)
X To switch on: turn the light switch to the
003F position.
The low-beam headlamps, parking lamps
and license plate lamp are switched on
when the engine is running. The 0058indi-
cator lamp in the instrument cluster lights
up.
i USA only:
If you turn the light switch to the 0060or
0058 position, the parking lamps or low-
beam headlamps switch on. If you turn the light switch to the 0058position, the day-
time running lamps remain switched on.
i Canada only:
If you turn the light switch to the 0058
position, the low-beam headlamps are
switched on. If you turn the light switch to
the 0060 or0058 position, the daytime
running lamps remain switched on.
Automatic headlamp mode G
WARNING
When the light switch is set to 0058, the low-
beam headlamps may not be switched on
automatically if there is fog, snow or other
causes of poor visibility due to the weather
conditions such as spray. There is a risk of an
accident.
In such situations, turn the light switch to
0058.
Automatic headlamp mode is only a driving
aid. You are responsible for the vehicle light-
ing at all times.
Depending on ambient light, the rain and light sensor automatically switches on the parking lamps, low-beam headlamps and the license
plate lamp. This excludes weather-related
impairments to visibility, such as snow, fog or
spray.
If there is fog, snow or spray, turn the light
switch quickly from 0058to0058. You could
otherwise briefly interrupt operation of the
headlamps.
X To switch on automatic headlamp
mode: turn the light switch to 0058.
Key in position 1in the ignition lock: the
parking lamps switch on or off automati-
cally depending on the ambient light.
When the engine is running: if you activate
the "daytime running lamps" function using the on-board computer, the daytime run-
ning lamps are switched on. The parking
lamps and low-beam headlamps also
switch on or off automatically, depending
on the ambient light.
When the low-beam headlamps are
switched on, the 0058indicator lamp in the
instrument cluster lights up.
Fog lamps/rear fog lamp G
WARNING
If you suspect that driving conditions will be
foggy, turn the light switch to 0058before you
start your journey. Your vehicle may other-
wise not be visible and you could endanger
yourself and others. G
WARNING
In low ambient lighting or foggy conditions,
only switch from position 0058to0058 with
the vehicle at a standstill in a safe location.
Switching from 0058to0058 will briefly
switch off the headlamps. Doing so while driv-
ing in low ambient lighting conditions may
result in an accident.
X Turn the ignition key to position 2in the
ignition lock or start the engine.
X Turn the light switch to 0058or0060. Exterior lighting
93Lights and windshield wipers Z
Page 98 of 334
Highbeam Assist
General notes You can use this function to set the head-
lamps to change between low beam and high beam automatically. The system recognizes
vehicles with their lights on, either approach-
ing from the opposite direction or traveling in front of your vehicle, and consequently
switches the headlamps from high beam to
low beam.
Once the system no longer detects any other
vehicles, it reactivates the high-beam head-
lamps.
The system's optical sensor is located behind the windshield near the overhead control
panel.
Important safety notes G
WARNING
Highbeam Assist does not recognize road
users:
R who have no lights, e.g. pedestrians
R who have poor lighting, e.g. cyclists
R whose lighting is blocked, e.g. by a barrier
In very rare cases, Highbeam Assist may fail to
recognize other road users who have lights, or
may recognize them too late. In this or similar situations, the automatic high-beam head-
lamps will not be deactivated or will be acti-
vated regardless. There is a risk of an acci-
dent.
Always carefully observe the traffic conditions and switch off the high-beam headlamps in
good time.
Highbeam Assist cannot take into account
road, weather or traffic conditions. Highbeam Assist is only an aid. You are responsible for
adjusting the vehicle's lighting to the prevail-
ing light, visibility and traffic conditions. In particular, the detection of obstacles can
be restricted if there is:
R poor visibility, e.g. due to fog, heavy rain or
snow
R dirt on the sensors or anything else cover-
ing the sensors
Activating/deactivating Highbeam
Assist X
To activate: switch on the Highbeam
Assist function using the on-board com-
puter (Y page 192).
X Turn the light switch to the 0058position.
X Press the combination switch beyond the
pressure point in the direction of arrow 0043
(Y page 94).
Highbeam Assist is active.
The 00CE or indicator lamp in the
multifunction display lights up when it is
dark and the light sensor activates the low-
beam headlamps.
If you are driving at speeds above approx-
imately 22 mph (35 km/h) and no other
road users have been detected:
The high-beam headlamps are switched on
automatically. The 0057indicator lamp in
the instrument cluster also lights up.
If you are driving at speeds below approx-
imately 19 mph (30 km/h), other road
users are recognized or the roads are ade-
quately lit:
The high-beam headlamps are switched off automatically. The 0057indicator lamp in
the instrument cluster goes out. The 00CE
or indicator lamp in the multifunc-
tion display remains lit.
X To deactivate: move the combination
switch back to its normal position or move the light switch to another position.
The 00CE or indicator lamp in the
multifunction display goes out. 96
Exterior lightingLights and windshield wipers
Page 109 of 334
Windshield wipers
Switching the windshield wiper
on/off
! Do not operate the windshield wipers
when the windshield is dry, as this could
damage the wiper blades. Moreover, dust
that has collected on the windshield can
scratch the glass if wiping takes place when the windshield is dry.
If it is necessary to switch on the windshield wipers in dry weather conditions, always
use washer fluid when operating the wind-
shield wipers.
! If the windshield wipers leave smears on
the windshield after the vehicle has been
washed in an automatic car wash, wax or
other residues may be the reason for this.
Clean the windshield using washer fluid
after washing the vehicle in an automatic
car wash.
! Vehicles with rain/light sensor:
Switch the wipers off in dry weather. Oth-
erwise, dirt or optical effects may cause
undesired windshield wiper sweeps. This
could then damage the windshield wiper
blades or scratch the windshield.
The windshield will no longer be wiped prop-
erly if the wiper blades are worn. Replace the wiper blades twice a year (Y page 108), ide-
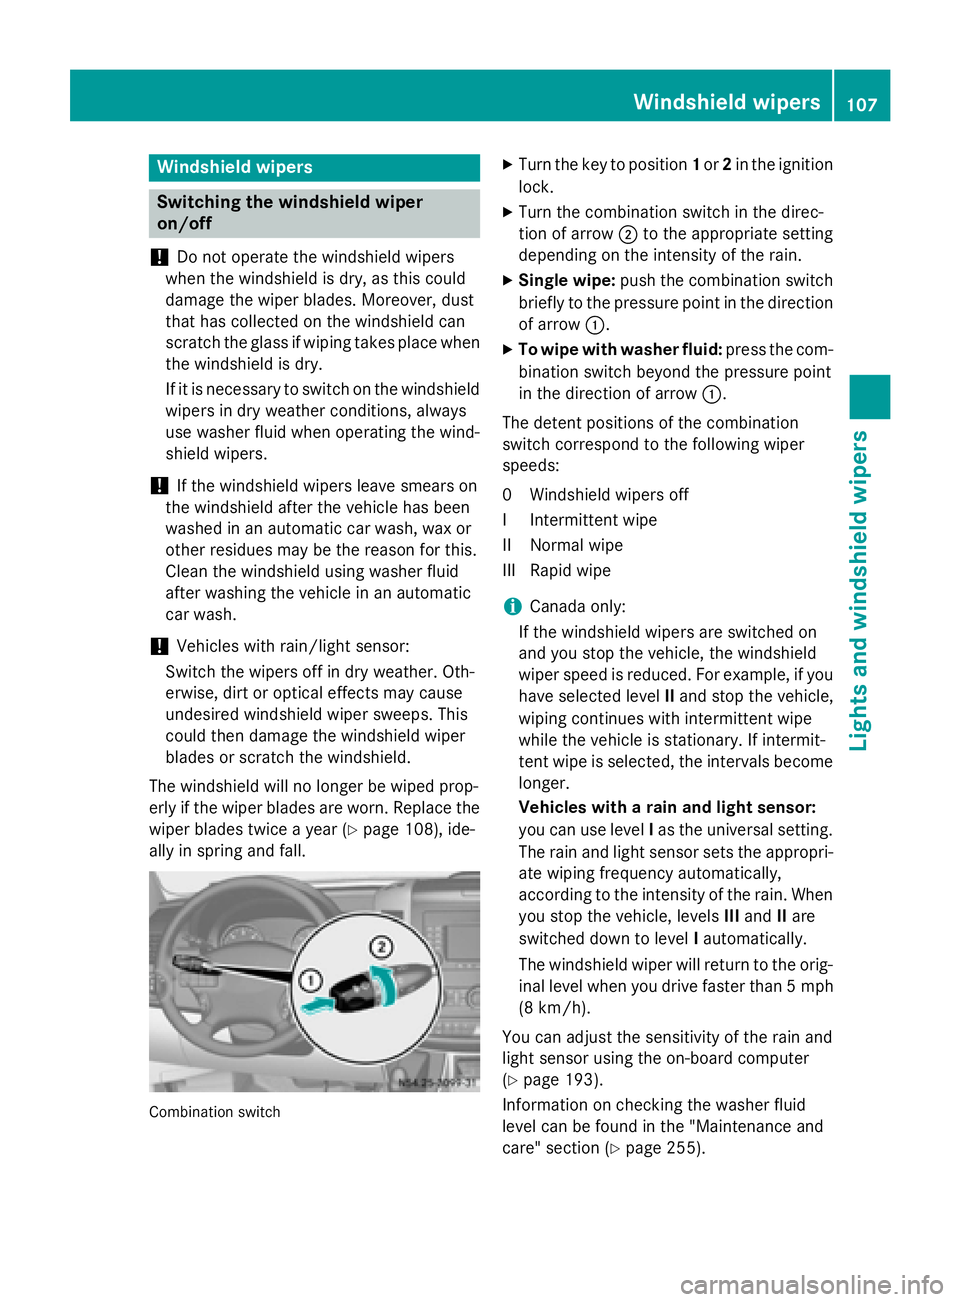
ally in spring and fall. Combination switch X
Turn the key to position 1or 2in the ignition
lock.
X Turn the combination switch in the direc-
tion of arrow 0044to the appropriate setting
depending on the intensity of the rain.
X Single wipe: push the combination switch
briefly to the pressure point in the direction
of arrow 0043.
X To wipe with washer fluid: press the com-
bination switch beyond the pressure point
in the direction of arrow 0043.
The detent positions of the combination
switch correspond to the following wiper
speeds:
0W indshield wipers off
II ntermittent wipe
II Normal wipe
III Rapid wipe
i Canada only:
If the windshield wipers are switched on
and you stop the vehicle, the windshield
wiper speed is reduced. For example, if you have selected level IIand stop the vehicle,
wiping continues with intermittent wipe
while the vehicle is stationary. If intermit-
tent wipe is selected, the intervals become
longer.
Vehicles with a rain and light sensor:
you can use level Ias the universal setting.
The rain and light sensor sets the appropri-
ate wiping frequency automatically,
according to the intensity of the rain. When
you stop the vehicle, levels IIIand IIare
switched down to level Iautomatically.
The windshield wiper will return to the orig- inal level when you drive faster than 5 mph
(8 km/h).
You can adjust the sensitivity of the rain and
light sensor using the on-board computer
(Y page 193).
Information on checking the washer fluid
level can be found in the "Maintenance and
care" section (Y page 255). Windshield wipers
107Lights andwindshield wipers Z
Page 163 of 334
Problems with cruise control
Problem
Possible causes/consequences and
0050
0050Solutions On vehicles with steer-
ing wheel buttons, the
speed cannot be set
when cruise control is
activated. The display shows a high-priority message. Thus a change in speed
is not possible.
X Proceed as instructed by the message in the display.
X Deactivate cruise control COLLISION PREVENTION ASSIST
General notes COLLISION PREVENTION ASSIST comprises
the distance warning function and adaptive
Brake Assist.
Distance warning function Important safety notes
i Note the section on 'Important safety
notes' (Y page 57). G
WARNING
The distance warning function does not react:
R to people or animals
R to oncoming vehicles
R to crossing traffic
R when cornering
Thus, the distance warning function cannot
provide a warning in all critical situations.
There is a risk of an accident.
Always pay careful attention to the traffic sit-
uation and be ready to brake. G
WARNING
The distance warning function cannot always
clearly identify objects and complex traffic
situations.
In such cases, the distance warning function
may:
R give an unnecessary warning
R not give a warning
There is a risk of an accident. Always pay careful attention to the traffic sit-
uation and do not rely solely on the distance
warning function.
Operation
The distance warning function can help you to
minimize the risk of a front-end collision with
a vehicle ahead or reduce the effects of such a collision. If the distance warning function
detects that there is a risk of a collision, you
will be warned visually and acoustically. With-out your intervention, the distance warning
function cannot prevent a collision.
The distance warning function will issue a
warning at speeds of around 20 mph
(30 km/h) or more if:
R you approach a vehicle ahead of you very
quickly. You will then hear an intermittent
warning tone and the 00C7warning lamp in
the instrument cluster flashes.
X Brake immediately in order to increase the
distance from the vehicle in front.
or
X Take evasive action provided it is safe to do
so.
If you want the distance warning function to
assist you, the function must be activated and operational.
Due to the nature of the system, particularly
complicated driving conditions may cause thesystem to display an unnecessary warning.
With the help of the radar sensor system, the
distance warning function can detect obsta-
cles that are in the path of your vehicle for an
extended period of time. Driving systems
161Driving and parking Z
Page 164 of 334
Up to a speed of about 45 mph (70 km/h), the
distance warning function can also react to
stationary obstacles, such as stopped or
parked vehicles.
If you approach an obstacle and the distance
warning function detects a risk of a collision,
the system will alert you both visually and
acoustically.
In particular, the detection of obstacles can
be impaired in the case of:
R there is dirt on the sensors or anything else
covering the sensors
R it is snowing or raining heavily
R there is interference from other radar sour-
ces
R there are strong radar reflections, for
example in parking garages
R a narrow vehicle traveling in front, e.g. a
motorbike
R a vehicle traveling in front on a different line
Following damage to the front end of the vehi-
cle, have the configuration and operation of
the radar sensor checked at a qualified spe-
cialist workshop. This also applies to colli-
sions at slow speeds where there is no visible
damage to the front of the vehicle.
Activating/deactivating the distance
warning function
When you switch on the engine, the distance
warning function switches on after a few sec-
onds.
X To deactivate: press the00D4button
(Y page 37).
Vehicles without steering wheel but-
tons: the00C7 warning lamp in the instru-
ment cluster lights up and the OFF
OFF message
flashes.
Vehicles with steering wheel buttons:
the 00C7 warning lamp in the instrument cluster lights up and the
Distance Warn‐ Distance Warn‐
ing Deactivated
ing Deactivated message appears.
X To activate: press the00D4button again
(Y page 37).
Vehicles without steering wheel but-
tons: the00C7 warning lamp in the instru-
ment cluster goes out and the ON
ON message
flashes.
Vehicles with steering wheel buttons:
the 00C7 warning lamp in the instrument
cluster goes out and the Distance Warn‐ Distance Warn‐
ing Activated
ing Activated message appears in the
multifunction display.
Adaptive Brake Assist i
Observe the "Important safety notes" sec-
tion for driving safety systems (Y page 57). G
WARNING
Adaptive Brake Assist cannot always clearly
identify objects and complex traffic situa-
tions.
In such cases, Adaptive Brake Assist can:
R intervene unnecessarily
R not intervene
There is a risk of an accident.
Always pay careful attention to the traffic sit- uation and be ready to brake. Terminate the
intervention in a non-critical driving situation. G
WARNING
Adaptive Brake Assist does not react:
R to people or animals
R to oncoming vehicles
R to crossing traffic
R to stationary obstacles
R when cornering
As a result, the Adaptive Brake Assist may not intervene in all critical conditions. There is a
risk of an accident.
Always pay careful attention to the traffic sit- uation and be ready to brake. 162
Driving systemsDriving and parking
Page 165 of 334
Adaptive Brake Assist aids you when braking
during hazardous situations at speeds above
20 mph (30 km/h). With the help of Adaptive Brake Assist, the distance warning signal can
detect obstacles that are in the path of your
vehicle for an extended period of time.
When you approach an obstacle and adaptive Brake Assist detects that there is a risk of a
collision, adaptive Brake Assist calculates the
braking force necessary to avoid a collision.
Should you apply the brakes forcefully, adap- tive Brake Assist will automatically increase
the braking force to the calculated level.
X Keep the brake pedal depressed until the
emergency braking situation is over.
ABS prevents the wheels from locking.
The brakes function as usual again if:
R you release the brake pedal
R there is no longer any danger of a collision
R no obstacle is detected in front of your
vehicle
Adaptive Brake Assist is then deactivated.
Up to the maximum vehicle speed, adaptive
Brake Assist can react to moving obstacles
that have already been recognized as such at least once over the period of observation.
Adaptive Brake Assist does not react to sta-
tionary obstacles.
In particular, the detection of obstacles can
be impaired if:
R there is dirt on the sensors or anything else
covering the sensors
R it is snowing or raining heavily
R there is interference from other radar sour-
ces
R there are strong radar reflections, for
example in parking garages
R a narrow vehicle traveling in front, e.g. a
motorbike
R a vehicle traveling in front on a different line
If adaptive Brake Assist is not available due to a malfunction in the radar sensor system, thefull brake boosting effect with the help of BAS
remains available. Following damage to the front end of the vehi-
cle, have the configuration and operation of
the radar sensor checked at a qualified spe-
cialist workshop. This also applies to colli-
sions at slow speeds where there is no visible damage to the front of the vehicle. Lane Tracking package
Blind Spot Assist General notes
Blind Spot Assist uses a radar sensor system
to monitor the areas on both sides of your
vehicle. It supports you from speeds of
approximately 20 mph (30 km/h). A warning
display in the exterior mirrors draws your
attention to vehicles detected in the moni-
tored area. If you then switch on the corre-
sponding turn signal to change lane, you will
also receive an optical and audible collision
warning. For this purpose, Blind Spot Assist
uses sensors in the rear bumper and behind
the protective strips of the B-pillars.
Important safety notes G
WARNING
Blind Spot Assist does not react to:
R vehicles overtaken too closely on the side,
placing them in the blind spot area
R vehicles which approach with a large speed
differential and overtake your vehicle
As a result, Blind Spot Assist may not give
warnings in such situations. There is a risk of an accident.
Always observe the traffic conditions care-
fully, and maintain a safe lateral distance.
Blind Spot Assist is only an aid. It may fail to
detect some vehicles and is no substitute for
attentive driving.
i USA only:
This device has been approved by the FCC as a "Vehicular Radar System". The radar
sensor is intended for use in an automotive Driving systems
163Driving and parking Z
Page 166 of 334
radar system only. Removal, tampering, or
altering of the device will void any warran-
ties, and is not permitted by the FCC. Do
not tamper with, alter, or use in any non-
approved way.
Any unauthorized modification to this
device could void the user’s authority to
operate the equipment.
Monitoring range of the sensors
In particular, the detection of obstacles can
be impaired in the case of:
R dirt on the sensors or anything else cover-
ing the sensors
R poor visibility, e.g. due to fog, heavy rain or
snow
R narrow and short vehicles, e.g. motorcy-
cles or bicycles
R very wide lanes
R narrow lanes
R vehicles not driving in the middle of their
lane
R barriers or other road boundaries
Vehicles in the monitoring range are then not
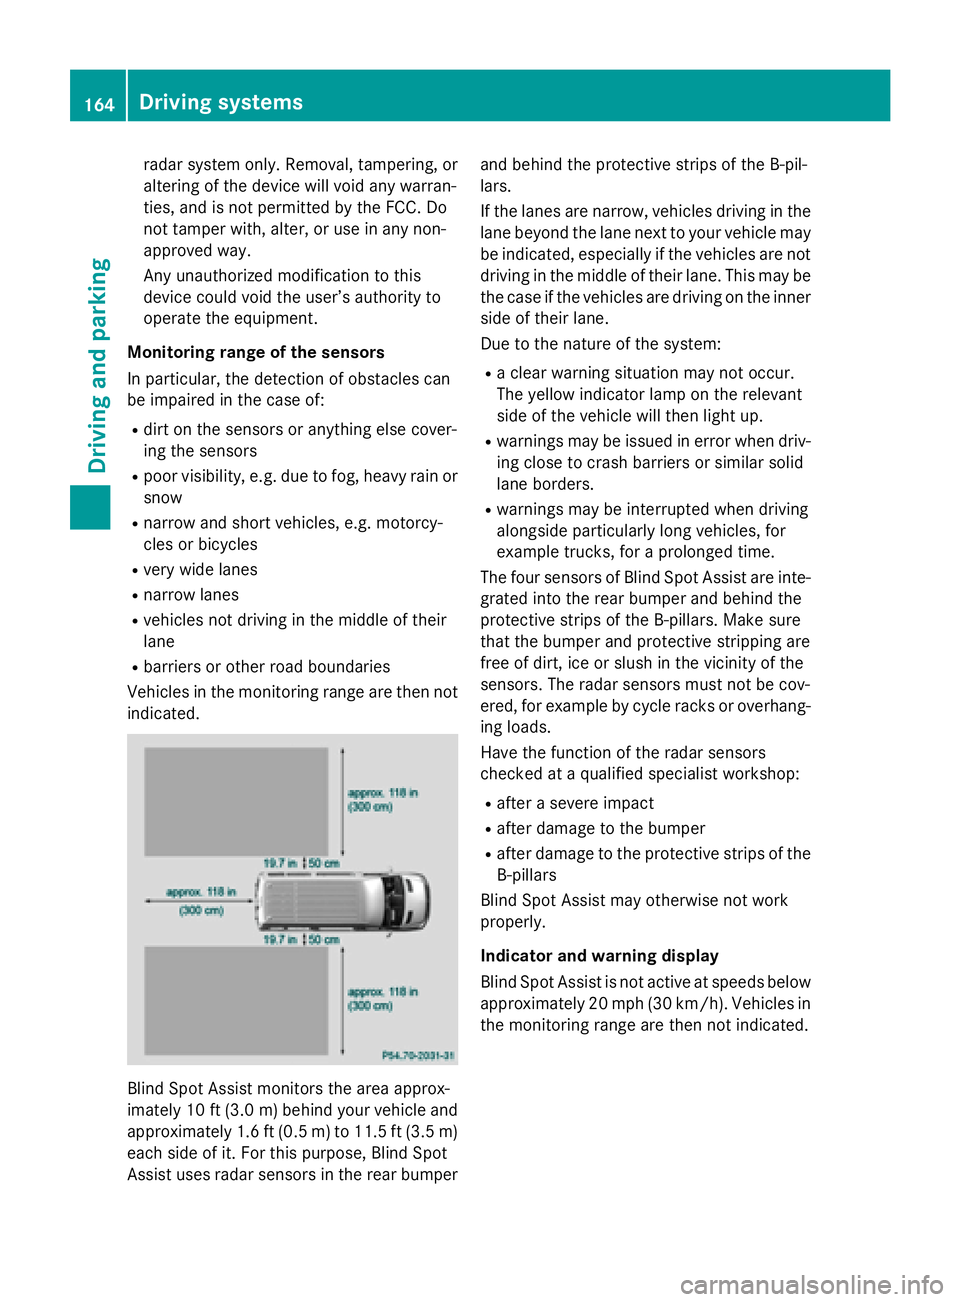
indicated. Blind Spot Assist monitors the area approx-
imately 10 ft (3.0 m)behind your vehicle and
approximately 1.6 ft (0.5 m) to 11.5 ft (3.5 m) each side of it. For this purpose, Blind Spot
Assist uses radar sensors in the rear bumper and behind the protective strips of the B-pil-
lars.
If the lanes are narrow, vehicles driving in the
lane beyond the lane next to your vehicle may
be indicated, especially if the vehicles are not
driving in the middle of their lane. This may be the case if the vehicles are driving on the inner
side of their lane.
Due to the nature of the system:
R a clear warning situation may not occur.
The yellow indicator lamp on the relevant
side of the vehicle will then light up.
R warnings may be issued in error when driv-
ing close to crash barriers or similar solid
lane borders.
R warnings may be interrupted when driving
alongside particularly long vehicles, for
example trucks, for a prolonged time.
The four sensors of Blind Spot Assist are inte-
grated into the rear bumper and behind the
protective strips of the B-pillars. Make sure
that the bumper and protective stripping are
free of dirt, ice or slush in the vicinity of the
sensors. The radar sensors must not be cov-
ered, for example by cycle racks or overhang- ing loads.
Have the function of the radar sensors
checked at a qualified specialist workshop:
R after a severe impact
R after damage to the bumper
R after damage to the protective strips of the
B-pillars
Blind Spot Assist may otherwise not work
properly.
Indicator and warning display
Blind Spot Assist is not active at speeds below approximately 20 mph (30 km/h). Vehicles in the monitoring range are then not indicated. 164
Driving systemsDriving and parking
Page 169 of 334
The
Lane Keep. Assist Deactivated
Lane Keep. Assist Deactivated
message appears in the display and the
00B0 indicator lamp in the instrument clus-
ter flashes and then lights up continuously.
Lane Keeping Assist is deactivated.
X To activate: press thejbutton in the
center console again (Y page 37).
On vehicles without steering wheel but-
tons:
ON ON flashes briefly in the display and the
00B0 indicator lamp in the instrument clus-
ter flashes and then goes out.
On vehicles with steering wheel but-
tons:
The Lane Lane Keep.
Keep. Assist
Assist Activated
Activated mes-
sage appears in the display and the 00B0
indicator lamp in the instrument cluster
flashes and then goes out.
Lane Keeping Assist is activated.
A Lane Keeping Assist warning is suppressed if:
R a driving safety system intervenes, such as
ABS, BAS or ESP ®
.
R you have set the turn signal and a lane
change is detected. In this case, the warn-
ings are suppressed for a certain period of
time.
R you accelerate hard, e.g. kickdown on vehi-
cles with an automatic transmission.
R you brake hard.
R you steer actively, e.g. swerve to avoid an
obstacle or change lane quickly.
R you cut the corner on a sharp bend.
In order that you are warned only when nec-
essary and in good time if you cross the lane marking, the system recognizes certain con-
ditions and warns you accordingly.
Lane Keeping Assist warns you earlier if:
R you approach the outer lane marking on a
bend.
R the road has very wide lanes, e.g. a free-
way.
R the system recognizes solid lane markings. Warnings are given later if:
R the road has narrow lanes.
R you cut the corner on a bend. PARKTRONIC
General notes PARKTRONIC is an electronic parking aid. The
system is equipped with ultrasonic sensors inthe front and rear bumpers to monitor the
area around your vehicle. PARKTRONIC indi-
cates visually and audibly the distance
between your vehicle and an object.
Your vehicle features two separate sound
emitters with different frequencies for the
warning tones. The warning ranges in front of
and behind the vehicle are indicated by dif-
ferent warning tones.
PARKTRONIC is activated automatically when you:
R turn the key to position 2in the ignition lock
R release the parking brake and
R move the selector lever to D,Nor R
PARKTRONIC is deactivated at speeds above
11 mph (18 km/h) . PARKTRONIC is reactiva-
ted at speeds below 10 mph (16 km/h).
Important safety notes PARKTRONIC is only an aid. It cannot replace
your own awareness of the immediate sur-
roundings. You are responsible for safe
maneuvering, parking and pulling away. Whenmaneuvering, parking and pulling away, make
sure that there are no persons, animals or
objects in the maneuvering area.
! Pay particular attention to obstacles
above or below the sensors when parking,
such as flower pots or trailer towbars.
PARKTRONIC does not recognize such
objects when they are in the immediate
vicinity of the vehicle. You could damage
the vehicle or objects. Driving systems
167Driving and parking Z