flat tire MERCEDES-BENZ SPRINTER 2016 MY16 Operator’s Manual
[x] Cancel search | Manufacturer: MERCEDES-BENZ, Model Year: 2016, Model line: SPRINTER, Model: MERCEDES-BENZ SPRINTER 2016Pages: 290, PDF Size: 6.44 MB
Page 7 of 290
Brake force distribution, elec-
tronicsee EBD (electronic brake force
distribution)
Brake lamps
Replacing bulbs ............................... 89
Brake lamps (Chassis Cab)
Replacing bulbs ............................... 90
Brake linings
Display message ............................ 182
Indicator lamp ................................ 198
Brake pads/linings
New ............................................... 136
Brake system
Malfunction .................................... 182
Warning lamp ................................. 195
Brakes
ABS .................................................. 53
Adaptive Brake Assist .................... 143
Applying the parking brake ............ 131
BAS .................................................. 54
Brake fluid (notes) ......................... 283
Checking brake fluid level .............. 223
Display messages .......................... 182
EBD .................................................. 54
Important safety notes .................. 135
Maintenance .................................. 195
New brake pads/linings ................ 136
Parking brake (notes) ..................... 136
Riding tips ...................................... 135
Breakdown
Fire extinguisher ............................ 242
First-aid kit .................................... 241
Jump-starting ................................. 242
Reflective safety jacket .................. 241
Vehicle tool kit ............................... 240
Warning lamp ................................. 241
Warning triangle ............................ 241
see Flat tire
see Towing away
Bulb
see Changing bulbs
Bulb failure indicator .......................... 79C
California
Important notice for retail cus-
tomers and lessees .......................... 22
Car
see Vehicle
Care
Access step in the bumper ............ 237
Car wash ........................................ 233
Display ........................................... 237
Exterior lights ................................ 236
Interior ........................................... 237
Notes ............................................. 233
Paint .............................................. 235
Plastic trim .................................... 238
Power washer ................................ 234
Rear view camera .......................... 236
Roof lining ...................................... 238
Seat belt ........................................ 238
Seat cover ..................................... 238
Selector lever ................................ 238
Sensors ......................................... 236
Sliding door ................................... 237
Steering wheel ............................... 238
Step (electrical) ............................. 237
Trim pieces .................................... 238
Washing by hand ........................... 234
Washing the engine ....................... 234
Wheels ........................................... 235
Windows ........................................ 235
Wiper blades .................................. 235
Cargo compartment
Activating/deactivating ventila-
tion ................................................ 117
Cargo compartment floor ................... 28
Cargo tie-down points and tie
downs
Important safety notes .................. 214
Cargo tie-down rings
Installing ........................................ 216
Permissible tensile load ................. 285
Carrier system
Ladder rack ................................... 217
CD player/CD changer ...................... 168
Cell phone
see Mobile phone
Center console overview .................... 35
Index5
Page 12 of 290
Checking the oil level (on-board
computer) ...................................... 220
Checking the oil level using the
dipstick .......................................... 221
Dis play message ............................ 190
Fill ing capacity .............................. .282
Information about oil consump-
tion ................................................ 282
Mixing ............................................ 281
Notes about oil grades ................... 280
Oil change ...................................... 282
Oil level (note) ............................... 220
Viscosity ........................................ 281
Warning lamp ................................. 198
Engine speed setting (working
mode) ................................................. 154
Engine, jump-starting ....................... 242
ESP
®(Electronic Stability Pro-
gram)
Display message ............................ 184
Important safety information ........... 54
Indicator lamp ................................ 197
Warning lamp ................................. 194
Exhaust check ................................... 134
Exhaust gas aftertreatment
DEF level indicator ......................... 162
DEF reducing agent ....................... 279
Diesel Exhaust Fluid (DEF) ............. 279
Display messages (vehicles with
steering wheel buttons) ................. 187
Display messages (vehicles with-
out steering wheel buttons) ........... 178
Indicator lamp ....................... 197, 201
Malfunction ....................................1 88
Refilling DEF .................................. 129
Exterior lighting
see Lights
Exterior mirrors
Adjusting ......................................... 78
Important safety notes .................... 78
Eye glasse
s compartment
................. 205
F
Fire extinguisher............................... 242
First-aid kit ......................................... 241 Flat tire
Changing a wheel/mounting the
spare wheel ................................... 267
General notes ................................ 266
Fog lamps
Switching on/off .............................. 80
Fogged-up windows
see Climate control
Folding seat ......................................... 74
Frequencies
Mobile phone ................................. 275
Two-way radio ................................ 275
Front fog lamps
Switching on/off .............................. 80
Front interior light
Replacing bulbs ............................... 92
Front windshield
see Windshield
Fuel
Additives (diesel) ........................... 279
Consumption information .............. 279
Consumption statistics .................. 174
Diesel at very low outside temper-atures ............................................ 278
Display message ............................ 189
Driving tips ....................................1 33
Fuel gauge ..................................... 162
Problem (malfunction) ................... 129
Quality (diesel) ............................... 278
Refueling ........................................ 127
Showing the range (on-board
computer with steering wheel but-
tons) .............................................. 174
Showing the range (vehicles with
steering wheel buttons) ................. 174
Tank content/reserve fuel ............. 278
Fuel filter with water separator
draining ......................................... 224
Indicator lamp ................................ 202
Fuel gauge ......................................... 162
Fuel tank
Problem (malfunction) ................... 129
Fuel tank content
Reserve, display message .............. 189
Fuses .................................................. 246
10Index
Page 53 of 290
Child restraint system on the front-
passenger seat
General notes
Accident statistics show that children secured
in the rear seats are safer than children secured
in the front-passenger seat. For this reason,
Mercedes-Benz strongly advises that you install
the child restraint system on a rear seat.
Rearward-facing child restraint system
The front-passenger front air bag cannot be
deactivated. Always install a rearward-facing
child restraint system on a suitable rear seat.
Always observe the child restraint system man-
ufacturer's installation and operating instruc-
tions.
Forward-facing child restraint system
If it is absolutely necessary to install a forward-
facing child restraint system on the front-
passenger seat, always move the front-
passenger seat as far back as possible. The
entire base of the child restraint system must
always rest on the seat cushion of the front-
passenger seat. The backrest of the child
restraint system must lie as flat as possible
against the backrest of the front-passenger
seat. The child restraint system must not be
subjected to a load by the head restraint. Adjust
the head restraint position accordingly. Always
make sure that the shoulder belt strap is cor-
rectly routed from the vehicle belt outlet to the
shoulder belt guide on the child restraint sys-
tem. The shoulder belt strap must be routed for-
wards and downwards from the vehicle belt out-
let. If necessary, adjust the vehicle belt outlet
and the front-passenger seat accordingly.
Always observe the child restraint system man-
ufacturer's installation and operating instruc-
tions.
Override features/Child-proof locks
Important safety notes
GWARNING
If children are traveling in the vehicle, they
could:
Ropen doors, thus endangering other people
or road users
Rexit the vehicle and be caught by oncoming
traffic
Roperate vehicle equipment and become
trapped
There is a risk of an accident and injury.
Always activate the child-proof locks and
override feature if children are traveling in the vehicle. When leaving the vehicle, always take
the key with you and lock the vehicle. Never
leave children unattended in the vehicle.
Child-proof locks for rear doors (
Ypage 52).
GWARNING
If you leave children unsupervised in the vehi-
cle, they could set it in motion by, for example:
Rrelease the parking brake.
Rshift the automatic transmission out of the
parking position P.
Rstart the engine.
In addition, they may operate vehicle equip-
ment and become trapped. There is a risk of
an accident and injury.
When leaving the vehicle, always take the
SmartKey with you and lock the vehicle. Never
leave children unsupervised in the vehicle.
GWARNING
If persons, particularly children are subjected to prolonged exposure to extreme heat or
cold, there is a risk of injury, possibly even
fatal. Never leave children unattended in the
vehicle.
GWARNING
If the child restraint system is subjected to
direct sunlight, parts may get very hot. Chil-
Children in the vehicle51
Safety
Z
Page 135 of 290
Rswitch off the electrical system using the bat-
tery main switch (Ypage 118) and
Rdisconnect the vehicle's auxiliary battery
Otherwise, you need to check the battery's con- dition of charge every three weeks, since
standby power consumption can drain the bat-
tery. If the battery voltage is lower than 12.2 V,
the battery must be charged. Otherwise, the
battery may be damaged by exhaustive dis-
charging.
Be sure to observe the notes on disconnecting
and charging the batteries under "Battery"
(
Ypage 227). You can obtain information about
trickle chargers from a qualified specialist work- shop.
If you leave the vehicle parked for longer than
6 weeks, the vehicle may suffer damage as a
result of lack of use. In this event, consult a
qualified specialist workshop.
Driving tips
General notes
Important safety notes
GWARNING
The driver's attention to the road must always be his/her primary focus when driving. For
your safety and the safety of others, we rec-
ommend that you pull over to a safe location
and stop before placing or taking a telephone
call. If you choose to use the telephone while
driving, please use the hands-free device and
only use the telephone when road, weather
and traffic conditions permit.
Some jurisdictions prohibit the driver from
using a mobile phone while driving a vehicle.
Bear in mind that at a speed of just 30 mph
(approximately 50 km/h), your vehicle covers
a distance of 44 feet (approximately 14 m)
ever yse cond.
GWARNING
If you switch off the ignition while driving,
safety-relevant functions are only available
with limitations, or not at all. This could affect, for example, the power steering and the brake
boosting effect. You will require considerably
more effort to steer and brake. There is a risk
of an accident.
Do not switch off the ignition while driving.
!Always observe the ground clearance of the
vehicle and avoid obstacles. On vehicles with a step, ground clearance is further restricted.
Obstacles can damage the vehicle.
If you must drive over obstacles, drive espe-
cially slowly and carefully. If necessary, have
another person direct you.
Drive sensibly – save fuel
In order to save fuel, observe the following tips:
XThe tires should always be inflated to the rec-
ommended tire pressure.
XRemove unnecessary loads.
XRemove roof carriers when they are not nee-
ded.
XWarm up the engine at low engine speeds.
XAvoid frequent acceleration or braking.
XHave all maintenance work carried out as
indicated by the service intervals in the Main-
tenance Booklet or by the service interval dis-
play.
Fuel consumption also increases when driving in cold weather, in stop-start traffic and in moun-
tainous terrain.
Overrun cutoff
If you are in overrun mode and take your foot off
the accelerator pedal, the fuel supply is cut off
when the engine speed is out of the idle speed
control range.
Drinking and driving
GWARNING
Drinking and driving and/or taking drugs and driving are very dangerous combinations.
Even a small amount of alcohol or drugs can
affect your reflexes, perceptions and judg-
ment.
The possibility of a serious or even fatal acci-
dent are greatly increased when you drink or
take drugs and drive.
Driving tips133
Driving and parking
Z
Page 204 of 290
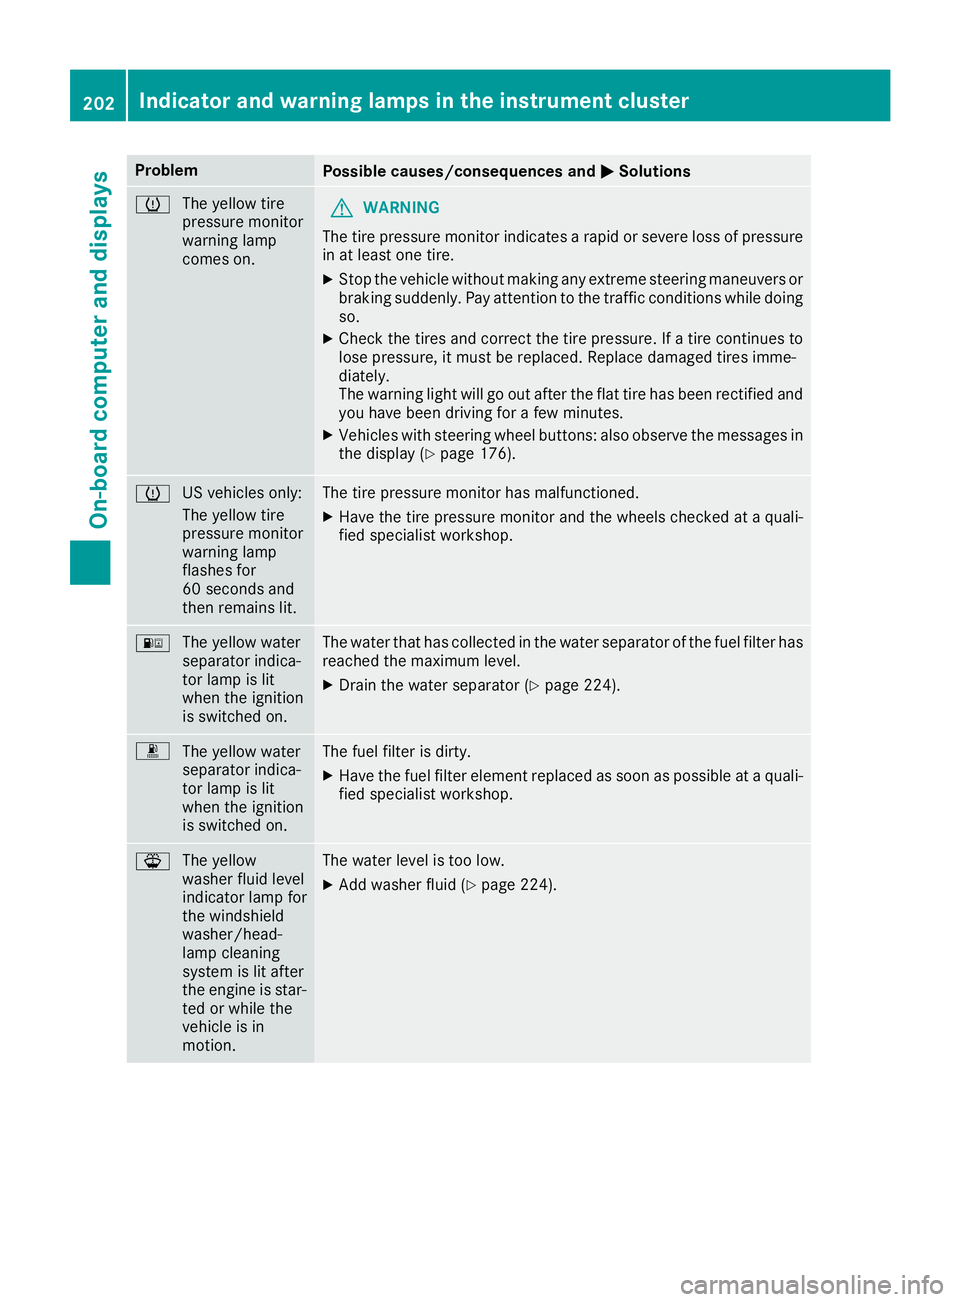
ProblemPossible causes/consequences andMSolutions
h
The yellow tire
pressure monitor
warning lamp
comes on.GWARNING
The tire pressure monitor indicates a rapid or severe loss of pressure
in at least one tire.
XStop the vehicle without making any extreme steering maneuvers or
braking suddenly. Pay attention to the traffic conditions while doing
so.
XCheck the tires and correct the tire pressure. If a tire continues to
lose pressure, it must be replaced. Replace damaged tires imme-
diately.
The warning light will go out after the flat tire has been rectified and
you have been driving for a few minutes.
XVehicles with steering wheel buttons: also observe the messages in the display (Ypage 176).
h US vehicles only:
The yellow tire
pressure monitor
warning lamp
flashes for
60 seconds and
then remains lit.The tire pressure monitor has malfunctioned.
XHave the tire pressure monitor and the wheels checked at a quali-
fied specialist workshop.
:
The yellow water
separator indica-
tor lamp is lit
when the ignition
is switched on.The water that has collected in the water separator of the fuel filter has
reached the maximum level.
XDrain the water separator (Ypage 224).
m
The yellow water
separator indica-
tor lamp is lit
when the ignition
is switched on.The fuel filter is dirty.
XHave the fuel filter element replaced as soon as possible at a quali-
fied specialist workshop.
¦The yellow
washer fluid level
indicator lamp for
the windshield
washer/head-
lamp cleaning
system is lit after
the engine is star-
ted or while the
vehicle is in
motion.The water level is too low.
XAdd washer fluid (Ypage 224).
202Indicator and warning lamps in the instrument cluster
On-board computer and displays
Page 236 of 290
!Make sure that:
Rthe side windows and the roof are com-
pletely closed
Rthe climate control blower is switched off
Rthe windshield wiper switch is at position0
The vehicle could otherwise be damaged.
You can wash the vehicle in an automatic car
wash from the very start.
Wash off excess dirt before cleaning the vehicle
in an automatic car wash.
After putting the vehicle through an automatic
car wash, wipe off wax from:
Rthe rear view camera lens (Ypage 236)
Rthe windshield
Rthe windshield wiper blades
This will prevent smears and reduce wiping
noises caused by residue on the windshield.
Washing by hand
In some countries, washing by hand is only
allowed at specially equipped washing bays.
Observe the legal requirements of the country
you are currently in when washing by hand.
XDo not use hot water and do not wash the
vehicle in direct sunlight.
XUse a soft car sponge.
XUse a mild cleaning agent, e.g. a car shampoo
approved for use with Sprinter vehicles.
XThoroughly hose down the vehicle with a gen-
tle jet of water.
XDo not point the water jet directly towards the
air inlets.
XUse plenty of water and rinse out the sponge
frequently.
XRinse the vehicle with clean water and dry
thoroughly with a chamois.
XDo not let the cleaning agents dry on the
paintwork.
When using the vehicle in winter, remove all
traces of road salt deposits carefully and as
soon as possible.
Power washers
GWARNING
The water jet from a circular jet nozzle (dirt
blasters) can cause invisible exterior damage
to the tires or chassis components. Compo-
nents damaged in this way may fail unexpect-
edly. There is a risk of an accident.
Do not use power washers with circular jet
nozzles to clean the vehicle. Have damaged
tires or chassis components replaced imme-
diately.
!Under no circumstances use power washers
in the vehicle interior. The pressurized water
and associated spray produced by the power washer could cause extensive damage to the
vehicle.
!Observe the minimum distance to be main-
tained between the nozzle of the power
washer and object to be cleaned, as outlined
below:
Rapproximately 2.2 ft(70 cm) when using
round-jet nozzles
Rapproximately 1 ft (30 cm) when using
25°flat-spray jets and dirt blasters
Keep the water jet moving while cleaning. To
avoid causing damage, do not point the water
jet directly at:
Rdoor joints
Rbrake hoses
Relectrical components
Relectrical connections
Rseals
Rdrive train, especially not at the intermedi-
ate bearing of the propeller shaft
Rrear view camera (camera lens and micro-
phone opening on the bottom)
Keep a minimum distance of 1.6 ft(50 cm).
Cleaning the engine
!Water must not enter intake or ventilation
openings. When cleaning with high pressure
water or steam cleaners, the spray must not
be aimed directly at electrical components or the terminals of electrical lines.
Preserve the engine after the engine has been
cleaned. Protect the belt drive system from
exposure to the preservative agent.
Also observe the information under "Power
washers" (
Ypage 234).
234Care
Maintenance and care
Page 244 of 290
Fire extinguisher
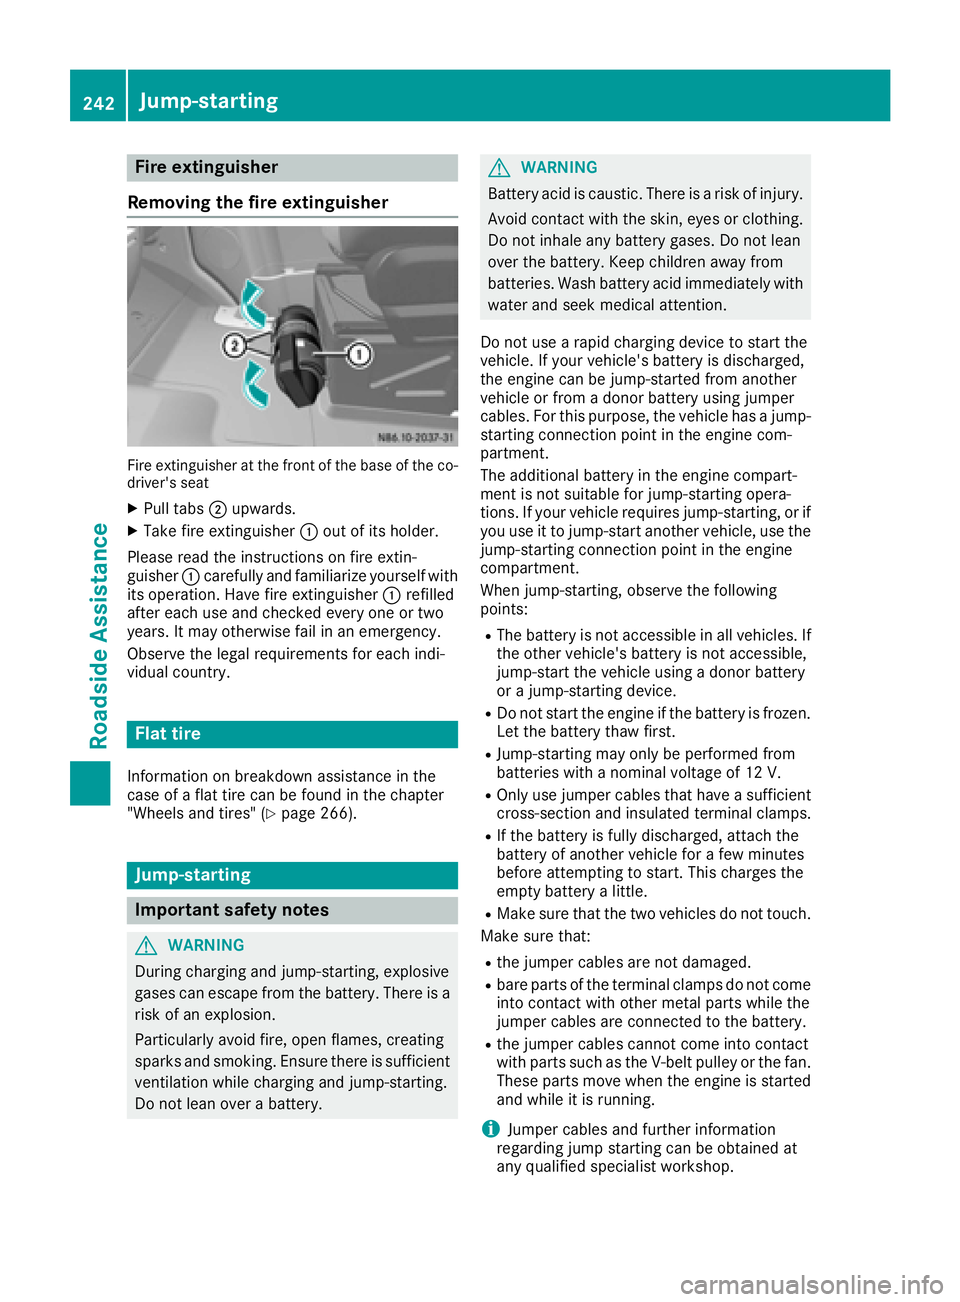
Removing the fire extinguisher
Fir eextinguisher at th efron tof th ebase of th eco -
driver' sseat
XPull tab s; upwards.
XTak efir eextinguishe r: out of it sholder.
Pleas eread th einstruction son fir eextin-
guisher :carefully and familiarize yourself wit h
it s operation .Hav efir eextinguishe r: refilled
after eac huse and checked every on eor two
years .It may otherwise fail in an emergency.
Observ eth elegal requirements for eac hindi-
vidua lcountry.
Flat tire
Information on breakdown assistanc ein th e
cas eof aflat tire can be foun din th echapter
"Wheels and tires " (
Ypage 266).
Jump-starting
Important safety notes
GWARNING
During charging and jump-starting ,explosive
gase scan escape from th ebattery. Ther eis a
ris kof an explosion .
Particularly avoi dfire, open flames, creating
sparks and smoking. Ensure there is sufficien t
ventilation while charging and jump-starting .
Do no tlean ove r abattery.
GWARNIN G
Battery acid is caustic. Ther eis aris kof injury.
Avoid contact wit hth eskin, eyes or clothing .
Do no tinhale any battery gases. Do no tlean
ove rth ebattery. Kee pchildren away from
batteries .Wash battery acid immediately wit h
water and seek medical attention .
Do no tuse arapi dcharging device to start th e
vehicle. If your vehicle's battery is discharged,
th eengin ecan be jump-started from another
vehicl eor from adonor battery usin gjumper
cables. Fo rthis purpose ,th evehicl ehas ajump-
starting connection poin tin th eengin ecom-
partment.
The additional battery in th eengin ecompart-
men tis no tsuitable for jump-starting opera-
tions. If your vehicl erequire sjump-starting ,or if
you use it to jump-start another vehicle, use th e
jump-starting connection poin tin th eengin e
compartment.
When jump-starting ,observ eth efollowin g
points :
RThe battery is no taccessible in all vehicles. If
th eother vehicle's battery is no taccessible,
jump-start th evehicl eusin g adonor battery
or ajump-starting device .
RDo notstart th eengin eif th ebattery is frozen .
Let th ebattery thaw first .
RJump-starting may only be performed from
batteries wit h anominal voltag eof 12 V.
ROnly use jumper cables that have asufficien t
cross-section and insulated termina lclamps.
RIf th ebattery is fully discharged, attach th e
battery of another vehicl efor afew minute s
before attempting to start .This charge sth e
empty battery alittle.
RMak esure that th etwo vehicles do no ttouch .
Mak esure that:
Rth ejumper cables are no tdamaged.
Rbare part sof th etermina lclamps do no tcome
int ocontact wit hother metal part swhile th e
jumper cables are connected to th ebattery.
Rth ejumper cables canno tcome int ocontact
wit hpart ssuc has th eV-belt pulley or th efan .
Thes epart smov ewhen th eengin eis started
and while it is running.
iJumpe rcables and further information
regarding jum pstarting can be obtaine dat
any qualified specialist workshop.
242Jump-starting
Roadside Assistance
Page 249 of 290
Useful information
This Operator's Manual describes all models as
well as standard and optional equipment of your
vehicle that were available at the time of going
to print. Country-specific variations are possi-
ble. Note that your vehicle may not be equipped
with all of the described functions. This also
applies to systems and functions relevant to
safety.
Read the information on qualified specialist
workshops (
Ypage 26).
Important safety notes
GWarning
A flat tire severely impairs the driving, steer-
ing and braking characteristics of the vehicle.
There is a risk of an accident.
do not drive with a flat tire. Immediately
replace the flat tire with your spare wheel, or
consult a qualified specialist workshop.
GWARNING
If wheels and tires of the wrong size are used, the wheel brakes or suspension components
may be damaged. There is a risk of an acci-
dent.
Always replace wheels and tires with those
that fulfill the specifications of the original
part.
When replacing wheels, make sure to use the
correct:
Rdesignation
Rmodel
When replacing tires, make sure to use the
correct:
Rdesignation
Rmanufacturer
Rmodel
Accessories that are not approved for your vehi-
cle by Mercedes-Benz or are not being used cor-
rectly can impair operating safety. Before purchasing and using non-approved
accessories, visit a qualified specialist work-
shop and inquire about:
Rsuitability
Rlegal stipulations
Rfactory recommendations
Contact an authorized Sprinter dealer if you
require information on tested and recommen-
ded wheels and tires for summer and winter
driving. Advice on purchasing and caring for
tires is also available there.
Information on tire and wheel dimensions and
types as well as the recommended tire pressure
for your vehicle can be found in the "Tire pres-
sure" section (
Ypage 257).
This data can also be found on the Tire and
Loading Information placard on the B-pillar.
Modifications to the brake system or wheels are
not permitted. The use of wheel spacers or
brake dust shields is not permitted. This inva-
lidates the general operating permit for the vehi-
cle.
iFurther information on wheels and tires can
be obtained at any qualified specialist work-
shop.
Operation
Information for a journey
If the vehicle is heavily laden, check the tire
pressures, and correct them, if necessary
(
Ypage 250).
While driving, pay attention to vibrations, noises and unusual handling characteristics, e.g. pull-
ing to one side. This may indicate that the
wheels or tires are damaged. If you suspect that
a tire is defective, reduce your speed immedi-
ately. Stop the vehicle as soon as possible to
check the wheels and tires for damage. Hidden
tire damage could also be causing the unusual
handling characteristics. If you find no signs of
damage, have the tires and wheels checked at a
qualified specialist workshop.
When parking your vehicle, make sure that the
tires do not get deformed by the curb or other
obstacles. If it is necessary to drive over curbs,
speed humps or similar elevations, try to do so
slowly and not at a sharp angle. Otherwise, the
tires, particularly the sidewalls, can get dam-
aged.
Operation247
Wheels and tires
Z
Page 250 of 290
Regular wheel and tire checks
GWARNING
Damaged tires can cause tire inflation pres-
sure loss. As a result, you could lose control of
your vehicle. There is a risk of accident.
Check the tires regularly for signs of damage
and replace any damaged tires immediately.
Check the wheels and tires of your vehicle for
damage regularly, i.e. at least every two weeks,
as well as after driving off-road or on rough
roads. Damaged wheels can cause a loss of tire
pressure. Pay particular attention to damage
such as:
Rcuts in the tires
Rpunctures
Rtears in the tires
Rbulges on tires
Rdeformation or severe corrosion on wheels
Regularly check the tire tread depth and the
condition of the tread across the whole width of
the tire (
Ypage 248). If necessary, turn the
front wheels to full lock in order to inspect the
inner side of the tire surface.
All wheels must have a valve cap to protect the valve against dirt and moisture. Do not install
anything onto the valve other than the standard
valve cap or other valve caps approved for your vehicle by dealers listed on the inside of the
front cover. Do not install any other valve caps
or systems, e.g. tire pressure monitor systems.
Regularly check the pressure of all the tires,
particularly prior to long trips. Adjust the tire
pressure if ne
cessary (Ypage 250).
The service life of tires depends on various fac-
tors, including the following:
Rdriving style
Rtire pressure
Rmileage
Tire tread
GWARNING
Insufficient tire tread will reduce tire traction.
The tire is no longer able to dissipate water.
This means that on wet road surfaces, the risk
of hydroplaning increases, in particular where
speed is not adapted to suit the driving con-
ditions. There is a risk of accident.
If the tire pressure is too high or too low, tires may exhibit different levels of wear at differ-
ent locations on the tire tread. Thus, you
should regularly check the tread depth and
the condition of the tread across the entire
width of all tires.
Minimum tire tread depth for:
RSummer tires: âin (3 mm)
RM+S tires: ãin (4 mm)
For safety reasons, replace the tires before
the legally prescribed limit for the minimum
tire tread depth is reached.
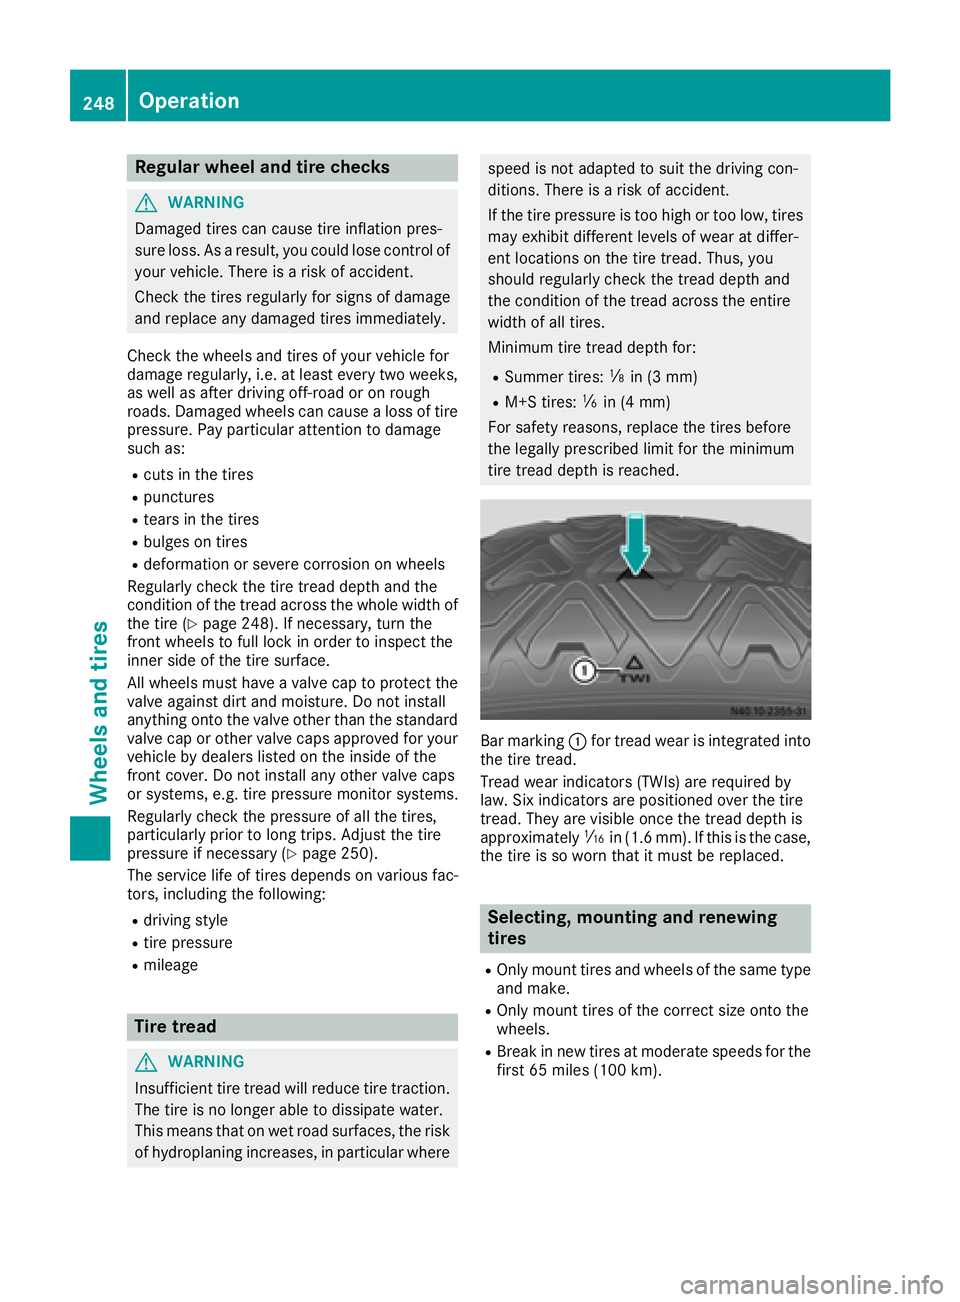
Bar marking :for tread wear is integrated into
the tire tread.
Tread wear indicators (TWIs) are required by
law. Six indicators are positioned over the tire
tread. They are visible once the tread depth is
approximately áin (1.6 mm). If this is the case,
the tire is so worn that it must be replaced.
Selecting, mounting and renewing
tires
ROnly mount tires and wheels of the same type
and make.
ROnly mount tires of the correct size onto the
wheels.
RBreak in new tires at moderate speeds for the first 65 miles (100 km).
248Operation
Wheels and tires
Page 252 of 290
Observe the maximum permissible speed for
operation with snow chains.
When driving with snow chains installed, do not
exceed the maximum permissible speed of
30 mph (50 km/h). Observe the country-spe-
cific laws and regulations for operation with
snow chains.
!Check the snow chains for damage before
mounting them. Damaged or worn snow
chains may snap and damage the following
components:
Rwheel
Rwheel housing
Rwheel suspension
For this reason, you must use only snow
chains that are free of defects. Observe the
manufacturer's mounting instructions.
!Vehicles with steel wheels: if you mount
snow chains on steel wheels, you may dam-
age the hub caps. Remove the hub caps from
the relevant wheels before mounting the
snow chains.
Snow chains increase traction on roads in wintry
conditions.
For reasons of safety we only recommend using
snow chains or traction aids that are approved
for the Sprinter. The snow chains or traction aids
must be of class U or meet the SAE type U
specification. Information on snow chains is
available at any qualified specialist workshop.
When mounting snow chains, please bear the
following points in mind:
RSnow chains cannot be mounted on all
wheel/tire combinations. When mounting the snow chains, note the permissible tire and
snow chain dimensions.
RMount snow chains only in pairs and only to
the rear wheels. On vehicles with twin tires,
mount the snow chains to the outer wheels.
Observe the manufacturer's mounting
instructions.
RVehicles with all-wheel-drive: snow chains
are not permitted on the front axle. There is
not sufficient space for commercially-availa-
ble snow chains. Information about snow
chains for all-wheel-drive vehicles can be
obtained from an authorized Sprinter Dealer.
ROnly use snow chains when the road is cov-
ered by a layer of snow. Remove the snow chains as soon as possible when you come to
a road that is not snow-covered.
RThe use of snow chains may be restricted by
local regulations. Observe the appropriate
regulations before mounting snow chains.
RActivate all-wheel drive before driving off with
snow chains (Ypage 148).
RWhen driving with snow chains installed, do
not exceed the maximum permissible speed
of 30 mph (50 km/h).
RCheck the tension of the chains after a dis-
tance of approximately 0.5 miles (1.0 km).
You can deactivate ASR (
Ypage 53) when pull-
ing away with snow chains mounted. This allows
the wheels to spin in a controlled manner, ach-
ieving an increased driving force (cutting
action).
Tire pressure
Tire pressure specifications
Important safety notes
GWARNING
Underinflated or overinflated tires pose the
following risks:
Rthe tires may burst, especially as the load
and vehicle speed increase.
Rthe tires may wear excessively and/or
unevenly, which may greatly impair tire
traction.
Rthe driving characteristics, as well as steer-
ing and braking, may be greatly impaired.
There is a risk of an accident.
Follow recommended tire inflation pressures
and check the pressure of all the tires includ-
ing the spare wheel:
Rmonthly, at least
Rif the load changes
Rbefore beginning a long journey
Runder different operating conditions, e.g.
off-road driving
If necessary, correct the tire pressure.
iThe specifications shown on the sample Tire
and Loading Information placard and tire
250Tire pressure
Wheels and tires