AUX MERCEDES-BENZ SPRINTER 2019 MY19 with 7ã screen
[x] Cancel search | Manufacturer: MERCEDES-BENZ, Model Year: 2019, Model line: SPRINTER, Model: MERCEDES-BENZ SPRINTER 2019Pages: 354, PDF Size: 6.15 MB
Page 17 of 354

šÈ¥š¯´ šš¿ PŠÀ Š°š
#
ŠýÚ¥ 1šŠ ŠËÇšÙššÊ.
ŠÊõ¡¯ŠË ŠšÊÚŠ šÇš Š°š Š Šýõ¯ 005Dšš¿
ŠÀÚ šŠˋŠŠÊ.
ŠÊš šÀ¯õÝÇ šÊ ÚŠõ¯ šÑˋšÀÝŠŠˋÇ šÈ¥š¯´ šš¿ 005DŠÀ šŠ Š°
šŠˋŠŠÊ.
R Š°š Š Šýõ¯ 005BŠŠ 005Ešš¿š šš Šš
šÏš Šõý§š¯
R š šÏ šÚ ŠŠ ŠÏÊš¯ ŠÛš šÈ¥Ú šŠšš
Š°š Š Šýõ¯ 005BŠŠ 005Ešš¿š šš ŠšÇ
š š ŠšÇŠË¥ š¯õý§š¯ Tiä¢ng Viãt
ThûÇng tin vã hó¯Ã£ng dä¨n sã٠dãËng
Bã
sung nû y lû mãt phÃ¤Ï n cãÏa hó¯Ã£ng dä¨n sã٠dãËng
Sprinter b äÈn invû bäÈn kã¿ thuäÙt sã.
Nû° thay thä¢phäÏn ãGû i sã áäÙuxeP ã trong chó¯óÀng
ãLûÀi xevû á ãxe ã - ãHãp sã tãÝáãngã.
BäÈo quäÈn tû i liãu bã sung nû y cû¿ng vãi Hó¯Ã£ng dä¨ n
sã٠dãËng trûˆn xe. Chãn sã áäÙu xe P
#
NhäËn nû¤t 1.
Vã trûÙ cäÏn sã 005Dhiãn tr ûˆn mû n hû˜nh hiãn thãáa
ch ãˋc náng.
Nä¢u mãt trong sã cûÀc áiãu kiãn sau áûÂy áó¯Ã£Èc áûÀp
ãˋng, sã áäÙu xe 005Dsä§ tÃ£Ý áãng áó¯Ã£Èc chãn:
R BäÀn tä₤ t áãng cóÀã vãtrûÙ sã 005Bhoäñ c005E.
R Khi x e áãˋng yûˆn hoäñ c áang lûÀi vãi tãc áã räËt
th äËp ã vã trûÙ sã 005Bhoäñc 005E, bäÀn hûÈy m ãcãÙa
xe ãbûˆn phûÙa ngó¯Ã£i lûÀi. Bahasa Indonesia
Informasi mengenai panduan pengoperasian
Pe
njelasan ini merupakan bagian da ripanduan
pengoperasian Sprinter versi ce tak dan digi tal.
Pe njelasan ini meng gantikan "T ransmisi otomatis"
bagian "Memindahkan keposisi parkir Pã dalam
bab "Ber kenda radan memarkir".
Simpan penjelasan ini bersama dengan panduan
pengoperasian dalam kenda raan. 15
Page 123 of 354
#
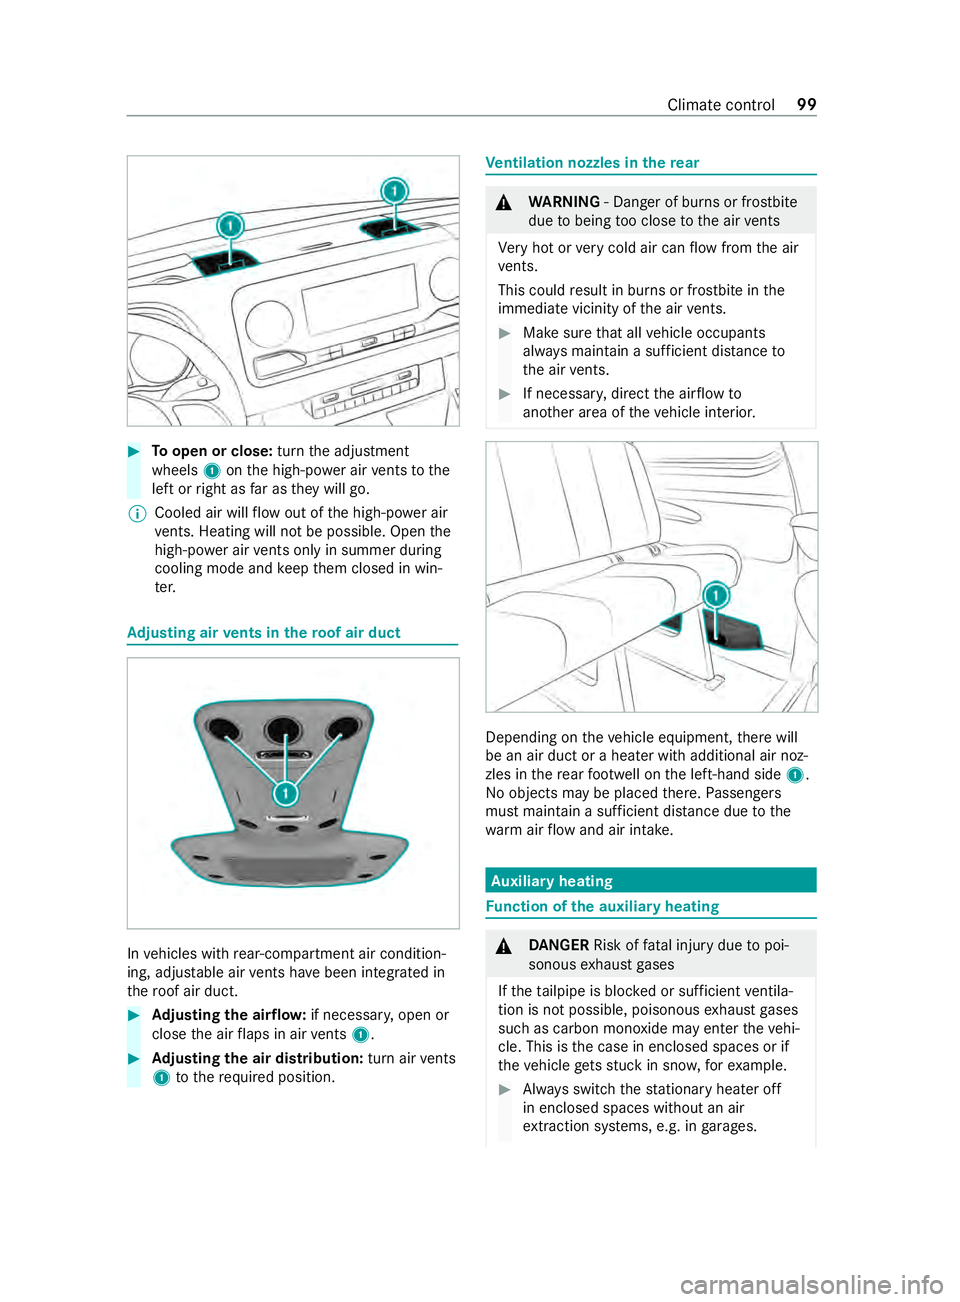
Toopen or close: turnthe adjustment
wheels 1onthe high-po wer air vents tothe
left or right as far as they will go.
% Cooled air will
flow out of the high-po wer air
ve nts. Heating will not be possible. Open the
high-po wer air vents only in summer du ring
cooling mode and keep them closed in winã
te r. Ad
justing air vents in thero of air duct In
vehicles with rear-compartment air conditionã
ing, adjus table air vents ha vebeen integrated in
th ero of air duct. #
Adjusting the air flow: if necessar y,open or
close the air flaps in air vents 1. #
Adjusting the air distribution: turn airvents
1 tothere qu ired position. Ve
ntilation nozzles in there ar &
WARNING ã Danger of bu rns or frostbite
due tobeing too close tothe air vents
Ve ry hot or very cold air can flow from the air
ve nts.
This could result in burns or frostbite in the
immediate vicinity of the air vents. #
Makesure that all vehicle occupants
alw ays maintain a suf ficient dis tance to
th e air vents. #
If necessa ry, direct the air flow to
ano ther area of theve hicle interior. Depending on
theve hicle equipment, there will
be an air duct or a heater with additional air nozã
zles in there ar foot we ll on the left-hand side 1.
No objects may be placed there. Passengers
must maintain a suf ficient dis tance due tothe
wa rm airflow and air intake. Au
xiliary heating Fu
nction of the auxiliary heating &
DANG ER Risk of fata l injury due topoiã
sonous exhaust gases
If th eta ilpipe is bloc ked or suf ficient ventilaã
tion is not possible, poisonous exhaust gases
such as carbon monoxide may enter theve hiã
cle. This is the case in enclosed spaces or if
th eve hicle getsst uck in sn ow,fo rex ample. #
Always switch thest ationary heater off
in enclosed spaces without an air
ex traction sy stems, e.g. in garage s. Climate
control 99
Page 124 of 354
#
Keep theta ilpipe and the area around
th eve hicle free from snow when the
engine or thest ationary heater are runã
ning. #
Open a window on the windward side of
th eve hicle toensure an adequate supã
ply of fresh air. &
WARNING Risk offire due tohot stationã
ary heater components
When thest ationary heater is swit ched on,
parts of theve hicle can become very hot, e.g.
th est ationary heater exhaust sy stem.
Flammable materials such as lea ves, grass or
twigs may ignite if they come into contact
wi th:
R hot parts of thest ationary heater exhaust
sy stem
R theex haust gas itself
There is a risk of fire. #
When thest ationary heater is swit ched
on, make sure that:
R Hot vehicle parts do not come into
contact with flammable materials.
R The exhaust gas can flow out of the
st ationary heater exhaust pipe
unhindered.
R The exhaust gas does not come into
contact with flammable materials. *
NO
TEDama getothe auxiliary heating If
th e auxiliary heating is not used for an
ex tended pe riod of time, it can be damaged. #
Switch the auxiliary heating on for
around ten minu tes at least once a
month. *
NO
TEDama getothe auxiliary heating
due toove rheating If
th e hot air flow is bloc ked, the auxiliary
heating can overheat and switch off. #
Do not block the hot air flow. %
Ve
hicles with modified fuel displa ys:if an
ex tern ally operated consumer is connec ted
via the cable forth e auxiliary heater, this is
not take n into conside ration on the "range
re maining" display of the on-board computer. In
this case, obser vethe fuel displa y.The fuel
display pr ovides the cur rent le vel.
If yo u are transpo rting hazardous materials, comã
ply with there leva nt sa fety regulations. Alw ays
place objects at a suf ficient dis tance from the
outlet opening of the auxiliary heating.
Au xilia ryheating works independently of the
engine and complements the climate cont rol sysã
te m in theve hicle. Auxilia ryheating heats the air
inside theve hicle tothe set temp erature. Hot-water auxiliary heater
Fu
nction of the hot- water auxiliary hea ter
The hot-water auxiliary heater complements your
ve hicle's climate contro l system, and has a
heater boos ter,auxiliary heating and auxiliary
ve ntilation function. In addition, the auxiliary
heating sy stem heats the engine coolant toproã
te ct the engine and sa vefuel during thewa rming-
up phase. The auxiliary heating heats the air
inside theve hicle tothe set temp erature. It is not
dependent on the heat output of theru nning
engine. The auxilia ryheating is operated directly
using theve hicle's fuel. Forth is reason, the fuel
ta nk must ha vebeen filled abo vethere ser vefuel
le ve l so that the auxiliary heating can work. The
auxilia ryheating automatically adapts its operatã
ing mode tothe outside temp erature and
we ather. It is therefore possible that the auxiliary
heating may switch from ventilation toheating
mode or from heating toventilation mode. When
th e engine is running, auxilia ryventilation is not
acti ve.Au xilia ryheating automatically switches
itself off af ter a maximum of 50 minutes. Yo u
cannot use the "auxiliary ventilation" ope rating
mode tocool the air inside theve hicle tobelow
th e outside temp erature. Auxilia ryheating helps
to heat up theve hicle while the engine is running
and at low outside temp eratures.
Operating the hot-wa ter auxiliary heater draws
po we r from theve hicle batter y.Therefore, drive a
re asonably long dis tance af ter heating or ventilatã
ing theve hicle twice in succession at most.
Au xilia ryheating can be activated only at temp erã
atures below 40 ô¯F (4.5 ô¯C).
Switching the hot- water auxiliary heating on
and off with the button
Re quirements:
R The fuel tank is filled abo vethere ser vefuel
le ve l. 100
Climate cont rol
Page 125 of 354
Switching auxiliary heating on and off
#
Toswitch on: pressthe003B button. #
Toswitch off: pressthe003B button.
Switching on the specified temperature #
Swit chon the ignition. #
Toswitch on: pressthe003B button. #
Toswitch off: pressthe003B button. #
Set thete mp erature using the0082 button. #
Press the 003B button.
The red or blue indicator lamp on the003B
button goes on or off.
Colors of the indicator lamp:
R Blue: auxiliary ventilation has been switched
on.
R Red:auxilia ryheating has been switched on.
R Yello w: departure time has been pre-selecã
te d.
Au xilia ryheating or ventilation switches off af ter
a maximum of 50 minutes.
Swit ching heater boos ter mode on and off #
Toswitch on: start the engine. #
Press the 003B button. #
Toswitch off: pressthe003B button.
Heater boos ter mode will be switched on at
an outside temp erature of less than 32 ô¯F
(0 ô¯C) when necessar y.
% Heater boo
ster mode is available only for
ve hicles with hot-water auxiliary heatings.Ad
justing the hot-water auxiliary hea ter with
the on-board co mputer
Re quirements:
R The fuel tank is filled abo vethere ser vefuel
le ve l.
R The ignition is switched on.
On-board computer: 4 Settings 5
Heating
Setting the switch-on time #
Select Settings. #
Select the desired departure time.
Ac tivating the departure time #
Activate the departure time byticking the
box.
% Ensure
that A, B and C ea chcor respond to a
programmed departure time.
% The programmed time
remains set only until
th e next time the engine is star ted.
Selecting prog rammed time #
Set therequ ired programmed time A,B or C.
% The
requ ired prog rammed time A,B or C will
appear only if the box toactivate the deparã
ture time is tic ked. #
Select there qu ired prog rammed time by
swiping left or right, e.g. A,B or C.
Problems with hot water auxiliary heating Problem
Possible causes/consequences and 0050 0050Solutions
FA IL00A3 Signal transmission between transmitter and
vehicle is malfunctioning. #
Change your position in relation totheve hicle, moving closer if necã
essar y.
FA IL Thestar ter battery is not suf ficiently charge d. #
Charge thest ar ter batter y.
The fuel tank is not filled up tothere ser veleve l. #
Refuel at the nearest gasst ation.
FA IL0099 Au
xilia ryheating is malfunctioning. #
Have the auxiliary heating checked at a qualified specialist workã
shop. Climate
control 101
Page 136 of 354
Ru
les for off-road driving
Alw ays be aware of the ground clearance of the
ve hicle and avoid obs tacles such as deep tire
ru ts.
Obs tacles can damage thefo llowing parts of the
ve hicle, forex ample:
R Suspension
R Driv etra in
R Fuel and supply tanks
The refore , alw ays drive slowly when off-road. If
yo u must drive over obs tacles, ha vethe co-driver
instruct you.
% Mercedes-Benz
recommends that you addiã
tionally car rya sho vel and a reco very rope
with a shackle in theve hicle.
R Make sure that loads and items of luggage
are securely stored or lashed down
(/ page 72).
R Before driving off-road, stop theve hicle and
engage a low gear.
R Vehicles with DSR: activate DSR when you
are driving downhill (/ page120).
R All-wheel drive vehicles: activate the all-
wheel drive (/ page119) and, if necessa ry,
activate theLO W RANGE transmission ratio
(/ page 119).
R Ifth e sur face requ ires, temp orarily deactivate
ASR when pulling away ( /page 119).
R Only drive off-road with the engine running
and a gear engaged.
R Drive slowly and smo othly. Wa lking pace is
necessary in many situations.
R Avoid spinning the driven wheels.
R Always ensure that the wheels remain in conã
ta ct wi th the ground.
R Exercise the utmost caution when driving
across unfamiliar, unpredictable terrain. As a
precaution, getout of theve hicle totake a
look at thero ute tobe take nfirs t.
R Look out for obs tacles (e.g. rocks, holes, tree
st umps and tire ruts).
R Avoid edges where the sur face could crumble
or break away.
Ru les forfo rd ing off-road (all-wheel drive
ve hicles)
R Obser vethe saf ety no tes and general no tes
on driving off-road. R
Check the dep thand characteristics of the
body of water before ford ing. The water must
not be deeper than 23.6 in (60 cm).
R The climate control sy stem is switched off
(/ page 95).
R The auxiliary heating is switched off
(/ page 100).
R Swit chon all-wheel drive (/ page118) and
engage it on vehicles with theLO W RANGE
transmission ratio (/ page 119).
R Restrict the shift range to1or 2.
R Avoid high engine speeds.
R Drive slowly and smoo thly at no more than a
wa lking pace.
R Ensure that no bow wavefo rm s while driving.
R Afterfo rd ing, dry the brakes.
Af ter driving thro ugh a body of water deeper than
19 .7 in (50 cm), make su retocheck all vehicle
fl uids for any signs of penetration bywate r.
Checklist af ter driving off-road
If yo ufind damage totheve hicle af ter off-road
driving, ha vetheve hicle checked at a qualified
specialist workshop immediatel y.
Driving overro ugh terrain places greater
demands on your vehicle than normal road operaã
tion. Check your vehicle af ter driving on rough
te rrain. This allo wsyouto detect damage
prom ptly and reduce therisk of an accident for
yo urself and other road users. Clean your vehicle
th oroughly before driving on public roads.
Obse rveth efo llowing points af ter driving off-
ro ad, on con stru ction sites and before driving on
public roads:
R Vehicles with DSR: deactivate DSR
(/ page 120).
R All-wheel drive vehicles: deactivate the all-
wheel drive (/ page119).
R Activate ASR (/ page 119).
R Clean theex terior lighting, particular lythe
headlamp s andtail lamps, and check them
fo r dama ge.
R Clean the front and rear license plates.
R Clean the windshield, windo wsand outside
mir rors.
R Clean thesteps, entra nces and grab handles.
This increases the saf ety of your foot ing.
R Clean the wheels and tires, wheel wells and
th e underbody of theve hicle with a water jet. 11 2
Driving and pa rking
Page 138 of 354
Diesel pa
rticulate filter Note
s onrege neration &
DANG ER Risk of fata l injuries due to
ex haust gases
Combustion engines emit poisonous exhaust
ga ses such as carbon monoxide. Inhaling
th ese exhaust gases is hazardous tohealth
and can lead topoisoning. #
Never lea vethe engine running in an
enclosed space wi thout suf ficient ventiã
lation. &
WARNING Risk offire caused byhot
ex haust sy stem parts
Flammable material such as lea ves, grass or
twigs may ignite if they come into contact
wi th hot parts of theex haust sy stem or
ex haust gasflow. #
Park theve hicle so that no flammable
material can come into con tact wi thhot
ve hicle components. #
In particular, do not park on dry grassã
land or har vested grain fields. If
th eve hicle is predominantly used for short disã
ta nce driving or extended non-operational times,
th is could lead toa malfunction in the automatic
cleaning function forth e diesel particulate filter.
As a result, permanent blocking of the diesel parã
ticulate filter may occur and fuel may also accuã
mulate in the engine oil and cause engine failure.
If yo u main lydrive short dis tances, you should
drive on a free way or go for a country drive for 20
minutes every500 km (300 miles). This faciliã
ta testh e diesel particulate filter's burn-off procã
ess.
* NO
TEDama gedue tohot exhaust gases During
rege neration, extremely hot exhaust
ga ses escape from theta ilpipe. #
During rege neration, maintain a miniã
mum di stance of 7 ft(2 m) from other
objects, e.g. par kedve hicles. Battery main switch
Note
s onthe bat tery main switch *
NO
TEDama getothe electrical sy stem If
yo ure mo veor disconnect the battery main
switch, it could lead tothe electrical sy stem
becoming damaged. #
Make sure that the ignition is switched
off and that at least 15minutes ha ve
passed before removing or reconnecting
th e battery main switch. Otherwise,
electrical sy stem components could be
damaged. Yo
u can use the battery main switch todisconã
nect the cur rent toall your vehicle's consumers.
This will pr event uncontrolled battery discha rge
caused byquiescent cur rent consumers.
If yo ur vehicle is equipped with an auxiliary batã
te ry inthe engine compartment or in the base of
th e front-passen ger seat, you must disconnect
bo th batteries. Only then is the electrical sy stem
fully disconnected from the po wer supply.
% Only disconnect theve hicle from the po wer
supply using the battery main switch in the
fo llowing situations:
R The vehicle is stationary for a long time
R It is absolutely necessary todisconnect
th eve hicle from the po wer supply
Af ter switching on the po wer supp ly,yo u will
need toreset the side windo ws (/page 53)
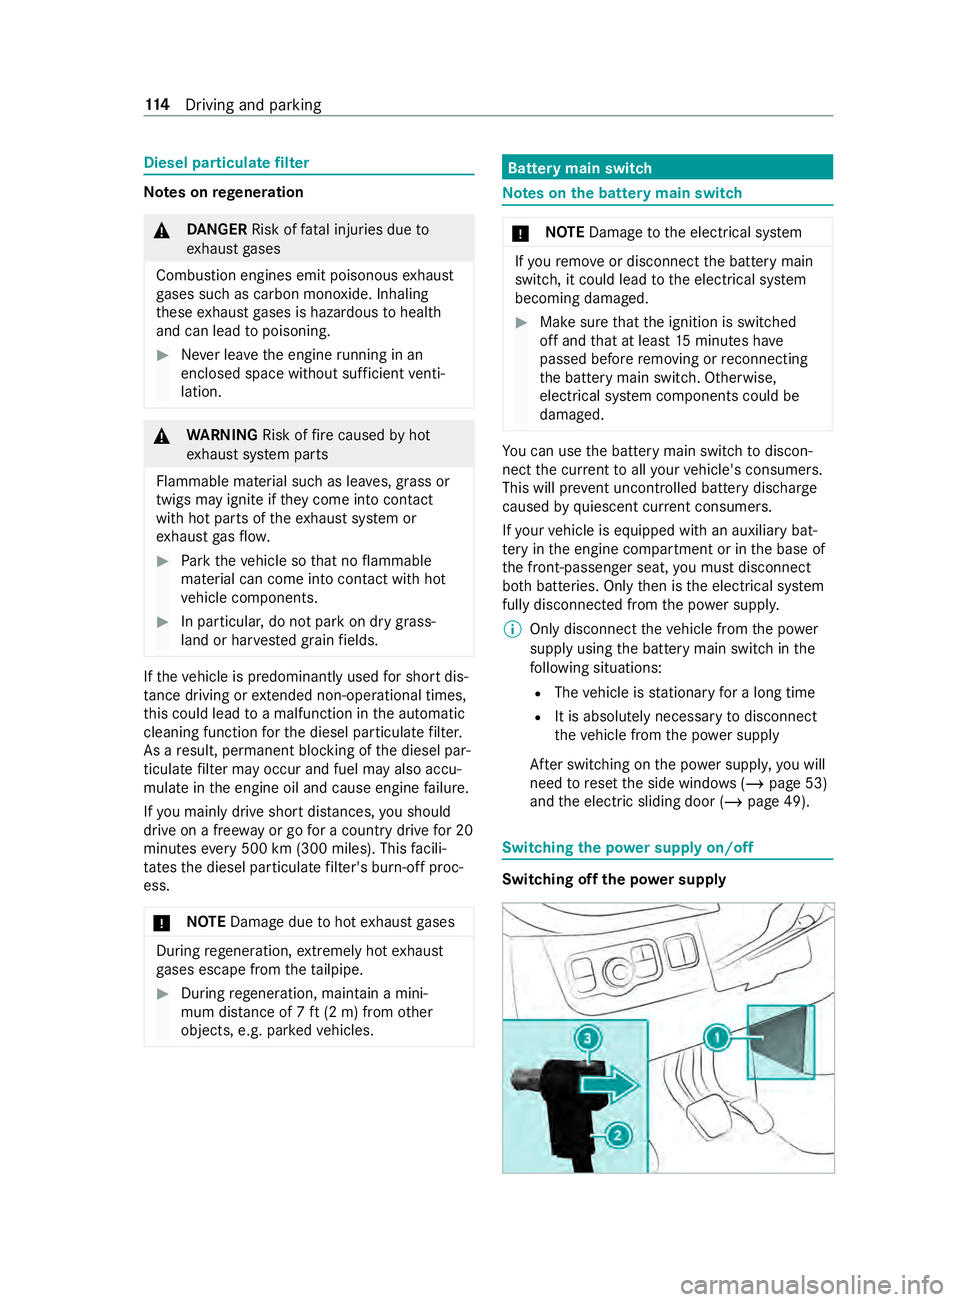
and the electric sliding door (/ page 49). Switching
the po wer supply on/o ff Switching off
the po wer supply 11 4
Driving and pa rking
Page 150 of 354
*
NO
TEDo not use diesel torefuel vehicles
with a gasoline engine. If
yo u acciden tally refuel with the wrong fuel:
R Do not switch the ignition on. Otherwise
fuel can enter the engine.
Even small amounts of the wrong fuel
could result in damage tothe fuel sy stem
and the engine. The repair costs are high. #
Consult a qualified specialist workshop. #
Have the fuel tank and fuel lines drained
comple tely. *
NO
TEDo not use gasoline torefuel vehiã
cles with a diesel engine. If
yo u acciden tally refuel with the wrong fuel:
R Do not switch the ignition on. Otherwise,
fuel can enter the fuel sy stem.
Even small amounts of the wrong fuel
could result in damage tothe fuel sy stem
and the engine. The repair costs are high. #
Consult a qualified specialist workshop. #
Have the fuel tank and fuel lines drained
comple tely. *
NO
TEDama getothe fuel sy stem caused
by ove rfilled fuel tanks. #
Only fill th e fuel tank until the pump
nozzle switches off. *
NO
TEFuel may spr ayout when you
re mo vethe fuel pump nozzle. #
Only fill th e fuel tank until the pump
nozzle switches off. *
NO
TEDama getopainted sur faces due to
fuel #
Do not spill any fuel on painted sur faã
ces. +
ENVI
RONMENTAL NOTEEnvironmental
damage due toimproper handling of fuel If fuels are handled improperly,
they pose a
danger topersons and the environment. #
Do not allow fuels torun into the sewã
age sy stem, the sur face wate rs,the
ground water or into the ground. Re
quirements:
R The vehicle is unloc ked.
R The auxiliary heating is deactivated.
R The ignition is switched off
R The front left-hand door is open.
% Do not
get ba ckinto theve hicle during the
re fueling process. Otherwise, electros tatic
ch arge could build up again.
Obser vethe no tes on operating fluids
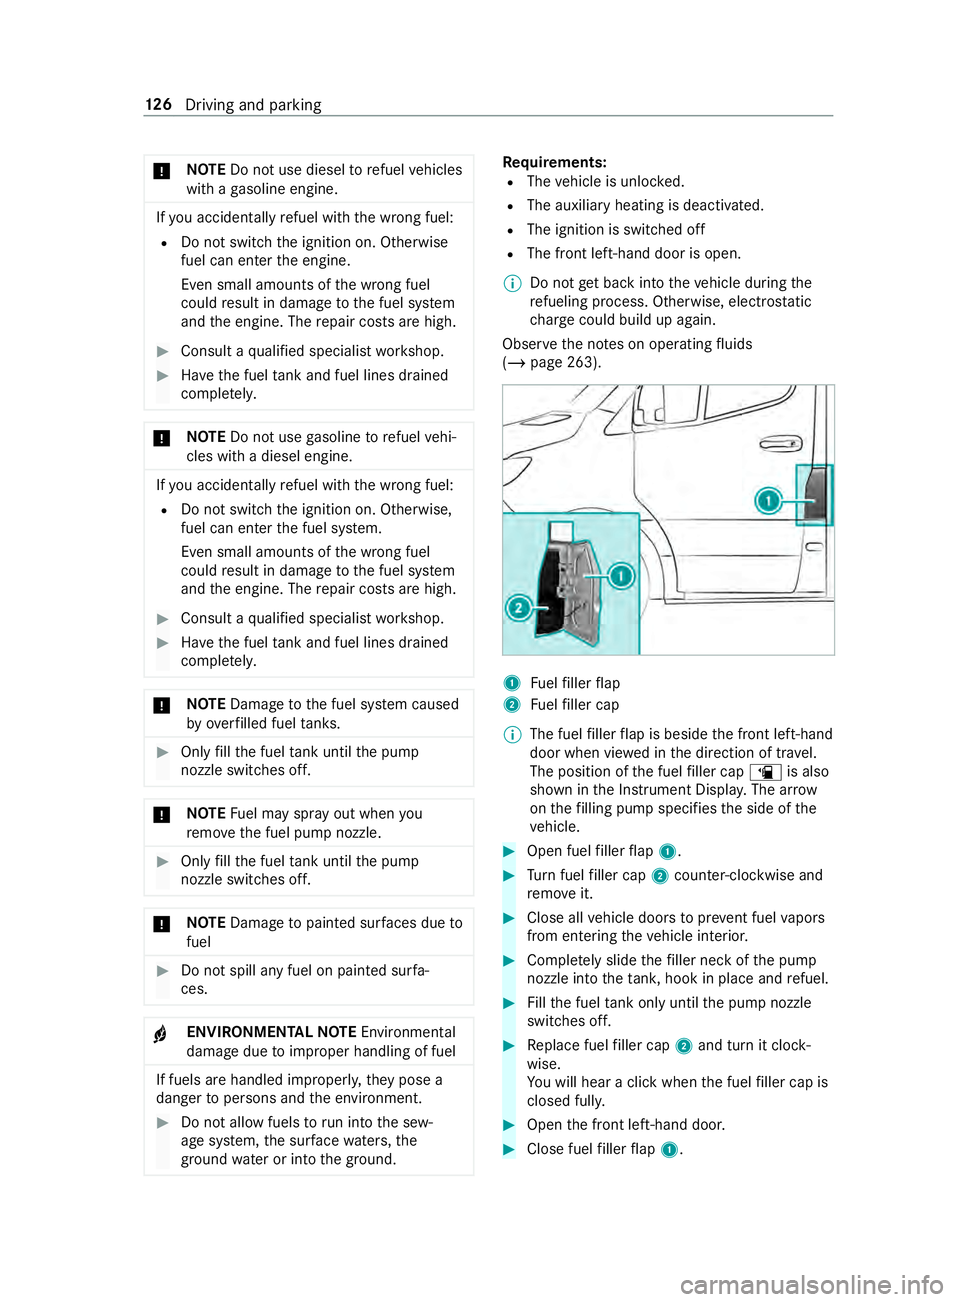
(/ page 263). 1
Fuelfiller flap
2 Fuelfiller cap
% The fuel
filler flap is beside the front left-hand
door when vie wed in the direction of tr avel.
The position of the fuel filler cap 00D4is also
shown in the Instrument Displa y.The ar row
on thefilling pump specifies the side of the
ve hicle. #
Open fuel filler flap 1. #
Turn fuel filler cap 2coun ter-clockwise and
re mo veit. #
Close all vehicle doors topreve nt fuel vapors
from entering theve hicle interior. #
Comple tely slide thefiller neck of the pump
nozzle into theta nk, hook in place and refuel. #
Fillthe fuel tank only until the pump nozzle
switches off. #
Replace fuel filler cap 2and turn it clockã
wise.
Yo u will hear a click when the fuel filler cap is
closed full y. #
Open the front left-hand door. #
Close fuel filler flap 1. 12 6
Driving and pa rking
Page 160 of 354
Emer
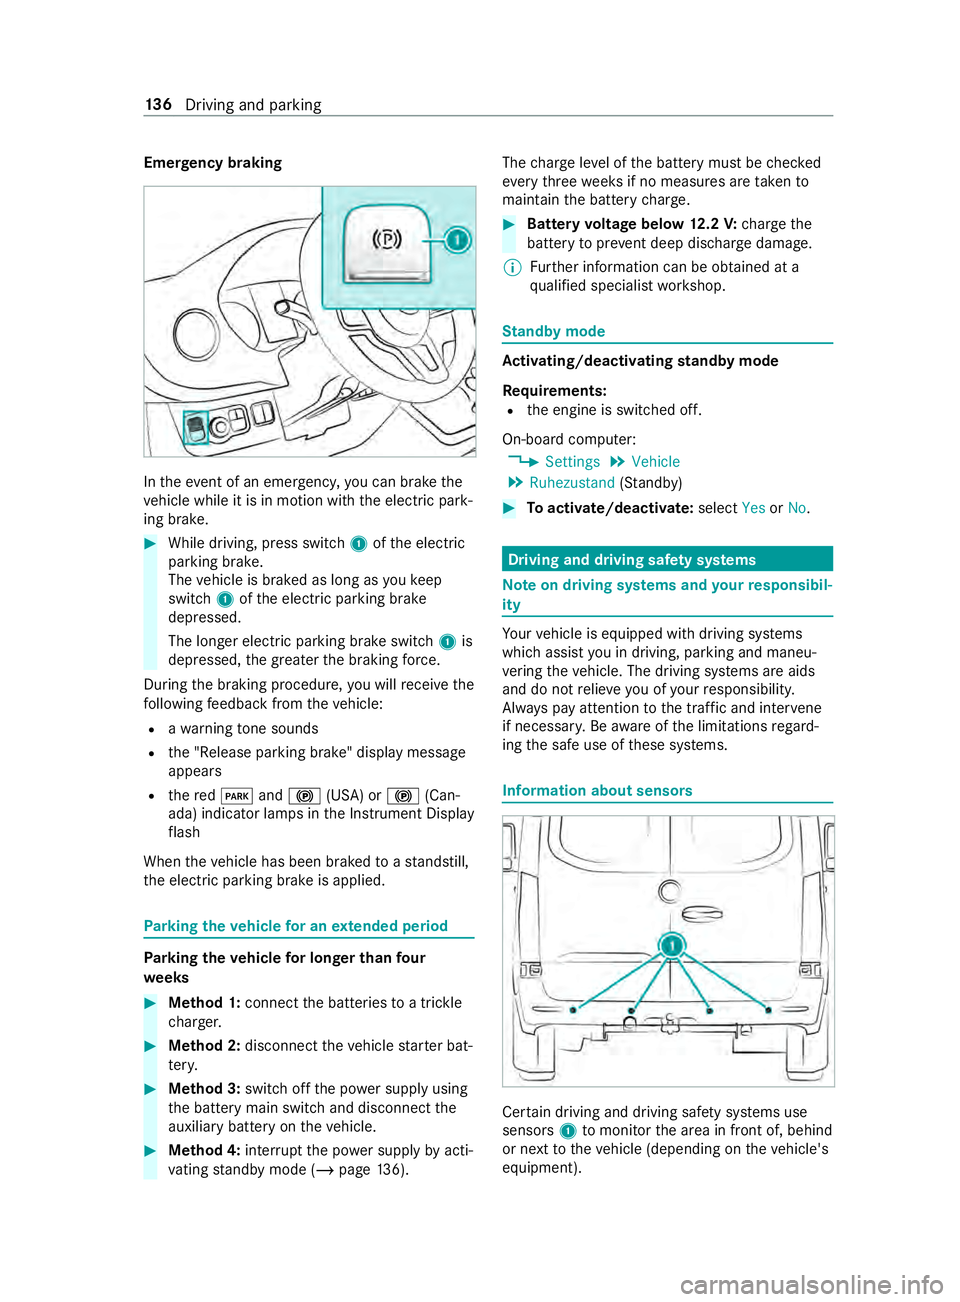
gency braking In
theeve nt of an emergency, you can brake the
ve hicle while it is in motion with the electric parkã
ing brake. #
While driving, press switch 1ofthe electric
parking brake.
The vehicle is braked as long as youke ep
switch 1ofthe electric parking brake
depressed.
The longer electric parking brake switch 1is
depressed, the greater the braking forc e.
During the braking procedure, you will receive the
fo llowing feedback from theve hicle:
R awa rning tone sounds
R the "Release parking brake" display message
appears
R there d0049 and0024 (USA) or 0024(Canã
ada) indicator lamps in the Instrument Display
fl ash
When theve hicle has been braked toast andstill,
th e electric parking brake is applied. Pa
rking theve hicle for an extended period Pa
rking theve hicle for longer than four
we eks #
Method 1: connect the batteries toa trickle
ch arge r. #
Method 2: disconnect theve hicle star ter batã
te ry. #
Method 3: switchoff the po wer supply using
th e battery main switch and disconnect the
auxiliary battery on theve hicle. #
Method 4: interrupt the po wer supply byactiã
va ting standby mode (/ page136). The
charge leve l of the battery must be checked
eve rythre ewe eks if no measures are take nto
maintain the battery charge. #
Battery voltage below 12.2 V: charge the
battery topreve nt deep discharge damage.
% Fu
rther information can be obtained at a
qu alified specialist workshop. St
andby mode Ac
tivating/deactivating standby mode
Re quirements:
R the engine is switched off.
On-board computer: 4 Settings 5
Vehicle
5 Ruhezustand (Stan dby) #
Toactivate/deactivate: selectYesorNo. Driving and driving saf
ety sy stems Note
on driving sy stems and your responsibilã
ity Yo
ur vehicle is equipped with driving sy stems
which assist you in driving, parking and maneuã
ve ring theve hicle. The driving sy stems are aids
and do not relie ve you of your responsibility.
Alw ays pay attention tothe tra ffic and inter vene
if necessa ry. Be aware of the limitations rega rdã
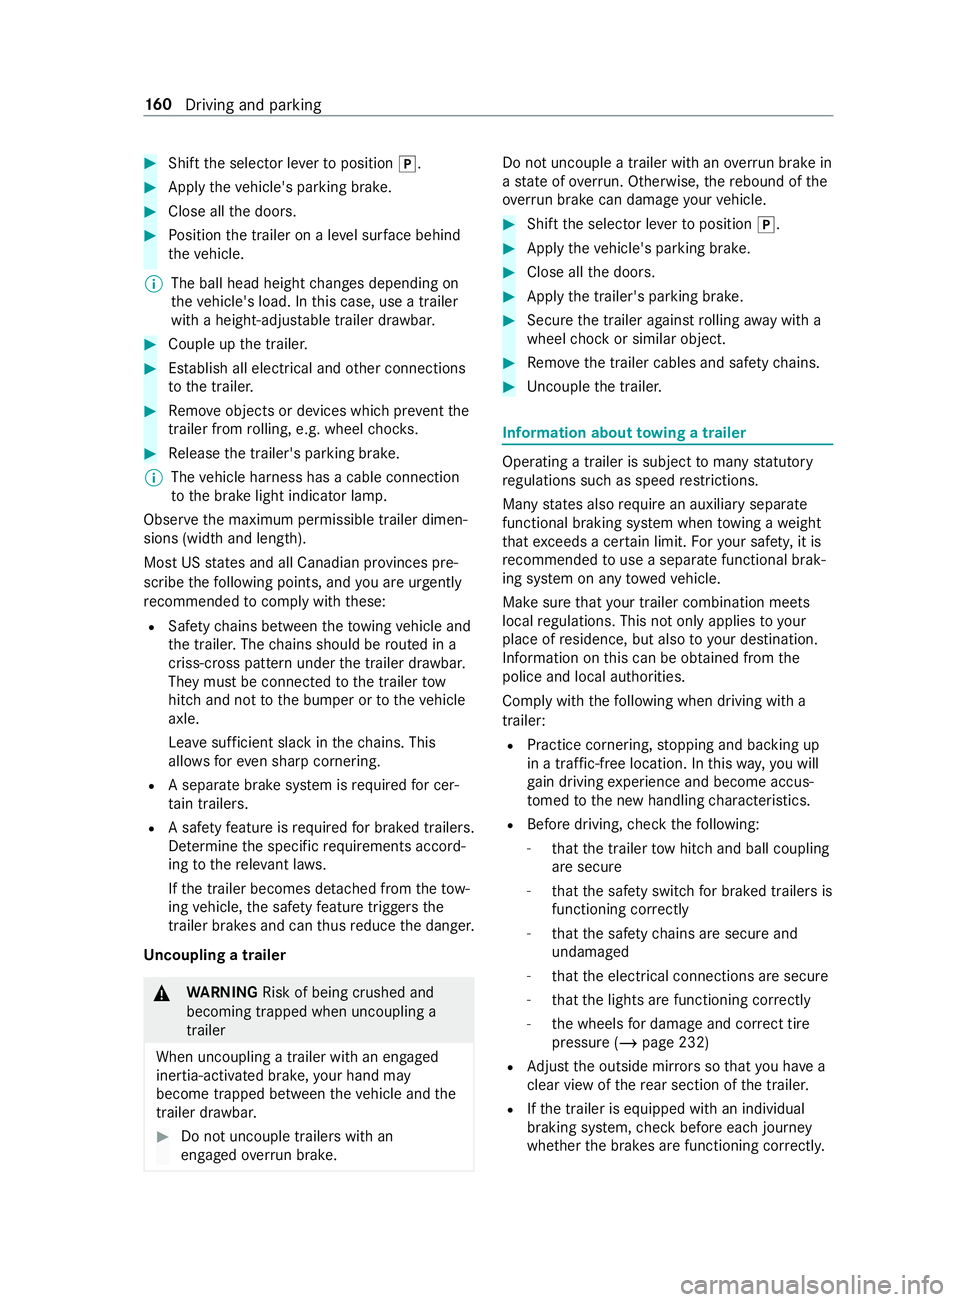
ing the safe use of these sy stems. Information about sensors
Cer
tain driving and driving saf ety sy stems use
sensors 1tomonitor the area in front of, behind
or next totheve hicle (depending on theve hicle's
equipment). 13 6
Driving and pa rking
Page 184 of 354
#
Shift the selector le verto position 005D. #
Apply theve hicle's parking brake. #
Close all the doors. #
Position the trailer on a le vel sur face behind
th eve hicle.
% The ball head height
changes depending on
th eve hicle's load. In this case, use a trailer
with a height-adjus table trailer dr awbar. #
Couple up the trailer. #
Establish all electrical and other connections
to the trailer. #
Remo veobjects or devices which pr eventthe
trailer from rolling, e.g. wheel choc ks. #
Release the trailer's parking brake.
% The
vehicle harness has a cable connection
to the brake light indicator lamp.
Obser vethe maximum permissible trailer dimenã
sions (width and length).
Most US states and all Canadian pr ovinces preã
scribe thefo llowing points, and you are ur gently
re commended tocomply wi th these:
R Safetych ains between theto wing vehicle and
th e trailer. The chains should be routed in a
criss-cross pat tern under the trailer dr awbar.
They must be connected tothe trailer tow
hitch and not tothe bumper or totheve hicle
axle.
Lea vesuf ficient sla ckinthech ains. This
allo wsforeve n sha rpcornering.
R A separate brake sy stem is requ ired for cerã
ta in trailers.
R A saf etyfe ature is requ ired for braked trailers.
De term ine the specific requ irements acco rdã
ing tothere leva nt la ws.
If th e trailer becomes de tach ed from theto wã
ing vehicle, the saf etyfe ature triggers the
trailer brakes and can thus reduce the danger.
Un coupling a trailer &
WARNING Risk of being crushed and
becoming trapped when uncoupling a
trailer
When uncoupling a trailer wi than engaged
ine rtia-activated brake, your hand may
become trapped between theve hicle and the
trailer dr awbar. #
Do not uncouple trailers with an
engaged overrun brake. Do not uncouple a trailer with an
overrun brake in
a st ate of overrun. Otherwise, there bound of the
ove rrun brake can damage your vehicle. #
Shift the selector le verto position 005D. #
Apply theve hicle's parking brake. #
Close all the doors. #
Apply the trailer's parking brake. #
Secure the trailer against rolling away with a
wheel chock or similar object. #
Remo vethe trailer cables and saf etych ains. #
Uncou plethe trailer. Information about
towing a trailer Operating a trailer is subject
tomany statutory
re gulations such as speed restrictions.
Many states also requ ire an auxiliary separate
functional braking sy stem when towing a weight
th at exc eeds a cer tain limit. Foryo ur saf ety, it is
re commended touse a separate functional brakã
ing sy stem on any towe dve hicle.
Make sure that your trailer combination meets
local regulations. This not only applies to your
place of residence, but also to your destination.
In fo rm ation on this can be obtained from the
police and local authorities.
Comply with thefo llowing when driving with a
trailer:
R Practice cornering, stopping and backing up
in a traf fic-free location. In this wa y,yo u will
ga in driving experience and become accusã
to med tothe new handling characteristics.
R Before driving, check thefo llowing:
- that the trailer tow hit chand ball coupling
are secure
- that the saf ety swit chfor braked trailers is
functioning cor rectly
- that the saf etych ains are secure and
undamaged
- that the electrical connections are secure
- that the lights are functioning cor rectly
- the wheels for dama geand cor rect tire
pressure (/ page 232)
R Adjust the outside mir rors so that you ha ve a
clear view of there ar section of the trailer.
R Ifth e trailer is equipped with an individual
braking sy stem, check before each journey
whe ther the brakes are functioning cor rectl y. 16 0
Driving and pa rking
Page 233 of 354
#
Neverto uch the danger zone sur roundã
ing moving component parts, e.g. the
ro tation area of thefa n. #
Remo vejewe lry and watches. #
Keep items of clo thing and hair away
from moving parts. &
WARNING Risk of bu rns from hot comã
ponent parts in the engine compartment
Cer tain components in the engine compartã
ment can be very hot, e.g. the engine, the
ra diator and parts of theex haust sy stem. #
Allow the engine tocool down and only
to uch component parts desc ribed in the
fo llowing. If
yo u ha vetocar ryout any workinthe engine
compartment, touch only thefo llowing compoã
nents:
R Hood
R Engine oil filler opening cap
R Washer fluid reser voir cap
R Coolant expansion reser voir cap #
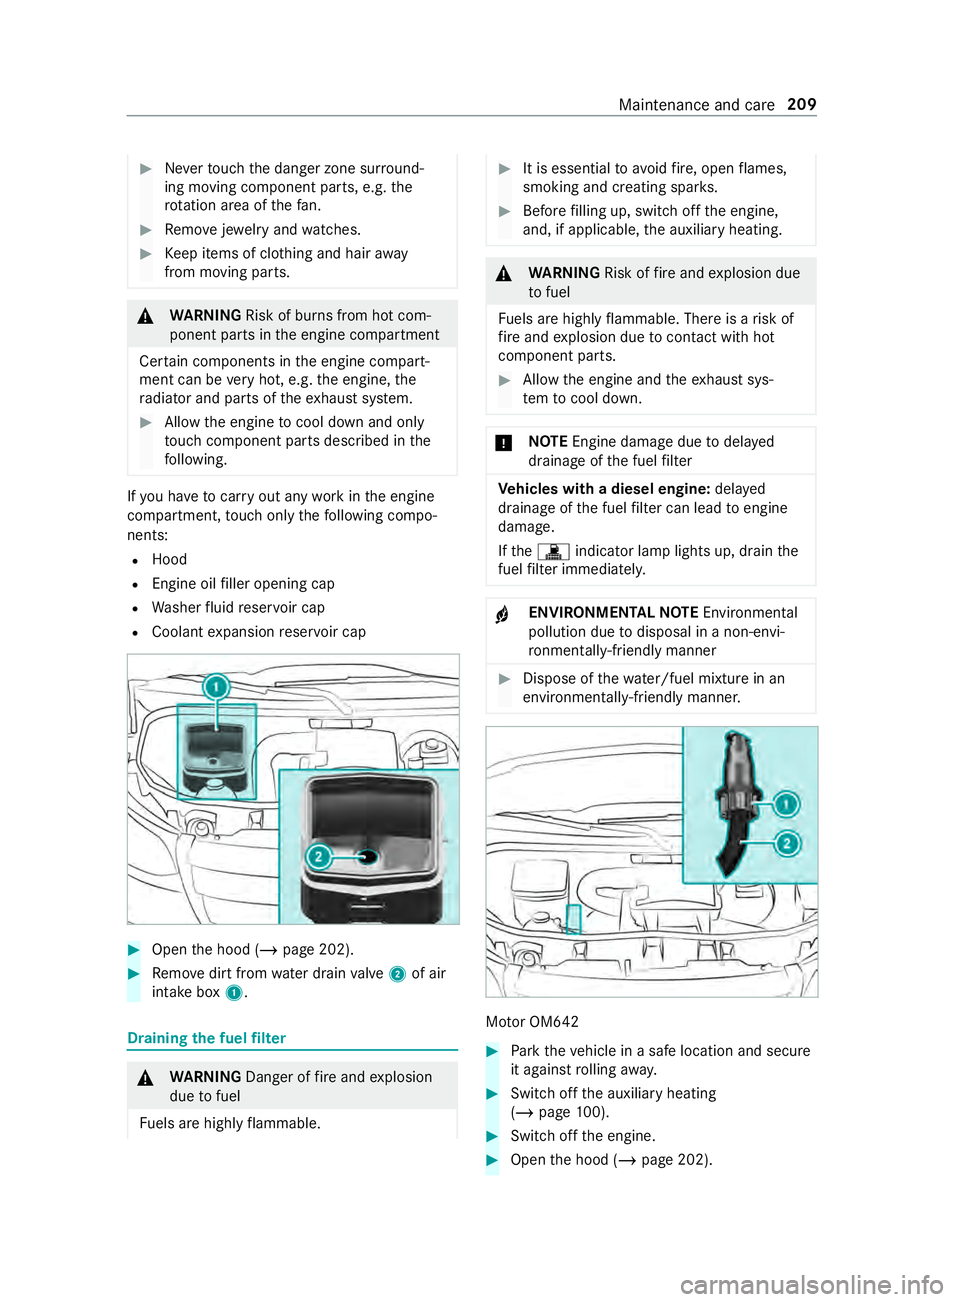
Open the hood (/ page 202). #
Remo vedirt from water drain valve 2 of air
intake box 1. Draining
the fuel filter &
WARNING Danger of fire and explosion
due tofuel
Fu els are highly flammable. #
It is essential toavoid fire , open flames,
smoking and creating spar ks. #
Before filling up, switch off the engine,
and, if applicable, the auxiliary heating. &
WARNING Risk offire and explosion due
to fuel
Fu els are highly flammable. There is a risk of
fi re and explosion due tocontact wi thhot
component parts. #
Allow the engine and theex haust sysã
te m to cool down. *
NO
TEEngine damage due todela yed
drainage of the fuel filter Ve
hicles with a diesel engine: delayed
drainage of the fuel filter can lead toengine
damage.
If th e003A indicator lamp lights up, drain the
fuel filter immediately. +
ENVIRONMENTAL
NOTEEnvironmental
pollution due todisposal in a non-enviã
ro nmental ly-friendly manner #
Dispose of thewate r/fuel mixture in an
environmentally-friendly manner. Mo
tor OM642 #
Park theve hicle in a safe location and secure
it against rolling away. #
Switch off the auxiliary heating
(/ page 100). #
Switch off the engine. #
Open the hood (/ page 202). Maintenance and care
209