tires MERCEDES-BENZ SPRINTER 2019 MY19 with 7” screen
[x] Cancel search | Manufacturer: MERCEDES-BENZ, Model Year: 2019, Model line: SPRINTER, Model: MERCEDES-BENZ SPRINTER 2019Pages: 354, PDF Size: 6.15 MB
Page 27 of 354
Menus and submenus .............................
16 6Mercedes PRO
....................................... 171
Information about Mercedes PRO ............ 171
Information about Mercedes PRO con‐
nect .........................................................1 71
Calling the Mercedes-Benz Cus tomer
Center using the multimedia sy stem ........ 171
Making a call via theove rhead control
panel ........................................................ 171
Information on theRo adside Assis‐
ta nce call via theove rhead control
panel ........................................................ 171
Information on Mercedes PRO connect
accident management .............................1 72
Tr ansmit ted data during a breakdown
assis tance call ......................................... 172MBUX multimedia sy
stem .................... 17 3
Overview and operation ........................... 173
Sy stem settings ....................................... 17 9
Ve hicle information ..................................1 81
Te lephone ................................................ 182
Media ...................................................... 189
Ra dio .......................................................1 92
Sound ...................................................... 194Tr
anspo rting .......................................... 19 5
No tes on loading guidelines ..................... 19 5
Load distribution ..................................... 19 6
Secu ring loads ......................................... 19 6
Car rier sy stems ....................................... 19 8
Using the interior roof car rier sy stem ...... 19 9
Placing a load on the wheel ar ch............. 201 Main
tenance and care .......................... 202
ASS YST PLUS service inter val display .... .202
Engine compartment ............................... 202
Cleaning and care ................................... .210 Breakdown assistance
..........................216
Emergency ............................................... 216
Emergency Call Sy stem ........................... 216
Flat tire ................................................... .218
Battery ..................................................... 218
To wing or tow- starting ............................ .224
Electrical fuses ........................................ 228
Ve hicle tool kit ......................................... 229
Hydraulic jack ......................................... 230 Wheels and tires
................................... 232
Information on noise or unusual driving
ch aracteristics ........................................ .232
No tes on regular lyinspecting wheels
and tires .................................................. 232
Information on driving with summer
tires ........................................................ .232
Information on M+S tires ......................... 233
No tes on snow chains ............................ .233
Ti re pressure ...........................................2 34
Loading theve hicle ..................................2 40
Ti re labeling ............................................ .243
Information on definitions (tires and
loading) ................................................... 24 6
Changing a wheel .................................... 24 8
Spa rewheel ............................................ 255 Te
ch nical data ....................................... 260
Information on tech nical da ta.................. 260
On-board electronics ............................... 260
Ve hicle identification plate, vehicle
identification number (VIN) and engine
number ....................................................2 61
Operating fluids and capacities .............. .263
Ve hicle data ............................................. 271
Tr ailer hit ch.............................................. 271
Lashing points and car rier sy stems ......... 275 Display messages and
warning and
indicator lamps ..................................... 277
Displ aymessa ges .................................... 277
Indicator and warning lamps .................. .296 Index
...................................................... 306 Contents
3
Page 42 of 354
Environmental pr
otection
+ ENVIRONMENTAL
NOTEEnvironmental
damage due tooperating conditions and
personal driving style The pollutant emission of
your vehicle is
directly related totheve hicle's operation.
Yo u can make a contribution toenvironmen tal
pr otection byoperating your vehicle in an
environmentally responsible manner. Todo
th is, obser vethefo llowing recommendations
on ope rating conditions and your personal
driving style.
Operating conditions: #
Make sure that the tire pressures are
alw ays cor rect. #
Do not transport any unnecessa ry
we ight (e.g. a roof rack which is no lon‐
ge rre qu ired). #
Obser vethe service inter vals.
A regularly serviced vehicle will contri b‐
ute toenvironmen tal pr otection. #
Always ha vemaintenance workcar ried
out at a qualified specialist workshop.
Pe rsonal driving style: #
Do not depress the accelera tor pedal
when starting the engine. #
Do not warm upthe engine while sta‐
tionar y. #
Drive carefully and maintain a su fficient
dis tance to ot hervehicles. #
Avoid frequent, sudden acceleration and
braking. #
Shift gears in good time and use each
ge ar only up to00C3 of its maximum
engine speed. #
Switch off the engine when in stationary
traf fic fo r a prolonged time. #
Drive in a fuel-ef ficient manne r.Pay
attention tothe ECO display for a fuel-
ef ficient driving style. Environmental issues and
recommendations
It is recommended torege nerate and recycle sub‐
st ances ins tead of immediately disposing of
th em.
The releva nt environmental guidelines and regula‐
tions ser vetoprotect the environment and
should be follo we d carefully. Mercedes-Benz Genuine
Parts
+ ENVIRONMENTAL
NOTEEnvironmental
damage caused bynot using recycled
re conditioned components Daimler
AGoffers recycled reconditioned
components and pa rts with the same quality
as new parts. The same entitlement from the
Limited Warranty is valid as for new parts. #
Use recycled reconditioned components
and pa rts from Daimler AG. *
NO
TEThe ef fectiveness of there stra int
sy stems can be impaired byinstalling
accessory parts, per form ing repairs or
we lding operations Airbags, Emer
gency Tensioning Devices as
we ll as control units and sensors forthe
re stra int sy stems can be ins talled in thefo l‐
lowing areas of theve hicle:
R Door frames
R Roof frames
R Doors
R Door pillars
R Door sills
R Seats
R Cockpit
R Instrument clus ter
R Center console #
Do not ins tall any accessories such as
audio sy stems in these areas. #
Do not per form repairs or welding oper‐
ations. #
Have accesso ryparts ins talled at a
qu alified specialist workshop. If
yo u use parts, tires, wheels or saf ety-re leva nt
accesso ries which ha venot been appr ovedby
Mercedes-Benz, the operating saf ety of theve hi‐
cle may be jeopardized. Saf ety-re leva nt sy stems,
e.g. the brake sy stem, may malfunction. Only use
Mercedes-Benz Genuine Parts or parts of equal
qu ality. Use only tires, wheels and accesso ry
parts that are appr oved foryo ur vehicle model.
Mercedes-Benz tests original parts, con version
parts and accessory parts that ha vebeen
appr ovedfo ryo ur vehicle model forre liability,
saf ety and suitabilit y.Despite ongoing ma rket
re sear ch,we are unable toassess other parts. 18
General no tes
Page 46 of 354
&
WARNING Risk offire due toflammable
materials on hot parts of theex haust sys‐
tem
Flammable material such as lea ves, grass or
twigs may ignite if they come into contact
wi th hot parts of theex haust sy stem. #
When driving on unpa vedro ads or off-
ro ad, regular lych eck theve hicle under‐
side. #
Remo vetrapped plants or other flam‐
mable material. #
Ifth ere is damage, consult a qualified
specialist workshop immediately. *
NO
TEDama getotheve hicle In
thefo llowing situations, in particular, there
is a risk of damage totheve hicle:
R The vehicle becomes grounded, e.g. on a
high curb or an unpa vedro ad
R The vehicle is driven toofast over an
obs tacle, e.g. a curb, speed bu mpor pot‐
hole
R A heavy object strike sth e underbody or
ch assis components
In situations such as this, the body, the
underbody, chassis components, wheels or
tires could be damaged without the damage
being visible. Components damaged in this
wa y can unexpectedly fail or, in the case of an
accident, may not absorb the loads that arise
as intended.
If th e underbody paneling is damaged, flam‐
mable materials such as lea ves, grass or
twigs can collect between the underbody and
th e underbody paneling. These materials may
ignite if they come into contact wi thhot parts
on theex haust sy stem. #
Have theve hicle checked and repaired
immediately at a qualified specialist
wo rkshop.
or #
If driving saf ety is impaired while con‐
tinuing your journe y,pull over and stop
th eve hicle immediately in accordance
with the traf fic conditions, and contact
a qu alified specialist workshop. Declarations of conformity
Information about
the decla ration of conform‐
ity for wi reless vehicle components USA:
"The wireless devices of this vehicle comply
with Part15 ofthe FCC Rules. Operation is sub‐
ject tothefo llowing two conditions: 1) These
devices may not cause harmful inter fere nce, and
2) These devices must acce ptany inter fere nce
re ceived, including inter fere nce that may cause
undesired operation. Changes or modi fications
not expressly appr ovedby the party responsible
fo r compliance could void the user's authority to
operate the equipment."
Canada: "The wireless devices of this vehicle
comply with Industry Canada license-e xemp t RSS
st andard(s). Operation is subject tothefo llowing
two conditions: (1) These devices may not cause
inter fere nce, and (2) These devices must acce pt
any inter fere nce, including inter fere nce that may
cause undesired operation of the device."
USA: "Wireless charging sy stem for mobile devi‐
ces (model: WMI2 Wireless Mobile Inter face): this
device complies with Part18 ofthe FCC Rules."
The name and address of there sponsible party
is:
peiker acustic GmbH
Max-Planc k-St r.28-32
61 381 Friedrichsdorf
Germany Diagnostics connection
The diagnostics connection is only intended for
th e connection of diagnostic devices at a quali‐
fi ed specialist workshop. &
WARNING Risk of accident due tocon‐
necting devices tothe diagnostics con‐
nection
If yo u connect equipment toa diagnostics
connection in theve hicle, it may af fect the
operation of vehicle sy stems.
As a result, the operating saf ety of theve hicle
could be af fected. #
Only connect equipment toa diagnos‐
tics connection in theve hicle which is
appr ovedfo ryo ur vehicle byMercedes-
Benz. 22
General no tes
Page 129 of 354
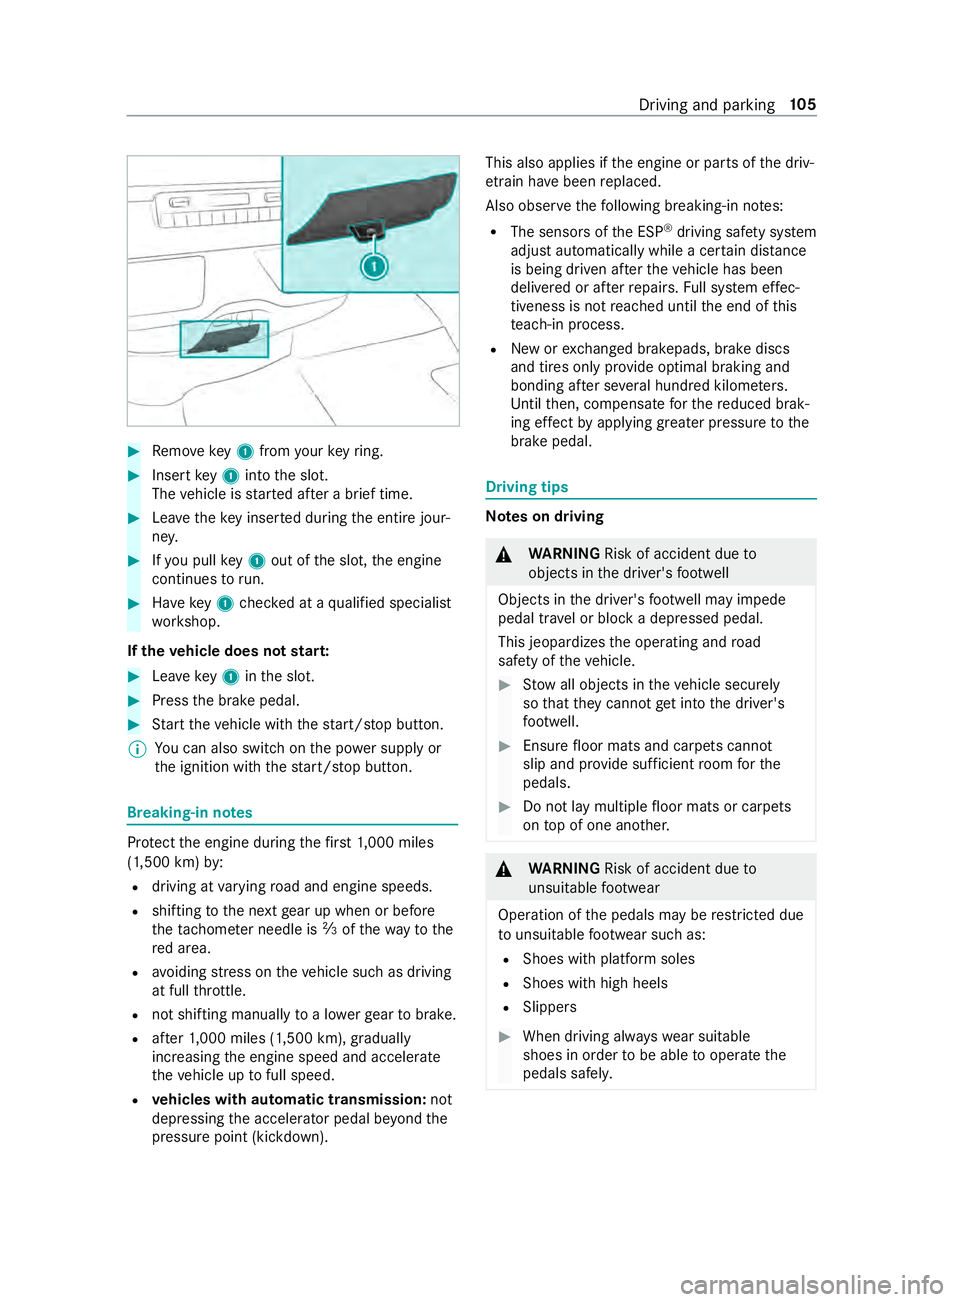
#
Remo vekey1 from your keyring. #
Inse rtkey1 into the slot.
The vehicle is star ted af ter a brief time. #
Leavetheke y inser ted during the entire jour‐
ne y. #
Ifyo u pull key1 out of the slot, the engine
continues torun. #
Have key1 checked at a qualified specialist
wo rkshop.
If th eve hicle does not star t: #
Leavekey1 inthe slot. #
Press the brake pedal. #
Start theve hicle with thest art/ stop button.
% Yo
u can also swit chon the po wer supp lyor
th e ignition with thest art/ stop button. Breaking-in no
tes Pr
otect the engine during thefirs t1, 000 miles
(1,500 km) by:
R driving at varying road and engine speeds.
R shifting tothe next gear up when or before
th etac home ter needle is 00C3ofthewa yto the
re d area.
R avoiding stre ss on theve hicle such as driving
at full thro ttle.
R not shi fting manually toa lo werge ar to brake.
R afte r1, 000 miles (1,500 km), gradually
increasing the engine speed and accelerate
th eve hicle up tofull speed.
R vehicles with automatic transmission: not
depressing the accelera tor pedal be yond the
pressure point (kickdown). This also applies if
the engine or parts of the driv‐
et ra in ha vebeen replaced.
Also obser vethefo llowing breaking-in no tes:
R The sensors of the ESP ®
driving saf ety sy stem
adjust automatically while a cer tain di stance
is being driven af terth eve hicle has been
delivered or af terre pairs. Full sy stem ef fec‐
tiveness is not reached until the end of this
te ach-in process.
R New or exch anged brakepads, brake discs
and tires only pr ovide optimal braking and
bonding af ter se veral hundred kilom eters.
Un tilthen, compensate forth ere duced brak‐
ing ef fect by applying greater pressure tothe
brake pedal. Driving tips
Note
s on driving &
WARNING Risk of accident due to
objects in the driver's foot we ll
Objects in the driver's foot we ll may impede
pedal tr avel or block a depressed pedal.
This jeopardizes the operating and road
saf ety of theve hicle. #
Stow all objects in theve hicle securely
so that they cannot getinto the driver's
fo ot we ll. #
Ensure floor mats and carpets cannot
slip and pr ovide suf ficient room forthe
pedals. #
Do not lay multiple floor mats or carpets
on top of one ano ther. &
WARNING Risk of accident due to
unsuitable foot we ar
Operation of the pedals may be restricted due
to unsuitable foot we ar such as:
R Shoes with plat form soles
R Shoes with high heels
R Slippers #
When driving alw ayswe ar suitable
shoes in order tobe able tooperate the
pedals safel y. Driving and pa
rking 105
Page 131 of 354
*
NO
TEWearing out the brake linings by
continuously dep ressing the brake pedal #
Do not depress the brake pedal continu‐
ously whilst driving. #
Touse the braking ef fect of the engine,
shift toa lo werge ar in good time. *
NO
TEDama getothe driv etra in and
engine when pulling away #
Do not warm upthe engine while the
ve hicle is stationar y.Pull away immedi‐
atel y. #
Avoid high engine speeds and driving at
full thro ttle until the engine has reached
its operating temp erature. *
NO
TEDama getothe catalytic con verter
due tonon-combu sted fuel The engine is not
running smo othly and is
misfiring.
Non-combus ted fuel may getinto the cata‐
lytic con verter. #
Only depress the accelera tor pedal
slightly. #
Have the cause rectified immedia tely at
a qualified speciali st workshop. Exhaust emission monitoring
Specific engine sy
stems are designed tokeep
poisonous components of exhaust emissions
within legal limits.
These sy stems only workoptimally if they are
main tained exactly according tomanufacturer's
specifications. It is forth is reason that all work
on the engine should only be per form ed byquali‐
fi ed and authorized Mercedes-Benz Center tech‐
nicians.
Under no circum stances should engine settings
be changed. In addition, all specific main tenance
wo rkmust be per form ed at regular inter vals and
in compliance with the service regulations of the
dealer named in the imprint. Referto the mainte‐
nance booklet for de tails.
Information about short-distance trips
If th eve hicle is predominantly used for short-dis‐
ta nce driving, fuel may accumulate in the engine
oil and cause engine damage.
If yo u main lydrive short dis tances, you should
drive on a free way or go for a country drive for 20 minutes
every300 km (480 miles). This facili‐
ta testh ere ge neration of the diesel particulate fil‐
te r.
Note s onthe speed limitation &
WARNING Risk of inju rythro ugh exceed‐
ing the specified tire load rating or the
permissible speed rating
Exceeding the specified tire load rating or the
permissible speed rating may lead totire
dama geand tothe tires bur sting. #
Therefore, only use tire types and sizes
appr ovedfo ryo ur vehicle model. #
Obser vethe tire load rating and speed
ra ting requ ired foryo ur vehicle. As
the driver, you must find out about the maxi‐
mum permissible speed forth e tires (tire and tire
pressure). In particular, obser vethe legal requ ire‐
ments for tires forth e count ryyou are in.
Yo u can permanently limit the speed of your vehi‐
cle.
Mercedes-Benz recommends a qualified special‐
ist workshop for programming the speed limita‐
tion.
Before overtaking, take into consideration that
th e engine speed limiter pr events the speed
increasing be yond the programmed speed limita‐
tion.
On downhill gradients, the speed limitation may
be exc eeded. Apply the brakes if necessar y.
Displ aymessages indica tethat you are approach‐
ing the limit speed.
Information about fore ign trips
Service
An extensive Mercedes-Benz service is also avail‐
able abroad. Ne vertheless, please remember that
services or spare parts may not be available
immediatel y.The releva nt wo rkshop directories
are available from an authorized Mercedes-Benz
Center.
Fu el
In some countries, only fuels with an inc reased
sulfur con tent are available.
Uns uitable fuel can cause engine damage. In for‐
mation about fuel can be found in the "Fuel" sec‐
tion (/ page 264). Driving and parking
107
Page 135 of 354
#
When driving on unpa vedro ads or off-
ro ad, regular lych eck theve hicle under‐
side. #
Remo vetrapped plants or other flam‐
mable material. #
Ifth ere is damage, consult a qualified
specialist workshop immediately. *
NO
TEDama getotheve hicle af ter driving
off-road When driving off-road or on unpa
ved sur fa‐
ces, fore ign bodies such as stones and
branches could become trapped on theve hi‐
cle underside, on wheels and tires, causing
damage totheve hicle.
Fo reign bodies could cause thefo llowing
damage:
R Damage the suspension, the fuel tank or
th e brake sy stem.
R Disturb the balance and cause vibrations. #
Regular lyremo veany trapped fore ign
bodies, e.g. stones and branches. #
After driving off-road, check carefully
whe ther there is any damage tothe
ve hicle. #
Ifth ere is damage, ha vetheve hicle
ch ecked at a qualified specialist work‐
shop. When driving off-road or on unpa
ved sur faces,
ch eck theve hicle underside, wheels and tires
re gularly at regular inter vals. In particular,
re mo veany trapped fore ign bodies, e.g. stones
and branches.
Obser vethefo llowing no tesre ga rding fore ign
bodies of this kind:
R They may damage the suspension, the fuel
ta nk or the brake sy stem.
R They may disturb the balance and cause
vibrations.
R They may be flung out from theve hicle when
yo u continue driving.
If th ere is any damage, inform a qualified special‐
ist workshop.
When driving off-road on steep inclines, you must
make sure that the DEF tank is su fficiently filled.
Therefore, ensure a le vel of at least ten li ters
before off-road driving. When driving off-road and on con
stru ction sites,
sand, mud and water,also mixed with oil, can get
into the brakes. This may lead toare duction in
braking ef fect or total brake failure, also as a
re sult of increased wear. The braking characteris‐
tics will vary depending on the material that has
got into the sy stem. Clean the brakes af ter driv‐
ing off-road. If youth en notice a reduced braking
ef fect or hear scraping noises, ha vethe brake
sy stem checked immediately at a qualified spe‐
cialist workshop. Adjust your driving style to the
ch anged braking characteristics.
Driving off- road or on con stru ction sites increa‐
ses the possibility of vehicle damage which may
in turn lead tothefa ilure of cer tain major assem‐
blies and sy stems. Adapt your driving style to the
off-road driving conditions. Drive carefull y.Ha ve
any vehicle damage rectified at a qualified spe‐
cialist workshop as soon as possible.
When driving on rough cross-country terrain, do
not shift the transmission into the neutral posi‐
tion and do not disengage the clutch. You could
lose control when attem pting tobrake theve hicle
with the service brake. If your vehicle cannot
manage an uphill incline, drive back down in
re ve rsege ar.
When loading your vehicle for off-road driving or
on a construction site, keep theve hicle's center
of gr avity as low as possible.
Checklist before off-road driving R Check the fuel and DEF le vels (/ page163)
and add if necessary (/ page 125).
R Engine: check the oil le vel and add oil if nec‐
essary (/ page 205). Before driving up or
down extreme inclines or slopes, fill th e oil to
th e maximum le vel.
% If
yo u drive up or down extreme inclines or
slopes, the00B2 symbol may appear in the
multifunction displa y.The engine operating
saf ety is not put at risk if you ha vefilled the
engine oil tothe maximum le vel before the
jou rney.
R Vehicle tool kit: check that the jack is work‐
ing (/ page 250).
R Make sure that a lug wrench (/ page 250), a
wo oden underlay forth e jac k,aro bust tow
ro pe, a folding spade and a wheel chock are
car ried in theve hicle.
R Tire s and wheels: check the tire tread dep th
( / page 232) and the tire pressure
(/ page 239). Driving and parking
111
Page 136 of 354
Ru
les for off-road driving
Alw ays be aware of the ground clearance of the
ve hicle and avoid obs tacles such as deep tire
ru ts.
Obs tacles can damage thefo llowing parts of the
ve hicle, forex ample:
R Suspension
R Driv etra in
R Fuel and supply tanks
The refore , alw ays drive slowly when off-road. If
yo u must drive over obs tacles, ha vethe co-driver
instruct you.
% Mercedes-Benz
recommends that you addi‐
tionally car rya sho vel and a reco very rope
with a shackle in theve hicle.
R Make sure that loads and items of luggage
are securely stored or lashed down
(/ page 72).
R Before driving off-road, stop theve hicle and
engage a low gear.
R Vehicles with DSR: activate DSR when you
are driving downhill (/ page120).
R All-wheel drive vehicles: activate the all-
wheel drive (/ page119) and, if necessa ry,
activate theLO W RANGE transmission ratio
(/ page 119).
R Ifth e sur face requ ires, temp orarily deactivate
ASR when pulling away ( /page 119).
R Only drive off-road with the engine running
and a gear engaged.
R Drive slowly and smo othly. Wa lking pace is
necessary in many situations.
R Avoid spinning the driven wheels.
R Always ensure that the wheels remain in con‐
ta ct wi th the ground.
R Exercise the utmost caution when driving
across unfamiliar, unpredictable terrain. As a
precaution, getout of theve hicle totake a
look at thero ute tobe take nfirs t.
R Look out for obs tacles (e.g. rocks, holes, tree
st umps and tire ruts).
R Avoid edges where the sur face could crumble
or break away.
Ru les forfo rd ing off-road (all-wheel drive
ve hicles)
R Obser vethe saf ety no tes and general no tes
on driving off-road. R
Check the dep thand characteristics of the
body of water before ford ing. The water must
not be deeper than 23.6 in (60 cm).
R The climate control sy stem is switched off
(/ page 95).
R The auxiliary heating is switched off
(/ page 100).
R Swit chon all-wheel drive (/ page118) and
engage it on vehicles with theLO W RANGE
transmission ratio (/ page 119).
R Restrict the shift range to1or 2.
R Avoid high engine speeds.
R Drive slowly and smoo thly at no more than a
wa lking pace.
R Ensure that no bow wavefo rm s while driving.
R Afterfo rd ing, dry the brakes.
Af ter driving thro ugh a body of water deeper than
19 .7 in (50 cm), make su retocheck all vehicle
fl uids for any signs of penetration bywate r.
Checklist af ter driving off-road
If yo ufind damage totheve hicle af ter off-road
driving, ha vetheve hicle checked at a qualified
specialist workshop immediatel y.
Driving overro ugh terrain places greater
demands on your vehicle than normal road opera‐
tion. Check your vehicle af ter driving on rough
te rrain. This allo wsyouto detect damage
prom ptly and reduce therisk of an accident for
yo urself and other road users. Clean your vehicle
th oroughly before driving on public roads.
Obse rveth efo llowing points af ter driving off-
ro ad, on con stru ction sites and before driving on
public roads:
R Vehicles with DSR: deactivate DSR
(/ page 120).
R All-wheel drive vehicles: deactivate the all-
wheel drive (/ page119).
R Activate ASR (/ page 119).
R Clean theex terior lighting, particular lythe
headlamp s andtail lamps, and check them
fo r dama ge.
R Clean the front and rear license plates.
R Clean the windshield, windo wsand outside
mir rors.
R Clean thesteps, entra nces and grab handles.
This increases the saf ety of your foot ing.
R Clean the wheels and tires, wheel wells and
th e underbody of theve hicle with a water jet. 11 2
Driving and pa rking
Page 137 of 354
This increases
road adhesion, especially on
we tro adw ays.
R Check the wheels and tires and wheel wells
fo r trapped fore ign objects and remo vethem.
Tr apped fore ign objects can damage the
wheels and tires or may be flung out from the
ve hicle when continuing the journe y.
R Check the underbody for trapped branches or
ot her parts of plants and remo vethem.
R Clean the brake discs, brakepads and axle
joints, particularly af ter operation in sand,
mud, grit and gr avel,wa ter or similar lydirty
conditions.
R Check the entire floor assembly, the tires,
wheels, bodywork stru cture, brakes, steering,
suspension and exhaust sy stem for any dam‐
age.
R Check the service brake for operating saf ety,
e.g. car ryout a brake test.
R Ifyo u notice strong vib rations af ter driving
off-road, check the wheels and driv etra in for
fo re ign objects again. Remo veany fore ign
objects which can lead toimbalances and
th us cause vibrations. In theeve nt of damage
to the wheels and the drive train, visit a quali‐
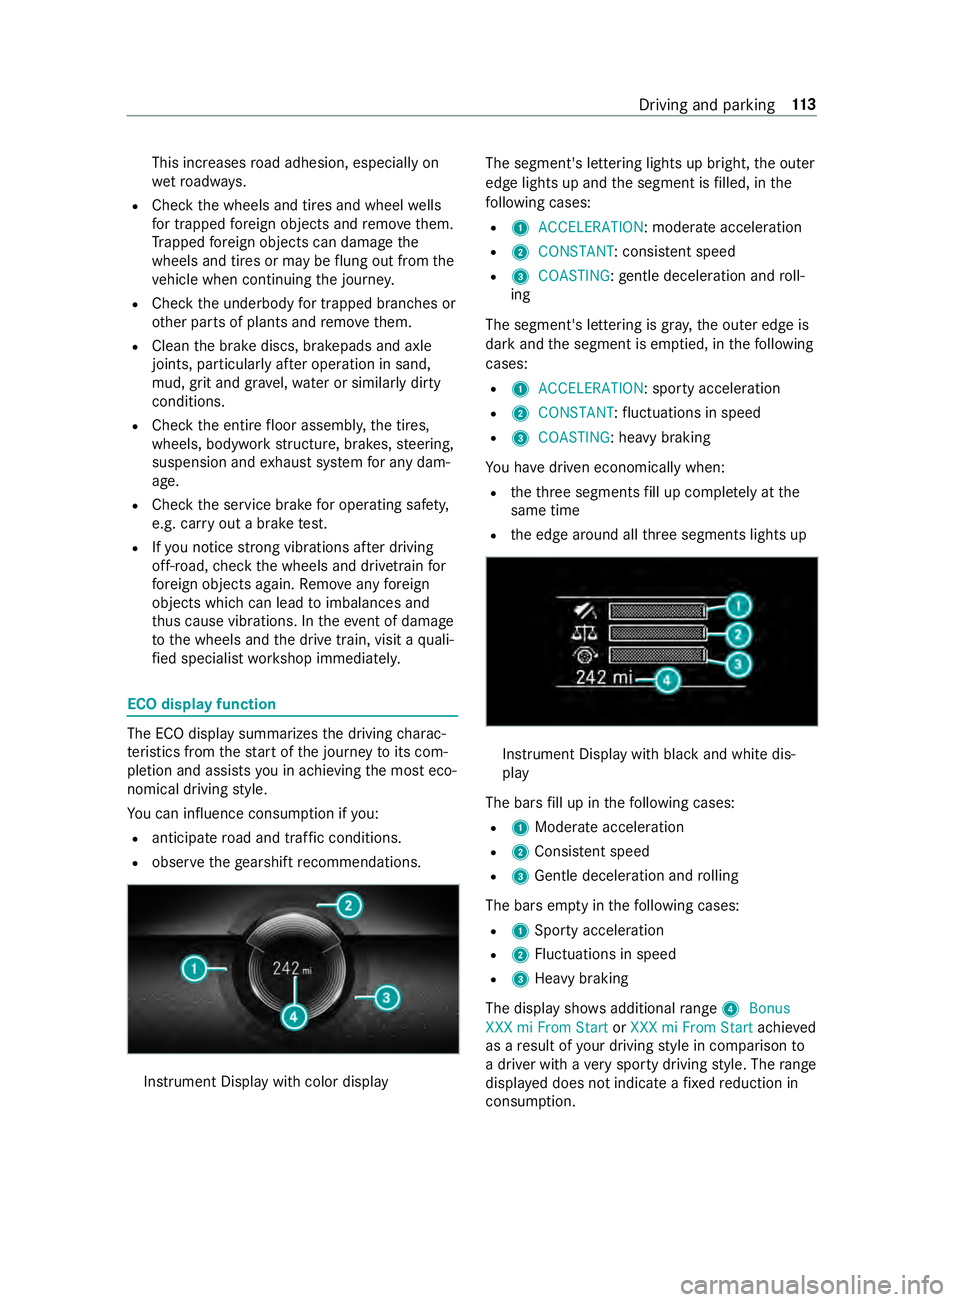
fi ed specialist workshop immediately. ECO display function
The ECO display summarizes
the driving charac‐
te rist ics from thest art of the journey toits com‐
pletion and assists you in achieving the most eco‐
nomical driving style.
Yo u can influence consum ption if you:
R anticipate road and traf fic conditions.
R obser vethege arshift recommendations. Instrument Display wi
thcolor display The segment's lettering lights up bright,
the outer
edge lights up and the segment is filled, in the
fo llowing cases:
R 1 ACCELERATION : moderate acceleration
R 2 CONSTANT: consis tent speed
R 3 COASTING: gentle deceleration and roll‐
ing
The segment's lettering is gray ,th e outer edge is
dark and the segment is em ptied, in thefo llowing
cases:
R 1 ACCELERATION: sporty acceleration
R 2 CONSTANT :fl uctuations in speed
R 3 COASTING: heavy braking
Yo u ha vedriven economically when:
R theth re e segments fill up comple tely at the
same time
R the edge around all thre e segments lights up Instrument Display with black and white dis‐
play
The bars fill up in thefo llowing cases:
R 1Moderate acceleration
R 2Consis tent speed
R 3Gentle deceleration and rolling
The bars em pty in thefo llowing cases:
R 1Sporty acceleration
R 2Fluctuations in speed
R 3Heavy braking
The display sho wsadditional range 4Bonus
XXX mi From Start orXXX mi From Start achieved
as a result of your driving style in comparison to
a driver with a very sporty driving style. The range
displ ayed does not indicate a fixe dre duction in
consum ption. Driving and parking
11 3
Page 142 of 354

0047
Use
the engine's braking ef fect on extremely
st eep downhill gradients and on long down‐
hill stre tches. Using kickdown
#
For maximum acceleration: depressthe
accelerator pedal be yond the pressure point. #
Ease off the accelera tor pedal once the
desired speed is reached. All-wheel drive
Note
s on all-wheel drive All-wheel drive ensures permanent drive
for all
fo ur wheels, and toget her with ESP ®
it impr oves
th e traction of theve hicle.
The traction contro l ofthe all-wheel drive also
ta ke s place via the brake sy stem. Therefore, the
brake sy stem can overheat during extreme off-
ro ad use. In this case, ease off the accelerator
pedal or stop toallow the brake sy stem tocool
down.
If a driven wheel spins due toinsuf ficient trac‐
tion, obser vethefo llowing no tes:
R When pulling away, make use of the traction
cont rol integrated in ESP ®
. Depress the
accelerator pedal as far as necessar y.
R Take your foot off the accelera tor pedal,
slowly, while theve hicle is in motion.
In wintry driving conditions, alw ays use winter
tires (M+S tires) and, if necessar y,snow chains
(/ page 233). Only in this wa y can the maximum
ef fect of all-wheel drive be achie ved.
Use DSR (Downhill Speed Regulation) when driv‐
ing downhill off-road (/ page120).
If yo ufa ilto adapt your driving style or if you are
inat tentive, the all-wheel drive sy stem can neither
re duce therisk of an accident nor override the
la ws of ph ysics. The all-wheel drive sy stem can‐
not take road, weather and traf fic conditions into
account. The all-wheel drive sy stem is only an
aid. You are responsible for maintaining a safe
dis tan ce from theve hicle in front, forve hicle
speed, for braking in good time and forst ay ing in
lane. *
NO
TERisk of damage tothe driv etra in
and the brake sy stem If
yo u operate vehicles with all-wheel drive on
a one-axle test st and, you may damage the
driv etra in or the brake sy stem. #
A function or per form ance test should
only be car ried out on a two-axle test
st and. #
Ifyo u wish tooperate theve hicle on
such a test st and, please consult a
qu alified specialist workshop in
advance. *
NO
TERisk of damage tothe transfer
case If
yo uto w theve hicle with a raised axle, the
trans fer case can getdamaged. Such damage
is not co veredby Mercedes-Benz Limited
Wa rrant y. #
Neverto w theve hicle with a raised axle. #
Only tow theve hicle with all wheels on
th e ground or fully raised. #
Notethe instructions on towing the
ve hicle with full contact with the ground
fo r all wheels. Engaging all-wheel drive
Conditions
for en gaging/disengaging
Yo u can engage and deactivate the all-wheel drive
when stationary or while driving slowl y.
When stationar y,thefo llowing must be obser ved:
R The engine is running.
R The steering wheel in thest ra ight-ahead posi‐
tion.
If th e all-wheel drive cann otbe engaged when
st ationary: #
Vehicles with automatic transmission:
shift the selector le ver from 005Cto005B from
005B to005C from 005Cto005E and back to005C .
Engaging and disengaging the all-wheel drive
can be made easier in this wa y.
Obser vethefo llowing when driving slowly:
R The engine is running.
R The vehicle is not tr aveling fasterthan
6.2 mph (1 0 km/h).
R The vehicle is not being driven around a bend. 11 8
Driving and pa rking
Page 145 of 354
DSR is in
standby mode.
R DSR is inactive:
-
as soon as youexc eed a speed of 28 mph
(45 km/h).
- DSR appears in thest atus area of the on-
board computer. In addition, theDSR Off
message appears.
- DSR - - - appears in thest atus area of the
on-board computer.
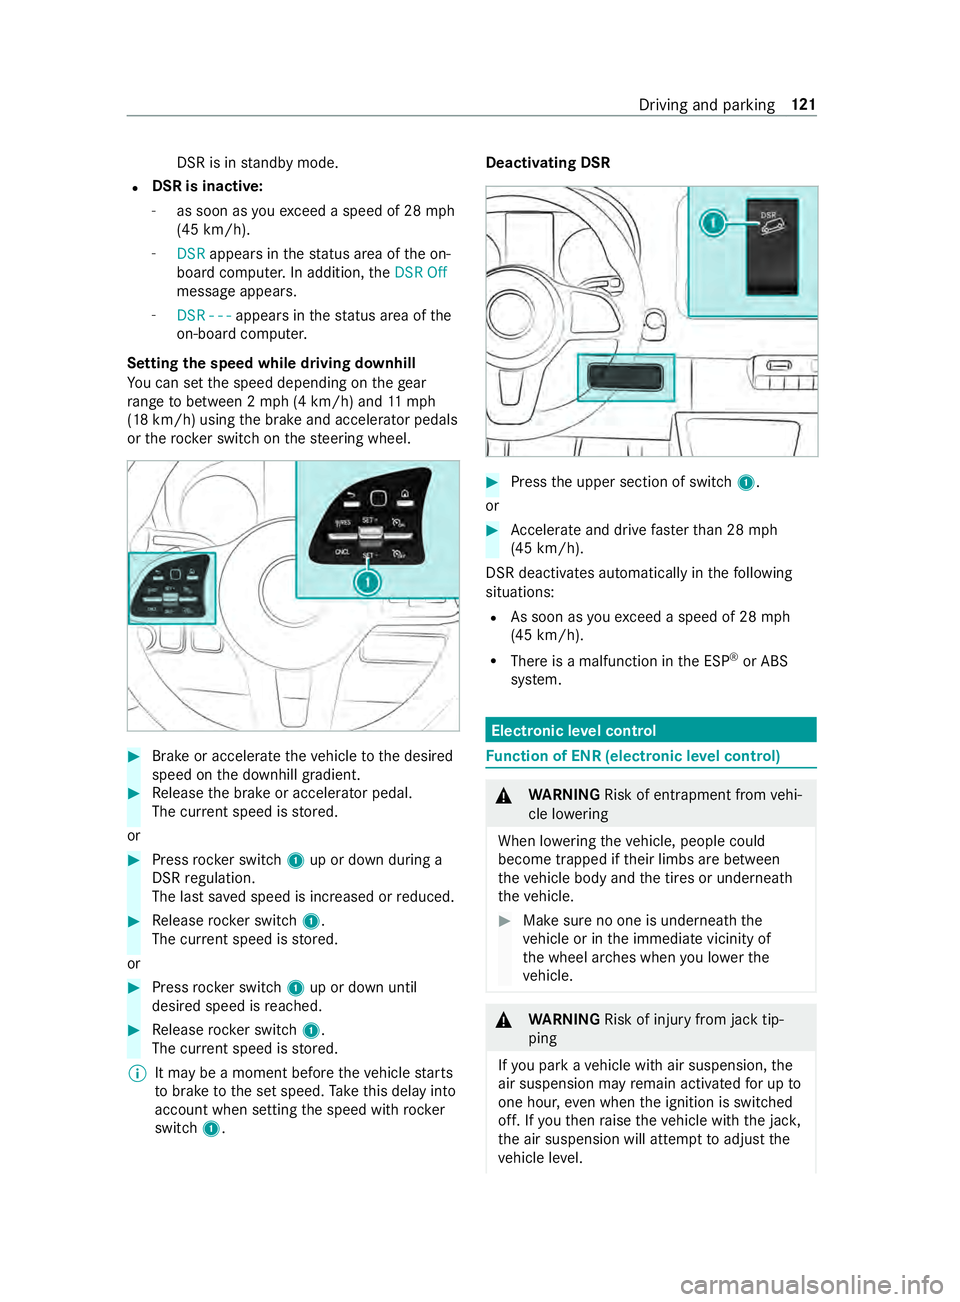
Setting the speed while driving downhill
Yo u can set the speed depending on thege ar
ra nge tobetween 2 mph (4 km/h) and 11mph
(18 km/h) using the brake and accelerator pedals
or therock er switch on thesteering wheel. #
Brake or accelerate theve hicle tothe desired
speed on the downhill gradient. #
Release the brake or accelera tor pedal.
The cur rent speed is stored.
or #
Press rocker switch 1up or down during a
DSR regulation.
The last sa ved speed is increased or reduced. #
Release rocker switch 1.
The cur rent speed is stored.
or #
Press rocker switch 1up or down until
desired speed is reached. #
Release rocker switch 1.
The cur rent speed is stored.
% It may be a moment before
theve hicle starts
to brake tothe set speed. Take this delay into
account when setting the speed with rock er
switch 1. Deactivating DSR
#
Press the upper section of switch 1.
or #
Accele rate and drive fasterthan 28 mph
(45 km/h).
DSR deactivates automatically in thefo llowing
situations:
R As soon as youexc eed a speed of 28 mph
(45 km/h).
R There is a malfunction in the ESP ®
or ABS
sy stem. Electronic le
vel control Fu
nction of ENR (electronic le vel control) &
WARNING Risk of entrapment from vehi‐
cle lo wering
When lo wering theve hicle, people could
become trapped if their limbs are between
th eve hicle body and the tires or underneath
th eve hicle. #
Make sure no one is underneath the
ve hicle or in the immediate vicinity of
th e wheel ar ches when you lo werthe
ve hicle. &
WARNING Risk of inju ryfrom jack tip‐
ping
If yo u park a vehicle with air suspension, the
air suspension may remain activated for up to
one hour, even when the ignition is switched
off. If youth en raise theve hicle with the jac k,
th e air suspension will attem pttoadjust the
ve hicle le vel. Driving and parking
121