bulb MERCEDES-BENZ V-CLASS MPV 2021 Owners Manual
[x] Cancel search | Manufacturer: MERCEDES-BENZ, Model Year: 2021, Model line: V-CLASS MPV, Model: MERCEDES-BENZ V-CLASS MPV 2021Pages: 337, PDF Size: 9.88 MB
Page 5 of 337
Symbols
..................................................... 4At
agl ance ................................................. 6
Cockpit ........................................................ 6
Indica tor and warning lamps ...................... .7
St eering wheel with buttons ........................ 8
Centre console ............................................ 9
Overhead control panel ............................. 13
Door control panel .................................... .14Digital Operating Instructions
...............15
Calling up the Digital Operating
Instructions ............................................... 15Genera
l notes.......................................... 16
Environmental pr otection ........................... 16
Ta ke -ba ckof end-of-life vehicles ................16
Mercedes-Benz GenuineParts .................... 16
Information about attachments, add-
on equipment, ins tallations and con‐
ve rsions .................................................... .17
Operating Instructions ...............................17
Operating saf ety ........................................ 18
Declarations of conformity ........................ 19
Diagno stics connection ............................ .21
No tes on changes tothe engine output ..... 22
Qualified specialist workshop .................... 22
Ve hicle registration ................................... 22
Cor rect use of theve hicle .........................23
Information on the REA CHdirective .......... 23
No tesfo r persons with electronic med‐
ical aids .....................................................23
Implied warranty ........................................ 24
QR codes forre scue card .......................... 24
Data storage ..............................................24
Copyright .................................................. .26Occupant saf
ety...................................... 27
Re stra int sy stem ........................................27
Seat belts .................................................. 28
Airbags ...................................................... 31
PRE-SAFE ®
Sy stem .................................... 36
Au tomatic measure s after an accident ...... 36
Safely transporting children in the
ve hicle .......................................................37
No tes on pets in theve hicle ......................48 Opening and closing
...............................49
Ke y ............................................................ 49
Doors ........................................................ .51
Sliding door ............................................... 54Electric sliding door ...................................
54
Ta ilgate ...................................................... 58
Side window .............................................. 61
Pa norama sliding sunroof .......................... 63
Anti-theft pr evention ................................. 66 Seats and
stowage .................................. 69
No tes on the cor rect driver's seat posi‐
tion ............................................................ 69
Seats ........................................................ .69
St eering wheel ...........................................96
St ow age areas .......................................... .96
Fo lding table .............................................. 98
Information about the bottle holder ......... 100
Cup holders ............................................ .101
Ashtr ayand cigar ette lighter .................... 101
Soc kets .................................................... 102
Switching there frigerator box in the
centre console on and off ........................ 104
No tes on attaching the iPad ®
.................. 104 Light and vision
.................................... 105
Exterior lighting ....................................... 105
Ad justing the interior lighting ...................1 11
Changing bulbs ........................................ 111
Wi ndsc reen wipers ................................... 11 6
Mir rors ..................................................... 11 8
Operating sun visors ................................ 11 9 Climate control
..................................... 12 0
Overview of climate contro l systems .......1 20
Operating clima tecontrol sy stems ..........1 22
Operating air vents .................................. 12 6
Au xilia ryheating ...................................... 12 6 Driving and pa
rking .............................. 13 6
Driving .................................................... .136
Manual transmission ................................ 141
Au tomatic transmission ........................... 14 2
All-wheel drive ........................................ .146
AIRMATIC ................................................ 14 6
Re fuelling ................................................ .147
Pa rking .................................................... 15 0
Driving and driving sa fety sy stems ..........1 53
Tr ailer operation ...................................... .176 Instrument clus
ter and on-board
co mp uter ............................................... 18 0
No tes on the instrument clus ter and
on-board computer .................................. 180
Overview of the instrument clus ter .......... 180 2
Contents
Page 114 of 337
deactivated and
the automatic driving lights acti‐
va ted. Ad
justing the in terior lighting Ad
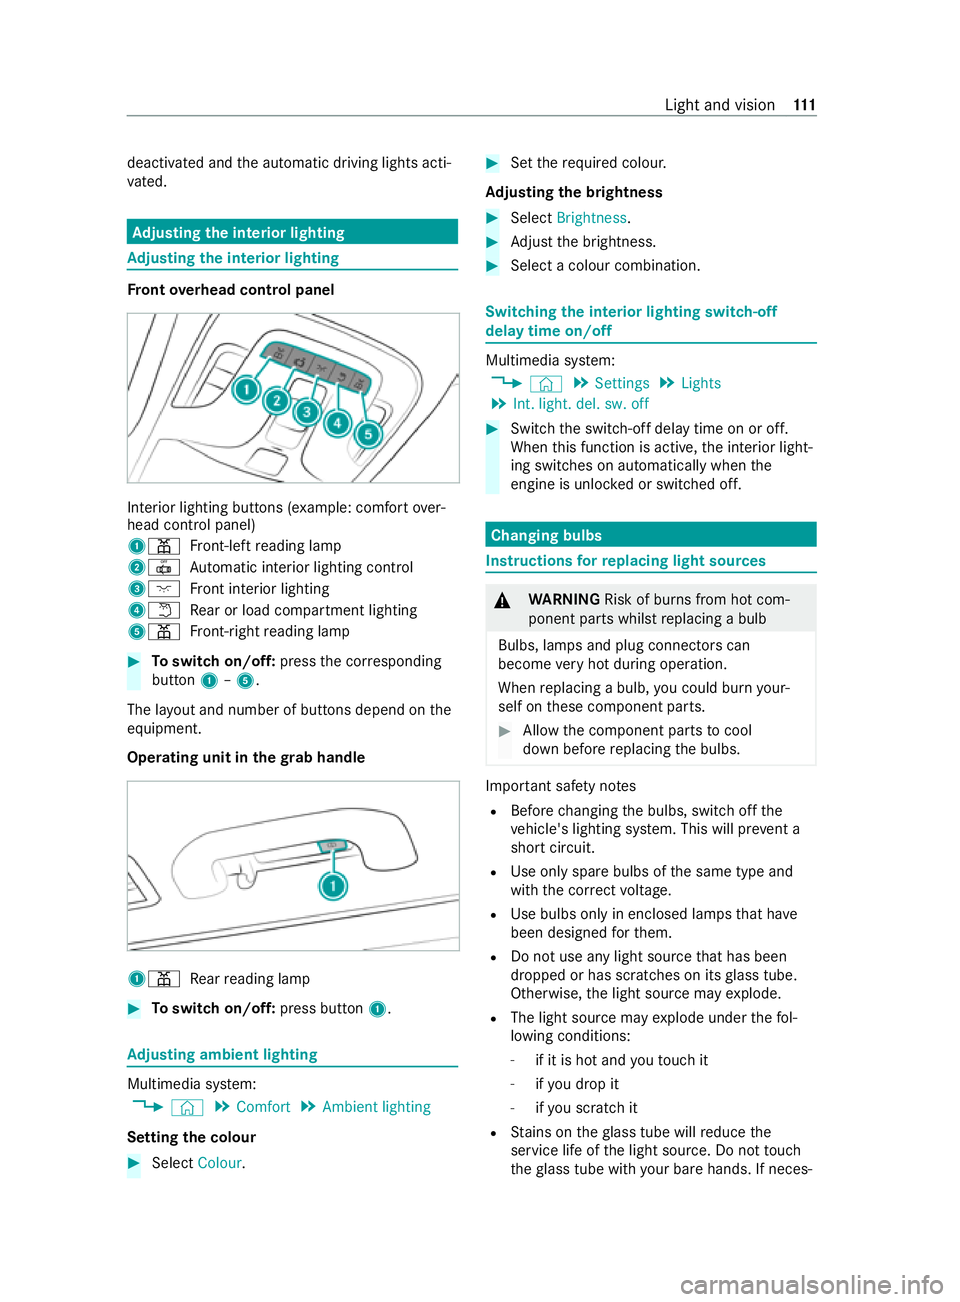
justing the in terior lighting Fr
ont overhead control panel In
te rior lighting buttons (e xample: com fort ove r‐
head control panel)
1003D Front-left reading lamp
20033 Automatic interior lighting control
3004A Front interior lighting
40044 Rear or load compartment lighting
5003D Front-ri ghtreading lamp #
Toswitch on/off: pressthe cor responding
button 1–5.
The la yout and number of buttons depend on the
equipment.
Operating unit in thegr ab handle 1003D
Rear reading lamp #
Toswitch on/off: press button1. Ad
justing ambient lighting Multimedia sy
stem:
4 © 5
Comfort 5
Ambient lighting
Setting the colour #
Select Colour. #
Set therequ ired colour.
Ad justing the brightness #
Select Brightness . #
Adjust the brightness. #
Select a colour combination. Switching
the interior lighting switch-off
delay time on/off Multimedia sy
stem:
4 © 5
Settings 5
Lights
5 Int. light. del. sw. off #
Switch the switch-off delay time on or off.
When this function is active, the interior light‐
ing switches on automatically when the
engine is unloc ked or switched off. Changing bulbs
Instructions
forre placing light sou rces &
WARNING Risk of burn s from hot com‐
ponent parts whilst replacing a bulb
Bulbs, lamps and plug connectors can
become very hot during operation.
When replacing a bulb, you could burn your‐
self on these component parts. #
Allow the component parts tocool
down before replacing the bulbs. Impor
tant sa fety no tes
R Before changing the bulbs, switch off the
ve hicle's lighting sy stem. This will pr event a
sho rtcircuit.
R Use only spa rebulbs of the same type and
with the cor rect voltage.
R Use bulbs only in enclosed lamps that ha ve
been designed forth em.
R Do not use any light source that has been
dropped or has scratches on its glass tube.
Otherwise, the light source may explode.
R The light source may explode under thefo l‐
lowing conditions:
- if it is hot and youto uch it
- ifyo u drop it
- ifyo u sc ratch it
R Stains on theglass tube will reduce the
service life of the light source. Do not touch
th eglass tube with your bare hands. If neces‐ Light and vision
111
Page 115 of 337

sar
y,clean theglass tube with alcohol or spi‐
ri ts while it is cold and wipe it down wi th a
lint-f ree clo th.
R Protect light sources from moisture and do
not bring them into contact with liquids.
Alw ays ensure the bulbs are firm ly secu red.
Ha ve thefo llowing light sources changed at a
qu alified specialist workshop only:
R Additional turn signal lamps on the outside
mir ror
R Bulbs in the licence plate lighting Re
placing front light bulbs (vehicles with hal‐
ogen headlamps) Overview of front light sourc
e types1
Additional turn signal lamp on the outside
mir ror: LED
2 Turn signal light: PY 21 W
3 Low beam: H7 55 W
4 High beam/s tanding/parking lights/daytime
ru nning lights: H15 55 W/15 W
Re placing light sou rces in the headlamp
Re quirements
R The lighting sy stem is switched off.
R The appropriate front wheel is turned
inwa rds.
R Low beam: youre qu ire a H7 55 W light bulb.
R Turn signal light: yourequ ire a PY 21W light
bulb.
R High beam /
standing/parking lights /
daytime running lights: youre qu ire a
H15 55 W/15 W light bulb. Fi
tting/ removing the co ver in the front wheel
ar ch #
Toremo ve:grip the cent reof co ver1, slide
it upwards and pull it out.
The co ver will hang down wards on thest ra p. #
Tofit: insert co ver1 attheto p and slide it
down wards until it engages.
Low beam #
Remo vethe co ver in the front wheel ar ch. #
Turn housing co ver1 anti-clockwise and
re mo veit. #
Turn soc ket2 for low beam tothe left and
pull it out. #
Pull the bulb out of soc ket2. #
Inse rtthe new bulb into soc ket2. #
Inse rtsoc ket2 and rotate itto theright to
tighten it. #
Press on housing co ver1 and rotate itto
th eright totighten it. 11 2
Light and vision
Page 116 of 337
#
Replace the co ver in the front wheel ar ch.
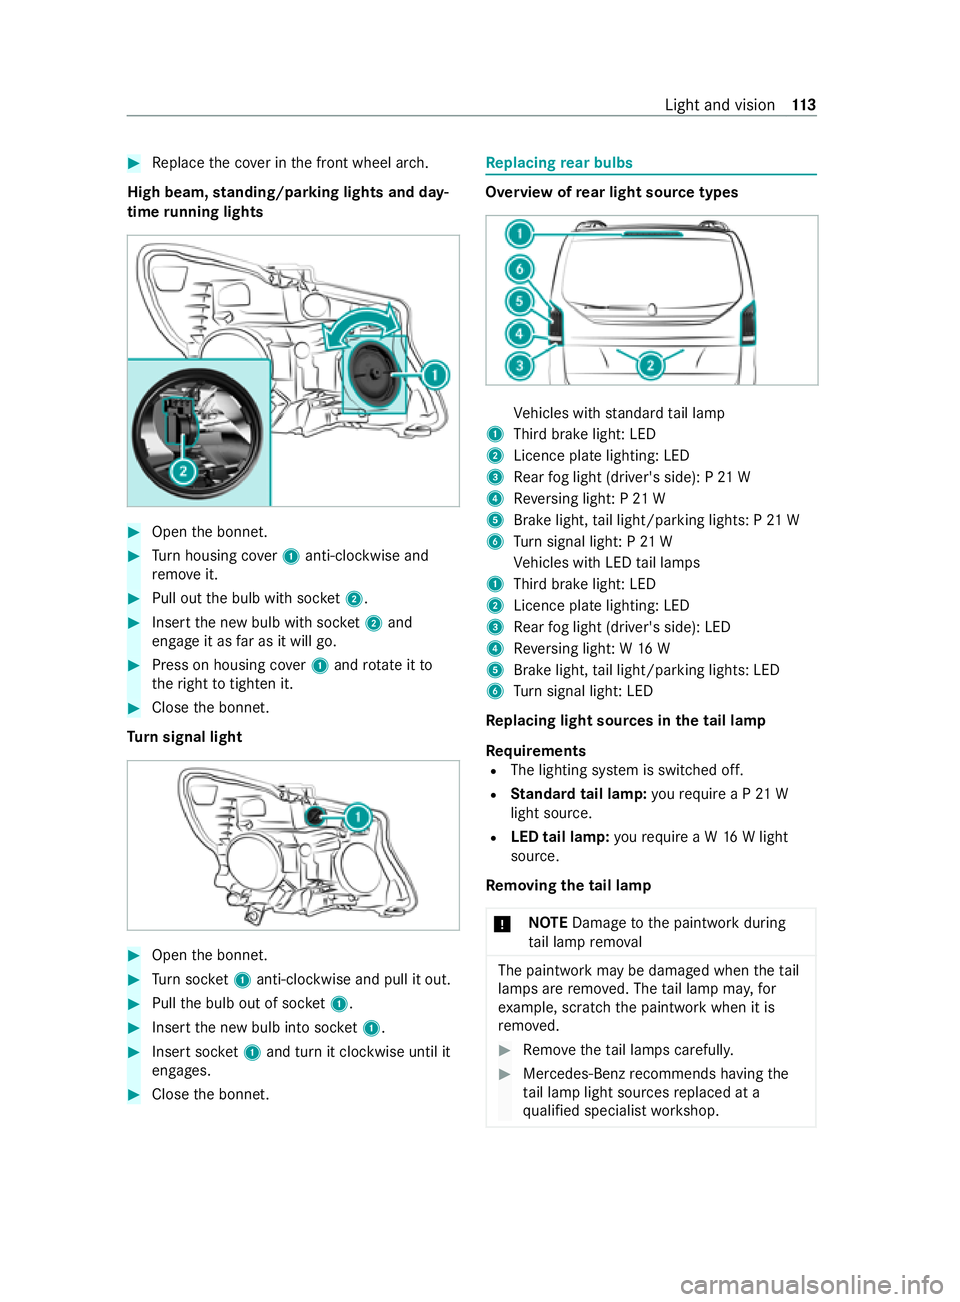
High beam, standing/parking lights and day‐
time running lights #
Open the bonn et. #
Turn housing co ver1 anti-clockwise and
re mo veit. #
Pull out the bulb with soc ket2. #
Inse rtthe new bulb with soc ket2 and
engage it as far as it will go. #
Press on housing co ver1 and rotate itto
th eright totighten it. #
Close the bonn et.
Tu rn signal light #
Open the bonn et. #
Turn soc ket1 anti-clo ckwise and pull it out. #
Pull the bulb out of soc ket1. #
Inse rtthe new bulb into soc ket1. #
Inse rtsoc ket1 and turn it clo ckwise until it
engages. #
Close the bonn et. Re
placing rear bulbs Overview of
rear light source types Ve
hicles with standard tail lamp
1 Third brake light: LED
2 Licence plate lighting: LED
3 Rear fog light (driver's side): P 21 W
4 Reversing light: P 21 W
5 Brake light, tail light/parking lights: P 21 W
6 Turn signal light: P 21 W
Ve hicles with LED tail lamps
1 Third brake light: LED
2 Licence plate lighting: LED
3 Rear fog light (driver's side): LED
4 Reversing light: W 16 W
5 Brake light, tail light/parking lights: LED
6 Turn signal light: LED
Re placing light sou rces in the tail lamp
Re quirements
R The lighting sy stem is switched off.
R Standard tail lamp: yourequ ire a P 21 W
light source.
R LED tail lamp: yourequ ire a W 16W light
source.
Re moving the tail lamp
* NO
TEDama getothe paintwork during
ta il lamp remo val The paintwork may be damaged when
theta il
lamps are remo ved. The tail lamp ma y,for
ex ample, scratch the paintwork when it is
re mo ved. #
Remo vetheta il lamps carefull y. #
Mercedes-Benz recommends having the
ta il lamp light sources replaced at a
qu alified specialist workshop. Light and vision
11 3
Page 117 of 337
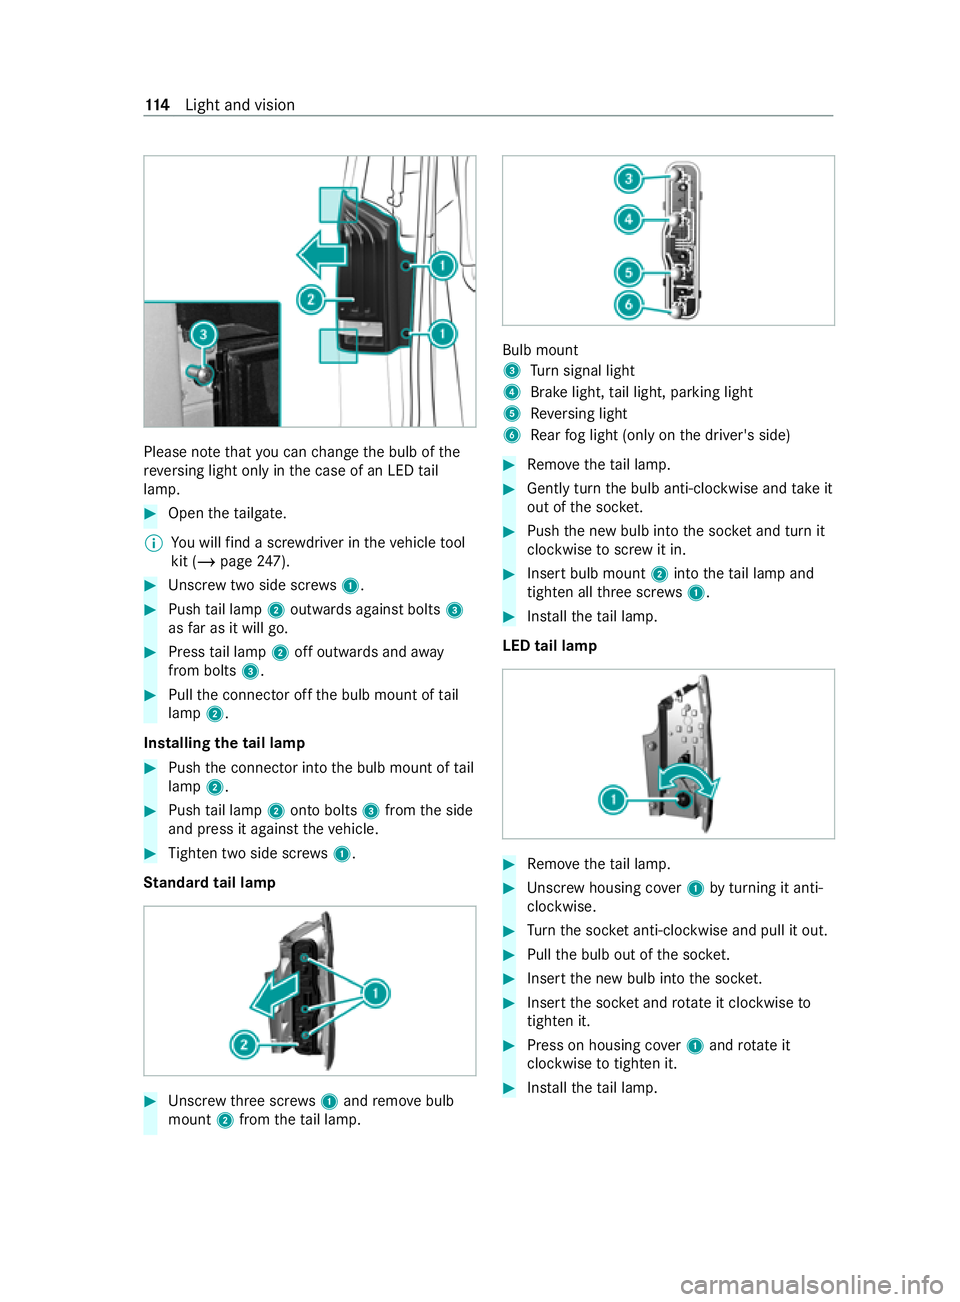
Please no
tethat you can change the bulb of the
re ve rsing light only in the case of an LED tail
lamp. #
Open theta ilgate.
% Yo
u will find a scr ewdriver in theve hicle tool
kit (/ page247). #
Unscr ewtwo side scre ws1. #
Push tail lamp 2outwards against bolts 3
as far as it will go. #
Press tail lamp 2off outwards and away
from bolts 3. #
Pull the connector off the bulb mount of tail
lamp 2.
Installing the tail lamp #
Push the connector into the bulb mount of tail
lamp 2. #
Push tail lamp 2onto bolts 3from the side
and press it against theve hicle. #
Tighten two side scr ews1.
St andard tail lamp #
Unscr ewthre e scr ews1 and remo vebulb
mount 2from theta il lamp. Bulb mount
3
Turn signal light
4 Brake light, tail light, parking light
5 Reversing light
6 Rear fog light (only on the driver's side) #
Remo vetheta il lamp. #
Gently turn the bulb anti-clockwise and take it
out of the soc ket. #
Push the new bulb into the soc ket and turn it
clo ckwise toscr ew it in. #
Insert bulb mount 2into theta il lamp and
tigh ten all thre e scr ews1. #
Installth eta il lamp.
LED tail lamp #
Remo vetheta il lamp. #
Unscr ewhousing co ver1 byturning it anti-
clo ckwise. #
Turn the soc ket anti-clo ckwise and pull it out. #
Pull the bulb out of the soc ket. #
Inse rtthe new bulb into the soc ket. #
Inse rtthe soc ket and rotate it clockwise to
tighten it. #
Press on housing co ver1 and rotate it
clockwise totighten it. #
Installth eta il lamp. 11 4
Light and vision
Page 118 of 337
Re
placing interior light bulbs Re
placing light sou rces in the interior
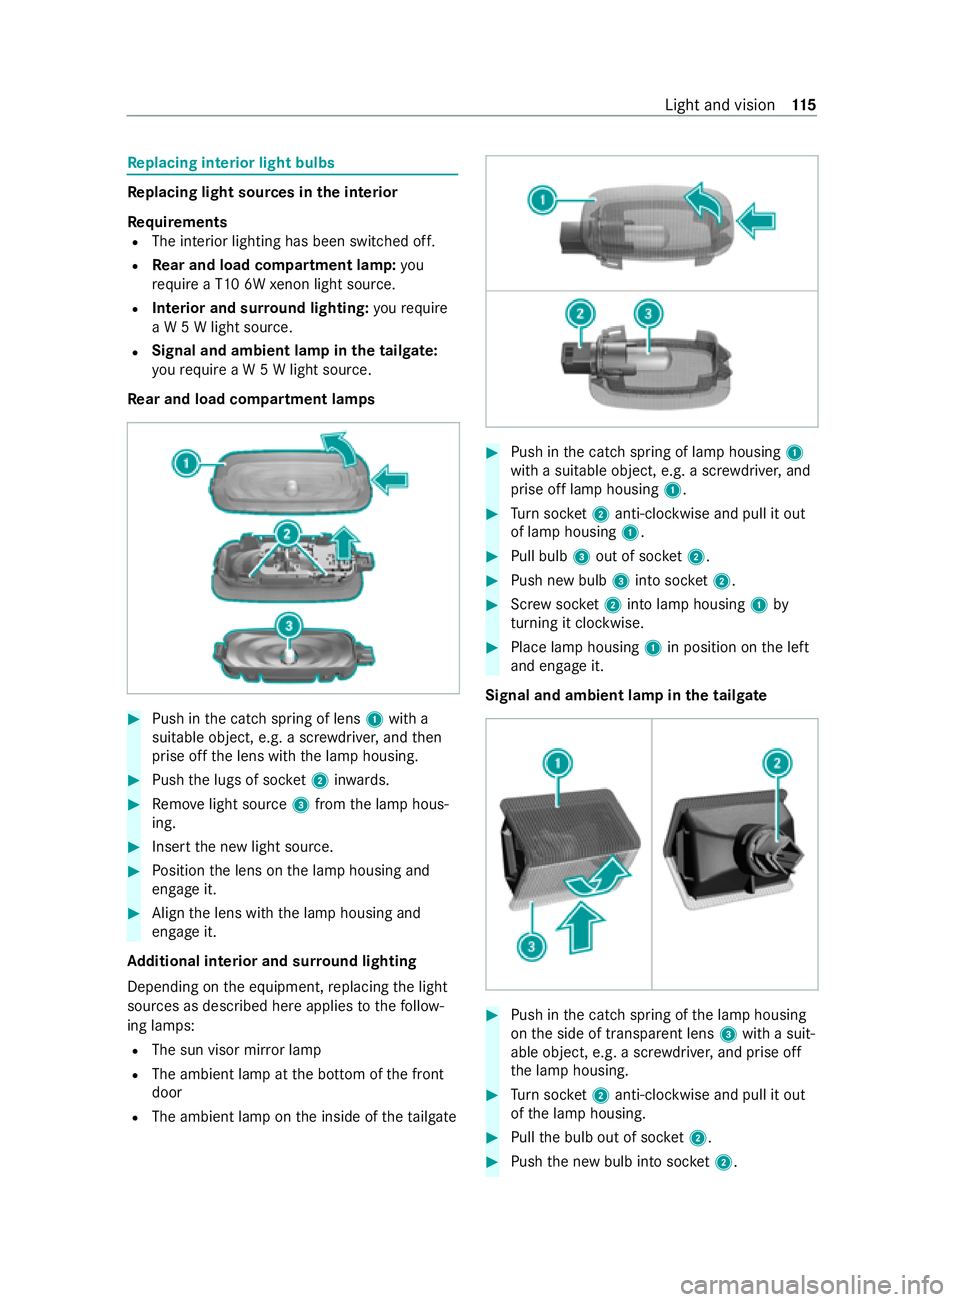
Re quirements
R The interior lighting has been switched off.
R Rear and load comp artment lamp:you
requ ire a T10 6W xenon light sou rce.
R Interior and sur round lighting: yourequ ire
a W 5 W light source.
R Signal and ambient lamp in
the tailgate:
yo ure qu ire a W 5 W light source.
Re ar and load comp artment lamps #
Push in the catch spring of lens 1with a
suitable object, e.g. a scr ewdriver, and then
prise off the lens with the lamp housing. #
Push the lugs of soc ket2 inwa rds. #
Remo velight source 3from the lamp hous‐
ing. #
Insert the new light source. #
Position the lens on the lamp housing and
engage it. #
Align the lens with the lamp housing and
engage it.
Ad ditional interior and sur round lighting
Depending on the equipment, replacing the light
sources as described here applies tothefo llow‐
ing lamps:
R The sun visor mir ror lamp
R The ambient lamp at the bottom of the front
door
R The ambient lamp on the inside of theta ilgate #
Push in the catch spring of lamp housing 1
with a suitable object, e.g. a scr ewdriver, and
prise off lamp housing 1. #
Turn soc ket2 anti-clo ckwise and pull it out
of lamp housing 1. #
Pull bulb 3out of soc ket2. #
Push new bulb 3into soc ket2. #
Screw soc ket2 into la mphousing 1by
turning it clo ckwise. #
Place lamp housing 1in position on the left
and engage it.
Signal and ambient lamp in the tailgate #
Push in the catch spring of the lamp housing
on the side of transparent lens 3with a suit‐
able object, e.g. a scr ewdriver, and prise off
th e lamp housing. #
Turn soc ket2 anti-clo ckwise and pull it out
of the lamp housing. #
Pull the bulb out of soc ket2. #
Push the new bulb into soc ket2. Light and vision
11 5
Page 304 of 337

Display messages
Possible causes/consequences and 0050 0050Solutions
003B
inoperative Refuel vehi-
cle *T
here is too little fuel in the fuel tank.The hot-water auxiliary heater
(s ta tionary hea ter) cannot be switched on. #
Refuel theve hicle.
003B
inoperative See Owner's
Man. *T
he hot-water auxiliary heater (stationary hea ter) is malfunctioning. #
When theve hicle is stationary on a le vel sur face and the engine
has cooled down, make up tofour attem ptsto switch on the hot-
wate r auxiliary heater (stationary hea ter), wa iting se veral
minutes between each attem pt (/ page 128).
If th e hot-wate r auxiliaryheater (stationary hea ter) does not switch
on: #
Consult a qualified specialist workshop. Lights
Display messages
Possible causes/consequences and 0050 0050Solutions
0049
Left dipped beam (exa m‐
ple) *T
he cor responding light source is defective.
Ha ve defective LED lights replaced at a qualified specialist work‐
shop. #
Obser vethe no tes on changing a bulb (/ page111). #
Replace the defective bulb at the front (/ page112) or rear
(/ page 113).
% Ve
hicles with LED lights on the trailer: if the cur rent falls below
th e minimum of 50 mA, a display message may appear even
th ough the trailer lights are working proper ly.
Adaptive Main-beam
Assist inoperative *A
daptive Highbeam Assist is malfunctioning. #
Switch high beam on/off manually. #
Consult a qualified specialist workshop.
Adaptive Main-beam
Assist currently unavaila-
ble See Owner's Manual *A
daptive Highbeam Assist is deactivated and temp orarily inopera‐
tive.
The following causes are possible:
R The windsc reen is dirty in the camera's field of vision.
R Visibility is impaired due toheavy rain, snow or fog. #
Clean the windscreen.
When the sy stem de tects that the camera is fully operational,
th e display will show the message Adaptive Main-beam Assist
available again
Ad aptive Highbeam Assist is operational again.
Active Light System inop-
erative *T
he active light function is faulty. #
Consult a qualified specialist workshop. Display messages and
warning and indicator lamps 301
Page 317 of 337
Seat belt............................................. 230
Seat co
ver.......................................... 230
Senso rs.............................................. 229
Ta ilpipes............................................ .229
Tr ailer hit ch........................................ 229
Wa shing byhand................................ 228
Wheels/rims......................................2 29
Wi ndo ws............................................ 229
Wi per blades...................................... 229
Carpet (care)........................................... 230
Car rier sy stems
No tes.................................................. 219
Centre console Between the seats (o verview).............. .12
Lo we r section (o verview)..................... .11
Middle section (o verview).................... .10
St ow age compartment......................... 96
To p (o verview)....................................... .9
Changing a bulb see Changing bulbs
Changing a wheel Lowe ring theve hicle........................... 261
Preparing...........................................2 59
Ra ising theve hicle.............................2 59
Re moving a wheel. ............................. 260
Changing bulbs Light bulb types haloge n headlamps...11 2
No tes.................................................. 111
Changing lamps see Changing bulbs
Cha rging
Bat tery ............................................... 237
Child saf ety lock
Hinged windo ws................................... 48
Child saf ety lock (doors) .......................... 47
Child seat App rova l categories.............................. 40
At tach ing (no tes)..................................40
Basic instructions................................. 37
Fr ont passenger seat (no tes)................46
Fr ont passenger seat (without
automatic airbag shutoff)..................... 45
ISOFIX (fitting)...................................... 42
No tes on risks and dangers.................. 37
Re commended child restra int sys‐
te ms..................................................... 39
Seats suita blefor belt-secu red
ch ild restra int sy stems......................... 44
Seats suitable for ISOFIX child
re stra int sy stems.................................. 41
Secu ring on the co-driver seat.............46
Secu ring on there ar seat.................... .45To
pTe ther............................................ 43
Children Avoiding dangers in theve hicle............ 37
Basic instructions................................. 37
Cigar ette lighter
Fr ont centre console.......................... 102
Cleaning see Care
Climate control Activating/deactivating...................... 12 2
Ac tivating/deactivating ai r-re circu‐
lation mode........................................ 124
Ad justing the air vents........................ 12 6
Air di stribution settings......................1 23
Au xilia ryheating................................. 12 6
Au xilia rywa rm-air hea ter.................... 13 0
Demi sting the windscreen.................. 124
Demi sting windo ws............................. 124
Hot-water auxiliary hea ter.................. 127
Re frigerant......................................... 275
Setting auto matic mode.................... .123
Setting the air distribution.................. 12 3
Setting the air flow .............................. 12 3
Setting thete mp eratur e..................... 124
Switching residual heat utilisation
on/off................................................1 25
Switching the A/C function on/of f.... 12 2
Switching there ar wind owheater
on/off................................................1 25
Switching there set function
on/off (control panel)......................... 124
TEMPMATIC contro l panel.................. 12 0
THERMOTRONIC contro l panel...........121
Ve ntilating theve hicle (con veni‐
ence opening)...................................... 62
Co-driver airbag shutoff see Automatic co-driver airbag shutoff
Cockpit (o verview) .................................... .6
Combination switch see Headlamp flasher
see High beam
see Indicator
Comfort rear ben chseat
Ad justing the seat backres t.................. 79
Constant headlamp mode see Daytime running lights
Co nvenience closing ................................ 63
Con venience opening .............................. 62
Con venience opening/closing ..............12 5
Con versions .............................................. 17314
Index
Page 326 of 337
Re
ar seat
Ad justing the seat backres t.................. 82
EAS Y-ENTRY easy entry and exit
fe atur e.................................................. 81
Fo lding forw ards and backwards.......... 83
In stalling and removing........................ 84
Moving................................................. 82
Re ar seats
No tes....................................................74
Seat anchorage.................................... 74
Seating variants................................... .74
Re ar window
Sepa rately opening and closing............ 60
Re ar window wiper
Re placing............................................ 11 8
Switching on/of f................................. 11 6
Re cycling
see Take -ba ckof end-of-life vehi‐
cles (environmental pr otection)
Re ducing agent
see AdBlue ®
Re frigerant (air conditioning)
No tes.................................................. 275
Re frigerator box
Switching on and off.......................... 104
Re fuel
To pping up AdBlue ®
........................... 14 9
Re fuelling
Displaying theAd Blue ®
leve l.............. 14 9
Re fuelling theve hicle.......................... 147
Re gistration
Ve hicle................................................. 22
Re gulating headlamp range .................. 106
Re mo tecont rol (stationa ryheat‐
ing/ventilation)
Displ ays.............................................. 12 9
Re placing the battery.................1 29,13 3
Setting........................................ 128, 13 2
Re placing a wheel
Fitting a new wheel............................. 261
Re placing bulbs
Ta il lamp types.................................... 11 3
Ta il lamps............................................ 11 3
Re placing light sources
Daytime running lights........................ 11 2
Fitting/removing co ver (front
wheel ar ch)......................................... 11 2
High beam.......................................... 11 2
Low beam........................................... 11 2
Re ar and load compartment lamps.... .115 St
anding/parking lights..................... .112
Sur round lighting................................ 11 5
Tu rn signal light...................................1 12
Re scue card.............................................. 24
Re set function (MBUX multimedia
sy stem)................................................... 200
Re set function (MBUX multimedia
sy stem)
see Reset function (MBUX multi‐
media sy stem)
Re setting (factory setting)
see Reset function (MBUX multi‐
media sy stem)
Re setting the trip compu ter.................. 184
Re sidual heat utilisation
Switching on/off................................1 25
Restra int system
Basic instructions forch ildren.............. 37
Fu nction in an accident........................ 27
Fu nctionality......................................... 27
Malfunction.......................................... 27
Pr otection impaired.............................. 27
Pr otection pr ovided.............................. 27
Self-test................................................ 27
Wa rning lamps...................................... 27
Rest ricting the shift range.................... 14 3
Re versing camera
Care.................................................. .229
Fu nction............................................. 167
Opening the camera co ver (360°
Camera)............................................. 16 9
Ro llaw ay protection
see HOLD function
Ro ller sunblind
Pa norama sliding sunroof.................... .65
Ro of car rier
see Roof luggage rack
Ro of lining (care) .................................... 230
Ro of luggage rack.................................. 278
Ro ute
Calculating......................................... 203
Selecting options............................... 203
Ru nning-in no tes.................................... 13 6 S
Saf ety sy stems
see Driving saf ety sy stem
Saf etyve st.............................................. 232 Index
323
Page 328 of 337

Smartphone
see Smartphone integration
see Telephone
Sma rtphone integ ration
Overview............................................ 207
Snow chains........................................... 250
Soc ket (12 V)
Fr ont centre console.......................... 102
Re ar.................................................... 103
Soc ket (230 V)
Re ar.................................................... 103
Software update System updates..................................1 97
Sound menu Functions overview............................. 211
Spare wheel Fitting/removing................................2 65
No tes.................................................2 65
Speciali stwo rkshop
see Qualified specialist workshop
Specific absor ption rate .......................... 19
Speed limitation, winter tyres Setting................................................1 60
Speedome ter.......................................... 180
St andard
see Lane Keeping Assist
St anding light......................................... 105
St anding/parking lights
Re placing light sources.......................1 12
St arting assi stance
see Jump -sta rt connection point
St arting-o ffaid
see Hill start assist
St ationary heater
see Auxilia ryheating
St ationary heating
see Auxilia rywa rm-air hea ter
St ationary heating/ventilation
Displ ays (remo tecontrol)................... 12 9
Setting (remo tecontrol)............. 128, 13 2
St ationary heating/ventilation
see Auxilia rywa rm-air hea ter
see Hot-water auxiliary heater
Ste ering wheel
Ad justing.............................................. 96
Ste ering wheel gearshift paddles......... 14 5
Ste ering-wheel but tons ............................. 8 St
op/start function
see ECO start/ stop function
St opping the ala rm(ATA ) ......................... 67
St ow age comp artment in there ar
Jack .................................................... 247
Ve hicle tool kit.................................... 247
St ow age space
Glasses compartment.......................... 97
Suggestions Configuring......................................... 197
Sulphur content.....................................2 70
Summer tyres ......................................... 24 9
Sur round lighting
Switching on/of f................................ 11 0
Suspension see AIRMATIC
SV HC (substances of very high con‐
cern) .......................................................... 23
Switch clock Overview............................................ 13 0
Switch-off delay time Exterior............................................... 11 0
Interior................................................ 111
Switching on the ignition ...................... 13 6
Switching seat heating on/off ................94
Switching the A/C function on/off ......12 2
Switching there ar window heater
on/off...................................................... 12 5
Switching there set function on/off
(control panel) ........................................1 24
Sy stem settings
Overview of the sy stem settings
menu..................................................1 97
Re set function (MBUX multimedia
sy stem).............................................. 200
Sy stem settings
see Language T
Ta ble
see Folding table
Ta il lamps (replacing bulbs) ...................113
Ta ilgate
Ad justing.............................................. 60
EAS Y-PA CK ........................................... 58
Limiting the opening angle...................60
Opening and closing.............................58
Opening in an emer gency..................... 58 Index
325