Mercury Mercury Cougar 2002 Workshop Manual
Manufacturer: MERCURY, Model Year: 2002, Model line: Mercury Cougar, Model: Mercury Mercury Cougar 2002Pages: 216, PDF Size: 4.04 MB
Page 51 of 216

BULBS
Replacing exterior bulbs
Check the operation of the following lamps frequently:
²Headlamps
²Tail lamps
²Brakelamps
²High-mount brakelamp
²Turn signal lamps
²Backup lamps
²License plate lamp
Do not remove lamp bulbs unless they will be replaced immediately. If a
bulb is removed for an extended period of time, contaminants may enter
the lamp housings and affect performance.
Using the right bulbs
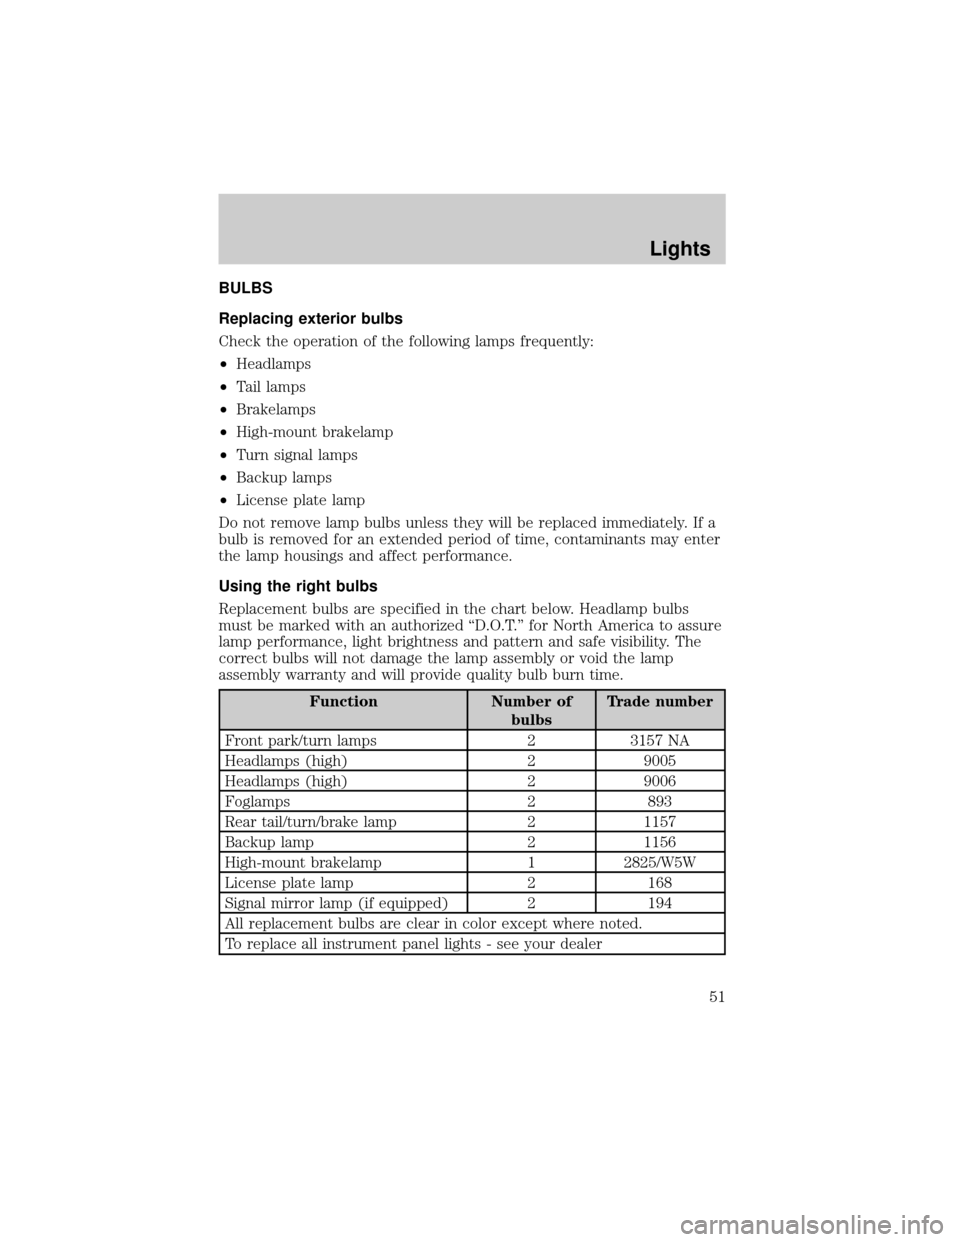
Replacement bulbs are specified in the chart below. Headlamp bulbs
must be marked with an authorized ªD.O.T.º for North America to assure
lamp performance, light brightness and pattern and safe visibility. The
correct bulbs will not damage the lamp assembly or void the lamp
assembly warranty and will provide quality bulb burn time.
Function Number of
bulbsTrade number
Front park/turn lamps 2 3157 NA
Headlamps (high) 2 9005
Headlamps (high) 2 9006
Foglamps 2 893
Rear tail/turn/brake lamp 2 1157
Backup lamp 2 1156
High-mount brakelamp 1 2825/W5W
License plate lamp 2 168
Signal mirror lamp (if equipped) 2 194
All replacement bulbs are clear in color except where noted.
To replace all instrument panel lights - see your dealer
Lights
51
Page 52 of 216

Replacing headlamp bulbs
Make sure the headlamp switch is in the OFF position.
To remove the high or low beam headlamp bulb:
1. Lift the hood and release the wire
clip on the rear of the headlamp
assembly and remove the cover.
2. Disconnect the electrical
connector by turning the bulb
holder counterclockwise.
3. Pull the bulb holder straight out
to remove the bulb.
To install the new bulb:
Handle a halogen headlamp bulb carefully and keep out of
children's reach. Grasp the bulb by only its plastic base and do
not touch the glass. The oil from your hand could cause the bulb to
break the next time the headlamps are operated.
Note:If the bulb is accidentally touched, it should be cleaned with
rubbing alcohol before being used.
1. Install the new bulb in the lamp assembly by pushing it straight in and
turning to lock it in position. You may need to turn the bulb slightly to
align the grooves in the plastic base with the tabs in the lamp assembly.
Lights
52
Page 53 of 216

2. Connect the electrical connector to the bulb.
3. Install the protective cover and secure it with the wire clips.
4. Turn the headlamps on and make sure they work properly. if the
headlamp was correctly aligned before you changed the bulb, you need
to align it again.
Replacing front parking lamp/turn signal bulbs
1. Remove the headlamp assembly
cover.
2. Turn the bulb holder counter
clockwise.
3. Remove the bulb socket by
pulling it straight out from the lamp
assembly.
4. Pull the bulb straight out of the
socket and press in the new bulb.
5. Install the bulb socket into the
lamp assembly by turning clockwise.
Replacing side marker lamps
1. Push the complete light assembly
to the front and pull it out.
2. Remove the socket from the
assembly by turning it counter
clockwise.
3. Pull the bulb straight out and
replace it.
4. Install the bulb socket into the
assembly by turning it clockwise.
Replacing brake/turn signal/tail/backup lamps
The brake, turn signal, tail and backup lamps bulbs are located in the
same portion of the tail lamp assembly. Follow the same steps to replace
either bulb.
Lights
53
Page 54 of 216

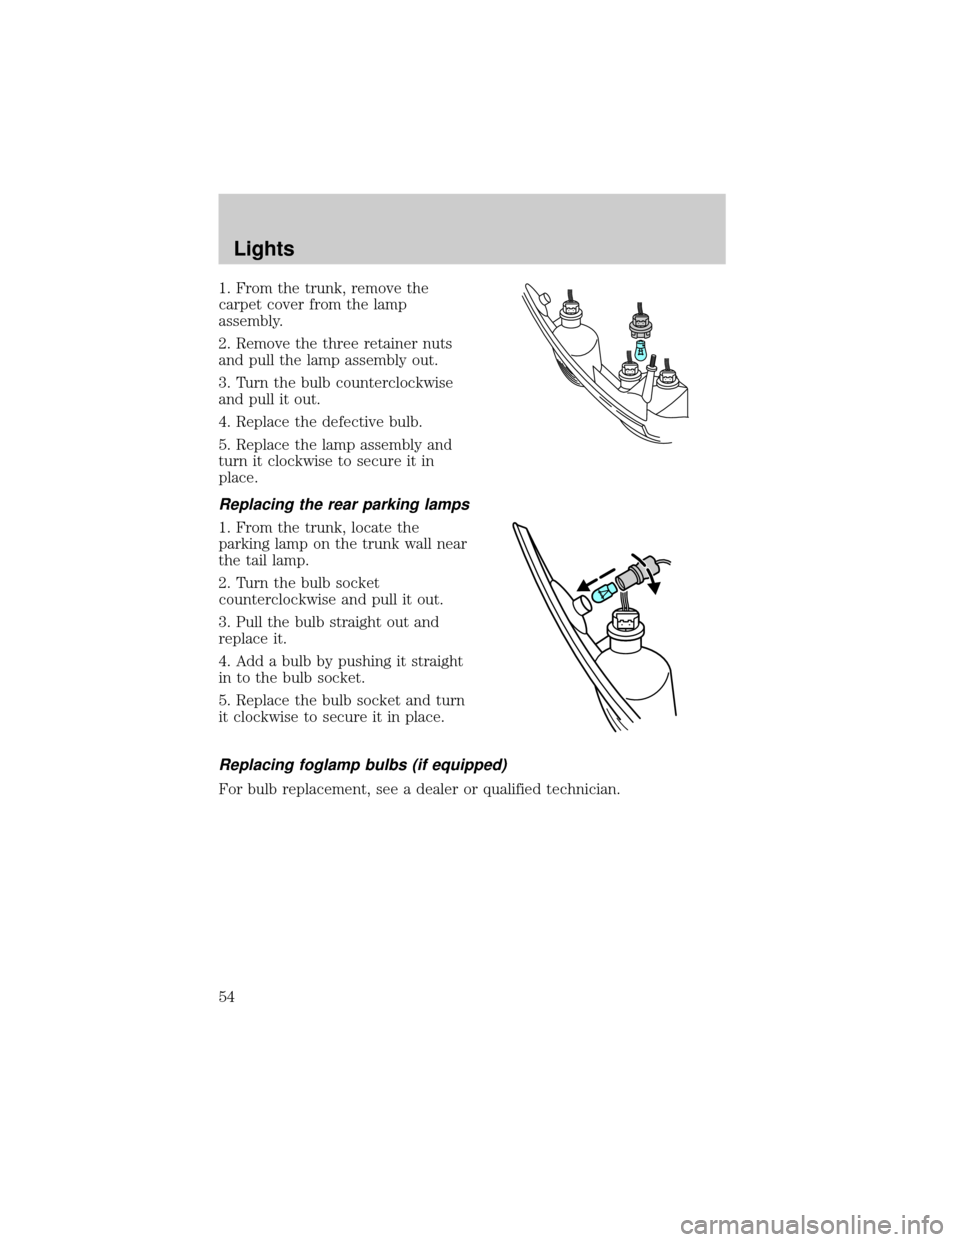
1. From the trunk, remove the
carpet cover from the lamp
assembly.
2. Remove the three retainer nuts
and pull the lamp assembly out.
3. Turn the bulb counterclockwise
and pull it out.
4. Replace the defective bulb.
5. Replace the lamp assembly and
turn it clockwise to secure it in
place.
Replacing the rear parking lamps
1. From the trunk, locate the
parking lamp on the trunk wall near
the tail lamp.
2. Turn the bulb socket
counterclockwise and pull it out.
3. Pull the bulb straight out and
replace it.
4. Add a bulb by pushing it straight
in to the bulb socket.
5. Replace the bulb socket and turn
it clockwise to secure it in place.
Replacing foglamp bulbs (if equipped)
For bulb replacement, see a dealer or qualified technician.
Lights
54
Page 55 of 216

Replacing high-mount brake
lamp bulbs
1. Remove the push pins and cover
from the liftgate. (To remove the
push pins, press the two tabs of the
push pin insert inward and pull the
insert out.)
2. Turn the bulb socket
counterclockwise.
3. Pull the bulb straight out of the
socket and push in the new bulb.
To install the lamp assembly:
1. Install the bulb into the lamp assembly and turn it clockwise
2. Replace the cover and the push pins.
Replacing the luggage compartment lamp
1. Remove the light assembly from
the underside of the liftgate.
2. Turn the spherical bulb (with
slight pressure) counterclockwise to
remove.
3. To replace the bulb, insert bulb
and turn it clockwise to secure in
place.
Lights
55
Page 56 of 216

Replacing interior lamps
1. Switch off the interior lamps
(middle switch position).
2. Open the lamp assembly.
3. Release the reflector at the side.
4. Pull out and replace the bulb.
Replacing reading bulbs (if equipped)
1. Open the reading lamp assembly.
2. Pull the bulb straight out and
replace it.
3. After the bulb has been replaced,
close the lamp assembly.
Lights
56
Page 57 of 216

WINDSHIELD WIPER/WASHER CONTROLS
Lift the windshield wiper control to
the desired interval.
²Intermittent: push lever up to the
first position.
²Low: push lever up to the second
position.
²High: push lever up to the third
position.
For a single wipe, push the lever
downward.
Intermittent wiper control
Rotate the variable intermittent
wiper control to the desired speed.
²1 = Short time interval
²6 = Extended time interval
Washer
Pull the lever toward the steering
wheel. The washer operates in
conjunction with the windshield
wipers.
REAR WINDOW WIPER/WASHER (IF EQUIPPED)
Wiper
To turn it on, push the wiper
control inward. Push the control in
again to turn it off.
Washer
Push the lever away from the
steering wheel.
Driver Controls
57
Page 58 of 216

WINDSHIELD WIPER BLADES
Check the wiper blades for wear at least twice a year or when they seem
less effective. Substances such as tree sap and some hot wax treatments
used by commercial car washes reduce the effectiveness of wiper blades.
CHECKING WIPER BLADES
Check the wiper blades on your
vehicle for roughness by running the
tip of your fingers over the edge of
the blade.
Traces of grease, silicone and fuel
also prevent wiper blades from
functioning properly. Clean the
blades regularly using a damp cloth
or sponge soaked with diluted
windscreen or car wash detergent.
Change the wiper blades on your vehicle at least once a year.
CHANGING THE WIPER BLADES
To replace the wiper blades:
1. Pull the wiper arm away from the
windshield and lock into the service
position.
2. Turn the blade at an angle from
the wiper arm. Push the lock pin
manually to release the blade and
pull the wiper blade down toward
the windshield to remove it from the
arm.
3. Attach the new wiper to the
wiper arm and press it into place
until a click is heard.
Driver Controls
58
Page 59 of 216

TILT STEERING WHEEL
Pull the locking lever on the
steering column cover up to adjust
the steering column position. Secure
the wheel by releasing the locking
lever.
Never adjust the steering
wheel when the vehicle is
moving.
HORN
Press the pad in the middle of the
steering wheel.
Driver Controls
59
Page 60 of 216

CLOCK
The clock can be set to either a 12 hour or a 24 hour format.
Press the CLOCK button until it
flashes.
Press the UNITS button once to
display 12HR. Press the RESET
button to toggle between 12 and 24
HR.
Press the UNITS button until the
hour flashes. Press the RESET
button to set the hour.
Press the UNITS button until the
minutes flash. Press the RESET button to set the minutes.
Press the CLOCK button to store the time.
POWER WINDOWS
Press and hold the rocker switches to open and close windows.
²Press the top portion of the
rocker switch to close.
²Press the bottom portion of the
rocker switch to open.
POWER SIDE VIEW MIRRORS
The power mirrors can be operated at any time.
Driver Controls
60