display Mercury Milan Hybrid 2010 s Service Manual
[x] Cancel search | Manufacturer: MERCURY, Model Year: 2010, Model line: Milan Hybrid, Model: Mercury Milan Hybrid 2010Pages: 329, PDF Size: 2.39 MB
Page 61 of 329
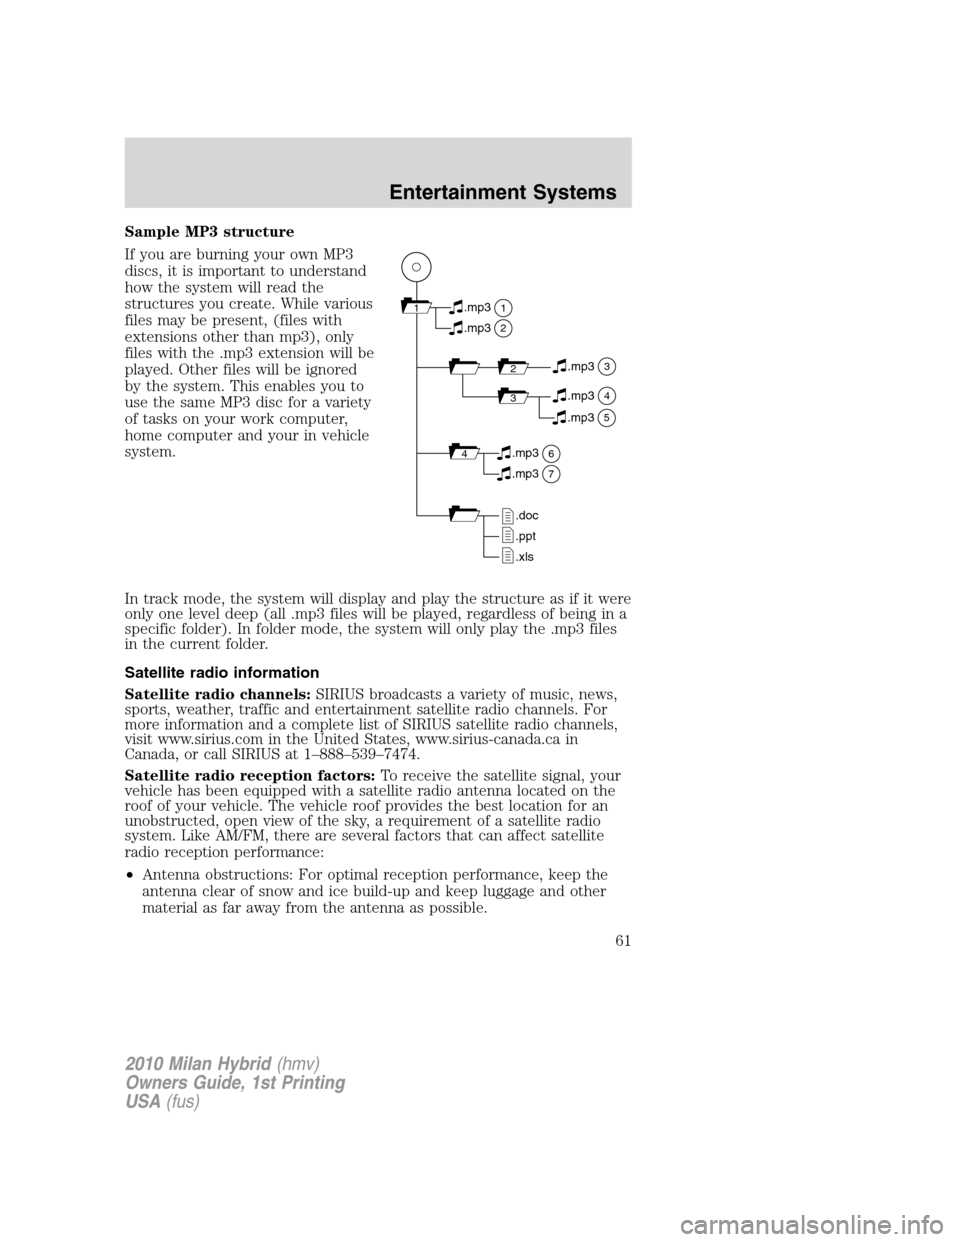
Sample MP3 structure
If you are burning your own MP3
discs, it is important to understand
how the system will read the
structures you create. While various
files may be present, (files with
extensions other than mp3), only
files with the .mp3 extension will be
played. Other files will be ignored
by the system. This enables you to
use the same MP3 disc for a variety
of tasks on your work computer,
home computer and your in vehicle
system.
In track mode, the system will display and play the structure as if it were
only one level deep (all .mp3 files will be played, regardless of being in a
specific folder). In folder mode, the system will only play the .mp3 files
in the current folder.
Satellite radio information
Satellite radio channels:SIRIUS broadcasts a variety of music, news,
sports, weather, traffic and entertainment satellite radio channels. For
more information and a complete list of SIRIUS satellite radio channels,
visit www.sirius.com in the United States, www.sirius-canada.ca in
Canada, or call SIRIUS at 1–888–539–7474.
Satellite radio reception factors:To receive the satellite signal, your
vehicle has been equipped with a satellite radio antenna located on the
roof of your vehicle. The vehicle roof provides the best location for an
unobstructed, open view of the sky, a requirement of a satellite radio
system. Like AM/FM, there are several factors that can affect satellite
radio reception performance:
•Antenna obstructions: For optimal reception performance, keep the
antenna clear of snow and ice build-up and keep luggage and other
material as far away from the antenna as possible.
11
2
.mp3
2.mp3
3.mp3
34.mp3
64.mp3
7.mp3
.doc
.ppt
.xls
5.mp3
2010 Milan Hybrid(hmv)
Owners Guide, 1st Printing
USA(fus)
Entertainment Systems
61
Page 62 of 329
•Terrain: Hills, mountains, tall buildings, bridges, tunnels, freeway
overpasses, parking garages, dense tree foliage and thunderstorms can
interfere with your reception.
•Station overload: When you pass a ground based broadcast repeating
tower, a stronger signal may overtake a weaker one and result in an
audio mute.
Unlike AM/FM audible static, you will hear an audio mute when there is
a satellite radio signal interference. Your radio display may display NO
SIGNAL to indicate the interference.
SIRIUS satellite radio service:SIRIUS Satellite Radio is a subscription
based satellite radio service that broadcasts music, sports, news and
entertainment programming. A service fee is required in order to receive
SIRIUS service. Vehicles that are equipped with a factory installed
SIRIUS Satellite Radio system include:
•Hardware and limited subscription term, which begins on the date of
sale or lease of the vehicle.
•Use of online media player providing access to all SIRIUS music
channels over the internet using any computer connected to the
internet (U.S. customers only)
For information on extended subscription terms, contact SIRIUS at
1–888–539–7474.
Note:SIRIUS reserves the unrestricted right to change, rearrange, add
or delete programming including canceling, moving or adding particular
channels, and its prices, at any time, with or without notice to you. Ford
Motor Company shall not be responsible for any such programming
changes.
2010 Milan Hybrid(hmv)
Owners Guide, 1st Printing
USA(fus)
Entertainment Systems
62
Page 63 of 329
Satellite Radio Electronic Serial Number (ESN):This 12-digit
Satellite Serial Number is needed to activate, modify or track your
satellite radio account. You will need this number when communicating
with SIRIUS. While in Satellite Radio mode, you can view this number on
the radio display by pressing the SIRIUS and Preset 1 buttons at the
same time.
Radio Display Condition Action Required
ACQUIRING Radio requires
more than two
seconds to
produce audio for
the selected
channel.No action required. This
message should disappear
shortly.
SAT FAULT Internal module
or system failure
present.If this message does not clear
within a short period of time, or
with an ignition key cycle, your
receiver may have a fault. See
your authorized dealer for
service.
INVALID CHNL Channel no
longer available.This previously available channel
is no longer available. Tune to
another channel. If the channel
was one of your presets, you
may choose another channel for
that preset button.
UNSUBSCRIBED Subscription not
available for this
channel.Contact SIRIUS at
1–888–539–7474 to subscribe to
the channel or tune to another
channel.
NO TEXT Artist information
not available.Artist information not available
at this time on this channel. The
system is working properly.
NO TEXT Song title
information not
available.Song title information not
available at this time on this
channel. The system is working
properly.
2010 Milan Hybrid(hmv)
Owners Guide, 1st Printing
USA(fus)
Entertainment Systems
63
Page 64 of 329
Radio Display Condition Action Required
NO TEXT Category
information not
available.Category information not
available at this time on this
channel. The system is working
properly.
NO SIGNAL Loss of signal
from the SIRIUS
satellite or
SIRIUS tower to
the vehicle
antenna.You are in a location that is
blocking the SIRIUS signal (i.e.,
tunnel, under an overpass,
dense foliage, etc). The system
is working properly. When you
move into an open area, the
signal should return.
UPDATING Update of
channel
programming in
progress.No action required. The process
may take up to three minutes.
CALL SIRIUS
1–888–539–7474Satellite service
has been
deactivated by
SIRIUS Satellite
Radio.Call SIRIUS at 1–888–539–7474
to re-activate or resolve
subscription issues.
NAVIGATION SYSTEM (IF EQUIPPED)
Your vehicle may be equipped with a navigation system. Refer to the
Navigation systemsupplement for further information.
SYNC
Your vehicle is equipped with SYNC, a hands-free communications and
entertainment system with special phone and media features. For more
information, please refer to theSYNCsupplement or to theSYNC
section in theNavigation systemsupplement (if equipped).
2010 Milan Hybrid(hmv)
Owners Guide, 1st Printing
USA(fus)
Entertainment Systems
64
Page 65 of 329
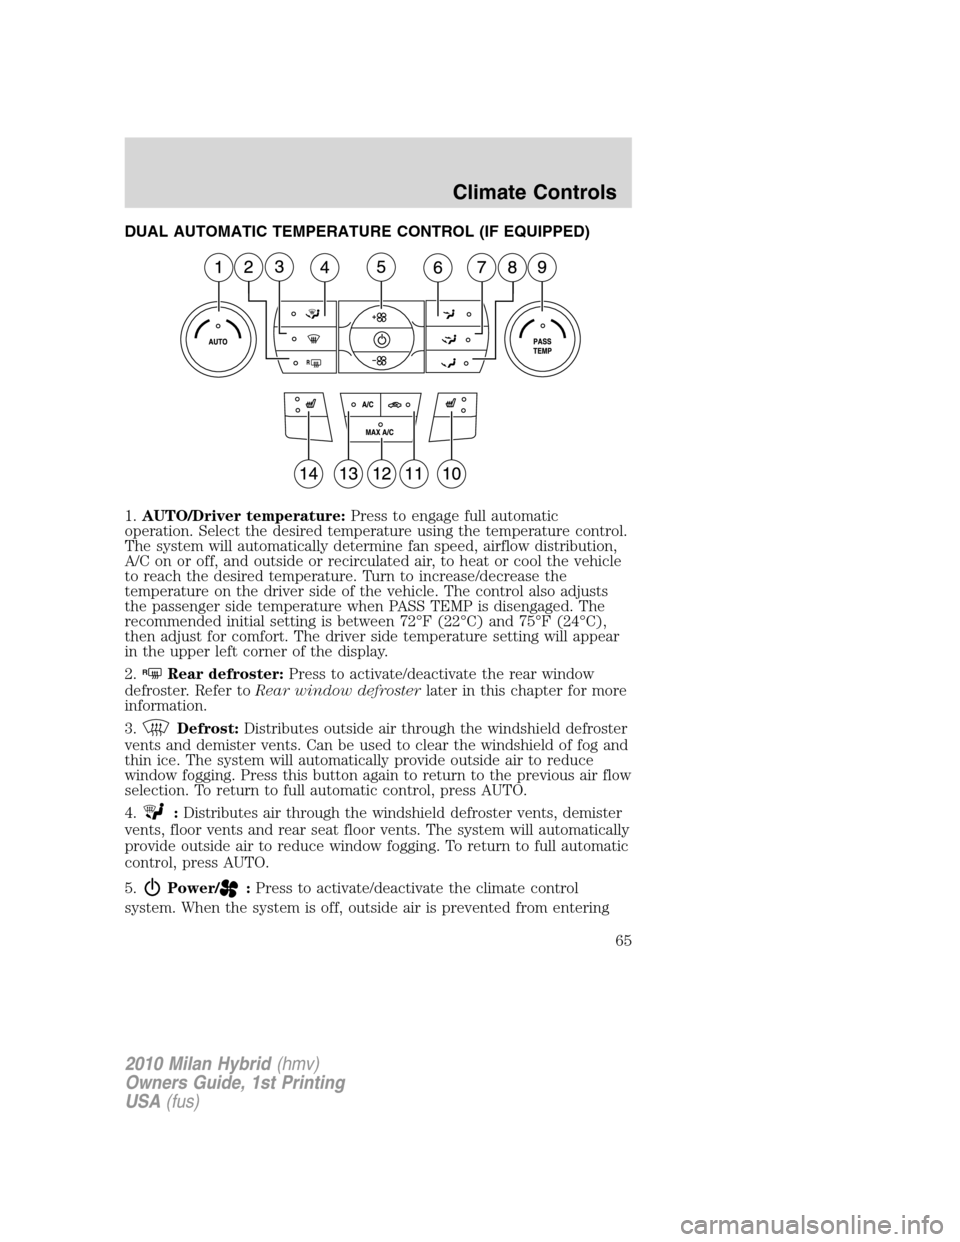
DUAL AUTOMATIC TEMPERATURE CONTROL (IF EQUIPPED)
1.AUTO/Driver temperature:Press to engage full automatic
operation. Select the desired temperature using the temperature control.
The system will automatically determine fan speed, airflow distribution,
A/C on or off, and outside or recirculated air, to heat or cool the vehicle
to reach the desired temperature. Turn to increase/decrease the
temperature on the driver side of the vehicle. The control also adjusts
the passenger side temperature when PASS TEMP is disengaged. The
recommended initial setting is between 72°F (22°C) and 75°F (24°C),
then adjust for comfort. The driver side temperature setting will appear
in the upper left corner of the display.
2.
RRear defroster:Press to activate/deactivate the rear window
defroster. Refer toRear window defrosterlater in this chapter for more
information.
3.
Defrost:Distributes outside air through the windshield defroster
vents and demister vents. Can be used to clear the windshield of fog and
thin ice. The system will automatically provide outside air to reduce
window fogging. Press this button again to return to the previous air flow
selection. To return to full automatic control, press AUTO.
4.
:Distributes air through the windshield defroster vents, demister
vents, floor vents and rear seat floor vents. The system will automatically
provide outside air to reduce window fogging. To return to full automatic
control, press AUTO.
5.
Power/:Press to activate/deactivate the climate control
system. When the system is off, outside air is prevented from entering
2010 Milan Hybrid(hmv)
Owners Guide, 1st Printing
USA(fus)
Climate Controls
65
Page 66 of 329

the vehicle through the vents. Turn to select the desired fan speed
manually. To return to full automatic control, press AUTO.
6.
:Distributes air through the instrument panel vents. To return to
full automatic control, press AUTO.
7.
:Distributes air through the instrument panel vents, demister
vents, floor vents and rear seat floor vents. To return to full automatic
control, press AUTO.
8.
:Distributes air through the demister vents, floor vents and rear
seat floor vents. To return to full automatic control, press AUTO.
9.PASS TEMP (passenger temperature):Press to engage/disengage
separate passenger side temperature control. Turn to increase/decrease
the temperature on the passenger side of the vehicle. The recommended
initial setting is between 72°F (22°C) and 75°F (24°C), then adjust for
comfort. The passenger side temperature setting will appear in the upper
right corner of the display.
10.
Passenger heated seat control (if equipped):Press to
activate/deactivate the passenger heated seat. SeeHeated seatsin the
Seating and Safety Restraintschapter.
11.
Recirculated air:Press to activate/deactivate air recirculation
in the vehicle. Recirculated air may reduce the amount of time needed to
cool down the interior of the vehicle and may also help reduce undesired
odors from reaching the interior of the vehicle. Recirculated air engages
automatically when MAX A/C is selected or can be engaged manually in
any airflow mode except
(defrost). Recirculated air may turn off
automatically in all airflow modes except MAX A/C. When the ignition
switch is turned off and back on, the climate system will return to the
recirculated air mode only if the A/C button LED is illuminated and the
air distribution selection is either
(panel) or(panel/floor).
Recirculation may turn off automatically in some airflow modes to reduce
fog potential.
12.MAX A/C:Activates air conditioning and distributes recirculated,
conditioned air through the instrument panel vents to provide maximum
cooling performance. Maximum cooling performance, however, may
decrease fuel efficiency in order to fully maintain interior cabin comfort.
13.A/C:Press to activate/deactivate air conditioning. Use with
recirculated air to improve cooling performance and efficiency. Engages
automatically in MAX A/C,
(defrost) and(floor/defrost).
2010 Milan Hybrid(hmv)
Owners Guide, 1st Printing
USA(fus)
Climate Controls
66
Page 67 of 329
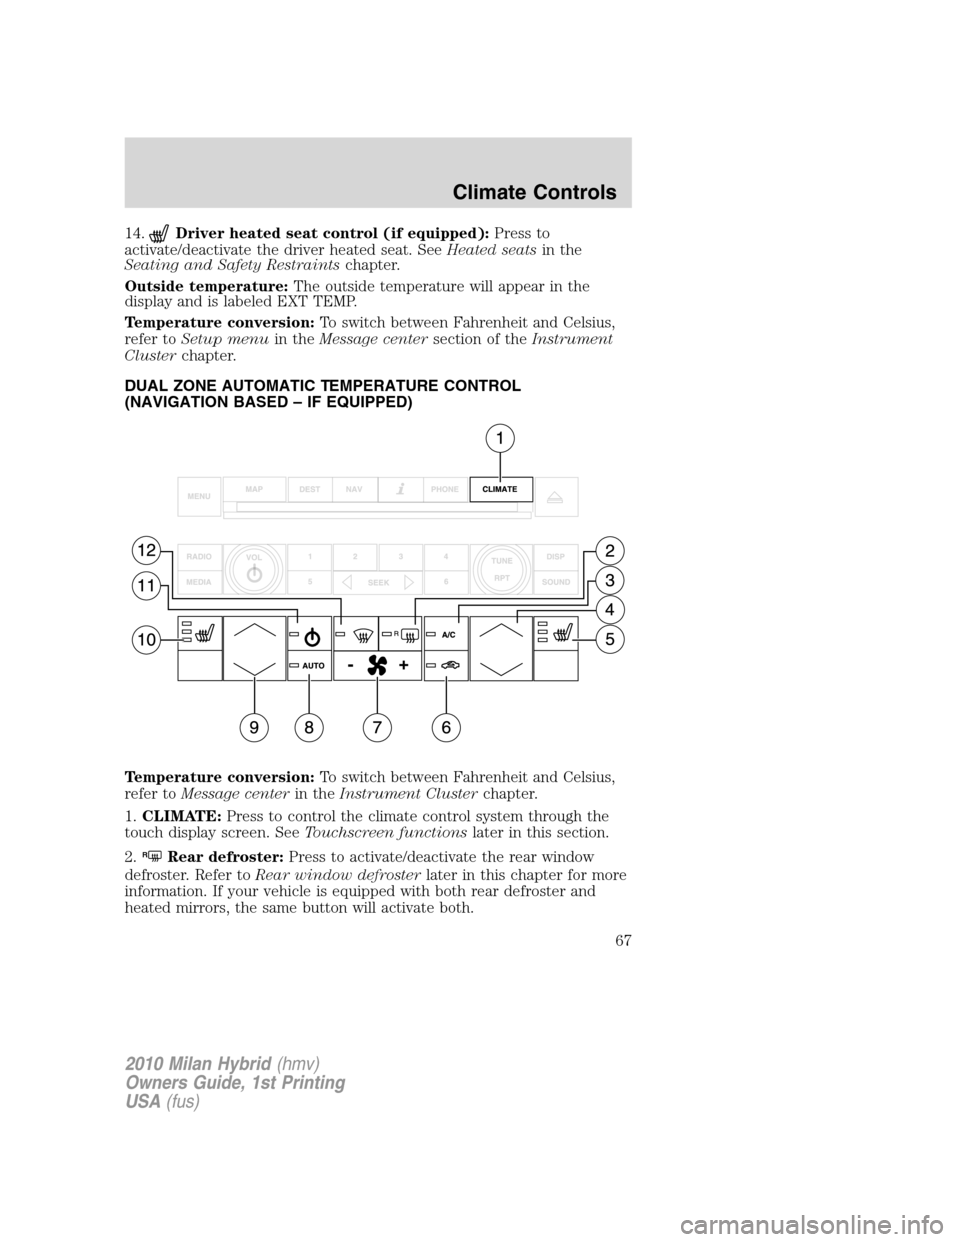
14.Driver heated seat control (if equipped):Press to
activate/deactivate the driver heated seat. See Heated seatsin the
Seating and Safety Restraints chapter.
Outside temperature: The outside temperature will appear in the
display and is labeled EXT TEMP.
Temperature conversion: To switch between Fahrenheit and Celsius,
refer to Setup menu in theMessage center section of theInstrument
Cluster chapter.
DUAL ZONE AUTOMATIC TEMPERATURE CONTROL
(NAVIGATION BASED – IF EQUIPPED)
Temperature conversion: To switch between Fahrenheit and Celsius,
refer to Message center in theInstrument Cluster chapter.
1. CLIMATE: Press to control the climate control system through the
touch display screen. See Touchscreen functionslater in this section.
2.
RRear defroster: Press to activate/deactivate the rear window
defroster. Refer to Rear window defroster later in this chapter for more
information. If your vehicle is equipped with both rear defroster and
heated mirrors, the same button will activate both.
2010 Milan Hybrid (hmv)
Owners Guide, 1st Printing
USA (fus)
Climate Controls
67
Page 75 of 329
Note:If the battery is disconnected, discharged, or a new battery is
installed, the dimmer control requires re-calibration. Press the dimmer
control from the full dim position to the full on position to reset. This
will ensure that your displays are visible under all lighting conditions.
AIMING THE HEADLAMPS
The headlamps on your vehicle are properly aimed at the assembly plant.
If your vehicle has been in an accident, the alignment of your headlamps
should be checked by your authorized dealer.
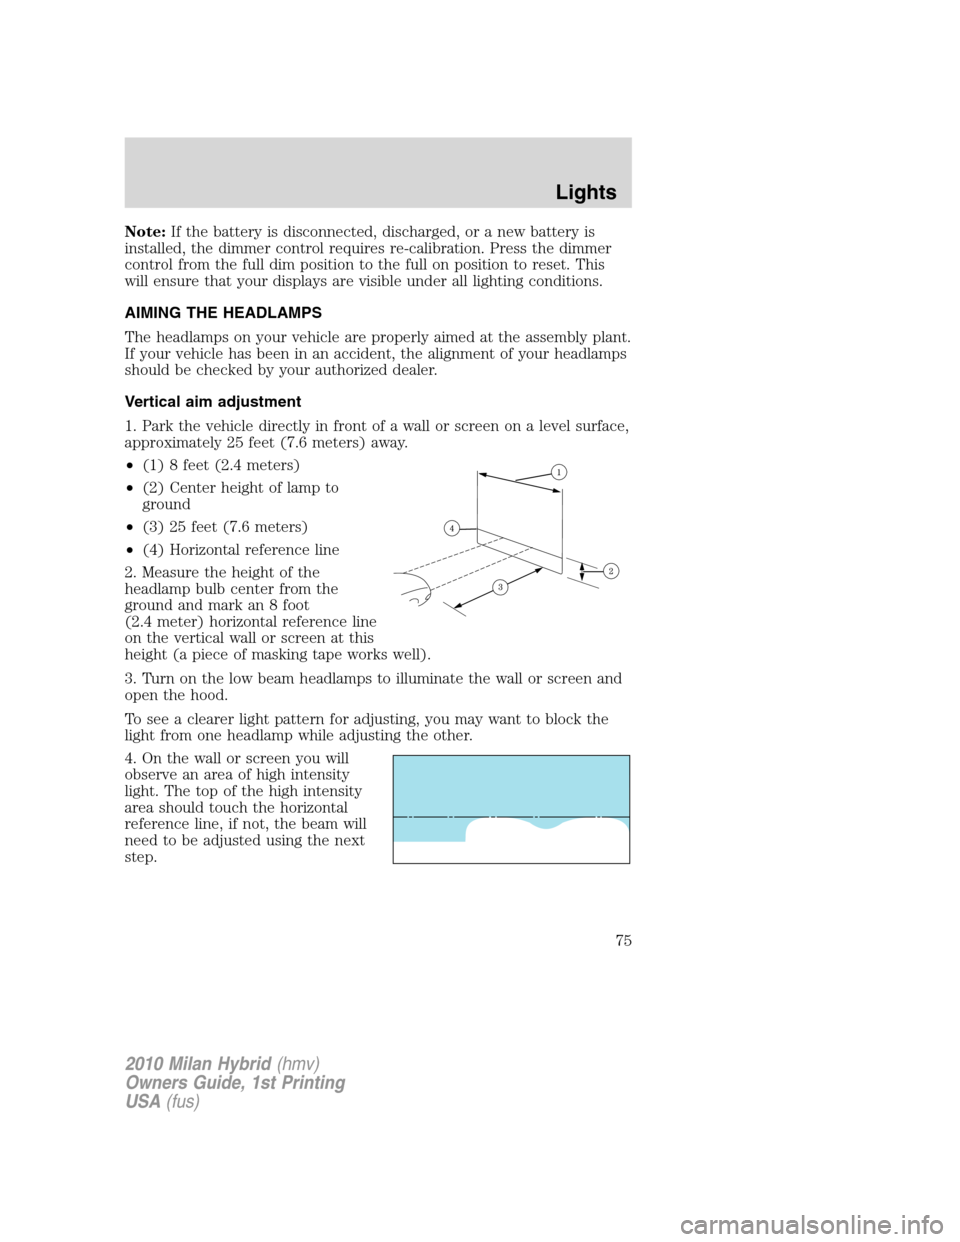
Vertical aim adjustment
1. Park the vehicle directly in front of a wall or screen on a level surface,
approximately 25 feet (7.6 meters) away.
•(1) 8 feet (2.4 meters)
•(2) Center height of lamp to
ground
•(3) 25 feet (7.6 meters)
•(4) Horizontal reference line
2. Measure the height of the
headlamp bulb center from the
ground and mark an 8 foot
(2.4 meter) horizontal reference line
on the vertical wall or screen at this
height (a piece of masking tape works well).
3. Turn on the low beam headlamps to illuminate the wall or screen and
open the hood.
To see a clearer light pattern for adjusting, you may want to block the
light from one headlamp while adjusting the other.
4. On the wall or screen you will
observe an area of high intensity
light. The top of the high intensity
area should touch the horizontal
reference line, if not, the beam will
need to be adjusted using the next
step.
2010 Milan Hybrid(hmv)
Owners Guide, 1st Printing
USA(fus)
Lights
75
Page 85 of 329
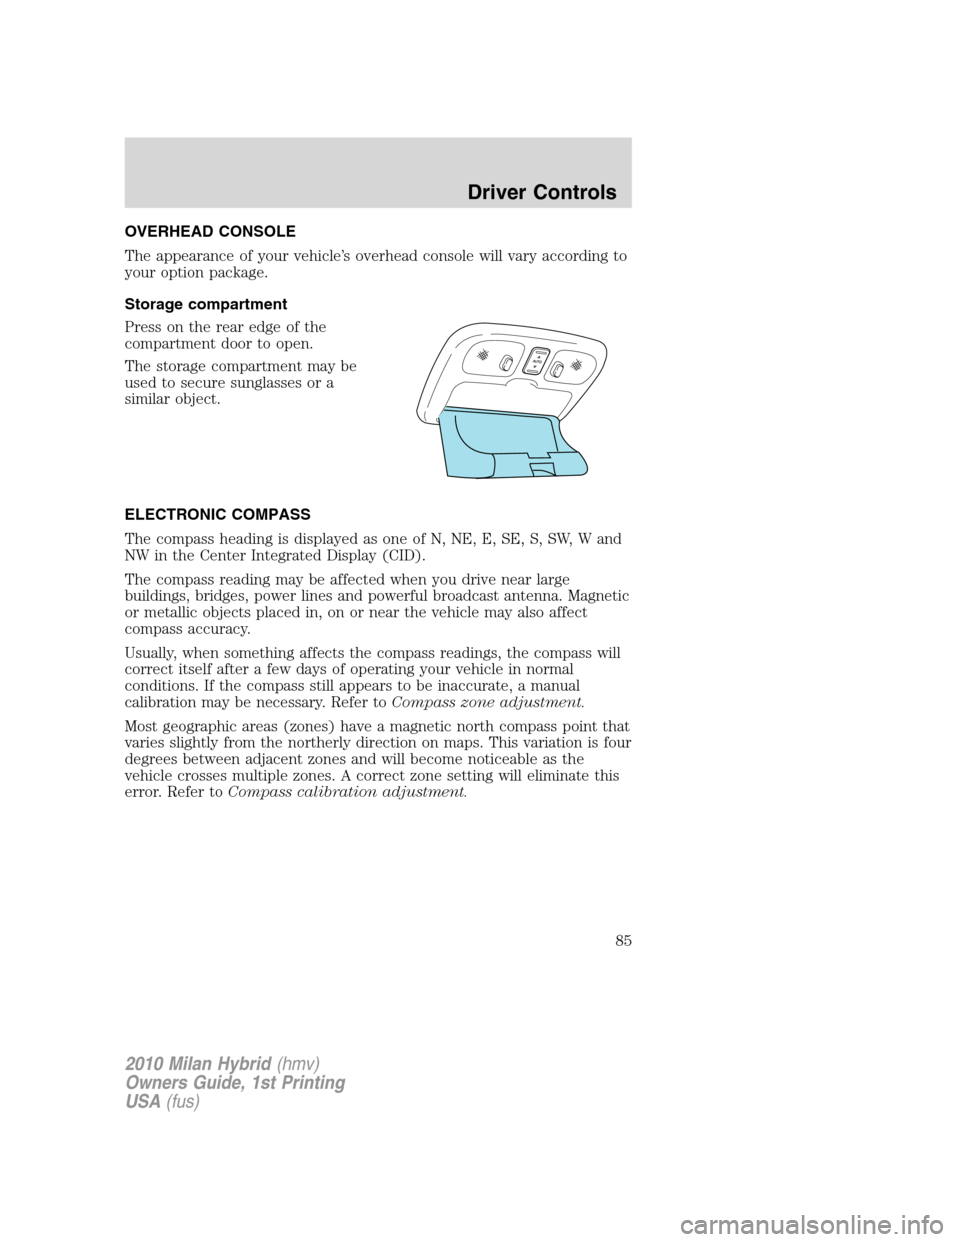
OVERHEAD CONSOLE
The appearance of your vehicle’s overhead console will vary according to
your option package.
Storage compartment
Press on the rear edge of the
compartment door to open.
The storage compartment may be
used to secure sunglasses or a
similar object.
ELECTRONIC COMPASS
The compass heading is displayed as one of N, NE, E, SE, S, SW, W and
NW in the Center Integrated Display (CID).
The compass reading may be affected when you drive near large
buildings, bridges, power lines and powerful broadcast antenna. Magnetic
or metallic objects placed in, on or near the vehicle may also affect
compass accuracy.
Usually, when something affects the compass readings, the compass will
correct itself after a few days of operating your vehicle in normal
conditions. If the compass still appears to be inaccurate, a manual
calibration may be necessary. Refer toCompass zone adjustment.
Most geographic areas (zones) have a magnetic north compass point that
varies slightly from the northerly direction on maps. This variation is four
degrees between adjacent zones and will become noticeable as the
vehicle crosses multiple zones. A correct zone setting will eliminate this
error. Refer toCompass calibration adjustment.
2010 Milan Hybrid(hmv)
Owners Guide, 1st Printing
USA(fus)
Driver Controls
85
Page 86 of 329

Compass zone adjustment
1. Determine which magnetic zone
you are in for your geographic
location by referring to the zone
map.
2. Turn ignition to the on position.
3. Press and hold the 7 and 9 radio
preset buttons together for
approximately five seconds until
ZONE XX appears in the CID.
4. Press and release the 7 and 9
radio preset buttons together,
repeatedly until ZONE XX changes
to the correct zone (1–15) in the
CID.
5. The direction will display after
the buttons are released. The zone
is now updated.
Compass calibration adjustment
Perform compass calibration in an open area free from steel structures
and high voltage lines. For optimum calibration, turn off all electrical
accessories (heater/air conditioning, wipers, etc.) and make sure all
vehicle doors are shut.
1. Start the vehicle.
1 2 3
4
5
6 7 8 9 101112 13 14 15
2010 Milan Hybrid(hmv)
Owners Guide, 1st Printing
USA(fus)
Driver Controls
86