light Mercury Mountaineer 1997 s User Guide
[x] Cancel search | Manufacturer: MERCURY, Model Year: 1997, Model line: Mountaineer, Model: Mercury Mountaineer 1997Pages: 197, PDF Size: 2.08 MB
Page 31 of 197

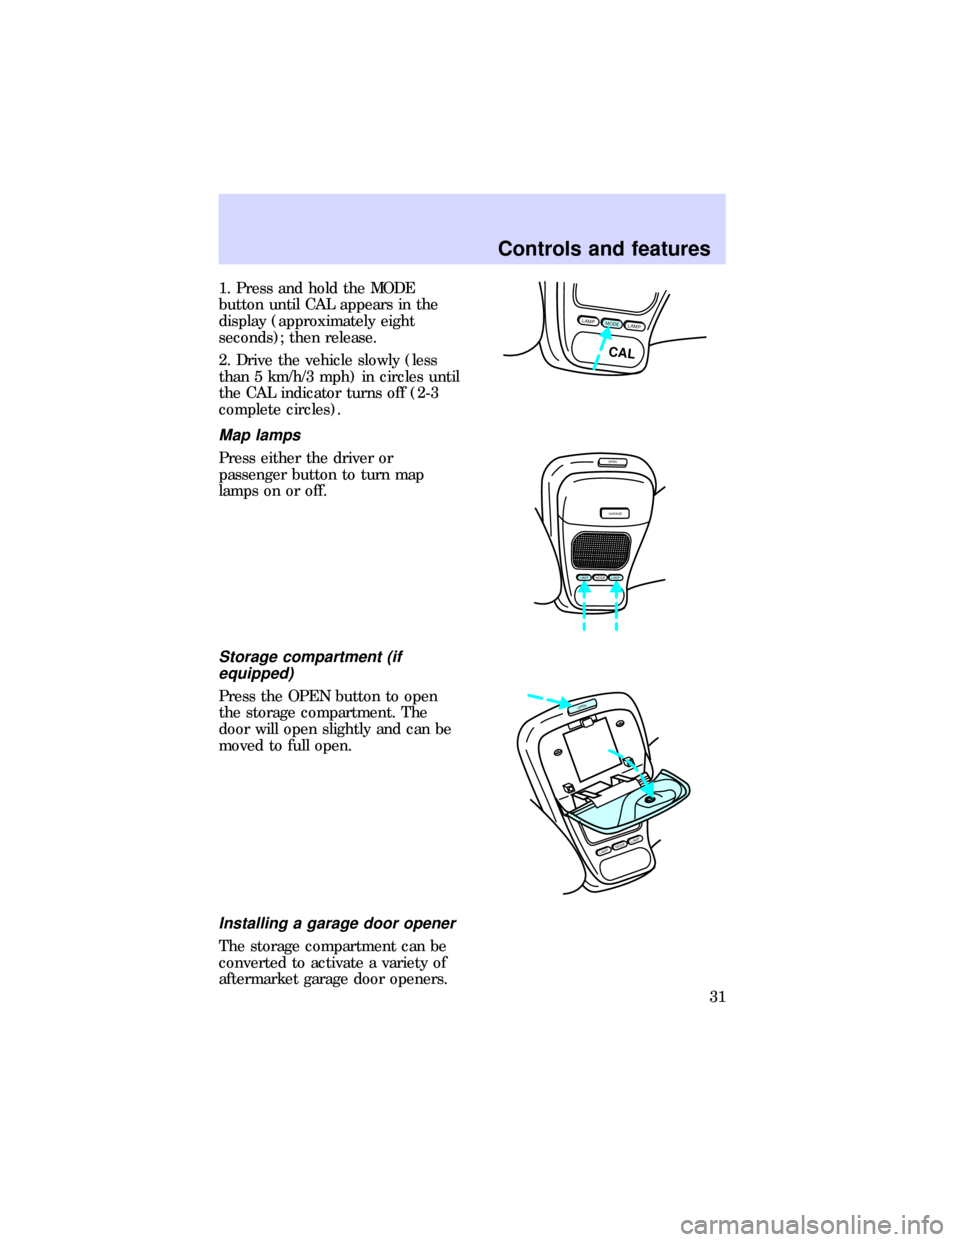
1. Press and hold the MODE
button until CAL appears in the
display (approximately eight
seconds); then release.
2. Drive the vehicle slowly (less
than 5 km/h/3 mph) in circles until
the CAL indicator turns off (2-3
complete circles).
Map lamps
Press either the driver or
passenger button to turn map
lamps on or off.
Storage compartment (if
equipped)
Press the OPEN button to open
the storage compartment. The
door will open slightly and can be
moved to full open.
Installing a garage door opener
The storage compartment can be
converted to activate a variety of
aftermarket garage door openers.
LAMPMODELAMP
CAL
OPEN
GARAGE
MODELAMPLAMP
MODELAMPLAMP
OPEN
Controls and features
31
Page 33 of 197

Moon roof (if equipped)
Press and hold bottom portion of
moon roof switch to open.
Press and hold top portion of
moon roof switch to close.
To raise the rear of the moon roof,
close the moon roof and press top
of rocker switch again. Press
bottom of rocker switch to close it.
Autolamp delay system and
automatic dimming mirror (if
equipped)
Autolamp
The autolamp sets the headlamps
to turn on and off automatically.
You can set the autolamp to:
²turn on the lamps automatically
at night
²turn off the lamps automatically
during daylight
²keep the lamps on for up to
three minutes after you turn the
key to OFF
Setting autolamp
1. Make sure the headlamp switch
is in the OFF position. If the
headlamp switch is on, you
override the autolamp.
2. Turn the ignition key to ON or
start your vehicle.
MODELAMPLAMP
Controls and features
33
Page 34 of 197

3. Slide the delay slide knob to the
center of travel. The further you
move the knob to the right, the
longer the headlamps stay on after
the ignition is turned to the OFF
position. The autolamp will keep
the headlamps on for a maximum
of three minutes after the ignition
is turned off.
4. The autolamp automatically
turns the lamps on and off.
Automatic dimming feature
The autolamp/automatic dimming
mirror is equipped with an
automatic dimming feature. This
feature will change from the
normal state to the non-glare
``active'' state when bright lights
(glare) reach the mirror. When the
mirror detects bright light from the
front or behind, it will adjust
automatically to minimize glare.
The automatic dimming feature is
active when the ignition is turned
to the ON position.
When active, the mirror senses
bright light (glare) from the front
and rear and automatically adjusts
itself to minimize glare.
AUTOLAMP
OFF MAXRELAY
Controls and features
34
Page 41 of 197

liftgate will unlock when the key
is returned to the vertical
position (position of key before
removal).
This feature can be activated by all
outside locks on vehicles equipped
with keyless entry.
Illuminated entry
Interior lamps illuminate when
either outside front door handle is
lifted, unlocked with the keyless
entry keypad or the UNLOCK
button is pressed on the remote
entry transmitter (seeRemote
entry systemorKeyless entry
systemfor further information).
The system will automatically turn
off after 25 seconds or when the
ignition switch is turned to START
or ON position.
The inside lights will not turn off if
you have turned them on with the
dimmer thumbwheel or if any door
is open. However, the battery saver
will turn them off after ten
minutes. SeeBattery saverfor
more information.
Controls and features
41
Page 43 of 197

Auxiliary power point
This power point is an additional
power source for electrical
accessories.
Do not plug optional
electrical accessories into
the cigarette lighter. Use the
power point.
Replacing the tissue box
1. Lift armrest and slide
coinholder/tissue box out of
console in an upward motion.
2. Replace tissue box.
3. Slide coinholder/tissue tray into
console locating pins at bottom of
tray. Fit in slots in console bracket.
Controls and features
43
Page 53 of 197

Additional transmitters can be
ordered from your dealer.
Unlocking the doors with the
remote entry system
Press UNLOCK button to unlock
driver door. The interior lamps will
illuminate.
Press UNLOCK a second time
within 5 seconds to unlock all
doors and liftgate.
Locking the doors with the
remote entry system
Press the LOCK button to lock all
doors and liftgate.
Press the LOCK button a second
time within 5 seconds to confirm
that all doors and liftgate are
locked.
The doors will lock again, the horn
will chirp, and the lamps will flash.
This will arm your anti-theft
system. If the horn chirps twice, a
door is still ajar and the anti-theft
system will not arm. SeeAnti-theft
systemfor more details.
Remote entry personal alarm
The remote entry personal alarm
feature allows you to activate the
alarm. When activated, the horn
will honk and the lights will flash.
LOCK
PANICUN
LOCK
PANICUN
LOCKLOCK
Controls and features
53
Page 57 of 197

²flash the headlamps, park lamps
and theTHEFTindicator in the
instrument cluster.
²sound the horn.
²disable vehicle starting.
The flashing exterior lamps and
honking horn will shut off
automatically after about 3
minutes. The lights and horn will
remain off unless another
unauthorized entry is attempted.
However, the vehicle will not start
until the system is properly
disarmed.
How to disarm the system
To cancel an armed system, you
must:
²press the UNLOCK button on
the remote entry transmitter.
OR
²unlock any door with the key.
OR
²turn the ignition switch to the
ON position.
OR
²unlock the doors by entering the
unlock code into the keyless
entry keypad.
How to deactivate a triggered
system
To immediately cancel an activated
system, press the PANIC button on
the remote entry transmitter.
A triggered system can also be
deactivated by following the steps
inHow to disarm the system.
Controls and features
57
Page 58 of 197

Delayed accessory
Delayed accessory provides power
to operate the power windows and
power moon roof (if equipped) for
10 minutes after the ignition
switch is turned to OFF.
If either front door is opened
during the 10 minute period the
delayed accessory feature is
disabled.
Battery saver
Battery saver is a feature that
automatically shuts off power to
these lights after 40 minutes: glove
box, engine compartment,
overhead console, mirror, courtesy
and interior lamps.
Battery saver prevents the battery
from being drained if these lights
are left on or if a door is not
completely closed. Battery power
is restored if the remote entry
transmitter is used, any door is
opened, the liftgate is opened, or
ignition key is turned to ON.
Controls and features
58
Page 69 of 197

SAFETY BELT WARNING AND
INDICATOR CHIME
The
warning light illuminates
in the instrument cluster and a
chime sounds to remind the
occupants to fasten their safety
belts.
Conditions of operation
If... Then...
The safety belt is not buckled
before the ignition key is turned
to ON...The safety belt indicator light
illuminates for one to two minutes
and the warning chime sounds for
4-8 seconds.
The safety belt is buckled while
the indicator light is illuminated
and the warning chime is
sounding...The safety belt indicator light and
the warning chime turn off.
The safety belt is buckled before
the ignition key is turned to ON...Both the safety belt warning light
and chime remain off.
SAFETY BELT MAINTENANCE
Check the safety belt systems
periodically to make sure that they
work properly and are not
damaged. Check the safety belts to
make sure there are no nicks,
wear, or cuts. If your vehicle has
been involved in an accident, have
all the safety belts and child seat
anchoring brackets (if equipped)
examined by a qualified technician.
Seating and safety restraints
69
Page 73 of 197

AIR BAG DESCRIPTION
The air bag system activates in
collisions more severe than hitting
a parked vehicle of similar size and
weight head-on at about 45km/h
(28 mph).
The air bag system consists of two
parts:
²The driver air bag in the middle
of the steering wheel and the
passenger air bag near the glove
compartment.
²The electrical system, made up
of impact sensors, a diagnostic
module, and a backup power
supply.
The diagnostic module monitors its
own internal circuits and the
supplemental air bag electrical
system readiness (including the
impact sensors), the system wiring,
the air bag system readiness light,
the air bag back up power, and the
air bag ignitors.
The air bags inflate within a
fraction of a second after air bag
sensors detect a severe frontal
collision. Gas generators within the
air bags fill the air bags with a
non-toxic, non-flammable gas.
After the vehicle occupants have
contacted the air bags, the gas
empties through holes in the air
EOFF0020406080100
120
140
160
180
200P RND21000000ooookm/hUNLEADED
FUEL ONLY
RPM x 100012345
6H
CEF
RSM
SET
ACC
COAST OFF ONOFFSRSHI LOOFF*A/C*MAX
A/CREW
1FF
2SIDE 1-2
3FM 1STVOL – PUSH ON
AM
FMBASS TREBBAL FADE
AUTO
SET CLKSEEKTUNE
DISCSSCAN4DOLBY SYSTEMEJTAPE CDCOMP
5SHUFFLE
6PUSH
Seating and safety restraints
73