weight Mercury Sable 2001 Owner's Manuals
[x] Cancel search | Manufacturer: MERCURY, Model Year: 2001, Model line: Sable, Model: Mercury Sable 2001Pages: 240, PDF Size: 2.22 MB
Page 61 of 240

CARGO AREA FEATURES
Storage compartment
Your vehicle comes equipped with a
storage compartment in the floor of
the cargo area. An additional
compartment is in the rear trim
panel on the right. Always put the
load you are carrying as far forward
as possible.
Cargo net (if equipped) (Wagon)
The cargo net secures lightweight
objects in the cargo area. Attach the
net to the anchors provided. Do not
put more than 22 kg (50 lbs.) in the
net. This net is not designed to
restrain objects during a collision.
Cargo cover (if equipped)
Your vehicle may be equipped with a cargo area shade that covers the
luggage compartment of your vehicle.
To install the shade:
1. Fasten the cover into the
mounting brackets (make sure the
cover is right side up).
2. Pull the end of the shade toward
you and hook the sides into the
notches (right side first) in the rear
trim panels.
Controls and features
61
Page 63 of 240
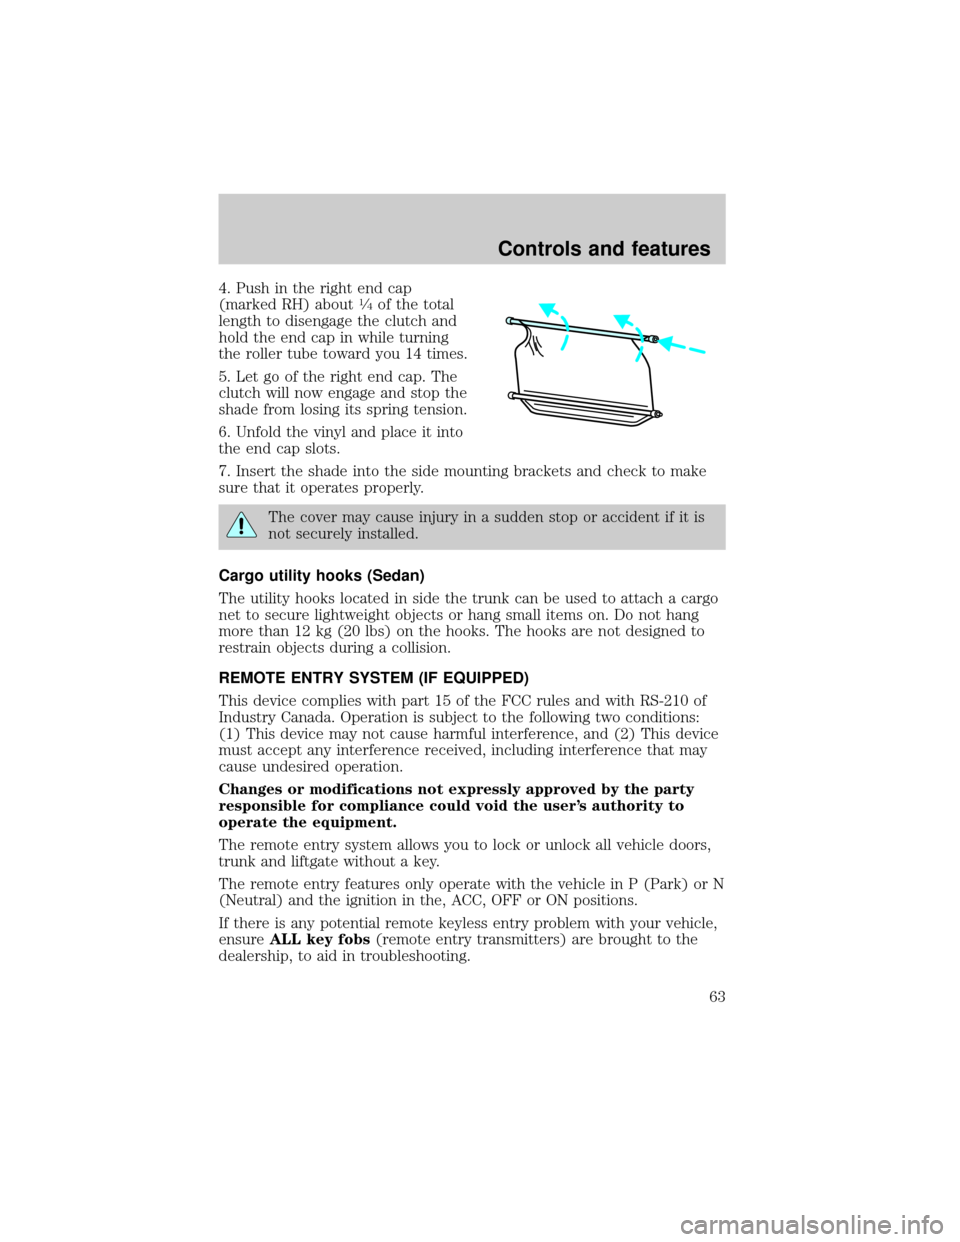
4. Push in the right end cap
(marked RH) about1¤4of the total
length to disengage the clutch and
hold the end cap in while turning
the roller tube toward you 14 times.
5. Let go of the right end cap. The
clutch will now engage and stop the
shade from losing its spring tension.
6. Unfold the vinyl and place it into
the end cap slots.
7. Insert the shade into the side mounting brackets and check to make
sure that it operates properly.
The cover may cause injury in a sudden stop or accident if it is
not securely installed.
Cargo utility hooks (Sedan)
The utility hooks located in side the trunk can be used to attach a cargo
net to secure lightweight objects or hang small items on. Do not hang
more than 12 kg (20 lbs) on the hooks. The hooks are not designed to
restrain objects during a collision.
REMOTE ENTRY SYSTEM (IF EQUIPPED)
This device complies with part 15 of the FCC rules and with RS-210 of
Industry Canada. Operation is subject to the following two conditions:
(1) This device may not cause harmful interference, and (2) This device
must accept any interference received, including interference that may
cause undesired operation.
Changes or modifications not expressly approved by the party
responsible for compliance could void the user's authority to
operate the equipment.
The remote entry system allows you to lock or unlock all vehicle doors,
trunk and liftgate without a key.
The remote entry features only operate with the vehicle in P (Park) or N
(Neutral) and the ignition in the, ACC, OFF or ON positions.
If there is any potential remote keyless entry problem with your vehicle,
ensureALL key fobs(remote entry transmitters) are brought to the
dealership, to aid in troubleshooting.
Controls and features
63
Page 80 of 240
REAR SEATS
2nd seat/Split-folding rear seat (if equipped)
One or both rear seatbacks can be folded down to provide additional
cargo space.
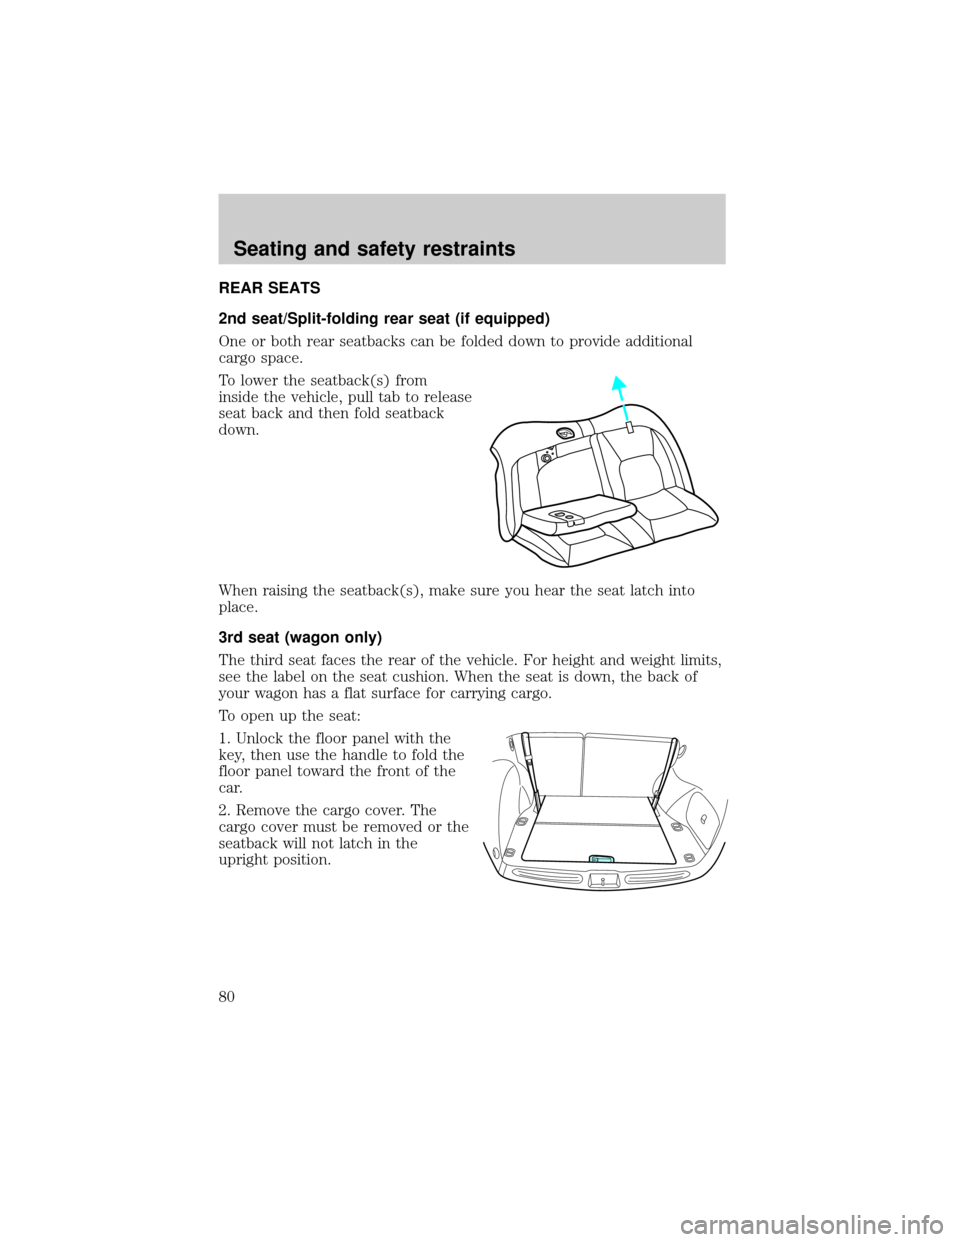
To lower the seatback(s) from
inside the vehicle, pull tab to release
seat back and then fold seatback
down.
When raising the seatback(s), make sure you hear the seat latch into
place.
3rd seat (wagon only)
The third seat faces the rear of the vehicle. For height and weight limits,
see the label on the seat cushion. When the seat is down, the back of
your wagon has a flat surface for carrying cargo.
To open up the seat:
1. Unlock the floor panel with the
key, then use the handle to fold the
floor panel toward the front of the
car.
2. Remove the cargo cover. The
cargo cover must be removed or the
seatback will not latch in the
upright position.
Seating and safety restraints
80
Page 105 of 240

SAFETY SEATS FOR CHILDREN
Child and infant or child safety seats
Use a safety seat that is recommended for the size and weight of the
child. Carefully follow all of the manufacturer's instructions with the
safety seat you put in your vehicle. If you do not install and use the
safety seat properly, the child may be injured in a sudden stop or
collision.
When installing a child safety seat:
²Review and follow the information
presented in theAir Bag
Supplemental Restraint System
section in this chapter.
²Use the correct safety belt buckle
for that seating position.
²Insert the belt tongue into the
proper buckle until you hear a
snap and feel it latch. Make sure
the tongue is securely fastened in
the buckle.
²Keep the buckle release button
pointing up and away from the
safety seat, with the tongue
between the child seat and the release button, to prevent accidental
unbuckling.
²Place seat back in upright position.
²Put the safety belt in the automatic locking mode. Refer toAutomatic
locking mode.
Seating and safety restraints
105
Page 128 of 240
When parking, do not use the gearshift in place of the parking
brake. Always set the parking brake fully and make sure that the
gearshift is securely latched in Park (P). Turn off the ignition
whenever you leave your vehicle. Never leave your vehicle unattended
while it is running. If you do not take these precautions, your vehicle
may move unexpectedly and injure someone.
VEHICLE LOADING
Before loading a vehicle, familiarize yourself with the following terms:
²Base Curb Weight:Weight of the vehicle including any standard
equipment, fluids, lubricants, etc. It does not include passengers or
aftermarket equipment.
²Payload:Combined maximum allowable weight of cargo, passengers
and optional equipment. The payload equals the gross vehicle weight
rating minus base curb weight.
²GVW (Gross Vehicle Weight):Base curb weight plus payload
weight. The GVW is not a limit or a specification.
²GVWR (Gross Vehicle Weight Rating):Maximum total weight of
the base vehicle, passengers, optional equipment and cargo. The
GVWR is specific to each vehicle and is listed on the Safety
Certification Label on the driver's door pillar.
²GAWR (Gross Axle Weight Rating):Carrying capacity for each axle
system. The GAWR is specific to each vehicle and is listed on the
Safety Certification Label on the driver's door pillar.
²GCW (Gross Combined Weight):The combined weight of the
towing vehicle (including passengers and cargo) and the trailer.
²GCWR (Gross Combined Weight Rating):Maximum combined
weight of towing vehicle (including passengers and cargo) and the
trailer. The GCWR indicates the maximum loaded weight that the
vehicle is designed to tow.
²Maximum Trailer Weight Rating:Maximum weight of a trailer the
vehicle is permitted to tow. The maximum trailer weight rating is
determined by subtracting the vehicle curb weight for each
engine/transmission combination, any required option weight for trailer
towing and the weight of the driver from the GCWR for the towing
vehicle.
Driving
128
Page 129 of 240
²Maximum Trailer Weight:Maximum weight of a trailer the loaded
vehicle (including passengers and cargo) is permitted to tow. It is
determined by subtracting the weight of the loaded trailer towing
vehicle from the GCWR for the towing vehicle.
²Trailer Weight Range:Specified weight range that the trailer must
fall within that ranges from zero to the maximum trailer weight rating.
Remember to figure in the tongue load of your loaded trailer when
figuring the total weight.
Do not exceed the GVWR or the GAWR specified on the
certification label.
Do not use replacement tires with lower load carrying capacities than the
originals because they may lower the vehicle's GVWR and GAWR
limitations. Replacement tires with a higher limit than the originals do
not increase the GVWR and GAWR limitations.
The Safety Certification Label, found on the driver's door pillar, lists
several important vehicle weight rating limitations. Before adding any
additional equipment, refer to these limitations. If you are adding weight
to the front of your vehicle, (potentially including weight added to the
cab), the weight added should not exceed the front axle reserve capacity
(FARC). Additional frontal weight may be added to the front axle reserve
capacity provided you limit your payload in other ways (i.e. restrict the
number of passengers or amount of cargo carried).
Always ensure that the weight of passengers, cargo and equipment being
carried is within the weight limitations that have been established for
your vehicle including both gross vehicle weight and Front and rear
gross axle weight rating limits. Under no circumstance should these
limitations be exceeded. Exceeding any vehicle weight rating limitation
could result in serious damage to the vehicle and/or personal injury.
DRIVING THROUGH WATER
Do not drive quickly through standing water, especially if the depth is
unknown. Traction or brake capability may be limited and if the ignition
system gets wet, your engine may stall. Water may also enter your
engine's air intake and severely damage your engine.
If driving through deep or standing water is unavoidable, proceed very
slowly. Never drive through water that is higher than the bottom of the
hubs (for trucks) or the bottom of the wheel rims (for cars).
Driving
129
Page 130 of 240
Once through the water, always try the brakes. Wet brakes do not stop
the vehicle as effectively as dry brakes. Drying can be improved by
moving your vehicle slowly while applying light pressure on the brake
pedal.
Driving through deep water where the transmission vent tube is
submerged may allow water into the transmission and cause
internal transmission damage.
TRAILER TOWING
Your vehicle is classified as a light duty towing vehicle. The amount of
weight you can safely tow depends on the type of engine you have in
your vehicle. Your vehicle does not come from the factory fully equipped
to tow. No towing packages are available through Ford or
Mercury/Lincoln dealers. Do not tow a trailer until your vehicle has been
driven at least 800 km (500 miles). If towing with a station wagon, inflate
the rear tires to 35 psi.
Towing a trailer places an additional load on your vehicle's engine,
transaxle, brakes, tires and suspension. Inspect these components
carefully after towing.
In order to identify your vehicle's engine, refer toIdentifying
components in the engine compartmentin the Maintenance and Care
chapter.
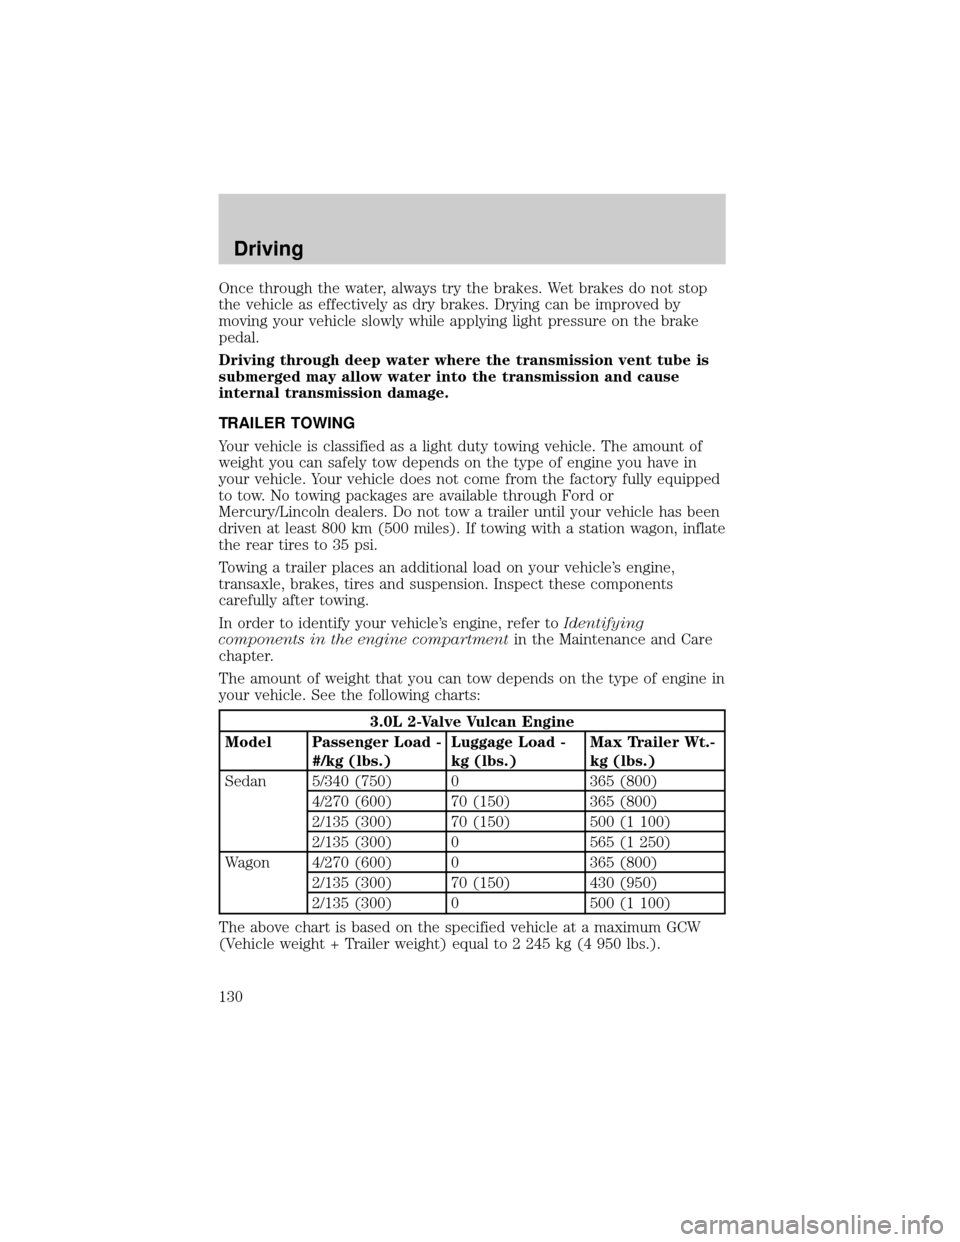
The amount of weight that you can tow depends on the type of engine in
your vehicle. See the following charts:
3.0L 2-Valve Vulcan Engine
Model Passenger Load -
#/kg (lbs.)Luggage Load -
kg (lbs.)Max Trailer Wt.-
kg (lbs.)
Sedan 5/340 (750) 0 365 (800)
4/270 (600) 70 (150) 365 (800)
2/135 (300) 70 (150) 500 (1 100)
2/135 (300) 0 565 (1 250)
Wagon 4/270 (600) 0 365 (800)
2/135 (300) 70 (150) 430 (950)
2/135 (300) 0 500 (1 100)
The above chart is based on the specified vehicle at a maximum GCW
(Vehicle weight + Trailer weight) equal to 2 245 kg (4 950 lbs.).
Driving
130
Page 131 of 240

3.0L 4-Valve Duratec Engine
Model Passenger Load -
#/kg (lbs.)Luggage Load -
kg (lbs.)Max Trailer Wt.-
kg (lbs.)
Sedan 5/340 (750) 0 590 (1 300)
2/135 (300) 70 (150) 725 (1 600)
2/135 (300) 0 795 (1 750)
Wagon 5/340 (750) 70 (150) 455 (1 000)
2/135 (300) 70 (150) 660 (1 450)
2/135 (300) 0 725 (1 600)
The above chart is based on the specified vehicle at a maximum GCW
(Vehicle weight + Trailer weight) equal to 2 470 kg (5 450 lbs.).
Do not exceed the GVWR or the GAWR specified on the
certification label.
Towing trailers beyond the maximum recommended gross trailer
weight exceeds the limit of the vehicle and could result in
engine damage, transaxle damage, structural damage, loss of control,
and personal injury.
Preparing to tow
Use the proper equipment for towing a trailer, and make sure it is
properly attached to your vehicle. See your dealer or a reliable trailer
dealer if you require assistance.
Hitches
Do not use hitches that clamp onto the vehicle bumper. Use a load
carrying hitch. You must distribute the load in your trailer so that 10% of
the total weight of the trailer is on the tongue.
Safety chains
Always connect the trailer's safety chains to the frame or hook retainers
of the vehicle hitch. To connect the trailer's safety chains, cross the
chains under the trailer tongue and allow slack for turning corners.
If you use a rental trailer, follow the instructions that the rental agency
gives to you.
Do not attach safety chains to the bumper.
Driving
131
Page 133 of 240

²The trailer tongue weight should be 10% of the loaded trailer weight.
²After you have traveled 80 km (50 miles), thoroughly check your
hitch, electrical connections and trailer wheel lug nuts.
²When stopped in traffic for long periods of time in hot weather, place
the gearshift in P (Park) and increase idle speed. This aids engine
cooling and air conditioner efficiency.
²Vehicles with trailers should not be parked on a grade. If you must
park on a grade, place wheel chocks under the trailer's wheels.
Recreational towing
Follow these guidelines for your specific powertrain combination to tow
your vehicle with all four wheels on the ground (such as behind a
recreational vehicle).
These guidelines are designed to ensure that your transmission is not
damaged due to insufficient lubrication.
All Front Wheel Drive (FWD) vehicles
An example of recreational towing is towing your vehicle behind a
Motorhome. The following recreational towing guidelines are designed to
ensure that your transmission is not damaged. It is not recommended to
tow front wheel drive vehicles with the front drive wheels on the ground.
It is recommended to tow your vehicle with the drive wheels on a dolly
or two wheel car hauling trailer.
In case of a roadside emergency with a disabled vehicle (without access
to wheel dollies, car hauling trailer or flatbed transport vehicle) your
vehicle can be flat towed (all wheels on the ground) under the following
conditions:
²Place the transmission in N (Neutral).
²Maximum speed is 56 km/h (35 mph).
²Maximum distance is 80 km (50 miles).
Driving
133
Page 189 of 240
![Mercury Sable 2001 Owners Manuals ²Sudden or hard accelerations may reduce fuel economy.
²Slow down gradually.
²Driving at reasonable speeds (traveling at 88 km/h [55 mph] uses 15%
less fuel than traveling at 105 km/h [65 mph]).
² Mercury Sable 2001 Owners Manuals ²Sudden or hard accelerations may reduce fuel economy.
²Slow down gradually.
²Driving at reasonable speeds (traveling at 88 km/h [55 mph] uses 15%
less fuel than traveling at 105 km/h [65 mph]).
²](/img/33/11160/w960_11160-188.png)
²Sudden or hard accelerations may reduce fuel economy.
²Slow down gradually.
²Driving at reasonable speeds (traveling at 88 km/h [55 mph] uses 15%
less fuel than traveling at 105 km/h [65 mph]).
²Revving the engine before turning it off may reduce fuel economy.
²Using the air conditioner or defroster may reduce fuel economy.
²You may want to turn off the speed control in hilly terrain if
unnecessary shifting between third and fourth gear occurs.
Unnecessary shifting of this type could result in reduced fuel
economy.
²Warming up a vehicle on cold mornings is not required and may
reduce fuel economy.
²Resting your foot on the brake pedal while driving may reduce fuel
economy.
²Combine errands and minimize stop-and-go driving.
Maintenance
²Keep tires properly inflated and use only recommended size.
²Operating a vehicle with the wheels out of alignment will reduce fuel
economy.
²Use recommended engine oil. Refer toLubricant Specifications.
²Perform all regularly scheduled maintenance items. Follow the
recommended maintenance schedule and owner maintenance checks
found in your vehicle scheduled maintenance guide.
Conditions
²Heavily loading a vehicle or towing a trailer may reduce fuel economy
at any speed.
²Carrying unnecessary weight may reduce fuel economy (approximately
0.4 km/L [1 mpg] is lost for every 180 kg [400 lb] of weight carried).
²Adding certain accessories to your vehicle (for example bug
deflectors, rollbars/light bars, running boards, ski/luggage racks) may
reduce fuel economy.
²Using fuel blended with alcohol may lower fuel economy.
²Fuel economy may decrease with lower temperatures during the first
12±16 km (8±10 miles) of driving.
Maintenance and care
189