change time Mercury Sable 2002 Owner's Manuals
[x] Cancel search | Manufacturer: MERCURY, Model Year: 2002, Model line: Sable, Model: Mercury Sable 2002Pages: 240, PDF Size: 3.53 MB
Page 28 of 240
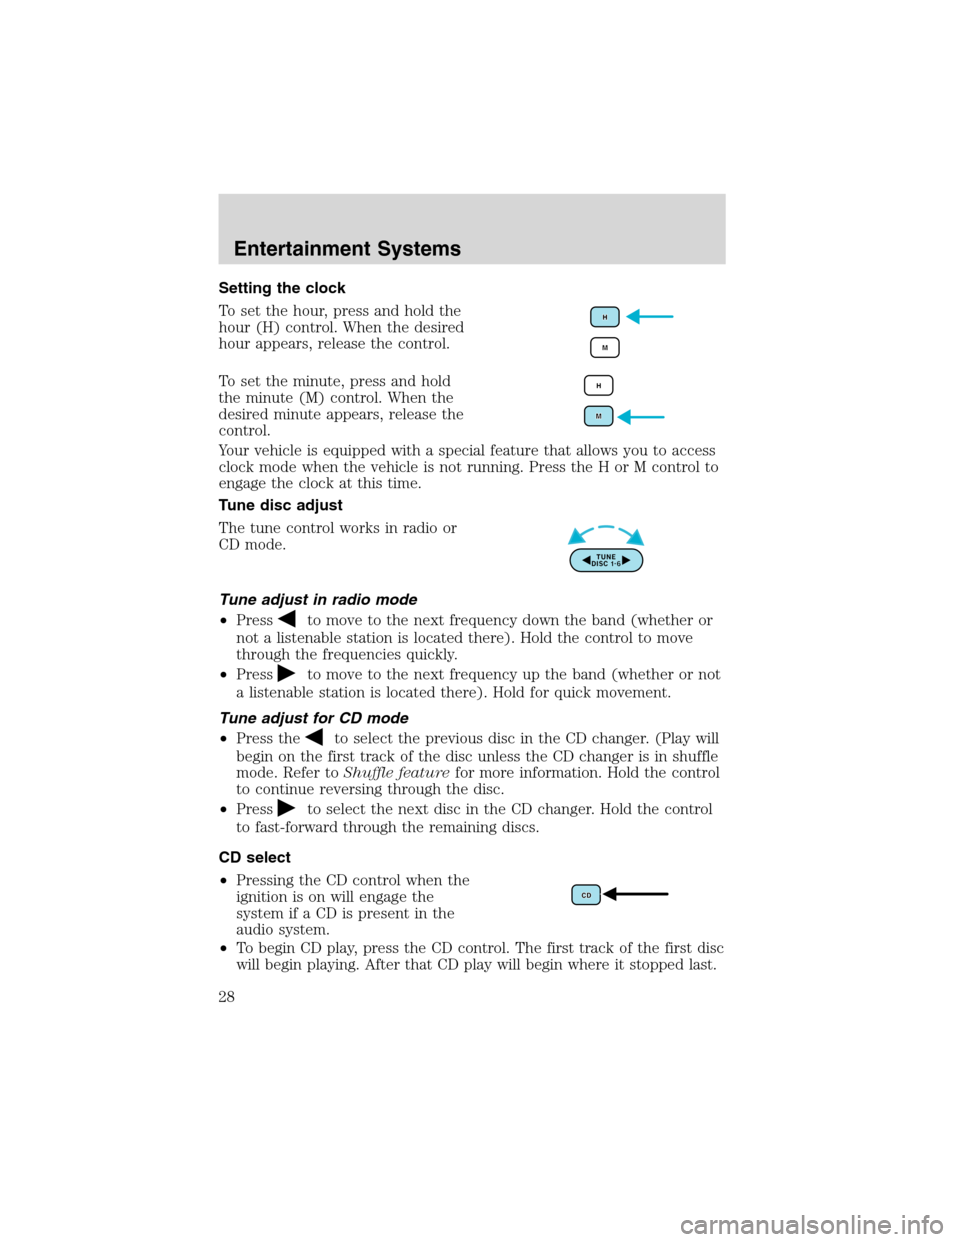
Setting the clock
To set the hour, press and hold the
hour (H) control. When the desired
hour appears, release the control.
To set the minute, press and hold
the minute (M) control. When the
desired minute appears, release the
control.
Your vehicle is equipped with a special feature that allows you to access
clock mode when the vehicle is not running. Press the H or M control to
engage the clock at this time.
Tune disc adjust
The tune control works in radio or
CD mode.
Tune adjust in radio mode
•Press
to move to the next frequency down the band (whether or
not a listenable station is located there). Hold the control to move
through the frequencies quickly.
•Press
to move to the next frequency up the band (whether or not
a listenable station is located there). Hold for quick movement.
Tune adjust for CD mode
•Press the
to select the previous disc in the CD changer. (Play will
begin on the first track of the disc unless the CD changer is in shuffle
mode. Refer toShuffle featurefor more information. Hold the control
to continue reversing through the disc.
•Press
to select the next disc in the CD changer. Hold the control
to fast-forward through the remaining discs.
CD select
•Pressing the CD control when the
ignition is on will engage the
system if a CD is present in the
audio system.
•To begin CD play, press the CD control. The first track of the first disc
will begin playing. After that CD play will begin where it stopped last.
Entertainment Systems
28
Page 32 of 240
Radio power must be turned on to play the CDs in the changer. The
magazine may be stored in the glove box when not being used.
The CD magazine may be inserted or ejected with the radio power off.
ONLY use the magazine supplied with the CD changer, other types will
damage the unit.
Keep the CD changer door closed. Coins and foreign objects will damage
the CD player and void your audio system warranty.
Do not insert any promotional (odd shaped or sized) discs, or
discs with removable labels into the CD player as jamming may
occur.
TROUBLESHOOTING THE CD CHANGER (IF EQUIPPED)
The laser beam used in the compact disc player is harmful to the
eyes. Do not attempt to disassemble the case.
If sound skips:
•You may be traveling on a rough road, playing badly scratched discs or
the disc may be dirty. Skipping will not scratch the discs or damage
the player.
If your changer does not work, it may be that:
•A disc is already loaded where you want to insert a disc.
•The disc is inserted with the label surface downward.
•The disc is dusty or defective.
•The player’s internal temperature is above 60°C (140°F). Allow the
player to cool down before operating.
•A disc with format and dimensions not within industry standards is
inserted.
CLEANING COMPACT DISCS
Inspect all discs for contamination before playing. If necessary, clean
discs only with an approved CD cleaner and wipe from the center out to
the edge. Do not use circular motion.
CD AND CD CHANGER CARE
•Handle discs by their edges only. Never touch the playing surface.
•Do not expose discs to direct sunlight or heat sources for extended
periods of time.
Entertainment Systems
32
Page 33 of 240
•Do not insert more than one disc into each slot of the CD changer
magazine.
CD units are designed to play commercially pressed 12 cm
(4.75 in) audio compact discs only. Due to technical
incompatibility, certain recordable and re-recordable compact
discs may not function correctly when used in Ford CD players.
Irregular shaped CDs, CDs with a scratch protection film
attached, and CDs with homemade paper (adhesive) labels should
not be inserted into the CD player. The label may peel and cause
the CD to become jammed. It is recommended that homemade
CDs be identified with permanent felt tip marker rather than
adhesive labels. Ball point pens may damage CDs. Please contact
your dealer for further information.
CLEANING CASSETTE PLAYER (IF EQUIPPED)
Clean the tape player head with a cassette cleaning cartridge after 10 to
12 hours of play in order to maintain the best sound and operation.
CASSETTE AND CASSETTE PLAYER CARE
•Use only cassettes that are 90 minutes long or less.
•Do not expose tapes to direct sunlight, high humidity, extreme heat or
extreme cold. Allow tapes that may have been exposed to extreme
temperatures to reach a moderate temperature before playing.
•Tighten very loose tapes by inserting a finger or pencil into the hole
and turning the hub.
•Remove loose labels before inserting tapes.
•Do not leave tapes in the cassette player for a long time when not
being played.
RADIO FREQUENCY INFORMATION
The Federal Communications Commission (FCC) and the Canadian Radio
and Telecommunications Commission(CRTC) establish the frequencies
AM and FM stations may use for their broadcasts. Allowable frequencies
are:
AM 530, 540–1600, 1610 kHz
FM 87.7, 87.9–107.7, 107.9 MHz
Not all frequencies are used in a given area.
Entertainment Systems
33
Page 40 of 240
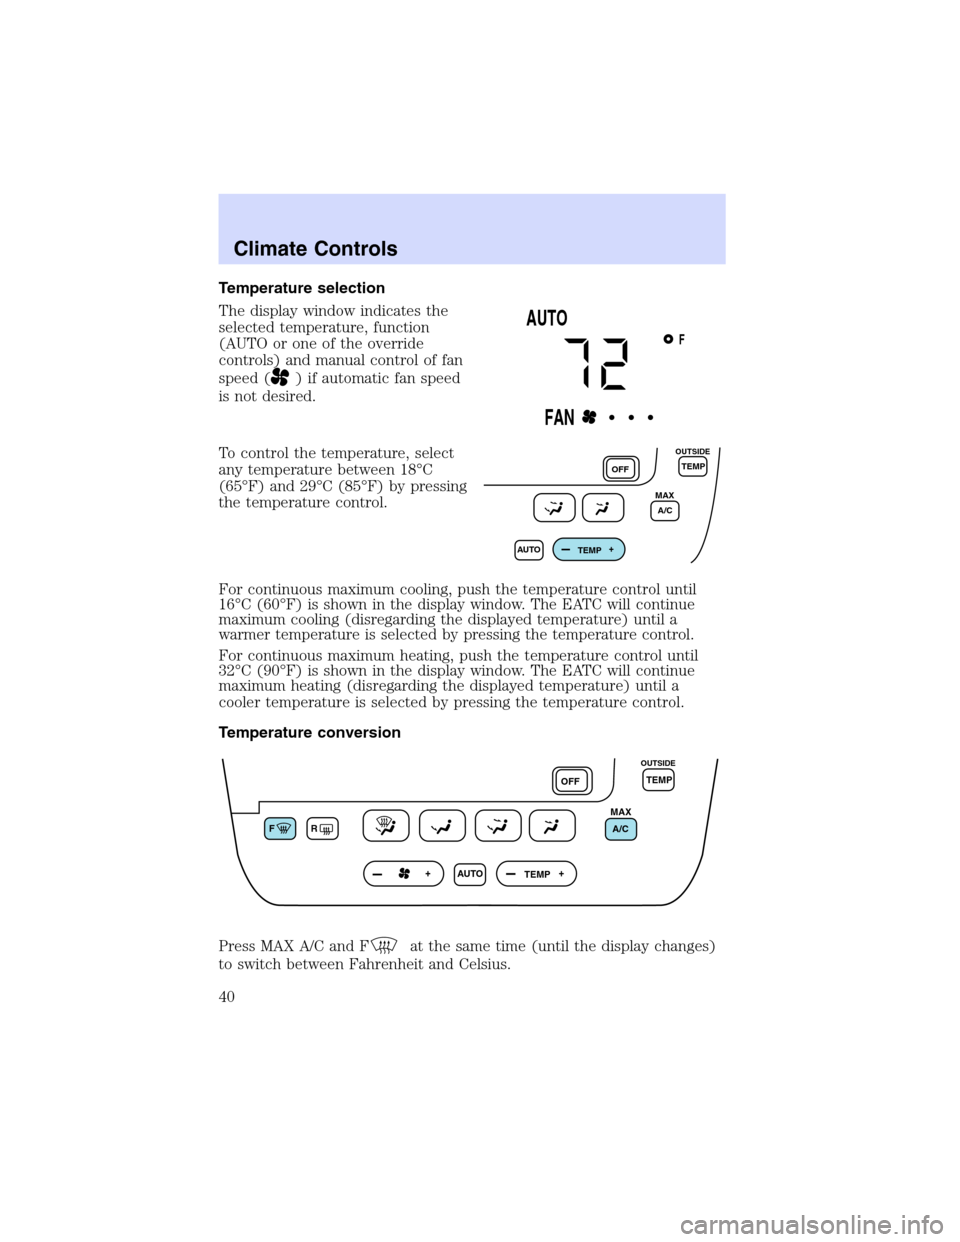
Temperature selection
The display window indicates the
selected temperature, function
(AUTO or one of the override
controls) and manual control of fan
speed (
) if automatic fan speed
is not desired.
To control the temperature, select
any temperature between 18°C
(65°F) and 29°C (85°F) by pressing
the temperature control.
For continuous maximum cooling, push the temperature control until
16°C (60°F) is shown in the display window. The EATC will continue
maximum cooling (disregarding the displayed temperature) until a
warmer temperature is selected by pressing the temperature control.
For continuous maximum heating, push the temperature control until
32°C (90°F) is shown in the display window. The EATC will continue
maximum heating (disregarding the displayed temperature) until a
cooler temperature is selected by pressing the temperature control.
Temperature conversion
Press MAX A/C and F
at the same time (until the display changes)
to switch between Fahrenheit and Celsius.
F
AUTO
FAN• • •
AUTO
TEMPOFF
MAX
A/CTEMP
OUTSIDE
F
R
AUTO
TEMPOFFTEMP
MAX
A/C
OUTSIDE
Climate Controls
40
Page 82 of 240
Changes or modifications not expressly approved by the party
responsible for compliance could void the user’s authority to
operate the equipment.
The remote entry system allows you to lock or unlock all vehicle doors,
trunk and liftgate without a key.
The remote entry features only operate with the vehicle in P (Park) or N
(Neutral) and the ignition in the, ACC, OFF or ON positions.
If there is any potential remote keyless entry problem with your vehicle,
ensureALL remote entry transmittersare brought to the dealership,
to aid in troubleshooting.
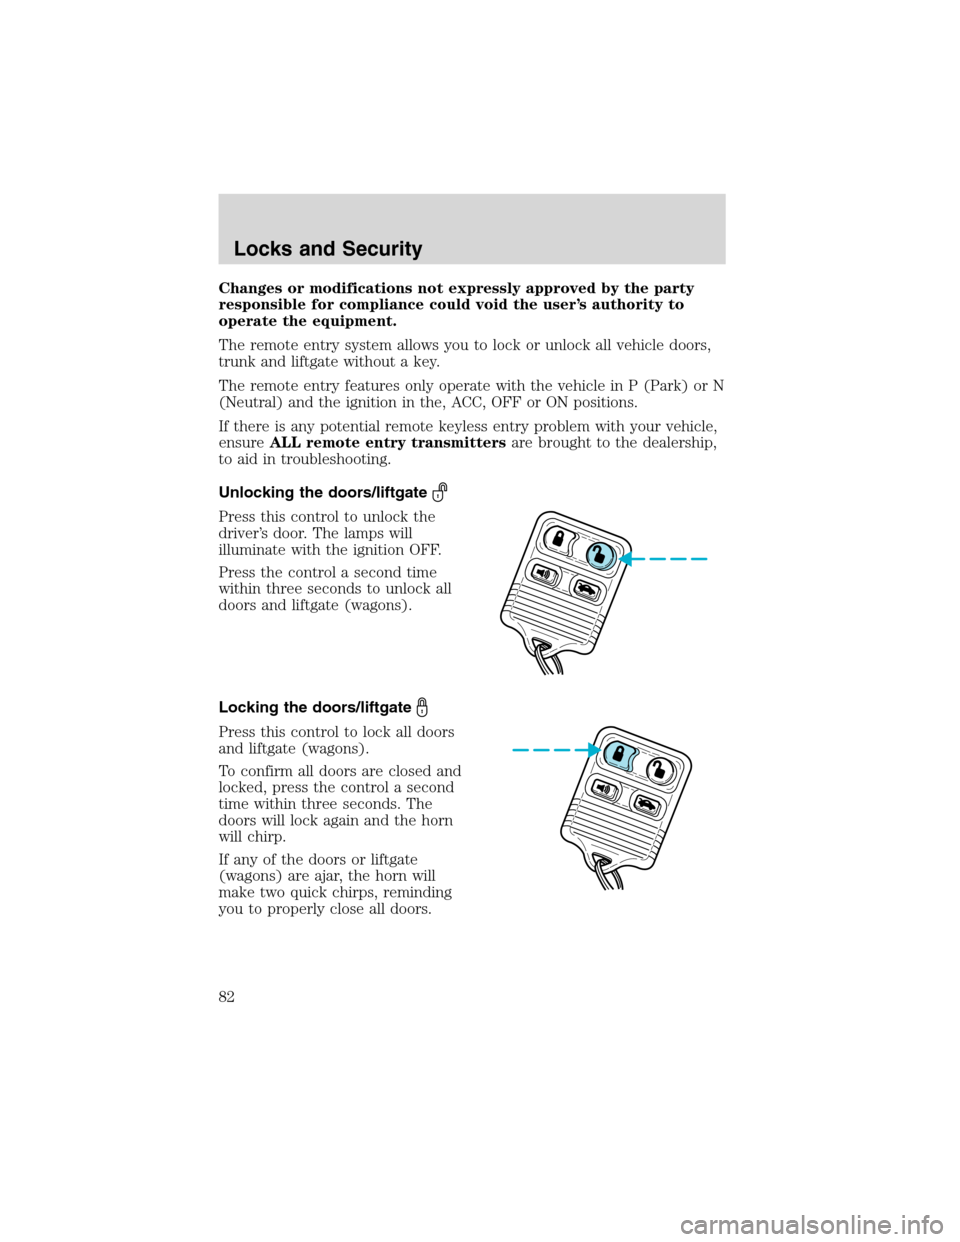
Unlocking the doors/liftgate
Press this control to unlock the
driver’s door. The lamps will
illuminate with the ignition OFF.
Press the control a second time
within three seconds to unlock all
doors and liftgate (wagons).
Locking the doors/liftgate
Press this control to lock all doors
and liftgate (wagons).
To confirm all doors are closed and
locked, press the control a second
time within three seconds. The
doors will lock again and the horn
will chirp.
If any of the doors or liftgate
(wagons) are ajar, the horn will
make two quick chirps, reminding
you to properly close all doors.
Locks and Security
82
Page 139 of 240
Have the exhaust and body ventilation systems checked whenever:
•the vehicle is raised for service.
•the sound of the exhaust system changes.
•the vehicle has been damaged in a collision.
WARNING:Engine exhaust, some of its constituents, and
certain vehicle components contain or emit chemicals known to
the State of California to cause cancer and birth defects or other
reproductive harm. In addition, certain fluids contained in vehicles and
certain products of component wear contain or emit chemicals known
to the State of California to cause cancer and birth defects or other
reproductive harm.
Important ventilating information
If the engine is idling while the vehicle is stopped in an open area for
long periods of time, open the windows at least 2.5 cm (one inch).
Adjust the heating or air conditioning (if equipped) to bring in fresh air.
Improve vehicle ventilation by keeping all air inlet vents clear of snow,
leaves and other debris.
BRAKES
Your service brakes are self-adjusting. Refer to the scheduled
maintenance guide for scheduled maintenance.
Occasional brake noise is normal and often does not indicate a
performance concern with the vehicle’s brake system. In normal
operation, automotive brake systems may emit occasional or intermittent
squeal or groan noises when the brakes are applied. Such noises are
usually heard during the first few brake applications in the morning;
however, they may be heard at any time while braking and can be
aggravated by environmental conditions such as cold, heat, moisture,
road dust, salt or mud. If a“metal-to-metal,”“continuous grinding”or
“continuous squeal”sound is present while braking, the brake linings
may be worn-out and should be inspected by a qualified service
technician.
If you are driving down a long or steep hill, shift to a lower gear.
Do not apply your brakes continuously, as they may overheat
and become less effective.
Driving
139
Page 164 of 240
The use of tire sealants is not recommended and may
compromise the integrity of your tires.
Temporary spare tire information
The temporary spare tire for your vehicle is labeled as such. It is smaller
than a regular tire and is designed for emergency use only. Replace the
temporary spare tire with a full-size tire as soon as possible.
If you use the temporary spare tire continuously or do not follow
these precautions, the tire could fail, causing you to lose control
of the vehicle, possibly injuring yourself or others.
When driving with the temporary spare tiredo not:
•use more than one temporary spare tire at a time
•exceed 80 km/h (50 mph)
•load the vehicle beyond maximum vehicle load rating listed on the
Safety Compliance Label
•tow a trailer
•use tire chains
•drive through an automatic car wash, because of the vehicle’s reduced
ground clearance
•try to repair the temporary spare tire or remove it from its wheel
•use the wheel for any other type of vehicle
Use of a temporary spare tire at any one wheel location can lead to
impairment of the following:
•handling, stability and braking performance
•comfort and noise
•ground clearance and parking at curbs
•Winter driving capability
Tire change procedure
1. Park on a level surface, activate hazard flashers and set parking brake.
When one of the front wheels is off the ground, the transaxle
alone will not prevent the vehicle from moving or slipping off the
jack, even if the vehicle is in P (Park).
Roadside Emergencies
164
Page 176 of 240
In some states (in the U.S.) you must directly notify Ford in writing
before pursuing remedies under your state’s warranty laws. Ford is also
allowed a final repair attempt in some states.
In the United States, a warranty dispute must be submitted to the
Dispute Settlement Board before taking action under the Magnuson-Moss
Warranty Act, or to the extent allowed by state law, before pursuing
replacement or repurchase remedies provided by certain state laws. This
dispute handling procedure is not required prior to enforcing state
created rights or other rights which are independent of the
Magnuson-Moss Warranty Act or state replacement or repurchase laws.
FORD EXTENDED SERVICE PLAN
You can get more protection for your new car or light truck by
purchasing Ford Extended Service Plan (Ford ESP) coverage. Ford ESP
is an optional service contract which is backed by Ford Motor Company
or Ford Motor Service Company (in the U.S.) and Ford of Canada (in
Canada). It provides the following:
•Benefits during the warranty period depending on the plan you
purchase (such as: reimbursement for rentals; coverage for certain
maintenance and wear items).
•Protection against covered repair costs after your Bumper-to-Bumper
Warranty expires.
You may purchase Ford ESP from any participating Ford and Lincoln
Mercury and Ford of Canada dealer. There are several plans available in
various time, distance and deductible combinations which can be tailored
to fit your own driving needs. Ford ESP also offers reimbursement
benefits for towing and rental coverage.
When you buy Ford ESP, you receive Peace-of-Mind protection
throughout the United States and Canada, provided by a network of
more than 5,000 participating Ford or Lincoln Mercury and Ford of
Canada dealers.
If you did not take advantage of the Ford Extended Service Plan at the
time of purchasing your vehicle, you may still be eligible. Please contact
your dealer for further information. Since this information is subject to
change, please ask your dealer for complete details about Ford Extended
Service Plan coverage options, or visit the Ford ESP website at
www.ford-esp.com.
Customer Assistance
176
Page 213 of 240
economy under current driving conditions. Additionally, keeping records
during summer and winter will show how temperature impacts fuel
economy. In general, lower temperatures give lower fuel economy.
Driving style—good driving and fuel economy habits
Give consideration to the lists that follow and you may be able to change
a number of variables and improve your fuel economy.
Habits
•Smooth, moderate operation can yield up to 10% savings in fuel.
•Steady speeds without stopping will usually give the best fuel
economy.
•Idling for long periods of time (greater than one minute) may waste
fuel.
•Anticipate stopping; slowing down may eliminate the need to stop.
•Sudden or hard accelerations may reduce fuel economy.
•Slow down gradually.
•Driving at reasonable speeds (traveling at 88 km/h [55 mph] uses 15%
less fuel than traveling at 105 km/h [65 mph]).
•Revving the engine before turning it off may reduce fuel economy.
•Using the air conditioner or defroster may reduce fuel economy.
•You may want to turn off the speed control in hilly terrain if
unnecessary shifting between third and fourth gear occurs.
Unnecessary shifting of this type could result in reduced fuel
economy.
•Warming up a vehicle on cold mornings is not required and may
reduce fuel economy.
•Resting your foot on the brake pedal while driving may reduce fuel
economy.
•Combine errands and minimize stop-and-go driving.
Maintenance
•Keep tires properly inflated and use only recommended size.
•Operating a vehicle with the wheels out of alignment will reduce fuel
economy.
•Use recommended engine oil. Refer toLubricant specificationsin
this chapter.
Maintenance and Specifications
213