instrument panel Mercury Villager 2000 s User Guide
[x] Cancel search | Manufacturer: MERCURY, Model Year: 2000, Model line: Villager, Model: Mercury Villager 2000Pages: 256, PDF Size: 2.21 MB
Page 38 of 256
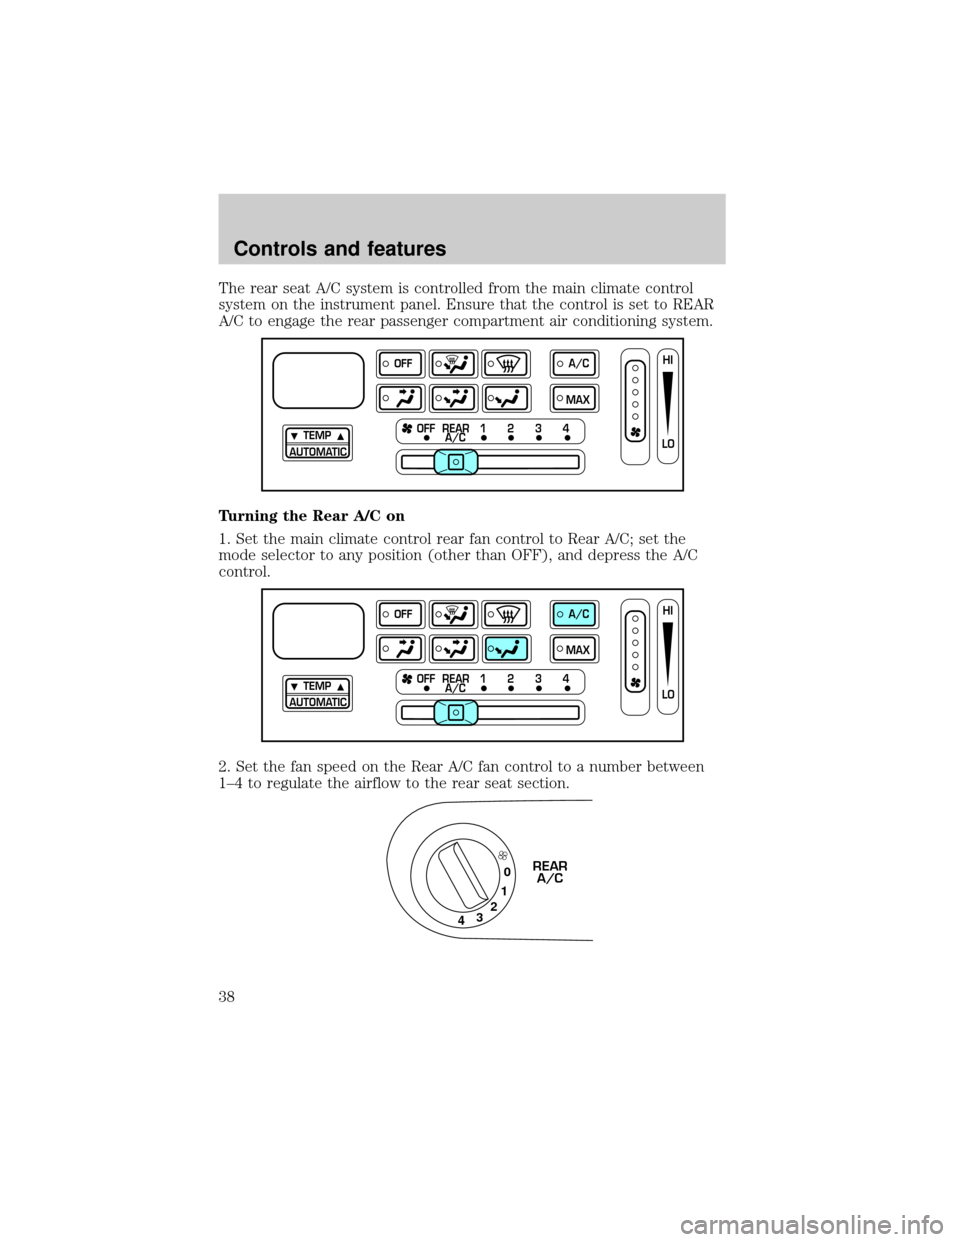
The rear seat A/C system is controlled from the main climate control
system on the instrument panel. Ensure that the control is set to REAR
A/C to engage the rear passenger compartment air conditioning system.
Turning the Rear A/C on
1. Set the main climate control rear fan control to Rear A/C; set the
mode selector to any position (other than OFF), and depress the A/C
control.
2. Set the fan speed on the Rear A/C fan control to a number between
1±4 to regulate the airflow to the rear seat section.
TEMP
AUTOMATICOFF REAR 1 2 3 4
OFFA/C
A/CMAXHI
LO
TEMP
AUTOMATICOFF REAR 1 2 3 4
OFFA/C
A/CMAXHI
LO
10
2
3
4
REAR
A/C
Controls and features
38
Page 40 of 256
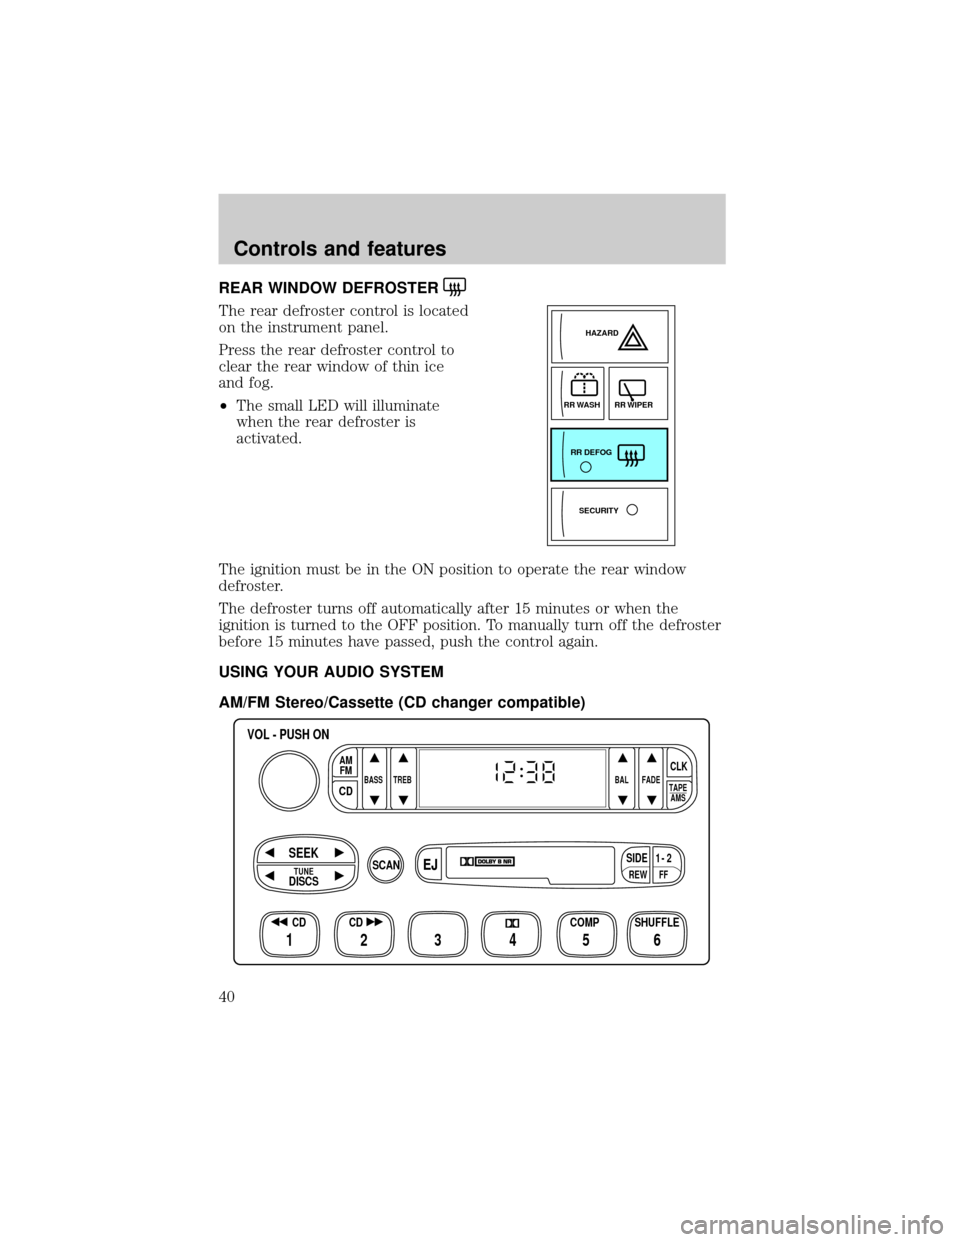
REAR WINDOW DEFROSTER
The rear defroster control is located
on the instrument panel.
Press the rear defroster control to
clear the rear window of thin ice
and fog.
²The small LED will illuminate
when the rear defroster is
activated.
The ignition must be in the ON position to operate the rear window
defroster.
The defroster turns off automatically after 15 minutes or when the
ignition is turned to the OFF position. To manually turn off the defroster
before 15 minutes have passed, push the control again.
USING YOUR AUDIO SYSTEM
AM/FM Stereo/Cassette (CD changer compatible)
SECURITYHAZARD
RR DEFOGRR WIPER
RR WASH
FFREW
SIDE1 - 2
BASS TREB BAL FADE
TAPE
AMS
AM
FM
CD
CLK
VOL - PUSH ON
SHUFFLE COMP CD
EJ
CDSCAN
DISCS
TUNE
SEEK
3 2 1456
Controls and features
40
Page 81 of 256
²Station overload.Weak signals are sometimes captured by stronger
signals when you pass a broadcast tower. A stronger signal may
temporarily overtake a weaker signal and play while the weak station
frequency is displayed.
The audio system automatically switches to single channel reception if it
will improve the reception of a station normally received in stereo.
Audio system warranties and service
Refer to the ªWarranty Guideº for audio system warranty information.
If service is necessary, see your dealer or a qualified technician.
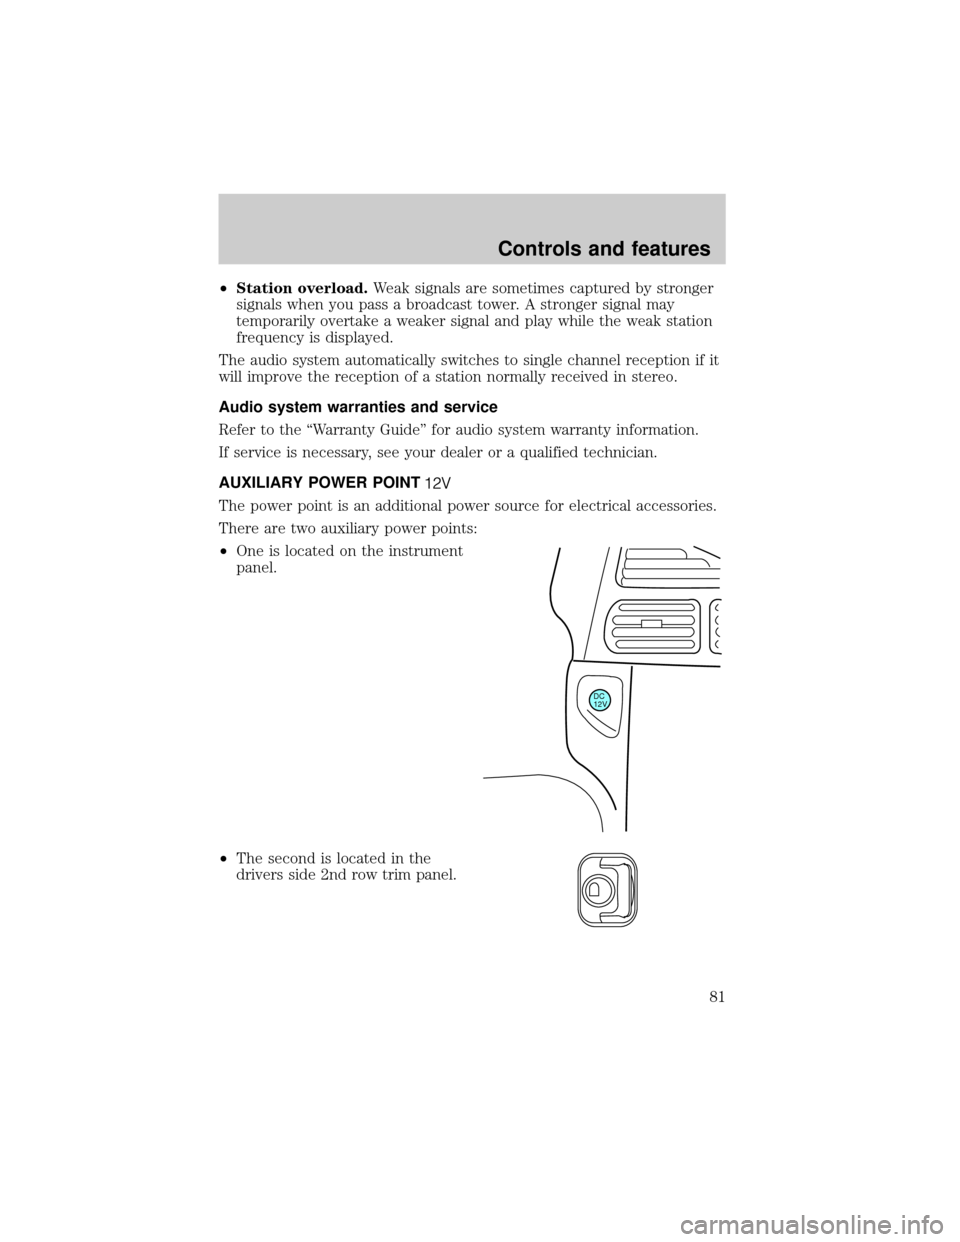
AUXILIARY POWER POINT
The power point is an additional power source for electrical accessories.
There are two auxiliary power points:
²One is located on the instrument
panel.
²The second is located in the
drivers side 2nd row trim panel.
DC
12V
Controls and features
81
Page 106 of 256
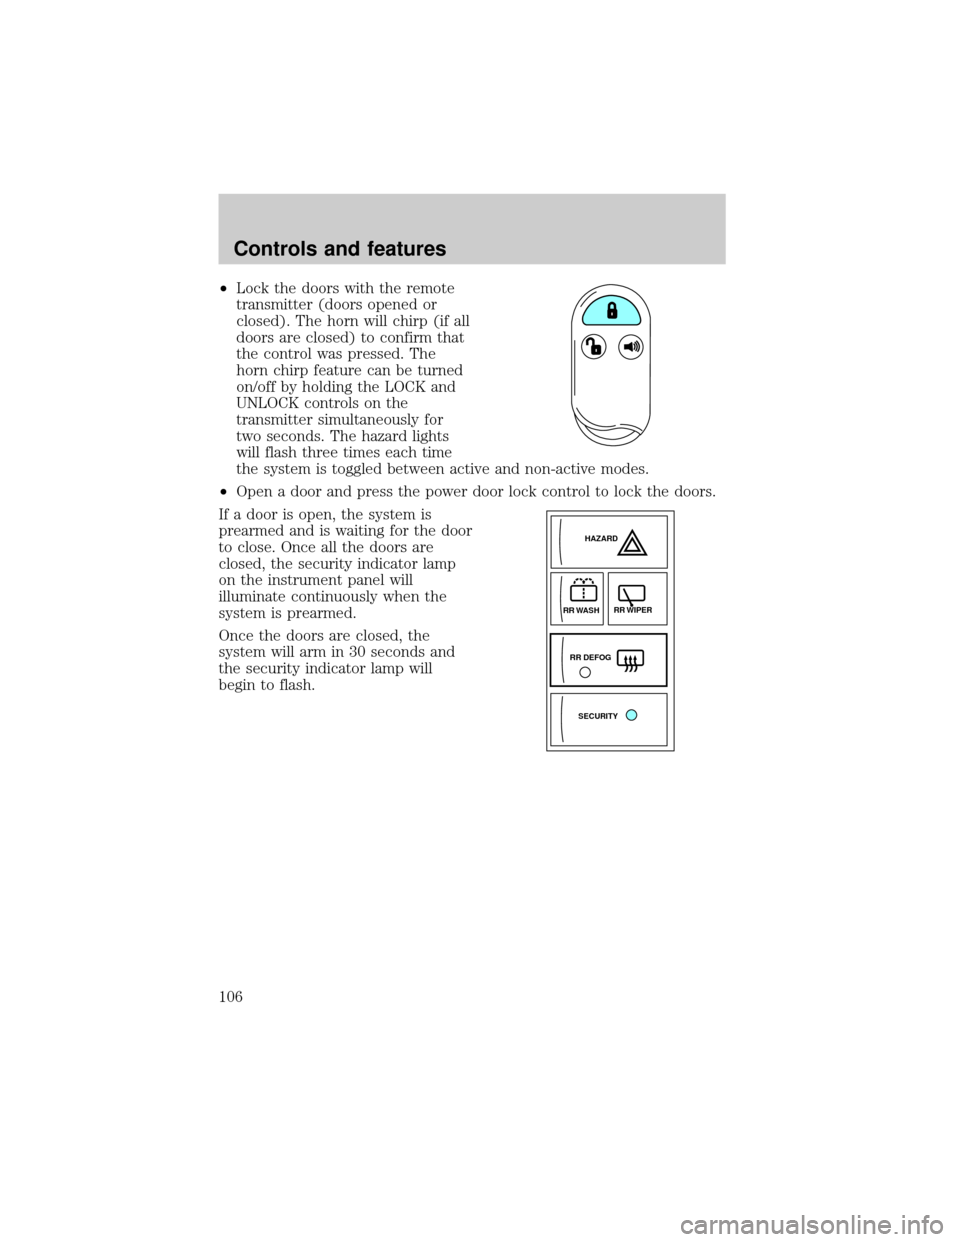
²Lock the doors with the remote
transmitter (doors opened or
closed). The horn will chirp (if all
doors are closed) to confirm that
the control was pressed. The
horn chirp feature can be turned
on/off by holding the LOCK and
UNLOCK controls on the
transmitter simultaneously for
two seconds. The hazard lights
will flash three times each time
the system is toggled between active and non-active modes.
²Open a door and press the power door lock control to lock the doors.
If a door is open, the system is
prearmed and is waiting for the door
to close. Once all the doors are
closed, the security indicator lamp
on the instrument panel will
illuminate continuously when the
system is prearmed.
Once the doors are closed, the
system will arm in 30 seconds and
the security indicator lamp will
begin to flash.
SECURITYHAZARD
RR DEFOGRR WIPER
RR WASH
Controls and features
106
Page 143 of 256
6. Before placing the child into the child seat, forcibly tilt the child seat
from side to side and in forward direction to make sure that the seat is
held securely in place. If the child seat moves excessively, repeat steps 5
through 6, or properly install the child seat in a different position.
Some manufacturers make safety seats that include a tether strap that
goes over the back of the vehicle seat and attaches to an anchoring
point. Other manufacturers offer the tether strap as an accessory.
Contact the manufacturer of your child safety seat for information about
ordering a tether strap.
Children should be placed in the rear in an appropriate child
safety seat that is properly secured to the vehicle.
Rear-facing infant seats must always be secured in the rear seat.
In vehicles without a rear seat, a rear-facing infant seat should
be secured in the front seat only if your vehicle does not have a
passenger side air bag or your vehicle is equipped with a passenger air
bag deactivate switch and the switch is turned to ªOFF.º
When using forward-facing child safety seats in vehicles with
only two seating positions so the forward-facing child safety seat
cannot be placed in the rear of the vehicle, move the passenger seat as
far back from the instrument panel as possible.
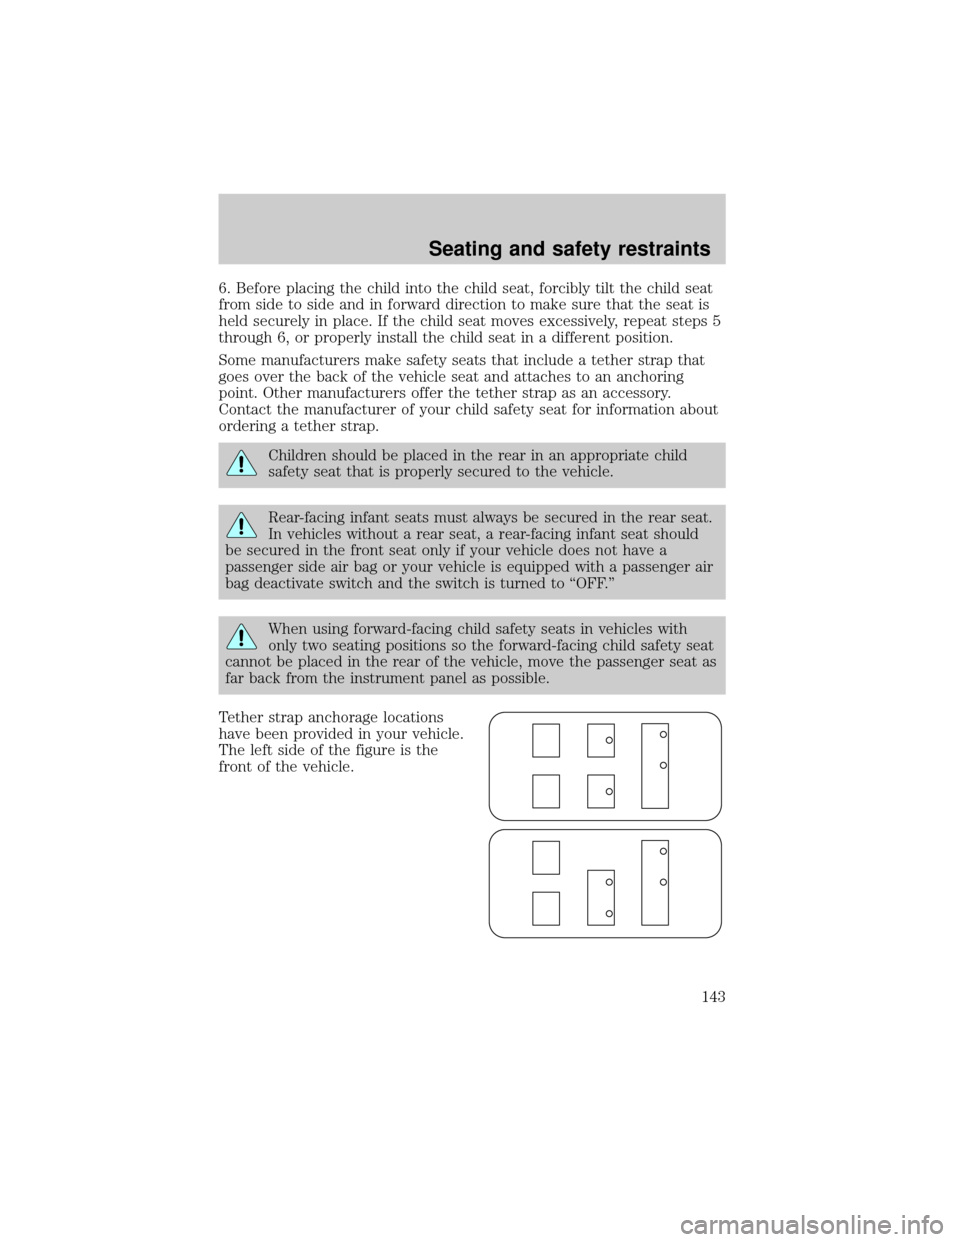
Tether strap anchorage locations
have been provided in your vehicle.
The left side of the figure is the
front of the vehicle.
Seating and safety restraints
143
Page 167 of 256
Roadside coverage beyond basic warranty
In the United States, you may purchase additional roadside assistance
coverage beyond this period through the Ford Auto Club by contacting
your Ford or Lincoln Mercury dealer.
Similarly in Canada, you may purchase additional coverage beyond the
basic coverage period by consulting the Ford Roadside Assistance Club
brochure or by calling 1±877±294±CLUB (1±877±894±2582).
HAZARD FLASHER
Use only in an emergency to warn traffic of vehicle breakdown,
approaching danger, etc. The hazard flashers can be operated when the
ignition is off.
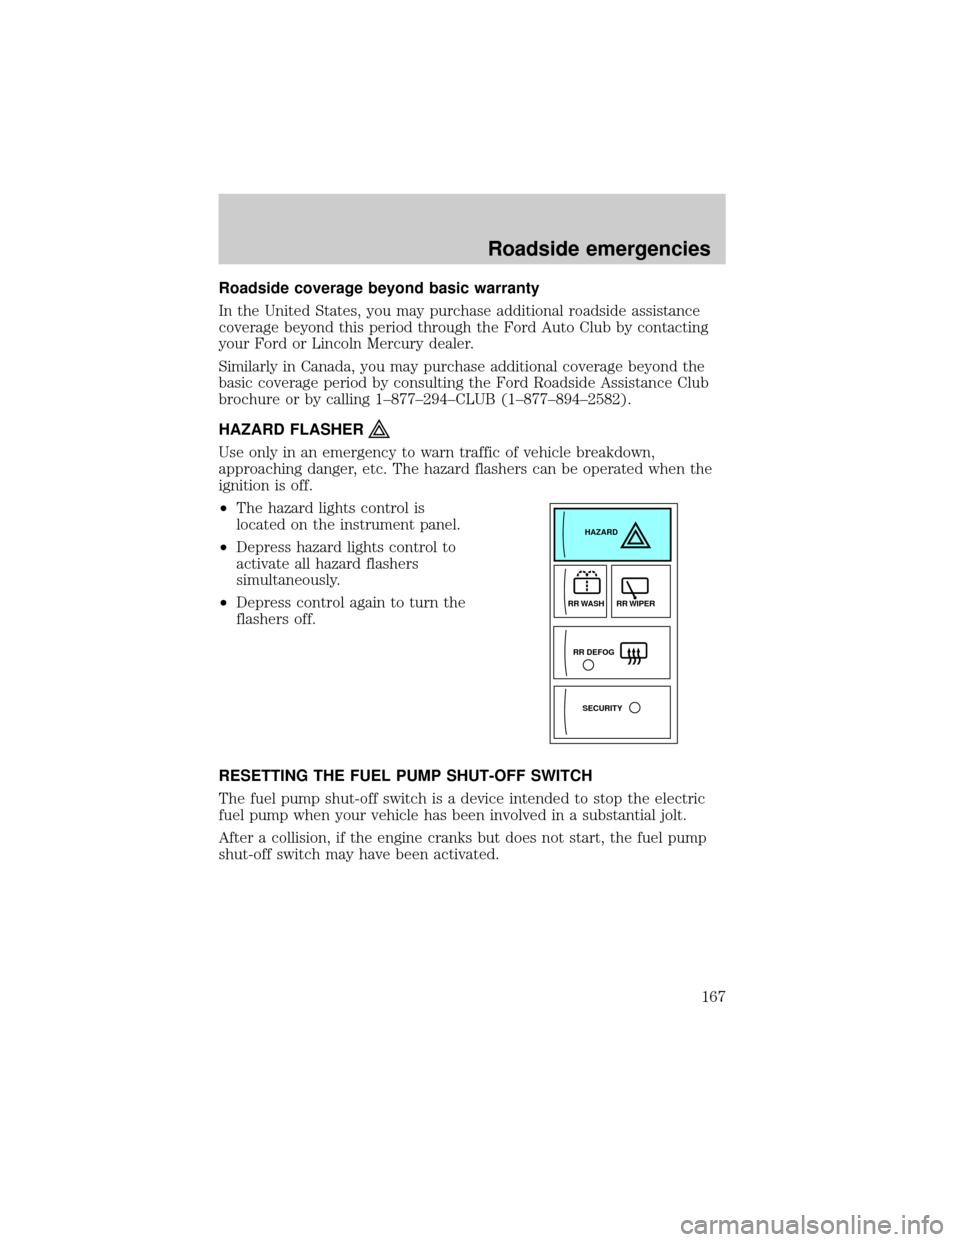
²The hazard lights control is
located on the instrument panel.
²Depress hazard lights control to
activate all hazard flashers
simultaneously.
²Depress control again to turn the
flashers off.
RESETTING THE FUEL PUMP SHUT-OFF SWITCH
The fuel pump shut-off switch is a device intended to stop the electric
fuel pump when your vehicle has been involved in a substantial jolt.
After a collision, if the engine cranks but does not start, the fuel pump
shut-off switch may have been activated.
SECURITYHAZARD
RR DEFOGRR WIPER RR WASH
Roadside emergencies
167
Page 170 of 256
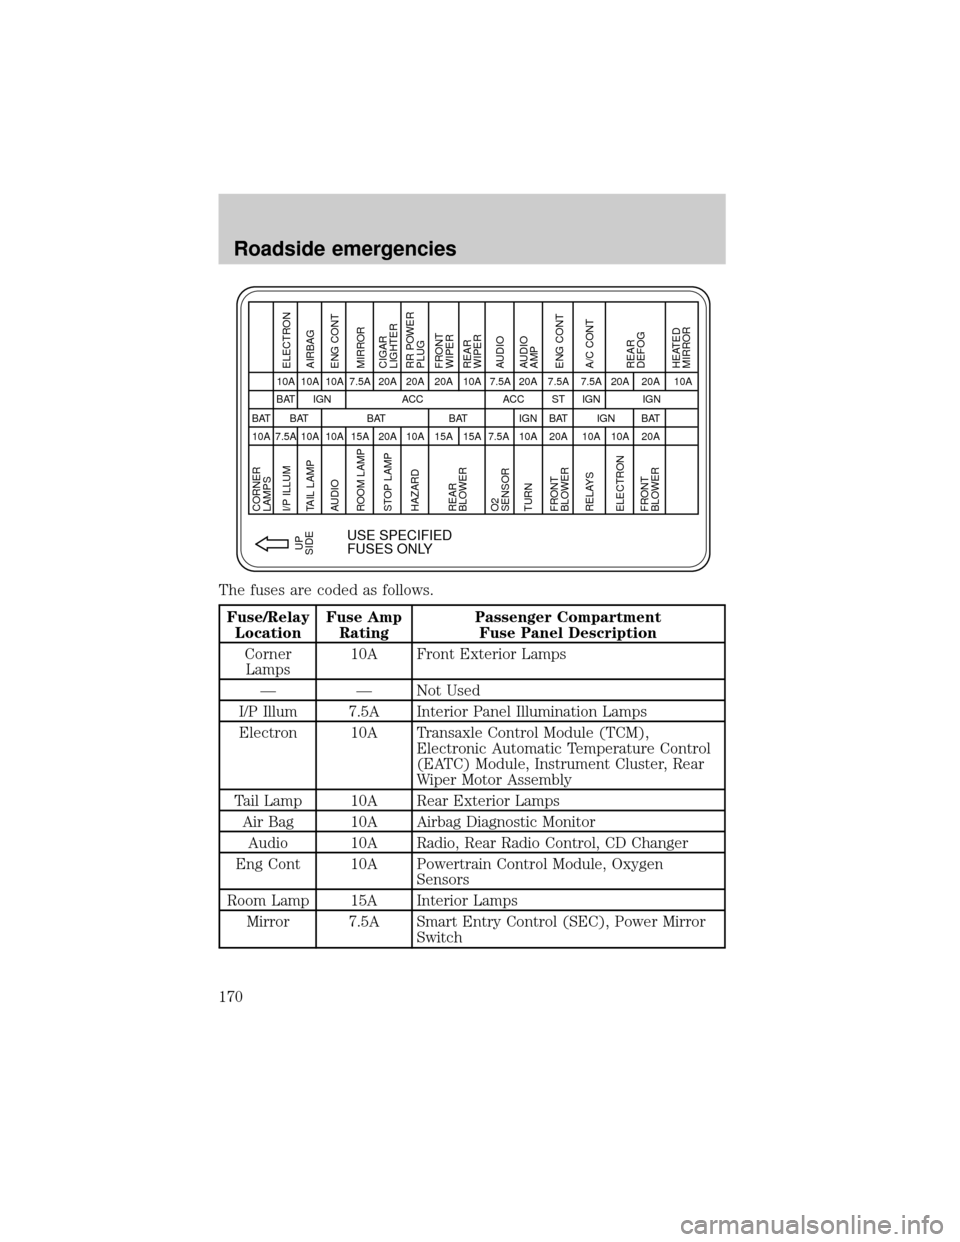
The fuses are coded as follows.
Fuse/Relay
LocationFuse Amp
RatingPassenger Compartment
Fuse Panel Description
Corner
Lamps10A Front Exterior Lamps
Ð Ð Not Used
I/P Illum 7.5A Interior Panel Illumination Lamps
Electron 10A Transaxle Control Module (TCM),
Electronic Automatic Temperature Control
(EATC) Module, Instrument Cluster, Rear
Wiper Motor Assembly
Tail Lamp 10A Rear Exterior Lamps
Air Bag 10A Airbag Diagnostic Monitor
Audio 10A Radio, Rear Radio Control, CD Changer
Eng Cont 10A Powertrain Control Module, Oxygen
Sensors
Room Lamp 15A Interior Lamps
Mirror 7.5A Smart Entry Control (SEC), Power Mirror
Switch
CORNER
LAMPS
I/P ILLUM
10A BAT
7.5ABAT IGN ACC
USE SPECIFIED
FUSES ONLY
ACC 10A
10A 10A
10A 10A
15A 7.5A
20A 20A
10A 20A
15A 20A
15A 7.5A 10A 7.5A
BAT BAT BAT
10A 20A
IGNST
20A 7.5A
BAT
20A 20A 10A
BAT IGN IGN
10A 7.5A
10A 20A
IGN
UP
SIDEELECTRON
TAIL LAMP AIRBAG
AUDIO ENG CONT
ROOM LAMP MIRROR
RELAYS A/C CONT
ELECTRON
FRONT
BLOWERREAR
DEFOG
HEATED
MIRROR STOP LAMPCIGAR
LIGHTER
HAZARDRR POWER
PLUG
TURNAUDIO
AMP
FRONT
BLOWERENG CONT REAR
BLOWER
O2
SENSORFRONT
WIPER
REAR
WIPER
AUDIO
Roadside emergencies
170
Page 171 of 256
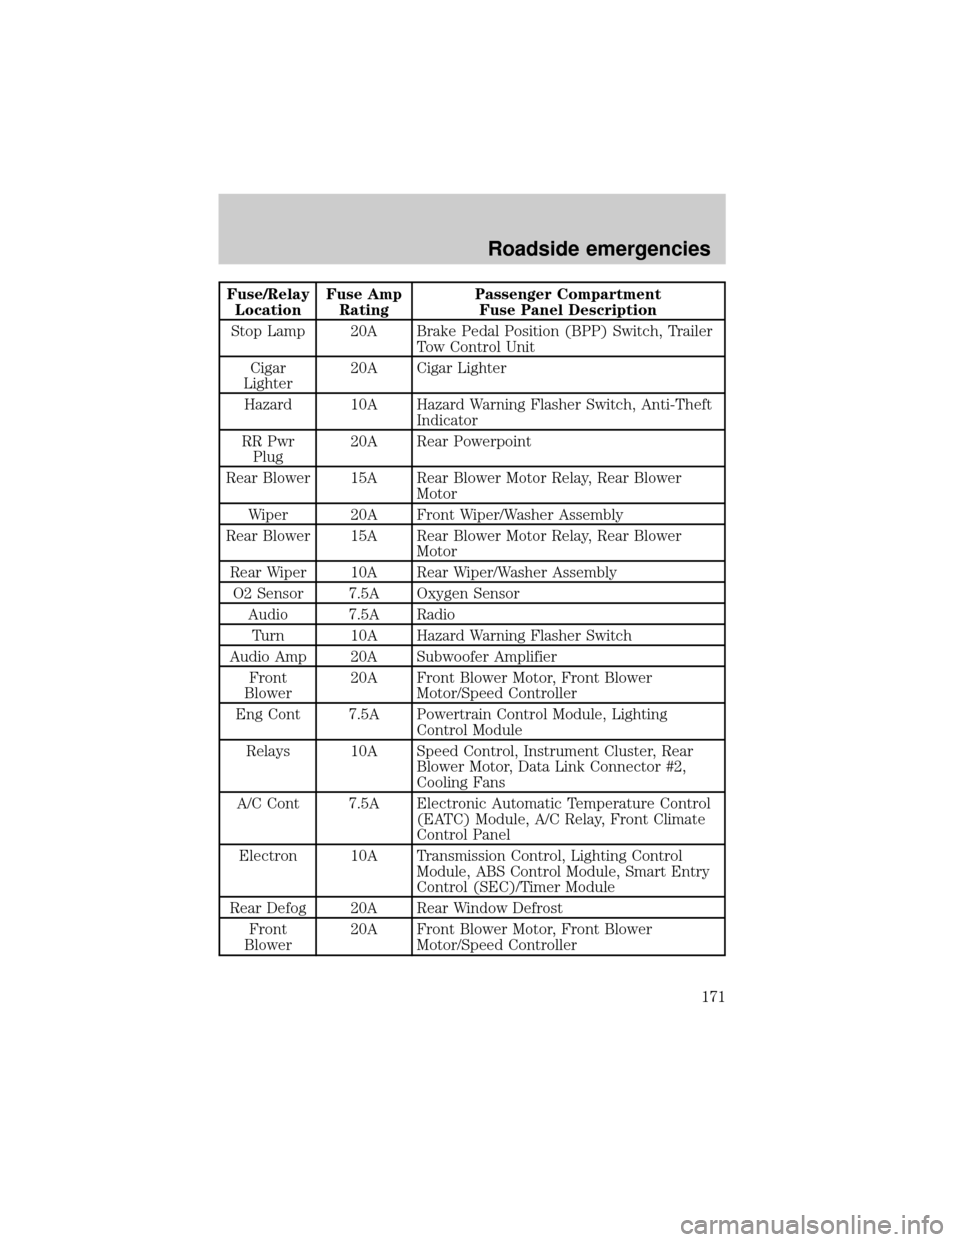
Fuse/Relay
LocationFuse Amp
RatingPassenger Compartment
Fuse Panel Description
Stop Lamp 20A Brake Pedal Position (BPP) Switch, Trailer
Tow Control Unit
Cigar
Lighter20A Cigar Lighter
Hazard 10A Hazard Warning Flasher Switch, Anti-Theft
Indicator
RR Pwr
Plug20A Rear Powerpoint
Rear Blower 15A Rear Blower Motor Relay, Rear Blower
Motor
Wiper 20A Front Wiper/Washer Assembly
Rear Blower 15A Rear Blower Motor Relay, Rear Blower
Motor
Rear Wiper 10A Rear Wiper/Washer Assembly
O2 Sensor 7.5A Oxygen Sensor
Audio 7.5A Radio
Turn 10A Hazard Warning Flasher Switch
Audio Amp 20A Subwoofer Amplifier
Front
Blower20A Front Blower Motor, Front Blower
Motor/Speed Controller
Eng Cont 7.5A Powertrain Control Module, Lighting
Control Module
Relays 10A Speed Control, Instrument Cluster, Rear
Blower Motor, Data Link Connector #2,
Cooling Fans
A/C Cont 7.5A Electronic Automatic Temperature Control
(EATC) Module, A/C Relay, Front Climate
Control Panel
Electron 10A Transmission Control, Lighting Control
Module, ABS Control Module, Smart Entry
Control (SEC)/Timer Module
Rear Defog 20A Rear Window Defrost
Front
Blower20A Front Blower Motor, Front Blower
Motor/Speed Controller
Roadside emergencies
171
Page 187 of 256
Do not start your engine with the air cleaner removed and do
not remove it while the engine is running.
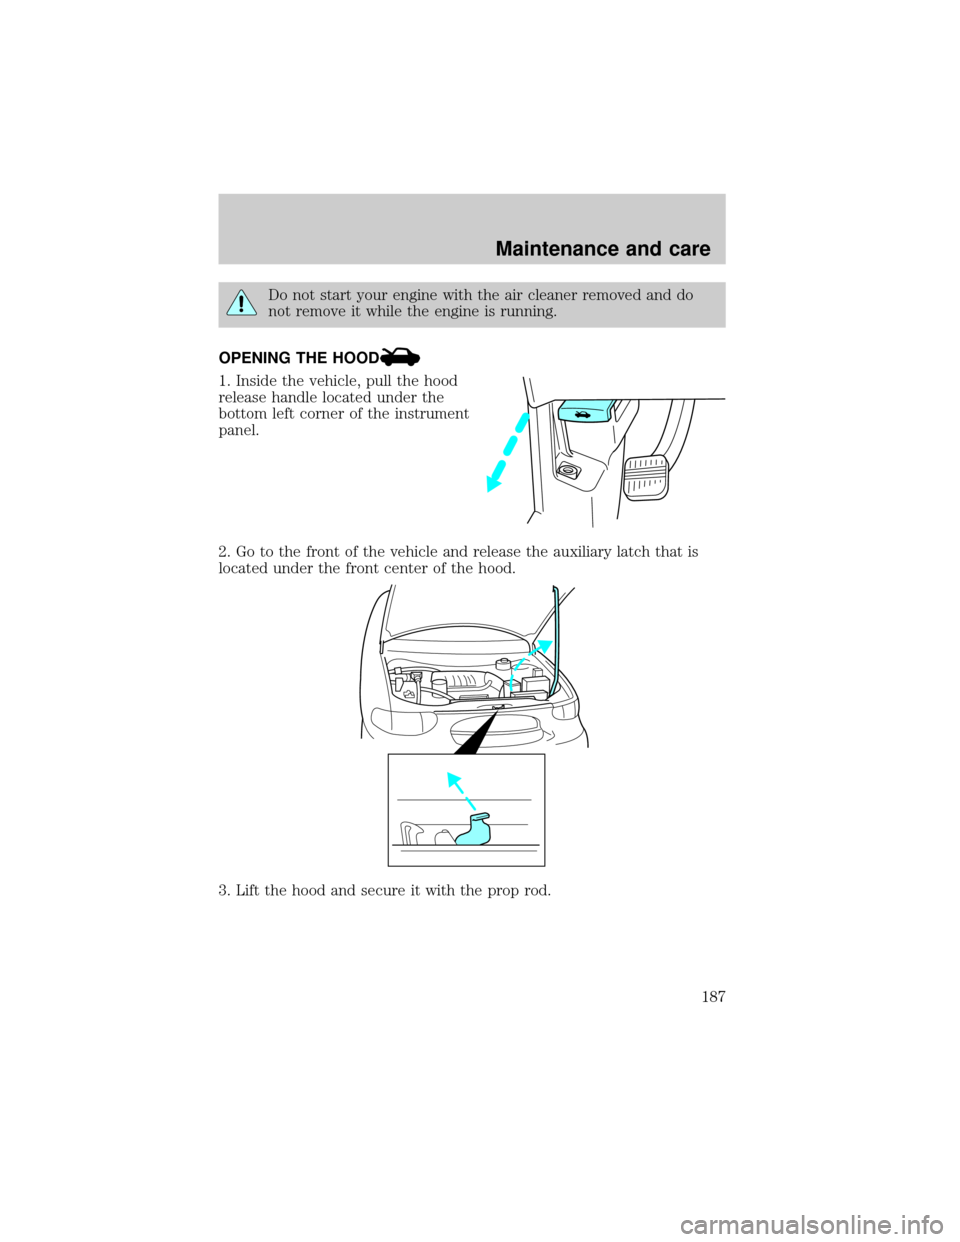
OPENING THE HOOD
1. Inside the vehicle, pull the hood
release handle located under the
bottom left corner of the instrument
panel.
2. Go to the front of the vehicle and release the auxiliary latch that is
located under the front center of the hood.
3. Lift the hood and secure it with the prop rod.
Maintenance and care
187
Page 227 of 256

Function Number of
bulbsTrade number
Dome lamps 2 211-2
Turn signal lamps (front) 2 3157NA (amber)
Turn signal lamps (rear) 2 3156
Tail Lamps 2 3157
Personal reading lamps 2 578
Stepwell lamps 4 194
Glove compartment 1 194
All replacement bulbs are clear in color except where noted.
To replace all instrument panel lights - see your dealer.
AIMING THE HEADLAMPS
The headlamps on your vehicle are properly aimed at the assembly plant.
If your vehicle has been in an accident the alignment of your headlamps
should be checked by a qualified service technician.
CLEANING AND CARING FOR YOUR VEHICLE
Refer to the Customer Assistance chapter for a list of Ford-approved
cleaners, polishes and waxes.
Washing your vehicle
Wash your vehicle regularly with
cold or lukewarm water. Never use
strong detergents or soap. If your
vehicle is particularly dirty, use a
quality car wash detergent. Always
use a clean sponge, washing glove
or similar device and plenty of water
for best results. To avoid spots,
avoid washing when the hood is still
warm, immediately after or during
exposure to strong sunlight.
During winter months, it is especially important to wash the vehicle on a
regular basis. Large quantities of dirt and road salt are difficult to
remove and also cause damage to the vehicle.
Maintenance and care
227