set clock Mercury Villager 2002 Owner's Manuals
[x] Cancel search | Manufacturer: MERCURY, Model Year: 2002, Model line: Villager, Model: Mercury Villager 2002Pages: 256, PDF Size: 1.91 MB
Page 24 of 256

3. Press and hold a memory preset control until the sound returns,
indicating the station is held in memory on the control you selected.
Setting the clock
Press CLK to toggle between
listening frequencies and clock
mode while in radio mode.
To set the hour, press and hold the
CLK control and press the SEEK
control:
•
to decrease hours and
•
to increase hours.
To set the minute, press and hold
the CLK control and press the
TUNE control:
•
to decrease minutes and
•
to increase minutes.
The CLK control will allow you to switch between media display mode
(radio station, stereo information, etc.) and clock display mode (time).
When in clock mode, the media information will display for 10 seconds,
when the radio is turned on, and then revert to clock information. Any
time that the media is changed, (new radio station, etc.), the media
information will again display for 10 seconds before reverting back to the
clock. In media mode, the media information will always be displayed.
SHUFFLE COMP CD CD
3 2 1456
TAPE
AMS
CLK
SEEK
TUNEDISCS
TAPE
AMS
CLK
SEEK
TUNEDISCS
Entertainment Systems
24
Page 33 of 256

3. Press and hold a memory preset control until the sound returns,
indicating the station is held in memory on the control you selected.
Autoset memory preset
Autoset allows you to set strong radio stations without losing your
original manually set preset stations. This feature is helpful on trips
when you travel between cities with different radio stations.
Starting autoset memory preset
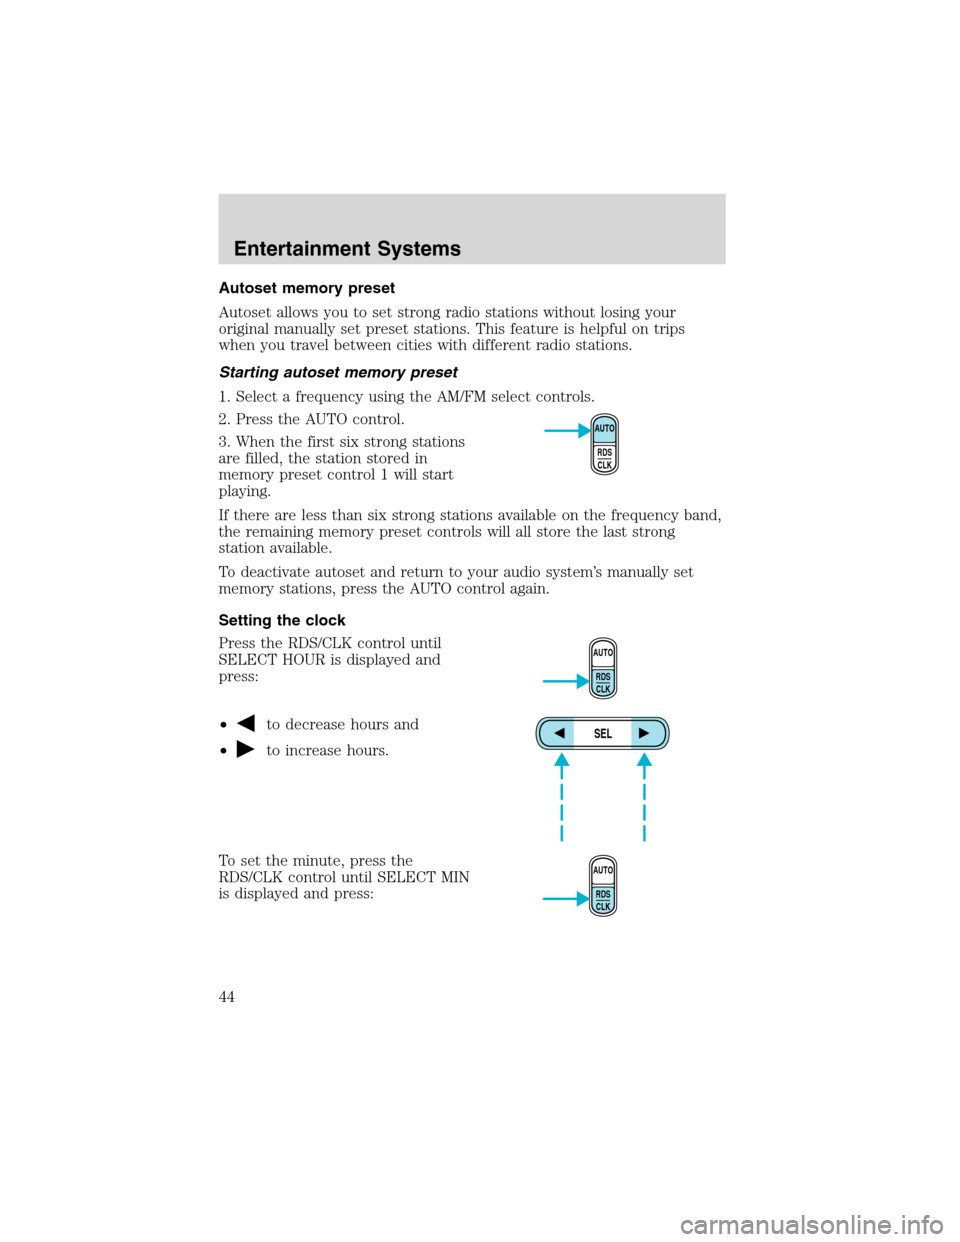
1. Select a frequency using the AM/FM select controls.
2. Press the AUTO control.
3. When the first six strong stations
are filled, the station stored in
memory preset control 1 will start
playing.
If there are less than six strong stations available on the frequency band,
the remaining memory preset controls will all store the last strong
station available.
To deactivate autoset and return to your audio system’s manually set
memory stations, press the AUTO control again.
Setting the clock
Press the CLOCK control until
SELECT HOUR or SELECT MINS is
displayed.
Use the SEL control to manually set
the time.
•Press
to increase
hours/minutes.
•Press
to decrease
hours/minutes.
REW
1
FF
2
SIDE 1.
2
34
COMP
5
SHUFF
6
AUTO
RDS / CLK
SEL
Entertainment Systems
33
Page 44 of 256

Autoset memory preset
Autoset allows you to set strong radio stations without losing your
original manually set preset stations. This feature is helpful on trips
when you travel between cities with different radio stations.
Starting autoset memory preset
1. Select a frequency using the AM/FM select controls.
2. Press the AUTO control.
3. When the first six strong stations
are filled, the station stored in
memory preset control 1 will start
playing.
If there are less than six strong stations available on the frequency band,
the remaining memory preset controls will all store the last strong
station available.
To deactivate autoset and return to your audio system’s manually set
memory stations, press the AUTO control again.
Setting the clock
Press the RDS/CLK control until
SELECT HOUR is displayed and
press:
•
to decrease hours and
•
to increase hours.
To set the minute, press the
RDS/CLK control until SELECT MIN
is displayed and press:
AUTO
RDS
CLK
AUTO
RDS
CLK
SEL
AUTO
RDS
CLK
Entertainment Systems
44
Page 74 of 256

HEADLAMP CONTROL
Rotate the headlamp control
clockwise to the first position to
turn on the parking lamps. Rotate
clockwise to the second position to
also turn on the headlamps.
Push the control to turn on the
interior lamps. Push control again to
turn off the interior lamps.
Autolamp control (if equipped)
The autolamp system provides light
sensitive automatic on-off control of
the low-beam exterior lights
normally controlled by the headlamp
control.
The autolamp system also keeps the
lights on for a preselected period of
time after the ignition switch is
turned to OFF.
•To turn autolamps on, rotate the
headlamp control counter clockwise to one of the two settings. The
AUTO 1 position has a preselected time lapse of approximately 25
seconds. The AUTO 2 position has a preselected time lapse of
approximately 2
1⁄2minutes.
•To turn autolamps off, rotate the headlamp control clockwise to the
OFF position.
Foglamp control (if equipped)
Turn on the low-beam headlamps
and press the foglamp control to
activate the foglamps. The foglamp
control will illuminate when the
foglamps are on.
Press the foglamp control a second
time to deactivate the foglamps.
OFFAUTO
1
AUTO
2
PUSH INTERIOR
Lights
74
Page 185 of 256

2. Install the retainer through the
wheel center and slide the wheel
under the vehicle.
3. Turn the wrench clockwise until
the tire is raised to its original
position underneath the vehicle. The
hex nut ratchets when the tire is
raised to the stowed position. It will
not allow you to overtighten.
4. Check seating position of tire for
looseness against the underbody
supports and retighten if necessary.
Ensure the position of the
tire is not too far forward to
avoid contact with the axle.
Tire change procedure
When one of the front wheels is off the ground, the transaxle
alone will not prevent the vehicle from moving or slipping off the
jack, even if the vehicle is in P (Park).
To prevent the vehicle from moving when you change a tire, be
sure the parking brake is set, then block (in both directions) the
wheel that is diagonally opposite (other side and end of the vehicle) to
the tire being changed.
If the vehicle slips off the jack, you or someone else could be
seriously injured.
All occupants should be out of the vehicle while it is on the jack.
Roadside Emergencies
185
Page 186 of 256

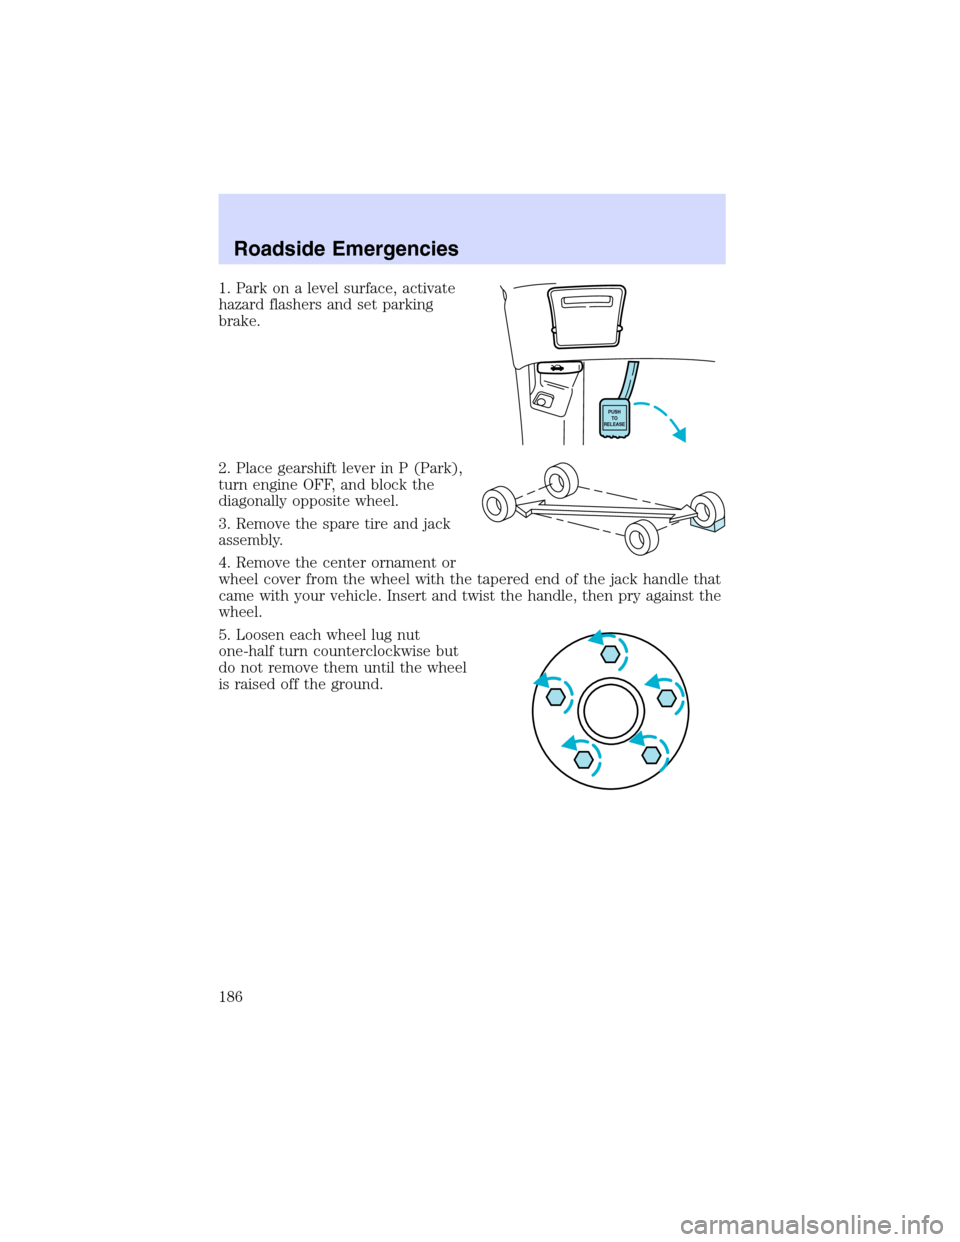
1. Park on a level surface, activate
hazard flashers and set parking
brake.
2. Place gearshift lever in P (Park),
turn engine OFF, and block the
diagonally opposite wheel.
3. Remove the spare tire and jack
assembly.
4. Remove the center ornament or
wheel cover from the wheel with the tapered end of the jack handle that
came with your vehicle. Insert and twist the handle, then pry against the
wheel.
5. Loosen each wheel lug nut
one-half turn counterclockwise but
do not remove them until the wheel
is raised off the ground.
PUSH
TO
RELEASE
Roadside Emergencies
186
Page 216 of 256

When the battery is disconnected or a new battery installed, the
transmission must learn its adaptive strategy. As a result of this, the
transmission may shift firmly. This operation is considered normal and
will fully update transmission operation to its optimum shift feel.
Batteries normally produce explosive gases which can cause
personal injury. Therefore, do not allow flames, sparks or lighted
substances to come near the battery. When working near the battery,
always shield your face and protect your eyes. Always provide proper
ventilation.
When lifting a plastic-cased battery, excessive pressure on the
end walls could cause acid to flow through the vent caps,
resulting in personal injury and/or damage to the vehicle or battery.
Lift the battery with a battery carrier or with your hands on opposite
corners.
Keep batteries out of reach of children. Batteries contain sulfuric
acid. Avoid contact with skin, eyes or clothing. Shield your eyes
when working near the battery to protect against possible splashing of
acid solution. In case of acid contact with skin or eyes, flush
immediately with water for a minimum of 15 minutes and get prompt
medical attention. If acid is swallowed, call a physician immediately.
Battery posts, terminals and related accessories contain lead and
lead compunds.Wash hands after handling.
Your automatic transaxle electronically controls the shift feel by using an
adaptive learning strategy. During the first few hundred kilometers
(miles) of operation, it is normal for your transaxle to have abrupt shifts.
The adaptive learning strategy is maintained by power from the battery.
When the battery is disconnected or a new battery is installed, the
transaxle must relearn its adaptive strategy. Optimal shifting will resume
within a few hundred kilometers (miles) of operation.
If the battery has been disconnected or a new battery has been installed,
the clock and the preset radio stations must be reset once the battery is
reconnected.
Maintenance and Specifications
216
Page 249 of 256

in front seat ............................146
in rear seat ......................146, 148
tether anchorage hardware ...150
Cleaning your vehicle
engine compartment ..............204
exterior ....................................207
instrument panel ....................206
interior .....................................207
plastic parts ............................205
washing ....................................203
waxing .....................................203
wheels ......................................204
wiper blades ............................206
woodtone trim ........................205
Climate control (see Air
conditioning or Heating) ......58, 63
Clock ................................24, 33, 44
Console ......................................103
overhead ....................................86
Controls
power seat ...............................117
steering column ........................94
Coolant
checking and adding ..............217
refill capacities ................220, 239
specifications ..................240–241
Cruise control (see Speed
control) ........................................90
Customer Assistance ................173
Ford accessories for your
vehicle .....................................208
Ford Extended Service
Plan ..........................................196
Getting assistance outside the
U.S. and Canada .....................200
Getting roadside assistance ...173
Getting the service you
need .........................................194
Ordering additional owner’s
literature .................................201The Dispute Settlement
Board .......................................197
Utilizing the
Mediation/Arbitration
Program ...................................200
D
Defrost
rear window ..............................72
Dipstick
automatic transmission
fluid ..........................................232
engine oil .................................212
Doors
door ajar warning .....................14
lubricant specifications ..........240
Driving under special
conditions
through water .........................166
E
Emergencies, roadside
jump-starting ..........................188
Emission control system ..........229
Engine ................................241–242
check engine/service engine
soon light ..................................10
cleaning ...................................204
coolant .....................................217
idle speed control ...................215
lubrication
specifications ..................240–241
refill capacities ........................239
service points ..........................211
starting after a collision .........174
Engine oil ..................................212
checking and adding ..............212
dipstick ....................................212
Index
249