engine overheat MINI Clubman 2010 Owner's Manual
[x] Cancel search | Manufacturer: MINI, Model Year: 2010, Model line: Clubman, Model: MINI Clubman 2010Pages: 160, PDF Size: 2.58 MB
Page 32 of 160
Opening and closing
30
Roller sun blind
The roller sun blind can be opened and closed
independently of the glass sunroof.
Following interruptions in electrical
power supply
After a power failure, there is a possibility that
the glass sunroof can only be raised. In this case,
have the system initialized. The manufacturer of
your MINI recommends that you have this work
done by your MINI dealer.
Windows
To prevent injuries, exercise care when
closing the windows.
Take the remote control with you when you
leave the car; otherwise, children could operate
the electric windows and possibly injure them-
selves.<
If, after a window is opened and closed
several times in close succession, the win-
dow can only be closed and not opened, the sys-
tem is overheated. Let the system cool for sev-
eral minutes with the ignition switched on or the
engine running.<
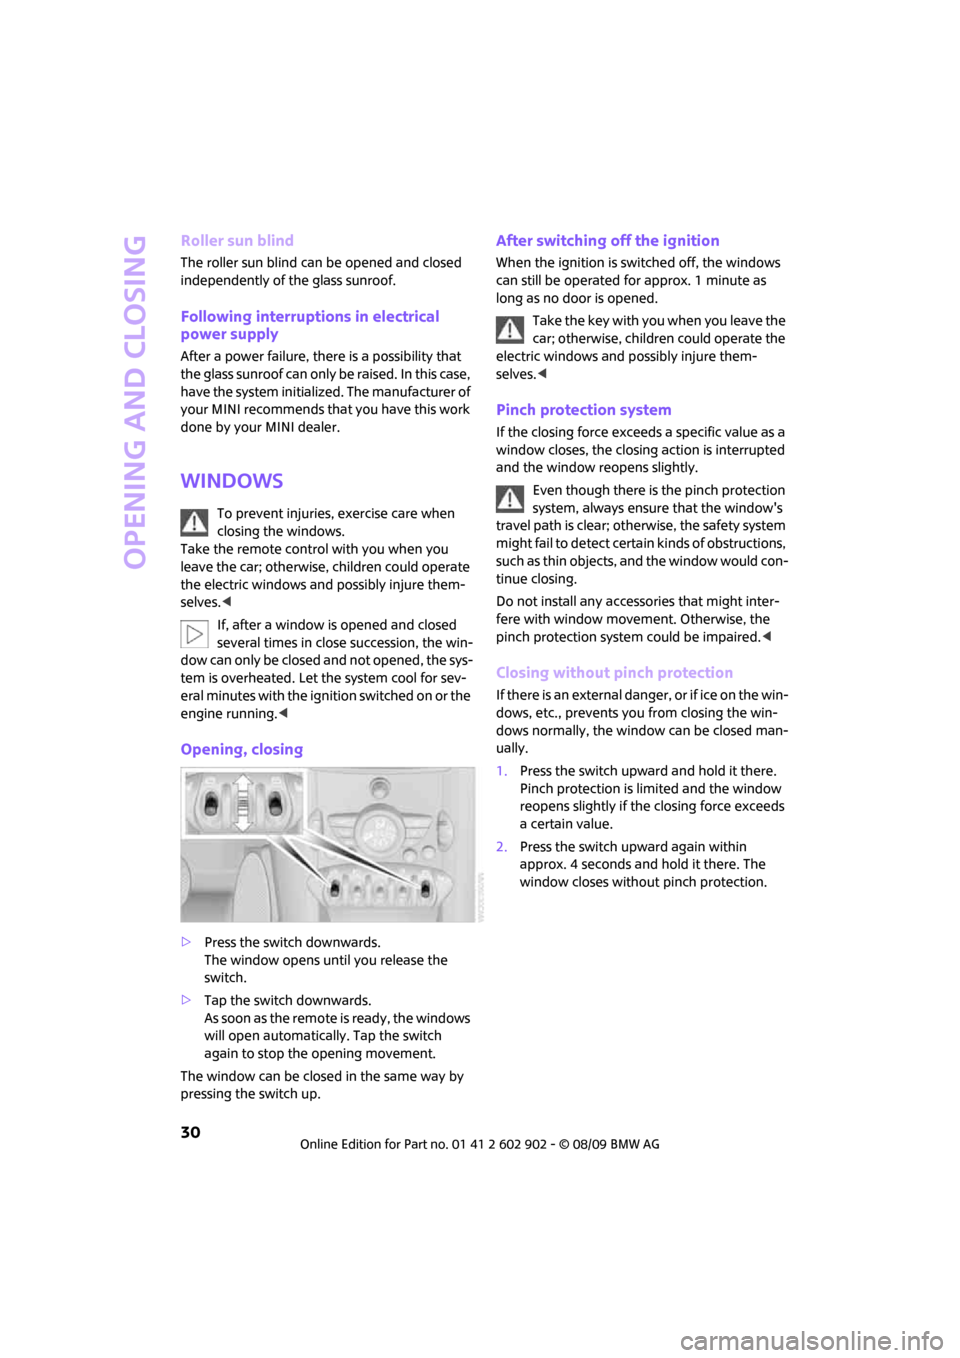
Opening, closing
>Press the switch downwards.
The window opens until you release the
switch.
>Tap the switch downwards.
As soon as the remote is ready, the windows
will open automatically. Tap the switch
again to stop the opening movement.
The window can be closed in the same way by
pressing the switch up.
After switching off the ignition
When the ignition is switched off, the windows
can still be operated for approx. 1 minute as
long as no door is opened.
Take the key with you when you leave the
car; otherwise, children could operate the
electric windows and possibly injure them-
selves.<
Pinch protection system
If the closing force exceeds a specific value as a
window closes, the closing action is interrupted
and the window reopens slightly.
Even though there is the pinch protection
system, always ensure that the window's
travel path is clear; otherwise, the safety system
might fail to detect certain kinds of obstructions,
such as thin objects, and the window would con-
tinue closing.
Do not install any accessories that might inter-
fere with window movement. Otherwise, the
pinch protection system could be impaired.<
Closing without pinch protection
If there is an external danger, or if ice on the win-
dows, etc., prevents you from closing the win-
dows normally, the window can be closed man-
ually.
1.Press the switch upward and hold it there.
Pinch protection is limited and the window
reopens slightly if the closing force exceeds
a certain value.
2.Press the switch upward again within
approx. 4 seconds and hold it there. The
window closes without pinch protection.
Page 43 of 160
REFERENCEAT A GLANCE CONTROLS DRIVING TIPS MOBILITY
41
Starting the engine
Do not allow the engine to run in enclosed
areas; otherwise, inhalation of the noxious
exhaust gases can lead to loss of consciousness
and death. Exhaust gases contain carbon mon-
oxide, an odorless and colorless, but highly toxic
gas. Never leave an unattended vehicle with the
engine running; otherwise, such a vehicle repre-
sents a potential safety hazard.
Before leaving the car while the engine is run-
ning, place the transmission in neutral or move
the selector lever to position P and forcefully
apply the parking brake to prevent the car from
moving.<
Avoid frequent starting in quick succes-
sion or repeated start attempts in which
the engine does not start. Otherwise, the fuel is
not burned or inadequately burned and there is
a danger of overheating and damaging the cat-
alytic converter.<
Do not let the engine warm up with the vehicle
at a standstill. Move off immediately at a moder-
ate engine speed.
When starting the engine, do not depress the
accelerator pedal.
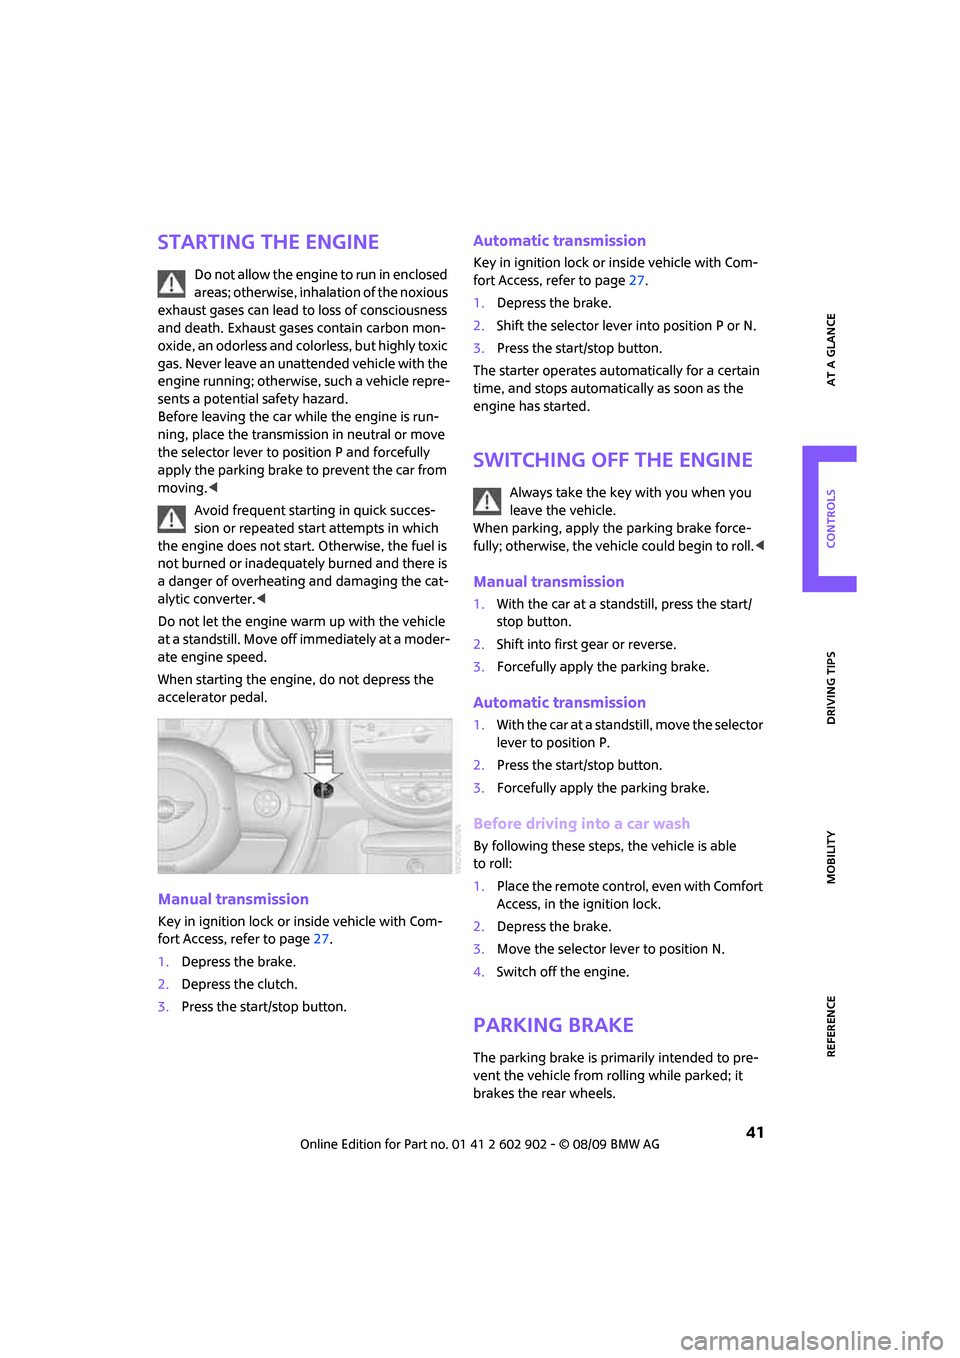
Manual transmission
Key in ignition lock or inside vehicle with Com-
fort Access, refer to page27.
1.Depress the brake.
2.Depress the clutch.
3.Press the start/stop button.
Automatic transmission
Key in ignition lock or inside vehicle with Com-
fort Access, refer to page27.
1.Depress the brake.
2.Shift the selector lever into position P or N.
3.Press the start/stop button.
The starter operates automatically for a certain
time, and stops automatically as soon as the
engine has started.
Switching off the engine
Always take the key with you when you
leave the vehicle.
When parking, apply the parking brake force-
fully; otherwise, the vehicle could begin to roll.<
Manual transmission
1.With the car at a standstill, press the start/
stop button.
2.Shift into first gear or reverse.
3.Forcefully apply the parking brake.
Automatic transmission
1.With the car at a standstill, move the selector
lever to position P.
2.Press the start/stop button.
3.Forcefully apply the parking brake.
Before driving into a car wash
By following these steps, the vehicle is able
to roll:
1.Place the remote control, even with Comfort
Access, in the ignition lock.
2.Depress the brake.
3.Move the selector lever to position N.
4.Switch off the engine.
Parking brake
The parking brake is primarily intended to pre-
vent the vehicle from rolling while parked; it
brakes the rear wheels.
Page 87 of 160
REFERENCEAT A GLANCE CONTROLS DRIVING TIPS MOBILITY
85
with the road surface, so that the car cannot be
steered or braked properly.<
The risk of hydroplaning increases with declining
tread depth on the tires, refer also to Tread
depth on page102.
Driving through water
Drive through water on the road only if it is
not deeper than 1 ft/30 cm, and then only
at walking speed at the most. Otherwise, the
vehicle's engine, the electrical systems and the
transmission may be damaged.<
Parking brake on inclines
On inclines, do not hold the vehicle with
the clutch; use the parking brake. Other-
wise, greater clutch wear will result.<
For information on driving off using Hill Assist*,
refer to page59.
Braking safely
Your MINI is equipped with ABS. If you are in a
situation which requires full braking, it is best to
brake using maximum brake pressure. Since the
vehicle maintains steering responsiveness, you
can still avoid possible obstacles with a mini-
mum of steering effort.
The pulsation of the brake pedal, together with
the sound of hydraulic regulation, indicates that
ABS is actively taking effect.
Driving in wet conditions
When roads are wet or there is heavy rain, briefly
exert gentle pressure on the brake pedal every
few miles. Monitor traffic conditions to ensure
that this maneuver does not endanger other
road users. The heat generated in this process
helps dry the pads and rotors to ensure that
Then full braking force will be immediately avail-
able when it is needed.
Hills
To prevent overheating and the resulting
reduced efficiency of the brake system,
drive long or steep downhill gradients in the
gear in which the least braking is required. Even
light but consistent brake pressure can lead to high temperatures, brake wear and possibly
even brake failure.<
You can increase the engine's braking effect by
shifting down, all the way to first gear if neces-
sary. This strategy helps you avoid placing
excessive loads on the brake system. Downshift-
ing in manual mode of the automatic transmis-
sion, page43.
Never drive with the clutch held down,
with the transmission in neutral or with
the engine switched off; otherwise, engine brak-
ing action will not be present or there will be no
power assistance to the brakes or steering.
Never allow floor mats, carpets or any other
objects to protrude into the area around the
pedals; otherwise, pedal function could be
impaired.<
Corrosion on brake rotors
When the vehicle is driven only occasionally,
during extended periods when the vehicle is not
used at all, and in operating conditions where
brake applications are less frequent, there is an
increased tendency for corrosion to form on
rotors, while contaminants accumulate on the
brake pads. This occurs because the minimum
pressure which must be exerted by the pads
during brake applications to clean the rotors is
not reached.
Should corrosion form on the brake rotors, the
brakes will tend to respond with a pulsating
effect that even extended application will fail
to cure.
When the vehicle is parked
Condensation forms while the automatic climate
control is in operation, and then exits under the
vehicle. Traces of condensed water under the
vehicle are therefore normal.
In the MINI Cooper S, the coolant pump may
continue to run for some time after the engine is
switched off. This will generate noise in the
engine compartment.
Page 122 of 160

Replacing components
120
4.Unscrew the dust cap from the valve of the
defective wheel and screw the filling hose 2
of the sealant bottle onto the valve.
5.Ensure that the compressor is switched off.
6.Insert the plug 3 into the lighter socket/
power socket in the vehicle interior,
page81.
7.With the engine running:
Switch on the compressor and let is run for
approx. 3 to 8 minutes to fill the tire with
sealant and achieve a tire inflation pressure
of approx. 26 psi/180 kPa.
When the tire is being filled with seal-
ant, the inflation pressure may spo-
radically reach approx. 73 psi/500 kPa. Do
not switch off the compressor in this
phase.<
Do not run the compressor for longer
than 10 minutes; otherwise, the
device will overheat and possibly be
damaged.<
8.Switch off the compressor.
If an air pressure of 26 psi/180 kPa is not
reached:
1.Unscrew the filling hose 2 from the wheel
and drive the vehicle forward and backward
approx. 33 ft/10 m to distribute the liquid
sealant in the tire evenly.
2.Inflate the tire again with the compressor.
If an inflation pressure of 26 psi/180 kPa
still cannot be reached, the tire is too
heavily damaged. Please contact the nearest
MINI dealer.<
Detach the connection hose 9 and filling hose 2
from the sealant bottle connection and tire
valve.Wrap the empty sealant bottle in suitable mate-
rial to avoid dirtying the cargo bay. Stow the
Mobility System back in the vehicle.
Distributing the sealant
Immediately drive approx. 3 mls/5 km to evenly
distribute the sealant.
Do not exceed speeds of 50 mph/
80 km/h.
If possible, do not drop below 10 mph/
20 km/h.<
Correcting the tire inflation pressure
1.After driving approx. 3 mls/5 km or ten min-
utes, stop at a suitable location.
2.Screw the connection hose 2 of the com-
pressor directly onto the tire valve.
3.Insert the plug 3 into the power socket in the
vehicle interior.
4.Correct the inflation pressure to 26 psi/
180 kPa. With the engine running:
>To increase the inflation pressure: switch on
the compressor. To check the current infla-
tion pressure, switch off the compressor.
Do not run the compressor for longer
than 10 minutes; otherwise, the
device will overheat and possibly be
damaged.<
>To decrease the inflation pressure: press the
release button 5.
If the tire cannot maintain the inflation
pressure, drive the vehicle again, refer to
Distributing the sealant. Then repeat steps
1to4.
If an inflation pressure of 26 psi/180 kPa still
cannot be reached, the tire is too heavily dam-
aged. Contact the nearest MINI dealer.<
Driving on
Do not exceed the permitted maximum
speed of 50 mph/80 km/h; doing so may
result in an accident.<
Replace the defective tire as soon as possible
and have the new wheel/tire assembly bal-
anced.
Have the Mobility System refilled.
Page 133 of 160
REFERENCEAT A GLANCE CONTROLS DRIVING TIPS MOBILITY
131
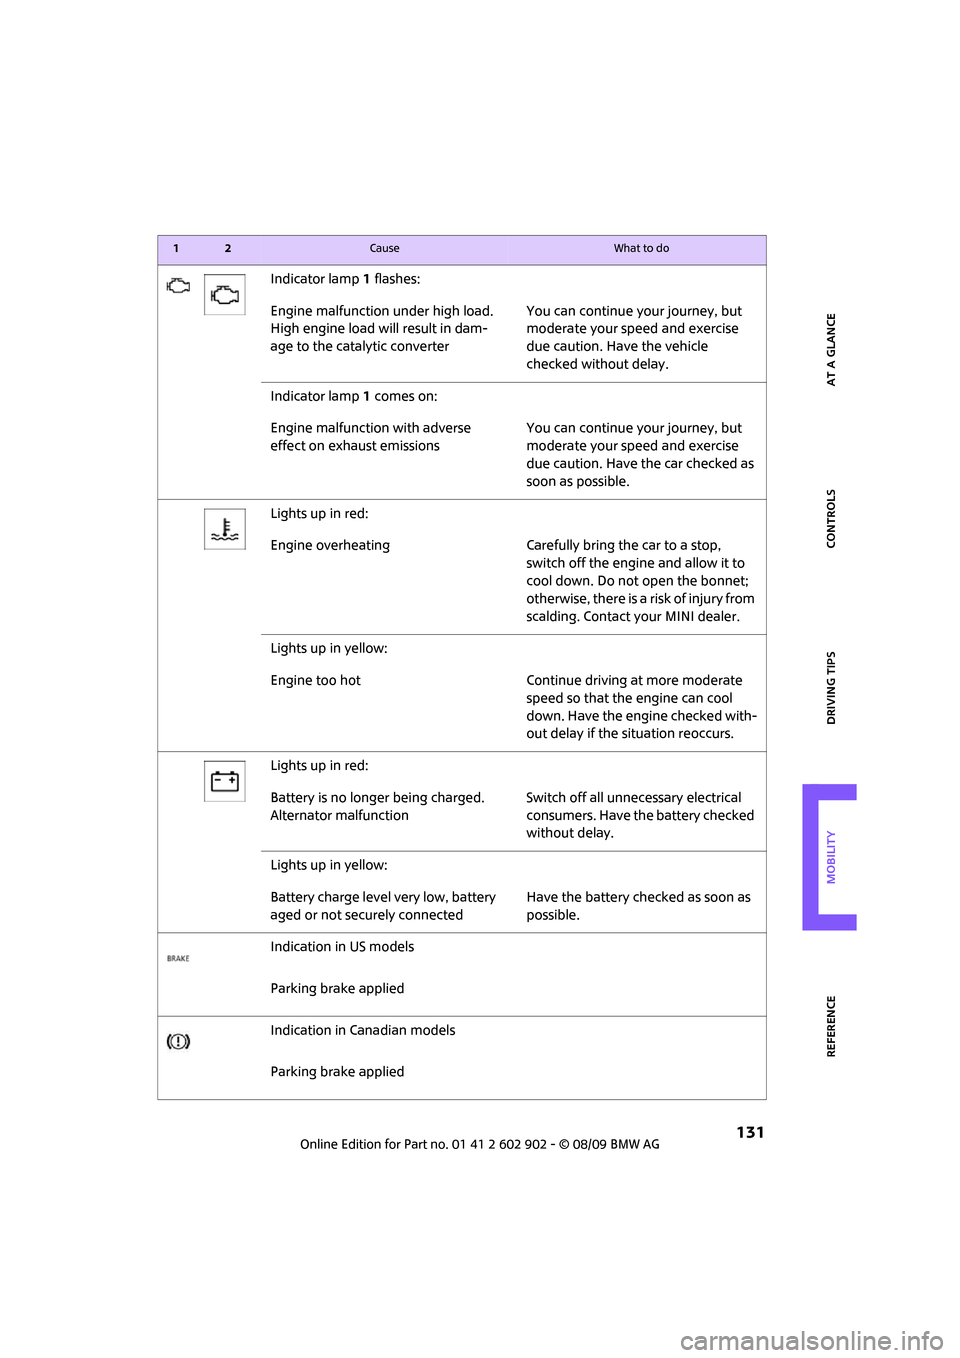
Indicator lamp1 flashes:
Engine malfunction under high load.
High engine load will result in dam-
age to the catalytic converterYou can continue your journey, but
moderate your speed and exercise
due caution. Have the vehicle
checked without delay.
Indicator lamp1 comes on:
Engine malfunction with adverse
effect on exhaust emissionsYou can continue your journey, but
moderate your speed and exercise
due caution. Have the car checked as
soon as possible.
Lights up in red:
Engine overheating Carefully bring the car to a stop,
switch off the engine and allow it to
cool down. Do not open the bonnet;
otherwise, there is a risk of injury from
scalding. Contact your MINI dealer.
Lights up in yellow:
Engine too hot Continue driving at more moderate
speed so that the engine can cool
down. Have the engine checked with-
out delay if the situation reoccurs.
Lights up in red:
Battery is no longer being charged.
Alternator malfunctionSwitch off all unnecessary electrical
consumers. Have the battery checked
without delay.
Lights up in yellow:
Battery charge level very low, battery
aged or not securely connectedHave the battery checked as soon as
possible.
Indication in US models
Parking brake applied
Indication in Canadian models
Parking brake applied
12Cause What to do
Page 138 of 160
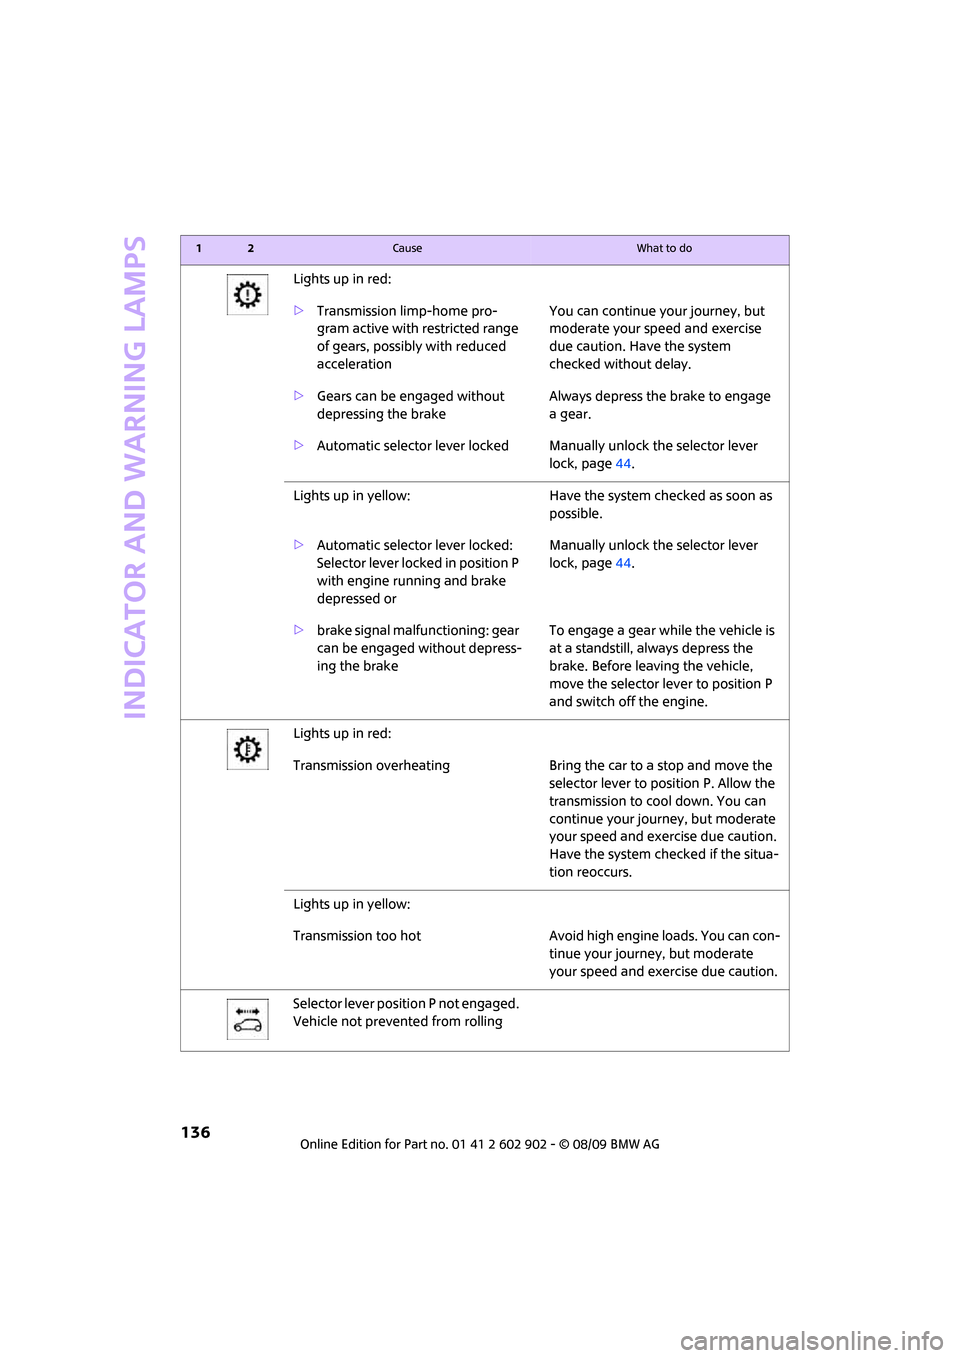
Indicator and warning lamps
136
Lights up in red:
>Transmission limp-home pro-
gram active with restricted range
of gears, possibly with reduced
accelerationYou can continue your journey, but
moderate your speed and exercise
due caution. Have the system
checked without delay.
>Gears can be engaged without
depressing the brakeAlways depress the brake to engage
agear.
>Automatic selector lever locked Manually unlock the selector lever
lock, page44.
Lights up in yellow: Have the system checked as soon as
possible.
>Automatic selector lever locked:
Selector lever locked in position P
with engine running and brake
depressed orManually unlock the selector lever
lock, page44.
>brake signal malfunctioning: gear
can be engaged without depress-
ing the brakeTo engage a gear while the vehicle is
at a standstill, always depress the
brake. Before leaving the vehicle,
move the selector lever to position P
and switch off the engine.
Lights up in red:
Transmission overheating Bring the car to a stop and move the
selector lever to position P. Allow the
transmission to cool down. You can
continue your journey, but moderate
your speed and exercise due caution.
Have the system checked if the situa-
tion reoccurs.
Lights up in yellow:
Transmission too hot Avoid high engine loads. You can con-
tinue your journey, but moderate
your speed and exercise due caution.
Selector lever position P not engaged.
Vehicle not prevented from rolling
12Cause What to do
Page 151 of 160
REFERENCEAT A GLANCE CONTROLS DRIVING TIPS MOBILITY
149
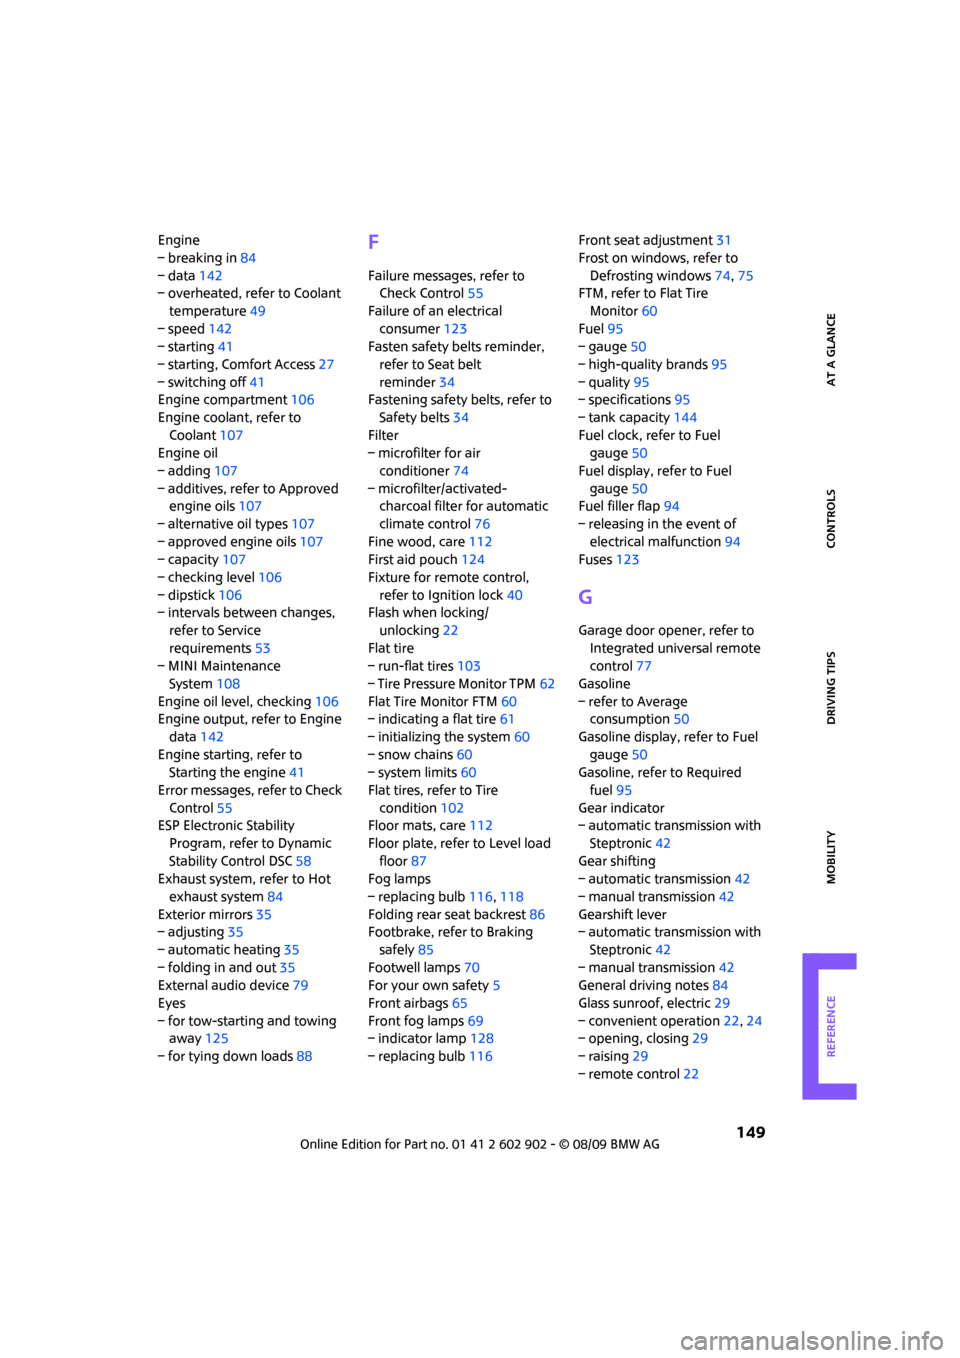
Engine
– breaking in84
– data142
– overheated, refer to Coolant
temperature49
– speed142
– starting41
– starting, Comfort Access27
– switching off41
Engine compartment106
Engine coolant, refer to
Coolant107
Engine oil
– adding107
– additives, refer to Approved
engine oils107
– alternative oil types107
– approved engine oils107
– capacity107
– checking level106
– dipstick106
– intervals between changes,
refer to Service
requirements53
– MINI Maintenance
System108
Engine oil level, checking106
Engine output, refer to Engine
data142
Engine starting, refer to
Starting the engine41
Error messages, refer to Check
Control55
ESP Electronic Stability
Program, refer to Dynamic
Stability Control DSC58
Exhaust system, refer to Hot
exhaust system84
Exterior mirrors35
– adjusting35
– automatic heating35
– folding in and out35
External audio device79
Eyes
– for tow-starting and towing
away125
– for tying down loads88F
Failure messages, refer to
Check Control55
Failure of an electrical
consumer123
Fasten safety belts reminder,
refer to Seat belt
reminder34
Fastening safety belts, refer to
Safety belts34
Filter
– microfilter for air
conditioner74
– microfilter/activated-
charcoal filter for automatic
climate control76
Fine wood, care112
First aid pouch124
Fixture for remote control,
refer to Ignition lock40
Flash when locking/
unlocking22
Flat tire
– run-flat tires103
– Tire Pressure Monitor TPM62
Flat Tire Monitor FTM60
– indicating a flat tire61
– initializing the system60
– snow chains60
– system limits60
Flat tires, refer to Tire
condition102
Floor mats, care112
Floor plate, refer to Level load
floor87
Fog lamps
– replacing bulb116,118
Folding rear seat backrest86
Footbrake, refer to Braking
safely85
Footwell lamps70
For your own safety5
Front airbags65
Front fog lamps69
– indicator lamp128
– replacing bulb116Front seat adjustment31
Frost on windows, refer to
Defrosting windows74,75
FTM, refer to Flat Tire
Monitor60
Fuel95
– gauge50
– high-quality brands95
– quality95
– specifications95
– tank capacity144
Fuel clock, refer to Fuel
gauge50
Fuel display, refer to Fuel
gauge50
Fuel filler flap94
– releasing in the event of
electrical malfunction94
Fuses123
G
Garage door opener, refer to
Integrated universal remote
control77
Gasoline
– refer to Average
consumption50
Gasoline display, refer to Fuel
gauge50
Gasoline, refer to Required
fuel95
Gear indicator
– automatic transmission with
Steptronic42
Gear shifting
– automatic transmission42
– manual transmission42
Gearshift lever
– automatic transmission with
Steptronic42
– manual transmission42
General driving notes84
Glass sunroof, electric29
– convenient operation22,24
– opening, closing29
– raising29
– remote control22
Page 154 of 160
From A to Z
152
Outlets
– refer to Ventilation76
Outlets, refer to Air vents72
Output, refer to Engine
data142
Outside temperature
display49
– changing unit of measure52
– on onboard computer52
Outside-air mode
– automatic climate control75
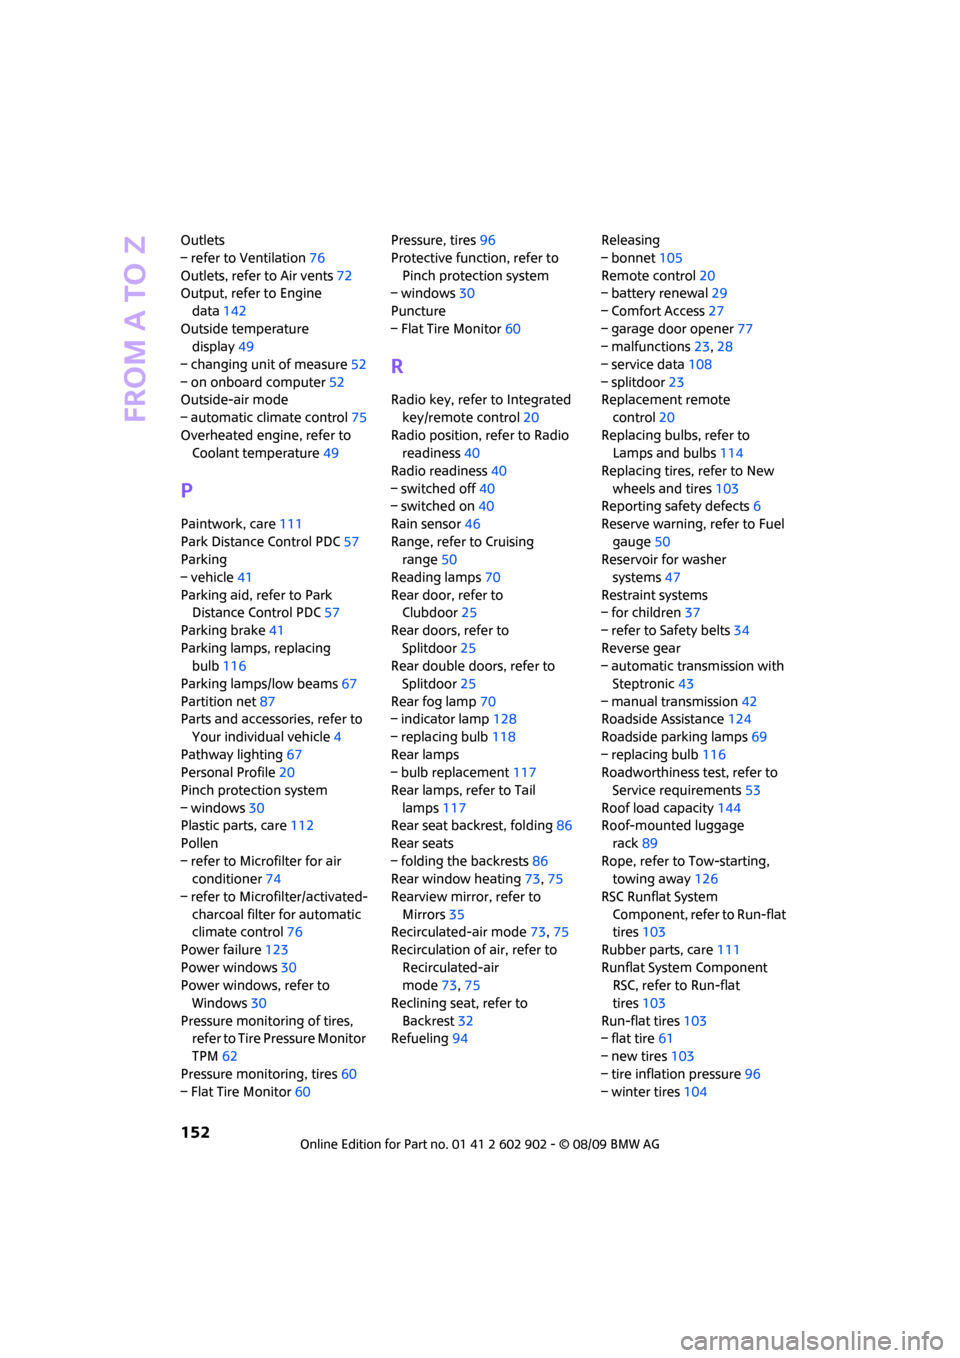
Overheated engine, refer to
Coolant temperature49
P
Paintwork, care111
Park Distance Control PDC57
Parking
– vehicle41
Parking aid, refer to Park
Distance Control PDC57
Parking brake41
Parking lamps, replacing
bulb116
Parking lamps/low beams67
Partition net87
Parts and accessories, refer to
Your individual vehicle4
Pathway lighting67
Personal Profile20
Pinch protection system
– windows30
Plastic parts, care112
Pollen
– refer to Microfilter for air
conditioner74
– refer to Microfilter/activated-
charcoal filter for automatic
climate control76
Power failure123
Power windows30
Power windows, refer to
Windows30
Pressure monitoring of tires,
refer to Tire Pressure Monitor
TPM62
Pressure monitoring, tires60
– Flat Tire Monitor60Pressure, tires96
Protective function, refer to
Pinch protection system
– windows30
Puncture
– Flat Tire Monitor60
R
Radio key, refer to Integrated
key/remote control20
Radio position, refer to Radio
readiness40
Radio readiness40
– switched off40
– switched on40
Rain sensor46
Range, refer to Cruising
range50
Reading lamps70
Rear door, refer to
Clubdoor25
Rear doors, refer to
Splitdoor25
Rear double doors, refer to
Splitdoor25
Rear fog lamp70
– indicator lamp128
– replacing bulb118
Rear lamps
– bulb replacement117
Rear lamps, refer to Tail
lamps117
Rear seat backrest, folding86
Rear seats
– folding the backrests86
Rear window heating73,75
Rearview mirror, refer to
Mirrors35
Recirculated-air mode73,75
Recirculation of air, refer to
Recirculated-air
mode73,75
Reclining seat, refer to
Backrest32
Refueling94Releasing
– bonnet105
Remote control20
– battery renewal29
– Comfort Access27
– garage door opener77
– malfunctions23,28
– service data108
– splitdoor23
Replacement remote
control20
Replacing bulbs, refer to
Lamps and bulbs114
Replacing tires, refer to New
wheels and tires103
Reporting safety defects6
Reserve warning, refer to Fuel
gauge50
Reservoir for washer
systems
47
Restraint systems
– for children37
– refer to Safety belts34
Reverse gear
– automatic transmission with
Steptronic43
– manual transmission42
Roadside Assistance124
Roadside parking lamps69
– replacing bulb116
Roadworthiness test, refer to
Service requirements53
Roof load capacity144
Roof-mounted luggage
rack89
Rope, refer to Tow-starting,
towing away126
RSC Runflat System
Component, refer to Run-flat
tires103
Rubber parts, care111
Runflat System Component
RSC, refer to Run-flat
tires103
Run-flat tires103
– flat tire61
– new tires103
– tire inflation pressure96
– winter tires104