ESP MINI Clubman 2016 (Mini Connected) User Guide
[x] Cancel search | Manufacturer: MINI, Model Year: 2016, Model line: Clubman, Model: MINI Clubman 2016Pages: 246, PDF Size: 5.21 MB
Page 35 of 246
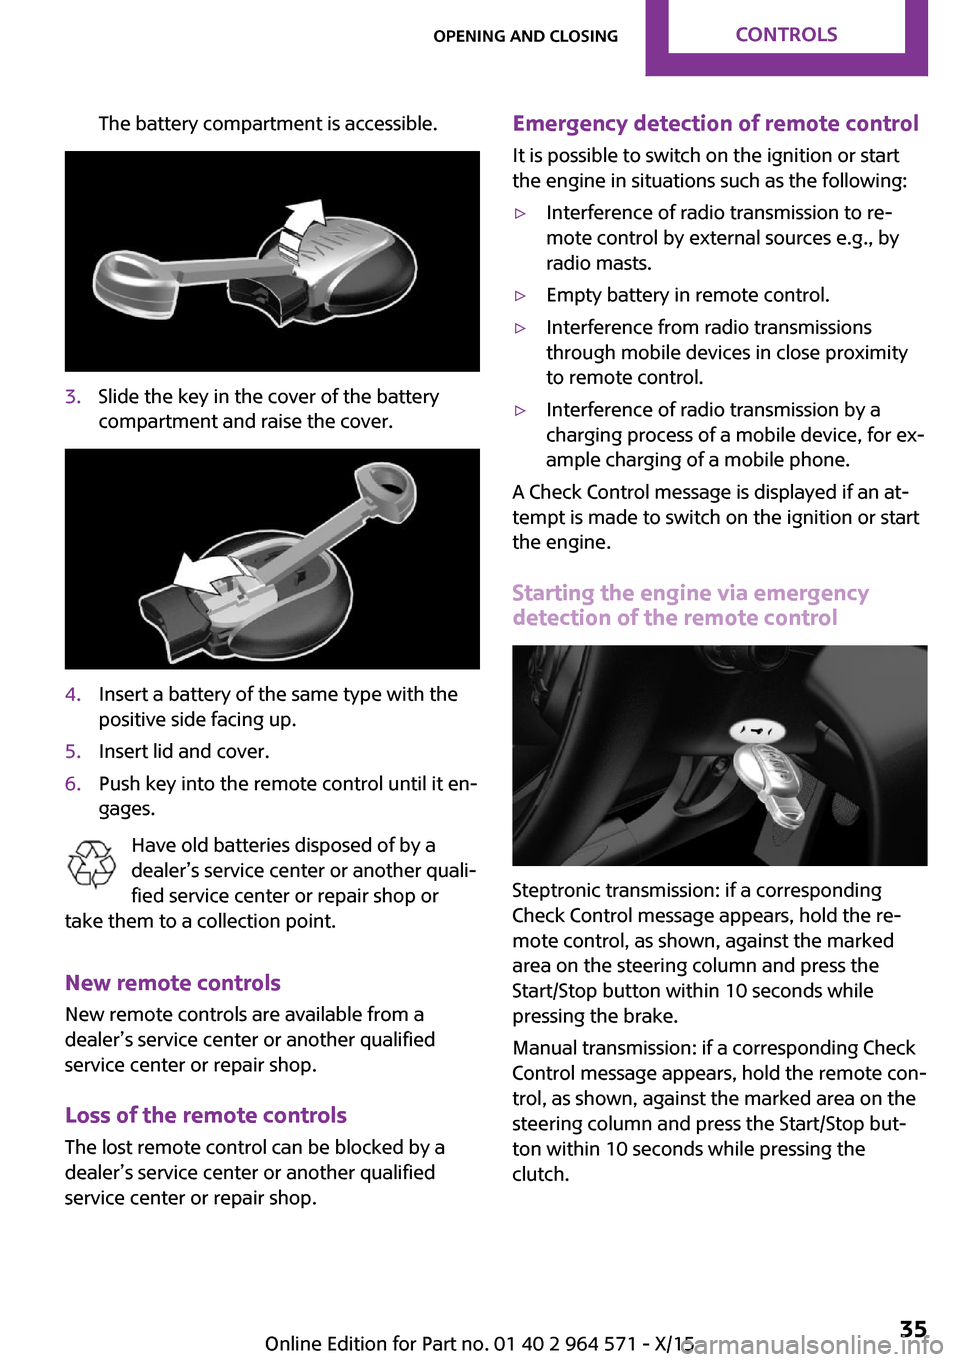
The battery compartment is accessible.3.Slide the key in the cover of the battery
compartment and raise the cover.
4.Insert a battery of the same type with the
positive side facing up.
5.Insert lid and cover.6.Push key into the remote control until it en‐
gages.
Have old batteries disposed of by a
dealer’s service center or another quali‐
fied service center or repair shop or
take them to a collection point.
New remote controls
New remote controls are available from a
dealer’s service center or another qualified
service center or repair shop.
Loss of the remote controls
The lost remote control can be blocked by a
dealer’s service center or another qualified
service center or repair shop.
Emergency detection of remote control
It is possible to switch on the ignition or start
the engine in situations such as the following:
▷Interference of radio transmission to re‐
mote control by external sources e.g., by
radio masts.
▷Empty battery in remote control.▷Interference from radio transmissions
through mobile devices in close proximity
to remote control.
▷Interference of radio transmission by a
charging process of a mobile device, for ex‐
ample charging of a mobile phone.
A Check Control message is displayed if an at‐
tempt is made to switch on the ignition or start
the engine.
Starting the engine via emergency
detection of the remote control
Steptronic transmission: if a corresponding
Check Control message appears, hold the re‐
mote control, as shown, against the marked
area on the steering column and press the
Start/Stop button within 10 seconds while
pressing the brake.
Manual transmission: if a corresponding Check
Control message appears, hold the remote con‐
trol, as shown, against the marked area on the
steering column and press the Start/Stop but‐
ton within 10 seconds while pressing the
clutch.
Seite 35Opening and closingCONTROLS35
Online Edition for Part no. 01 40 2 964 571 - X/15
Page 42 of 246

Unlocking
On the driver's or front passenger's door han‐
dle, press the button.
This corresponds to pressing the remote control
button:
Locking
On the driver's or front passenger's door han‐
dle, press the button.
This corresponds to pressing the remote control
button:
If a door was unlocked and opened from the
inside via the door opener, all other doors con‐
tinue to be locked. This is the case, if the vehi‐
cle was locked automatically after driving off or
via the central locking system button. In this
case, all doors are unlocked, when pressing the
button on the door handle. The button must be
pressed again for locking.
To save battery power, ensure that all power
consumers are turned off before locking the ve‐
hicle.
Convenient closing
WARNING
With convenient closing, body parts can
be jammed. There is risk of injuries. Make sure
that the area of movement of the doors is clear
during convenient closing.◀
Press and hold down the handle of the driver or
the front seat passenger.
This corresponds to pressing and holding the
remote control button:
In addition to locking, the windows and glass
sunroof will be closed.
Unlocking the splot doors separately
Press the button in the handle of the split
doors.
This corresponds to pressing the remote control
button:
The situation of the doors does not change.
Opening split doors with no-touch
activation
The split doors can be opened with no-touch
activation using the remote control you are car‐
rying. Two sensors detect a forward-directed
foot motion in the center of the area at the rear
of the car and the split doors open.
Foot movement to be carried out
WARNING
During no-contact activation of the split
doors, vehicle parts may be touched, e.g. hot
exhaust system. There is risk of injuries. With
Seite 42CONTROLSOpening and closing42
Online Edition for Part no. 01 40 2 964 571 - X/15
Page 44 of 246
3. Select the symbol.4.Select the desired function.▷"Driver's door only"
Only the driver's door and the fuel filler
flap are unlocked. Pressing again un‐
locks the entire vehicle.
▷"All doors"
The entire vehicle is unlocked.
Split doors
Depending on optional features and country
version, this setting is not offered in some
cases.
1. "Settings"2."Doors/key"3. Select the symbol.4.Select the desired function.▷"Split rear door"
Only the split doors are opened.
▷"Split rear door + door(s)"
The split doors are opened and the
doors unlocked.
Locking
The settings are saved in the active profile. Per‐
sonal Profile, refer to page 36.
1. "Settings"2."Doors/key"3.Select desired setting.▷"Lock if no door is opened"
The vehicle locks automatically after a
short period of time if no door is
opened after unlocking.
▷"Lock after start driving"
The vehicle locks automatically after
you drive off.
Confirmation signals from the vehicle
1. "Settings"2."Doors/key"3.Select desired setting.▷With alarm system:
"Acoustic sig. lock/unlock"
Unlocking is signaled by one honk of
the horn.
▷"Flash when lock/unlock"
Unlocking is signaled by two flashes,
locking by one.
Alarm system
The concept
When the vehicle is locked, the vehicle alarm
system responds to:
▷Opening a door, the hood or the split doors.▷Movements in the vehicle interior.▷Changes in the vehicle tilt, e. g., during at‐
tempts at stealing a wheel or when towing
the car.
▷Disconnected battery voltage.
The alarm system briefly signals tampering:
▷Acoustic alarm.▷By switching on the hazard warning system.▷By flashing the daytime running lights.
Switching on and off
When you lock or unlock the vehicle, either
with the remote control or with Comfort Access,
the alarm system is switched on and off at the
same time.
Door lock with the alarm system
switched on
The alarm system is triggered when the door is
opened, when the vehicle is unlocked via the
door lock.
Switching off the alarm, refer to page 45.
Seite 44CONTROLSOpening and closing44
Online Edition for Part no. 01 40 2 964 571 - X/15
Page 45 of 246
Split soors with the alarm system
switched on
The split doors can be opened even when the
alarm system is switched on.
After the split doors are closed, they are locked
and monitored again when the doors are
locked. The hazard warning system flashes
once.
Panic mode
You can trigger the alarm system if you find
yourself in a dangerous situation.
Press button on the remote control for
at least 3 seconds.
To switch off the alarm: press any button.
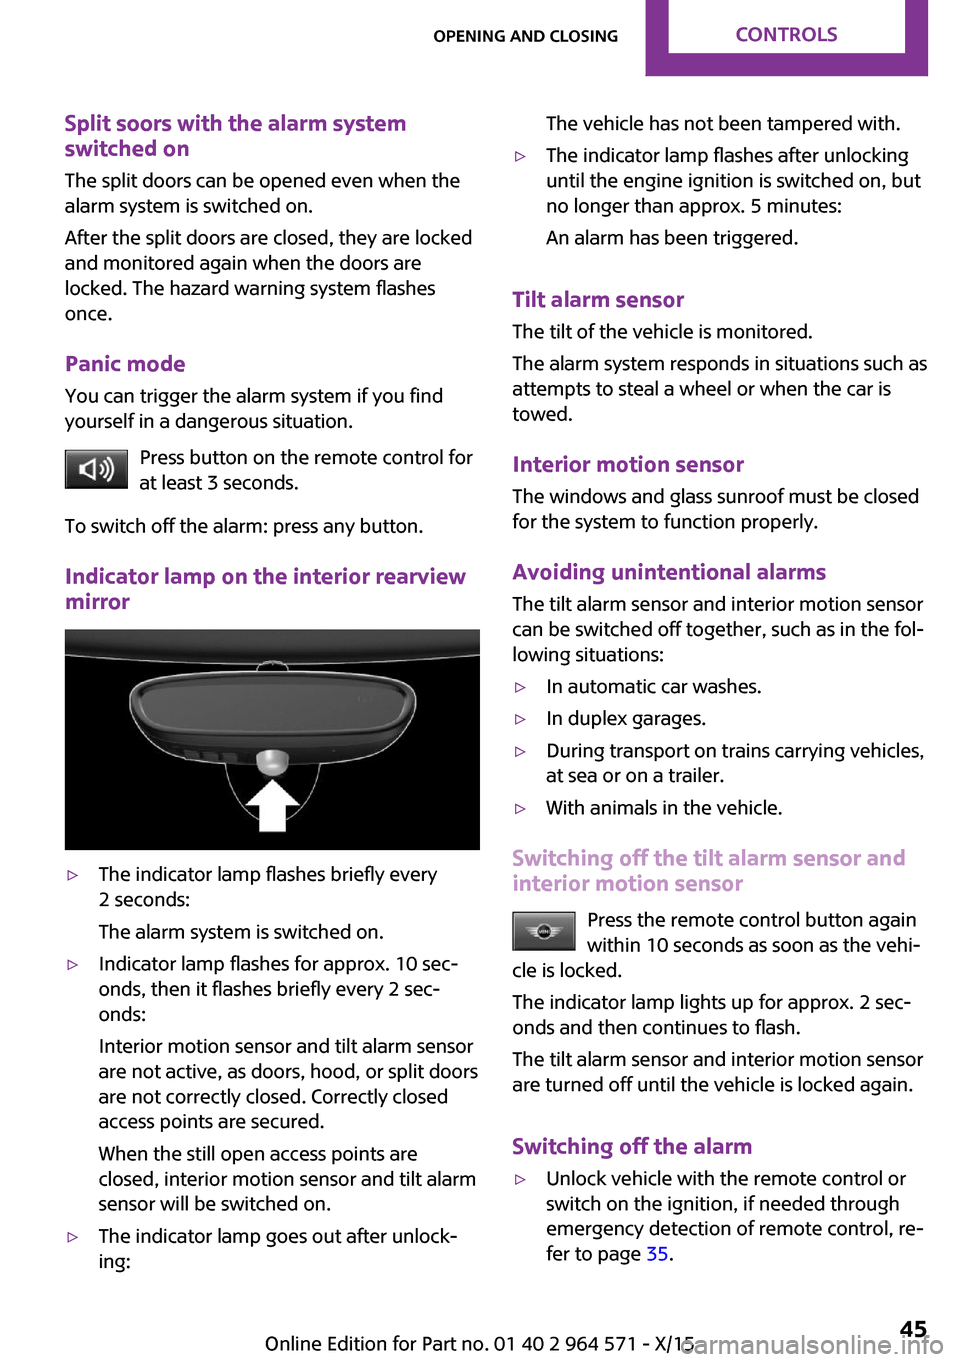
Indicator lamp on the interior rearview
mirror
▷The indicator lamp flashes briefly every
2 seconds:
The alarm system is switched on.
▷Indicator lamp flashes for approx. 10 sec‐
onds, then it flashes briefly every 2 sec‐
onds:
Interior motion sensor and tilt alarm sensor
are not active, as doors, hood, or split doors
are not correctly closed. Correctly closed
access points are secured.
When the still open access points are
closed, interior motion sensor and tilt alarm
sensor will be switched on.
▷The indicator lamp goes out after unlock‐
ing:
The vehicle has not been tampered with.▷The indicator lamp flashes after unlocking
until the engine ignition is switched on, but
no longer than approx. 5 minutes:
An alarm has been triggered.
Tilt alarm sensor
The tilt of the vehicle is monitored.
The alarm system responds in situations such as
attempts to steal a wheel or when the car is
towed.
Interior motion sensor
The windows and glass sunroof must be closed
for the system to function properly.
Avoiding unintentional alarms
The tilt alarm sensor and interior motion sensor
can be switched off together, such as in the fol‐
lowing situations:
▷In automatic car washes.▷In duplex garages.▷During transport on trains carrying vehicles,
at sea or on a trailer.
▷With animals in the vehicle.
Switching off the tilt alarm sensor and
interior motion sensor
Press the remote control button again
within 10 seconds as soon as the vehi‐
cle is locked.
The indicator lamp lights up for approx. 2 sec‐
onds and then continues to flash.
The tilt alarm sensor and interior motion sensor
are turned off until the vehicle is locked again.
Switching off the alarm
▷Unlock vehicle with the remote control or
switch on the ignition, if needed through
emergency detection of remote control, re‐
fer to page 35.
Seite 45Opening and closingCONTROLS45
Online Edition for Part no. 01 40 2 964 571 - X/15
Page 50 of 246
AdjustingVehicle features and op‐
tions
This chapter describes all standard, country-
specific and optional features offered with the
series. It also describes features that are not
necessarily available in your car, e. g., due to
the selected options or country versions. This
also applies to safety-related functions and sys‐
tems. The respectively applicable country provi‐
sions must be observed when using the respec‐
tive features and systems.
Sitting safely
The ideal seating position meeting the needs of
the occupants can make a vital contribution to
relaxed, fatigue-free driving.
The seating position plays an important role in
an accident in combination with:
▷Safety belts, refer to page 53.▷Head restraints, refer to page 54.▷Airbags, refer to page 101.
Seats
Information
WARNING
Seat adjustments while driving can lead
to unexpected movements of the seat. Vehicle
control could be lost. There is risk of an acci‐
dent. Only adjust the side on the driver's side
when the vehicle is stationary.◀
WARNING
With a backrest inclined too far to the
rear, the protective effect of the safety belt
cannot be ensured anymore. There is a danger
of sliding under the safety belt in an accident.
There is risk of injuries or danger to life. Adjust
the seat prior to starting the trip. Adjust the
backrest in an as upright position as possible
and do not adjust again while driving.◀
WARNING
There is risk of jamming when moving the
seats. There is risk of injuries or risk of property
damage. Make sure that the area of movement
of the seat is clear prior to any adjustment.◀
Manually adjustable seats
Overview
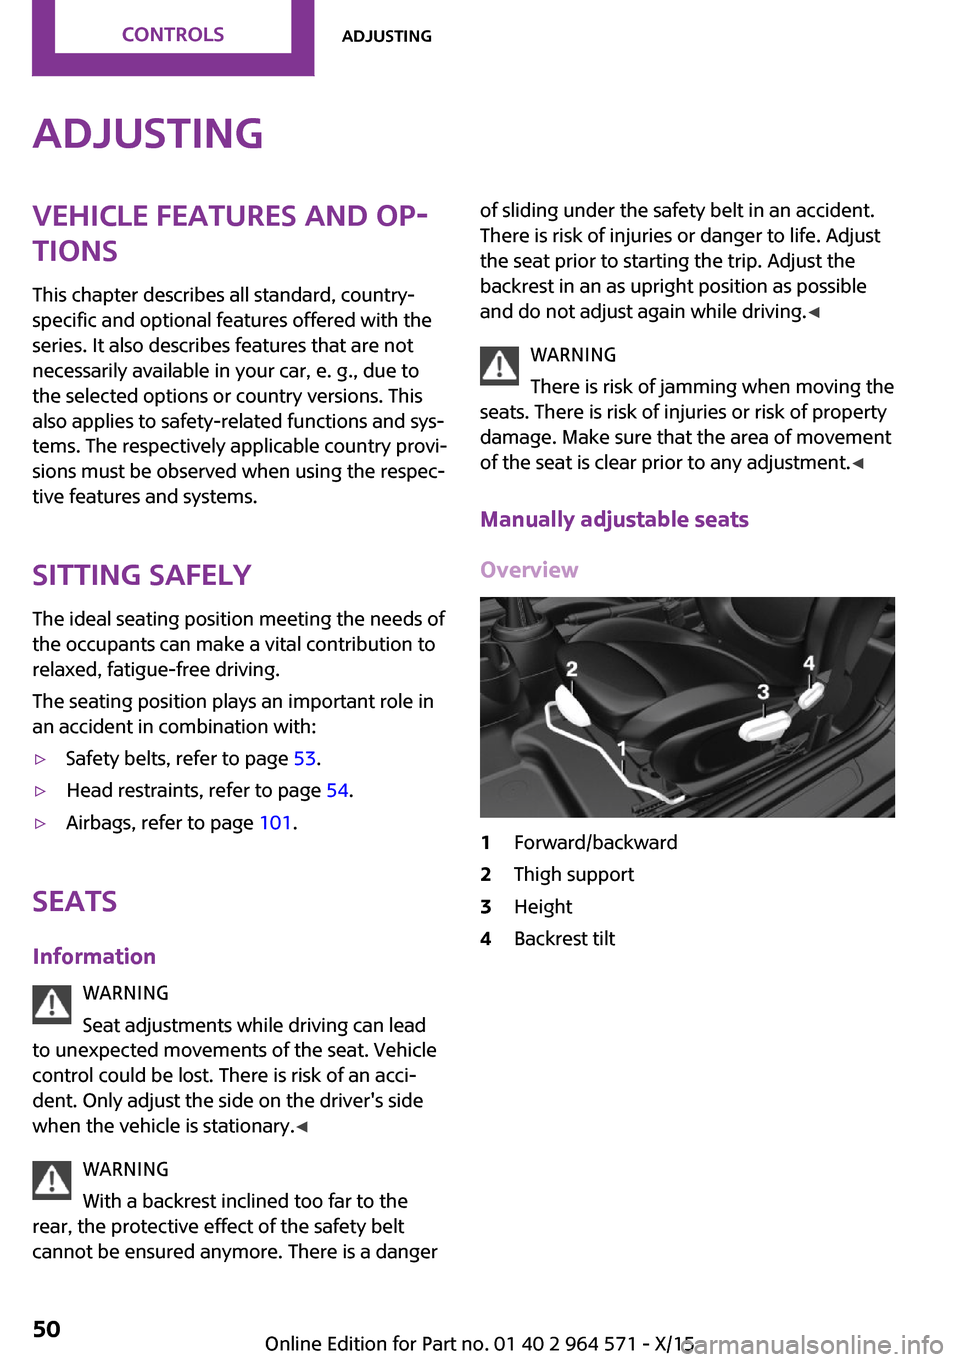
1Forward/backward2Thigh support3Height4Backrest tiltSeite 50CONTROLSAdjusting50
Online Edition for Part no. 01 40 2 964 571 - X/15
Page 53 of 246
Switching on
Press button once for each tempera‐
ture level.
The maximum temperature is reached when
three LEDs are lit.
If the trip is continued within approx. 15 mi‐
nutes, the seat heating is activated automati‐
cally with the temperature selected last.
When GREEN Mode, refer to page 169, is acti‐
vated, the heater output is reduced.
Switching off
Press and hold the button, until the
LEDs are no longer illuminated.
Safety belts
Number of safety belts
The vehicle is fitted with five safety belts to en‐
sure occupant safety. However, they can only
offer protection when adjusted correctly.
The two outer safety belt buckles, integrated
into the rear seat, are for passengers sitting on
the left and right.
The center safety belt buckle of the rear seat is
solely intended for the person sitting in the
middle.
General information
Always make sure that safety belts are being
worn by all occupants before driving off.
For the occupants' safety the belt locking
mechanism triggers early. Slowly guide the
safety belt out of the holder when applying it.
If needed, disengage the safety belt in the rear
from the belt buckle on the side.
Although airbags enhance safety by providing
added protection, they are not a substitute for
safety belts.
Information
WARNING
If the safety belt is used by more than
one person, the protective effect of the safety
belt cannot be ensured anymore. There is risk
of injuries or danger to life. Do not allow more
than one person to wear a single safety belt. In‐
fants and children are not allowed in an occu‐
pant's lap, but must be transported and respec‐
tively secured in designated child restraint
systems.◀
WARNING
The protective effect of the safety belts
can be limited or lost when safety belts are fas‐
tened incorrectly. An incorrectly fastened safety
belt can cause additional injuries, for example
in the event of an accident or during braking
and evasive maneuvers. There is risk of injuries
or danger to life. Make sure that all occupants
are wearing safety belts correctly.◀
WARNING
With a rear backrest that is not locked,
the protective function of the middle safety belt
is not guaranteed. There is risk of injuries or
danger to life. If you are using the middle safety
belt, lock the wider rear backrest.◀
Correct use of safety belts
▷Wear the safety belt twist-free and as tight
to your body as possible over your lap and
shoulders.
▷Wear the safety belt deep on your hips over
your lap. The safety belt may not press on
your stomach.
▷Do not wear the safety belt on your throat,
rub it on sharp edges, guide it or jam it in
across hard or fragile objects.
▷Avoid thick clothing.▷Re-tighten the safety belt frequently up‐
ward around your upper body.
Seite 53AdjustingCONTROLS53
Online Edition for Part no. 01 40 2 964 571 - X/15
Page 57 of 246

Overview
Storing
1.Switch on the ignition.2.Set the desired position.3. Press button. The LED in the button
lights up.
4.Press selected button 1 or 2 while the LED
is lit. The LED goes out.
Button was pressed inadvertently:
Press button again.
The LED goes out.
Calling up settings
Comfort function
1.Open the driver's door.2.Switching off the ignition.3.Briefly press the desired button 1 or 2.
The corresponding seat position is performed
automatically.
The procedure stops when a switch for adjust‐
ing the seat or one of the buttons is pressed.
Safety mode
1.Close the driver's door or switch on the ig‐
nition.
2.Press and hold the desired button 1 or 2
until the adjustment procedure is com‐
pleted.
Calling up of a seat position
deactivated
After a brief period, calling up stored seat posi‐
tions is deactivated to save battery power.
To reactivate calling up of a seat position:
▷Open or close the door or split doors.▷Press a button on the remote control.▷Press the Start/Stop button.
Mirrors
Exterior mirrors
General information
The mirror on the passenger side is more
curved than the driver's side mirror.
Depending on the vehicle equipment, the mir‐
ror setting is stored for the profile currently
used. When the vehicle is unlocked via the re‐
mote control, the position is automatically re‐
trieved if this function is active.
Information
WARNING
Objects reflected in the mirror are closer
than they appear. The distance to the traffic
behind could be incorrectly estimated, for ex‐
ample while changing lanes. There is risk of an
accident. Estimate the distance to the traffic
behind by looking over your shoulder.◀
Seite 57AdjustingCONTROLS57
Online Edition for Part no. 01 40 2 964 571 - X/15
Page 58 of 246

Overview1Adjusting 582Left/right, Automatic Curb Monitor3Fold in and out 58
Selecting a mirror
To change over to the other mirror:
Slide the switch.
Adjusting electrically
The setting corresponds to the direction
in which the button is pressed.
Saving positions
Seat and mirror memory, refer to page 56
Adjusting manually
In case of electrical malfunction press edges of
mirror.
Automatic Curb Monitor
The concept
If reverse gear is engaged, the mirror glass on
the front passenger side is tilted downward.
This improves your view of the curb and other
low-lying obstacles when parking, for example.
Activating
1. Slide the switch to the driver's side
mirror position.
2.Engage selector lever position R.
Deactivating
Slide the switch to the passenger side mirror
position.
Fold in and out
CAUTION
Depending on the vehicle width, the ve‐
hicle can be damaged in car washes. There is
risk of property damage. Before washing, fold
in the mirrors by hand or with the button.◀
Press button.
Possible at speeds up to approx.
15 mph/20 km/h.
Folding the mirrors in and out is advantageous
in the following situations:
▷In car washes.▷On narrow roads.▷For folding mirrors back out that were
folded away manually.
Mirrors that were folded in are folded out auto‐
matically at a speed of approx.
25 mph/40 km/h.
Automatic heating
Both exterior mirrors are automatically heated
whenever the engine is running.
Automatic dimming feature
Both exterior mirrors are automatically dim‐
med. Photocells are used to control the Interior
mirror, refer to page 59.
Seite 58CONTROLSAdjusting58
Online Edition for Part no. 01 40 2 964 571 - X/15
Page 60 of 246
Transporting children safelyVehicle features and op‐
tions
This chapter describes all standard, country-
specific and optional features offered with the
series. It also describes features that are not
necessarily available in your car, e. g., due to
the selected options or country versions. This
also applies to safety-related functions and sys‐
tems. The respectively applicable country provi‐
sions must be observed when using the respec‐
tive features and systems.
The right place for children
Information
WARNING
Unattended children or animals can move
the vehicle and endanger themselves and traf‐
fic, for example with the following actions:
▷Pressing the Start/Stop button.▷Releasing the parking brake.▷Opening and closing of doors or windows.▷Engaging selector lever position N.▷Using vehicle equipment.
There is risk of accidents or injuries. Do not
leave children or animals unattended in the ve‐
hicle. Carry remote control along when exiting
and lock the vehicle.◀
Children should always be in the rear
WARNING
Children shorter than 5 ft, 150 cm cannot
correctly fasten the safety belt without suitable
additional restraint systems. The protective ef‐
fect of the safety belts can be limited or lost
when safety belts are fastened incorrectly. An
incorrectly fastened safety belt can cause addi‐
tional injuries, for example in the event of an
accident or during braking and evasive maneu‐
vers. There is risk of injuries or danger to life.
Secure persons shorter than 5 ft, 150 cm using
suitable restraint systems.◀
Accident research shows that the safest place
for children is in the rear seat.
Only transport children younger than 13 years
of age or shorter than 5 ft, 150 cm in the rear in
suitable child restraint systems provided in ac‐
cordance with the age, weight and size of the
child.
Children 13 years of age or older must wear a
safety belt as soon as a suitable child restraint
system can no longer be used due to their age,
weight and size.
Children on the front passenger seat
Before using a child restraint system on the
front passenger seat, ensure that the front,
knee, and side airbags on the front passenger
side are deactivated. Automatic deactivation of
front-seat passenger airbags, refer to
page 103.
Information
WARNING
Active front-seat passenger airbags can
injure a child in a child restraint system when
the airbags are activated. There is risk of inju‐
ries. Make sure that the front-seat passenger
airbags are deactivated and that the PASSEN‐
GER AIRBAG OFF indicator lamp lights up.◀
Seite 60CONTROLSTransporting children safely60
Online Edition for Part no. 01 40 2 964 571 - X/15
Page 62 of 246

Locking the safety belt1.Pull out the strap completely.2.Secure the child restraint system with the
belt.
3.Allow the strap to be pulled in and pull it
tight against the child restraint system. The
safety belt is locked.
Unlocking the safety belt1.Unbuckle the belt buckle.2.Remove the child restraint system.3.Allow the strap to be pulled in completely.
LATCH child restraint system
Information
LATCH: Lower Anchors and Tether for Children.
Pay attention to the operating and safety infor‐
mation of the child restraint system manufac‐
turer when installing and using LATCH child re‐
straint fixing systems.
Mounts for the lower LATCH anchors
The lower anchors may be used to attach the
CRS to the vehicle seat up to a combined child
and CRS weight of 65 lb/30 kg when the child is
restrained by the internal harnesses.
Information
WARNING
If the LATCH child restraint fixing systems
are not correctly engaged, the protective effect
of the LATCH child restraint fixing system can
be limited. There is risk of injuries or danger to
life. Make sure that the lower anchors are se‐
curely engaged and that the LATCH child re‐
straint fixing system fits securely against the
backrest.◀
Position
The corresponding symbol shows the
mounts for the lower LATCH anchors.
Seats equipped with lower anchors are
marked with a pair, 2, of LATCH sym‐
bols. It is not recommended to use the
inner lower anchors of standard outer
LATCH positions to fasten a child restraint sys‐
tem on the middle seat. Use the vehicle seat
belt instead for the middle seat.
Before installing LATCH child restraint
systems
Pull the belt away from the area of the child re‐
straint system.
Assembly of LATCH child restraint
systems
1.Install child restraint system, see manufac‐
turer's information.
2.Ensure that both LATCH anchors are prop‐
erly connected.
Child restraint fixing system with a
tether strap
Information
CAUTION
The mounting points for the upper retain‐
ing straps of child restraint systems are only
provided for these retaining straps. When other
objects are mounted, the anchors can be dam‐
aged. There is risk of property damage. Only
mount child restraint systems to the upper re‐
taining straps.◀
Mounting points
The respective symbol shows the an‐
chor for the upper retaining strap. Seats
with an upper Top Tether are marked
Seite 62CONTROLSTransporting children safely62
Online Edition for Part no. 01 40 2 964 571 - X/15