Sport MINI COOPER 2012 Owners Manual
[x] Cancel search | Manufacturer: MINI, Model Year: 2012, Model line: COOPER, Model: MINI COOPER 2012Pages: 207, PDF Size: 3.18 MB
Page 4 of 207
Contents
The fastest way to find information on a particu-
lar topic or item is by using the index, refer to
page194.
4 Notes
7 Reporting safety defects
AT A GLANCE 9
10Cockpit
16 Radio
CONTROLS 21
22Opening and closing
35 Adjustments
41 Transporting children safely
44 Driving
54 Controls overview
63 Technology for drivin g comfort and safety
75 Lamps
80 Climate
85 Practical interior accessories
DRIVING TIPS 93
94Things to remember when driving
ENTERTAINMENT 103
104Radio MINI Boost CD
COMMUNICATIONS 115
116Telephone
MOBILITY 127
128Refueling
131 Wheels and tires
143 Engine compartment
147 Maintenance
149 Care
153 Replacing components
167 Giving and receiving assistance
172 Indicator and warning lamps
REFERENCE 185
186Technical data
194 Everything from A to Z
Online Edition for Part no. 01 40 2 914 744 - \251 07/12 BMW AG
Page 8 of 207
Notes
7
Reporting safety defects
For US customers
The following applies only to vehicles owned
and operated in the US.
If you believe that your vehicle has a defect that
could cause a crash or could cause injury or
death, you should immediately inform the
National Highway Traffic Safety Administration,
NHTSA, in addition to notifying MINI of North
America, LLC, P.O. Box 1227, Westwood, New
Jersey 07675-1227, Telephone 1-800-831-
1117.
If NHTSA receives similar complaints, it may
open an investigation, and if it finds that a safety
defect exists in a group of vehicles, it may order
a recall and remedy campaign. However, NHTSA
cannot become involved in individual problems
between you, your dealer, or MINI of North
America, LLC.
To contact NHTSA, you may call the Vehicle
Safety Hotline toll-free at 1-888-327-4236 (TTY:
1-800-424-9153); go to http://www.safer-
car.gov; or write to: Administrator, NHTSA, 400
Seventh Street, SW., Washington, DC 20590. You
can also obtain other information about motor
vehicle safety from http://www.safercar.gov
For Canadian customers
Canadian customers wh o wish to report a
safety-related defect to Transport Canada,
Defect Investigations and Recalls, may tele-
phone the toll-free hotline 1-800-333-0510.
You can also obtain ot her information about
motor vehicle safety from http://www.tc.gc.ca/
roadsafety
Online Edition for Part no. 01 40 2 914 744 - \251 07/12 BMW AG
Page 16 of 207
CockpitAT A GLANCE
15
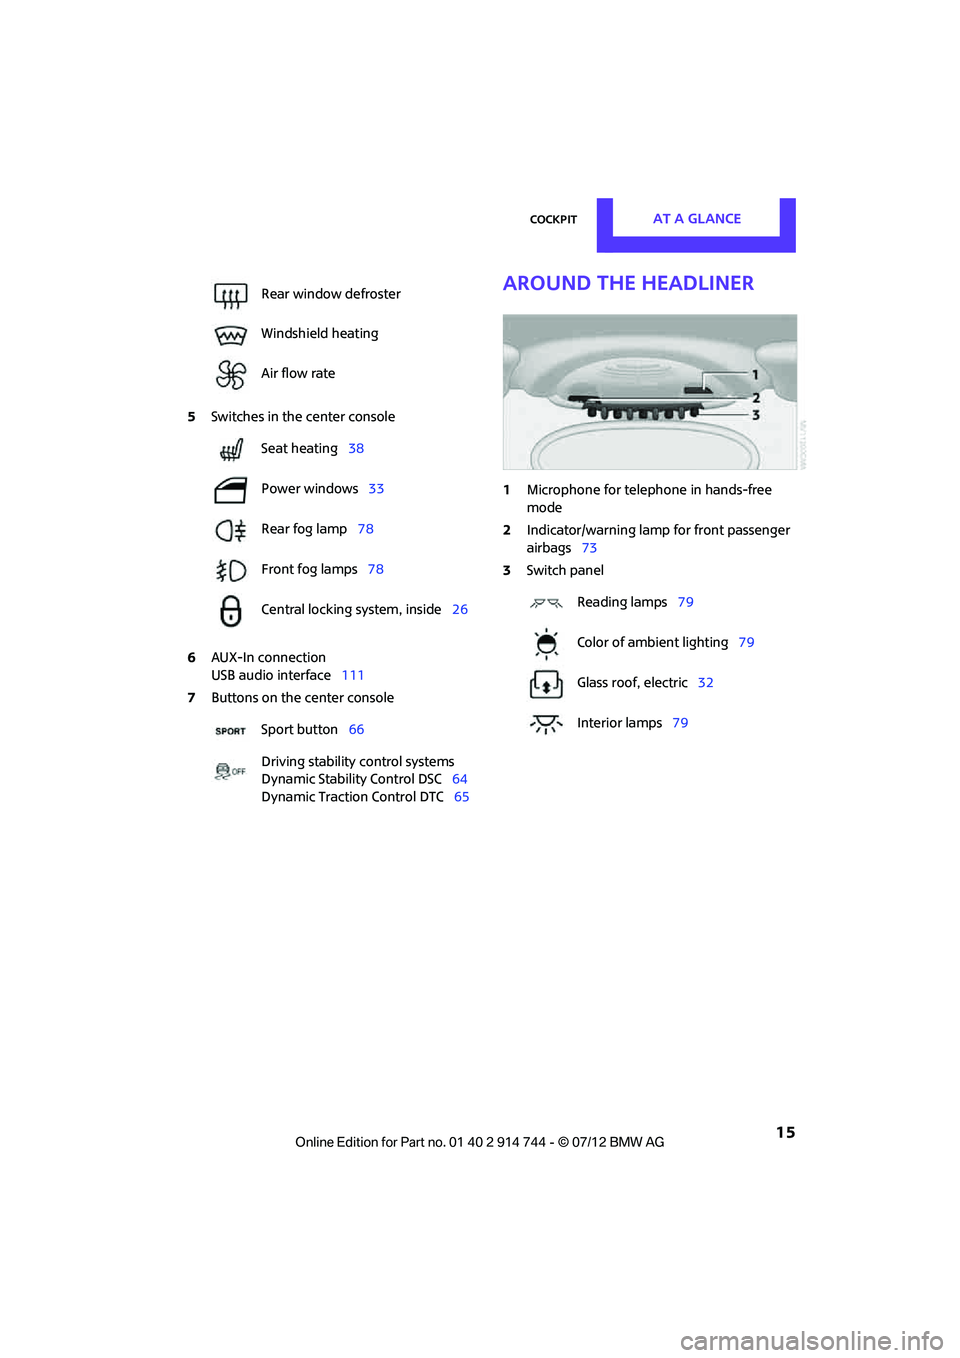
5Switches in the center console
6 AUX-In connection
USB audio interface 111
7 Buttons on the center console
Around the headliner
1Microphone for telephone in hands-free
mode
2 Indicator/warning lamp for front passenger
airbags 73
3 Switch panel
Rear window defroster
Windshield heating
Air flow rate
Seat heating
38
Power windows 33
Rear fog lamp 78
Front fog lamps 78
Central locking system, inside 26
Sport button 66
Driving stability control systems
Dynamic Stability Control DSC 64
Dynamic Traction Control DTC 65
Reading lamps79
Color of ambient lighting 79
Glass roof, electric 32
Interior lamps 79
Online Edition for Part no. 01 40 2 914 744 - \251 07/12 BMW AG
Page 31 of 207
CONTROLSOpening and closing
30
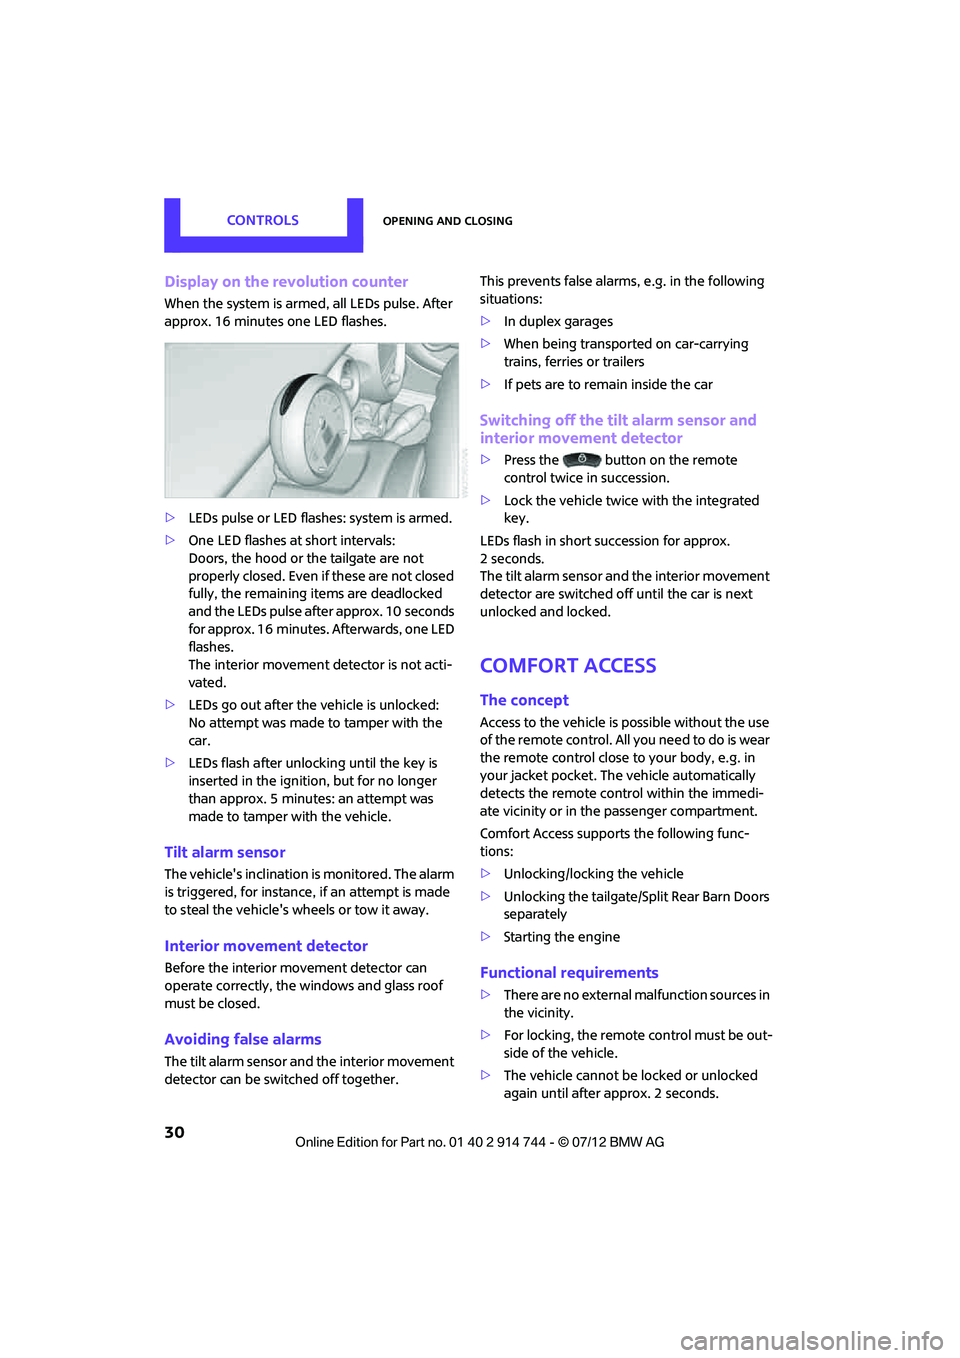
Display on the revolution counter
When the system is armed, all LEDs pulse. After
approx. 16 minutes one LED flashes.
>LEDs pulse or LED flashes: system is armed.
> One LED flashes at short intervals:
Doors, the hood or the tailgate are not
properly closed. Even if these are not closed
fully, the remaining items are deadlocked
and the LEDs pulse after approx. 10 seconds
for approx. 16 minutes. Afterwards, one LED
flashes.
The interior movement detector is not acti-
vated.
> LEDs go out after the vehicle is unlocked:
No attempt was made to tamper with the
car.
> LEDs flash after unlocking until the key is
inserted in the ignition, but for no longer
than approx. 5 minutes: an attempt was
made to tamper with the vehicle.
Tilt alarm sensor
The vehicle's inclination is monitored. The alarm
is triggered, for instance, if an attempt is made
to steal the vehicle's wheels or tow it away.
Interior movement detector
Before the interior movement detector can
operate correctly, the windows and glass roof
must be closed.
Avoiding false alarms
The tilt alarm sensor and the interior movement
detector can be switched off together. This prevents false alarms, e.g. in the following
situations:
>
In duplex garages
> When being transported on car-carrying
trains, ferries or trailers
> If pets are to remain inside the car
Switching off the tilt alarm sensor and
interior movement detector
>Press the button on the remote
control twice in succession.
> Lock the vehicle twice with the integrated
key.
LEDs flash in short succession for approx.
2seconds.
The tilt alarm sensor and the interior movement
detector are switched off until the car is next
unlocked and locked.
Comfort Access
The concept
Access to the vehicle is possible without the use
of the remote control. All you need to do is wear
the remote control close to your body, e.g. in
your jacket pocket. The vehicle automatically
detects the remote control within the immedi-
ate vicinity or in the passenger compartment.
Comfort Access support s the following func-
tions:
> Unlocking/locking the vehicle
> Unlocking the tailgate/S plit Rear Barn Doors
separately
> Starting the engine
Functional requirements
>There are no external malfunction sources in
the vicinity.
> For locking, the remote control must be out-
side of the vehicle.
> The vehicle cannot be locked or unlocked
again until after approx. 2 seconds.
Online Edition for Part no. 01 40 2 914 744 - \251 07/12 BMW AG
Page 36 of 207
AdjustmentsCONTROLS
35
Adjustments
Vehicle equipment
In this chapter, all production, country, and
optional equipment that is offered in the model
range is described. Equipment is also described
that is not available because of, for example,
selected options or count ry version. This also
applies to safety related functions and systems.
Sitting safely
The ideal sitting positi on can make a vital
contribution to relaxed, fatigue-free driving. In
conjunction with the safety belts, the head
restraints and the airbags, the seated position
has a major influence on yo ur safety in the event
of an accident. To ensure that the safety systems
operate with optimal efficiency, we strongly
urge you to observe the instructions contained
in the following section.
For additional information on transporting
children safely, refer to page 41.
Airbags
Always maintain an adequate distance
between yourself and the airbags. Always
grip the steering wheel on the rim, with your
hands in the 3 o'clock and 9 o'clock positions, to
minimize the risk of inju ry to the hands or arms
in the event of the airbag being deployed.
No one and nothing should come between the
airbags and the seat occupant.
Do not use the cover of the front airbag on the
front passenger side as a storage area. Ensure
that the front passenger is correctly seated, e.g.
that no feet or legs are propped against the
dashboard. Otherwise, leg injury could result if
the front airbag suddenly deployed.
Make sure that passeng ers keep their heads
away from the side airbag and do not lean
against the cover of the head airbag; otherwise injuries can occur when the airbags are
deployed.
<
Even if you follow all the instructions, injuries
resulting from contact with airbags cannot be
fully excluded, depending on the circumstances.
The ignition and inflation noise may provoke a
mild hearing loss in ex tremely sensitive indivi-
duals. This effect is usually only temporary.
For airbag locations as well as additional infor-
mation, refer to page 72.
Head restraint
A correctly adjusted head restraint reduces the
risk of neck injury in the event of an accident.
Adjust the head rest raint in such a way
that its center is at approx. ear level.
Otherwise, there is an increased risk of injury in
the event of an accident. <
Head restraints, refer to page 37.
Safety belt
Before every drive, make sure that all occupants
wear their safety belts. Airbags complement the
safety belt as an additi onal safety device, but
they do not represent a substitute.
Number of safety belts
Never allow more th an one person to
wear a single safety belt. Never allow
infants or small children to ride in a passenger's
lap.
Make sure that the belt in the lap area sits low
across the hips and does not press against the
abdomen. The safety belt must not rest against
the throat, run across sh arp edges, pass over
hard or fragile objects or be pinched. Fasten the
safety belt so that it is pulled taut across the lap
and shoulder, fitting the body snugly without
any twists. Otherwise, the belt could slide over
the hips in the event of a frontal collision and
injure the abdomen. Avoid wearing bulky
Online Edition for Part no. 01 40 2 914 744 - \251 07/12 BMW AG
Page 42 of 207
Transporting children safelyCONTROLS
41
Transporting children safely
Vehicle equipment
In this chapter, all production, country, and
optional equipment that is offered in the model
range is described. Equipment is also described
that is not available because of, for example,
selected options or count ry version. This also
applies to safety related functions and systems.
The right place for
children
Do not leave children unattended in the
vehicle; otherwise, they could endanger
themselves and/or other persons by opening the
doors, for example.<
Children should always sit in the rear
Accident research has shown that the safest
place for children is on the rear seat.
Only transport children under the age of
13 or smaller than 5 ft/150 cm in the rear
in a child restraint system suitable for their age,
weight and size. Othe rwise, there is an
increased risk of injury in the event of an acci-
dent. <
Children 13 years of age or older must be
buckled in with a safety belt as soon as there no
longer is any child restraint system that is appro-
priate for their age, size and weight. Only install child seats in the rear when the
rear seat backrest is folded all the way
back and engaged. Otherwise, there is an
increased risk of injury in the event of an
accident. <
Exception for front passenger seat
Front passenger airbags
Should it be necessary to use a child
restraint system on the front passenger
seat, the front and side airbags must be deacti-
vated. Otherwise, there is an increased risk of
injury to the child if th e airbags deploy, even if
the child is seated in a child restraint system. <
For more informat ion on automatic deactivation
of the front passenger airbags, refer to page 72.
Child restraint systems,
installation
Observe the child restraint system manu-
facturer's instructions when selecting,
installing and using ch ild restraint systems.
Otherwise, the protective effect may be
diminished. <
On the front passenger seat
After installing a child restraint system on
the front passenger seat, make sure that
the front and side airbags for the front passen-
ger are deactivated; otherwise, there is an
increased risk of injury if the airbags deploy. <
Seat position
Before installing a child restraint system, move
the front passenger seat as far back and up as
possible to obtain the be st possible position for
the belt. Do not change the seat position after
this.
Online Edition for Part no. 01 40 2 914 744 - \251 07/12 BMW AG
Page 43 of 207
CONTROLSTransporting children safely
42
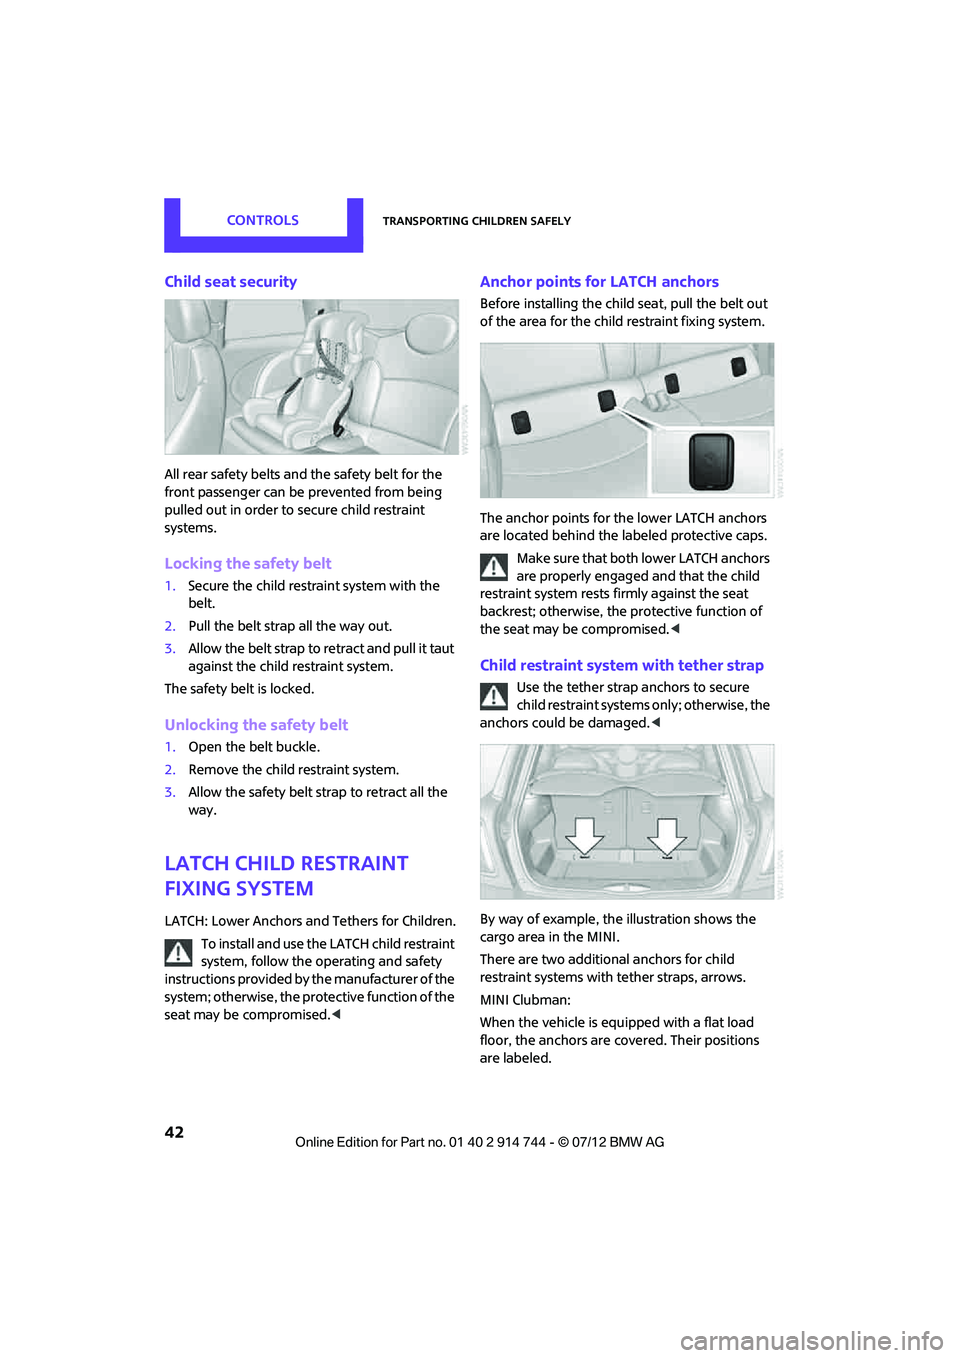
Child seat security
All rear safety belts and the safety belt for the
front passenger can be prevented from being
pulled out in order to secure child restraint
systems.
Locking the safety belt
1.Secure the child restraint system with the
belt.
2. Pull the belt strap all the way out.
3. Allow the belt strap to retract and pull it taut
against the child restraint system.
The safety belt is locked.
Unlocking the safety belt
1. Open the belt buckle.
2. Remove the child restraint system.
3. Allow the safety belt strap to retract all the
way.
LATCH child restraint
fixing system
LATCH: Lower Anchors and Tethers for Children.
To install and use the LATCH child restraint
system, follow the operating and safety
instructions provided by the manufacturer of the
system; otherwise, the protective function of the
seat may be compromised. <
Anchor points for LATCH anchors
Before installing the child seat, pull the belt out
of the area for the child restraint fixing system.
The anchor points for the lower LATCH anchors
are located behind the labeled protective caps.
Make sure t hat bo th l owe r LATCH ancho rs
are properly engaged and that the child
restraint system rests fi rmly against the seat
backrest; otherwise, the protective function of
the seat may be compromised. <
Child restraint system with tether strap
Use the tether strap anchors to secure
child restraint systems only; otherwise, the
anchors could be damaged. <
By way of example, the illustration shows the
cargo area in the MINI.
There are two additional anchors for child
restraint systems with tether straps, arrows.
MINI Clubman:
When the vehicle is equi pped with a flat load
floor, the anchors are covered. Their positions
are labeled.
Online Edition for Part no. 01 40 2 914 744 - \251 07/12 BMW AG
Page 44 of 207
Transporting children safelyCONTROLS
43
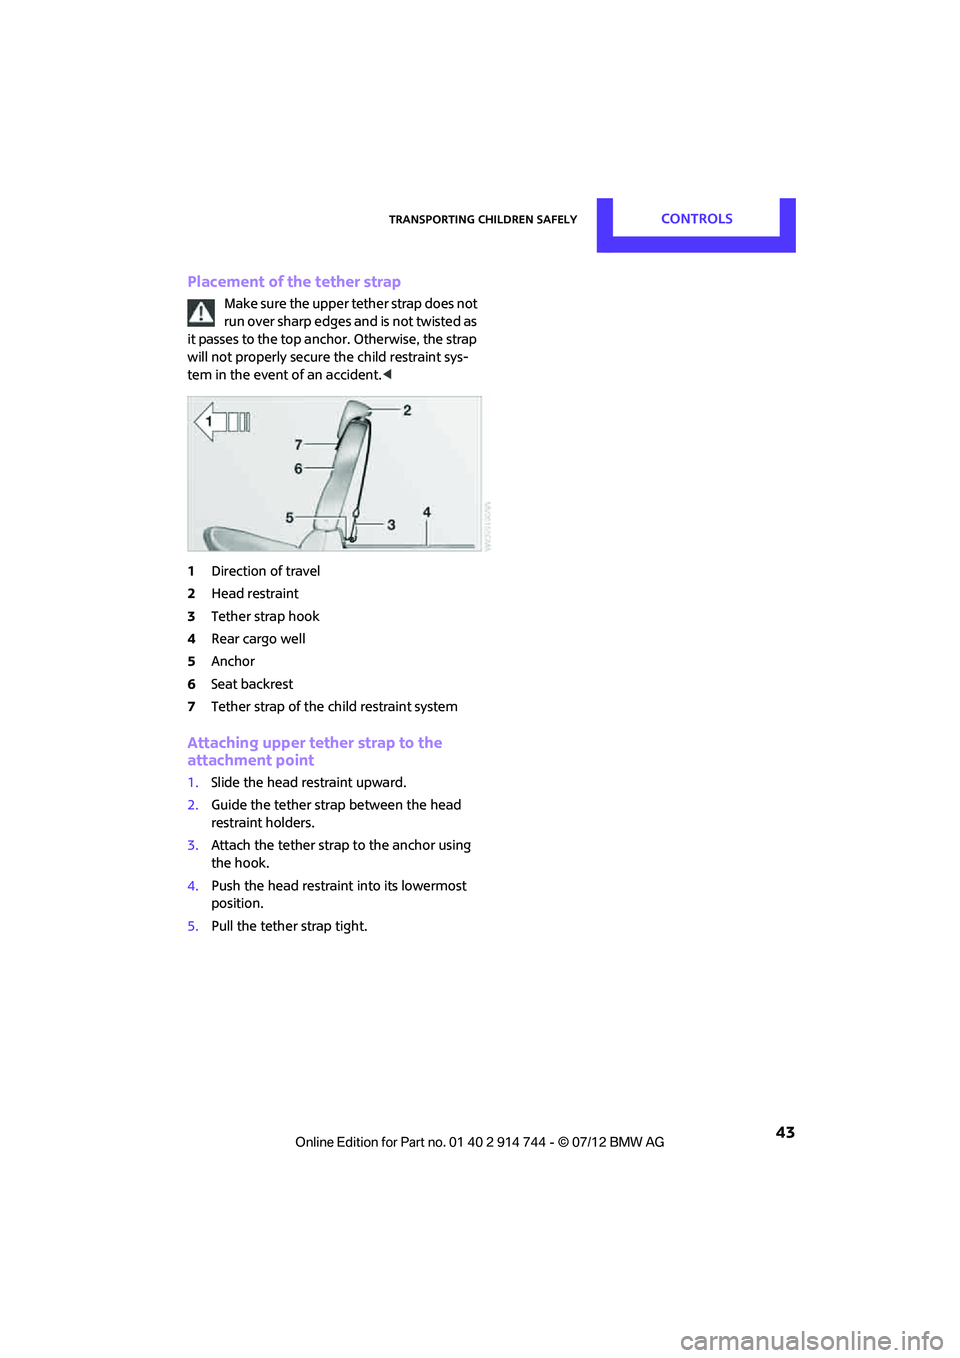
Placement of the tether strap
Make sure the upper tether strap does not
run over sharp edges and is not twisted as
it passes to the top anchor. Otherwise, the strap
will not properly secure the child restraint sys-
tem in the event of an accident. <
1 Direction of travel
2 Head restraint
3 Tether strap hook
4 Rear cargo well
5 Anchor
6 Seat backrest
7 Tether strap of the child restraint system
Attaching upper tether strap to the
attachment point
1.Slide the head restraint upward.
2. Guide the tether strap between the head
restraint holders.
3. Attach the tether strap to the anchor using
the hook.
4. Push the head restraint into its lowermost
position.
5. Pull the tether strap tight.
Online Edition for Part no. 01 40 2 914 744 - \251 07/12 BMW AG
Page 49 of 207
CONTROLSDriving
48
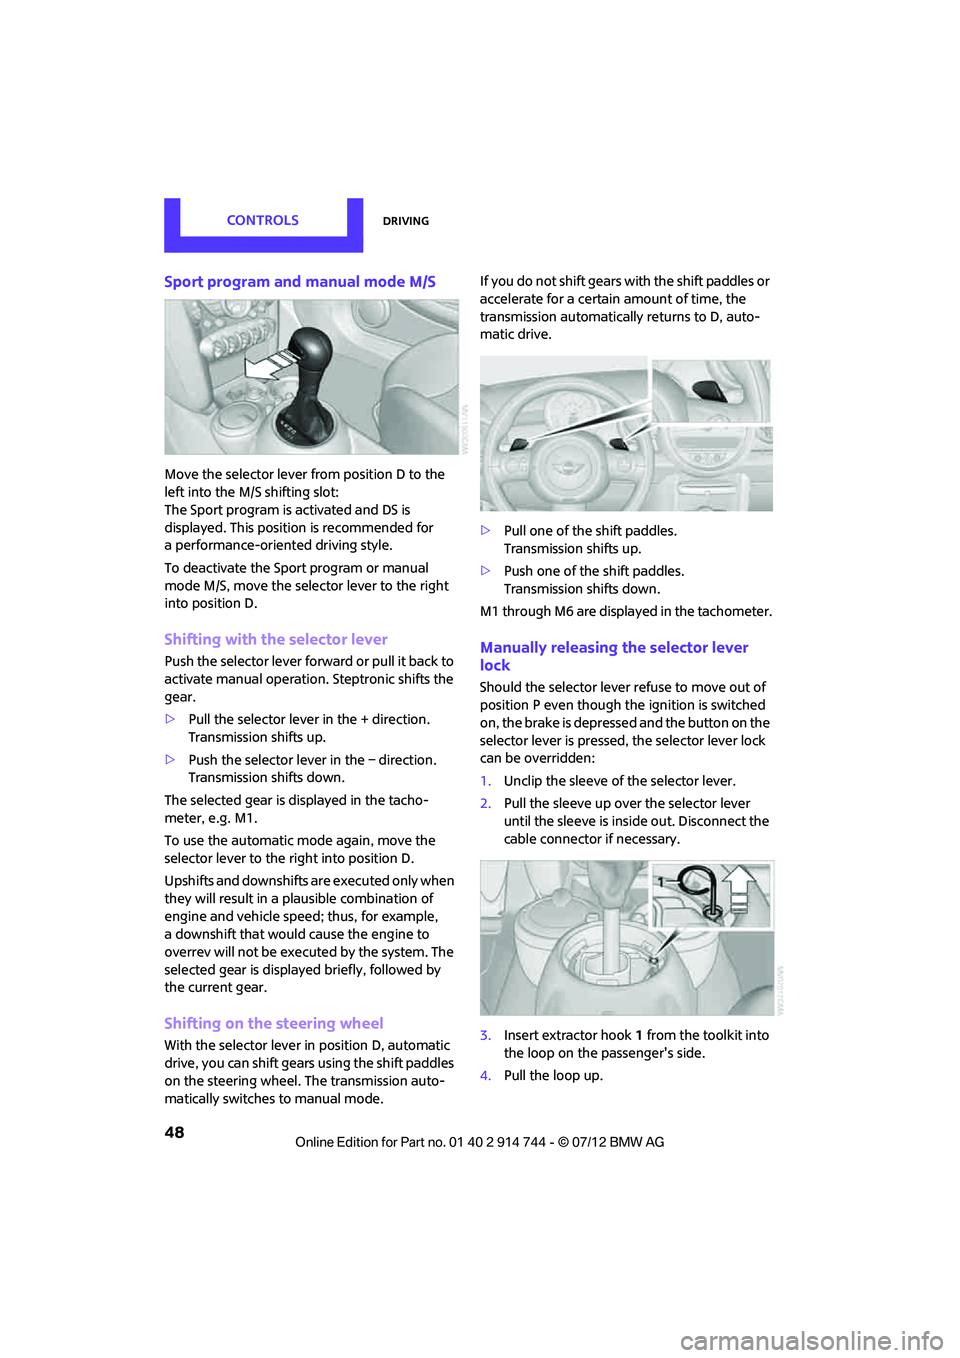
Sport program and manual mode M/S
Move the selector lever from position D to the
left into the M/S shifting slot:
The Sport program is activated and DS is
displayed. This position is recommended for
a performance-oriented driving style.
To deactivate the Sport program or manual
mode M/S, move the selector lever to the right
into position D.
Shifting with the selector lever
Push the selector lever forward or pull it back to
activate manual operation. Steptronic shifts the
gear.
> Pull the selector lever in the + direction.
Transmission shifts up.
> Push the selector leve r in the – direction.
Transmission shifts down.
The selected gear is displayed in the tacho-
meter, e.g. M1.
To use the automatic mode again, move the
selector lever to the right into position D.
Upshifts and downshifts are executed only when
they will result in a plausible combination of
engine and vehicle speed; thus, for example,
a downshift that would cause the engine to
overrev will not be executed by the system. The
selected gear is displayed briefly, followed by
the current gear.
Shifting on the steering wheel
With the selector lever in position D, automatic
drive, you can shift gears using the shift paddles
on the steering wheel. The transmission auto-
matically switches to manual mode. If you do not shift gears with the shift paddles or
accelerate for a certai
n amount of time, the
transmission automatically returns to D, auto-
matic drive.
> Pull one of the shift paddles.
Transmission shifts up.
> Push one of the shift paddles.
Transmission shifts down.
M1 through M6 are displayed in the tachometer.
Manually releasing the selector lever
lock
Should the selector lever refuse to move out of
position P even though the ignition is switched
on, the brake is depressed and the button on the
selector lever is pressed, the selector lever lock
can be overridden:
1. Unclip the sleeve of the selector lever.
2. Pull the sleeve up over the selector lever
until the sleeve is insi de out. Disconnect the
cable connector if necessary.
3. Insert extractor hook 1 from the toolkit into
the loop on the passenger's side.
4. Pull the loop up.
Online Edition for Part no. 01 40 2 914 744 - \251 07/12 BMW AG
Page 67 of 207

CONTROLSTechnology for driving comfort and safety
66
Deactivating both DTC and DSC
Press the button for at least 3 seconds; the indi-
cator lamp DSC OFF on the speedometer comes
on and DSC OFF is displayed on the tachometer.
The Dynamic Traction Control DTC and Dynamic
Stability Control DSC are both deactivated. There
will be no more stabilizing interventions.
Interventions (differential lock) in braking occur
to improve propulsion when drive wheels are
rotating unevenly, even when DSC is deacti-
vated.
Activating DSC
Press the button again: the indicator lamps go
out.
Hill Assist
Hill Assist aids you in co mfortably driving off on
inclines. It is not necessary to use the parking
brake for this.
1. Hold the MINI with the brake.
2. Release the brake and immediately drive
off.
Hill Assist holds the car in place for approx.
2 seconds after the brake is released. Depending on the load and gradient, the
vehicle can roll backwa rd slightly during
this period. After you release the brake, imme-
diately start driving since the Hill Assist only
holds the vehicle for about 2 seconds, and it will
start to roll backward. <
Sport button
Pressing the button causes your MINI to respond
even more sportily.
>Engine responds more spontaneously to
movements of the accelerator.
> Steering response is more direct.
> Cooper S, John Cooper Works: the engine
sounds more sporty in coasting mode.
With automatic transmission:
> More rapid gear shifting in Sport program.
Activating the system
Press the button.
The LED lights up.
SPORT is briefly displayed in the tachometer.
Deactivating the system
>Press the button again.
> Switch off the engine.
Flat Tire Monitor FTM
The concept
The system does not me asure the actual infla-
tion pressure in the tires.
The system detects a pres sure loss in a tire by
comparing the rotational speeds of the indivi-
dual wheels while moving.
In the event of a pressure loss, the diameter and
therefore the rotational speed of the corre-
sponding wheel change. This is detected and
reported as a flat tire.
Online Edition for Part no. 01 40 2 914 744 - \251 07/12 BMW AG