Back MINI COOPER CONVERTIBLE 2012 Owners Manual
[x] Cancel search | Manufacturer: MINI, Model Year: 2012, Model line: COOPER CONVERTIBLE, Model: MINI COOPER CONVERTIBLE 2012Pages: 218, PDF Size: 4.5 MB
Page 5 of 218
Notes
4
Notes
Using this Owner's
Manual
We have tried to make all the information in this
Owner's Manual easy to find. The fastest way to
find specific topics is to refer to the detailed
index at the back of the manual. If you wish to
gain an initial overview of your vehicle, you will
find this in the first chapter.
Should you wish to sell yo ur MINI at some time in
the future, remember to hand over this Owner's
Manual to the new owner; it is an important part
of the vehicle.
Additional sources of information
Should you have any other questions, your MINI
dealer will be glad to advise you at any time.
You can find more information about the MINI,
for example on its technology, on the Internet at
www.MINI.com.
Symbols used
Indicates precautions that must be
followed precisely in order to avoid the
possibility of personal injury and serious
damage to the vehicle. <
Indicates information that will assist you in
gaining the optimum benefit from your
vehicle and enable you to care more effectively
for your vehicle. <
Refers to measures that can be taken to
help protect the environment. <
< Marks the end of a specific item of informa-
tion.
"..." Identifies radio display texts used to select
individual functions.
Symbols on vehicle components
Indicates that you should consult the rele-
vant section of this Owner's Manual for
information on a particular part or assembly.
Vehicle equipment
The manufacturer of your MINI is the Bayerische
Motoren Werke Aktien gesellschaft, BMW AG.
This Owner's Manual describes all models as well
as all production, country and special equip-
ment that is offered in the model range. Equip-
ment is also described that is not available
because of, for example, selected options or
country version. This also applies to safety
related functions and systems. For equipment
and models that are not described in this
Owner's Manual, please see the supplementary
Owner's Manuals that are provided.
Status of this Owner's
Manual at time of
printing
The high level of safety and quality of the MINI
vehicles is ensured through continuous develop-
ment. In rare cases, there may be differences
between the description and the vehicle.
For your safety
Maintenance and repair
Advanced technology, e.g. the use of
modern materials and high-performance
electronics, requires specially adapted mainte-
nance and repair methods. Therefore, have the
necessary work on your MI NI only carried out by
a MINI dealer or a work shop that has specially
trained personnel workin g in accordance with
Online Edition for Part no. 01 40 2 914 786 - \251 07/12 BMW AG
Page 19 of 218

AT A GLANCERadio
18
Exit menu, one menu
back
Displaying additional
menu items
Scroll display, list contains
more than two inputs
Changing to parent
directory
SymbolFunction
Online Edition for Part no. 01 40 2 914 786 - \251 07/12 BMW AG
Page 23 of 218
CONTROLSOpening and closing
22
Opening and closing
Vehicle equipment
In this chapter, all production, country, and
optional equipment that is offered in the model
range is described. Equipment is also described
that is not available because of, for example,
selected options or coun try version. This also
applies to safety relate d functions and systems.
Keys/remote controls
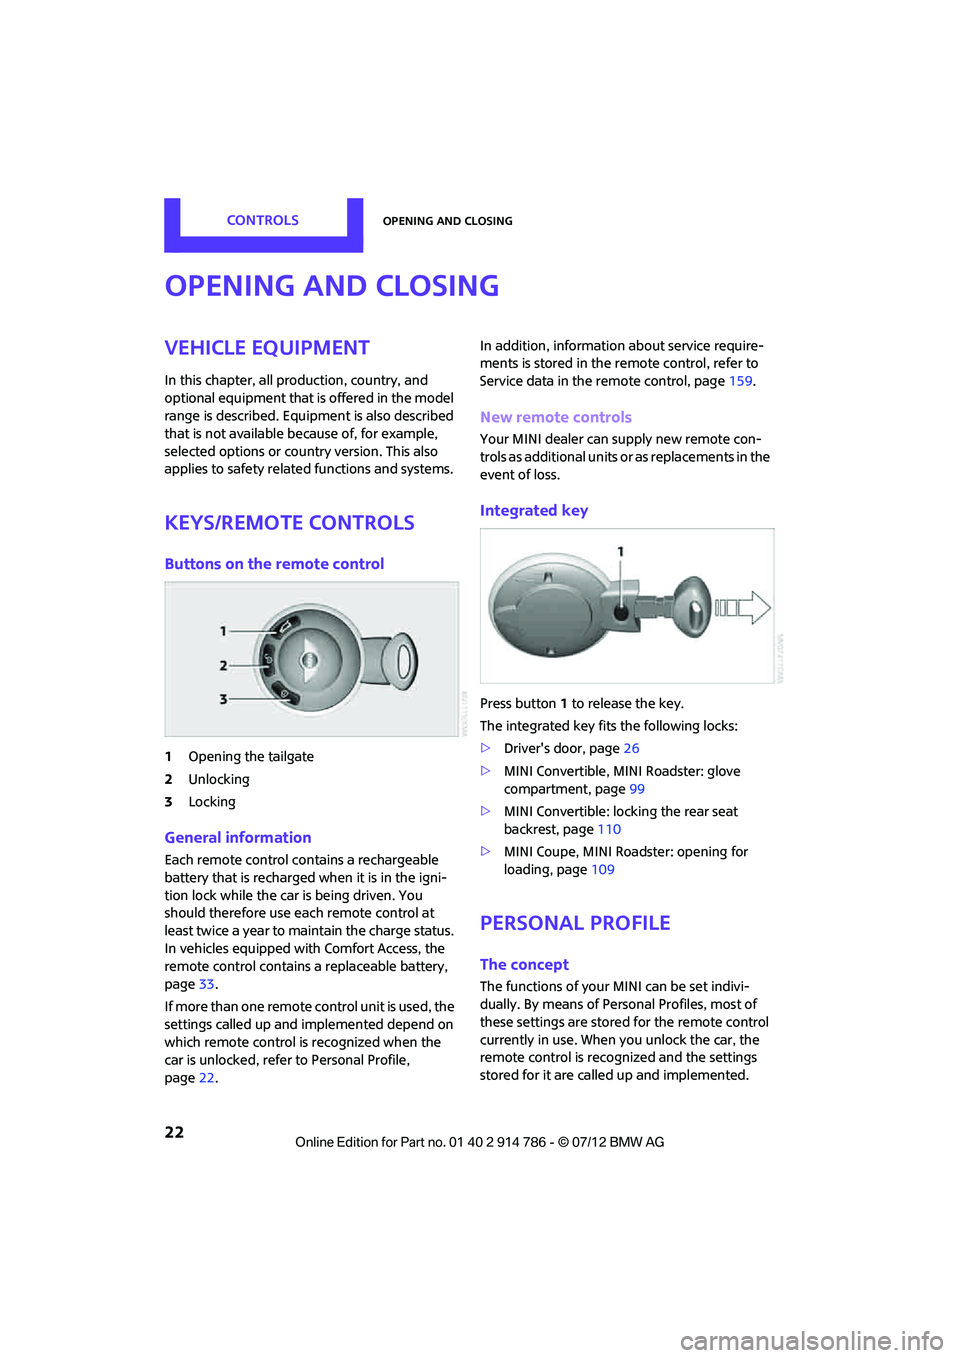
Buttons on the remote control
1Opening the tailgate
2 Unlocking
3 Locking
General information
Each remote control co ntains a rechargeable
battery that is recharged when it is in the igni-
tion lock while the car is being driven. You
should therefore use each remote control at
least twice a year to maintain the charge status.
In vehicles equipped with Comfort Access, the
remote control contains a replaceable battery,
page 33.
If more than one remote control unit is used, the
settings called up and implemented depend on
which remote control is recognized when the
car is unlocked, refer to Personal Profile,
page 22. In addition, information about service require-
ments is stored in the remote control, refer to
Service data in the remote control, page
159.
New remote controls
Your MINI dealer can supply new remote con-
trols as additional units or as replacements in the
event of loss.
Integrated key
Press button1 to release the key.
The integrated key fits the following locks:
> Driver's door, page 26
> MINI Convertible, MINI Roadster: glove
compartment, page 99
> MINI Convertible: locking the rear seat
backrest, page 110
> MINI Coupe, MINI Roadster: opening for
loading, page 109
Personal Profile
The concept
The functions of your MINI can be set indivi-
dually. By means of Pers onal Profiles, most of
these settings are stored for the remote control
currently in use. When you unlock the car, the
remote control is recognized and the settings
stored for it are called up and implemented.
Online Edition for Part no. 01 40 2 914 786 - \251 07/12 BMW AG
Page 30 of 218
Opening and closingCONTROLS
29
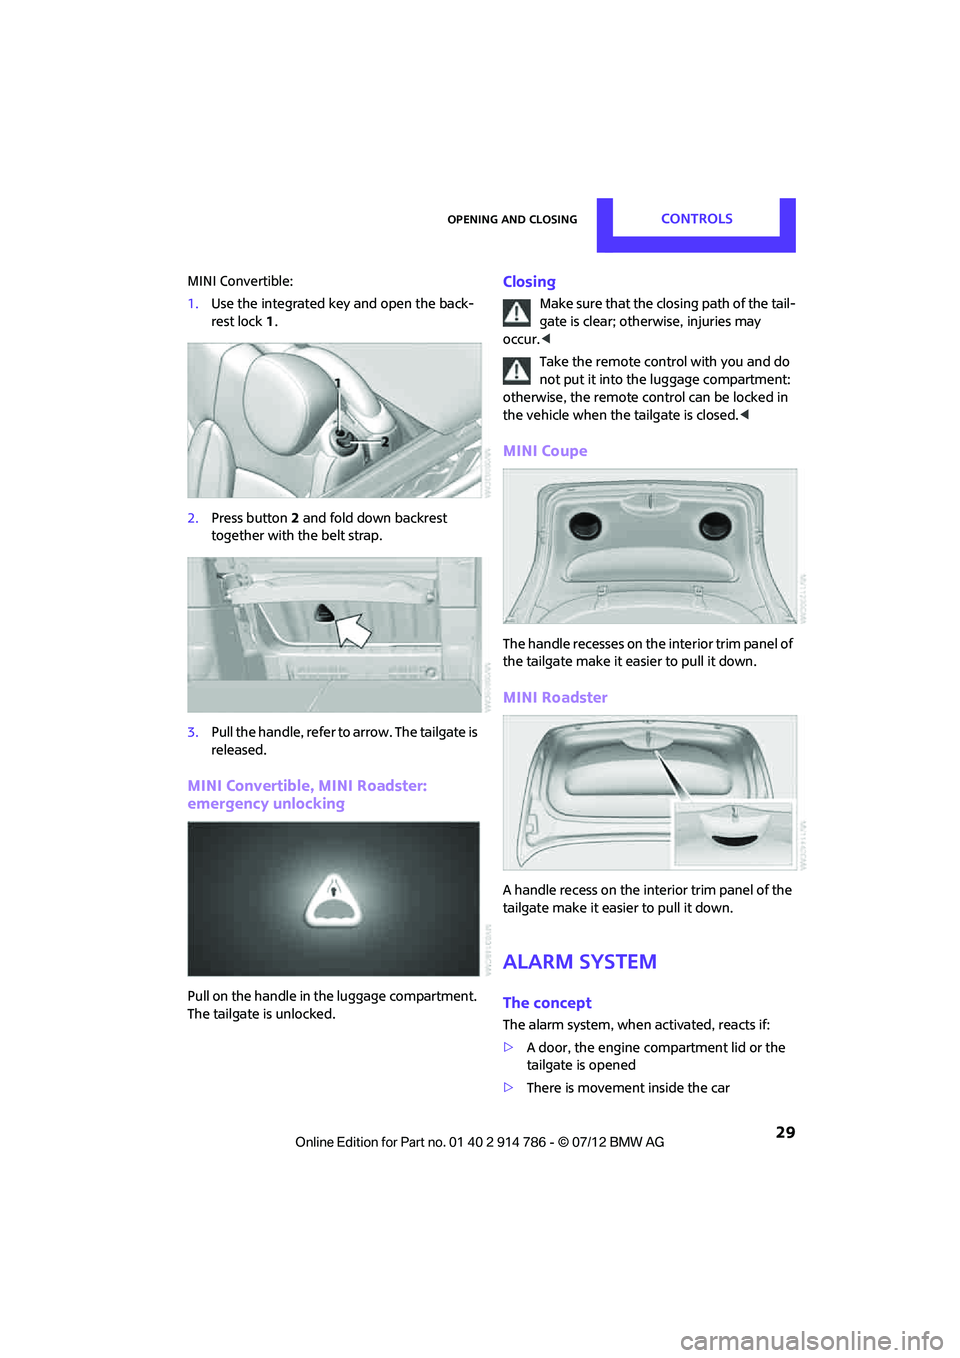
MINI Convertible:
1.Use the integrated key and open the back-
rest lock 1.
2. Press button 2 and fold down backrest
together with the belt strap.
3. Pull the handle, refer to arrow. The tailgate is
released.
MINI Convertible, MINI Roadster:
emergency unlocking
Pull on the handle in the luggage compartment.
The tailgate is unlocked.
Closing
Make sure that the closing path of the tail-
gate is clear; otherwise, injuries may
occur. <
Take the remote cont rol with you and do
not put it into the luggage compartment:
otherwise, the remote control can be locked in
the vehicle when the tailgate is closed. <
MINI Coupe
The handle recesses on the interior trim panel of
the tailgate make it easier to pull it down.
MINI Roadster
A handle recess on the interior trim panel of the
tailgate make it easier to pull it down.
Alarm system
The concept
The alarm system, when activated, reacts if:
>A door, the engine compartment lid or the
tailgate is opened
> There is movement inside the car
Online Edition for Part no. 01 40 2 914 786 - \251 07/12 BMW AG
Page 35 of 218
CONTROLSOpening and closing
34
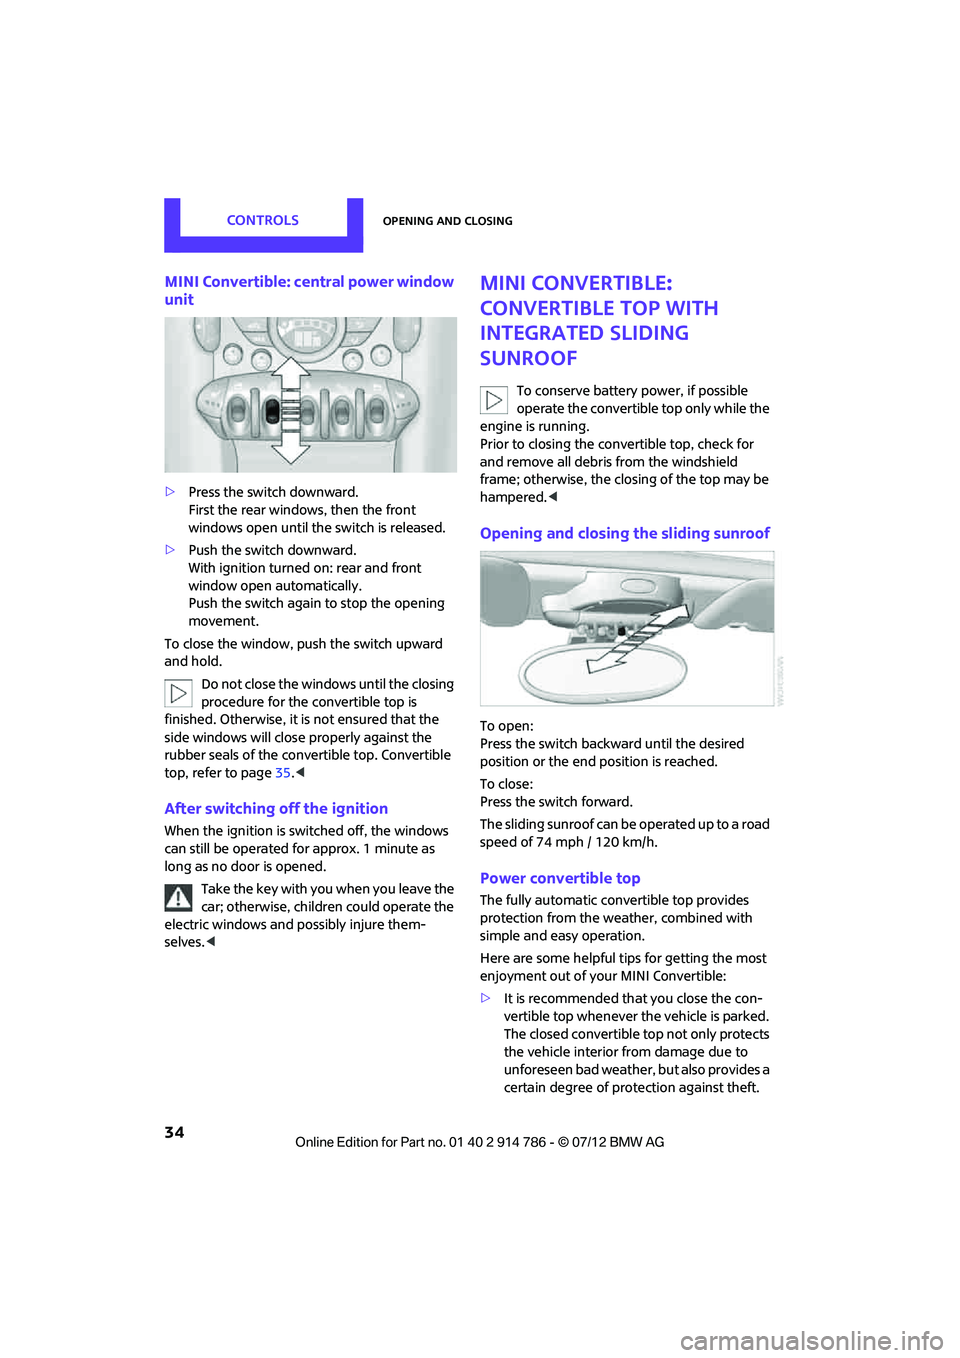
MINI Convertible: central power window
unit
>Press the switch downward.
First the rear windows, then the front
windows open until the switch is released.
> Push the switch downward.
With ignition turned on: rear and front
window open automatically.
Push the switch again to stop the opening
movement.
To close the window, push the switch upward
and hold.
Do not close the windows until the closing
procedure for the convertible top is
finished. Otherwise, it is not ensured that the
side windows will clos e properly against the
rubber seals of the convertible top. Convertible
top, refer to page 35.<
After switching off the ignition
When the ignition is switched off, the windows
can still be operated for approx. 1 minute as
long as no door is opened.
Take the key with you when you leave the
car; otherwise, children could operate the
electric windows and possibly injure them-
selves. <
MINI Convertible:
convertible top with
integrated sliding
sunroof
To conserve battery power, if possible
operate the convertible top only while the
engine is running.
Prior to closing the conv ertible top, check for
and remove all debris from the windshield
frame; otherwise, the closing of the top may be
hampered. <
Opening and closing the sliding sunroof
To open:
Press the switch backward until the desired
position or the end position is reached.
To close:
Press the switch forward.
The sliding sunroof can be operated up to a road
speed of 74 mph / 120 km/h.
Power convertible top
The fully automatic convertible top provides
protection from the weather, combined with
simple and easy operation.
Here are some helpful tips for getting the most
enjoyment out of your MINI Convertible:
>It is recommended th at you close the con-
vertible top whenever the vehicle is parked.
The closed convertible top not only protects
the vehicle interior from damage due to
unforeseen bad weather, but also provides a
certain degree of protection against theft.
Online Edition for Part no. 01 40 2 914 786 - \251 07/12 BMW AG
Page 36 of 218
Opening and closingCONTROLS
35
Always keep your valuables inside the
locked luggage compartment, even if the
convertible top is closed.
> Do not mount any roof rack systems on the
convertible top.
> When opening the wet convertible top, e.g.,
after driving in the rain, water drops may
enter the luggage compartment. In order to
avoid water stains or soiling, remove all
objects from the luggage compartment, if
necessary.
If the temperature drops below +10 7/
–12 6, do not operate the convertible
top; otherwise, damage may occur.
Do not leave a wet convertible top open for
more than one day, since the humidity may
cause damages.
Do not place any objects on the convertible top,
as they could otherwise fall off while the con-
vertible top is being op erated and result in
property damage or personal injury.
If the rollover protective system is extended, do
not operate the convertible top.
Always completely finish the operation of the
convertible top. Driving off before an opening or
closing procedure is completely finished can
lead to property damage or personal injury.
During the opening an d closing operation,
ensure that no one is in jured by the convertible
top linkage or other moving parts. Keep children
away from the pivoting range of the convertible
top.
For safety reasons, only operate the convertible
top while the vehicle is standing. <
While opening and closing, the convertible
top pivots upward. If operating the con-
vertible top inside a garage or under a bridge,
or similar low structure, ensure the minimum
clearance is 6.5 ft/2 m; otherwise, the vehicle
may be damaged.
tions.
> Please ensure the luggage compartment
roller cover is in its lo west position, refer to
page 109; otherwise, the convertible top
cannot be opened.
> Ensure the cargo does not push against the
luggage compartment roller cover from
below.
> Make sure that the tailgate is closed.
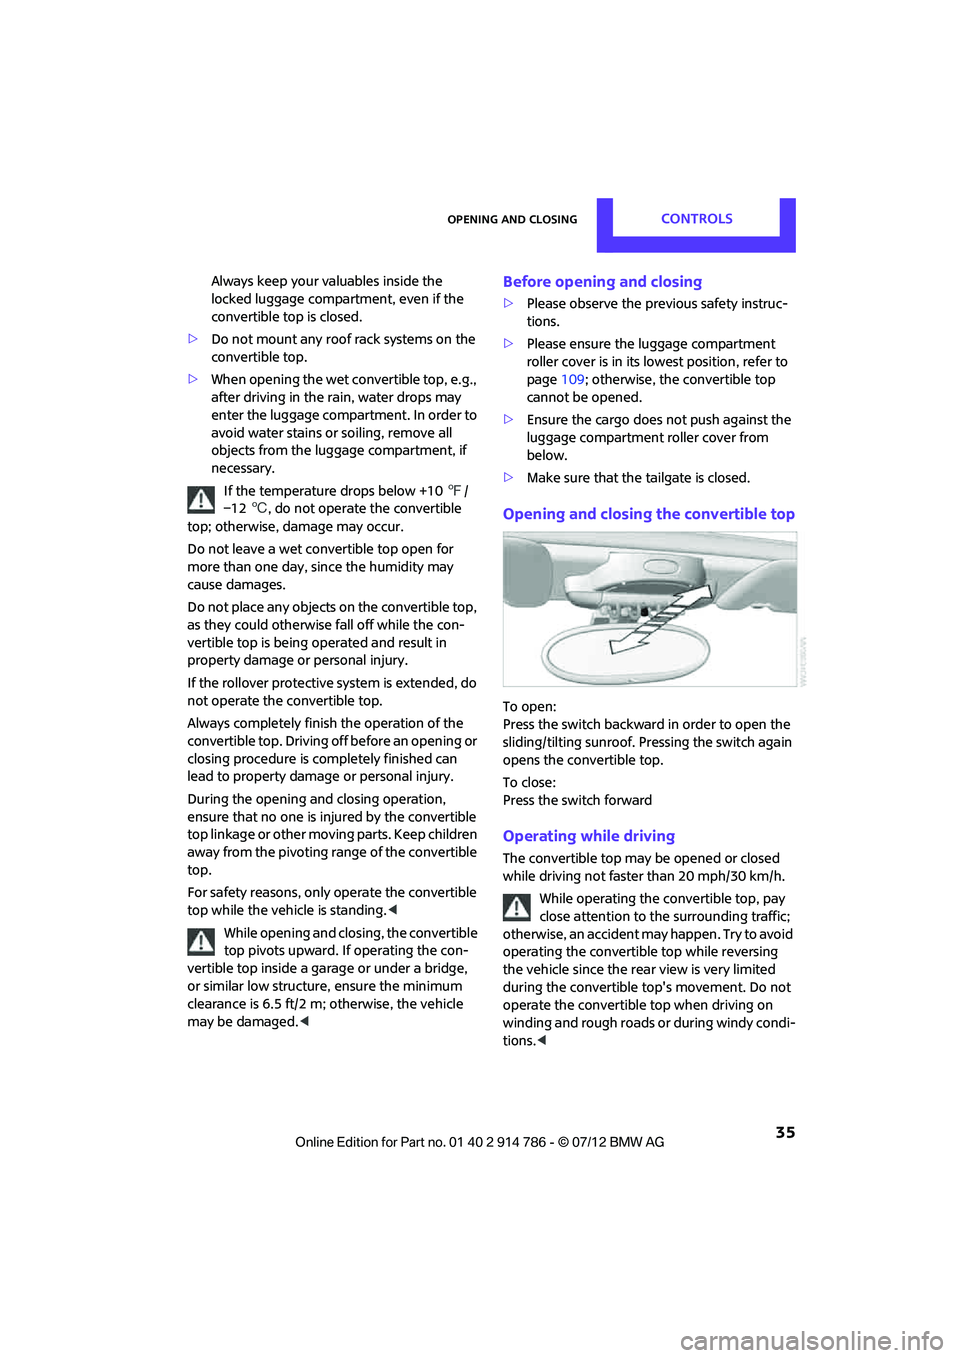
Opening and closing the convertible top
To open:
Press the switch backward in order to open the
sliding/tilting sunroof. Pr essing the switch again
opens the convertible top.
To close:
Press the switch forward
Operating while driving
The convertible top may be opened or closed
while driving not faster than 20 mph/30 km/h.
While operating the convertible top, pay
close attention to the surrounding traffic;
otherwise, an accident may happen. Try to avoid
operating the convertible top while reversing
the vehicle since the rear view is very limited
during the convertible top's movement. Do not
operate the convertible top when driving on
winding and rough roads or during windy condi-
tions. <
Online Edition for Part no. 01 40 2 914 786 - \251 07/12 BMW AG
Page 40 of 218
Opening and closingCONTROLS
39
3.On the opposite side of the vehicle, insert
the retaining pin 1 into the opening,
pushing against the spring load.
4. Push out retaining pin 2 on one side until it
engages.
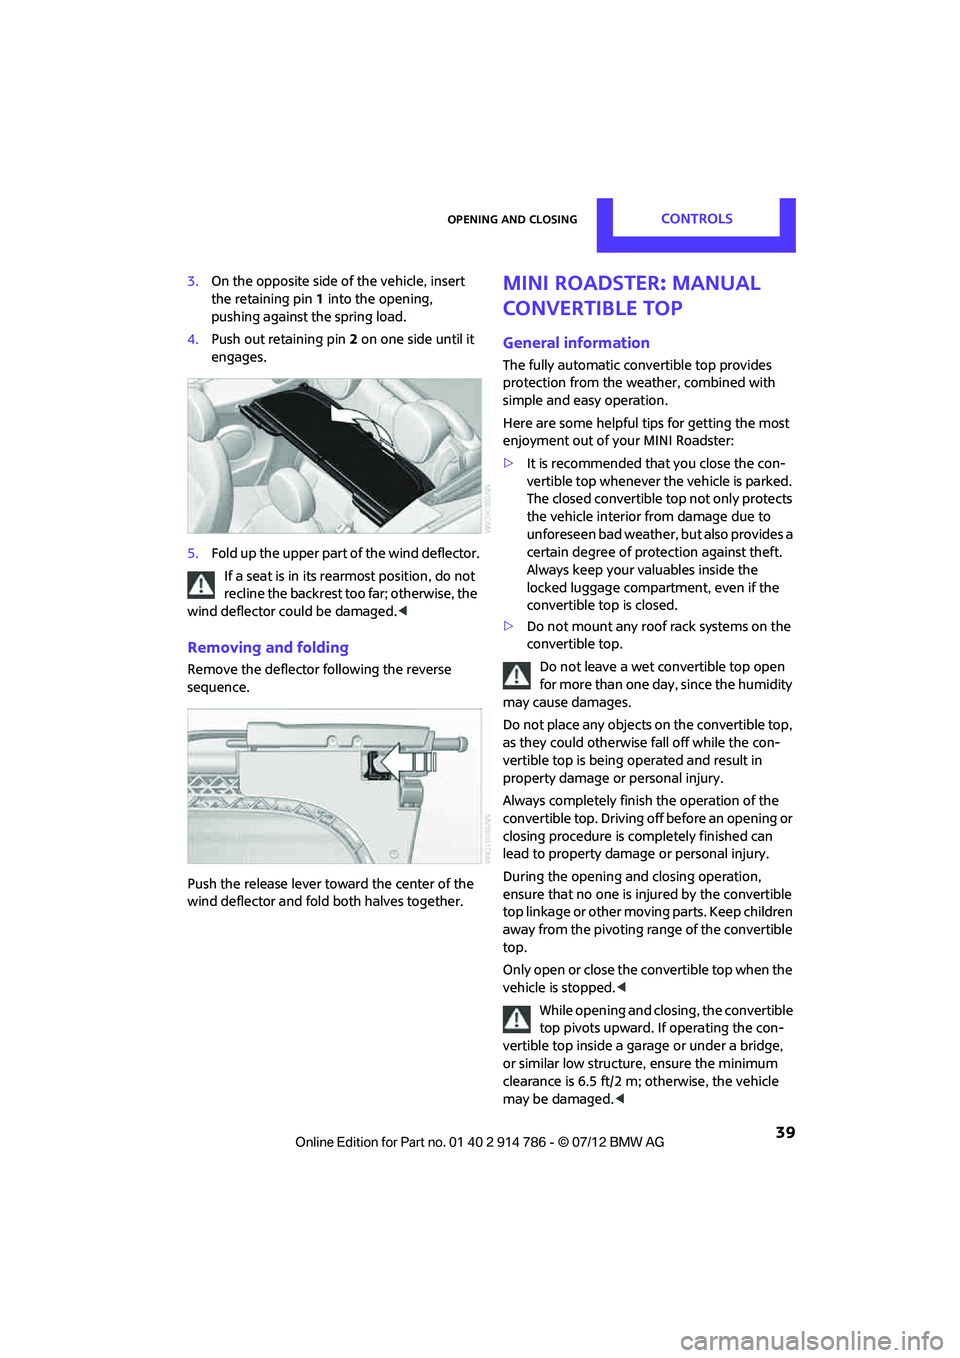
5. Fold up the upper part of the wind deflector.
If a seat is in its rearmost position, do not
recline the backrest t oo far; otherwise, the
wind deflector could be damaged. <
Removing and folding
Remove the deflector following the reverse
sequence.
Push the release lever toward the center of the
wind deflector and fold both halves together.
MINI Roadster: manual
convertible top
General information
The fully automatic convertible top provides
protection from the weather, combined with
simple and easy operation.
Here are some helpful tips for getting the most
enjoyment out of your MINI Roadster:
>It is recommended that you close the con-
vertible top whenever the vehicle is parked.
The closed convertible top not only protects
the vehicle interior from damage due to
unforeseen bad weather, but also provides a
certain degree of protection against theft.
Always keep your valuables inside the
locked luggage compartment, even if the
convertible top is closed.
> Do not mount any roof rack systems on the
convertible top.
Do not leave a wet convertible top open
for more than one day, since the humidity
may cause damages.
Do not place any objects on the convertible top,
as they could otherwise fall off while the con-
vertible top is being op erated and result in
property damage or personal injury.
Always completely finish the operation of the
convertible top. Driving off before an opening or
closing procedure is completely finished can
lead to property damage or personal injury.
During the opening an d closing operation,
ensure that no one is in jured by the convertible
top linkage or other moving parts. Keep children
away from the pivoting range of the convertible
top.
Only open or close the convertible top when the
vehicle is stopped. <
While opening and closing, the convertible
top pivots upward. If operating the con-
vertible top inside a garage or under a bridge,
or similar low structure, ensure the minimum
clearance is 6.5 ft/2 m; otherwise, the vehicle
may be damaged. <
Online Edition for Part no. 01 40 2 914 786 - \251 07/12 BMW AG
Page 41 of 218
CONTROLSOpening and closing
40
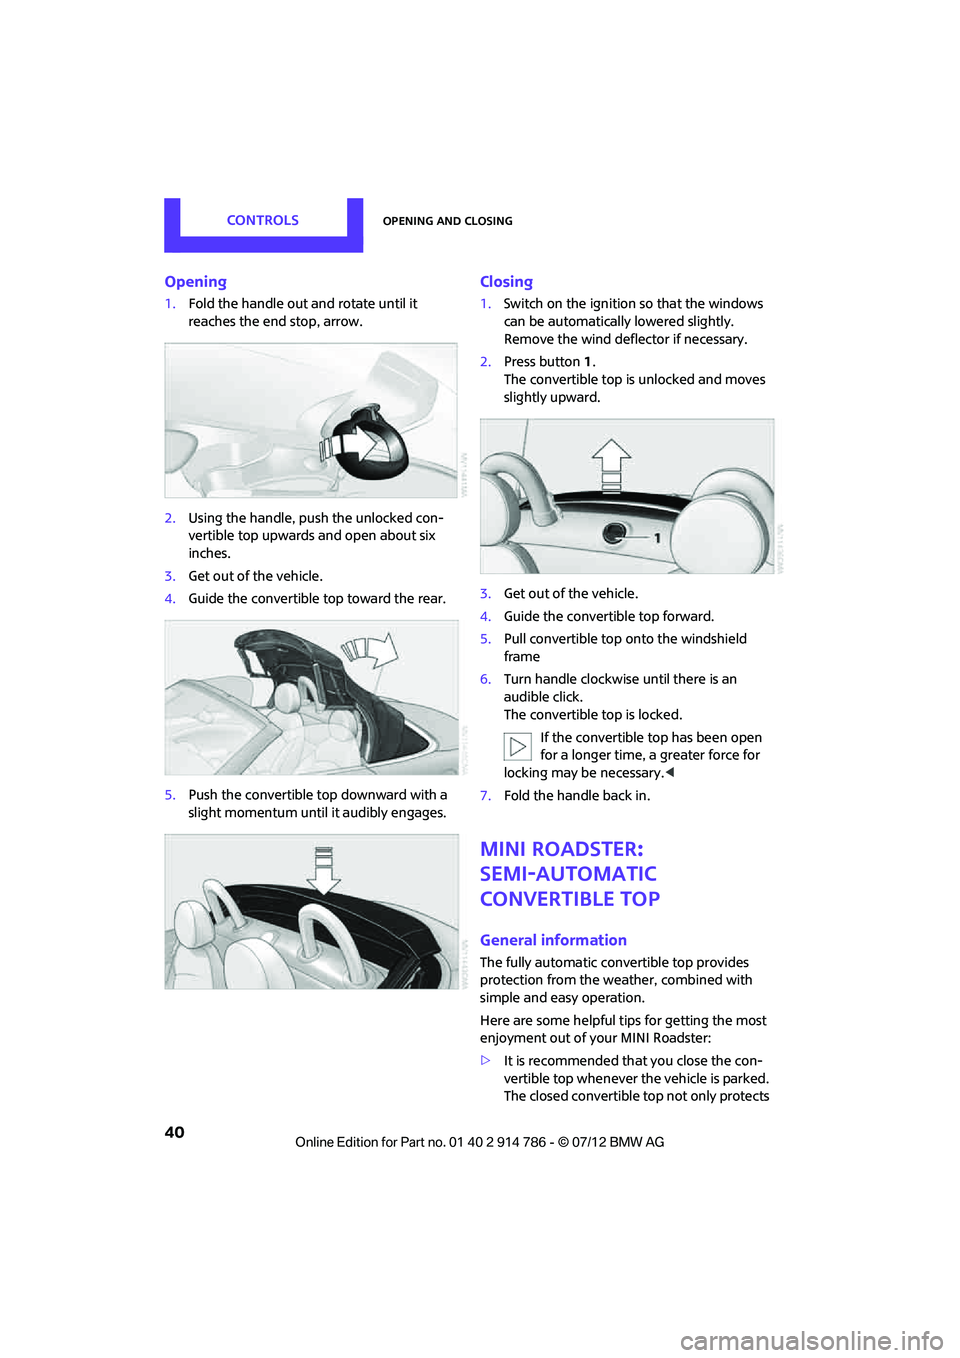
Opening
1.Fold the handle out and rotate until it
reaches the end stop, arrow.
2. Using the handle, push the unlocked con-
vertible top upwards and open about six
inches.
3. Get out of the vehicle.
4. Guide the convertible top toward the rear.
5. Push the convertible top downward with a
slight momentum until it audibly engages.
Closing
1. Switch on the ignition so that the windows
can be automatically lowered slightly.
Remove the wind deflector if necessary.
2. Press button 1 .
The convertible top is unlocked and moves
slightly upward.
3. Get out of the vehicle.
4. Guide the convertible top forward.
5. Pull convertible top onto the windshield
frame
6. Turn handle clockwise until there is an
audible click.
The convertible top is locked.
If the convertible top has been open
for a longer time, a greater force for
locking may be necessary.<
7. Fold the handle back in.
MINI Roadster:
semi-automatic
convertible top
General information
The fully automatic convertible top provides
protection from the weather, combined with
simple and easy operation.
Here are some helpful tips for getting the most
enjoyment out of your MINI Roadster:
>It is recommended th at you close the con-
vertible top whenever the vehicle is parked.
The closed convertible top not only protects
Online Edition for Part no. 01 40 2 914 786 - \251 07/12 BMW AG
Page 43 of 218
CONTROLSOpening and closing
42
Opening and closing the convertible top
Switching on radio readiness or ignition, see
page55.
To spare the battery, operate the conver-
tible top only when the engine is running,
if possible.
Before closing the convertible top, remove any
foreign objects from the windshield frame that
may interfere with the closing of the convertible
top. <
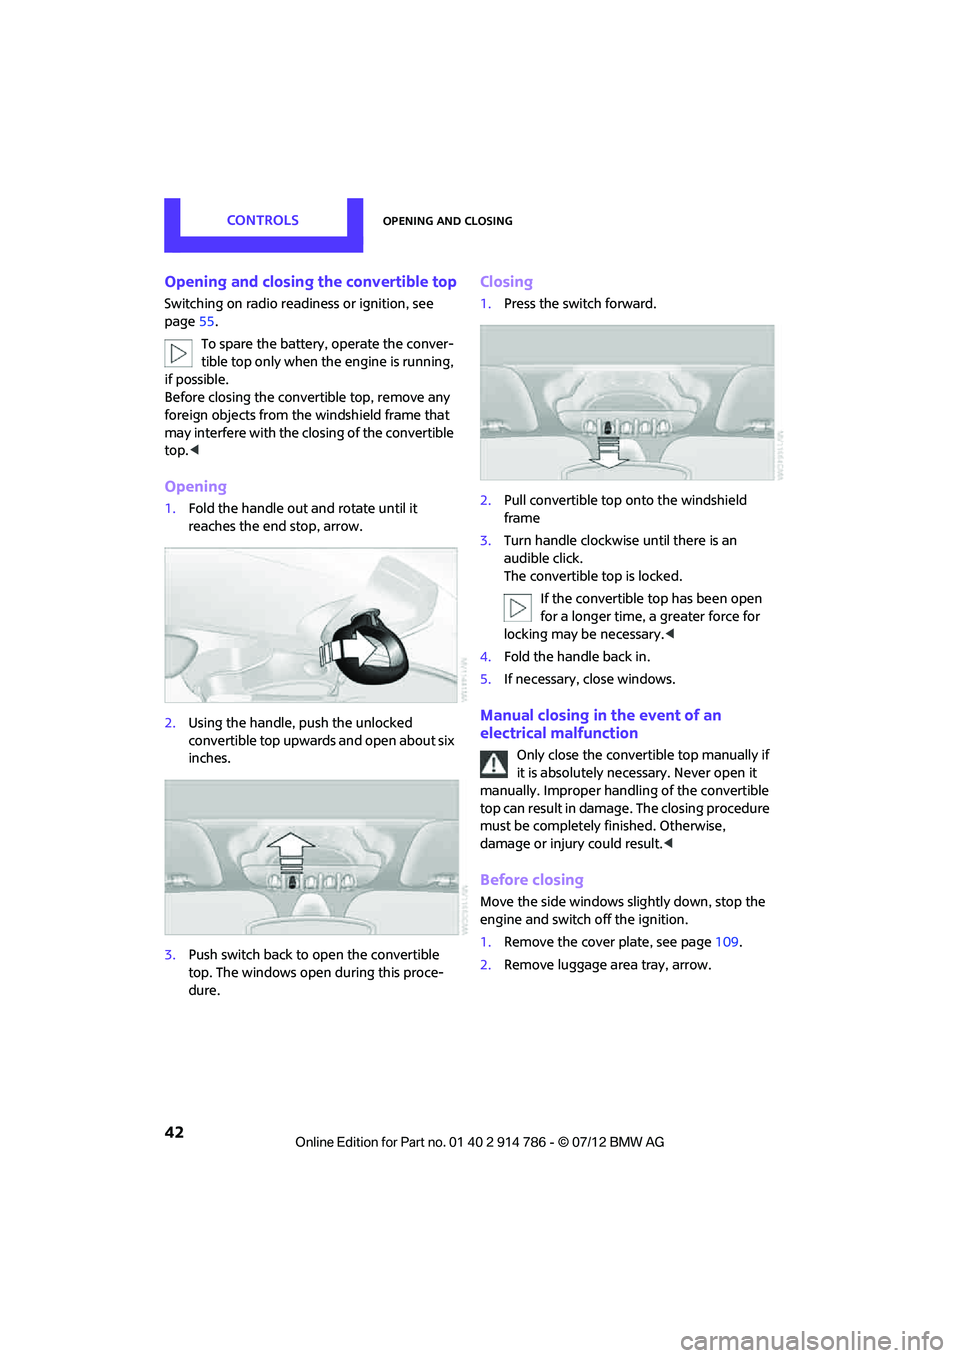
Opening
1.Fold the handle out and rotate until it
reaches the end stop, arrow.
2. Using the handle, push the unlocked
convertible top upwards and open about six
inches.
3. Push switch back to open the convertible
top. The windows open during this proce-
dure.
Closing
1.Press the switch forward.
2. Pull convertible top onto the windshield
frame
3. Turn handle clockwise until there is an
audible click.
The convertible top is locked.
If the convertible top has been open
for a longer time, a greater force for
locking may be necessary.<
4. Fold the handle back in.
5. If necessary, close windows.
Manual closing in the event of an
electrical malfunction
Only close the convertible top manually if
it is absolutely nece ssary. Never open it
manually. Improper handli ng of the convertible
top can result in damage . The closing procedure
must be completely finished. Otherwise,
damage or injury could result. <
Before closing
Move the side windows slightly down, stop the
engine and switch off the ignition.
1. Remove the cover plate, see page109.
2. Remove luggage area tray, arrow.
Online Edition for Part no. 01 40 2 914 786 - \251 07/12 BMW AG
Page 47 of 218
CONTROLSAdjustments
46
body area taut; otherwise, its restraining effect
could be impaired.<
Safety belts, refer to page 48.
Seats
Note before adjusting
Never attempt to adjust your seat while
the vehicle is moving. The seat could
respond with unexpected movement, and the
ensuing loss of vehicle control could lead to an
accident.
On the front passenger seat as well, do not
incline the backrest too far to the rear while the
vehicle is being driven; otherwise, there is a
danger in the event of an accident of sliding
under the safety belt, eliminating the protection
normally provided by the belt. <
Comply with the instruct ions on head restraint
height on page 47 and on damaged safety belts
on page 49.
Seat adjustment
Observe the instructions on page 46 to
ensure the best possible personal protec-
tion. <
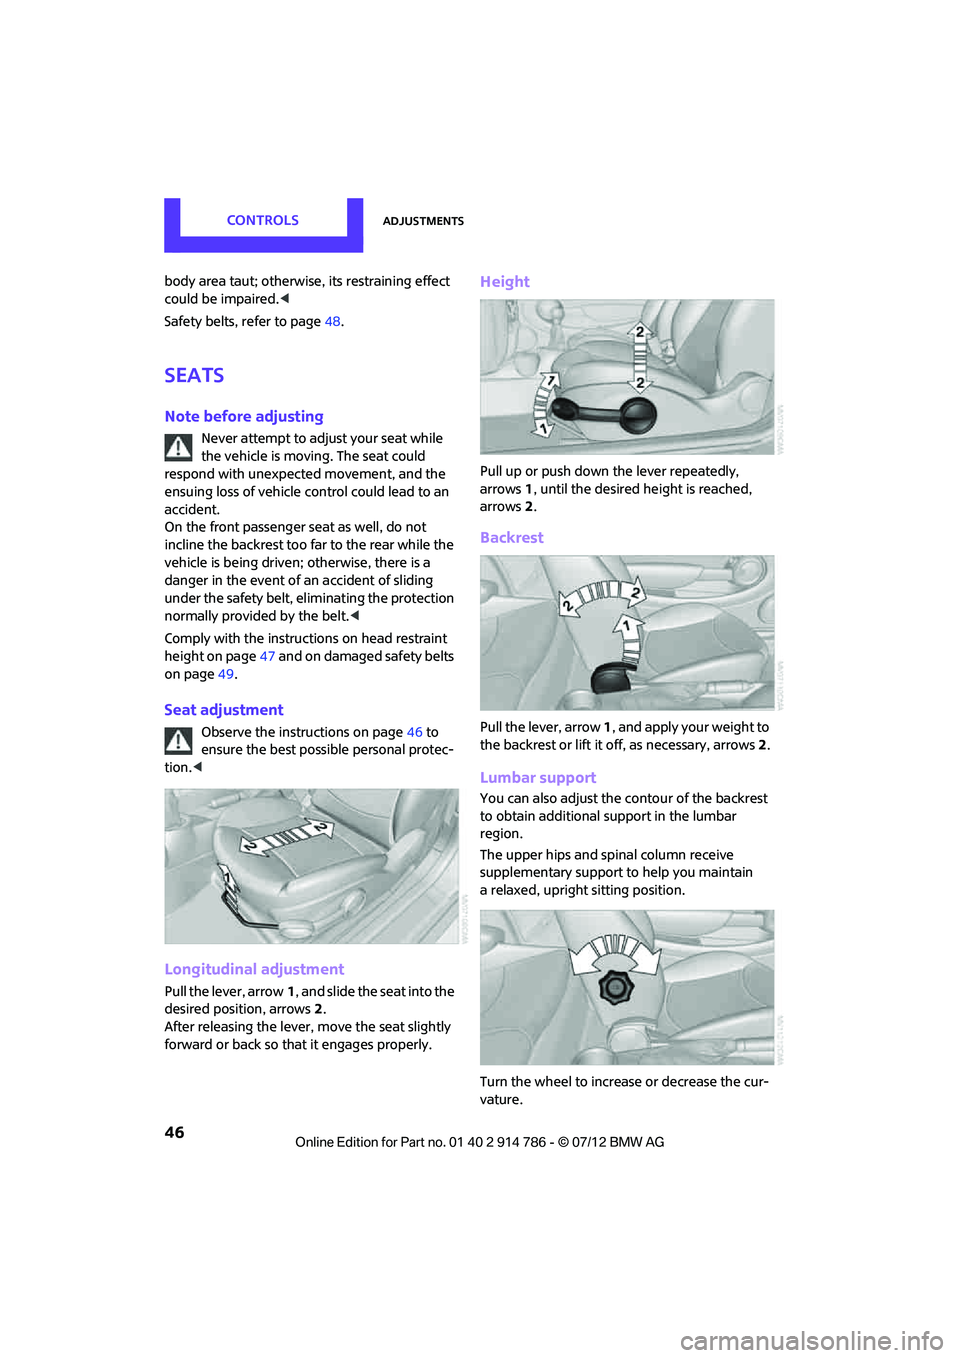
Longitudinal adjustment
Pull the lever, arrow 1, and slide the seat into the
desired position, arrows 2.
After releasing the lever, move the seat slightly
forward or back so that it engages properly.
Height
Pull up or push down the lever repeatedly,
arrows 1, until the desired he ight is reached,
arrows 2.
Backrest
Pull the lever, arrow 1, and apply your weight to
the backrest or lift it off, as necessary, arrows 2.
Lumbar support
You can also adjust the contour of the backrest
to obtain additional support in the lumbar
region.
The upper hips and spinal column receive
supplementary support to help you maintain
a relaxed, upright sitting position.
Turn the wheel to increase or decrease the cur-
vature.
Online Edition for Part no. 01 40 2 914 786 - \251 07/12 BMW AG