MINI Countryman 2012 Owner's Manual (Mini Connected)
Manufacturer: MINI, Model Year: 2012, Model line: Countryman, Model: MINI Countryman 2012Pages: 259, PDF Size: 3.07 MB
Page 211 of 259
MOBILITYMaintenance
210
Socket for On-Board
Diagnosis OBD
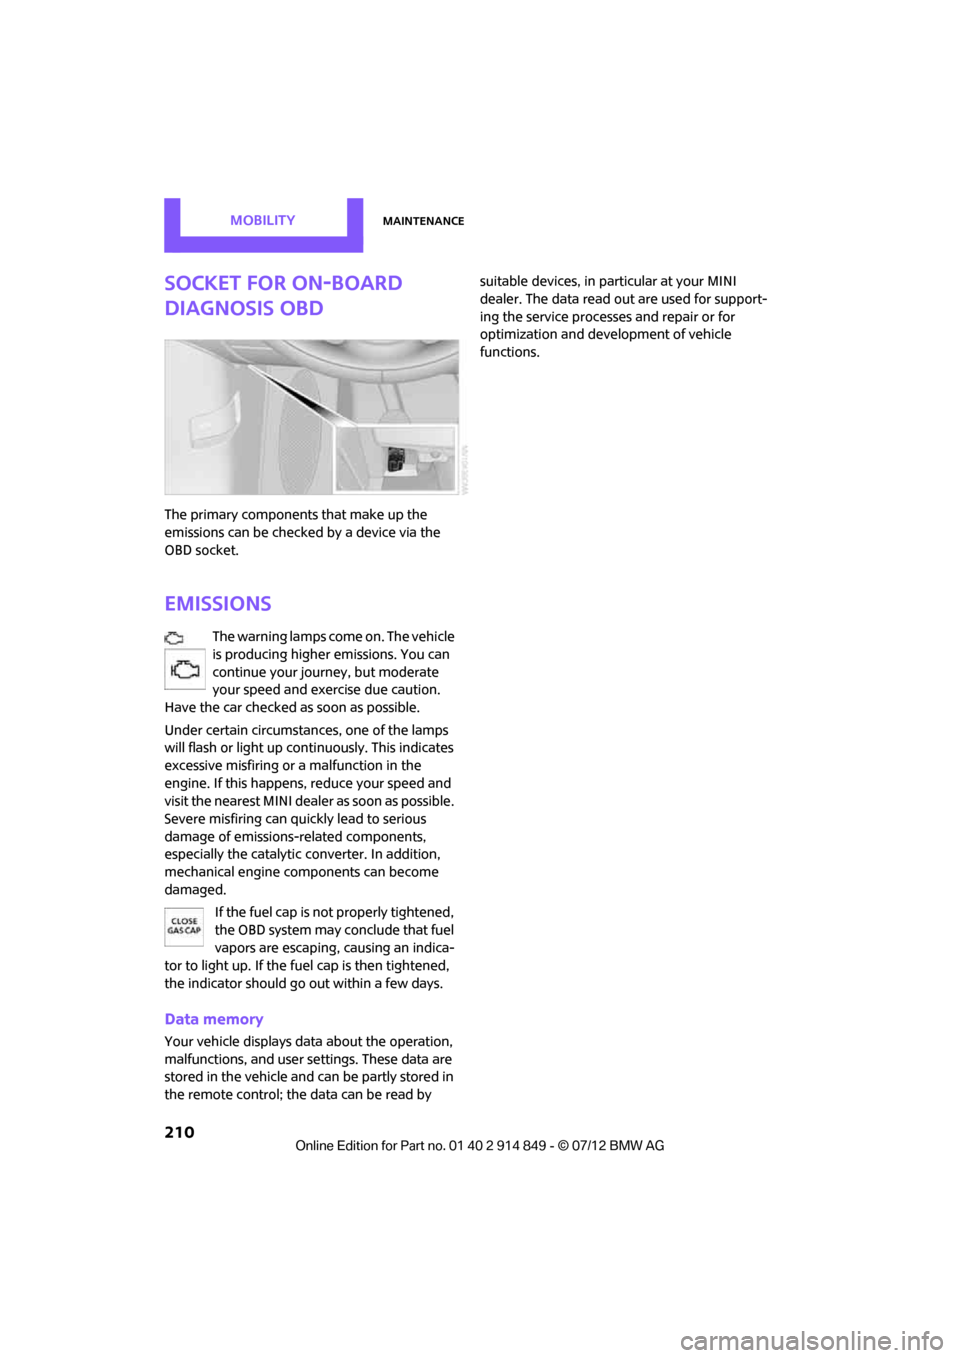
The primary components that make up the
emissions can be checked by a device via the
OBD socket.
Emissions
The warning lamps come on. The vehicle
is producing higher emissions. You can
continue your journey, but moderate
your speed and exercise due caution.
Have the car checked as soon as possible.
Under certain circumstances, one of the lamps
will flash or light up cont inuously. This indicates
excessive misfiring or a malfunction in the
engine. If this happens, reduce your speed and
visit the nearest MINI dealer as soon as possible.
Severe misfiring can quickly lead to serious
damage of emissions-related components,
especially the catalytic converter. In addition,
mechanical engine components can become
damaged.
If the fuel cap is not properly tightened,
the OBD system may conclude that fuel
vapors are escaping, causing an indica-
tor to light up. If the fuel cap is then tightened,
the indicator should go out within a few days.
Data memory
Your vehicle displays da ta about the operation,
malfunctions, and user settings. These data are
stored in the vehicle and can be partly stored in
the remote control; the data can be read by suitable devices, in pa
rticular at your MINI
dealer. The data read out are used for support-
ing the service processe s and repair or for
optimization and development of vehicle
functions.
Online Edition for Part no. 01 40 2 914 849 - \251 07/12 BMW AG
Page 212 of 259
CareMOBILITY
211
Care
Vehicle equipment
In this chapter, all production, country, and
optional equipment that is offered in the model
range is described. Equipment is also described
that is not available because of, for example,
selected options or count ry version. This also
applies to safety related functions and systems.
Car-care products
Regular cleaning and care helps to maintain the
value of your MINI.
The manufacturer of your MINI recommends
using manufacturer-approved products to clean
and care for your vehicle.
Your MINI dealer would be pleased to advise
you on cleaning and care products and services
for your MINI.
The ingredients of original MINI Care
Products have been tested, and the
products have been tested in the laboratory and
in practice. They offer optimum care and protec-
tion for your vehicle.<
Do not use any cleansers containing
alcohol or solvents as these may cause
damage. <
Cleaning agents may contain hazardous
or health-damaging substances. Follow
the warning and hazard instructions on the
packaging. For interior cleaning, always open
the doors or windows of the vehicle.
Do not use any products that are not intended
for cleaning the vehicle. <
External care
Washing your vehicle
Especially during the winter months the
vehicle should be frequently washed. Dirt
and road salt can damage the vehicle.<
After washing the vehicle, apply the
brakes briefly to dry them; otherwise,
water can reduce braking efficiency over the
short term and the brake rotors can corrode. <
Car washes
Preference should be given to cloth car washes.
Do not use automatic high-pressure car
washes; otherwise, water may drip into
the vehicle around the windows. <
Before driving into the car wash, check if the
system is suitable for your MINI. Observe the
following points:
> Vehicle dimensions, page 233
> If necessary: fold in the outside mirrors,
page 42
> Maximum permissible tire width
Avoid car washes with tracks higher than
4 in/10 cm; otherwise, the chassis could
be damaged. <
Preparations for driving into the car wash:
> Unscrew the rod antenna.
> Deactivate the rain sensor to prevent
unintentional wiping.
> Deactivate rear window wiper and protect it
from damage. Ask the car wash operator
about measures that can be taken to protect
the wipers.
> Remove additional attachments, e.g.
spoilers or telephone antennas, if there is a
possibility that they could be damaged.
> Insert the remote control into the ignition
lock.
Online Edition for Part no. 01 40 2 914 849 - \251 07/12 BMW AG
Page 213 of 259
MOBILITYCare
212
Automatic transmission
Before driving into the car wash, make sure that
the vehicle can roll:
1.Place the remote control, even with Comfort
Access, in the ignition lock.
2. Move the selector lever to position N.
3. Release the parking brake.
4. Switch off the engine.
5. Insert the remote control in the ignition lock
so that the vehicle can roll.
Steam jets/high-pressure washers
When using steam jets or high-pressure
washers, make sure th at you maintain suf-
ficient distance from the vehicle and do not
exceed a maximum temperature of 140 7/
60 6 .
If the distance is too close, the pressure too high,
or the temperature too high, parts of the vehicle
can be damaged, or water can penetrate.
Observe the operating instructions for high-
pressure washers. <
Do not spray sensors such as the Park
Distance Control wi th high-pressure
washers for a long time and maintain the
greatest possible distance of approx. 1 ft/30 cm
from them. <
Manual washing
Use a great deal of water and, if necessary, car
shampoo when washing your car by hand. Clean
the vehicle with a sponge or a washing brush
applying a slight amount of pressure.
Before cleaning the windshield, deacti-
vate the rain sensor or turn off the ignition
to prevent unintentional wiping. <
Observe local regulations regarding
washing vehicles by hand. <
Headlamps
Do not wipe dry and do not use abrasive or
corrosive cleaning agents. Remove dirt and
contamination, such as in sects, by soaking with shampoo and then washing with plenty of
water.
Do not remove accumulated ice and snow with
an ice scraper; use window deicers instead.
Windows
Clean the outside and inside of the windows and
mirrors with a window cleaner.
Do not clean the mirrors with cleaners
containing quartz. <
Wiper blades
Clean with soapy water and change regularly to
prevent the formation of streaks.
Wax, preservatives and dirt on the win-
dows cause streaks wh en the windshield
wipers are on, and can cause premature wear of
the wiper blades and interfere with the rain
sensor. <
Paintwork, care
Regular care helps your vehicle retain its value
and protects the paint from the long-term
effects of aggressive substances.
Environmental influences in areas with
increased air pollution or natural contaminants,
such as tree sap or pollen, can affect the vehicle
paintwork. It is therefore important to adjust the
frequency and extent of vehicle care corre-
spondingly.
Immediately remove any pa rticularly aggressive
substances, such as fuel that has overflowed, oil,
grease, brake fluid, or bird droppings; otherwise,
paint damage can be caused.
Removing paintwork damage
Depending on the severity of the damage,
immediately repair stone damage or
scratches to prevent rusting. <
The manufacturer of the MINI recommends
repairing paint damage professionally according
to factory specifications with original MINI
paints.
Online Edition for Part no. 01 40 2 914 849 - \251 07/12 BMW AG
Page 214 of 259

CareMOBILITY
213
Preservation
Preservation is necessary when water no longer
beads on the clean paint surface. To preserve
the paint, only use preservatives that contain
carnauba or synthetic waxes.
Rubber seals
Only treat with water or rubber care products.Do not use silicon sprays or other silicon-
containing care products on rubber seals;
otherwise, noise and damage could occur. <
Chrome parts
Carefully clean vehicle parts such as the radiator
grill and door handles with copious quantities of
water and, if necessary, a shampoo additive,
especially when contaminated with road salt.
For additional treatment, use chrome polish.
Light alloy wheels
The system produces brake dust that collects on
the light alloy wheels. Clean them regularly with
acid-free wheel cleaner.
Do not use aggressive , acid-containing,
highly alkaline, or abrasive cleansers or
steam jets hotter than 140 7/60 6 as they may
cause damage. <
External sensors
Keep the outside sensors on the vehicle
such as the Park Di stance Control clean
and ice-free to ensure that they function
properly. <
Internal care
Upholstery/fabrics
Regularly use a vacuum cleaner to remove
surface dirt.
In case of serious spots such as liquid stains, use
a soft sponge or lint-f ree microfiber cloth and
suitable interior cleaners. Observe the instruc-
tions on the packaging. Clean upholstery up to the seams. Do not
rub forcefully.
<
Velcro fasteners on pants or other items of
clothing can damage seat covers. Make
sure that all Velcro fasteners are closed. <
Leather/leather coverings
The leather processed by the manufac-
turer of your MINI is a high-quality natural
product. Light variations in the grain is one of
the typical properties of natural leather. <
Dust and road grit in the pores and folds of the
leather have an abrasive effect, leading to
increased wear and causing the leather surface
to become brittle prematurely. Use a cloth or
vacuum cleaner to remove dust on a regular
basis.
Especially when the leather has a light color, it
should be cleaned regularl y since it tends to get
heavily soiled.
Treat the leather twice a year using a leather
lotion since dirt and grease will gradually attack
the leather's protective layer.
Carpets/floor mats
Keep floor mats, carp et, and other objects
out of the movement range of the pedals;
otherwise, they may inhi bit the function of the
pedals during driving.
Do not place additional floor mats onto an
existing one or onto other objects.
Only use floor mats that have been approved for
the vehicle and can be appropriately fastened.
Make sure that the fl oor mats are securely
fastened again after they have been removed,
e.g. for cleaning. <
Floor mats can be removed to be cleaned.
If the carpets are very dirty, clean with a micro-
fiber cloth and water or an interior cleaner.
When doing so, rub forward and back in the
driving direction; othe rwise, the carpet may
become matted.
Online Edition for Part no. 01 40 2 914 849 - \251 07/12 BMW AG
Page 215 of 259

MOBILITYCare
214
Interior plastic parts
These include:
>Plastic surfaces
> Lamp glass
> Display panes
> Mat parts
Only clean with water an d, if necessary, solvent-
free plastic cleaners.
Do not use solvents such as alcohol,
lacquer thinner, cold cleaners, fuel, or
similar, as these will damage the surfaces. <
Decorative strips
Only clean decorative strips and fine wood parts
with damp cloths. Wipe dry with a soft cloth.
Safety belts
Dirty belt straps impede the reeling action and
thus have a negative impact on safety.
Do not clean chemically, as this may
destroy the webbing.<
Displays
To clean displays, such as the radio or display
elements, use an anti-static microfiber cloth.
Avoid pressing too hard when cleaning
the display as this can cause damage. <
Do not use chemical or abrasive house-
hold cleaning agents. Keep fluids of any
kind away from th e device. Surfaces or electrical
components may otherw ise become corroded
or damaged. <
CD/DVD drives
Do not use cleaning CDs as this could
damage parts of the drive. <
Vehicle storage
If you park your vehicle longer than three
months, ask your MINI dealer to advise you.
Online Edition for Part no. 01 40 2 914 849 - \251 07/12 BMW AG
Page 216 of 259

Replacing componentsMOBILITY
215
Replacing components
Vehicle equipment
In this chapter, all production, country, and
optional equipment that is offered in the model
range is described. Equipment is also described
that is not available because of, for example,
selected options or count ry version. This also
applies to safety related functions and systems.
Wiper blades
Do not place windshield wipers on the
windshield if wiper blades are not
installed; otherwise, the windshield may be
damaged. <
Changing the front wiper blades
1.Fold out the wiper arm and hold it.
2. Press together the locking spring, arrows 1,
and fold out the wiper blade, arrow 2.
3. Pull the wiper blade forward and out of the
catch mechanism.
4. Press the new wiper blade into the fixture
until it engages audibly.
To avoid damage, make sure that the
wiper arms are against the windshield
before you open the hood. <
Changing the rear wiper blade
1.Fold out the wiper arm and hold it.
2. Rotate the wiper blade toward the back as
far as it will go, arrow.
3. Press the wiper blade against the limit and
thus out of the mounting.
4. Press the new wiper blade into the fixture
until it engages audibly.
Lamps and bulbs
Lamps and bulbs make an essential contribution
to vehicle safety. They should, therefore, be
handled carefully. The manufacturer of your
MINI recommends having your MINI dealer per-
form any work that you do not feel competent to
perform yourself or that is not described here.
Never touch the glass of new bulbs with
your bare fingers, as even minute
amounts of contaminatio n will burn into the
bulb's surface and reduce its service life. Use a
clean tissue, cloth or some thing similar, or hold
the bulb by its base.<
You can obtain a selectio n of replacement bulbs
at your MINI dealer.
Only replace bulbs after they have cooled
down; otherwise, you may burn your
fingers.<
When working on electrical systems,
always begin by switching off the
Online Edition for Part no. 01 40 2 914 849 - \251 07/12 BMW AG
Page 217 of 259

MOBILITYReplacing components
216
consumer in question; otherwise, short circuits
could result. To avoid possible injury or equip-
ment damage when replacing bulbs, observe
any instructions provided by the bulb manufac-
turer.<
Caring for headlamp s, refer to page212.
For any bulb replacement not described
below, contact a MINI dealer or a work-
shop that has specially trained personnel
working in accordance with the specifications of
the MINI manufacturer. <
For checking and adjusting headlamp aim,
please contact your MINI dealer. <
Light-emitting diodes LEDs
Light-emitting diodes installed behind translu-
cent lenses serve as the light sources for many of
the controls and displays in your vehicle. These
light-emitting diodes are related to conven-
tional laser diodes, and legislation defines them
as Class 1 light-emitting diodes.
Do not remove the covers or expose the
eyes directly to the unfiltered light source
for several hours; otherwise, this could cause
irritation of the retina. <
Headlamp glass lens
In cool or humid weather, condensation may
occur on the interiors of the headlamps. During
trips with the headlamps on, the condensation
disappears after a short time. The headlamps do
not need to be changed.
Do not remove the condensation from head-
lamps, despite driving with lights on, and if
condensation increases, e.g., because of water
droplets, have this checked by your MINI dealer.
Xenon lamps
The service life of these bulbs is very long and
the probability of failure very low, provided that
they are not switched on and off an excessive
number of times. If a xenon lamp fails neverthe-
less, switch on the fog lamps and continue the
journey with great care , provided that local
legislation does not prohibit this. Work on the xenon lighting system,
including lamp replacement, is only to be
carried out only by your MINI dealer. Due to high
voltage, there is a risk of fatal injury if work on
the xenon lamps is carried out improperly. <
Halogen low beams and high beams
H13 bulb, 60/55 watts
The H13 bulb is pressurized. Therefore,
wear safety glasses and protective gloves.
Otherwise, there is a risk of injury if the bulb is
damaged. <
Be careful when inst alling the cover;
otherwise, leaks co uld occur and cause
damage to the headlamp system. <
Accessing the lamp from the engine
compartment
The low-beam/high-beam bulb can be changed
from the engine compartment.
Removing the cover:
1. Press the tab.
2. Flip open the cover and take it out of the
holder.
Follow the same steps in reverse order to
reattach the cover.
Online Edition for Part no. 01 40 2 914 849 - \251 07/12 BMW AG
Page 218 of 259
Replacing componentsMOBILITY
217
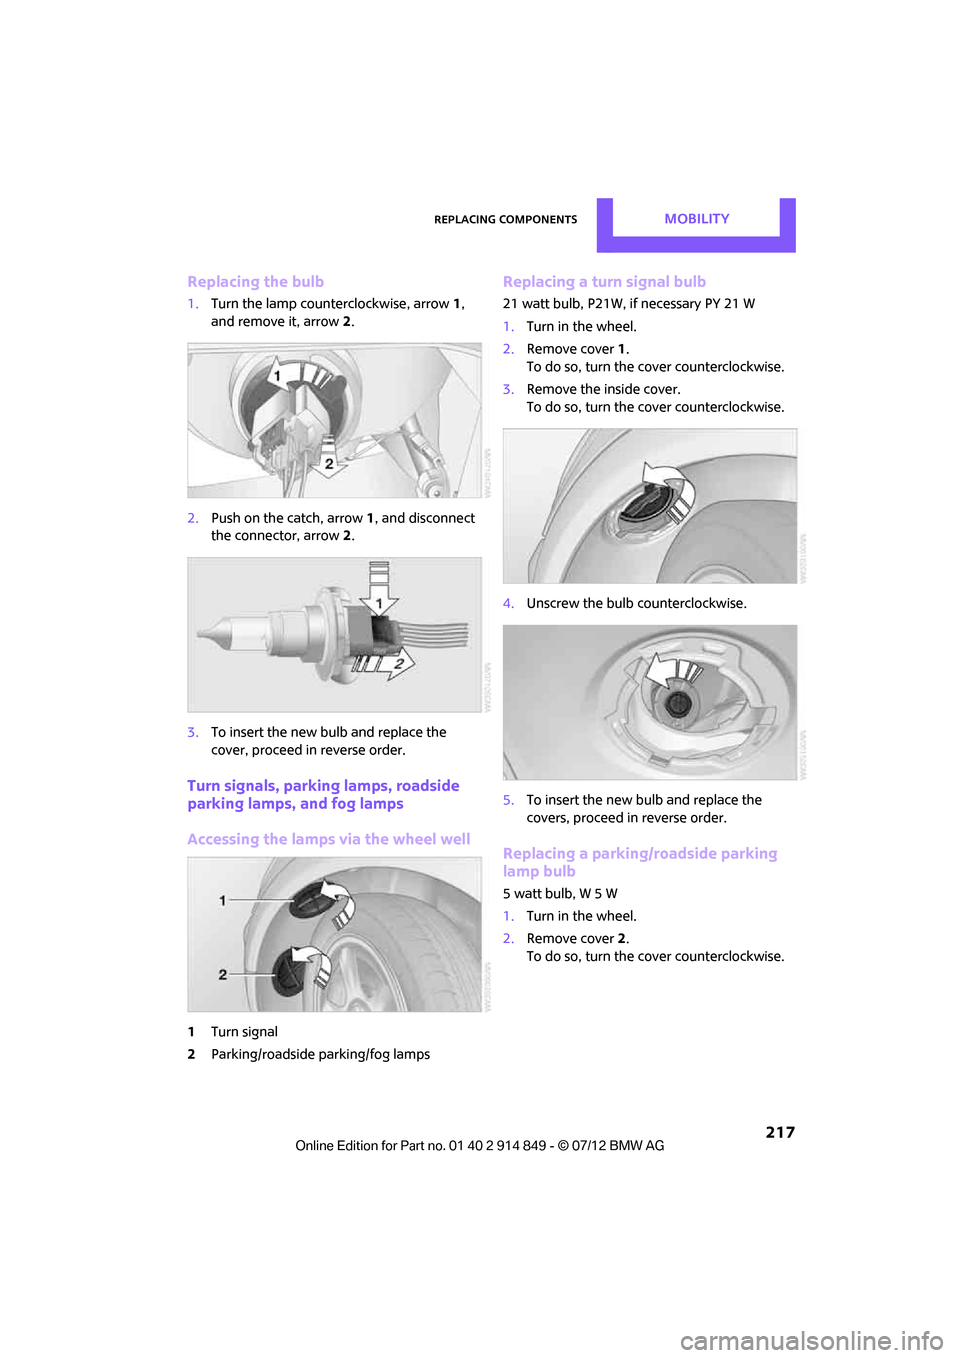
Replacing the bulb
1.Turn the lamp counterclockwise, arrow 1,
and remove it, arrow 2.
2. Push on the catch, arrow 1, and disconnect
the connector, arrow 2.
3. To insert the new bulb and replace the
cover, proceed in reverse order.
Turn signals, parking lamps, roadside
parking lamps, and fog lamps
Accessing the lamps via the wheel well
1Turn signal
2 Parking/roadside parking/fog lamps
Replacing a turn signal bulb
21 watt bulb, P21W, if necessary PY 21 W
1.Turn in the wheel.
2. Remove cover 1.
To do so, turn the cover counterclockwise.
3. Remove the inside cover.
To do so, turn the cover counterclockwise.
4. Unscrew the bulb counterclockwise.
5. To insert the new bulb and replace the
covers, proceed in reverse order.
Replacing a parking/roadside parking
lamp bulb
5watt bulb, W5W
1.Turn in the wheel.
2. Remove cover 2.
To do so, turn the cover counterclockwise.
Online Edition for Part no. 01 40 2 914 849 - \251 07/12 BMW AG
Page 219 of 259
MOBILITYReplacing components
218
3.Unscrew the upper bulb counterclockwise.
4. To insert the new bulb and replace the
cover, proceed in reverse order.
Replacing a fog lamp bulb
H8 bulb, 35 watts
1.Turn in the wheel.
2. Remove cover 2.
To do so, turn the cover counterclockwise.
3. Pull the cable connector.
4. Unscrew the lower bulb counterclockwise.
5. To insert the new bulb and replace the
cover, proceed in reverse order.
Side turn signals
5 watt bulb, W 5 W
1.Open hood.
2. Squeeze clamping clip , arrows, and remove
bulb holder.
3. Unscrew bulb coun terclockwise and
replace.
4. To insert the new bulb and replace the
cover, proceed in reverse order.
Side marker lamps
Have these bulbs replaced by your MINI dealer.
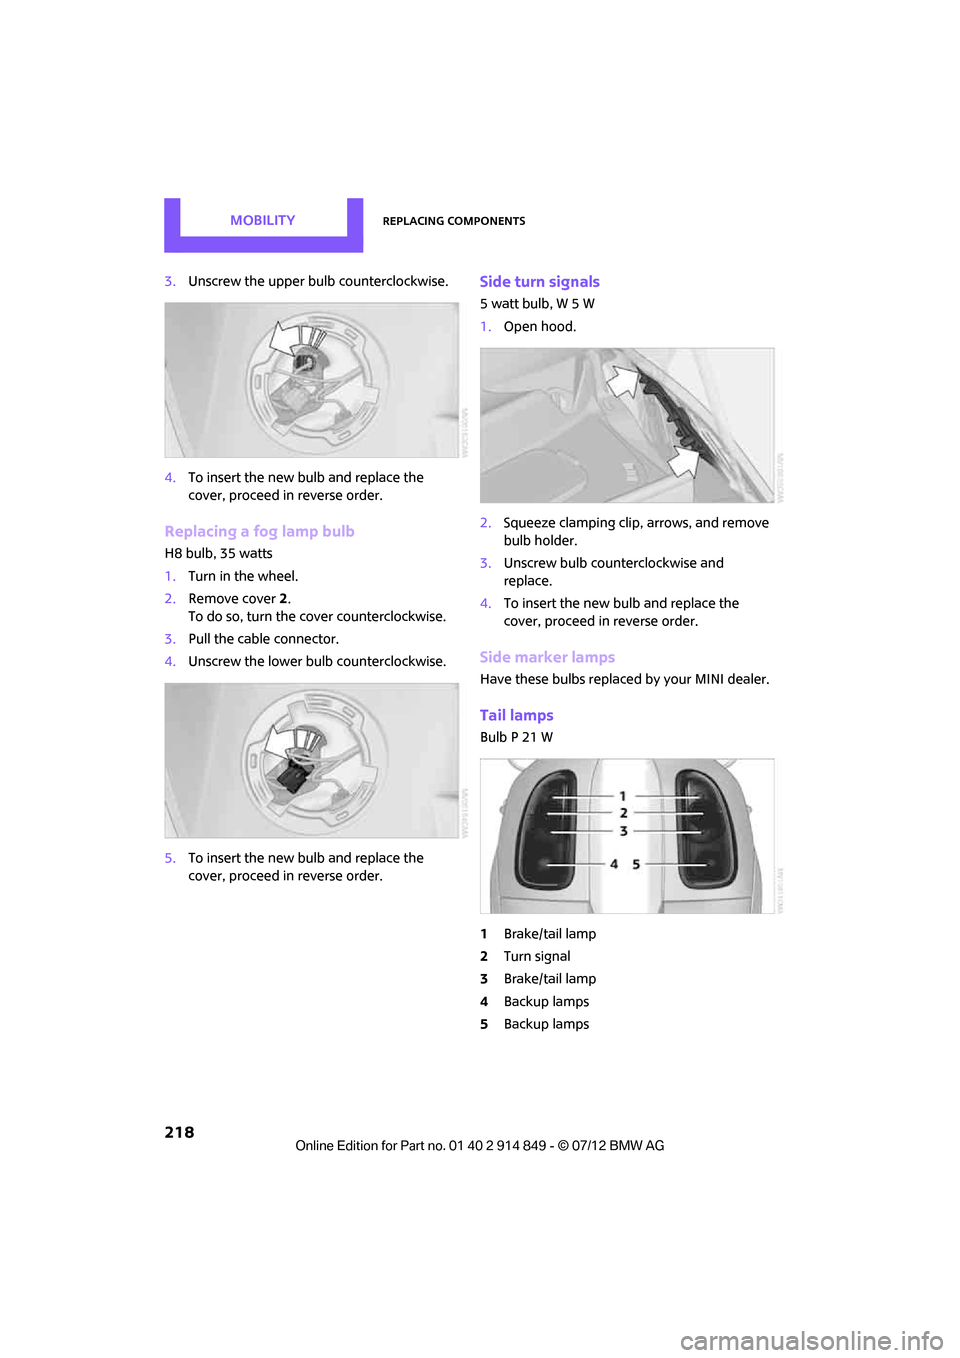
Tail lamps
Bulb P 21 W
1Brake/tail lamp
2 Turn signal
3 Brake/tail lamp
4 Backup lamps
5 Backup lamps
Online Edition for Part no. 01 40 2 914 849 - \251 07/12 BMW AG
Page 220 of 259

Replacing componentsMOBILITY
219
Changing
All bulbs are integrated in a central bulb holder.
1.Switch off the light and remove the infrared
remote control from the ignition lock.
2. Push the cover panel out from the rear of the
cargo area side trim panel and remove it.
3. Open emergency release for the fuel filler
flap, see page 194, and then push to the
side with the foam insert.
Ensure that the emergency release is not
damaged.
4. Disengage the bulb holder by pressing down
on the clamping clip, arrow 1.
5. Take out bulb holder and pull out cable,
arrow 2.
6. Exerting gentle pressure, turn bulb to the left
and remove.
7. To insert the new bulb and install the bulb
holder, proceed in reverse order. Ensure that
the lamp holder engages in all the fasteners.
8. Put foam insert in its original position and
install the emergency fuel flap release.
9. Install cover.
License plate lamps
5watt bulb, C5W
1.Using a screwdriver, push the lamp to the
left in the tab of the lamp housing, arrow 1.
2. Remove the lamp, arrow 2.
3. Replace the bulb.
4. Insert the lamp.
Center brake lamp
This lamp uses LED technology for operation. In
the event of a malfunction, contact your MINI
dealer or a workshop that has specially trained
personnel working in accordance with the
specifications of your MINI manufacturer.
Repairing a flat tire
Safety measures in the event of a break-
down:
Park the vehicle as far as possible from moving
traffic and switch on the hazard warning
flashers.
Turn the steering wheel until the front wheels
are in the straight-ahead position and engage
the steering wheel lock. Engage the parking
brake and shift into 1st or reverse gear or place
the selector lever in position P.
All passengers should be outside the vehicle and
in a safe place, e.g. behind a guardrail.
Erect a warning triangle or warning flasher at the
appropriate distance if necessary. Comply with
all safety guidelines and regulations. <
Online Edition for Part no. 01 40 2 914 849 - \251 07/12 BMW AG