steering MINI Coupe 2012 Owner's Manual
[x] Cancel search | Manufacturer: MINI, Model Year: 2012, Model line: Coupe, Model: MINI Coupe 2012Pages: 218, PDF Size: 3.84 MB
Page 11 of 218
AT A GLANCECockpit
10
Cockpit
Vehicle equipment
In this chapter, all production, country, and
optional equipment that is offered in the model range is described. Equi
pment is also described
that is not available because of, for example,
selected options or coun try version. This also
applies to safety relate d functions and systems.
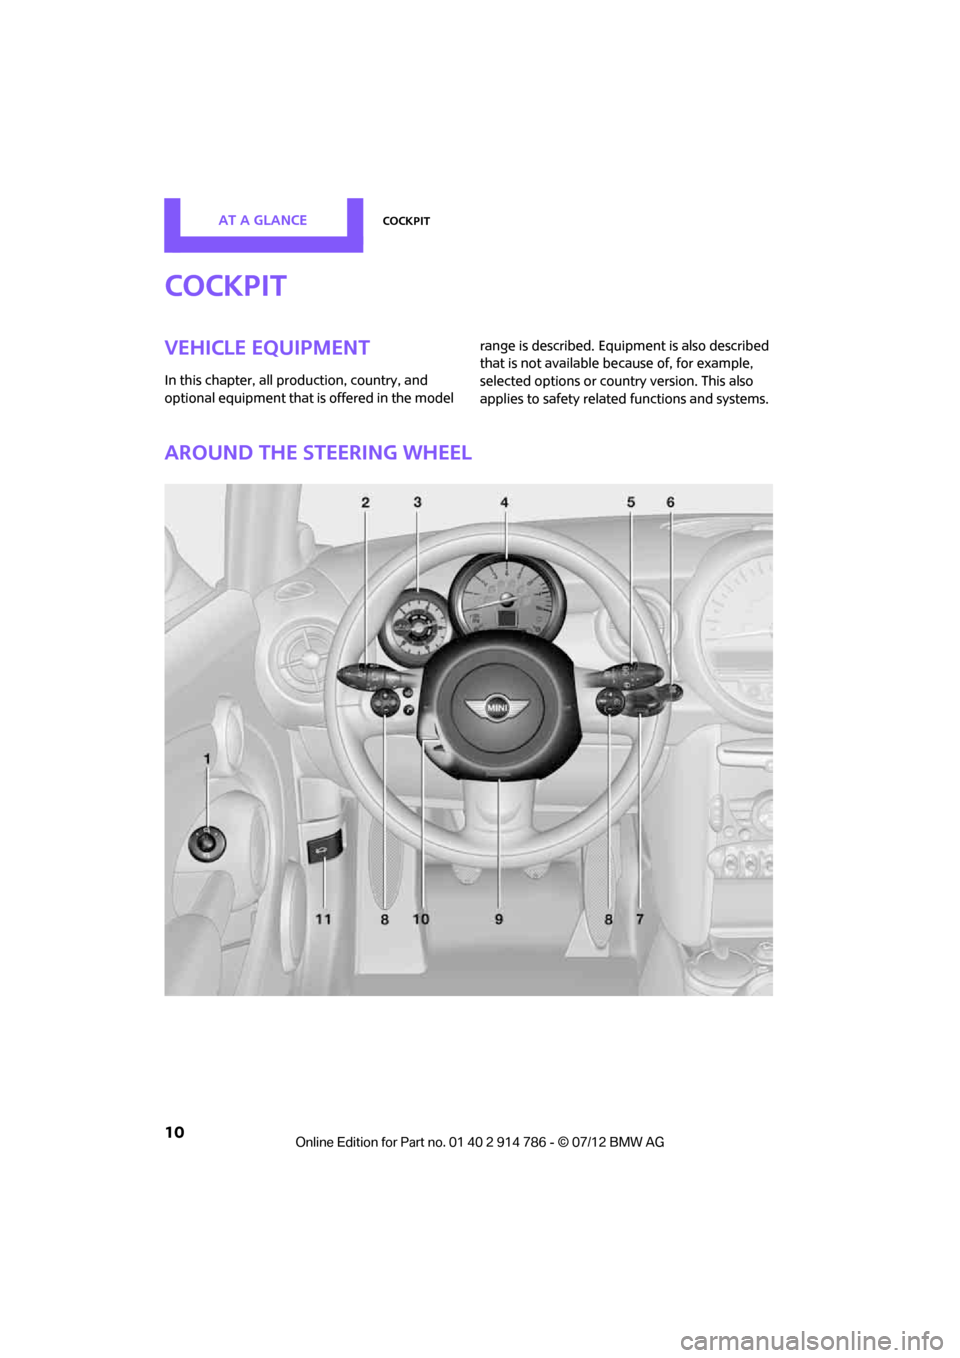
Around the steering wheel
Online Edition for Part no. 01 40 2 914 786 - \251 07/12 BMW AG
Page 12 of 218
CockpitAT A GLANCE
11
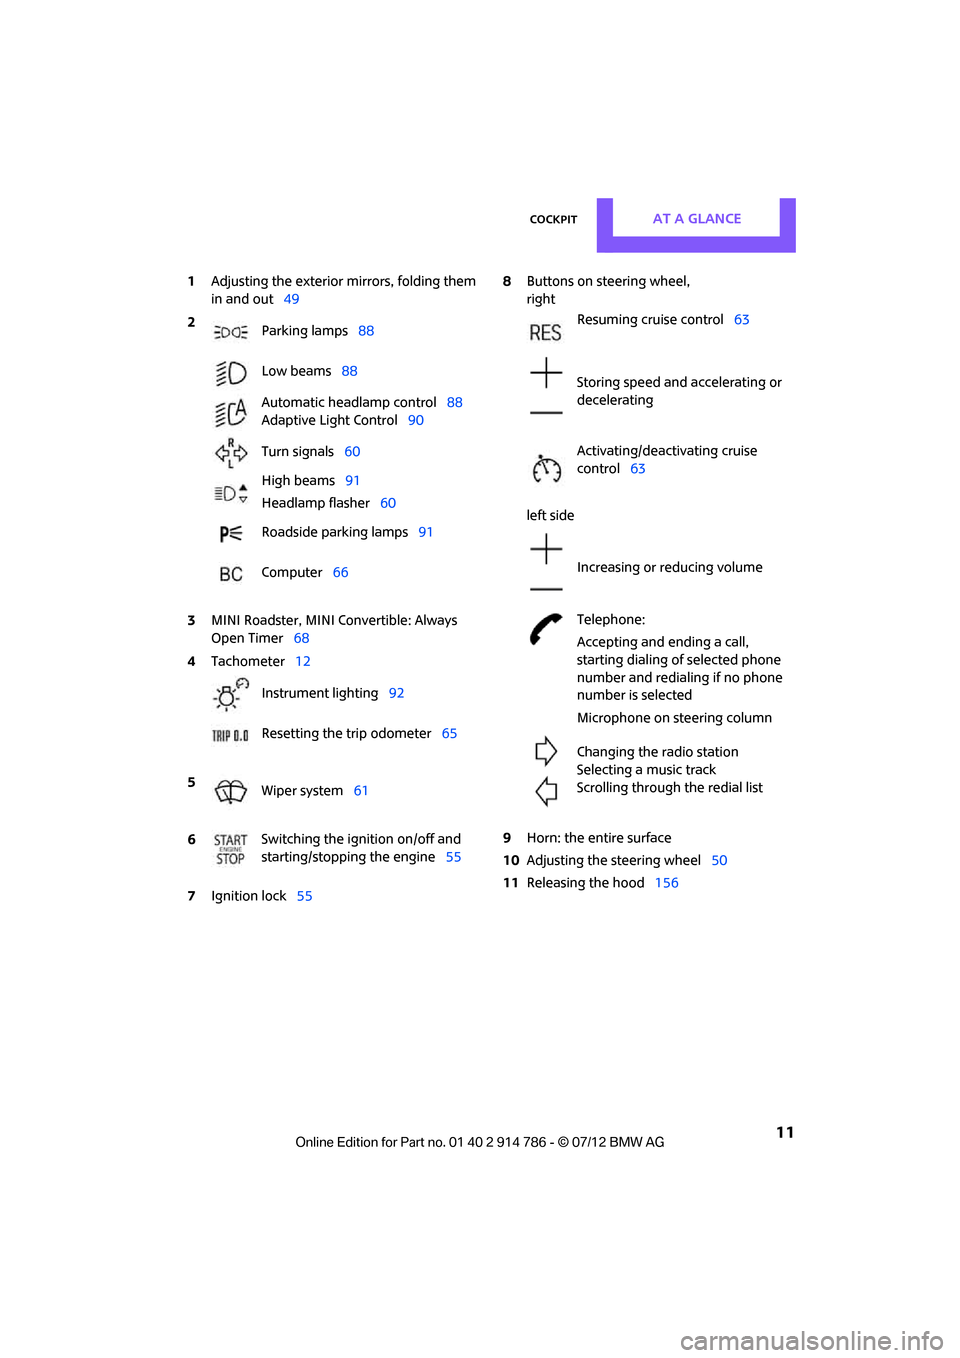
1Adjusting the exterior mirrors, folding them
in and out 49
3 MINI Roadster, MINI Convertible: Always
Open Timer 68
7 Ignition lock 55 8
Buttons on steering wheel,
right
left side
9 Horn: the entire surface
10 Adjusting the steering wheel 50
11 Releasing the hood 156
2
Parking lamps 88
Low beams 88
Automatic headlamp control 88
Adaptive Light Control 90
Turn signals 60
High beams 91
Headlamp flasher 60
Roadside parking lamps 91
Computer 66
4 Tachometer 12
Instrument lighting 92
Resetting the trip odometer 65
5 Wiper system 61
6 Switching the ignition on/off and
starting/stopping the engine
55
Resuming cruise control63
Storing speed and accelerating or
decelerating
Activating/deactivating cruise
control 63
Increasing or reducing volume
Telephone:
Accepting and ending a call,
starting dialing of selected phone
number and redialing if no phone
number is selected
Microphone on steering column
Changing the radio station
Selecting a music track
Scrolling through the redial list
Online Edition for Part no. 01 40 2 914 786 - \251 07/12 BMW AG
Page 46 of 218
AdjustmentsCONTROLS
45
Adjustments
Vehicle equipment
In this chapter, all production, country, and
optional equipment that is offered in the model
range is described. Equipment is also described
that is not available because of, for example,
selected options or count ry version. This also
applies to safety related functions and systems.
Sitting safely
The ideal sitting position can make a vital contri-
bution to relaxed, fatigue-free driving. In con-
junction with the safety belts, the head restraints
and the airbags, the seated position has a major
influence on your safety in the event of an
accident. To ensure th at the safety systems
operate with optimal efficiency, we strongly
urge you to observe the instructions contained
in the following section.
For additional information on transporting
children safely, refer to page 51.
Airbags
Always maintain an adequate distance
between yourself and the airbags. Always
grip the steering wheel on the rim, with your
hands in the 3 o'clock and 9 o'clock positions, to
minimize the risk of inju ry to the hands or arms
in the event of the airbag being deployed.
No one and nothing should come between the
airbags and the seat occupant.
Do not use the cover of the front airbag on the
front passenger side as a storage area. Ensure
that the front passenger is correctly seated, e.g.
that no feet or legs are propped against the
dashboard. Otherwise, leg injury could result if
the front airbag suddenly deployed.
Make sure that passeng ers keep their heads
away from the side/h ead airbag; otherwise
injuries can occur when airbags are deployed.
fully excluded, depending on the circumstances.
The ignition and inflation noise may provoke a
mild hearing loss in ex
tremely sensitive indivi-
duals. This effect is usually only temporary.
For airbag locations as well as additional infor-
mation, refer to page 85.
Head restraint
A correctly adjusted head restraint reduces the
risk of neck injury in the event of an accident.
Adjust the head rest raint in such a way
that its center is at approx. ear level.
Otherwise, there is an increased risk of injury
in the event of an accident. <
Head restraints, refer to page 47.
Safety belt
Before every drive, make sure that all occupants
wear their safety belts. Airbags complement the
safety belt as an additi onal safety device, but
they do not represent a substitute.
Number of safety belts
Never allow more th an one person to
wear a single safety belt. Never allow
infants or small children to ride in a passenger's
lap.
Make sure that the belt in the lap area sits low
across the hips and does not press against the
abdomen. The safety belt must not rest against
the throat, run across sh arp edges, pass over
hard or fragile objects or be pinched. Fasten the
safety belt so that it is pulled taut across the lap
and shoulder, fitting the body snugly without
any twists. Otherwise, the belt could slide over
the hips in the event of a frontal collision and
injure the abdomen. Avoid wearing bulky
clothing and regularly pull the belt in the upper-
Online Edition for Part no. 01 40 2 914 786 - \251 07/12 BMW AG
Page 51 of 218
CONTROLSAdjustments
50
Automatic heating
At external temperatures below a certain limit,
both exterior mirrors are automatically heated
while the engine is running or the ignition
switched on.
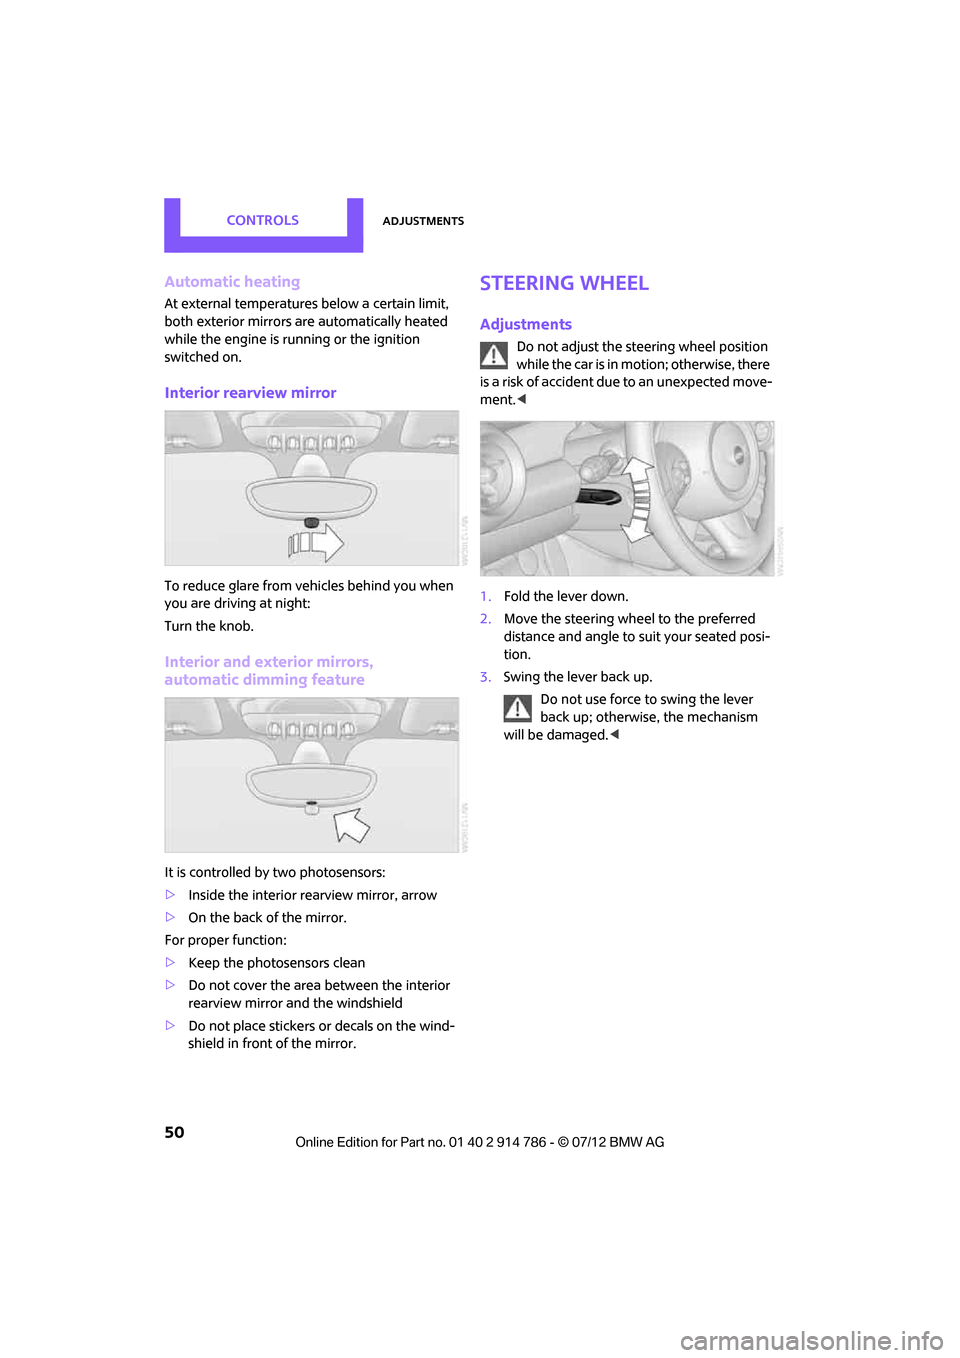
Interior rearview mirror
To reduce glare from vehicles behind you when
you are driving at night:
Turn the knob.
Interior and exterior mirrors,
automatic dimming feature
It is controlled by two photosensors:
>Inside the interior rearview mirror, arrow
> On the back of the mirror.
For proper function:
> Keep the photosensors clean
> Do not cover the area between the interior
rearview mirror and the windshield
> Do not place stickers or decals on the wind-
shield in front of the mirror.
Steering wheel
Adjustments
Do not adjust the steering wheel position
while the car is in motion; otherwise, there
is a risk of accident du e to an unexpected move-
ment. <
1. Fold the lever down.
2. Move the steering wheel to the preferred
distance and angle to suit your seated posi-
tion.
3. Swing the lever back up.
Do not use force to swing the lever
back up; otherwise, the mechanism
will be damaged. <
Online Edition for Part no. 01 40 2 914 786 - \251 07/12 BMW AG
Page 57 of 218
CONTROLSDriving
56
Radio readiness and ignition off
All indicator and warning lamps in the displays
go out.
The ignition switches off automatically if the
driver's door is opened. Pressing the Start/Stop
button again switches the ignition back on.
The ignition is not switched off in situations such
as the following:
> The clutch or brake is depressed
> The low beams are switched on
Starting the engine
Do not allow the engine to run in enclosed
areas; otherwise, inha lation of the noxious
exhaust gases can lead to loss of consciousness
and death. Exhaust gases contain carbon
monoxide, an odorless and colorless, but highly
toxic gas. Never leave an unattended vehicle
with the engine running; otherwise, such a
vehicle represents a potential safety hazard.
Before leaving the car while the engine is run-
ning, place the transmission in neutral or move
the selector lever to position P and forcefully
apply the parking brake to prevent the car from
moving. <
Avoid frequent starting in quick succes-
sion or repeated start attempts in which
the engine does not start. Otherwise, the fuel is
not burned or inadequate ly burned and there is
a danger of overheating and damaging the
catalytic converter. <
Do not let the engine warm up with the vehicle
at a standstill. Move off immediately at a
moderate engine speed.
When starting the engi ne, do not depress the
accelerator pedal.
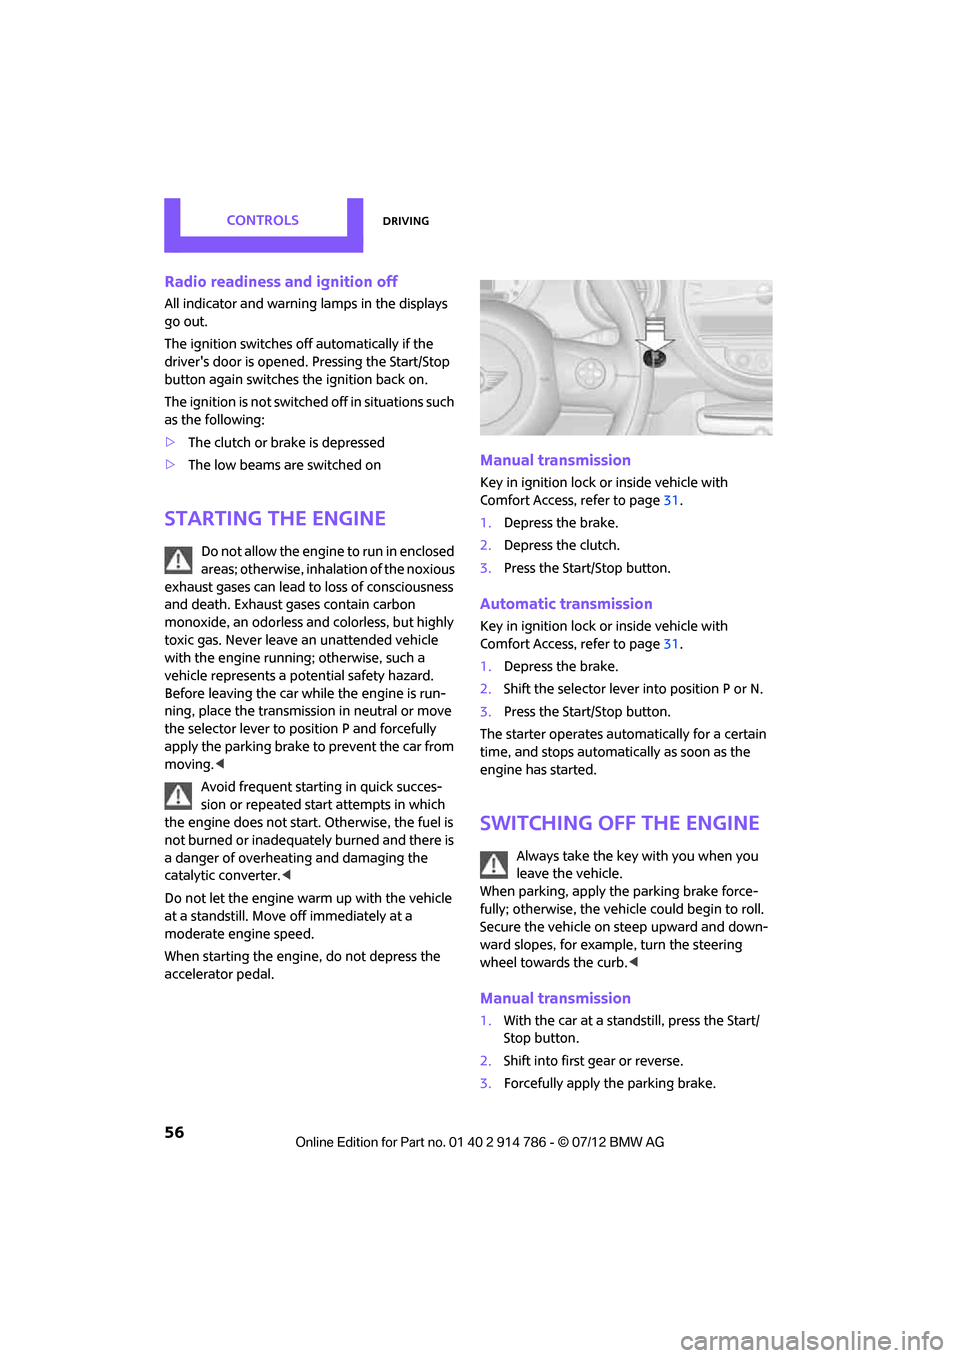
Manual transmission
Key in ignition lock or inside vehicle with
Comfort Access, refer to page 31.
1. Depress the brake.
2. Depress the clutch.
3. Press the Start/Stop button.
Automatic transmission
Key in ignition lock or inside vehicle with
Comfort Access, refer to page 31.
1. Depress the brake.
2. Shift the selector lever into position P or N.
3. Press the Start/Stop button.
The starter operates auto matically for a certain
time, and stops automati cally as soon as the
engine has started.
Switching off the engine
Always take the key with you when you
leave the vehicle.
When parking, apply the parking brake force-
fully; otherwise, the vehicle could begin to roll.
Secure the vehicle on steep upward and down-
ward slopes, for example, turn the steering
wheel towards the curb. <
Manual transmission
1.With the car at a standstill, press the Start/
Stop button.
2. Shift into first gear or reverse.
3. Forcefully apply the parking brake.
Online Edition for Part no. 01 40 2 914 786 - \251 07/12 BMW AG
Page 60 of 218
DrivingCONTROLS
59
Sport program and manual mode M/S
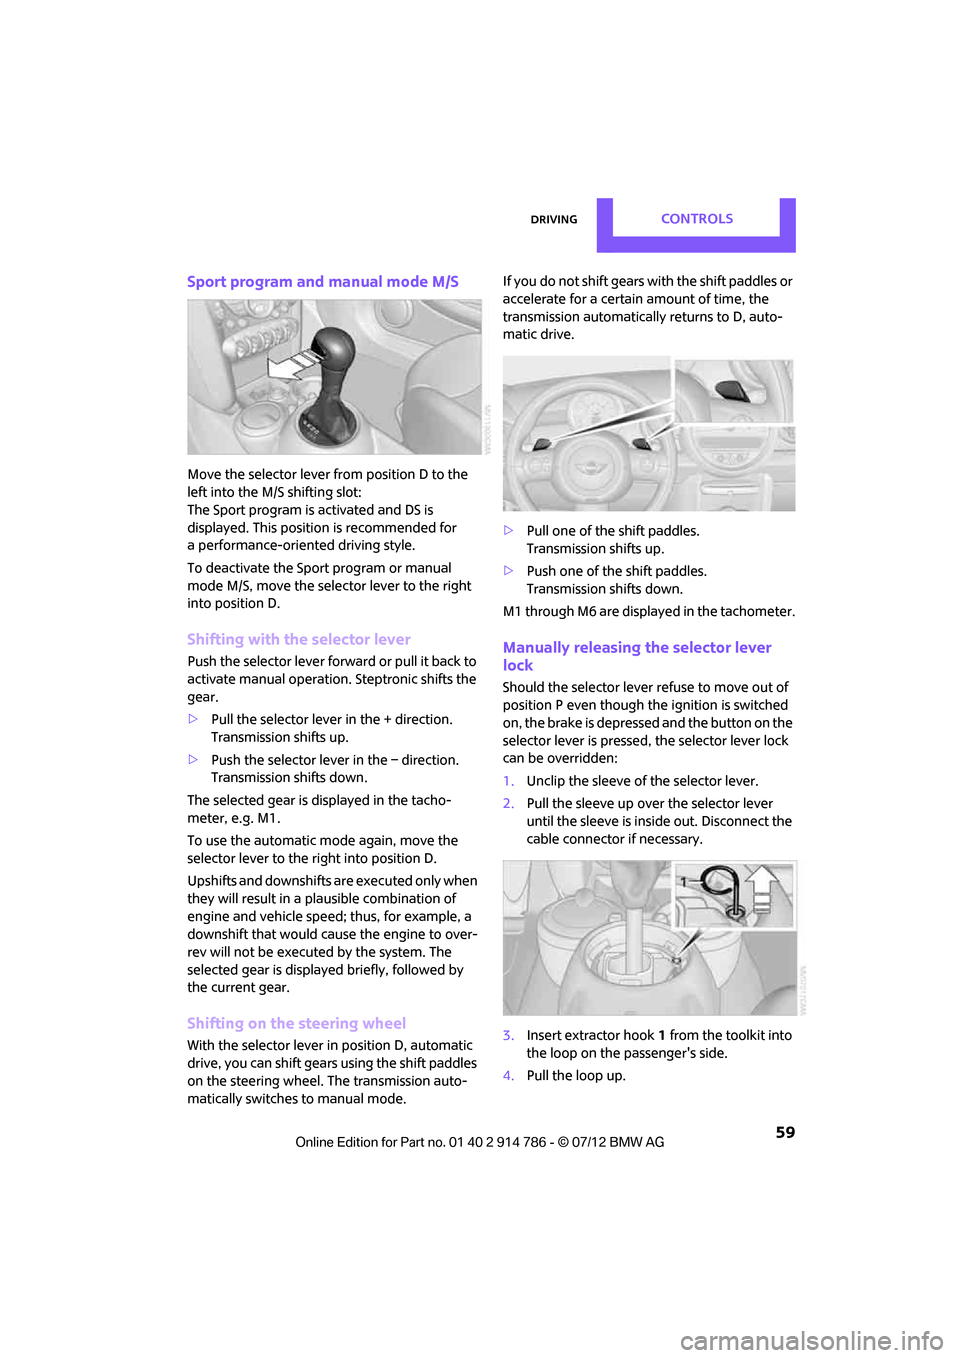
Move the selector lever from position D to the
left into the M/S shifting slot:
The Sport program is activated and DS is
displayed. This position is recommended for
a performance-oriented driving style.
To deactivate the Sport program or manual
mode M/S, move the selector lever to the right
into position D.
Shifting with the selector lever
Push the selector lever forward or pull it back to
activate manual operation. Steptronic shifts the
gear.
> Pull the selector lever in the + direction.
Transmission shifts up.
> Push the selector leve r in the – direction.
Transmission shifts down.
The selected gear is displayed in the tacho-
meter, e.g. M1.
To use the automatic mode again, move the
selector lever to the right into position D.
Upshifts and downshifts are executed only when
they will result in a pl ausible combination of
engine and vehicle speed; thus, for example, a
downshift that would cause the engine to over-
rev will not be executed by the system. The
selected gear is displayed briefly, followed by
the current gear.
Shifting on the steering wheel
With the selector lever in position D, automatic
drive, you can shift gears using the shift paddles
on the steering wheel. The transmission auto-
matically switches to manual mode. If you do not shift gears with the shift paddles or
accelerate for a certai
n amount of time, the
transmission automatically returns to D, auto-
matic drive.
> Pull one of the shift paddles.
Transmission shifts up.
> Push one of th e shift paddles.
Transmission shifts down.
M1 through M6 are displayed in the tachometer.
Manually releasing the selector lever
lock
Should the selector lever refuse to move out of
position P even though the ignition is switched
on, the brake is depressed and the button on the
selector lever is pressed, the selector lever lock
can be overridden:
1. Unclip the sleeve of the selector lever.
2. Pull the sleeve up over the selector lever
until the sleeve is insi de out. Disconnect the
cable connector if necessary.
3. Insert extractor hook 1 from the toolkit into
the loop on the passenger's side.
4. Pull the loop up.
Online Edition for Part no. 01 40 2 914 786 - \251 07/12 BMW AG
Page 64 of 218
DrivingCONTROLS
63
Fill with water and, if required, with a washer
antifreeze, according to manufacturer's recom-
mendations.Mix the water and antifreeze before filling
the washer fluid reservoir to make sure
the correct concentration is maintained. <
Capacity
Approx. 2.6 US quarts/2.5 liters.
With headlamp washer system:
approx. 4.8 US quarts/4.5 liters.
Cruise control
The concept
Cruise control is available at vehicle speeds of at
least approx. 20 mph or 30 km/h. The car then
stores and maintains the speed that you specify
using the button on the steering wheel.
Do not use cruise control when driving at
constant speed is prevented by adverse
conditions, e.g. winding roads, dense traffic or
poor road conditions due to, e.g. snow, rain, ice
or loose surfaces. Otherwise, you could lose
control of the vehicle and cause an accident as
aresult. <
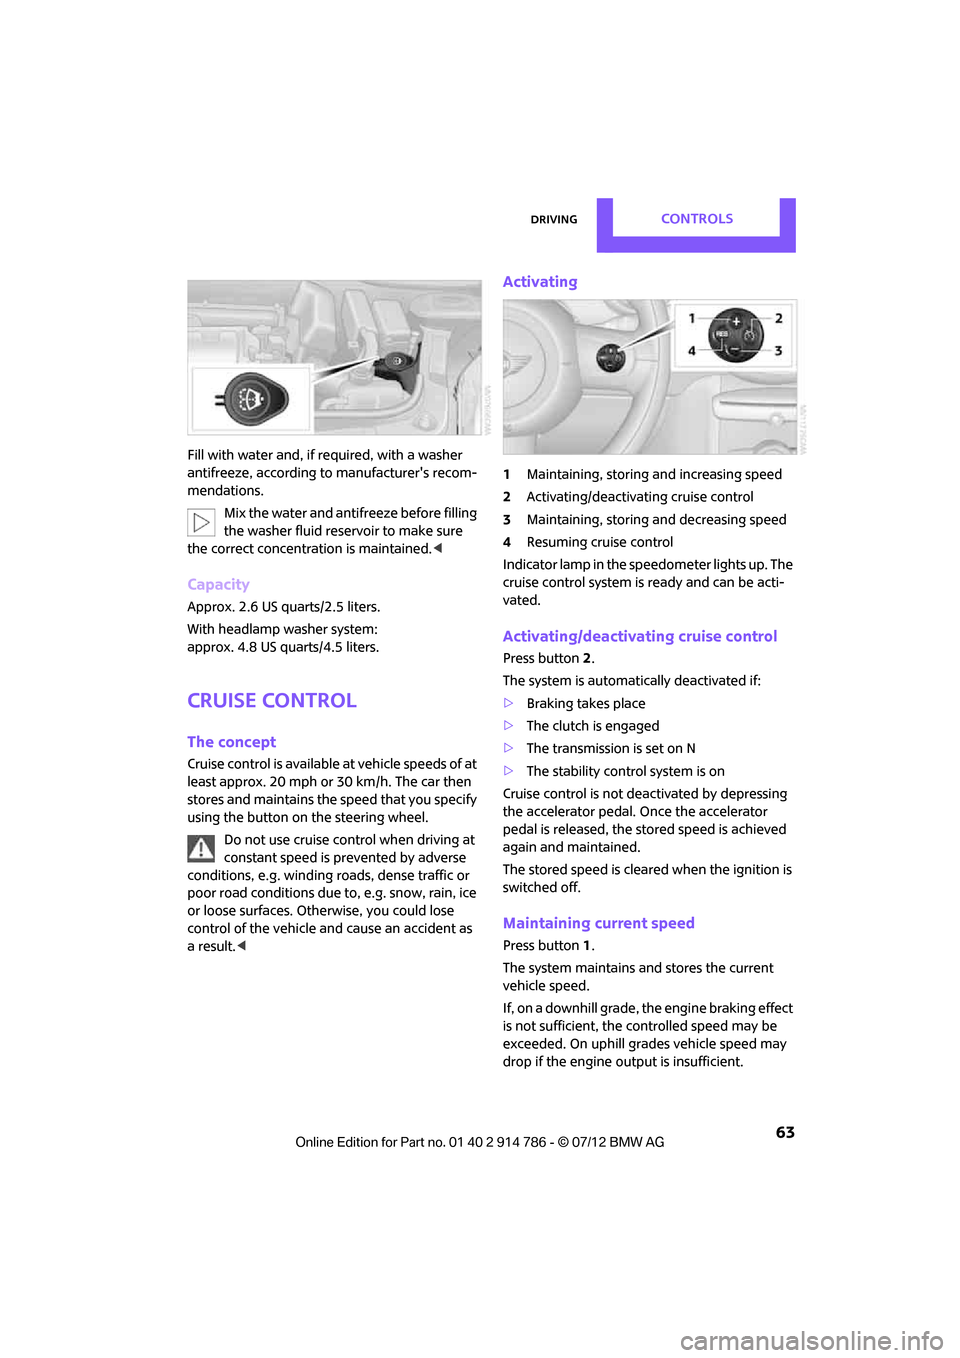
Activating
1Maintaining, storing and increasing speed
2 Activating/deactivating cruise control
3 Maintaining, storing and decreasing speed
4 Resuming cruise control
Indicator lamp in the sp eedometer lights up. The
cruise control system is ready and can be acti-
vated.
Activating/deactivating cruise control
Press button 2.
The system is automatically deactivated if:
> Braking takes place
> The clutch is engaged
> The transmission is set on N
> The stability cont rol system is on
Cruise control is not de activated by depressing
the accelerator pedal. Once the accelerator
pedal is released, the stored speed is achieved
again and maintained.
The stored speed is cleared when the ignition is
switched off.
Maintaining current speed
Press button 1.
The system maintains and stores the current
vehicle speed.
If, on a downhill grade, the engine braking effect
is not sufficient, the controlled speed may be
exceeded. On uphill grades vehicle speed may
drop if the engine output is insufficient.
Online Edition for Part no. 01 40 2 914 786 - \251 07/12 BMW AG
Page 77 of 218
CONTROLSTechnology for driving comfort and safety
76
property damage. Loud sound sources outside
or inside the car can drown out the PDC signal.<
Driving stability control
systems
Your MINI has a number of systems that help to
maintain the vehicle's stability even in adverse
driving conditions.
The laws of physics cannot be repealed,
even with driving stability control systems.
An appropriate driving style always remains the
responsibility of the driver. Therefore do not
reduce the additional safe t y m a r g i n b y e n g a g i n g
in hazardous driving thereby running the risk of
an accident. <
Antilock Brake System ABS
ABS prevents locking of the wheels during
braking. Safe steering response is maintained
even during full braking. Active safety is thus
increased.
Braking safely, refer to page 107.
ABS is operational every time you start the
engine.
Cornering Brake Control CBC
Driving stability and stee ring characteristics are
further enhanced while braking in turns or
during a lane change.
Electronic brake-force distribution EBV
The system controls the brake pressure in the
rear wheels to ensure stable braking behavior.
Brake Assist
Rapidly depressing the brake causes this system
to automatically develop maximum braking
force. Thus, the system helps keep braking
distance to a minimum. At the same time, all the
benefits provided by ABS are exploited.
Do not reduce the pressure on the brake for the
duration of the full braking application.
Dynamic Stability Control DSC
The concept
DSC prevents the driving wheels from losing
traction when you pull away from rest or
accelerate.
DSC also detect s unstable driving conditions
such as when the vehicle's rear end fishtails or
the vehicle is sliding on its front wheels. In these
cases, DSC helps the ve hicle maintain a safe
course within physical limits by reducing engine
output and through braking actions at the indi-
vidual wheels.
Every time that the engine is started, DSC is
ready to operate.
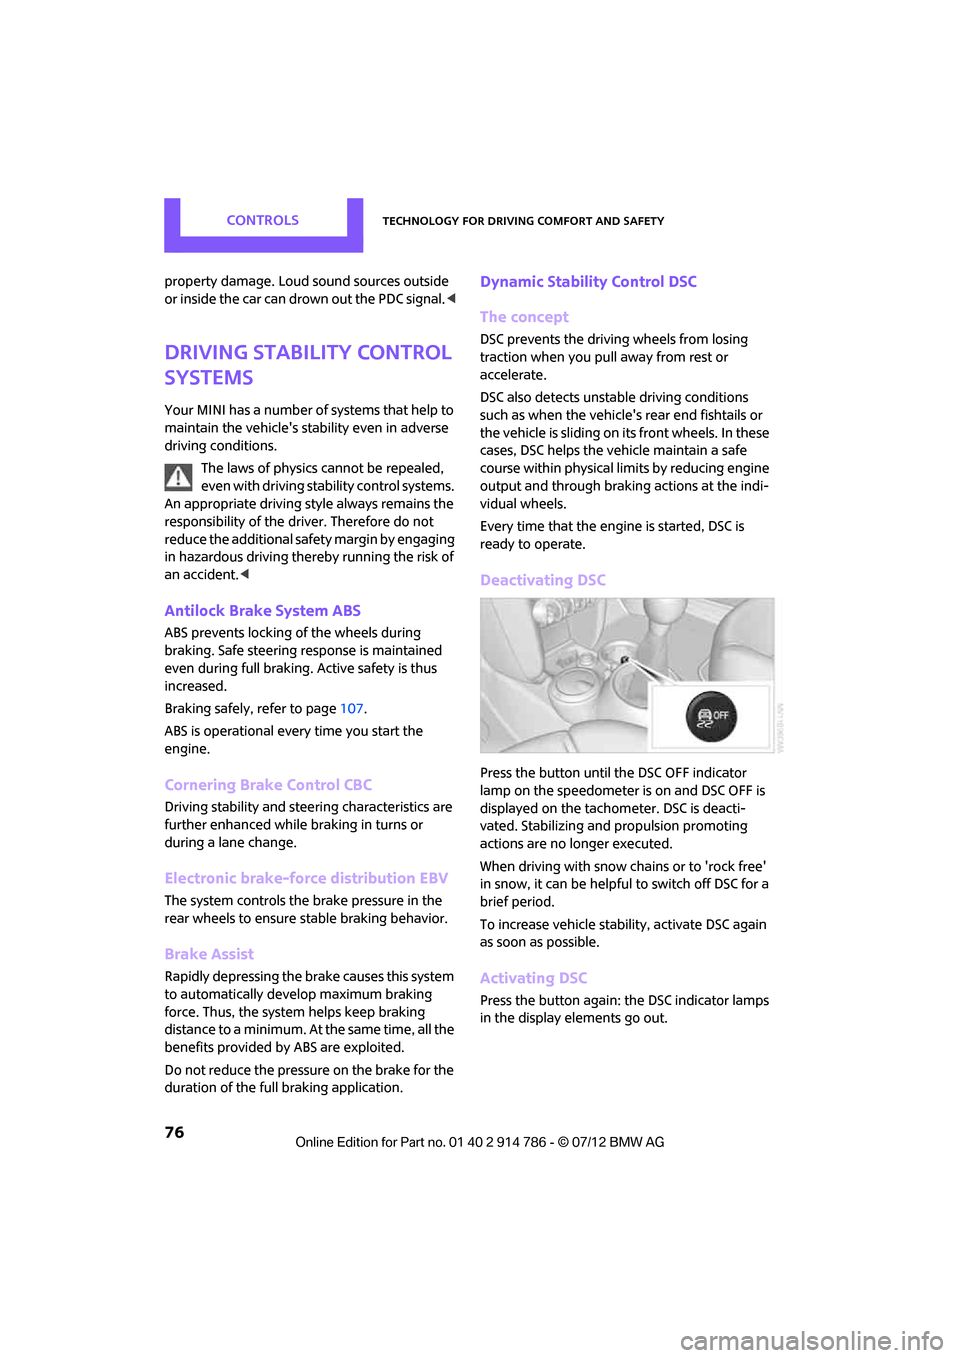
Deactivating DSC
Press the button until the DSC OFF indicator
lamp on the speedometer is on and DSC OFF is
displayed on the tachometer. DSC is deacti-
vated. Stabilizing and propulsion promoting
actions are no longer executed.
When driving with snow chains or to 'rock free'
in snow, it can be helpfu l to switch off DSC for a
brief period.
To increase vehicle stabil ity, activate DSC again
as soon as possible.
Activating DSC
Press the button again: the DSC indicator lamps
in the display elements go out.
Online Edition for Part no. 01 40 2 914 786 - \251 07/12 BMW AG
Page 79 of 218
CONTROLSTechnology for driving comfort and safety
78
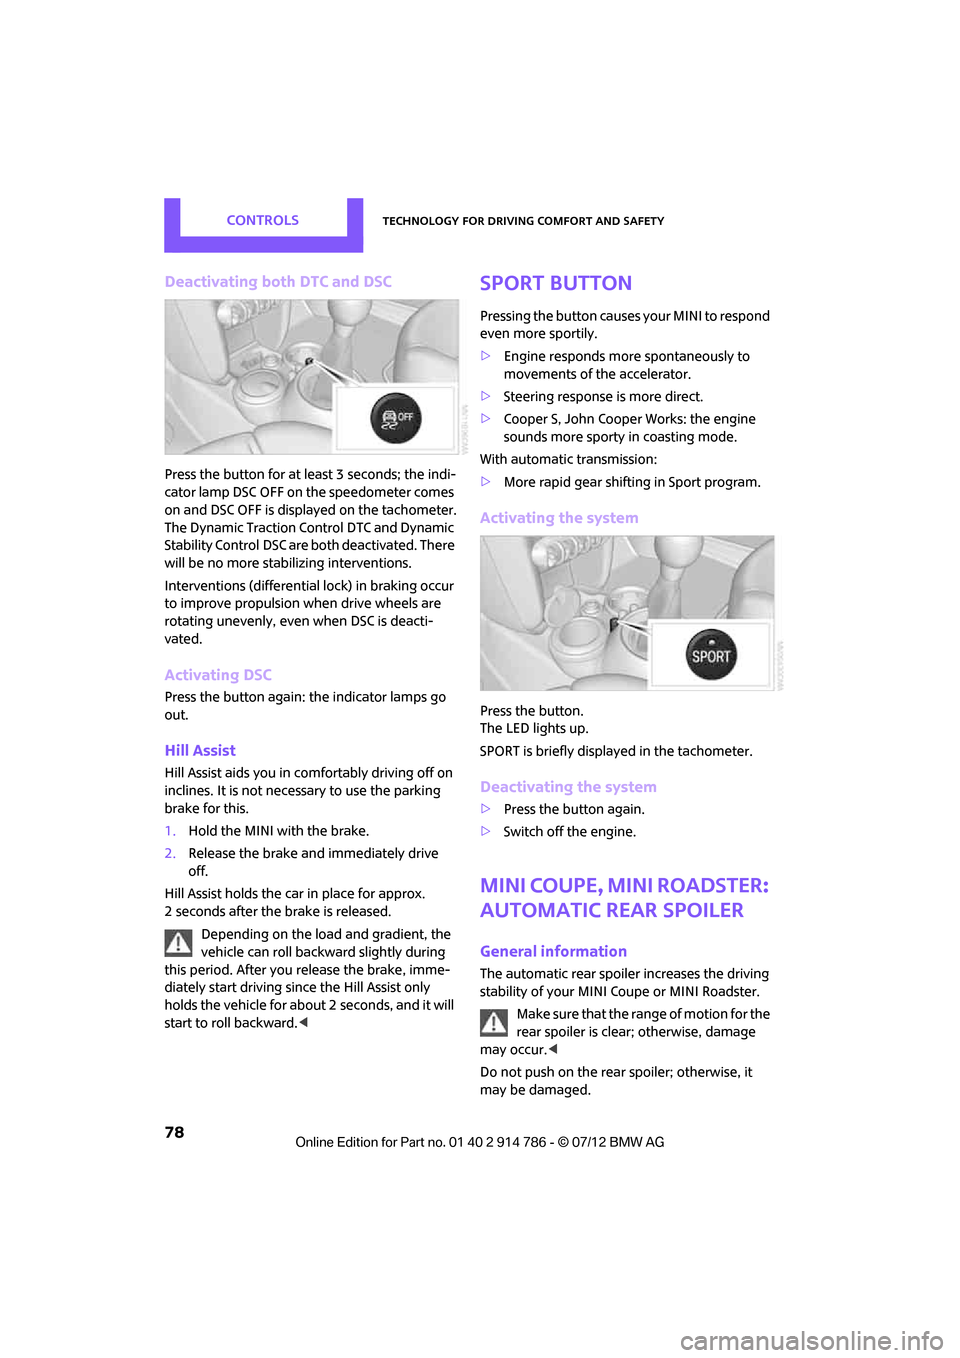
Deactivating both DTC and DSC
Press the button for at least 3 seconds; the indi-
cator lamp DSC OFF on the speedometer comes
on and DSC OFF is displayed on the tachometer.
The Dynamic Traction Control DTC and Dynamic
Stability Control DSC are both deactivated. There
will be no more stabilizing interventions.
Interventions (differential lock) in braking occur
to improve propulsion when drive wheels are
rotating unevenly, even when DSC is deacti-
vated.
Activating DSC
Press the button again: the indicator lamps go
out.
Hill Assist
Hill Assist aids you in co mfortably driving off on
inclines. It is not necessary to use the parking
brake for this.
1. Hold the MINI with the brake.
2. Release the brake and immediately drive
off.
Hill Assist holds the car in place for approx.
2 seconds after the brake is released. Depending on the load and gradient, the
vehicle can roll backwa rd slightly during
this period. After you release the brake, imme-
diately start driving since the Hill Assist only
holds the vehicle for about 2 seconds, and it will
start to roll backward. <
Sport button
Pressing the button causes your MINI to respond
even more sportily.
>Engine responds more spontaneously to
movements of the accelerator.
> Steering response is more direct.
> Cooper S, John Cooper Works: the engine
sounds more sporty in coasting mode.
With automatic transmission:
> More rapid gear shifting in Sport program.
Activating the system
Press the button.
The LED lights up.
SPORT is briefly displayed in the tachometer.
Deactivating the system
>Press the button again.
> Switch off the engine.
MINI Coupe, MINI Roadster:
automatic rear spoiler
General information
The automatic rear spoiler increases the driving
stability of your MINI Coupe or MINI Roadster.
Make sure that the ra nge of motion for the
rear spoiler is clear; otherwise, damage
may occur. <
Do not push on the rear spoiler; otherwise, it
may be damaged.
Online Edition for Part no. 01 40 2 914 786 - \251 07/12 BMW AG
Page 82 of 218
Technology for driving comfort and safetyCONTROLS
81
Indication of a flat tire
The warning lamps come on in yellow
and red. An acoustic signal also sounds.
There is a flat tire or a major loss in tire
inflation pressure.
1. Reduce speed and stop the vehicle with
caution. Avoid sudden braking and steering
maneuvers.
2. Check whether the vehicle is equipped with
normal tires or with run-flat tires.
Run-flat tires, refer to page 152, are identi-
fied by a circular symbol containing the
letters RSC on the tire sidewall.
If the vehicle is not equipped with run-flat
tires, do not continue driving; continuing
to drive can result in serious accidents. <
When a flat tire is repo rted, the Dynamic Stability
Control DSC is activated.
Actions in the event of a flat tire
Normal tires
1. Identify the damaged tire.
To do so, check the inflation pressure in all
four tires.
The inflation pressure di splay of the Mobility
Kit, page 171, can be used for this purpose.
If the inflation pressure in all four tires is
correct, the Flat Tire Monitor might not have
been initialized. The system must then be
initialized.
If it is not possible to identify the damaged
tire, contact your MINI dealer.
2. Use the Mobility Kit to remedy the flat tire on
the damaged wheel, refer to page 170, or to
replace the damaged wheel, refer to
page 173.
Run-flat tires
You can continue driving with a damaged tire at
speeds up to 50 mph or 80 km/h.
Continued driving with a flat tire
When driving with a damaged tire: 1.
Avoid sudden braking and steering maneu-
vers.
2. Do not exceed a speed of 50 mph or
80 km/h.
3. At the next opportunity, check the air
pressure in all four tires.
If the inflation pressure in all four tires is
correct, the Flat Tire Monitor might not have
been initialized. The system must then be
initialized.
Possible driving distance with complete loss of
tire inflation pressure:
The distance it is possible to drive with a flat tire
depends on the load and the stress on the
vehicle while driving.
With an average load, it may be possible to drive
for approx. 50 miles/80 km.
When driving with damage d tires, the handling
characteristics change, e.g. the vehicle will skid
sooner when braking, braking distances will be
longer, or self-steering response will change.
Adapt your driving style accordingly. Avoid
turning abruptly and driv ing over obstacles such
as curbs, potholes, etc.
Since the possible driving distance depends to a
considerable degree on the strain exerted on
the vehicle while driving, it can be shorter or,
with a gentle dr iving style, can also be longer,
depending on the speed, road condition, exter-
nal temperature, vehicle load, etc.
Drive cautiously and do not exceed a
speed of 50 mph/80 km/h.
A loss of tire inflation pressure results in a
change in the handling characteristics, e.g.
reduced lane stability during braking, a longer
braking distance and altered self-steering
properties. <
Vibrations or loud noises while driving can
indicate final failure of the tire. Reduce
your speed and bring the vehicle to a stop;
otherwise, pieces of tire may come off, which
could result in an accident. Do not continue
driving and contact your MINI dealer.<
Online Edition for Part no. 01 40 2 914 786 - \251 07/12 BMW AG