warning MINI Hardtop 2 Door 2002 Owner's Manual
[x] Cancel search | Manufacturer: MINI, Model Year: 2002, Model line: Hardtop 2 Door, Model: MINI Hardtop 2 Door 2002Pages: 140, PDF Size: 1.63 MB
Page 4 of 140
CONTENTS
2
© 2002 Bayerische Motoren Werke
Aktiengesellschaft
Munich, Germany
Reprinting, including excerpts, only with the
written consent of BMW AG, Munich.
Order No. 01 41 0 156 724
US English II/02
Printed in Germany
Printed on environmentally friendly paper
(bleached without chlorine, suitable for recycling).
Using this Owner's Manual
Notes on the Owner's Manual 6
Symbols used 6
Symbol for vehicle parts 6
Your individual vehicle 6
Editorial notice 7
For your own safety 8
Reporting safety defects 9
At a glance
Cockpit 12
Display elements 13
Display elements with navigation
system 14
Indicator and warning lamps 15
Multifunction steering wheel MFL 18
Controls and features
Opening and closing:
Keys 22
Central locking system 23
Opening and closing Ð from outside 23
Opening and closing Ð from inside 26
Tailgate 27
Electric power windows 28
Sliding/tilt sunroof 29
Roller sun blind 30
Adjustments:
Correct sitting posture 31
Seats 31
Entry to the rear 33
Seat heating 34
Head restraints 34
Safety belts 35
Steering wheel 35
Mirrors 36
Airbags 37
Transporting children safely 38
Vehicle Memory 41
Page 6 of 140
CONTENTS
4
In the engine compartment:
Hood 86
Engine compartment Ð
MINI COOPER 87
Engine compartment Ð
MINI COOPER S 88
Washer fluid 89
Engine oil 89
Coolant 91
Brake fluid 92
Maintenance and care:
MINI Maintenance System 93
Caring for your vehicle 94
Vehicle immobilization 96
Laws and regulations:
OBD interface socket 96
Technical modifications 96
California Proposition 65 Warning 97
Owner Service Procedures
Replacement procedures:
Onboard tool kit 100
Windshield wiper blades 100
Lamps and bulbs 101
Repairing a flat tire 106
Changing tires Ð MINI
with space-saver spare tire 106
Flat tire Ð safety tires 110
Battery 111
Fuses 112
Giving and receiving assistance:
Warning triangle 113
First-aid kit 113
Jump-starting 113
Tow-starting and towing 115
Technical data
Engine data 120
Dimensions 121
Weights 122
Capacities 123
Electrical system 124
Page 14 of 140
12
COCKPIT
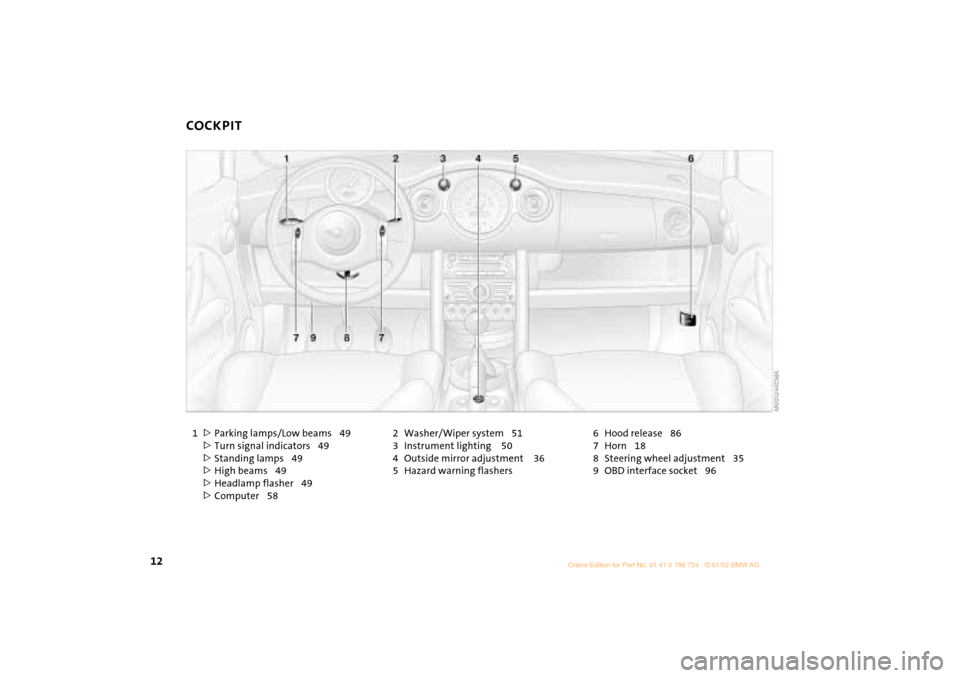
1
>
Parking lamps/Low beams 49
>
Turn signal indicators 49
>
Standing lamps 49
>
High beams 49
>
Headlamp flasher 49
>
Computer 582 Washer/Wiper system 51
3 Instrument lighting 50
4 Outside mirror adjustment 36
5 Hazard warning flashers6 Hood release 86
7 Horn 18
8 Steering wheel adjustment 35
9 OBD interface socket 96
Page 15 of 140

13
OVERVIEW REPAIRS OPERATION CONTROLS DATA INDEX
DISPLAY ELEMENTS
1 Tachometer 55
with indicator and warning lamps, see
from page 15
2 Display for computer 58
3 Speedometer with indicator and warning
lamps, see from page 154 Indicator for
>
Odometer 55
>
Trip odometer 55
>
Service Interval 57
>
Program display for Continuously
Variable Transmission (CVT) 485 Trip odometer, reset to zero 55
6 Fuel gauge 55
7 Engine coolant temperature gauge 56
Page 16 of 140

14
DISPLAY ELEMENTS WITH NAVIGATION SYSTEM
*
1 Tachometer 55
with indicator and warning lamps, see
from page 15
2 Display for computer 583 Speedometer with indicator and warning
lamps, see from page 15
4 Trip odometer, reset to zero 555 Indicator for
>
Odometer 55
>
Trip odometer 55
>
Service Interval 57
>
Program display for Continuously
Variable Transmission (CVT) 48
Page 17 of 140
15
OVERVIEW REPAIRS OPERATION CONTROLS DATA INDEX
INDICATOR AND WARNING LAMPS
Technology
that monitors itself
The system runs a check on the warning
and indicator lamps marked by "
l
" each
time you switch on the ignition. They each
light up once for different periods of time.
If a malfunction should occur in one of
these systems, the corresponding lamp
does not go out after the engine is started
or it lights up while the vehicle is moving.
You will see how to react correctly to this
below.
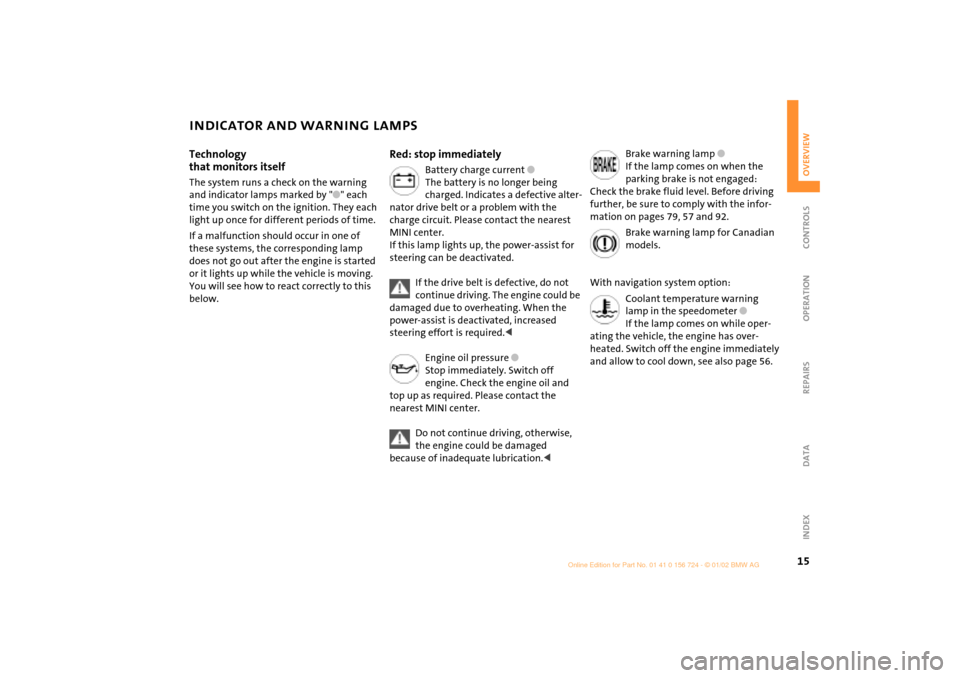
Red: stop immediately
Battery charge current
l
The battery is no longer being
charged. Indicates a defective alter-
nator drive belt or a problem with the
charge circuit. Please contact the nearest
MINI center.
If this lamp lights up, the power-assist for
steering can be deactivated.
If the drive belt is defective, do not
continue driving. The engine could be
damaged due to overheating. When the
power-assist is deactivated, increased
steering effort is required.
<
Engine oil pressure
l
Stop immediately. Switch off
engine. Check the engine oil and
top up as required. Please contact the
nearest MINI center.
Do not continue driving, otherwise,
the engine could be damaged
because of inadequate lubrication.
<
Brake warning lamp
l
If the lamp comes on when the
parking brake is not engaged:
Check the brake fluid level. Before driving
further, be sure to comply with the infor-
mation on pages 79, 57 and 92.
Brake warning lamp for Canadian
models.
With navigation system option:
Coolant temperature warning
lamp in the speedometer
l
If the lamp comes on while oper-
ating the vehicle, the engine has over-
heated. Switch off the engine immediately
and allow to cool down, see also page 56.
Page 18 of 140

16
INDICATOR AND WARNING LAMPS
Yellow: stop immediately
Flat Tire Monitor
l
Flashes: tire failure.
Reduce speed immediately and
stop the vehicle.
With safety (run-flat) tires:
Reduce vehicle speed carefully to under
50 mph (80 km/h).
In both cases, avoid hard brake applications
and steering maneuvers. Check the tire
inflation pressures.
Conduct in the event of a flat tire, see
pages 106, 110.
General information on the system, see
page 62
Red and yellow: continue to drive;
drive cautiously
Brake warning lamp together with
yellow indicator lamps for ABS, EBV
and ASC+T/DSC:
The control system ABS, EBV and
ASC+T/DSC has failed. Drive
cautiously and defensively. Avoid
full brake applications. Please have
the system checked by your MINI
center as soon as possible.
More information on pages 60, 61
Brake warning lamp together with
the yellow indicator warning lamps
ABS, EBV and ASC+T/DSC for Cana-
dian models.
Red: an important reminder
Brake warning lamp
with parking brake applied.
More information on the parking
brake on page 44
Parking brake lamp for Canadian
models.
Fasten safety belts
l
Depending on model, with acoustic
signal
*
. Lights up either for several
seconds or until the belt is engaged, de-
pending on version.
More information on page 35
Depending on the level of equipment,
the indicator lamp is in the vicinity of
the navigation system.
<
Airbags
l
Please have the system inspected
at your MINI center.
More information on pages 31, 37
Depending on the level of equipment,
the indicator lamp is in the vicinity of
the navigation system.
<
Hood/tailgate
Lights up when the hood and/or
tailgate are open.
More information on pages 27, 86
Page 19 of 140
17
OVERVIEW REPAIRS OPERATION CONTROLS DATA INDEX
INDICATOR AND WARNING LAMPS
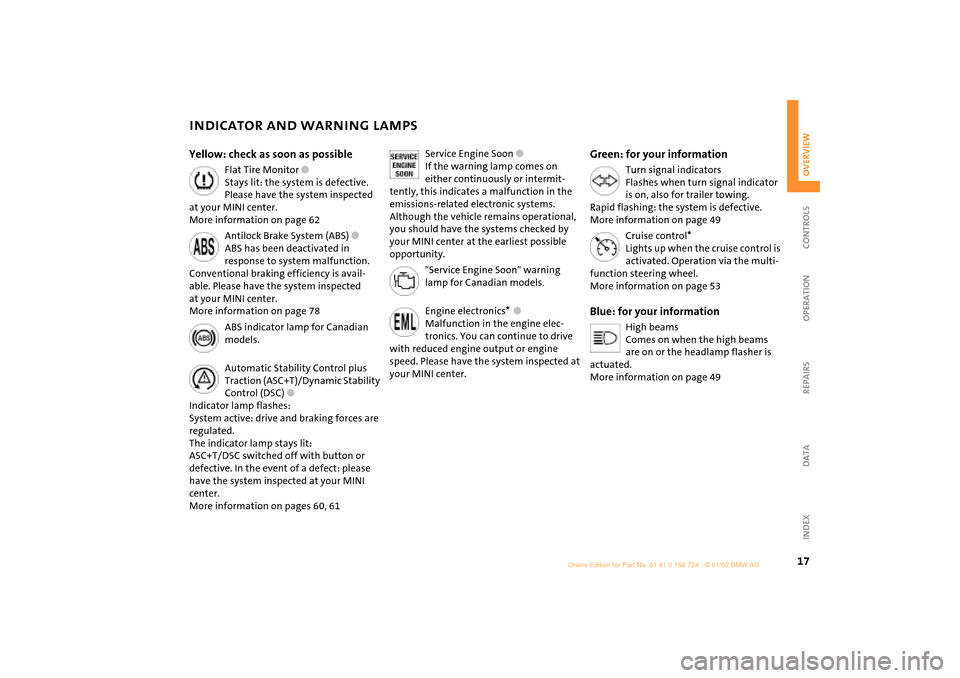
Yellow: check as soon as possible
Flat Tire Monitor
l
Stays lit: the system is defective.
Please have the system inspected
at your MINI center.
More information on page 62
Antilock Brake System (ABS)
l
ABS has been deactivated in
response to system malfunction.
Conventional braking efficiency is avail-
able. Please have the system inspected
at your MINI center.
More information on page 78
ABS indicator lamp for Canadian
models.
Automatic Stability Control plus
Traction (ASC+T)/Dynamic Stability
Control (DSC)
l
Indicator lamp flashes:
System active: drive and braking forces are
regulated.
The indicator lamp stays lit:
ASC+T/DSC switched off with button or
defective. In the event of a defect: please
have the system inspected at your MINI
center.
More information on pages 60, 61
Service Engine Soon
l
If the warning lamp comes on
either continuously or intermit-
tently, this indicates a malfunction in the
emissions-related electronic systems.
Although the vehicle remains operational,
you should have the systems checked by
your MINI center at the earliest possible
opportunity.
"Service Engine Soon" warning
lamp for Canadian models
.
Engine electronics
*
l
Malfunction in the engine elec-
tronics. You can continue to drive
with reduced engine output or engine
speed. Please have the system inspected at
your MINI center.
Green: for your information
Turn signal indicators
Flashes when turn signal indicator
is on, also for trailer towing.
Rapid flashing: the system is defective.
More information on page 49
Cruise control
*
Lights up when the cruise control is
activated. Operation via the multi-
function steering wheel.
More information on page 53
Blue: for your information
High beams
Comes on when the high beams
are on or the headlamp flasher is
actuated.
More information on page 49
Page 25 of 140

23
OVERVIEW REPAIRS OPERATIONCONTROLS DATA INDEX
CENTRAL LOCKING SYSTEM OPENING AND CLOSING Ð FROM OUTSIDE
The concept
The central locking system is ready for
operation whenever the driver's door is
closed. The doors, the tailgate and the fuel
filler door are unlocked or locked.
The central locking system can be oper-
ated:
>
From outside via the remote control as
well as via the door lock
>
From inside by pressing a button.
If operated from outside, the anti-theft
system is activated at the same time. This
prevents the doors from being unlocked via
safety lock buttons or door handles.
In the event of an accident, the central
locking system unlocks automatically. The
hazard warning system and interior lamps
are also switched on.
Via remote control
The remote control gives you an exception-
ally convenient method for unlocking and
locking your vehicle. It also offers another
function:
To open the tailgate, refer to page 24.
The tailgate will open slightly, regardless of
whether it was locked or unlocked.
Whenever you unlock (lock) the vehicle,
you simultaneously deactivate (activate)
the anti-theft system, and switch the inte-
rior lamps on (off).
If the vehicle has been properly locked
using the remote control, the hazard
warning system lights up once.
When the vehicle is unlocked, the hazard
warning system does not react.
Children might be able to lock the
doors from the inside. Always take
the vehicle keys with you so that the
vehicle can be opened again from the
outside at any time.
<
For US owners only
The transmitter and receiver units comply
with part 15 of the FCC (Federal Communi-
cation Commission) regulations. Operation
is governed by the following:
FCC ID: LX8765S
LX8765E
LX8CAS
Compliance statement:
This device complies with part 15 of the
FCC Rules. Operation is subject to the
following two conditions:
>
This device may not cause harmful inter-
ference, and
>
this device must accept any interference
received, including interference that may
cause undesired operation.
Any unauthorized modifications or
changes to these devices could void
the user's authority to operate this equip-
ment.
<
Page 26 of 140

24
OPENING AND CLOSING Ð FROM OUTSIDE
1 Unlocking and opening the tailgate
2 Locking and securing
If the remote control does not react,
the battery is discharged.
In the event of a system malfunction,
please contact your MINI center. You can
also obtain replacement keys and batteries
from your MINI center.
Battery changing, see page 22.
<
To unlock
1. Press button 1 once to unlock the
driver's door only
2. Press button 1 a second time to unlock
the other door as well as the tailgate and
the fuel filler door.
When the vehicle is unlocked, the hazard
warning system does not react.
To open the tailgate
Hold button 1 pressed for approx. five
seconds.
The tailgate will open slightly, regardless
of whether it was previously locked or
unlocked.
Before and after a trip, be sure that
the tailgate was not opened uninten-
tionally.
<
To lock and securePress button 2.
The hazard warning system flashes once.
Do not lock the vehicle if there are
passengers still inside, because they
cannot unlock the doors.
control.
In this case, use the master key to unlock
the door lock.