window MINI Hardtop 2 Door 2004 User Guide
[x] Cancel search | Manufacturer: MINI, Model Year: 2004, Model line: Hardtop 2 Door, Model: MINI Hardtop 2 Door 2004Pages: 152, PDF Size: 1.41 MB
Page 71 of 152
69
OVERVIEW REPAIRS OPERATIONCONTROLS DATA INDEX
AIR CONDITIONING SYSTEM
*
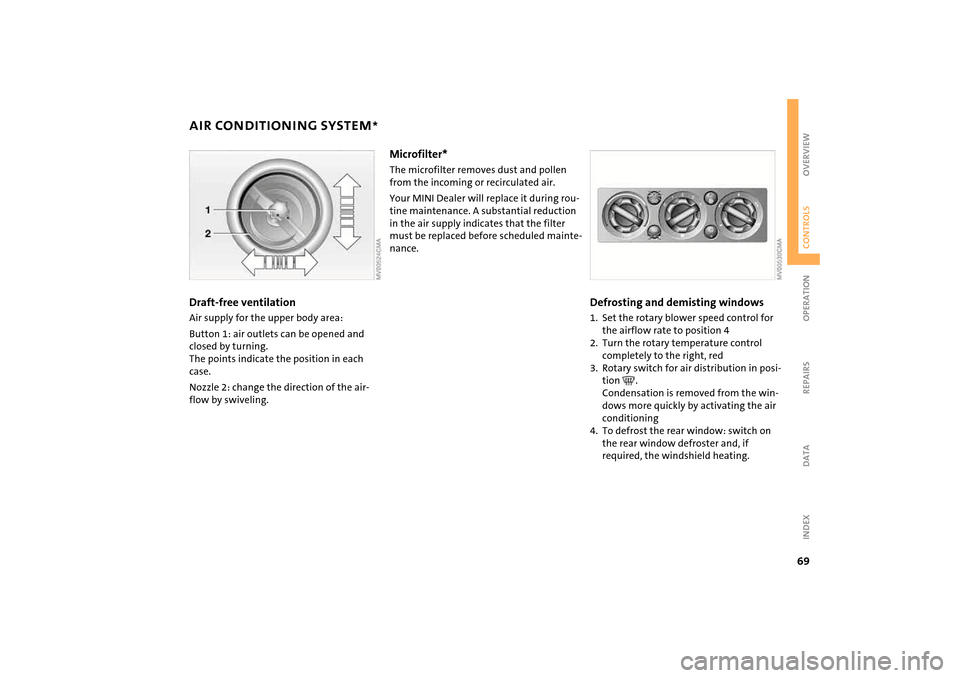
Draft-free ventilation
Air supply for the upper body area:
Button 1: air outlets can be opened and
closed by turning.
The points indicate the position in each
case.
Nozzle 2: change the direction of the air-
flow by swiveling.
Microfilter* The microfilter removes dust and pollen
from the incoming or recirculated air.
Your MINI Dealer will replace it during rou-
tine maintenance. A substantial reduction
in the air supply indicates that the filter
must be replaced before scheduled mainte-
nance.
Defrosting and demisting windows 1. Set the rotary blower speed control for
the airflow rate to position 4
2. Turn the rotary temperature control
completely to the right, red
3. Rotary switch for air distribution in posi-
tion .
Condensation is removed from the win-
dows more quickly by activating the air
conditioning
4. To defrost the rear window: switch on
the rear window defroster and, if
required, the windshield heating.
Page 72 of 152

70
AUTOMATIC CLIMATE CONTROL
*
1Air onto the windshield and onto the
side windows
2Air for the upper body area72
3Air for the front and rear footwells
4Rear window defroster and windshield
heating715Interior temperature sensor,
please keep clear and unobstructed
6Recirculated air mode71
7Air conditioning71
8Automatic air distribution and
supply71
9Switching the automatic climate control
on/off7110 Temperature71
11 Display for temperature and air
supply71
12 Blower for air supply72
13 Defrosting and demisting the wind-
shield and side windows72
14 Individual air distribution72
Page 73 of 152
71
OVERVIEW REPAIRS OPERATIONCONTROLS DATA INDEX
AUTOMATIC CLIMATE CONTROL
*
Automatic air distribution and supply
Automatic program (AUTO):
Indicator lamp lights up.
Automatic adjustment of the air distribu-
tion and supply, and adaptation of the
specified temperatures to external influ-
ences, i.e. outside temperature and sun-
light.
In the automatic program (AUTO), the air
conditioner is activated automatically.
You can change the unit from 6 to
7 by keeping extended pressure on
the button.<
Switching the automatic climate
control on/off
The blower, heating and air condi-
tioner are switched off.
To switch the automatic climate control on
again: Press any button of the automatic
climate control.
Air conditioning
Air conditioner switched on: indi-
cator lamp lights up.
The air is cooled and dehumidified and –
depending on the temperature setting –
rewarmed.
In the automatic program (AUTO), the air
conditioner is activated automatically.
Condensation on the windows is reduced
when the air conditioning is turned on.
Condensation forms in the air condi-
tioning system during operation, and
then exits under the vehicle. Traces of con-
densed water on the ground are therefore
normal.
cle is blocked: indicator lamp lights
up.
The air within the vehicle is recirculated.
In the automatic program (AUTO) in hot
weather conditions, the recirculated air
mode is activated temporarily to enable
faster cooling.
Do not run the recirculated air mode
over a longer period of time, as the air
quality in the vehicle's interior will other-
wise diminish.<
If the windows fog up in the recircu-
lated air mode, turn the recirculated
air mode off and if necessary increase the
air supply.<
Rear window defroster and windshield
heating*
Rear window defroster and wind-
shield heating switched on:
Indicator lamp lights up.
As long as the indicator lamp is lit, the
heating operates at high power output –
rapid defrosting.
Indicator lamp goes out.
The heating continues to run with reduced
power output and then switches itself off
automatically.
Temperature
Setting the temperature:
Move or turn the wheel in the
appropriate direction to increase
the temperature step by step.
The figures in the display provide a general
indication of interior temperature. When
you start the vehicle, the system ensures
that the selected temperature is achieved
as quickly as possible and then maintained.
Permanent heating with maximum
power output at temperature selec-
tion HI. Permanent cooling at LO.<
Page 74 of 152

72
AUTOMATIC CLIMATE CONTROL
*
Air supply
Press the left or right half of the
button: the air supply varies.
Defrosting and demisting windows
Press the button briefly.
The indicator lamp flashes.
Ice and condensation are rapidly removed
from the rear window, windshield and side
windows. Condensation is removed from
the windows more quickly by activating the
air conditioning.
The rear window defroster/windshield
heating is switched on automatically. It can
be switched off again separately.
Press the button for a longer period.
The indicator lamp stays lit. Permanent air
supply to the windshield and side windows.
The air supply can be directed both to the
windows and to the footwell simulta-
neously.
The rear window defroster/windshield
heating is switched off.
Individual air distribution
Combine the air distribution your-
self. This switches off the auto-
matic program.
Draft-free ventilation Air supply for the upper body area:
Button 1: air outlets can be opened and
closed by turning.
The points indicate the position in each
case.
Vent 2: change the direction of the airflow
by swiveling.
Microfilter/activated-charcoal filterThe microfilter removes dust and pollen
from the incoming or recirculated air. The
activated-charcoal filter provides addi-
tional protection by filtering gaseous pol-
lutants from the outside air.
Your MINI Dealer replaces this combined
filter as a standard part of your scheduled
maintenance. A substantial reduction in
the air supply indicates that the filter must
be replaced before scheduled maintenance.
Page 107 of 152

105
OVERVIEW REPAIRSOPERATIONCONTROLS DATA INDEX
CARING FOR YOUR VEHICLE VEHICLE STORAGE Caring for leather* and imitation
leather The leather and imitation leather used by
the manufacturer of your MINI are high
quality products processed using state-of-
the-art methods and will retain their qual-
ity level for many years if cared for prop-
erly.
Regular cleaning and care are necessary, as
dust and road dirt scratch in pores and
creases and lead to heavy wear as well as
premature brittleness of the leather and
imitation leather surface.
This is why you should use a cloth or vac-
uum cleaner to remove dust on a regular
basis.
Since dirt and oil slowly destroy the protec-
tive layer of the leather and imitation
leather, a treatment with a leather care
product is necessary twice a year. This pre-
serves the quality of the leather and pre-
vents electrostatic charging.Cleaning agents can contain hazard-
ous or health-damaging substances.
For this reason, always observe the warn-
ings on the package. For interior cleaning,
always open the doors or windows of the
vehicle.
Do not use any products that are not
intended for cleaning the vehicle.<
Your MINI Dealer will be glad to advise you
on what is important if the vehicle is to be
decommissioned for longer than three
months.
Page 113 of 152

111
OVERVIEW REPAIRSOPERATION CONTROLS DATA INDEX
WIPER BLADES LAMPS AND BULBS Rear window wiper 1. Rotate the wiper arm completely out
from the windshield
2. Turn the wiper blade as far as it will go
to the rear, see arrow
3. Press the wiper blade against the limit
and thus out of the mounting
4. Press the new wiper blade into the
mounting.
Lamps and bulbs are an important compo-
nent of vehicle safety. Therefore, proceed
carefully when handling bulbs. The manu-
facturer of your MINI recommends that you
have such work performed by your MINI
Dealer if you are not familiar with the pro-
cedures.
Do not touch the glass portion of a
new bulb with your bare hands since
even small amounts of impurities burn into
the surface and reduce the service life of
the bulb. Use a clean cloth, paper napkin, or
similar material, or hold the bulb by its
metallic base.<
A replacement bulb set is available at your
MINI Dealer.
Whenever working on the electrical
system, switch off the electrical
accessory you are working on or disconnect
the cable from the negative terminal of the
battery. Failure to do this could result in
short circuits.
To prevent injuries and damage, comply
with any instructions provided by the bulb
manufacturer.<
Page 129 of 152

127
OVERVIEW REPAIRSOPERATION CONTROLS DATA INDEX
JUMP-STARTINGThe illustration shows the auxiliary jump-
starting terminal on the MINI COOPER S.
In the MINI COOPER S, the auxiliary jump-
starting terminal, arrow 1, acts as the posi-
tive battery terminal, refer to view of
engine compartment on page 97.
1. Remove the cover of the battery or open
the cover of the auxiliary jump-starting
terminal:
>MINI COOPER:
Remove the battery cover.
To do so, press the two clips simulta-
neously.
>MINI COOPER S:
Open the cover of the auxiliary jump-
starting terminal, arrow 1
2. Connect one terminal clamp of the
plus/+ jumper cable to the positive bat-
tery terminal or to an auxiliary jump-
starting terminal of the support vehicle
3. Connect the other terminal clamp of the
plus/+ jumper cable to the positive bat-
tery terminal or to an auxiliary jump-
starting terminal of the vehicle to be
started
Engine or body ground in your MINI:
arrow 2.
4. Connect one terminal clamp of the
minus/– jumper cable to the negative
battery terminal or to an engine or body
ground of the support vehicle
5. Connect the second terminal clamp of
the minus/– jumper cable to the nega-
tive terminal of the battery or to the
engine or body ground of the vehicle to
be started.
Performing the jump-start1. Start the engine of the support vehicle
and allow it to run at a fast idle speed for
several minutes
2. Start the engine of the other vehicle in
the usual manner.
If the first start attempt is not success-
ful, wait a few minutes before another
attempt in order to allow the discharged
battery to recharge
3. Allow the engines of both vehicles to run
for several minutes
On the MINI: before disconnecting
the jumper cables, switch on the
lighting, the rear window defroster and
the highest blower speed to prevent a
voltage surge from the regulator to the
electrical systems and components.<
4. Then disconnect the jumper cables in
the reverse order.
If necessary have the battery checked and
completely charged at a MINI Dealer.
Do not use spray starter fluids to start
the engine.<
Page 141 of 152
EVERYTHING FROM A TO Z
139
OVERVIEW REPAIRS OPERATION CONTROLS DATA INDEX
Brakes 86
ABS 61
brake fluid 101
break-in procedures 82
handbrake 43
indicator/warning
lamps 15, 16
Breaking in 82
Bulb replacement, refer to
Lamps and bulbs 111
Buttons in multifunction
steering wheel 18
Continuously Variable
automatic Transmission
(CVT) 46
C
California Proposition
65 warning 107
Capacities 135
Car care, refer to Caring for your
vehicle 103
Car keys, refer to Keys 22
Car radio, refer to separate
Owner's Manual
Car telephone, refer to separate
Owner's Manual
Car vacuum cleaner,
connecting, refer to Cigarette
lighter socket 74
Car wash 103 Car wash, refer to Washing
your vehicle 103
Car-care products 103
Care, vehicle 103
Cargo area 75
cover 75
emergency operation, refer
to Manual operation 27
foldable rear backrest 75
lid, refer to Tailgate 27
volume, refer to Weights 134
Cargo area lamps
bulb replacement 116
Cargo area net 77
Carpet care 104
Cassette operation, refer to
Owner's Manual for Radio
Catalytic converter, refer to
High temperatures 83
CBC Cornering Brake Control 61
warning lamp 16
CD changer, refer to separate
Owner's Manual
CD operation, refer to
Owner's Manual for Radio
Center high-mount brake lamp
bulb replacement 114
Central locking system 23
interior 26
Changing bulbs, refer to Lamps
and bulbs 111 Changing tires
space-saver spare tire 117
Charge-current indicator
light 15
Child seat, refer to Child-
restraint systems 38
Child-restraint systems 38
Chock, folding
MINI Mobility System 121
Run Flat tires 93
space-saver spare tire 117
Chrome parts, refer to Caring
for your vehicle 104
Chrome-plated parts, care 104
Cigarette lighter 74
Cigarette lighter socket 74
Circulation of air, refer to
Recirculated air mode 68, 71
Cleaning the rear window 51
Cleaning the vehicle, refer to
Caring for your vehicle 103
Clock 56
Closing
from inside 26
from outside 23
Clothes hooks 83
Clutch
break-in procedures 82
Cockpit 12
Cold start, refer to
Starting the engine 41 Compact disk operation, refer
to Owner's Manual for Radio
Compartments 73
Compression, refer to Engine
data 132
Compressor, refer to MINI
Mobility System
operation, refer to
Reinflating tires 122
storage location 110
Computer, refer to Onboard
computer 57
Condensed water, refer to Air
conditioning 68, 71
Configuring settings, refer to
Vehicle Memory 37
Consumption, refer to Average
consumption 58
Consumption, refer to Current
consumption 58
Contents 2
Continuously Variable
automatic Transmission
(CVT) 45
ignition 41
indicator lamp 47
interlock 41
selector lever lock 45
shiftlock 45
towing 129
Page 142 of 152
EVERYTHING FROM A TO Z
140
Control elements, refer to
Cockpit 12
Convenience operation
from outside 24, 25
glass sunroof, electric 29
window 28
Coolant 100
indicator lamp 15
level 100
temperature 55
Coolant temperature gauge 55
Cooling system, refer to
Capacities 135
Cooling, refer to Air
conditioning 68, 71
Copyright 2
Cornering Brake Control
(CBC) 61
warning lamp 16
Cosmetic mirror, refer to
Illuminated vanity mirror 36
Cruise control 52
indicator lamp 17
multifunction steering
wheel 18
sports steering wheel 18
Cup holders, refer to Beverage
holders 74
Curb weight, refer to
Weights 134 Current fuel consumption
setting units 58
Cylinders, refer to Engine
data 132
D
Daily odometer, refer to Trip
odometer 54
Dashboard lighting, refer to
Instrument lighting 49
Data, technical
dimensions 133
engine data 132
weights 134
Date of the Owner's Manual 7
Daytime driving lamps 48
Deep water, refer to Water on
roadways 83
Defrost setting, refer to
Defrosting and demisting
windows 69, 72
Defrosting and demisting
windows
air conditioning system 69
automatic climate control 72
Defrosting windows 69, 72
air conditioning system 68
automatic climate control 71
Defrosting windshield, refer to
Defrosting and demisting
windows 69, 72 Demisting windows 69, 72
Digital clock 56
Dimensions 133
Dimming interior rearview
mirror 37
Dipstick, engine oil 98
Directional turn signal,
refer to Turn signal
indicators 49
Disc brakes 86
Displacement, refer to Engine
data 132
Display elements 13
with navigation system 14
Display lighting, refer to
Instrument lighting 49
Disposal
oil 99
remote control battery 22
vehicle battery 124
Distance covered, refer to
Odometer 54
Door keys 24
Door lock 25
Doors, locking and unlocking
from inside 26
from outside 24
DOT quality grades 89
Draft-free ventilation 69, 72
Drink holders, refer to Beverage
holders 74 Driving lamps, refer to Parking
lamps/Low beams 48
Driving notes 83
break-in procedures 82
Driving stability control 59, 60
Dry air, refer to Air
conditioning 68, 71
DSC Dynamic Stability
Control 60
indicator lamp 16
DVD changer, refer to separate
Owner's Manual
Dynamic Stability Control
(DSC) 60
indicator lamp 16
Dynamic
Stability Control (DSC) 60
E
Easy entry to the rear 34
EBD Electronic Brake Force
Distribution 61
indicator lamp 16
Electric glass sunroof 29
Electric power windows 28
initializing 28
Page 144 of 152
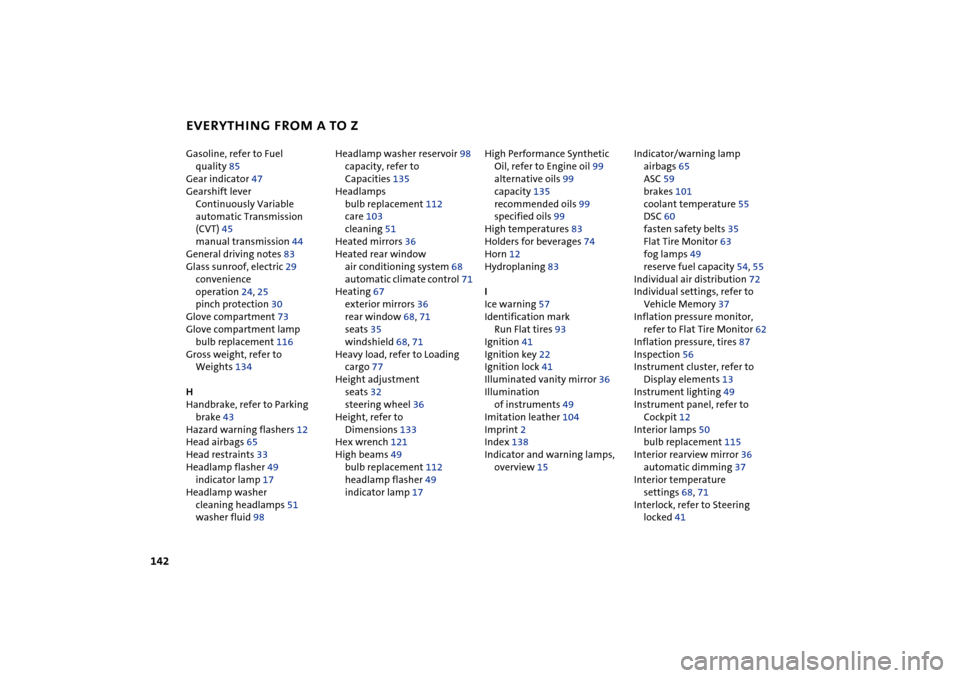
EVERYTHING FROM A TO Z
142
Gasoline, refer to Fuel
quality 85
Gear indicator 47
Gearshift lever
Continuously Variable
automatic Transmission
(CVT) 45
manual transmission 44
General driving notes 83
Glass sunroof, electric 29
convenience
operation 24, 25
pinch protection 30
Glove compartment 73
Glove compartment lamp
bulb replacement 116
Gross weight, refer to
Weights 134
H
Handbrake, refer to Parking
brake 43
Hazard warning flashers 12
Head airbags 65
Head restraints 33
Headlamp flasher 49
indicator lamp 17
Headlamp washer
cleaning headlamps 51
washer fluid 98 Headlamp washer reservoir 98
capacity, refer to
Capacities 135
Headlamps
bulb replacement 112
care 103
cleaning 51
Heated mirrors 36
Heated rear window
air conditioning system 68
automatic climate control 71
Heating 67
exterior mirrors 36
rear window 68, 71
seats 35
windshield 68, 71
Heavy load, refer to Loading
cargo 77
Height adjustment
seats 32
steering wheel 36
Height, refer to
Dimensions 133
Hex wrench 121
High beams 49
bulb replacement 112
headlamp flasher 49
indicator lamp 17 High Performance Synthetic
Oil, refer to Engine oil 99
alternative oils 99
capacity 135
recommended oils 99
specified oils 99
High temperatures 83
Holders for beverages 74
Horn 12
Hydroplaning 83
I
Ice warning 57
Identification mark
Run Flat tires 93
Ignition 41
Ignition key 22
Ignition lock 41
Illuminated vanity mirror 36
Illumination
of instruments 49
Imitation leather 104
Imprint 2
Index 138
Indicator and warning lamps,
overview 15 Indicator/warning lamp
airbags 65
ASC 59
brakes 101
coolant temperature 55
DSC 60
fasten safety belts 35
Flat Tire Monitor 63
fog lamps 49
reserve fuel capacity 54, 55
Individual air distribution 72
Individual settings, refer to
Vehicle Memory 37
Inflation pressure monitor,
refer to Flat Tire Monitor 62
Inflation pressure, tires 87
Inspection 56
Instrument cluster, refer to
Display elements 13
Instrument lighting 49
Instrument panel, refer to
Cockpit 12
Interior lamps 50
bulb replacement 115
Interior rearview mirror 36
automatic dimming 37
Interior temperature
settings 68, 71
Interlock, refer to Steering
locked 41