ECU MINI Hardtop 2 Door 2004 Owner's Manual
[x] Cancel search | Manufacturer: MINI, Model Year: 2004, Model line: Hardtop 2 Door, Model: MINI Hardtop 2 Door 2004Pages: 152, PDF Size: 1.41 MB
Page 25 of 152
23
OVERVIEW REPAIRS OPERATIONCONTROLS DATA INDEX
CENTRAL LOCKING SYSTEM OPENING AND CLOSING: FROM OUTSIDEThe conceptThe central locking system is ready for
operation whenever the driver's door is
closed. The doors, the tailgate and the fuel
filler door are unlocked or locked.
The central locking system secures your
MINI:
>When operated from the outside via the
remote control as well as via the door
lock
>When operated from the inside via a
switch.
If operated from outside, the anti-theft sys-
tem is activated at the same time. This pre-
vents the doors from being unlocked via
safety lock buttons or door handles.
In the event of an accident, the central lock-
ing system unlocks automatically. The haz-
ard warning system and interior lamps are
also switched on.
Via remote controlThe remote control gives you an exception-
ally convenient method for unlocking and
locking your vehicle. It also offers addi-
tional functions:
>To open the power windows and the
glass sunroof, refer to page 24.
Locking/unlocking the vehicle automati-
cally activates/deactivates the anti-theft
system and switches the interior lamps off/
on.
If the vehicle has been properly locked
using the remote control, the hazard warn-
ing system flashes once.
When the vehicle is unlocked, the hazard
warning system does not react.
Children might be able to lock the
doors from the inside. Always take
the vehicle keys with you so that the vehi-
cle can be opened again from the outside at
any time.<
For US owners only The transmitter and receiver units comply
with part 15 of the FCC, Federal Communi-
cations Commission, regulations. Opera-
tion is governed by the following:
FCC ID: LX8765S
LX8765E
LX8CAS
Compliance statement:
This device complies with part 15 of the
FCC Rules. Operation is subject to the fol-
lowing two conditions:
>This device may not cause harmful inter-
ference, and
>this device must accept any interference
received, including interference that may
cause undesired operation.
Any unauthorized modifications or
changes to these devices could void
the user's authority to operate this equip-
ment.<
Page 26 of 152
24
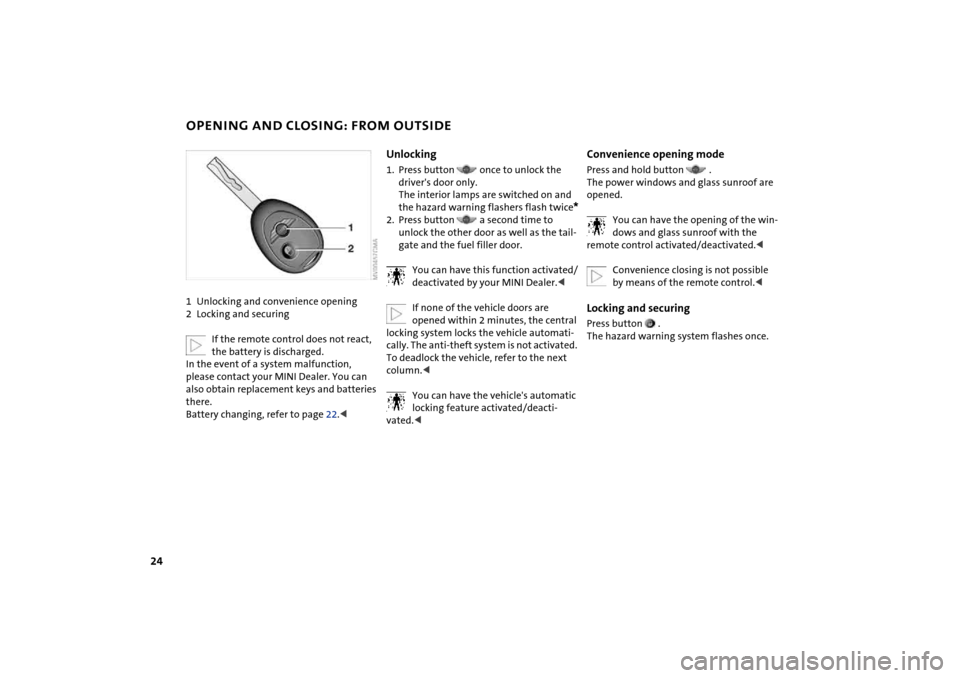
OPENING AND CLOSING: FROM OUTSIDE1Unlocking and convenience opening
2Locking and securing
If the remote control does not react,
the battery is discharged.
In the event of a system malfunction,
please contact your MINI Dealer. You can
also obtain replacement keys and batteries
there.
Battery changing, refer to page 22.<
Unlocking1. Press button once to unlock the
driver's door only.
The interior lamps are switched on and
the hazard warning flashers flash twice
*
2. Press button a second time to
unlock the other door as well as the tail-
gate and the fuel filler door.
You can have this function activated/
deactivated by your MINI Dealer.<
If none of the vehicle doors are
opened within 2 minutes, the central
locking system locks the vehicle automati-
cally. The anti-theft system is not activated.
To deadlock the vehicle, refer to the next
column.<
You can have the vehicle's automatic
locking feature activated/deacti-
vated.<
Convenience opening modePress and hold button .
The power windows and glass sunroof are
opened.
You can have the opening of the win-
dows and glass sunroof with the
remote control activated/deactivated.<
Convenience closing is not possible
by means of the remote control.
Page 34 of 152
32
SEAT ADJUSTMENTImportant adjustment information
Never try to adjust your seat while
operating the vehicle. The seat could
respond with an unexpected movement,
and the ensuing loss of vehicle control
could lead to an accident.
While driving, do not recline the backrest
too far toward the rear. This especially
applies to the front passenger side. If you
do so, there is a risk that you will slide
under the safety belt in an accident, thus
reducing the protection provided by the
safety belt.<
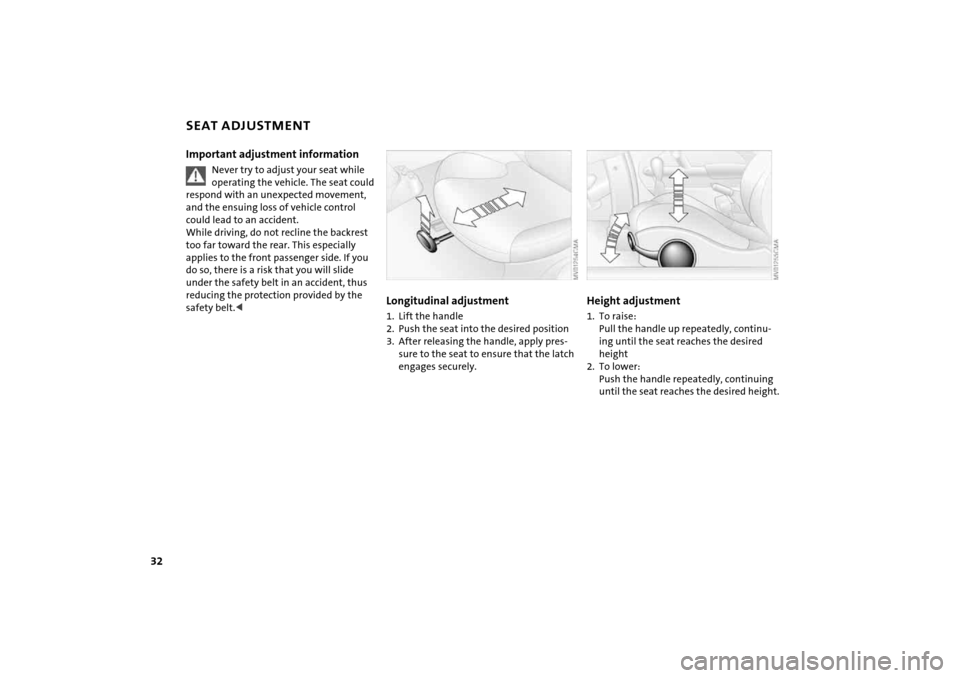
Longitudinal adjustment1. Lift the handle
2. Push the seat into the desired position
3. After releasing the handle, apply pres-
sure to the seat to ensure that the latch
engages securely.
Height adjustment 1. To raise:
Pull the handle up repeatedly, continu-
ing until the seat reaches the desired
height
2. To lower:
Push the handle repeatedly, continuing
until the seat reaches the desired height.
Page 40 of 152
38
TRANSPORTING CHILDREN SAFELY The proper place for childrenChildren should always sit in the rear:
Accident research shows that the safest
place for children in a vehicle is in the rear
seat.
Older children should be tightly secured
with a safety belt, after they have out-
grown a booster seat that is appropriate for
their age, height and weight.
A child sitting in the rear seat and not
properly restrained may place his or
her head on or near the airbag, if so
equipped. For example, a child – even
though belted – may fall asleep with his or
her head against the side airbag. It may be
difficult for a driver to ensure that children
in the rear seat will remain properly posi-
tioned at all times and do not place their
heads on or near the side airbag. Therefore,
we recommend that the rear side airbags, if
provided, be deactivated if you plan to
transport children in the rear seat.<
Child-restraint system in the rear
Children under 13 years of age and
children less than 5 ft / 150 cm tall
should always ride in the rear and the
restraint systems should be secured with
the vehicle's safety belts.<
Younger children should be secured in an
appropriate forward-facing child-restraint
system that has first been properly
restrained. We strongly urge you to care-
fully read and comply with the instructions
for installation and use provided by the
child-restraint's manufacturer whenever
you use such a device.
All rear seating positions in your vehicle
meet the recommendations of SAE J1819,
an industry-recommended practice for
securing child-restraint systems in motor
vehicles.
Exception for the front passenger seat
Never install a rearward-facing child-
restraint system in the front passen-
ger seat of this vehicle if the passenger's
airbag is not deactivated. If you do so, the
child could be severely injured or killed
when the airbag is triggered. Your vehicle is
equipped with an airbag supplemental
restraint system for the front passenger.
Because the backrest on any rearward-fac-
ing child-restraint system – of the kind
designed for infants under 1 year and
20 Ibs / 9 kg – would be within the airbag's
deployment range, you should never
mount such a system in the front passen-
ger seat, since the impact of the airbag
against the child restraint's backrest could
lead to serious or fatal injuries.<
Page 41 of 152
39
OVERVIEW REPAIRS OPERATIONCONTROLS DATA INDEX
TRANSPORTING CHILDREN SAFELYInstalling child-restraint systemsBefore installing any child-restraint system
or child seat, read the following:
Always follow the manufacturer's
instructions concerning installation
and use; otherwise the system's protective
function could be impaired.
After an accident, have all parts of the
affected safety belt system inspected and/
or replaced by your MINI Dealer.<
Commercially available child-restraint sys-
tems are designed to be secured with a lap
belt or with the lap belt portion of a combi-
nation lap/shoulder belt. Improperly or
inadequately installed restraint systems
can increase the risk of injury to children.
Always read and follow the instructions
that come with the system.
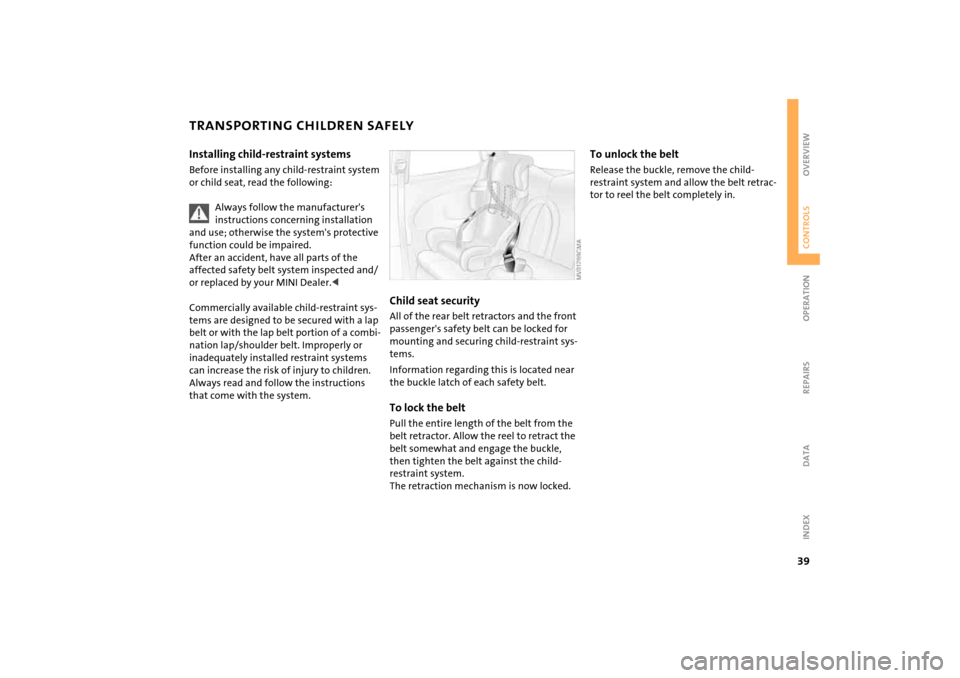
Child seat securityAll of the rear belt retractors and the front
passenger's safety belt can be locked for
mounting and securing child-restraint sys-
tems.
Information regarding this is located near
the buckle latch of each safety belt.To lock the beltPull the entire length of the belt from the
belt retractor. Allow the reel to retract the
belt somewhat and engage the buckle,
then tighten the belt against the child-
restraint system.
The retraction mechanism is now locked.
To unlock the beltRelease the buckle, remove the child-
restraint system and allow the belt retrac-
tor to reel the belt completely in.
Page 42 of 152
40
TRANSPORTING CHILDREN SAFELYChild-restraint system with tether
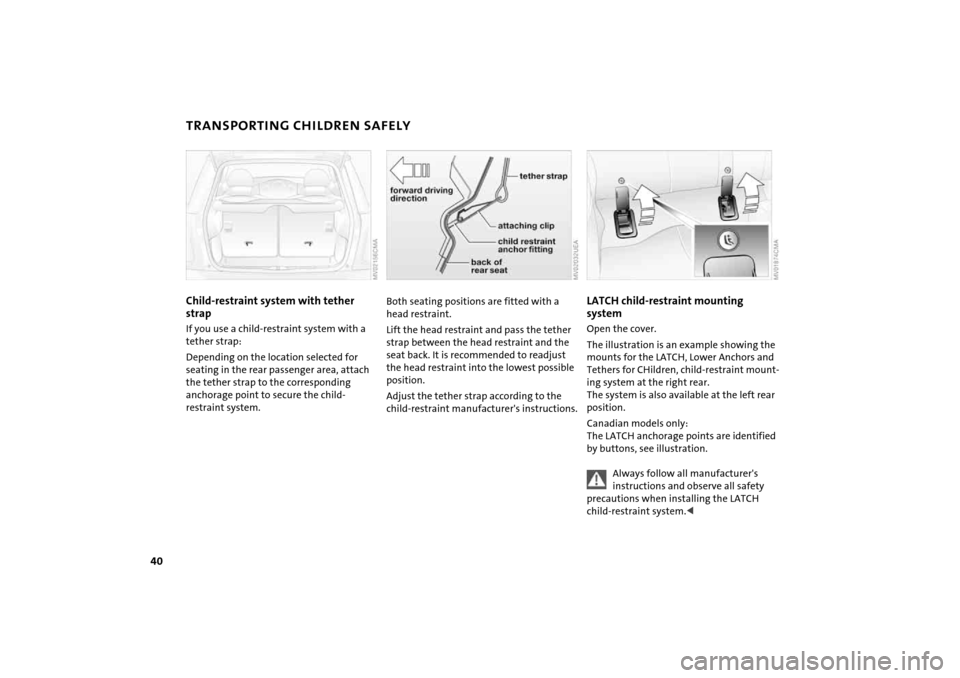
strapIf you use a child-restraint system with a
tether strap:
Depending on the location selected for
seating in the rear passenger area, attach
the tether strap to the corresponding
anchorage point to secure the child-
restraint system.
Both seating positions are fitted with a
head restraint.
Lift the head restraint and pass the tether
strap between the head restraint and the
seat back. It is recommended to readjust
the head restraint into the lowest possible
position.
Adjust the tether strap according to the
child-restraint manufacturer's instructions.
LATCH child-restraint mounting
system Open the cover.
The illustration is an example showing the
mounts for the LATCH, Lower Anchors and
Tethers for CHildren, child-restraint mount-
ing system at the right rear.
The system is also available at the left rear
position.
Canadian models only:
The LATCH anchorage points are identified
by buttons, see illustration.
Always follow all manufacturer's
instructions and observe all safety
precautions when installing the LATCH
child-restraint system.<
Page 48 of 152
46
CONTINUOUSLY VARIABLE AUTOMATIC TRANSMISSION (CVT)
*
PPark
Select P only when the vehicle is completely
stopped. The transmission locks to prevent
the rear wheels from turning.RReverse Select P only when the vehicle is completely
stopped.NNeutral: idleSelect N only if your journey is interrupted
for a long period.DDrive: CVT driving positionThis position is designed for driving under
all normal operating conditions. KickdownIn 'kickdown' mode, you achieve maximum
acceleration and maximum speed in
position D.
Press the accelerator pedal past the
increased resistance point at the full-throt-
tle position.
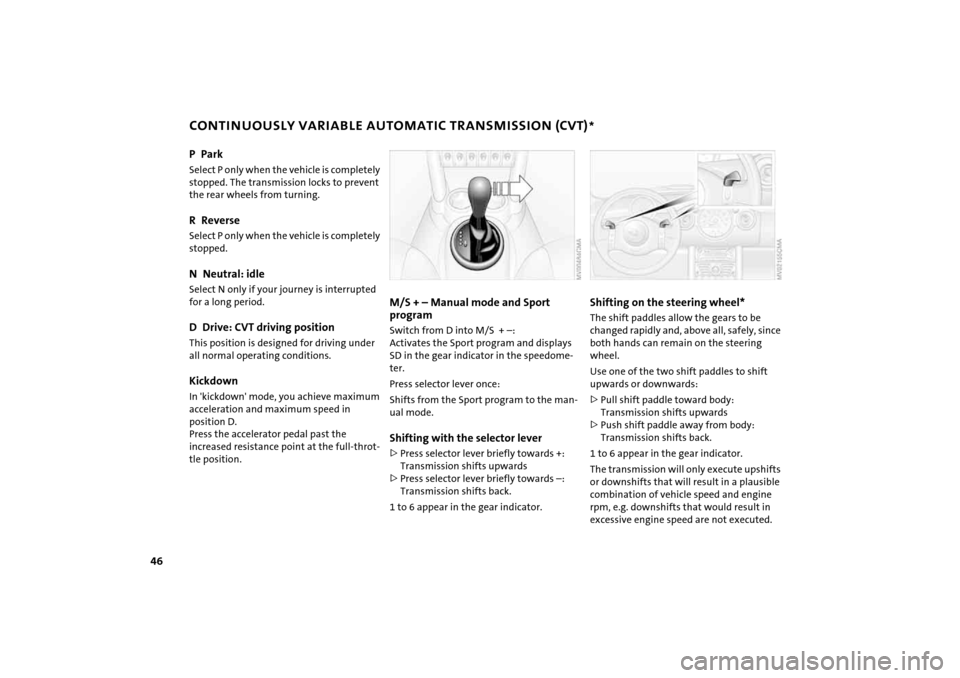
M/S + – Manual mode and Sport
program Switch from D into M/S + –:
Activates the Sport program and displays
SD in the gear indicator in the speedome-
ter.
Press selector lever once:
Shifts from the Sport program to the man-
ual mode.Shifting with the selector lever>Press selector lever briefly towards +:
Transmission shifts upwards
>Press selector lever briefly towards –:
Transmission shifts back.
1 to 6 appear in the gear indicator.
Shifting on the steering wheel*The shift paddles allow the gears to be
changed rapidly and, above all, safely, since
both hands can remain on the steering
wheel.
Use one of the two shift paddles to shift
upwards or downwards:
>Pull shift paddle toward body:
Transmission shifts upwards
>Push shift paddle away from body:
Transmission shifts back.
1 to 6 appear in the gear indicator.
The transmission will only execute upshifts
or downshifts that will result in a plausible
combination of vehicle speed and engine
rpm, e.g. downshifts that would result in
excessive engine speed are not executed.
Page 77 of 152
75
OVERVIEW REPAIRS OPERATIONCONTROLS DATA INDEX
CARGO AREA Cargo area cover When the tailgate is opened, the cargo area
cover is also raised.
Never place any heavy or hard objects
on the cargo area cover; otherwise
occupants could be injured during braking
maneuvers.<
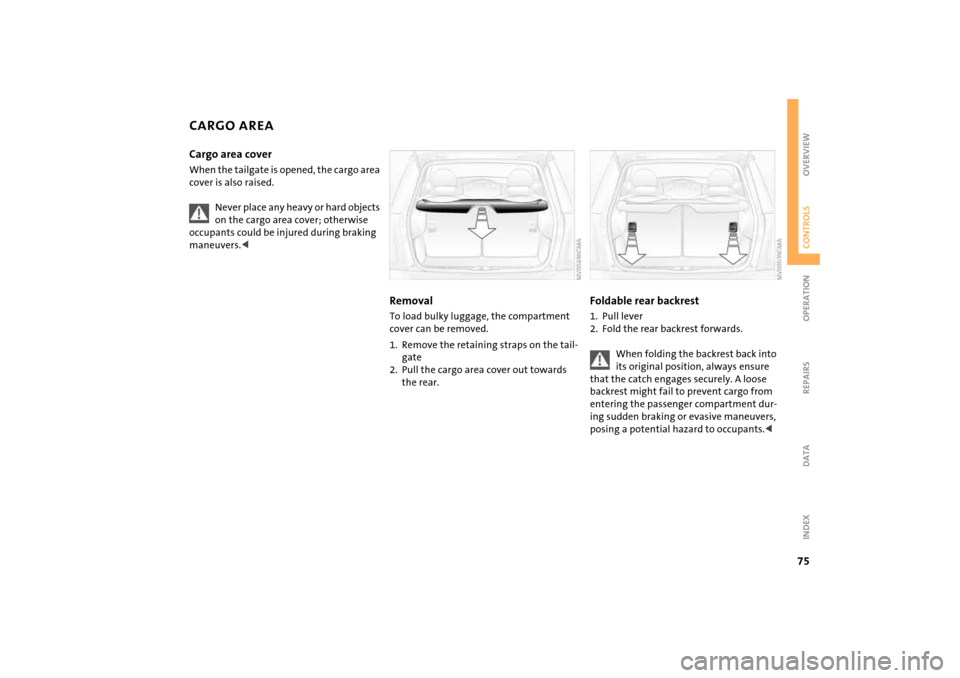
RemovalTo load bulky luggage, the compartment
cover can be removed.
1. Remove the retaining straps on the tail-
gate
2. Pull the cargo area cover out towards
the rear.
Foldable rear backrest 1. Pull lever
2. Fold the rear backrest forwards.
When folding the backrest back into
its original position, always ensure
that the catch engages securely. A loose
backrest might fail to prevent cargo from
entering the passenger compartment dur-
ing sudden braking or evasive maneuvers,
posing a potential hazard to occupants.<
Page 79 of 152

77
OVERVIEW REPAIRS OPERATIONCONTROLS DATA INDEX
LOADING CARGOStowing cargo >Place heavy cargo as far forward as possi-
ble, directly behind the backrests, and as
low as possible
>Cover sharp edges and corners
>Do not pile objects higher than the top
edge of the backrest
>For very heavy cargo when the rear seat
is unoccupied, fasten each safety belt in
the opposite buckle. This provides addi-
tional stabilization for the rear backrests.
Securing the load >Secure smaller and lighter items using
the cargo area net
* or elastic straps
>For large, heavy items, see your MINI
Dealer for load-securing devices
*. Lash-
ing eyes are provided at the inner corners
of the cargo area for attaching these
load-securing devices.
Comply with the information enclosed
with the load-securing devices.
Page 80 of 152
78
ROOF-MOUNTED LUGGAGE RACK
*
Always position and secure the load
carefully. If you do not, it can endan-
ger the passengers during braking or eva-
sive maneuvers.
Do not exceed the permissible gross weight
and axle load, refer to page 134; otherwise
the vehicle's operating safety is no longer
assured and it will not be in compliance
with the certification regulations.
Do not stow heavy or hard objects in the
passenger compartment without first
securing them. Otherwise they would be
thrown around during braking and evasive
maneuvers and endanger the occupants.<
When loading a roof-mounted lug-
gage rack, ensure that there is suffi-
cient space for the movement of the glass
sunroof and that no objects protrude into
the swiveling area of the tailgate, as other-
wise damage can occur.<
Do not secure the roof-mounted lug-
gage rack to the trim panels/strips:
the lack of a secure hold could lead to dam-
age or accidents.<
Special roof-mounted luggage racks
for your MINI are available as acces-
sories from your MINI Dealer.<