language MINI Hardtop 2 Door 2010 Owner's Manual (Mini Connected)
[x] Cancel search | Manufacturer: MINI, Model Year: 2010, Model line: Hardtop 2 Door, Model: MINI Hardtop 2 Door 2010Pages: 230, PDF Size: 4.02 MB
Page 23 of 230
MOBILITYAT A GLANCE CONTROLS DRIVING TIPS ENTERTAINMENT
21
NAVIGATION REFERENCE
Voice activation system
The concept
The voice activation system allows you to con-
trol operation of various vehicle systems without
removing your hands from the steering wheel.
Individual menu items on the Control Display
can be spoken as commands. It is not necessary
to use the MINI joystick.
The voice activation system transforms oral
commands into control signals for the selected
systems and provides support in the form of
instructions or questions.
Precondition
Via the onboard monitor, select the language in
which the voice activation system is operating,
so that the spoken commands can be identified.
Setting the onboard monitor language, page73.
Symbols in the Owner's Manual
Saying commands
Activating voice activation system
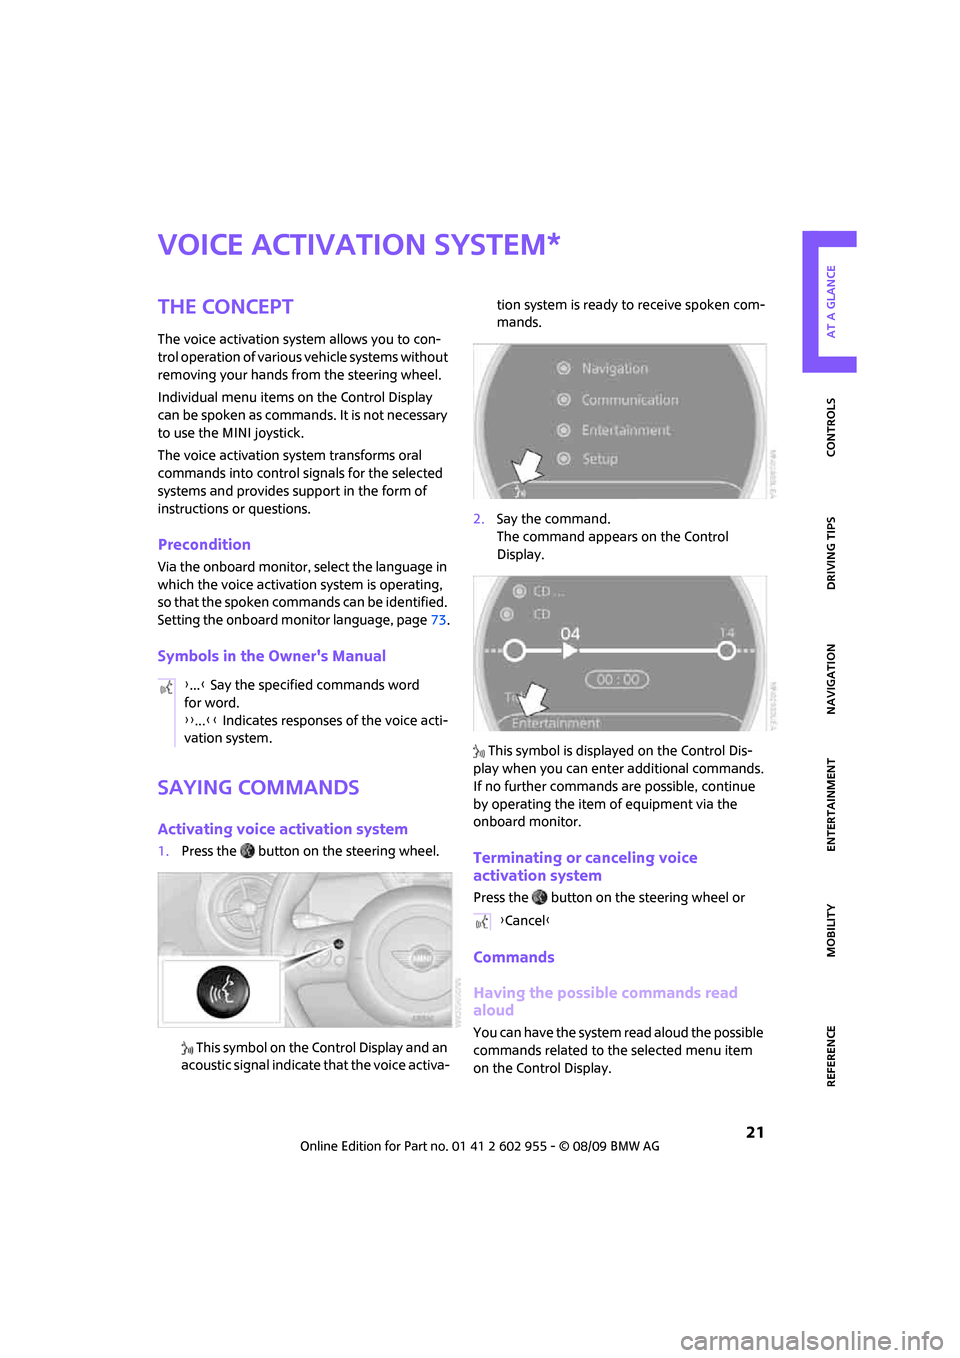
1.Press the button on the steering wheel.
This symbol on the Control Display and an
acoustic signal indicate that the voice activa-tion system is ready to receive spoken com-
mands.
2.Say the command.
The command appears on the Control
Display.
This symbol is displayed on the Control Dis-
play when you can enter additional commands.
If no further commands are possible, continue
by operating the item of equipment via the
onboard monitor.Terminating or canceling voice
activation system
Press the button on the steering wheel or
Commands
Having the possible commands read
aloud
You can have the system read aloud the possible
commands related to the selected menu item
on the Control Display.
*
{...} Say the specified commands word
for word.
{{...}} Indicates responses of the voice acti-
vation system.
{Cancel}
Page 29 of 230
MOBILITYAT A GLANCE CONTROLS DRIVING TIPS ENTERTAINMENT
27
NAVIGATION REFERENCE
>Response of the central locking system
when the car is being unlocked27
>Automatic locking of the vehicle30
>Triple turn signal activation55
>Settings for the displays on the onboard
monitor, in the speedometer and in the
tachometer:
>12h/24h mode of the clock69
>Date format70
>Brightness of the Control Display74
>Language on the Control Display73
>Units of measure for fuel consumption,
distance covered/remaining distances
and temperature65
>Show visual warning for Park Distance Con-
trol PDC
*75
>Light settings:
>Pathway lighting87
>Daytime running lights88
>Automatic climate control: activating/deac-
tivating the AUTO program, setting the tem-
perature, air volume and air distribution92
>Entertainment:
>Audio volume139
>Tone control139
>Speed-dependent volume control139
Central locking system
The concept
The central locking system is ready for operation
whenever the driver's door is closed.
The system simultaneously engages and
releases the locks on the following:
>Doors
>Tailgate
>Fuel filler flap
Operating from outside
>Via the remote control
>Via the door lock
*
>In cars with Comfort Access*, via the door
handles on the driver's and passenger's
sides.
The anti-theft system is also operated at the
same time. It prevents the doors from being
unlocked using the lock buttons or door han-
dles. The remote control can also be used to
switch on/off the welcome lamps and interior
lamps. The alarm system
* is also activated or
deactivated, page32.
Operating from inside
Button for central locking system, page30.
In the event of a sufficiently severe accident, the
central locking system unlocks automatically. In
addition, the hazard warning flashers and inte-
rior lamps come on.
Opening and closing:
from outside
Persons or animals in a parked vehicle
could lock the doors from the inside. Take
the key with you when you leave the vehicle
so that the vehicle can be opened from the
outside.<
Using the remote control
Unlocking
Press the button.
The welcome lamps and interior lamps come on.
Unlocking mode
You can also set which parts of the car are
unlocked. The setting is stored for the remote
control in use.
Onboard monitor, for operating principle refer
to page16.
1.Press the button.
This opens the start menu.
2.Move the MINI joystick to highlight "Setup"
and press the MINI joystick.
Page 67 of 230
MOBILITYAT A GLANCE CONTROLS DRIVING TIPS ENTERTAINMENT
65
NAVIGATION REFERENCE
Exiting displays
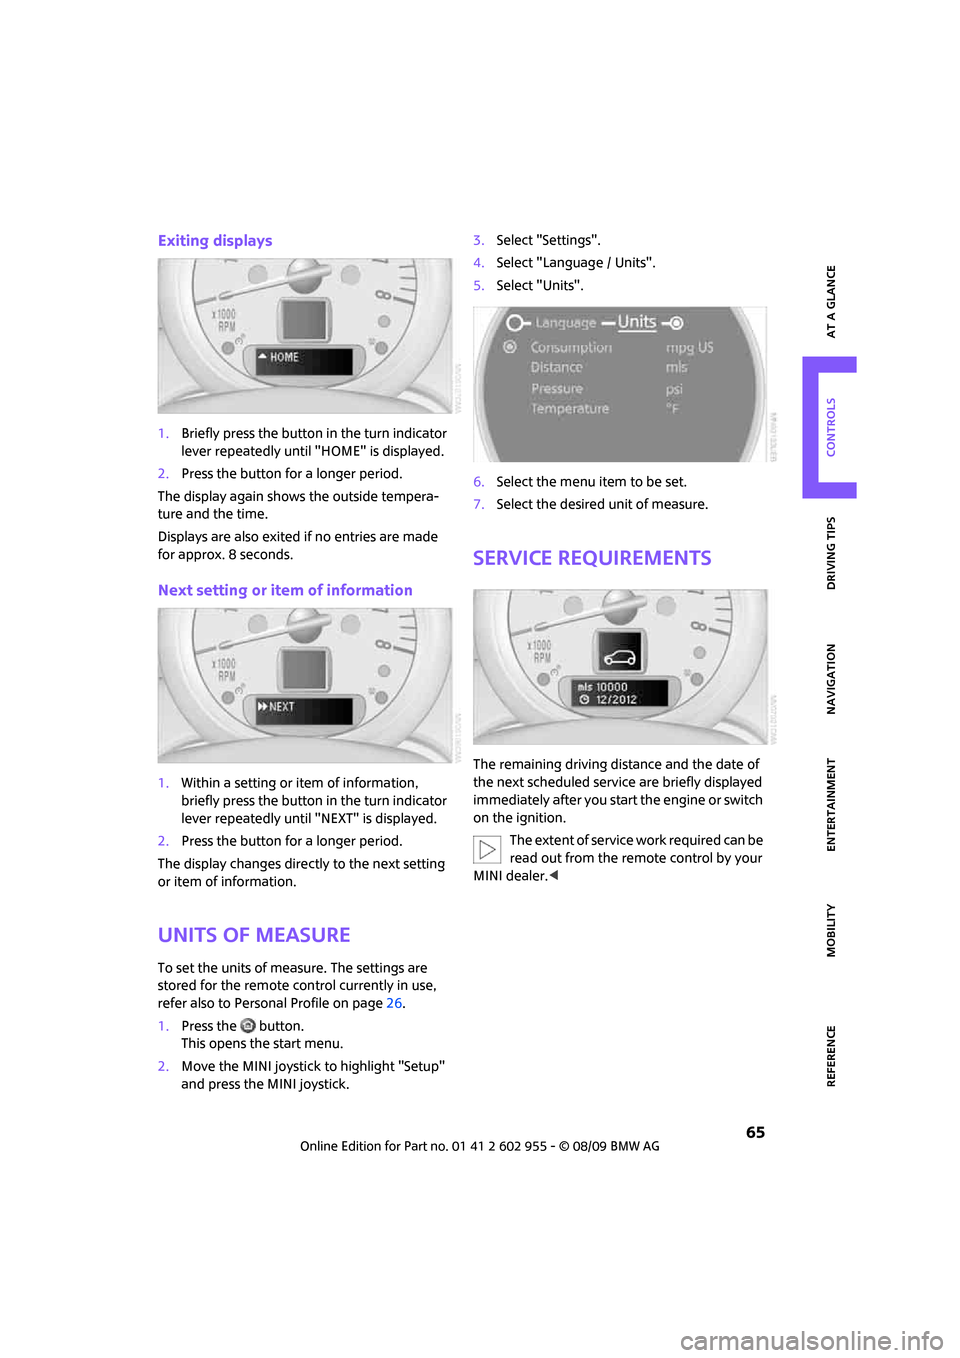
1.Briefly press the button in the turn indicator
lever repeatedly until "HOME" is displayed.
2.Press the button for a longer period.
The display again shows the outside tempera-
ture and the time.
Displays are also exited if no entries are made
for approx. 8 seconds.
Next setting or item of information
1.Within a setting or item of information,
briefly press the button in the turn indicator
lever repeatedly until "NEXT" is displayed.
2.Press the button for a longer period.
The display changes directly to the next setting
or item of information.
Units of measure
To set the units of measure. The settings are
stored for the remote control currently in use,
refer also to Personal Profile on page26.
1.Press the button.
This opens the start menu.
2.Move the MINI joystick to highlight "Setup"
and press the MINI joystick.3.Select "Settings".
4.Select "Language / Units".
5.Select "Units".
6.Select the menu item to be set.
7.Select the desired unit of measure.
Service requirements
The remaining driving distance and the date of
the next scheduled service are briefly displayed
immediately after you start the engine or switch
on the ignition.
The extent of service work required can be
read out from the remote control by your
MINI dealer.<
Page 75 of 230
MOBILITYAT A GLANCE CONTROLS DRIVING TIPS ENTERTAINMENT
73
NAVIGATION REFERENCE
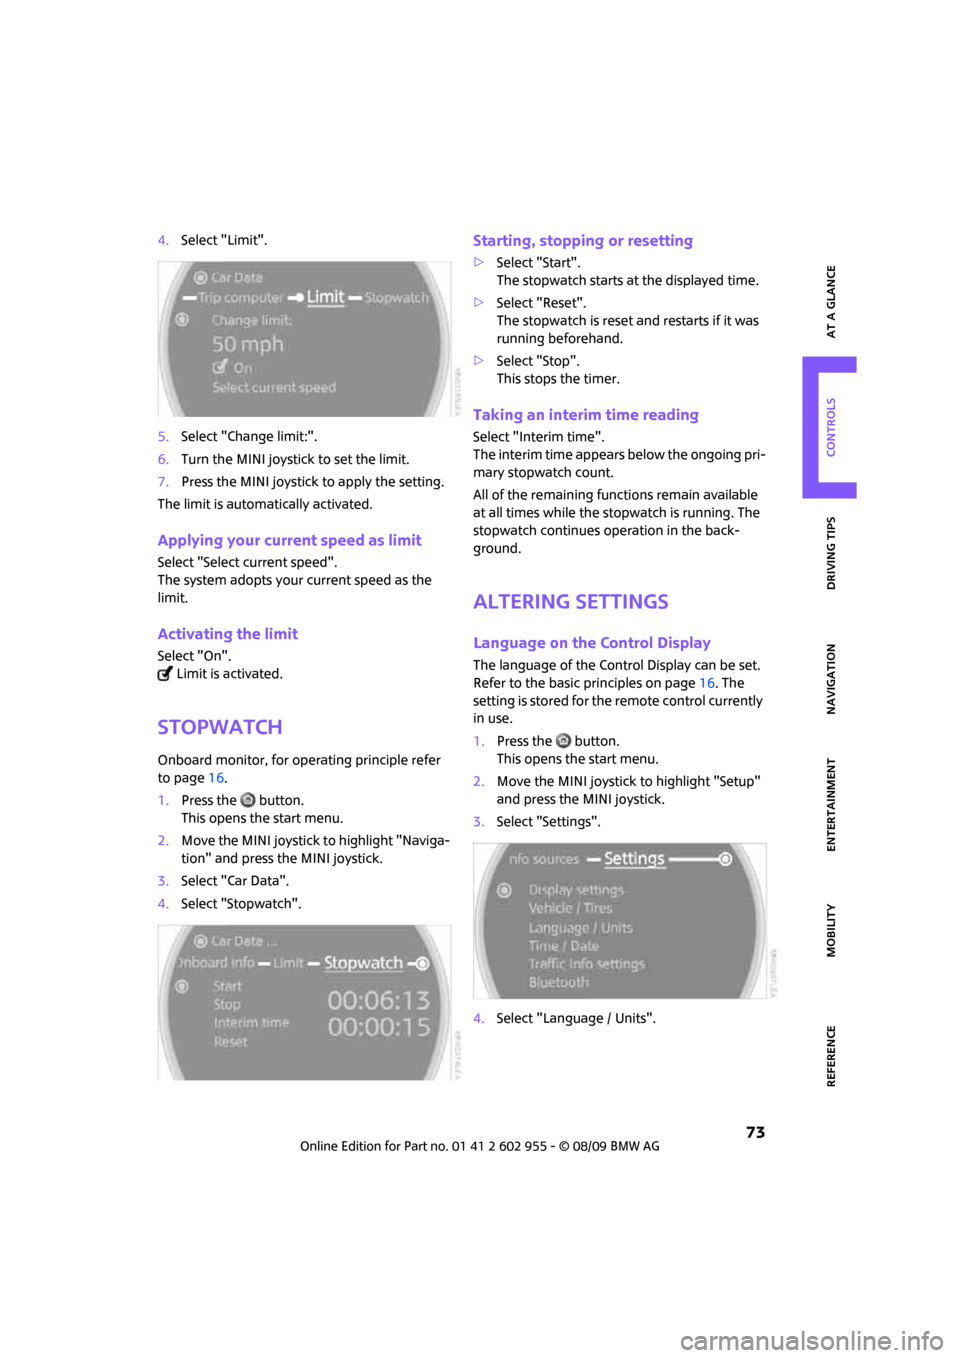
4.Select "Limit".
5.Select "Change limit:".
6.Turn the MINI joystick to set the limit.
7.Press the MINI joystick to apply the setting.
The limit is automatically activated.
Applying your current speed as limit
Select "Select current speed".
The system adopts your current speed as the
limit.
Activating the limit
Select "On".
Limit is activated.
Stopwatch
Onboard monitor, for operating principle refer
to page16.
1.Press the button.
This opens the start menu.
2.Move the MINI joystick to highlight "Naviga-
tion" and press the MINI joystick.
3.Select "Car Data".
4.Select "Stopwatch".
Starting, stopping or resetting
>Select "Start".
The stopwatch starts at the displayed time.
>Select "Reset".
The stopwatch is reset and restarts if it was
running beforehand.
>Select "Stop".
This stops the timer.
Taking an interim time reading
Select "Interim time".
The interim time appears below the ongoing pri-
mary stopwatch count.
All of the remaining functions remain available
at all times while the stopwatch is running. The
stopwatch continues operation in the back-
ground.
Altering settings
Language on the Control Display
The language of the Control Display can be set.
Refer to the basic principles on page16. The
setting is stored for the remote control currently
in use.
1.Press the button.
This opens the start menu.
2.Move the MINI joystick to highlight "Setup"
and press the MINI joystick.
3.Select "Settings".
4.Select "Language / Units".
Page 76 of 230
Controls overview
74
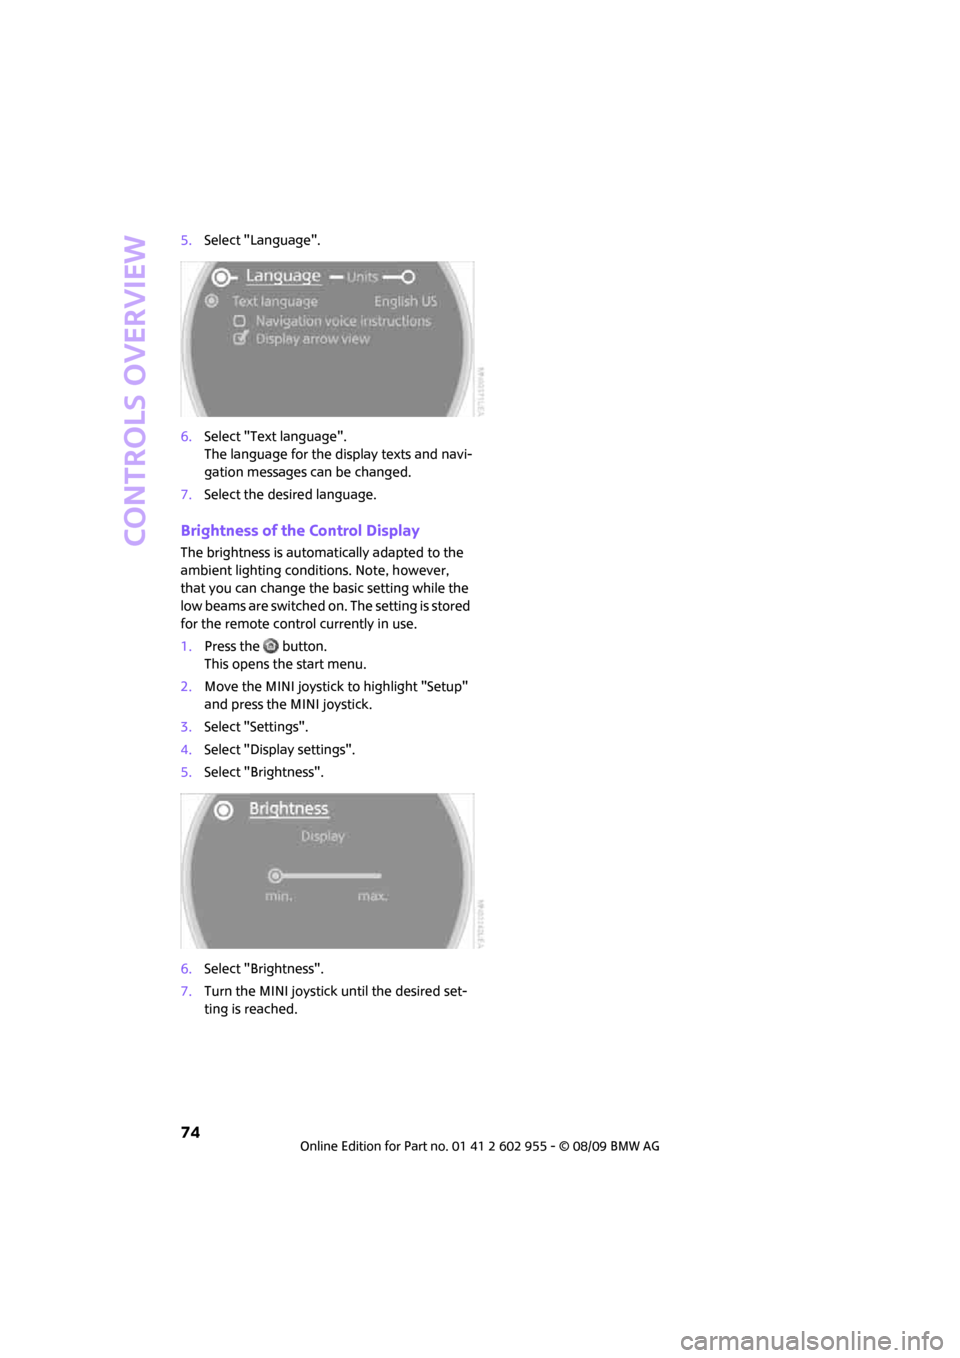
5.Select "Language".
6.Select "Text language".
The language for the display texts and navi-
gation messages can be changed.
7.Select the desired language.
Brightness of the Control Display
The brightness is automatically adapted to the
ambient lighting conditions. Note, however,
that you can change the basic setting while the
low beams are switched on. The setting is stored
for the remote control currently in use.
1.Press the button.
This opens the start menu.
2.Move the MINI joystick to highlight "Setup"
and press the MINI joystick.
3.Select "Settings".
4.Select "Display settings".
5.Select "Brightness".
6.Select "Brightness".
7.Turn the MINI joystick until the desired set-
ting is reached.
Page 114 of 230
Starting the navigation system
112
Starting the navigation system
Your navigation system can use satellites to
ascertain the precise position of your vehicle
and guide you reliably to any destination you
enter.
Navigation DVD
The navigation system requires a special naviga-
tion DVD. You can obtain the latest version from
your MINI dealer.
Inserting navigation DVD
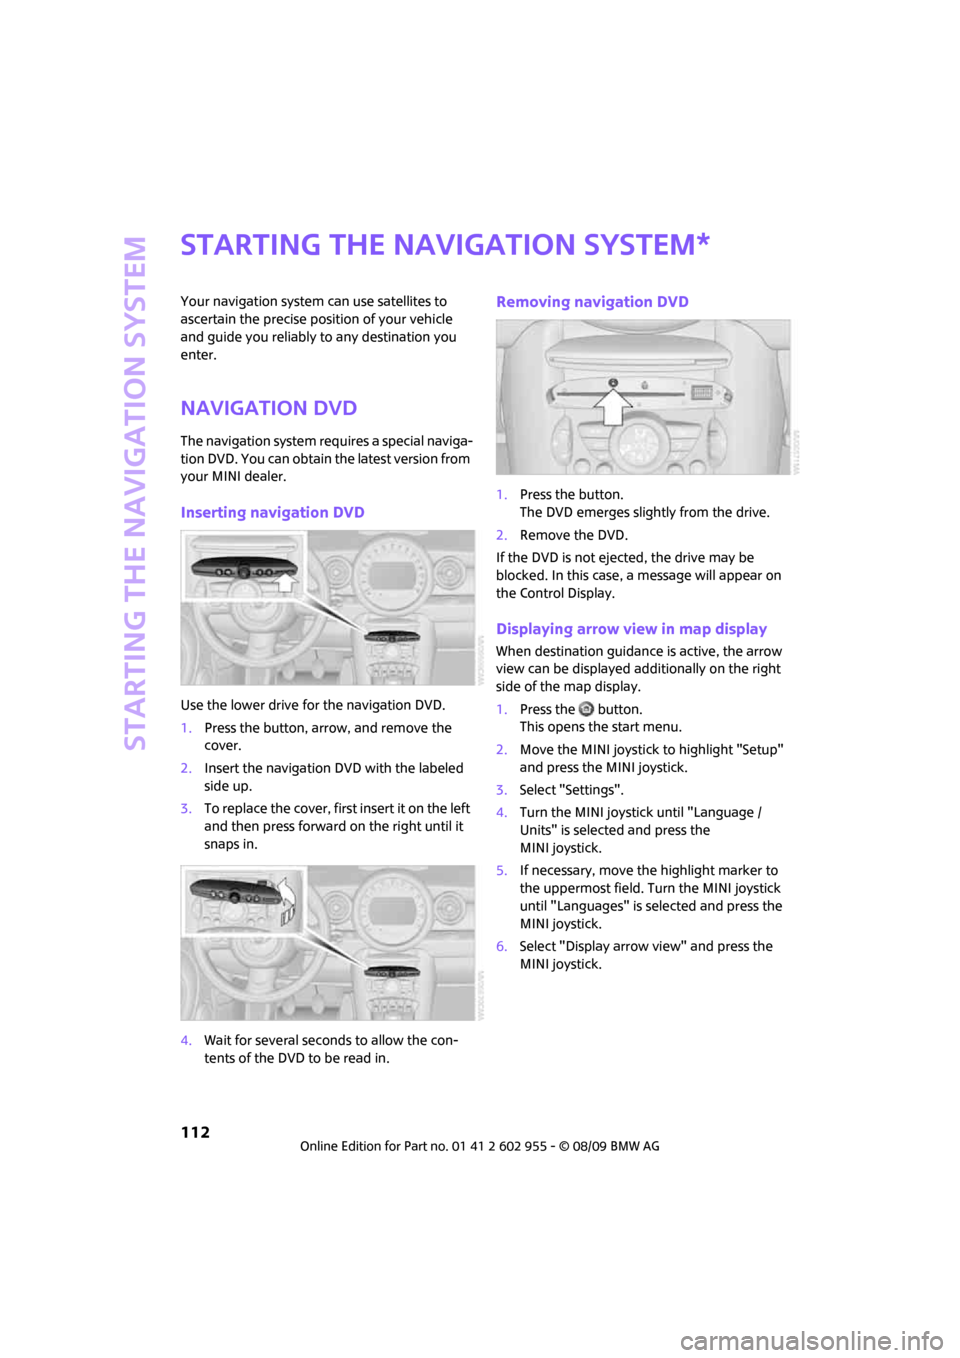
Use the lower drive for the navigation DVD.
1.Press the button, arrow, and remove the
cover.
2.Insert the navigation DVD with the labeled
side up.
3.To replace the cover, first insert it on the left
and then press forward on the right until it
snaps in.
4.Wait for several seconds to allow the con-
tents of the DVD to be read in.
Removing navigation DVD
1.Press the button.
The DVD emerges slightly from the drive.
2.Remove the DVD.
If the DVD is not ejected, the drive may be
blocked. In this case, a message will appear on
the Control Display.
Displaying arrow view in map display
When destination guidance is active, the arrow
view can be displayed additionally on the right
side of the map display.
1.Press the button.
This opens the start menu.
2.Move the MINI joystick to highlight "Setup"
and press the MINI joystick.
3.Select "Settings".
4.Turn the MINI joystick until "Language /
Units" is selected and press the
MINI joystick.
5.If necessary, move the highlight marker to
the uppermost field. Turn the MINI joystick
until "Languages" is selected and press the
MINI joystick.
6.Select "Display arrow view" and press the
MINI joystick.
*
Page 119 of 230
MOBILITYAT A GLANCE CONTROLS DRIVING TIPS ENTERTAINMENT
117
NAVIGATION REFERENCE
5.If necessary, enter more letters.
The list gradually grows smaller each time
you enter a new letter.
6.Change to the list of street names and
select the street name in the corresponding
town/city.
Entering a house number
You can enter all house numbers that are stored
for the street on the navigation DVD.
1.Select "House number".
2.To enter the house number:
Select the digits individually.
3.Move the highlight marker to the third field
from the top. Select the house number.
You can only enter house numbers that are
stored for the street on the navigation DVD.
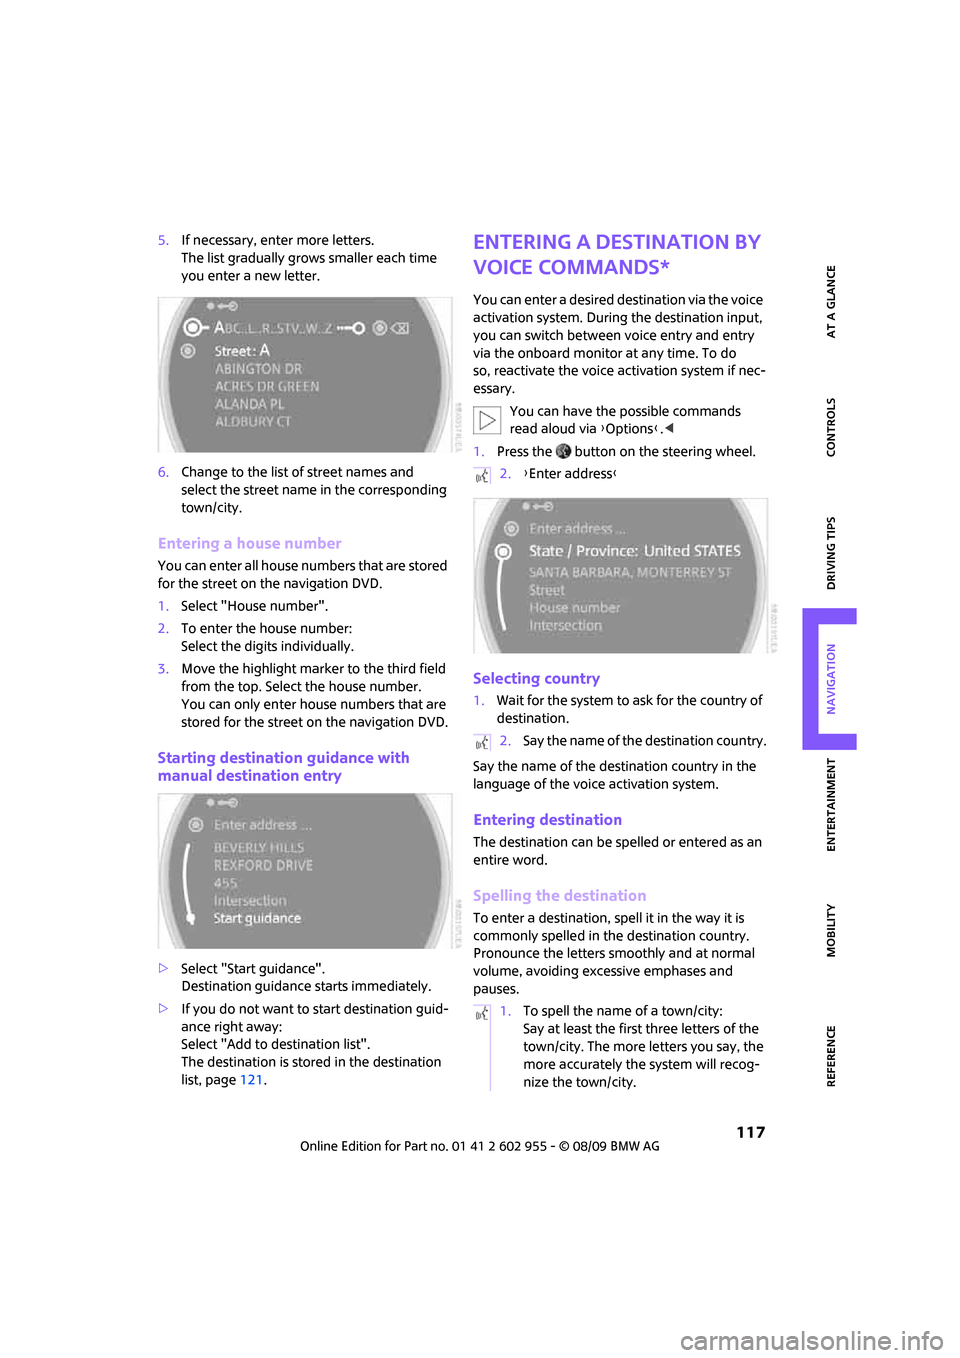
Starting destination guidance with
manual destination entry
>Select "Start guidance".
Destination guidance starts immediately.
>If you do not want to start destination guid-
ance right away:
Select "Add to destination list".
The destination is stored in the destination
list, page121.
Entering a destination by
voice commands*
You can enter a desired destination via the voice
activation system. During the destination input,
you can switch between voice entry and entry
via the onboard monitor at any time. To do
so, reactivate the voice activation system if nec-
essary.
You can have the possible commands
read aloud via {Options}.<
1.Press the button on the steering wheel.
Selecting country
1.Wait for the system to ask for the country of
destination.
Say the name of the destination country in the
language of the voice activation system.
Entering destination
The destination can be spelled or entered as an
entire word.
Spelling the destination
To enter a destination, spell it in the way it is
commonly spelled in the destination country.
Pronounce the letters smoothly and at normal
volume, avoiding excessive emphases and
pauses.
2.{Enter address}
2.Say the name of the destination country.
1.To spell the name of a town/city:
Say at least the first three letters of the
town/city. The more letters you say, the
more accurately the system will recog-
nize the town/city.
Page 120 of 230
Destination entry
118
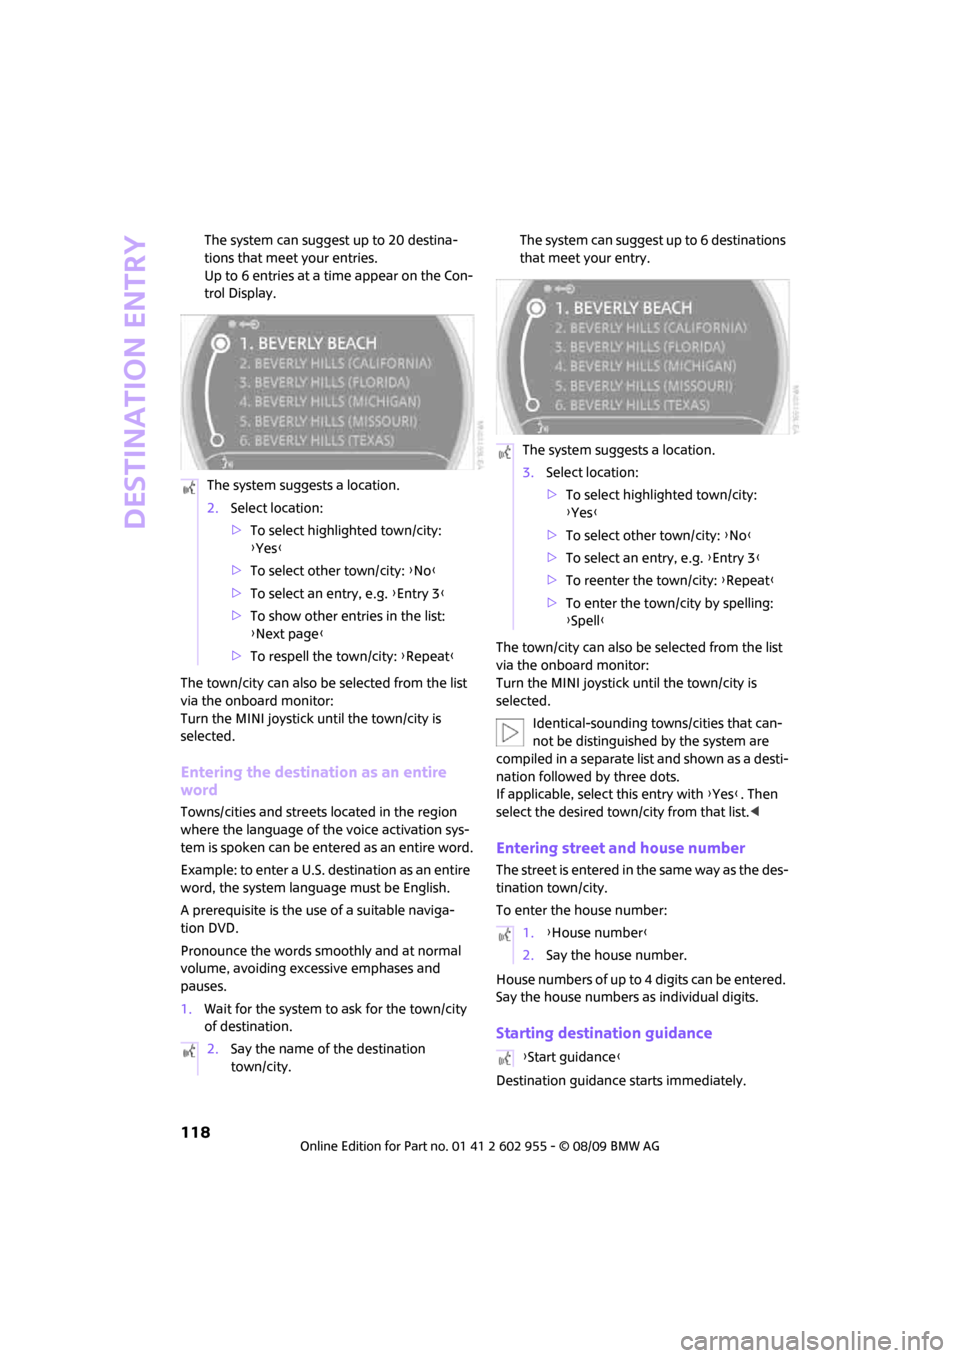
The system can suggest up to 20 destina-
tions that meet your entries.
Up to 6 entries at a time appear on the Con-
trol Display.
The town/city can also be selected from the list
via the onboard monitor:
Turn the MINI joystick until the town/city is
selected.
Entering the destination as an entire
word
Towns/cities and streets located in the region
where the language of the voice activation sys-
tem is spoken can be entered as an entire word.
Example: to enter a U.S. destination as an entire
word, the system language must be English.
A prerequisite is the use of a suitable naviga-
tion DVD.
Pronounce the words smoothly and at normal
volume, avoiding excessive emphases and
pauses.
1.Wait for the system to ask for the town/city
of destination.The system can suggest up to 6 destinations
that meet your entry.
The town/city can also be selected from the list
via the onboard monitor:
Turn the MINI joystick until the town/city is
selected.
Identical-sounding towns/cities that can-
not be distinguished by the system are
compiled in a separate list and shown as a desti-
nation followed by three dots.
If applicable, select this entry with {Yes}. Then
select the desired town/city from that list.<
Entering street and house number
The street is entered in the same way as the des-
tination town/city.
To enter the house number:
House numbers of up to 4 digits can be entered.
Say the house numbers as individual digits.
Starting destination guidance
Destination guidance starts immediately. The system suggests a location.
2.Select location:
>To select highlighted town/city:
{Yes}
>To select other town/city: {No}
>To select an entry, e.g. {Entry 3}
>To show other entries in the list:
{Next page}
>To respell the town/city: {Repeat}
2.Say the name of the destination
town/city.
The system suggests a location.
3.Select location:
>To select highlighted town/city:
{Yes}
>To select other town/city: {No}
>To select an entry, e.g. {Entry 3}
>To reenter the town/city: {Repeat}
>To enter the town/city by spelling:
{Spell}
1.{House number}
2.Say the house number.
{Start guidance}
Page 131 of 230
MOBILITYAT A GLANCE CONTROLS DRIVING TIPS ENTERTAINMENT
129
NAVIGATION REFERENCE
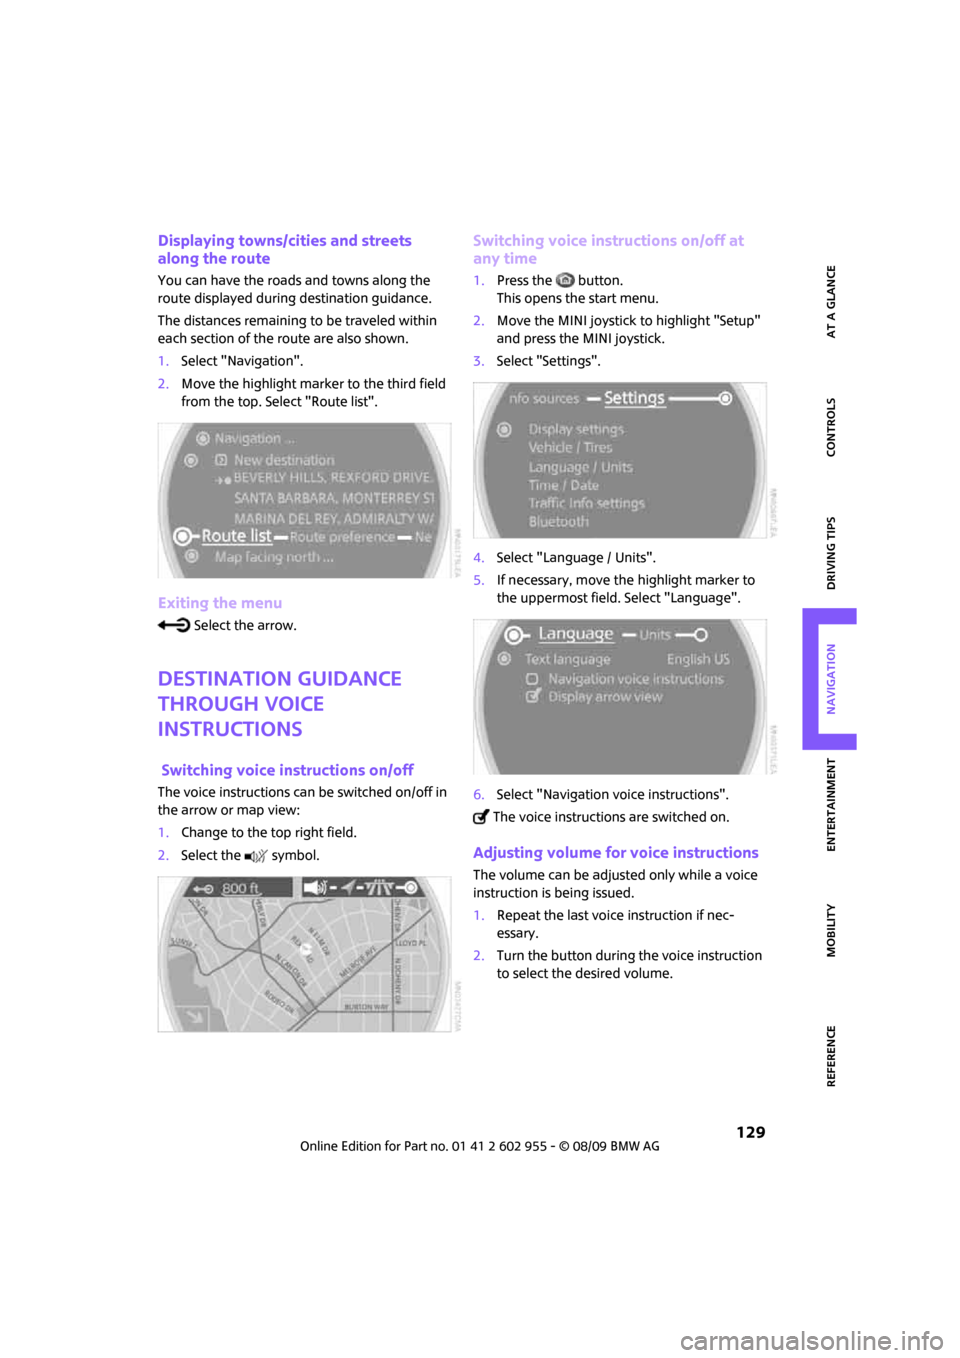
Displaying towns/cities and streets
along the route
You can have the roads and towns along the
route displayed during destination guidance.
The distances remaining to be traveled within
each section of the route are also shown.
1.Select "Navigation".
2.Move the highlight marker to the third field
from the top. Select "Route list".
Exiting the menu
Select the arrow.
Destination guidance
through voice
instructions
Switching voice instructions on/off
The voice instructions can be switched on/off in
the arrow or map view:
1.Change to the top right field.
2.Select the symbol.
Switching voice instructions on/off at
any time
1.Press the button.
This opens the start menu.
2.Move the MINI joystick to highlight "Setup"
and press the MINI joystick.
3.Select "Settings".
4.Select "Language / Units".
5.If necessary, move the highlight marker to
the uppermost field. Select "Language".
6.Select "Navigation voice instructions".
The voice instructions are switched on.
Adjusting volume for voice instructions
The volume can be adjusted only while a voice
instruction is being issued.
1.Repeat the last voice instruction if nec-
essary.
2.Turn the button during the voice instruction
to select the desired volume.
Page 212 of 230
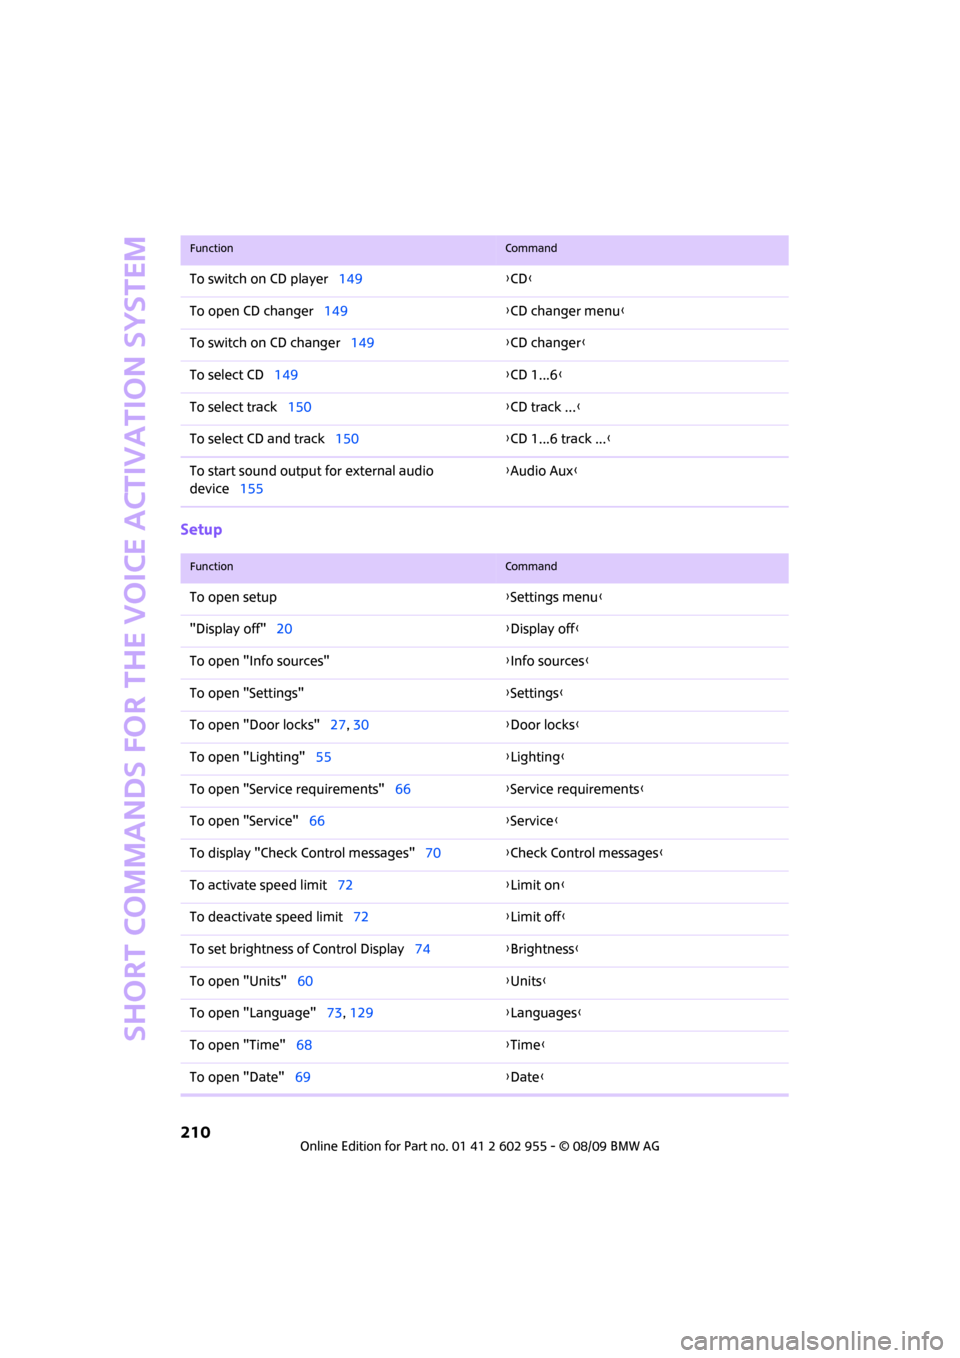
Short commands for the voice activation system
210
Setup
To switch on CD player149{CD}
To open CD changer149{CD changer menu}
To switch on CD changer149{CD changer}
To select CD149{CD 1...6}
To select track150{CD track ...}
To select CD and track150{CD 1...6 track ...}
To start sound output for external audio
device155{Audio Aux}
FunctionCommand
FunctionCommand
To open setup{Settings menu}
"Display off"20{Display off}
To open "Info sources"{Info sources}
To open "Settings"{Settings}
To open "Door locks"27, 30{Door locks}
To open "Lighting"55{Lighting}
To open "Service requirements"66{Service requirements}
To open "Service"66{Service}
To display "Check Control messages"70{Check Control messages}
To activate speed limit72{Limit on}
To deactivate speed limit72{Limit off}
To set brightness of Control Display74{Brightness}
To open "Units"60{Units}
To open "Language"73, 129{Languages}
To open "Time"68{Time}
To open "Date"69{Date}