light MINI Hardtop 4 Door 2016 Owner's Manual (Mini Connected)
[x] Cancel search | Manufacturer: MINI, Model Year: 2016, Model line: Hardtop 4 Door, Model: MINI Hardtop 4 Door 2016Pages: 246, PDF Size: 6.36 MB
Page 5 of 246
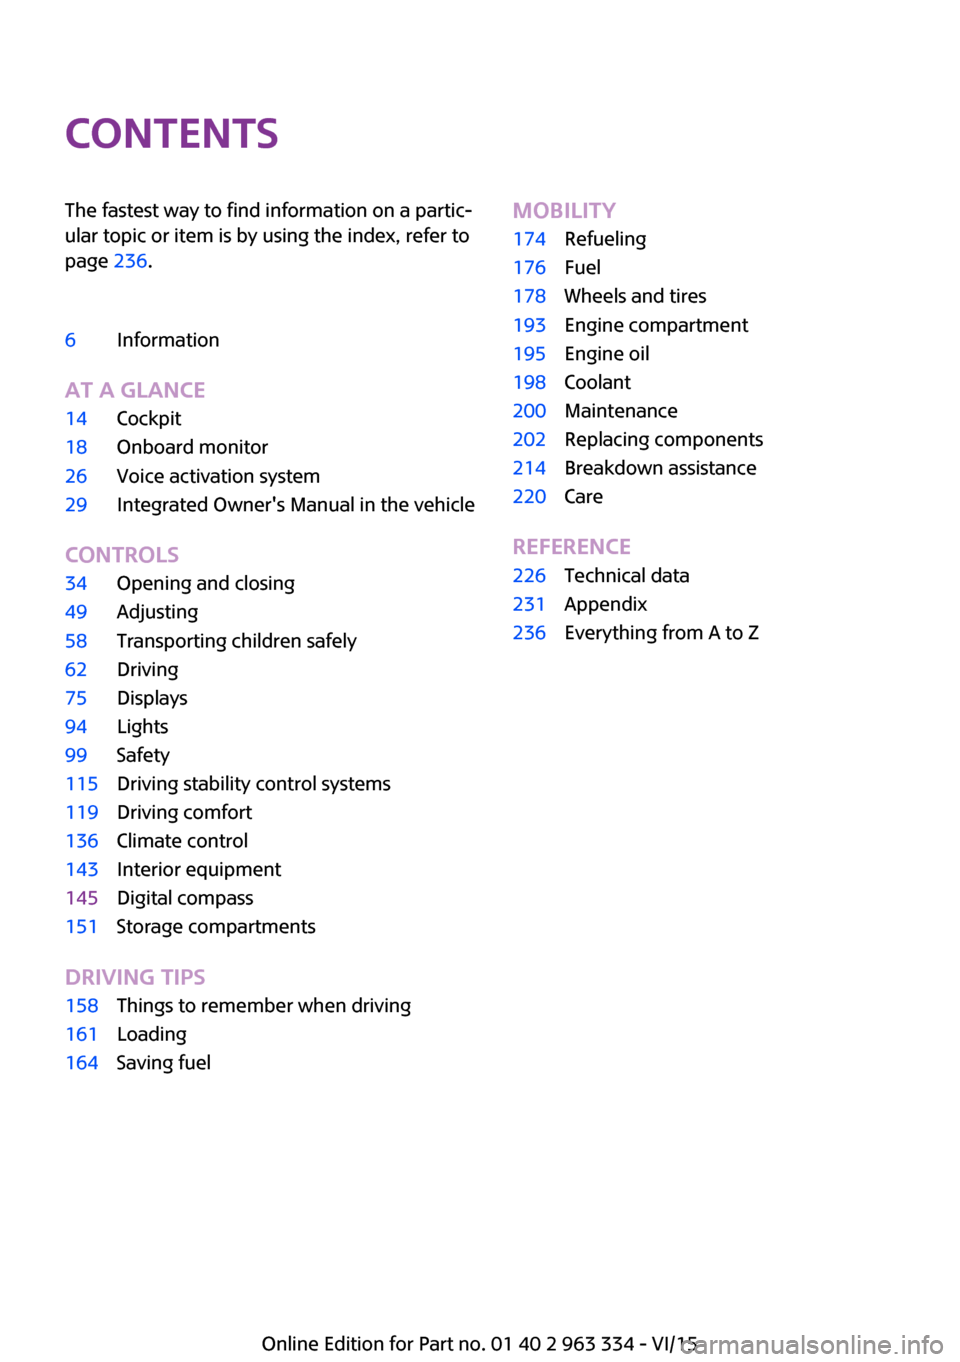
ContentsThe fastest way to find information on a partic‐
ular topic or item is by using the index, refer to
page 236.6Information
AT A GLANCE
14Cockpit18Onboard monitor26Voice activation system29Integrated Owner's Manual in the vehicle
CONTROLS
34Opening and closing49Adjusting58Transporting children safely62Driving75Displays94Lights99Safety115Driving stability control systems119Driving comfort136Climate control143Interior equipment145Digital compass151Storage compartments
DRIVING TIPS
158Things to remember when driving161Loading164Saving fuelMOBILITY174Refueling176Fuel178Wheels and tires193Engine compartment195Engine oil198Coolant200Maintenance202Replacing components214Breakdown assistance220Care
REFERENCE
226Technical data231Appendix236Everything from A to Z
Online Edition for Part no. 01 40 2 963 334 - VI/15
Page 9 of 246
▷Status messages for the vehicle and from its
individual components, e.g., wheel rotation
speed/vehicle speed, deceleration, trans‐
verse acceleration.▷Malfunctions and faults in important system
components, e.g., lights and brakes.▷Responses by the vehicle to special situa‐
tions such as airbag deployment or engag‐
ing the stability control system.▷Ambient conditions, such as temperature.
This data is purely technical in nature and is
used to detect and correct faults and to opti‐
mize vehicle functions. Motion profiles over
routes traveled cannot be created from this
data. When service offerings are used, e.g., re‐
pair services, service processes, warranty
claims, quality assurance, this technical infor‐
mation can be read out from the event and
fault memories by employees of the dealer’s
service center or another qualified service cen‐
ter or repair shop, including the manufacturer,
using special diagnostic tools. You can obtain
further information there if you need it. After
an error is corrected, the information in the
fault memory is deleted or overwritten on a
continuous basis.
With the vehicle in use there are situations
where you can associate these technical data
with individuals if combined with other infor‐
mation, e.g., an accident report, damage to the
vehicle, eye witness accounts — possibly with
the assistance of an expert.
Additional functions that are contractually
agreed with the customer - such as vehicle
emergency locating - you can transmit certain
vehicle data from the vehicle.
Event Data Recorder EDR
This vehicle is equipped with an event data re‐
corder EDR. The main purpose of an EDR is to
record, in certain crash or near crash-like situa‐
tions, such as an air bag deployment or hitting
a road obstacle, data that will assist in under‐
standing how a vehicle’s systems performed.
The EDR is designed to record data related to
vehicle dynamics and safety systems for a short
period of time, typically 30 seconds or less.
The EDR in this vehicle is designed to record
such data as:▷How various systems in your vehicle were
operating.▷Whether or not the driver and passenger
safety belts were fastened.▷How far, if at all, the driver was depressing
the accelerator and/or brake pedal.▷How fast the vehicle was traveling.
These data can help provide a better under‐
standing of the circumstances in which crashes
and injuries occur.
EDR data are recorded by your vehicle only if a
nontrivial crash situation occurs; no data are re‐
corded by the EDR under normal driving condi‐
tions and no personal data, e.g., name, gender,
age, and crash location, are recorded.
However, other parties, such as law enforce‐
ment, could combine the EDR data with the
type of personally identifying data routinely ac‐
quired during a crash investigation.
To read data recorded by an EDR, special
equipment is required, and access to the vehi‐
cle or the EDR is needed. In addition to the ve‐
hicle manufacturer, other parties, such as law
enforcement, that have the special equipment,
can read the information if they have access to
the vehicle or the EDR.
Seite 9Information9
Online Edition for Part no. 01 40 2 963 334 - VI/15
Page 14 of 246
CockpitVehicle features and op‐
tions
This chapter describes all standard, country-
specific and optional features offered with the
series. It also describes features that are notnecessarily available in your car, e. g., due to
the selected options or country versions. This
also applies to safety-related functions and sys‐
tems. The respectively applicable country provi‐
sions must be observed when using the respec‐
tive features and systems.
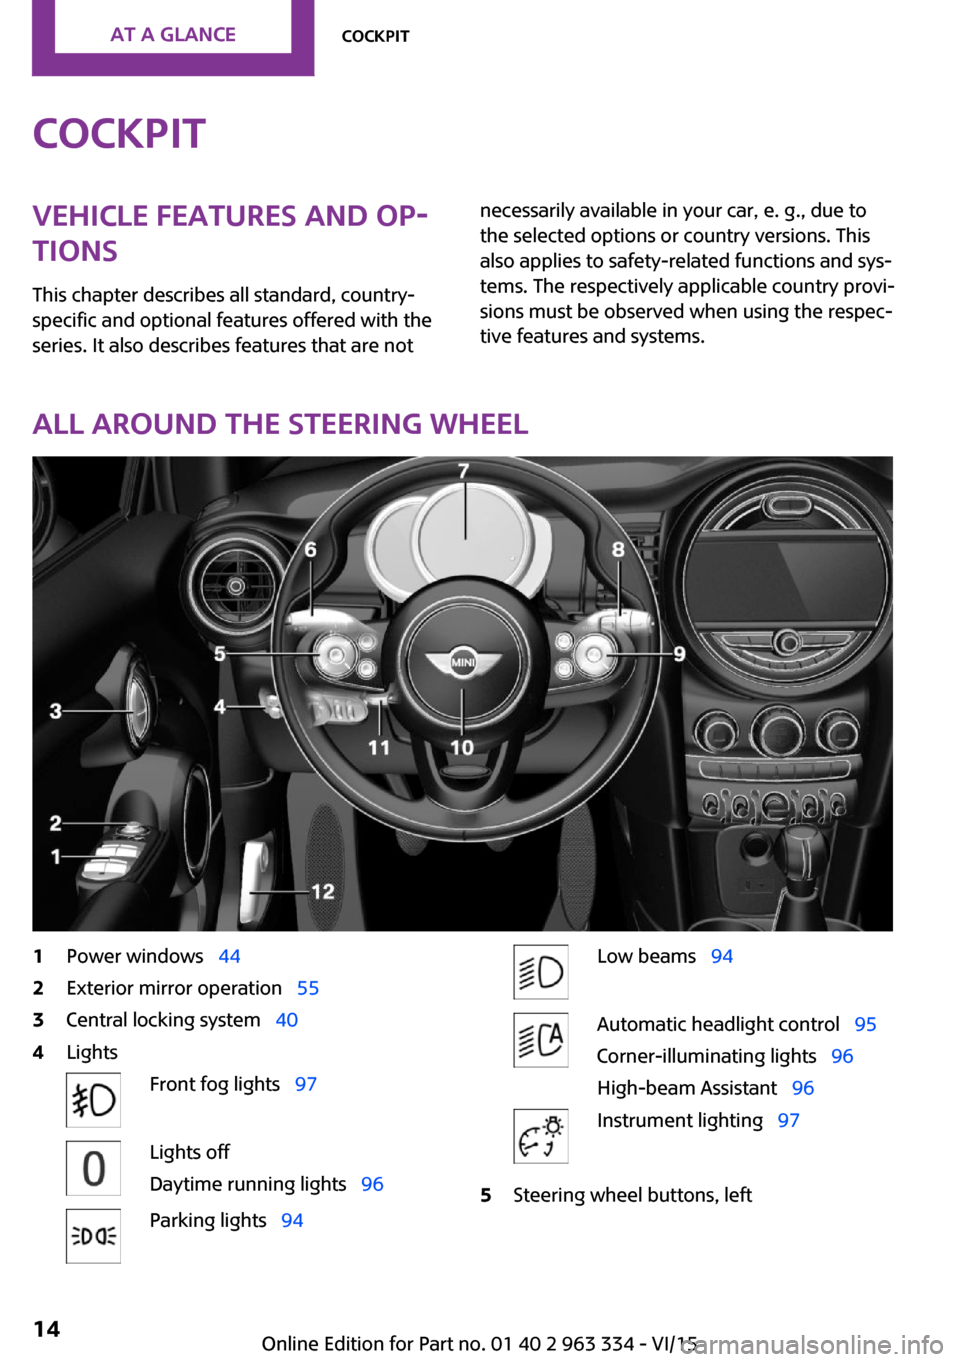
All around the steering wheel
1Power windows 442Exterior mirror operation 553Central locking system 404LightsFront fog lights 97Lights off
Daytime running lights 96Parking lights 94Low beams 94Automatic headlight control 95
Corner-illuminating lights 96
High-beam Assistant 96Instrument lighting 975Steering wheel buttons, leftSeite 14AT A GLANCECockpit14
Online Edition for Part no. 01 40 2 963 334 - VI/15
Page 15 of 246
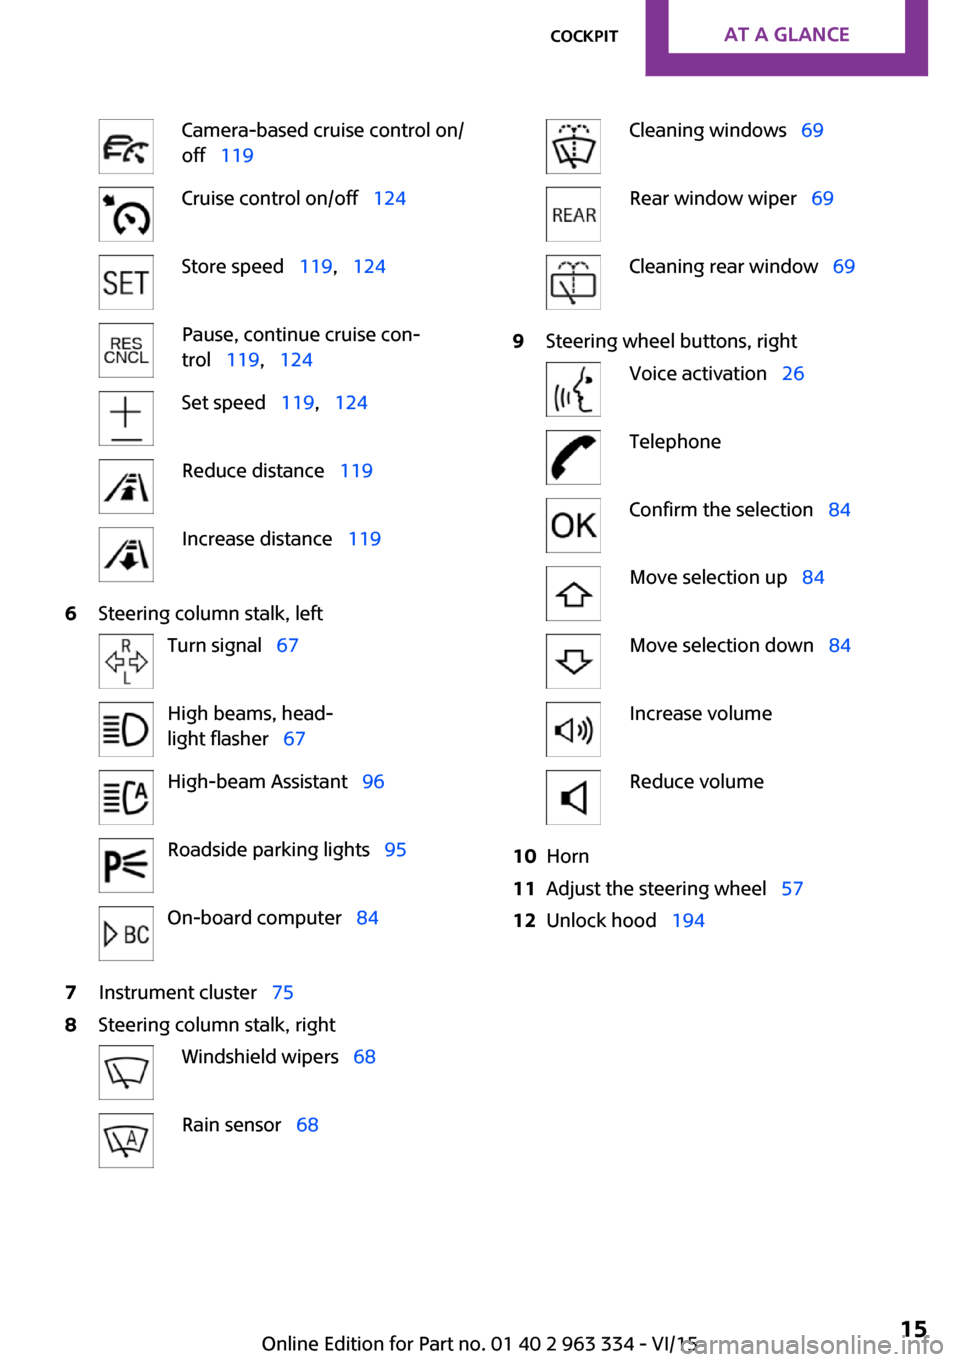
Camera-based cruise control on/
off 119Cruise control on/off 124Store speed 119, 124Pause, continue cruise con‐
trol 119, 124Set speed 119, 124Reduce distance 119Increase distance 1196Steering column stalk, leftTurn signal 67High beams, head‐
light flasher 67High-beam Assistant 96Roadside parking lights 95On-board computer 847Instrument cluster 758Steering column stalk, rightWindshield wipers 68Rain sensor 68Cleaning windows 69Rear window wiper 69Cleaning rear window 699Steering wheel buttons, rightVoice activation 26TelephoneConfirm the selection 84Move selection up 84Move selection down 84Increase volumeReduce volume10Horn11Adjust the steering wheel 5712Unlock hood 194Seite 15CockpitAT A GLANCE15
Online Edition for Part no. 01 40 2 963 334 - VI/15
Page 17 of 246
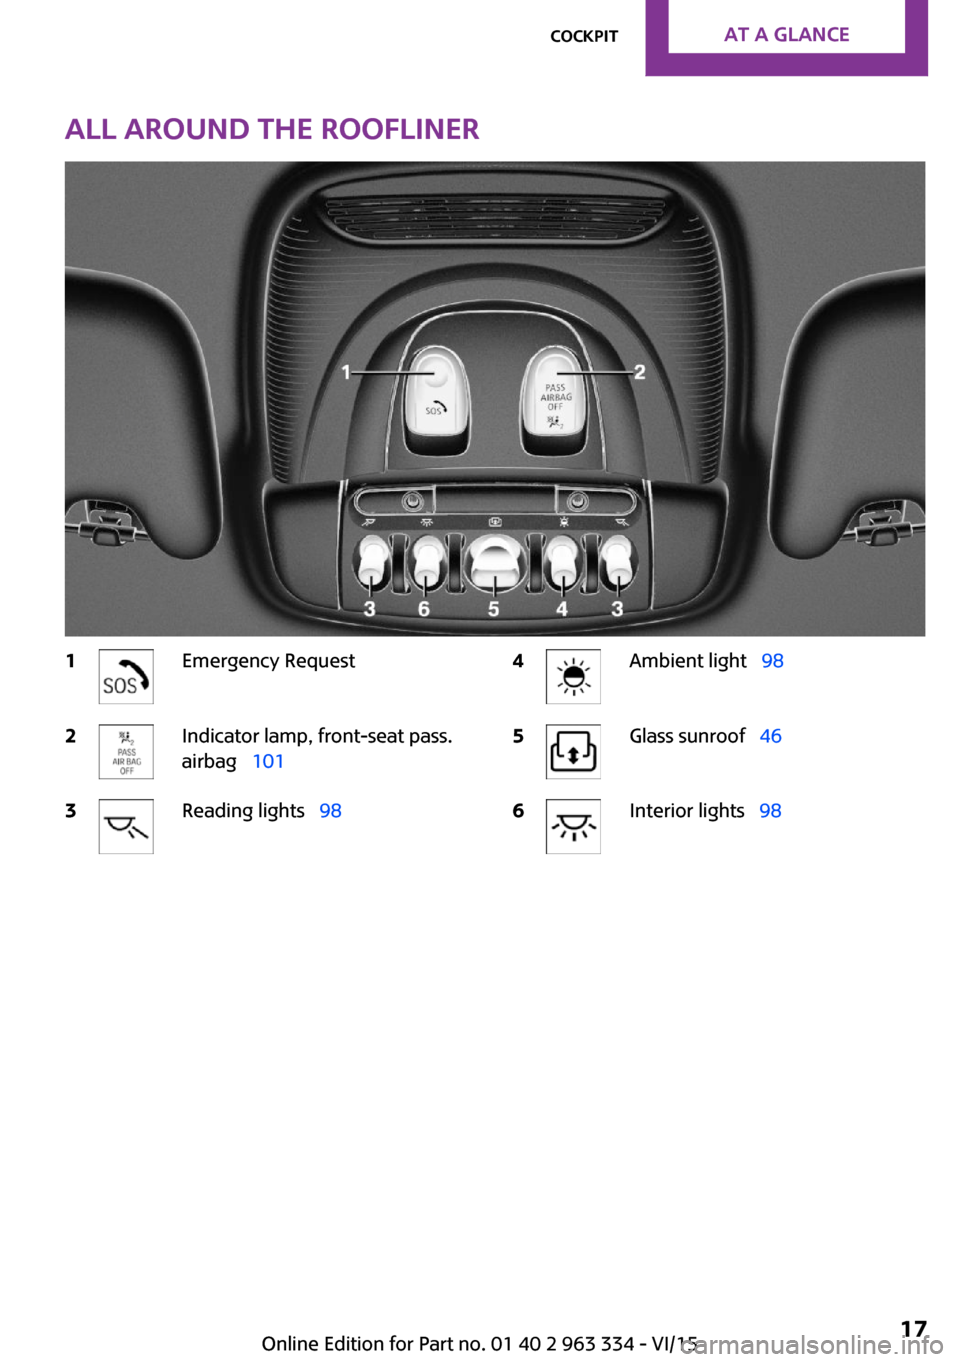
All around the roofliner1Emergency Request2Indicator lamp, front-seat pass.
airbag 1013Reading lights 984Ambient light 985Glass sunroof 466Interior lights 98Seite 17CockpitAT A GLANCE17
Online Edition for Part no. 01 40 2 963 334 - VI/15
Page 20 of 246
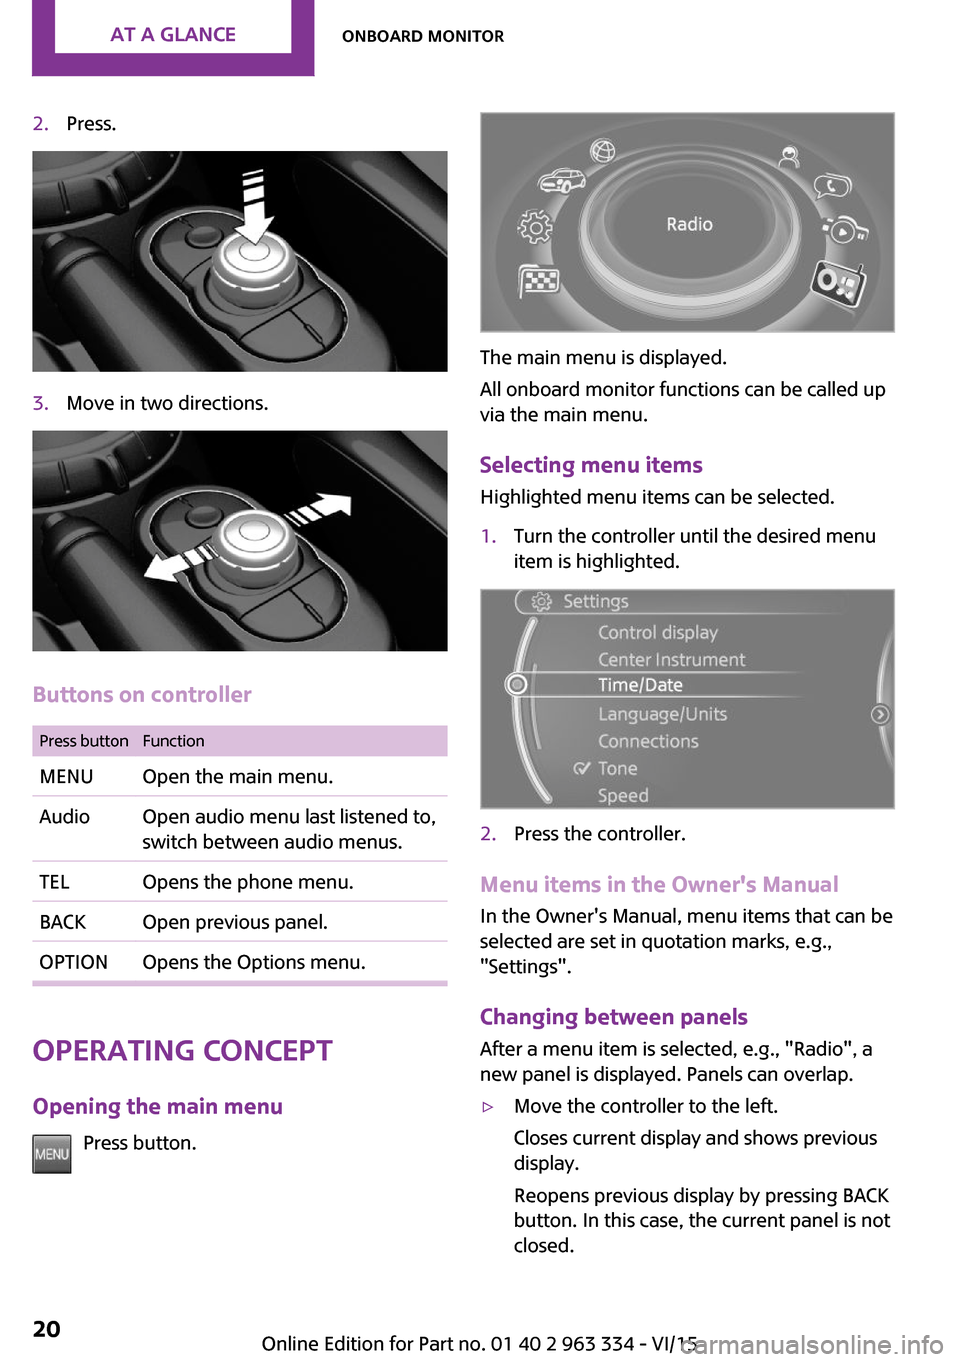
2.Press.3.Move in two directions.
Buttons on controller
Press buttonFunctionMENUOpen the main menu.AudioOpen audio menu last listened to,
switch between audio menus.TELOpens the phone menu.BACKOpen previous panel.OPTIONOpens the Options menu.
Operating concept
Opening the main menu Press button.
The main menu is displayed.
All onboard monitor functions can be called up
via the main menu.
Selecting menu items Highlighted menu items can be selected.
1.Turn the controller until the desired menu
item is highlighted.2.Press the controller.
Menu items in the Owner's Manual
In the Owner's Manual, menu items that can be
selected are set in quotation marks, e.g.,
"Settings".
Changing between panels
After a menu item is selected, e.g., "Radio", a
new panel is displayed. Panels can overlap.
▷Move the controller to the left.
Closes current display and shows previous
display.
Reopens previous display by pressing BACK
button. In this case, the current panel is not
closed.Seite 20AT A GLANCEOnboard monitor20
Online Edition for Part no. 01 40 2 963 334 - VI/15
Page 22 of 246
▷The system recognizes capital and lower
case letters. For the input of upper/lower
case letters and numbers, it may be neces‐
sary to switch to the corresponding input
mode, e.g. when upper and lower case let‐
ters are written the same way. Switching
between cases, numbers and letters, refer
to page 25.▷Enter characters as they are displayed on
the Control Display.▷Always enter associated characters, such as
accents or periods so that the letter can be
clearly recognized. Possible input depends
on the set language. Where necessary, en‐
ter special characters via the controller.▷To delete a character, slide to the left on
the touchpad.▷To enter a blank space, slide to the right in
the center of the touchpad.▷To enter a hyphen, slide to the right in the
upper area of the touchpad.▷To enter an underscore, swipe to the right
in the lower area of the touchpad.
Operating the interactive map
The interactive map in the navigation system
can be moved via the touchpad.
FunctionControlsInteractive map.Swipe into respective
direction.Enlarge/shrink in‐
teractive map.Drag in or out on the
touchpad with fingers.Display menu.Tap once.
Changing settings
You may change control display settings via
touchpad. Swipe left or right accordingly.
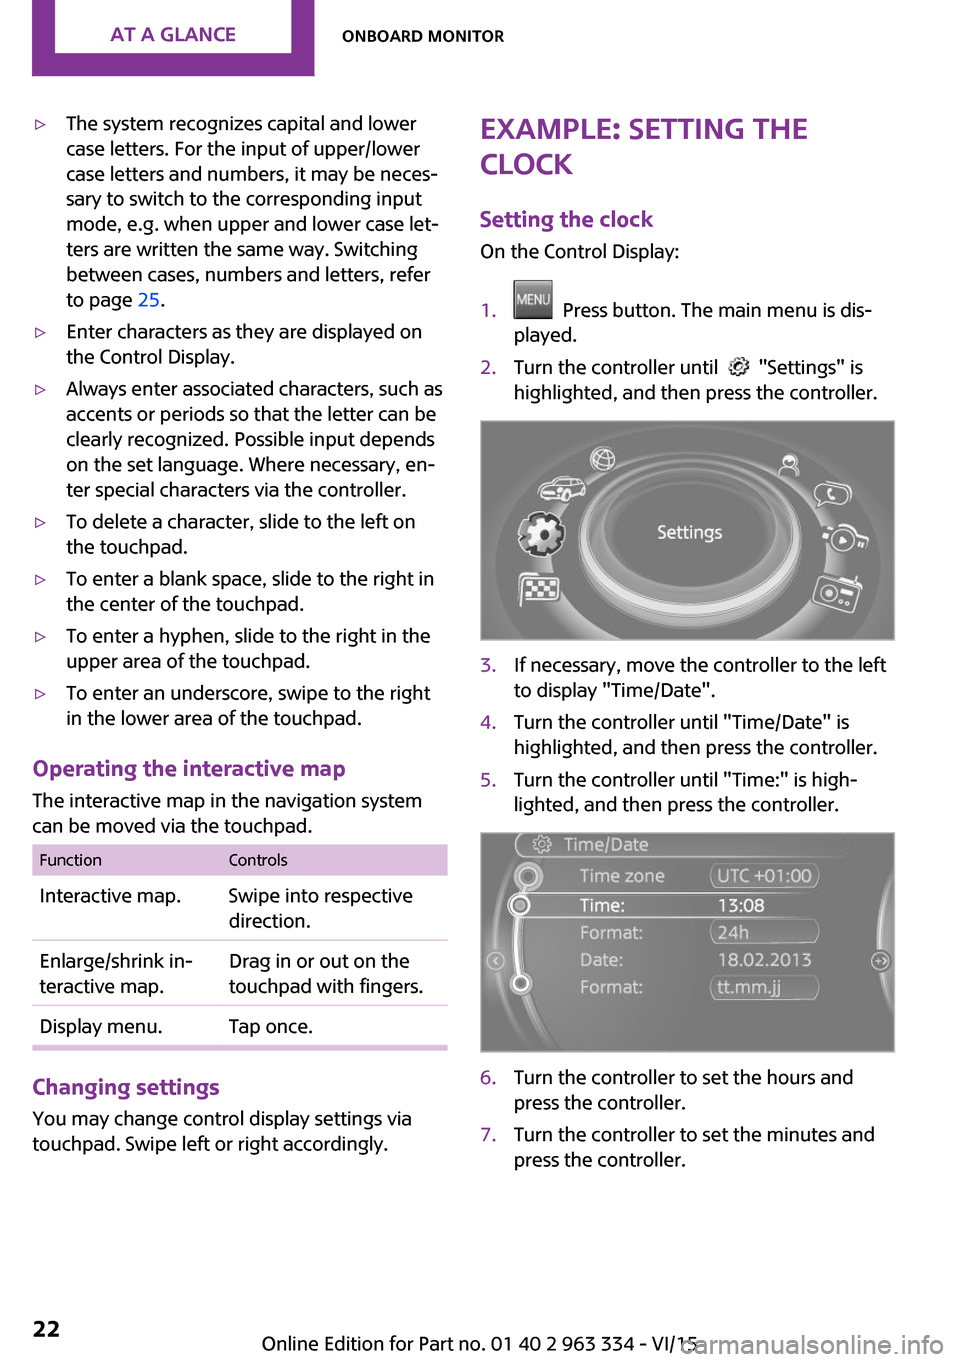
Example: setting the
clock
Setting the clock
On the Control Display:1. Press button. The main menu is dis‐
played.2.Turn the controller until "Settings" is
highlighted, and then press the controller.3.If necessary, move the controller to the left
to display "Time/Date".4.Turn the controller until "Time/Date" is
highlighted, and then press the controller.5.Turn the controller until "Time:" is high‐
lighted, and then press the controller.6.Turn the controller to set the hours and
press the controller.7.Turn the controller to set the minutes and
press the controller.Seite 22AT A GLANCEOnboard monitor22
Online Edition for Part no. 01 40 2 963 334 - VI/15
Page 24 of 246
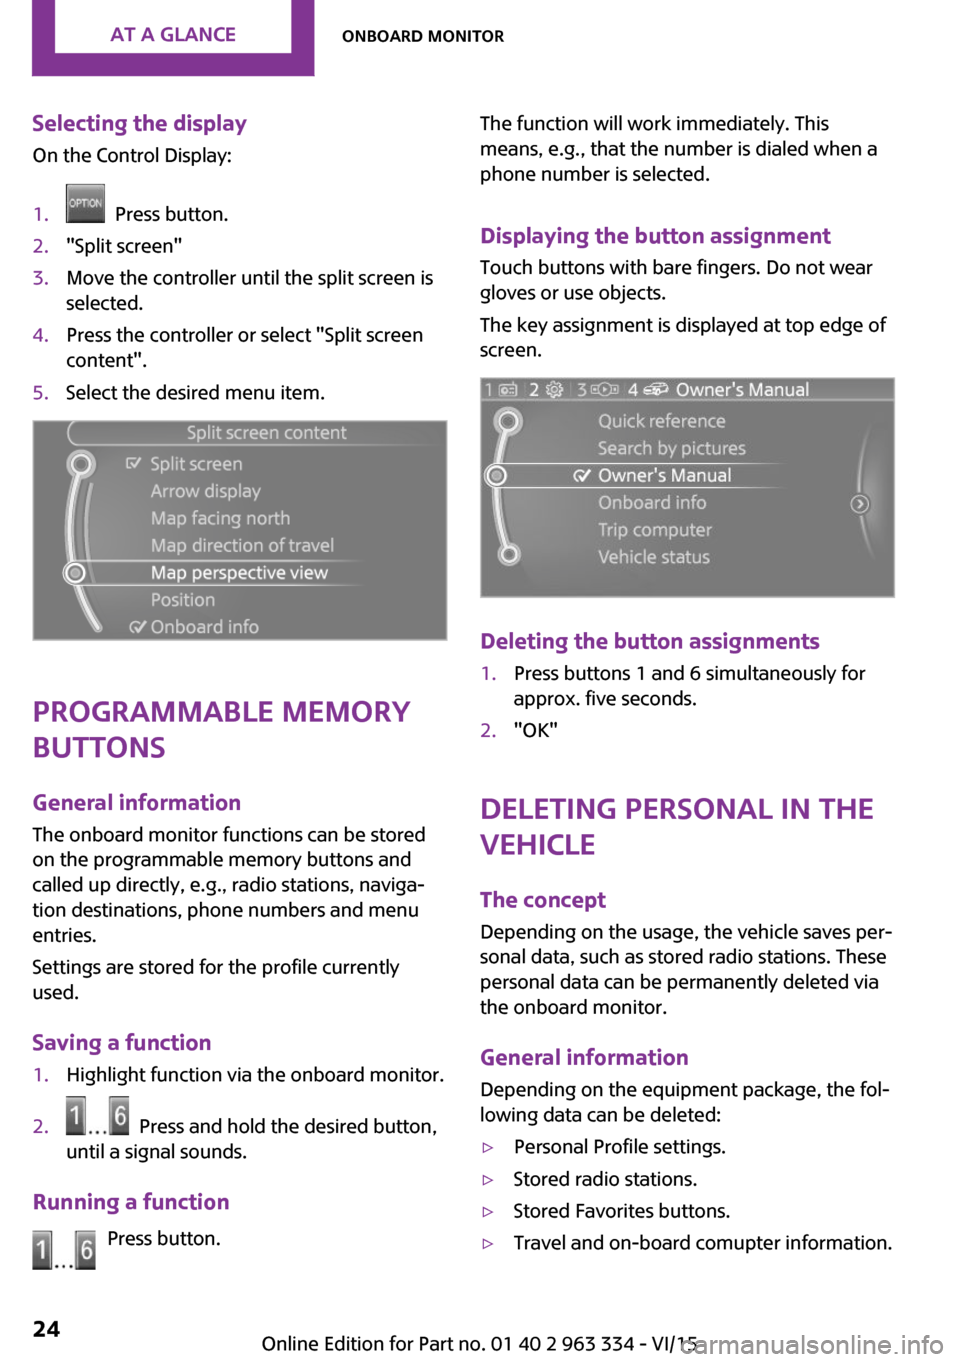
Selecting the displayOn the Control Display:1. Press button.2."Split screen"3.Move the controller until the split screen is
selected.4.Press the controller or select "Split screen
content".5.Select the desired menu item.
Programmable memory
buttons
General information
The onboard monitor functions can be stored
on the programmable memory buttons and
called up directly, e.g., radio stations, naviga‐
tion destinations, phone numbers and menu
entries.
Settings are stored for the profile currently
used.
Saving a function
1.Highlight function via the onboard monitor.2. Press and hold the desired button,
until a signal sounds.
Running a function
Press button.
The function will work immediately. This
means, e.g., that the number is dialed when a
phone number is selected.
Displaying the button assignmentTouch buttons with bare fingers. Do not wear
gloves or use objects.
The key assignment is displayed at top edge of
screen.
Deleting the button assignments
1.Press buttons 1 and 6 simultaneously for
approx. five seconds.2."OK"
Deleting personal in the
vehicle
The concept
Depending on the usage, the vehicle saves per‐
sonal data, such as stored radio stations. These
personal data can be permanently deleted via
the onboard monitor.
General information Depending on the equipment package, the fol‐
lowing data can be deleted:
▷Personal Profile settings.▷Stored radio stations.▷Stored Favorites buttons.▷Travel and on-board comupter information.Seite 24AT A GLANCEOnboard monitor24
Online Edition for Part no. 01 40 2 963 334 - VI/15
Page 29 of 246

Integrated Owner's Manual in the
vehicleVehicle features and op‐
tions
This chapter describes all standard, country-
specific and optional features offered with the
series. It also describes features that are not
necessarily available in your car, e. g., due to
the selected options or country versions. This
also applies to safety-related functions and sys‐
tems. The respectively applicable country provi‐
sions must be observed when using the respec‐
tive features and systems.
Integrated Owner's
Manual in the vehicle
The Integrated Owner's Manual can be dis‐
played on the Control Display. It specifically de‐
scribes features and functions found in the ve‐
hicle.
Components of the Integrated Owner's
Manual
The Integrated Owner's Manual consists of
three parts, which offer various levels of infor‐ mation or possible access.
Quick Reference Guide The Quick Reference Guide provides informa‐
tion how to operate the car, how to use basic
vehicle functions or what to do in case of a
breakdown. This information can also be dis‐
played while driving.
Search by images Image search provides information and de‐
scriptions. This is helpful when the terminology
for a feature is not at hand.Owner's Manual
Search for information and descriptions by en‐
tering terms selected from the index.
Select components1. Press button.2.Turn the controller: open "Vehicle info".3.Press the controller.4.Selecting desired range:▷"Quick reference"▷"Search by pictures"▷"Owner's Manual"
Leafing through the Owner's ManualPage by page with link access
Turn the controller until the next or previous
page is displayed.
Page by page without link access Scroll through the pages directly while skipping
the links.
Highlight the symbol once. Now simply press
the controller to browse from page to page.
Scroll back.
Seite 29Integrated Owner's Manual in the vehicleAT A GLANCE29
Online Edition for Part no. 01 40 2 963 334 - VI/15
Page 36 of 246
Personal Profile
The concept
Personal Profile provides three profiles, using
which personal vehicle settings can be stored.
Every remote control has one of these profiles
assigned.
If the vehicle is unlocked using a remote con‐
trol, the assigned personal profile will be acti‐
vated. All settings stored in the profile are auto‐
matically applied.
If several drivers use their own remote control,
the vehicle will adjust the personal settings dur‐
ing unlocking. These settings are also restored,
if the vehicle has been used in the meantime
by a person with a different remote control.
Changes to the settings are automatically saved
in the personal profile.
Three personal profiles and a guest profile can
be created.
Adjusting
The settings for the following systems and func‐
tions are saved in the active profile. The scope
of storable settings is country- and equipment-
dependable.▷Unlocking and locking.▷Lights.▷Radio.▷Instrument cluster.▷Programmable memory buttons.▷Volumes, tone.▷Control Display.▷Climate control.▷Navigation.▷Park Distance Control PDC.▷Rearview camera▷Head-up Display.▷Driving Dynamics Control.▷Cruise control.▷Intelligent Safety.
Profile management
Opening profiles
Regardless of the remote control in use a differ‐
ent profile may be activated.
On the Control Display:
1. "Settings"2."Profiles"3.Select a profile.▷All settings stored in the called-up profile
are automatically applied.▷The called-up profile is assigned to the re‐
mote control being used at the time.▷If the profile is already assigned to a differ‐
ent remote control, this profile will apply to
both remote controls. It cannot be differen‐
tiated anymore between the settings for
the two remote controls.
Renaming profiles
A personal name can be assigned to every pro‐
file to avoid confusion between the profiles.
On the Control Display:
1. "Settings"2."Profiles"
The current profile is selected.3.Open "Options".4."Rename current profile"
Resetting profiles The settings of the active profile are reset to
their default values.
On the Control Display:
1. "Settings"2."Profiles"
The current profile is selected.Seite 36CONTROLSOpening and closing36
Online Edition for Part no. 01 40 2 963 334 - VI/15