height MINI Paceman 2014 Owner's Manual (Mini Connected)
[x] Cancel search | Manufacturer: MINI, Model Year: 2014, Model line: Paceman, Model: MINI Paceman 2014Pages: 282, PDF Size: 6.76 MB
Page 45 of 282
AdjustingVehicle equipment
This chapter describes all series equipment as
well as country-specific and special equipment
offered for this model series.Therefore, it also
describes equipment that may not be found in
your vehicle, for instance due to the selected
special equipment or the country version. This
also applies to safety-related functions and sys‐
tems.
Sitting safely The ideal seating position can make a vital con‐
tribution to relaxed, fatigue-free driving.
The seating position plays an important role in
an accident in combination with:▷Safety belts, refer to page 47▷Head restraints, refer to page 50.▷Airbags, refer to page 82.
Seats
Note before adjusting Do not adjust the seat while driving
Never attempt to adjust the driver's seat
while driving. The seat could respond with un‐
expected movement and the ensuing loss of
vehicle control could lead to an accident. ◀
Do not incline the backrest too far to the
rear
Do not incline the backrest on the front passen‐
ger side too far to the rear during driving. Oth‐
erwise, there is the danger of sliding under the
safety belt in an accident. This would eliminate
the protection normally provided by the belt. ◀
Front seat adjustment
Forward/backward
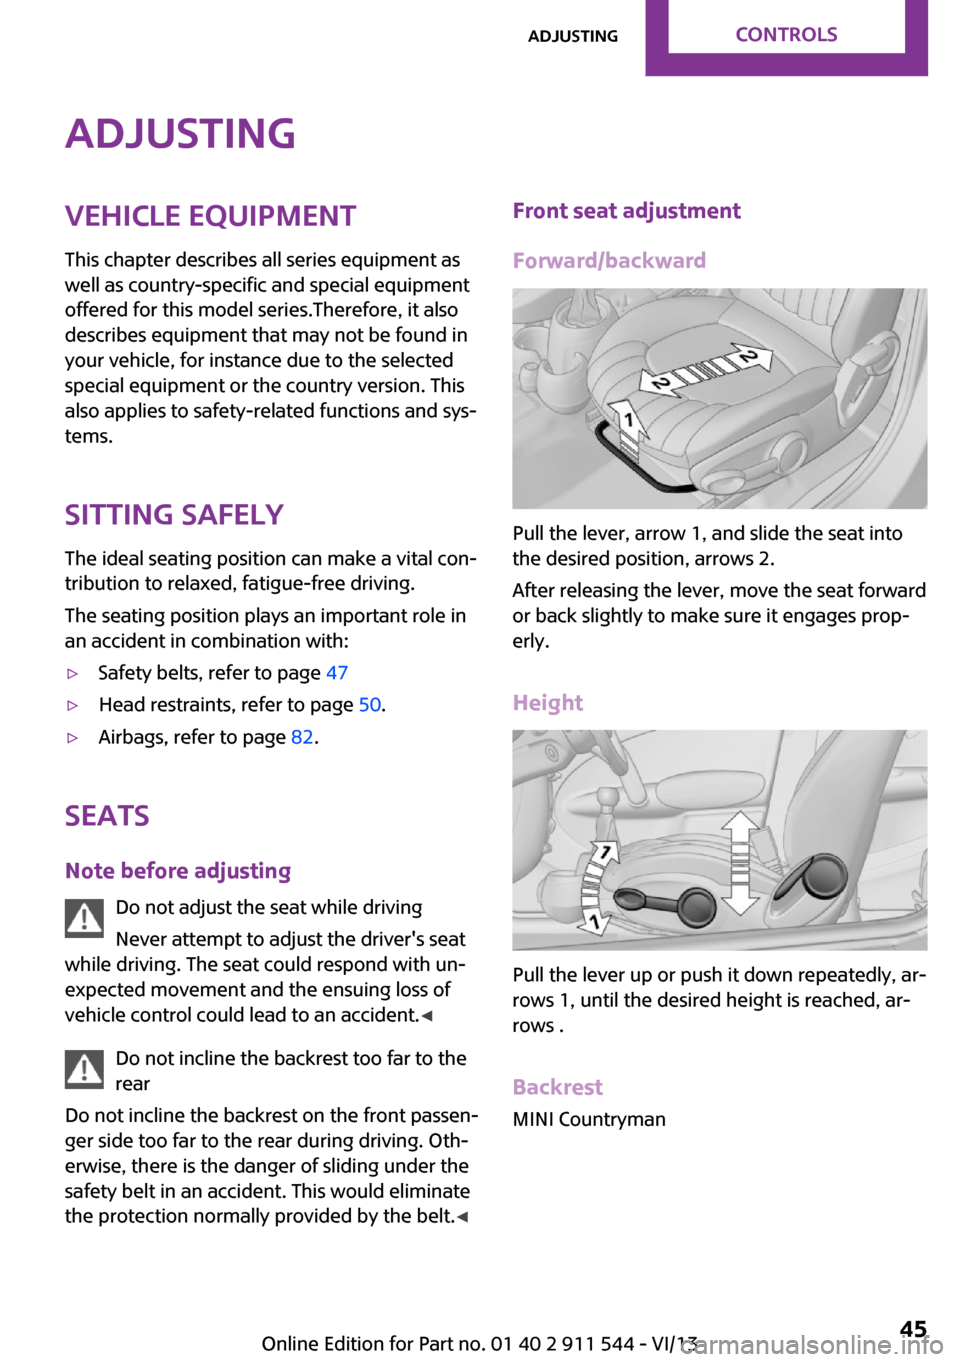
Pull the lever, arrow 1, and slide the seat into
the desired position, arrows 2.
After releasing the lever, move the seat forward
or back slightly to make sure it engages prop‐
erly.
Height
Pull the lever up or push it down repeatedly, ar‐
rows 1, until the desired height is reached, ar‐
rows .
Backrest MINI Countryman
Seite 45AdjustingControls45
Online Edition for Part no. 01 40 2 911 544 - VI/13
Page 50 of 282

Safety belt reminder for driver's seat
and front passenger seat
The indicator lamps light up and a sig‐
nal sounds. In addition, a message ap‐
pears on the Control Display. Check
whether the safety belt has been fas‐
tened correctly.
Damage to safety belts
In the case of strain caused by accidents or
damage:
Have the safety belts, including the safety belt
tensioners, replaced and have the belt anchors
checked.
Checking and replacing safety belts
Have the work performed only by your
service center; otherwise, it cannot be ensured
that this safety feature will function properly. ◀
Head restraints Correctly set head restraint
A correctly adjusted head restraint reduces the
risk of spinal injury in the event of an accident.
Adjusting the head restraint
Correctly adjust the head restraints of all
occupied seats; otherwise, there is an increased
risk of injury in an accident. ◀
Height Adjust the head restraint so that its center is
approx. at ear level.Height adjustment
To raise: pull.
To lower: press the button, arrow 1, and push
the head restraint down.
Removing
Only remove the head restraint if no one will be
sitting in the seat in question.
Before transporting passengers
Reinstall the head restraint before trans‐
porting anyone in the seat; otherwise, the pro‐
tective function of the head restraint is unavail‐
able. ◀
Front
1.Pull upward as far as possible.2.Fold the backrest back slightly.3.Press button 1 and pull out the head re‐
straint all the way to the stop.4.MINI Countryman: press the additional but‐
ton 2 using a suitable tool.5.Pull out the head restraint.6.Fold back the backrest.Seite 50ControlsAdjusting50
Online Edition for Part no. 01 40 2 911 544 - VI/13
Page 52 of 282

Interior rearview mirror
To reduce the blinding effect from the rear
when driving at night: turn the knob.
Interior rearview and exterior mirrors,
automatic dimming feature
Two photocells are used for control:
▷In the mirror frame, see arrow.▷On the back of the mirror.
For proper operation:
▷Keep the photocells clean.▷Do not cover the area between the inside
rearview mirror and the windshield.▷Do not apply stickers to the windshield in
front of the mirror.Steering wheel
Adjusting Do not adjust while driving
Do not adjust the steering wheel while
driving; otherwise, an unexpected movement
could result in an accident. ◀1.Fold the lever down.2.Move the steering wheel to the preferred
height and angle to suit your seating posi‐
tion.3.Fold the lever back.
Do not use force to swing the lever back.
Do not use force to swing the lever back
up; otherwise, the mechanism will be dam‐
aged. ◀
Seite 52ControlsAdjusting52
Online Edition for Part no. 01 40 2 911 544 - VI/13
Page 53 of 282
Transporting children safelyVehicle equipment
This chapter describes all series equipment as
well as country-specific and special equipment
offered for this model series.Therefore, it also
describes equipment that may not be found in
your vehicle, for instance due to the selected
special equipment or the country version. This
also applies to safety-related functions and sys‐
tems.
The right place for chil‐
dren
Notes Children in the vehicle
Do not leave children unattended in the
vehicle; otherwise, they could endanger them‐
selves and other persons, e.g., by opening the
doors. ◀
Children should always be in the rear Accident research shows that the safest place
for children is on the rear seat.
Transporting children in the rear
Transport children younger than 13 years
of age or shorter than 5 ft/150 cm in the rear
only, using child restraint fixing systems suita‐
ble for the age, weight, and height of the child; otherwise, there is an increased risk of injury in
an accident.
Children 13 years of age or older must wear a
safety belt as soon as a suitable child restraint fixing system can no longer be used, due to
their age, weight and size. ◀Installing child seats
Only install child seats in the rear when
the rear seat backrest is folded all the way back
and engaged; otherwise, there is an increased
risk of injury in an accident. ◀
Children on the front passenger seat
Front passenger airbags Should it be necessary to use a child restraint
fixing system on the front passenger seat,
make sure that the front and side airbags on
the front passenger side are deactivated, refer
to page 83.
Deactivating the front passenger airbags
If a child restraint fixing system is used in
the front passenger seat, the front passenger
airbags must be deactivated; otherwise, there
is an increased risk of injury to the child when
the airbags are triggered, even with a child re‐
straint fixing system. ◀
Installing child re‐
straint fixing systems
Before mounting MINI Countryman: before mounting a child re‐
straint fixing system on the rear seats, move
the seats into the rearmost positions.
Adjust the inclination of the center backrest to
that of the respective outer backrest.
After mounting the child restraint fixing system
on the respective outer rear seat, adjust the
backrest forward, if necessary, to ensure that
the backrest is in contact with the child re‐
straint fixing system. Rear seat backrests, refer
to page 110.Seite 53Transporting children safelyControls53
Online Edition for Part no. 01 40 2 911 544 - VI/13
Page 54 of 282
NotesManufacturer's information for child re‐
straint fixing systems
To select, mount and use child restraint fixing
systems, observe the information provided by
the system manufacturer; otherwise, the pro‐
tective effect can be impaired. ◀
On the front passenger seat
Deactivating the airbags After installing a child restraint fixing system on
the front passenger seat, ensure that the front,
side, and knee airbags on the front passenger
side are deactivated.
Deactivating the front passenger airbags
If a child restraint fixing system is used in
the front passenger seat, the front passenger
airbags must be deactivated; otherwise, there
is an increased risk of injury to the child when
the airbags are triggered, even with a child re‐
straint fixing system. ◀
Seat position and height
Before installing a child restraint fixing system,
move the front passenger seat as far back as
possible and adjust its height to the highest po‐
sition to obtain the best possible position for
the belt and to offer optimal protection in the
event of an accident.
Do not change this seat position once it has
been set.Child seat security
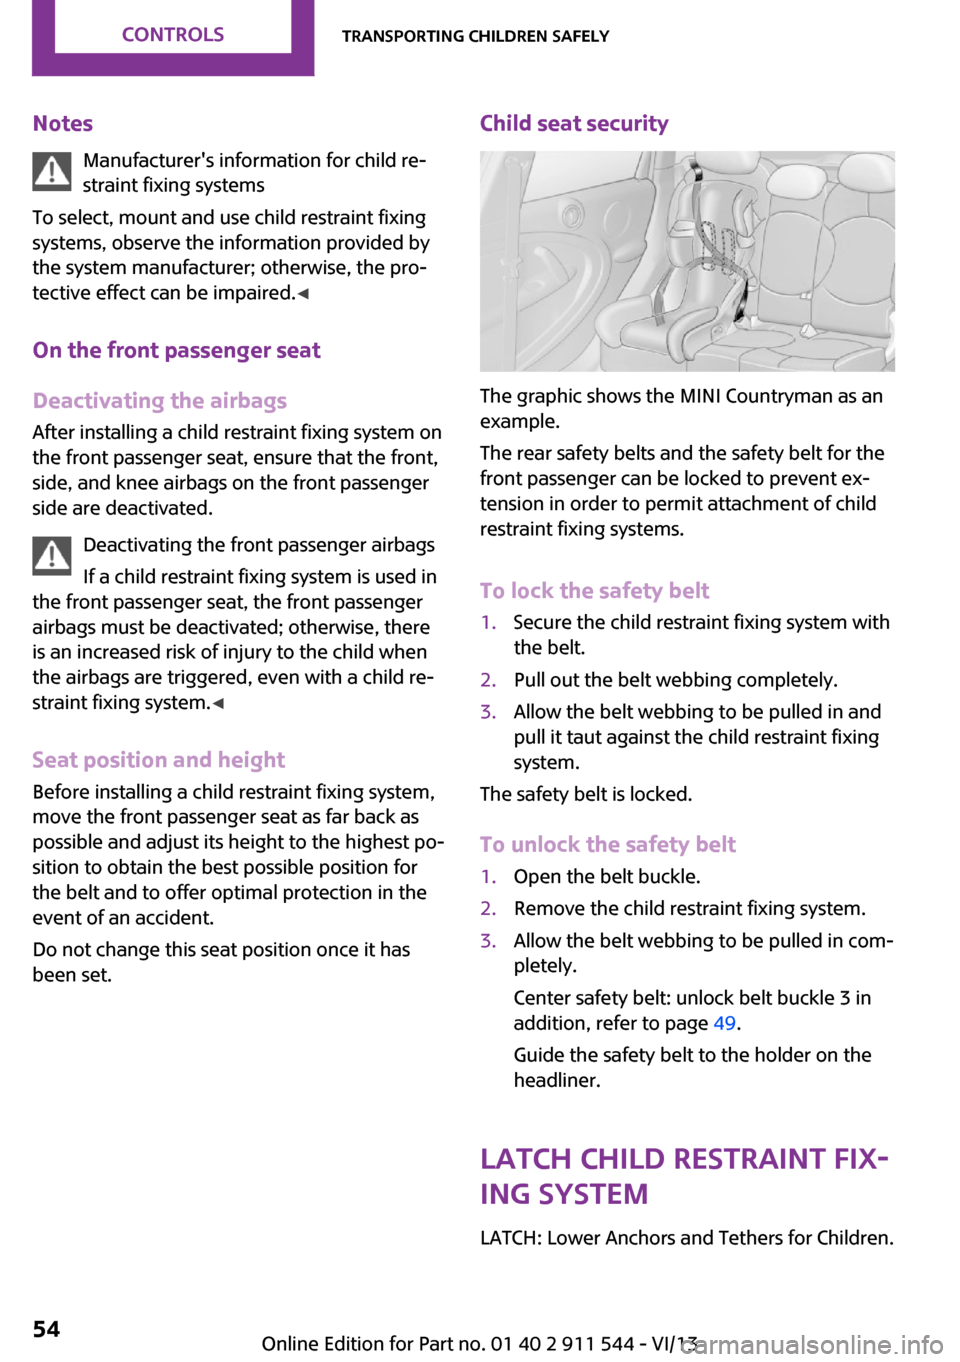
The graphic shows the MINI Countryman as an
example.
The rear safety belts and the safety belt for the
front passenger can be locked to prevent ex‐
tension in order to permit attachment of child
restraint fixing systems.
To lock the safety belt
1.Secure the child restraint fixing system with
the belt.2.Pull out the belt webbing completely.3.Allow the belt webbing to be pulled in and
pull it taut against the child restraint fixing
system.
The safety belt is locked.
To unlock the safety belt
1.Open the belt buckle.2.Remove the child restraint fixing system.3.Allow the belt webbing to be pulled in com‐
pletely.
Center safety belt: unlock belt buckle 3 in
addition, refer to page 49.
Guide the safety belt to the holder on the
headliner.
LATCH child restraint fix‐
ing system
LATCH: Lower Anchors and Tethers for Children.
Seite 54ControlsTransporting children safely54
Online Edition for Part no. 01 40 2 911 544 - VI/13
Page 123 of 282
Closing the tailgateDrive with the tailgate closed
Only drive with the tailgate closed; other‐
wise, passengers and other road users may be
endangered or the vehicle may be damaged if
an accident occurs or during braking or swerv‐
ing. In addition, exhaust fumes may enter the
passenger compartment. ◀
If, despite this, the vehicle must be driven with
the tailgate open:▷Drive moderately.▷Close all windows and the glass sunroof.▷Switch off recirculated air mode and greatly
increase the blower speed.
Hot exhaust system
Hot exhaust system
High temperatures are generated in the
exhaust system.
Do not remove the heat shields installed and
never apply undercoating to them. Make sure
that flammable materials, e. g. hay, leaves,
grass, etc. do not come in contact with the hot
exhaust system during driving, while in idle po‐
sition mode, or when parked. Such contact
could lead to a fire, and with it the risk of seri‐
ous personal injury as well as property damage.
Do not touch hot exhaust pipes; otherwise,
there is the danger of getting burned. ◀
Mobile communication devices in the
vehicle
Mobile communication devices in the ve‐
hicle
It is not recommended to use mobile phones,
such as mobile phones without a direct con‐
nection to an external aerial in the vehicle's
passenger compartment. Otherwise, the vehi‐
cle electronics and mobile communication de‐
vices can interfere with each other. In addition,
there is no assurance that the radiation gener‐
ated during transmission will be discharged
from the vehicle interior. ◀
Hydroplaning On wet or slushy roads, a wedge of water can
form between the tires and road surface.
This phenomenon is referred to as hydroplan‐
ing. It is characterized by a partial or complete
loss of contact between the tires and the road
surface, ultimately undermining your ability to
steer and brake the vehicle.
Hydroplaning
When driving on wet or slushy roads, re‐
duce your speed to prevent hydroplaning. ◀
The risk of hydroplaning increases as the tire
tread depth decreases. Minimum tread depth,
refer to page 226.
Driving through water Drive though calm water only if it is not deeper
than 12 inches/30 cm and at this height, no
faster than walking speed, up to
6 mph/10 km/h.
Using the handbrake on inclines Using the handbrake
On inclines, do not hold the vehicle sta‐
tionary with a slipping clutch for extended pe‐
riod; use the handbrake instead. Otherwise, the
clutch will be subject to increased wear. ◀
Support from the hill drive-off assistant, refer to
page 95.
Braking safely The vehicle is equipped with ABS as a standard
feature.
Applying the brakes fully is the most effective
way of braking in situations when this is neces‐
sary.
The vehicle maintains steering responsiveness.
You can still avoid any obstacles with a mini‐
mum of steering effort.Seite 123Things to remember when drivingDriving tips123
Online Edition for Part no. 01 40 2 911 544 - VI/13
Page 125 of 282
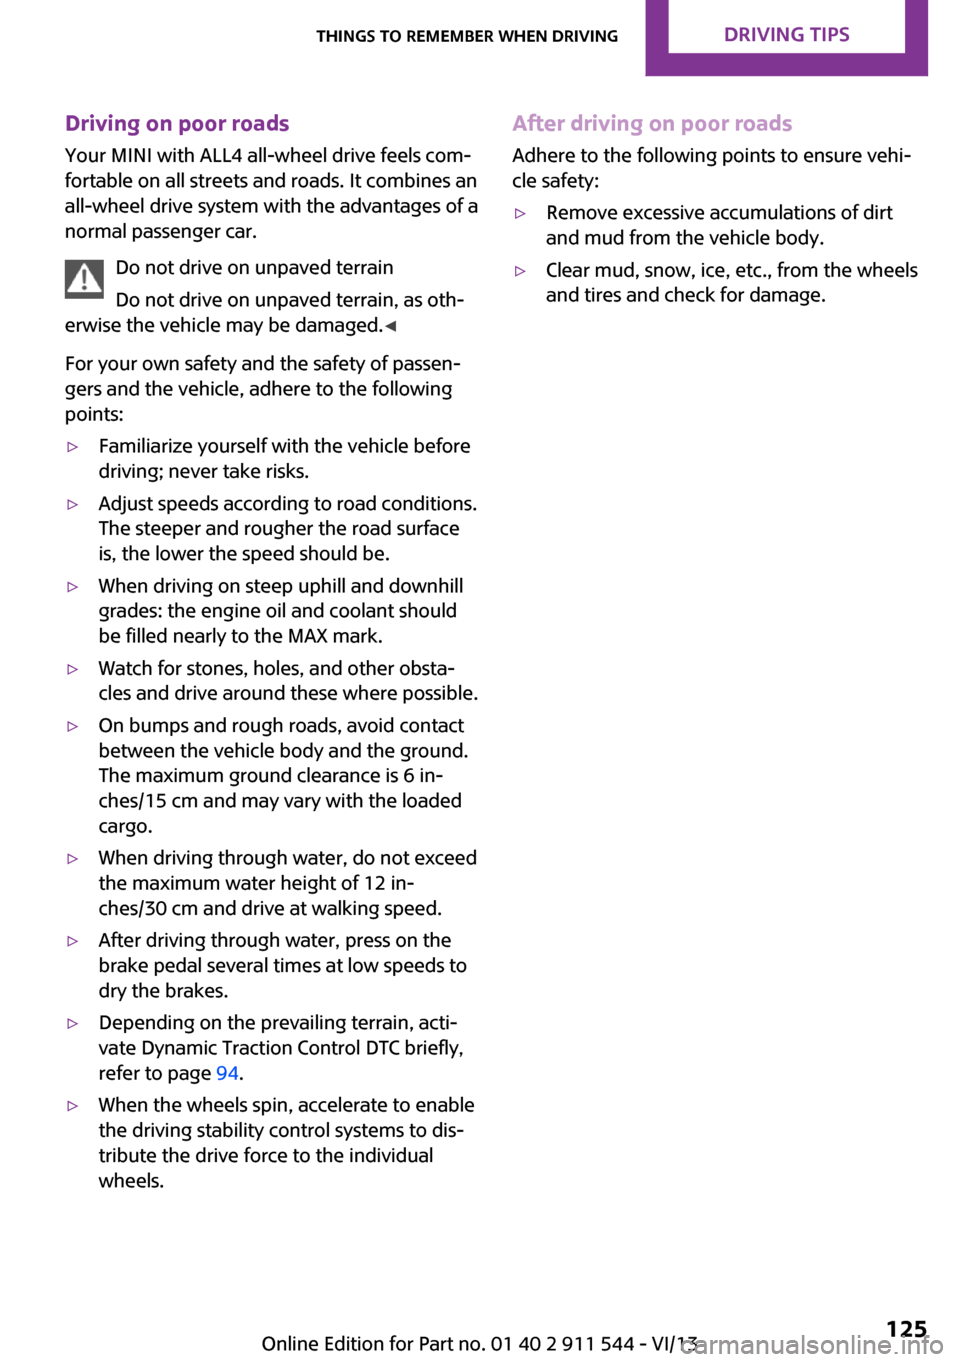
Driving on poor roadsYour MINI with ALL4 all-wheel drive feels com‐
fortable on all streets and roads. It combines an
all-wheel drive system with the advantages of a
normal passenger car.
Do not drive on unpaved terrain
Do not drive on unpaved terrain, as oth‐
erwise the vehicle may be damaged. ◀
For your own safety and the safety of passen‐
gers and the vehicle, adhere to the following
points:▷Familiarize yourself with the vehicle before
driving; never take risks.▷Adjust speeds according to road conditions.
The steeper and rougher the road surface
is, the lower the speed should be.▷When driving on steep uphill and downhill
grades: the engine oil and coolant should
be filled nearly to the MAX mark.▷Watch for stones, holes, and other obsta‐
cles and drive around these where possible.▷On bumps and rough roads, avoid contact
between the vehicle body and the ground.
The maximum ground clearance is 6 in‐
ches/15 cm and may vary with the loaded
cargo.▷When driving through water, do not exceed
the maximum water height of 12 in‐
ches/30 cm and drive at walking speed.▷After driving through water, press on the
brake pedal several times at low speeds to
dry the brakes.▷Depending on the prevailing terrain, acti‐
vate Dynamic Traction Control DTC briefly,
refer to page 94.▷When the wheels spin, accelerate to enable
the driving stability control systems to dis‐
tribute the drive force to the individual
wheels.After driving on poor roads
Adhere to the following points to ensure vehi‐
cle safety:▷Remove excessive accumulations of dirt
and mud from the vehicle body.▷Clear mud, snow, ice, etc., from the wheels
and tires and check for damage.Seite 125Things to remember when drivingDriving tips125
Online Edition for Part no. 01 40 2 911 544 - VI/13
Page 233 of 282

To avoid damage, make sure that the
wiper arms are resting against the wind‐
shield before you open the engine compart‐
ment. Do not open the engine hood before the
engine has cooled down; otherwise, injuries
may result. ◀
Unlocking and opening the hood1.Pull the lever.2.Lift the hood all the way.3.Press the release handle and open the
hood.
Danger of injury when the hood is open
There is a danger of injury from protrud‐
ing parts when the hood is open. ◀
Closing the hood
Close the hood from a height of ap‐
prox. 16 in/40 cm with momentum. It must be
clearly heard to engage.
Hood open when driving
If you see any signs that the hood is not
completely closed while driving, pull over im‐
mediately and close it securely. ◀
Danger of pinching
Make sure that the closing path of the
hood is clear; otherwise, injuries may result. ◀
Seite 233Engine compartmentMobility233
Online Edition for Part no. 01 40 2 911 544 - VI/13
Page 260 of 282
Technical dataVehicle equipment
This chapter describes all series equipment as
well as country-specific and special equipment
offered for this model series.Therefore, it alsodescribes equipment that may not be found in
your vehicle, for instance due to the selected
special equipment or the country version. This
also applies to safety-related functions and sys‐
tems.
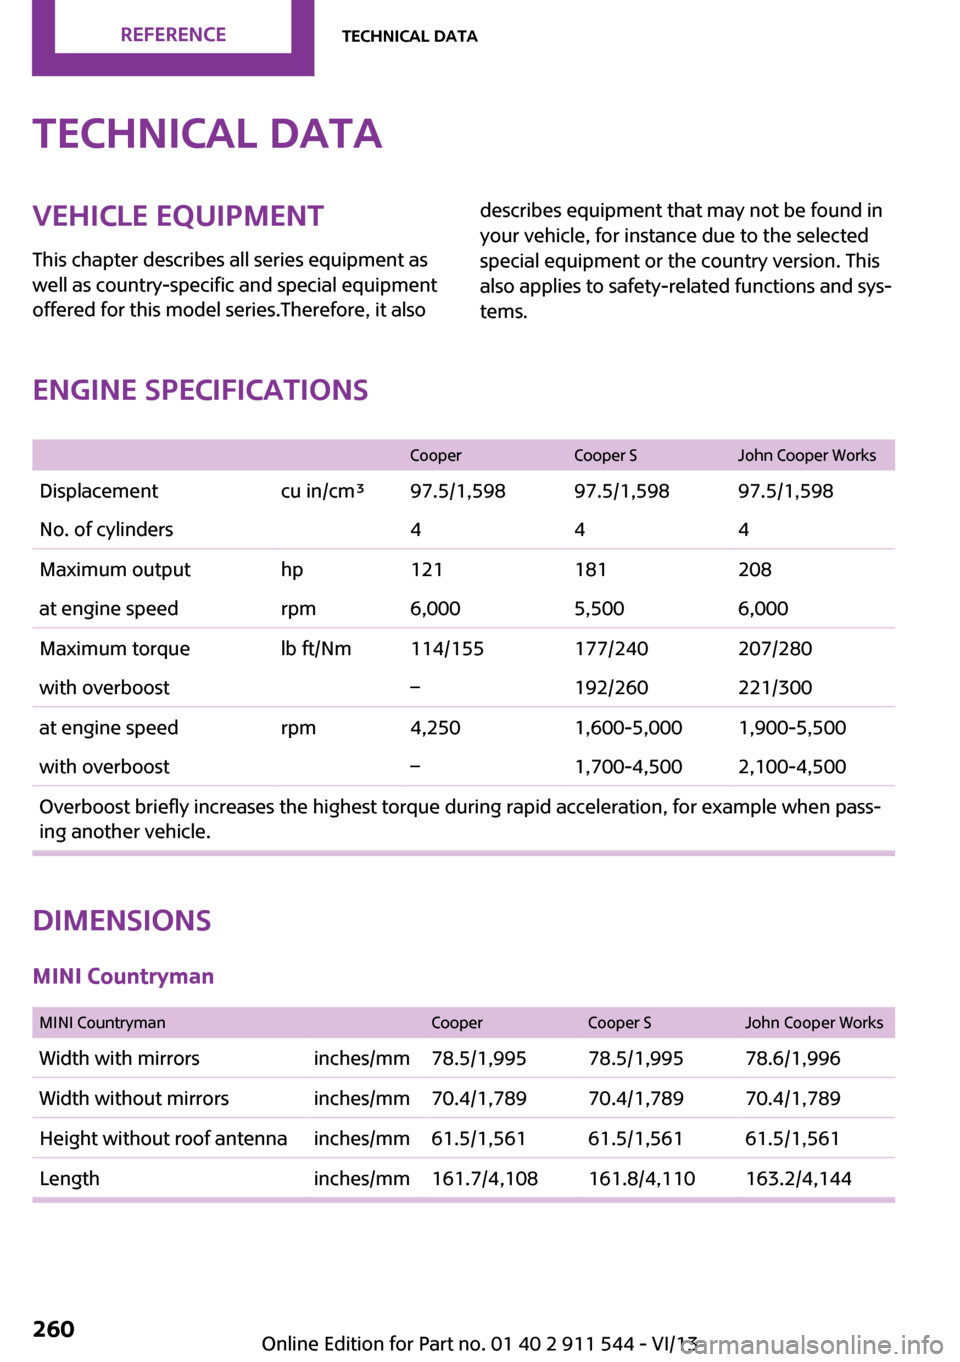
Engine specifications
CooperCooper SJohn Cooper WorksDisplacementcu in/cm³97.5/1,59897.5/1,59897.5/1,598No. of cylinders444Maximum outputhp121181208at engine speedrpm6,0005,5006,000Maximum torquelb ft/Nm114/155177/240207/280with overboost–192/260221/300at engine speedrpm4,2501,600-5,0001,900-5,500with overboost–1,700-4,5002,100-4,500Overboost briefly increases the highest torque during rapid acceleration, for example when pass‐
ing another vehicle.
Dimensions
MINI Countryman
MINI CountrymanCooperCooper SJohn Cooper WorksWidth with mirrorsinches/mm78.5/1,99578.5/1,99578.6/1,996Width without mirrorsinches/mm70.4/1,78970.4/1,78970.4/1,789Height without roof antennainches/mm61.5/1,56161.5/1,56161.5/1,561Lengthinches/mm161.7/4,108161.8/4,110163.2/4,144Seite 260ReferenceTechnical data260
Online Edition for Part no. 01 40 2 911 544 - VI/13
Page 261 of 282
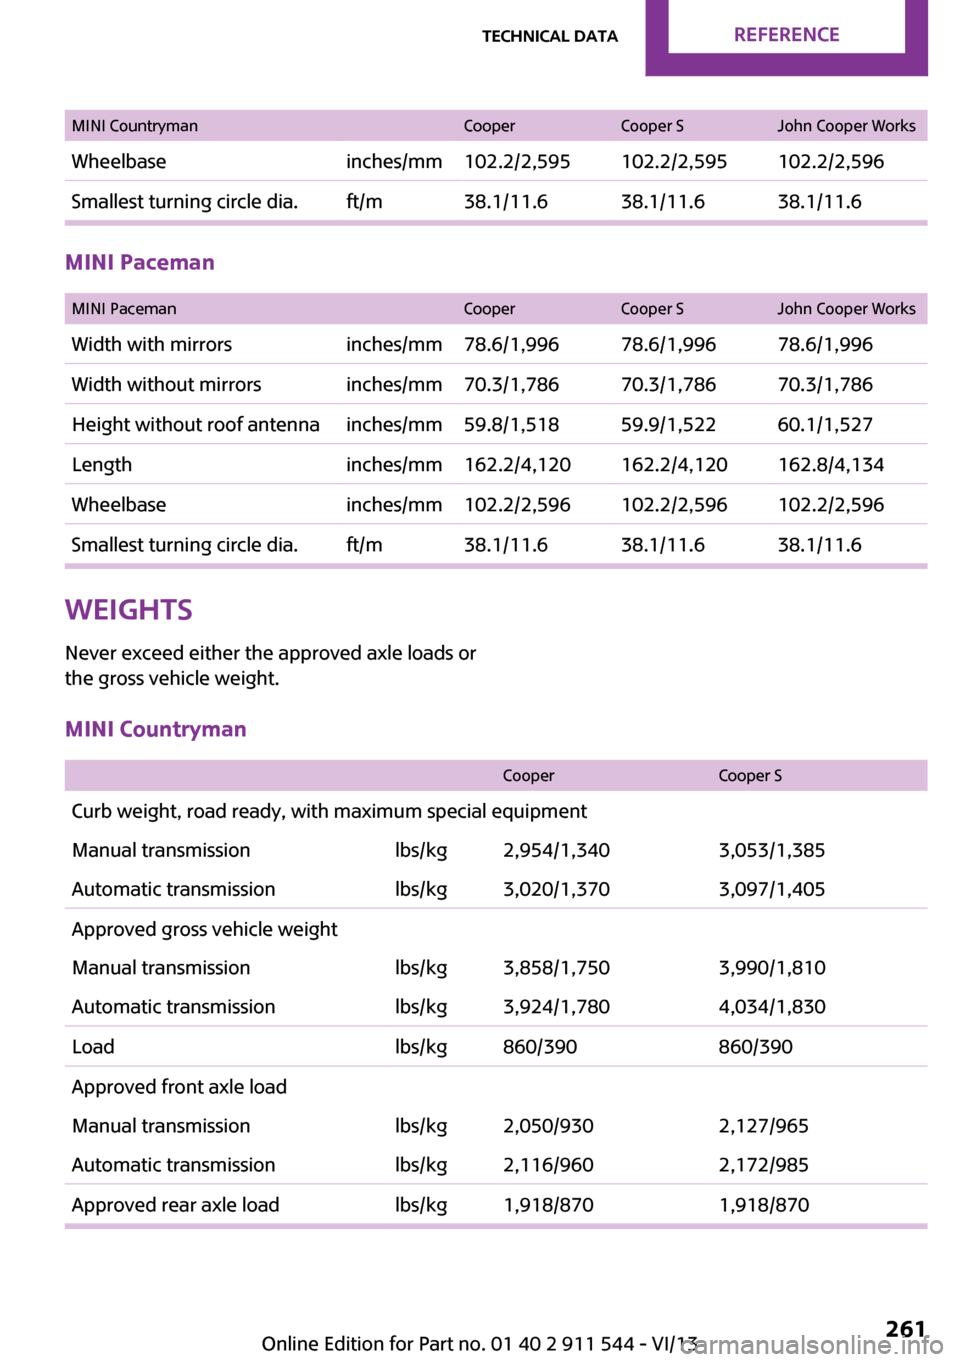
MINI CountrymanCooperCooper SJohn Cooper WorksWheelbaseinches/mm102.2/2,595102.2/2,595102.2/2,596Smallest turning circle dia.ft/m38.1/11.638.1/11.638.1/11.6
MINI Paceman
MINI PacemanCooperCooper SJohn Cooper WorksWidth with mirrorsinches/mm78.6/1,99678.6/1,99678.6/1,996Width without mirrorsinches/mm70.3/1,78670.3/1,78670.3/1,786Height without roof antennainches/mm59.8/1,51859.9/1,52260.1/1,527Lengthinches/mm162.2/4,120162.2/4,120162.8/4,134Wheelbaseinches/mm102.2/2,596102.2/2,596102.2/2,596Smallest turning circle dia.ft/m38.1/11.638.1/11.638.1/11.6Weights
Never exceed either the approved axle loads or
the gross vehicle weight.MINI Countryman
CooperCooper SCurb weight, road ready, with maximum special equipmentManual transmissionlbs/kg2,954/1,3403,053/1,385Automatic transmissionlbs/kg3,020/1,3703,097/1,405Approved gross vehicle weightManual transmissionlbs/kg3,858/1,7503,990/1,810Automatic transmissionlbs/kg3,924/1,7804,034/1,830Loadlbs/kg860/390860/390Approved front axle loadManual transmissionlbs/kg2,050/9302,127/965Automatic transmissionlbs/kg2,116/9602,172/985Approved rear axle loadlbs/kg1,918/8701,918/870Seite 261Technical dataReference261
Online Edition for Part no. 01 40 2 911 544 - VI/13