Convertible MINI Roadster 2013 User Guide
[x] Cancel search | Manufacturer: MINI, Model Year: 2013, Model line: Roadster, Model: MINI Roadster 2013Pages: 292, PDF Size: 7.02 MB
Page 38 of 292
▷The engine can only be started if the re‐
mote control is inside the vehicle.▷The doors and tailgate must be closed to
operate the windows.
Comparison with ordinary remote
control
The functions can be controlled by pressing the
buttons or via Comfort Access.
Notes on opening and closing, refer to page 30.
If you notice a brief delay while opening or
closing the windows or convertible top, the sys‐
tem is checking whether a remote control is in‐
side the vehicle. Repeat the opening or closing
procedure, if necessary.
Unlocking
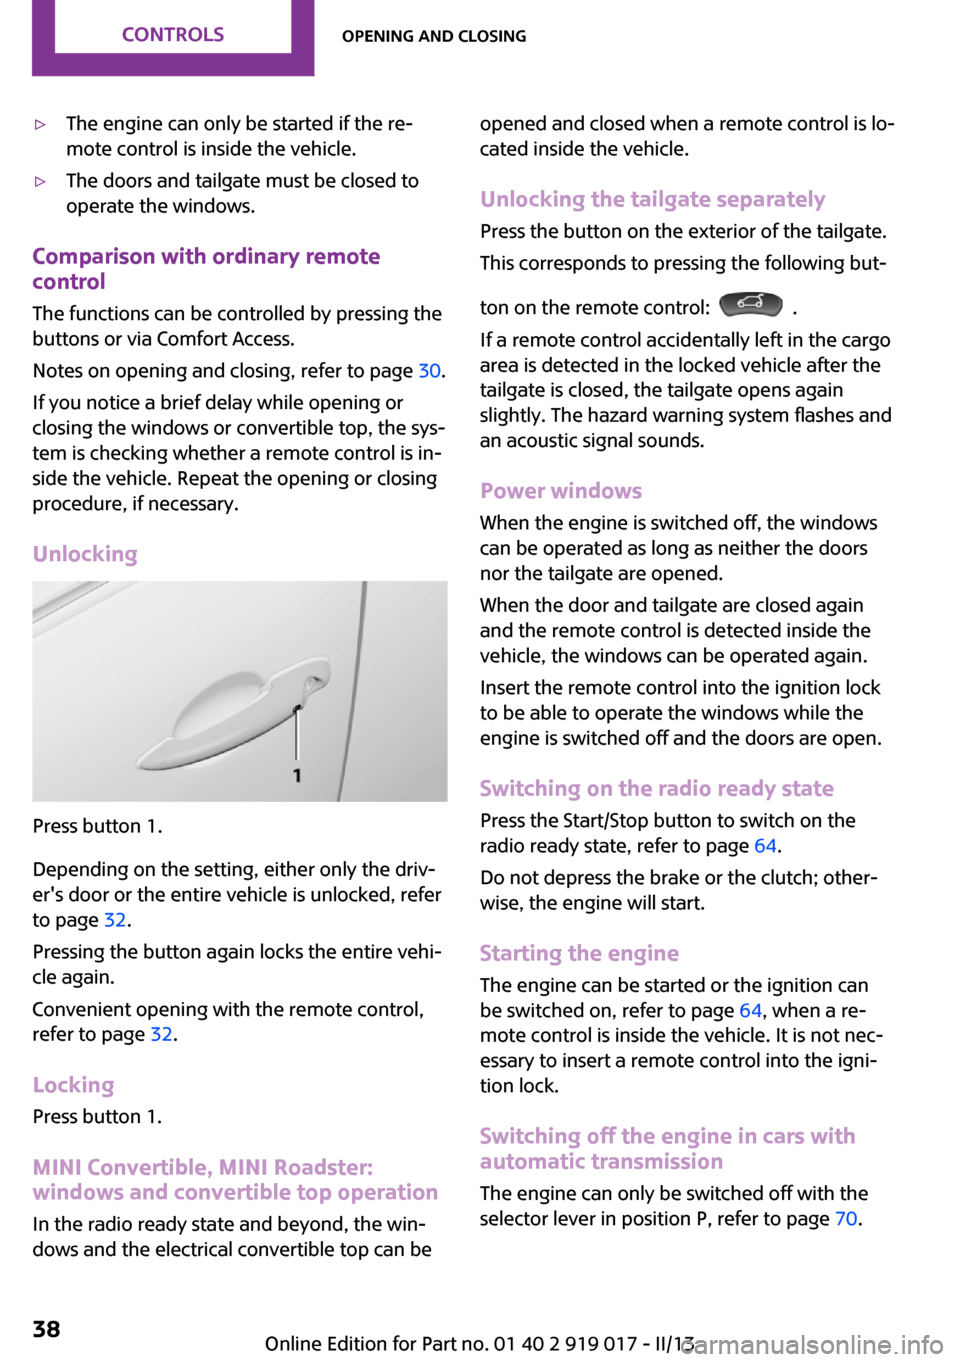
Press button 1.
Depending on the setting, either only the driv‐
er's door or the entire vehicle is unlocked, refer
to page 32.
Pressing the button again locks the entire vehi‐
cle again.
Convenient opening with the remote control,
refer to page 32.
Locking
Press button 1.
MINI Convertible, MINI Roadster:
windows and convertible top operation
In the radio ready state and beyond, the win‐
dows and the electrical convertible top can be
opened and closed when a remote control is lo‐
cated inside the vehicle.
Unlocking the tailgate separately Press the button on the exterior of the tailgate.
This corresponds to pressing the following but‐
ton on the remote control:
.
If a remote control accidentally left in the cargo
area is detected in the locked vehicle after the
tailgate is closed, the tailgate opens again
slightly. The hazard warning system flashes and
an acoustic signal sounds.
Power windows When the engine is switched off, the windows
can be operated as long as neither the doors
nor the tailgate are opened.
When the door and tailgate are closed again
and the remote control is detected inside the
vehicle, the windows can be operated again.
Insert the remote control into the ignition lock
to be able to operate the windows while the
engine is switched off and the doors are open.
Switching on the radio ready state Press the Start/Stop button to switch on the
radio ready state, refer to page 64.
Do not depress the brake or the clutch; other‐
wise, the engine will start.
Starting the engine The engine can be started or the ignition can
be switched on, refer to page 64, when a re‐
mote control is inside the vehicle. It is not nec‐
essary to insert a remote control into the igni‐
tion lock.
Switching off the engine in cars with
automatic transmission
The engine can only be switched off with the
selector lever in position P, refer to page 70.
Seite 38ControlsOpening and closing38
Online Edition for Part no. 01 40 2 919 017 - II/13
Page 40 of 292
▷An acoustic alarm.▷Switching on the hazard warning flashers.
Arming and disarming
General information
Whenever the car is locked or unlocked, the
alarm system is armed or disarmed.
Door lock and armed alarm systemUnlocking via the door lock will trigger the
alarm on some market-specific versions.
To stop this alarm, unlock the vehicle with the
remote control or switch on the ignition.
Tailgate with armed alarm system
The tailgate can also be opened when the
alarm system is armed.
Press the button on the remote con‐
trol.
When you subsequently close the tailgate it is
again locked and monitored.
Switching off an alarm
▷Unlock the car with the remote control.▷Insert the key fully into the ignition lock.▷In cars with convenient access, press the
button on the door lock.
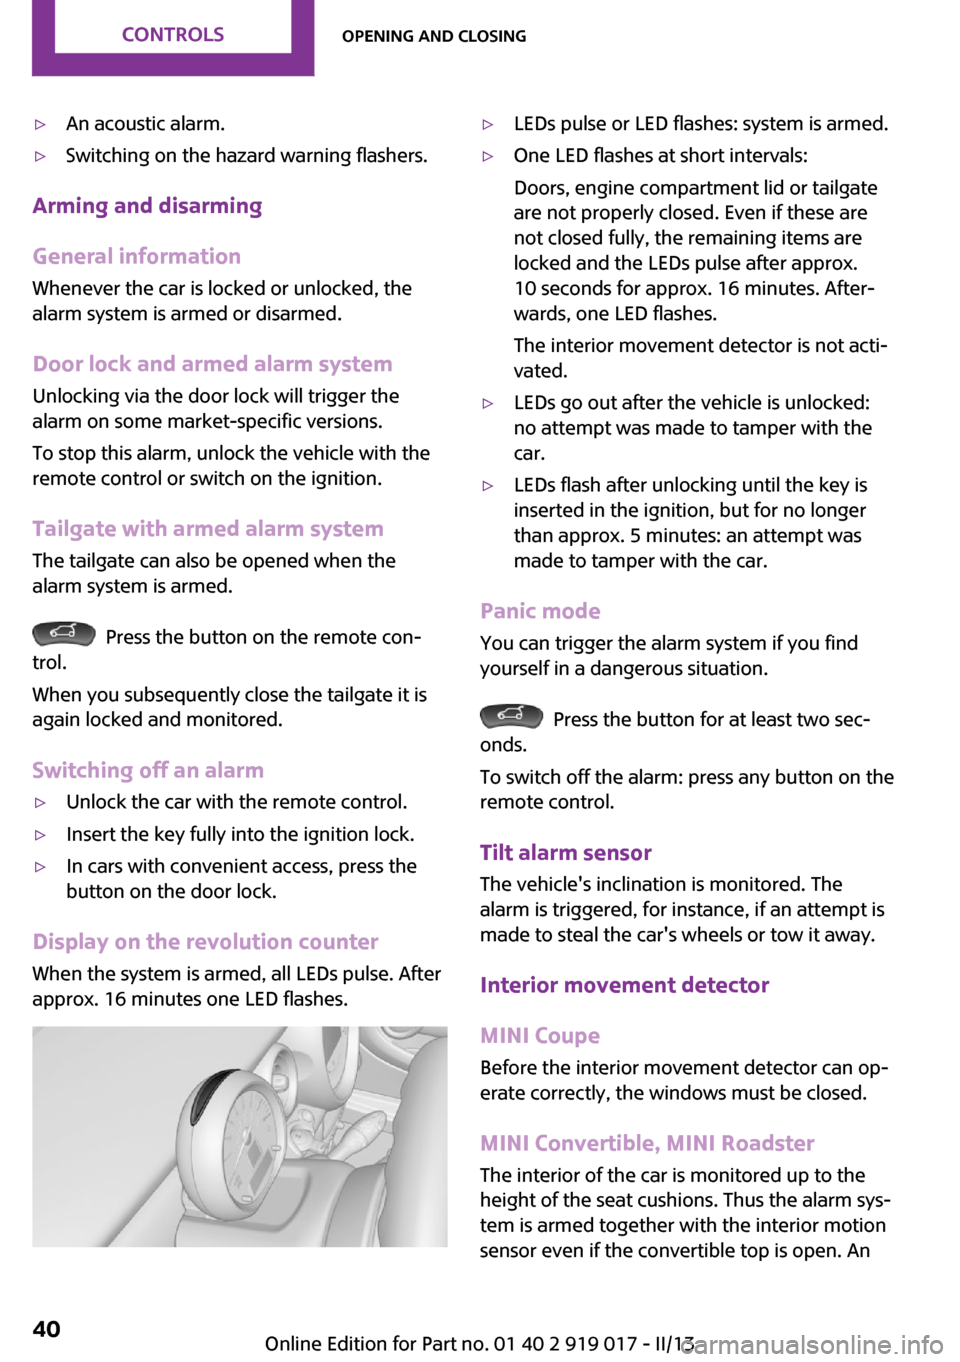
Display on the revolution counter
When the system is armed, all LEDs pulse. After
approx. 16 minutes one LED flashes.
▷LEDs pulse or LED flashes: system is armed.▷One LED flashes at short intervals:
Doors, engine compartment lid or tailgate
are not properly closed. Even if these are
not closed fully, the remaining items are
locked and the LEDs pulse after approx.
10 seconds for approx. 16 minutes. After‐
wards, one LED flashes.
The interior movement detector is not acti‐
vated.▷LEDs go out after the vehicle is unlocked:
no attempt was made to tamper with the
car.▷LEDs flash after unlocking until the key is
inserted in the ignition, but for no longer
than approx. 5 minutes: an attempt was
made to tamper with the car.
Panic mode
You can trigger the alarm system if you find
yourself in a dangerous situation.
Press the button for at least two sec‐
onds.
To switch off the alarm: press any button on the
remote control.
Tilt alarm sensor
The vehicle's inclination is monitored. The
alarm is triggered, for instance, if an attempt is
made to steal the car's wheels or tow it away.
Interior movement detector
MINI Coupe
Before the interior movement detector can op‐
erate correctly, the windows must be closed.
MINI Convertible, MINI RoadsterThe interior of the car is monitored up to the
height of the seat cushions. Thus the alarm sys‐
tem is armed together with the interior motion
sensor even if the convertible top is open. An
Seite 40ControlsOpening and closing40
Online Edition for Part no. 01 40 2 919 017 - II/13
Page 42 of 292
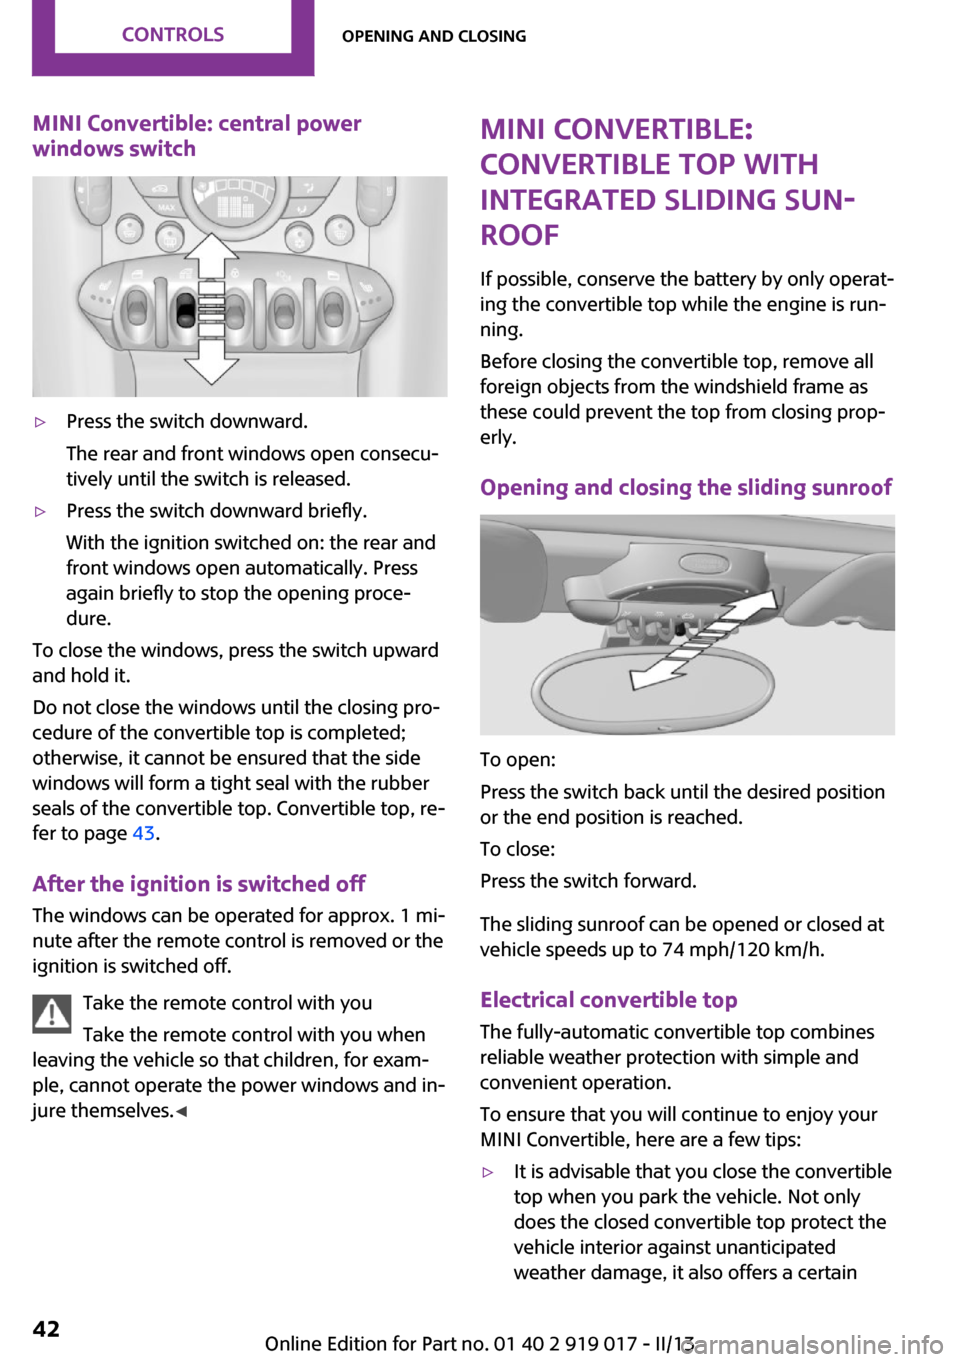
MINI Convertible: central power
windows switch▷Press the switch downward.
The rear and front windows open consecu‐
tively until the switch is released.▷Press the switch downward briefly.
With the ignition switched on: the rear and
front windows open automatically. Press
again briefly to stop the opening proce‐
dure.
To close the windows, press the switch upward
and hold it.
Do not close the windows until the closing pro‐
cedure of the convertible top is completed;
otherwise, it cannot be ensured that the side
windows will form a tight seal with the rubber
seals of the convertible top. Convertible top, re‐
fer to page 43.
After the ignition is switched off The windows can be operated for approx. 1 mi‐
nute after the remote control is removed or the
ignition is switched off.
Take the remote control with you
Take the remote control with you when
leaving the vehicle so that children, for exam‐
ple, cannot operate the power windows and in‐
jure themselves. ◀
MINI Convertible:
convertible top with
integrated sliding sun‐
roof
If possible, conserve the battery by only operat‐
ing the convertible top while the engine is run‐
ning.
Before closing the convertible top, remove all
foreign objects from the windshield frame as
these could prevent the top from closing prop‐
erly.
Opening and closing the sliding sunroof
To open:
Press the switch back until the desired position
or the end position is reached.
To close:
Press the switch forward.
The sliding sunroof can be opened or closed at
vehicle speeds up to 74 mph/120 km/h.
Electrical convertible top The fully-automatic convertible top combines
reliable weather protection with simple and convenient operation.
To ensure that you will continue to enjoy your
MINI Convertible, here are a few tips:
▷It is advisable that you close the convertible
top when you park the vehicle. Not only
does the closed convertible top protect the
vehicle interior against unanticipated
weather damage, it also offers a certainSeite 42ControlsOpening and closing42
Online Edition for Part no. 01 40 2 919 017 - II/13
Page 43 of 292
amount of theft protection. However, even
when the convertible top is closed, valua‐
bles should only be stored in the locked
cargo area.▷Do not attach roof rack systems to the
convertible top.▷If you open the convertible top while it is
wet, e.g., after driving in the rain, water
may drip into the cargo area. If necessary,
remove items from the cargo area before‐
hand to avoid water stains or soiling.
Safety notes on the convertible top
▷At temperatures below +10 ℉/-12 ℃,
do not move the convertible top or
else damage could result.▷Do not leave the convertible top open for
longer than one day while it is wet; other‐
wise, damage could be caused by the mois‐
ture.▷Do not place any objects on the convertible
top; otherwise, they could fall during oper‐
ation of the convertible top and cause
damage or injury.▷The convertible top pivots up when it is
opened and closed. When moving the
convertible top in places like garages, en‐
sure that there is a minimum height of
79 inches/2 meters; otherwise, damage
could result.▷When the rollover protection system is ex‐
tended, do not move the convertible top
under any circumstances.▷Always carry out the convertible top move‐
ment to the end. Driving when the
convertible top is not fully opened or closed
may result in damage or injury.▷During opening and closing, ensure that
people cannot be injured by the convertible
top frame or other moving parts. Keep chil‐
dren away from the opening path of the
convertible top.▷For safety reasons, only move the
convertible top while the vehicle is station‐
ary, if possible.▷Do not place any objects on the convertible
top; otherwise, they could fall during oper‐
ation of the convertible top and cause
damage or injury. ◀
Before opening and closing
▷Follow the above-mentioned safety instruc‐
tions.▷Ensure that the cargo cover is in the lower
position, refer to page 116; otherwise, the
convertible top cannot be opened.▷Ensure that cargo does not push against
the cargo cover from underneath.▷Ensure that the tailgate is closed.
Opening and closing the convertible top
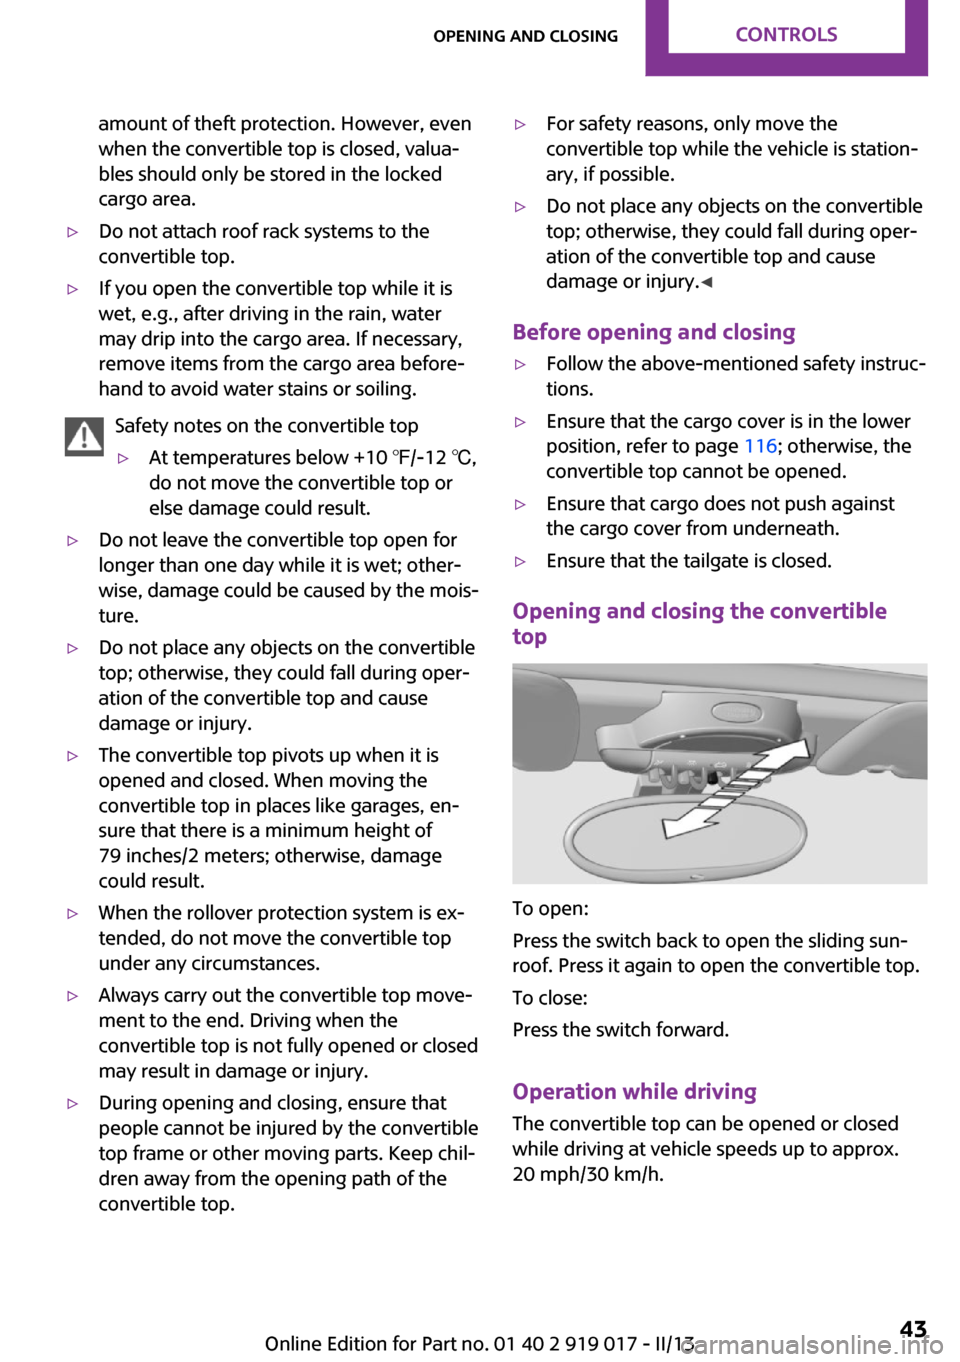
To open:
Press the switch back to open the sliding sun‐
roof. Press it again to open the convertible top.
To close:
Press the switch forward.
Operation while driving The convertible top can be opened or closed
while driving at vehicle speeds up to approx.
20 mph/30 km/h.
Seite 43Opening and closingControls43
Online Edition for Part no. 01 40 2 919 017 - II/13
Page 44 of 292
Pay close attention to the traffic
When operating the convertible top while
driving, pay extra attention to the traffic to
avoid an accident. If possible, do not move the
convertible top while driving in reverse because
your view to the rear is severely limited during
the procedure. Do not operate the convertible
top while the vehicle is moving through curves,
on uneven road surfaces, or in wind. ◀
For better control▷The LED lights up while the convertible top
is activated until the top is fully opened or
closed.▷The LED flashes after the switch is released.
The opening or closing procedure is not yet
fully completed. The sequence can be con‐
tinued in the desired direction by pushing
or pulling the switch.▷The "convertible top not locked" indicator
lamp lights up and a message appears on
the Control Display.
Interruption
Danger
A convertible top that is not fully opened
or closed is a source of danger. ◀
The automatic sequence of movements is inter‐
rupted immediately if the switch for convertible
top operation is released. The sequence can be
continued in the desired direction by pushing
or pulling the switch.
When the opening or closing procedure is inter‐
rupted because the switch is released, the
convertible top remains in the position in which
it stopped for a few seconds before it slowly
moves to a stable position. The sequence can
be continued using the switch.
The opening or closing procedure is also inter‐
rupted when it is blocked mechanically. To be
able to reactivate the convertible top in this
case:1.Switch the ignition off and on again.2.Press the switch to continue the sequence
in the desired direction.
Opening and closing procedure
Do not interrupt the closing procedure
Do not interrupt and resume the closing
procedure several times in close succession as
this could damage the convertible top mecha‐
nism. ◀
If, after having been activated a number of
times in close succession, the convertible top
can only be moved in one direction, the
convertible top system is overheated. Let the
system cool for approx. 4 minutes.
If the battery was disconnected, for example to
change the battery or to put the vehicle into
storage, reinitialize, refer to page 41, the power
windows; otherwise, the windows will not be
lowered, and it will not be possible to open the
convertible top.
Convenient opening and closing Convenient operation is possible via the remote
control, refer to page 32, and the door lock, re‐
fer to page 34.
Manual closing in case of electrical
malfunction
Only close the convertible top manually if
there is an electrical malfunction
Only close the convertible top manually if this is
absolutely necessary; never open it manually.
Damage may occur if incorrectly operated. The
closing procedure must be fully completed;
otherwise, there is a risk of injury or damage. ◀
Before closing
1.Take the hex key and screwdriver out of the
onboard vehicle tool kit, refer to page 243.Seite 44ControlsOpening and closing44
Online Edition for Part no. 01 40 2 919 017 - II/13
Page 45 of 292

2.Pry out the trunk lamp in the left side trim
using the screwdriver, arrow.3.Using the screwdriver, unscrew the gold-
colored screw by approx. one and a half
turns.
Unlocking the convertible top
1.Release the screw, arrow, using the hex key
and take it out.2.Slide the cover in the direction of travel, ar‐
row 1, and twist it out sideways, arrow 2. If
necessary, push the plastic trim, arrow 3,
inward slightly.3.Pull the sensor out of the cover, arrow, and
set it down on the inside side trim.4.Release the second screw, arrow, using the
hex key to unlock the convertible top.5.Take out the screw.6.Lift the side frame slightly, arrow 1, and pull
the sensor and cable forward out of the
guide.7.Pivot the cable out sideways, arrow 2.
When setting it down, ensure that the cable
is not pinched.8.Unlock the second side frame.Seite 45Opening and closingControls45
Online Edition for Part no. 01 40 2 919 017 - II/13
Page 46 of 292
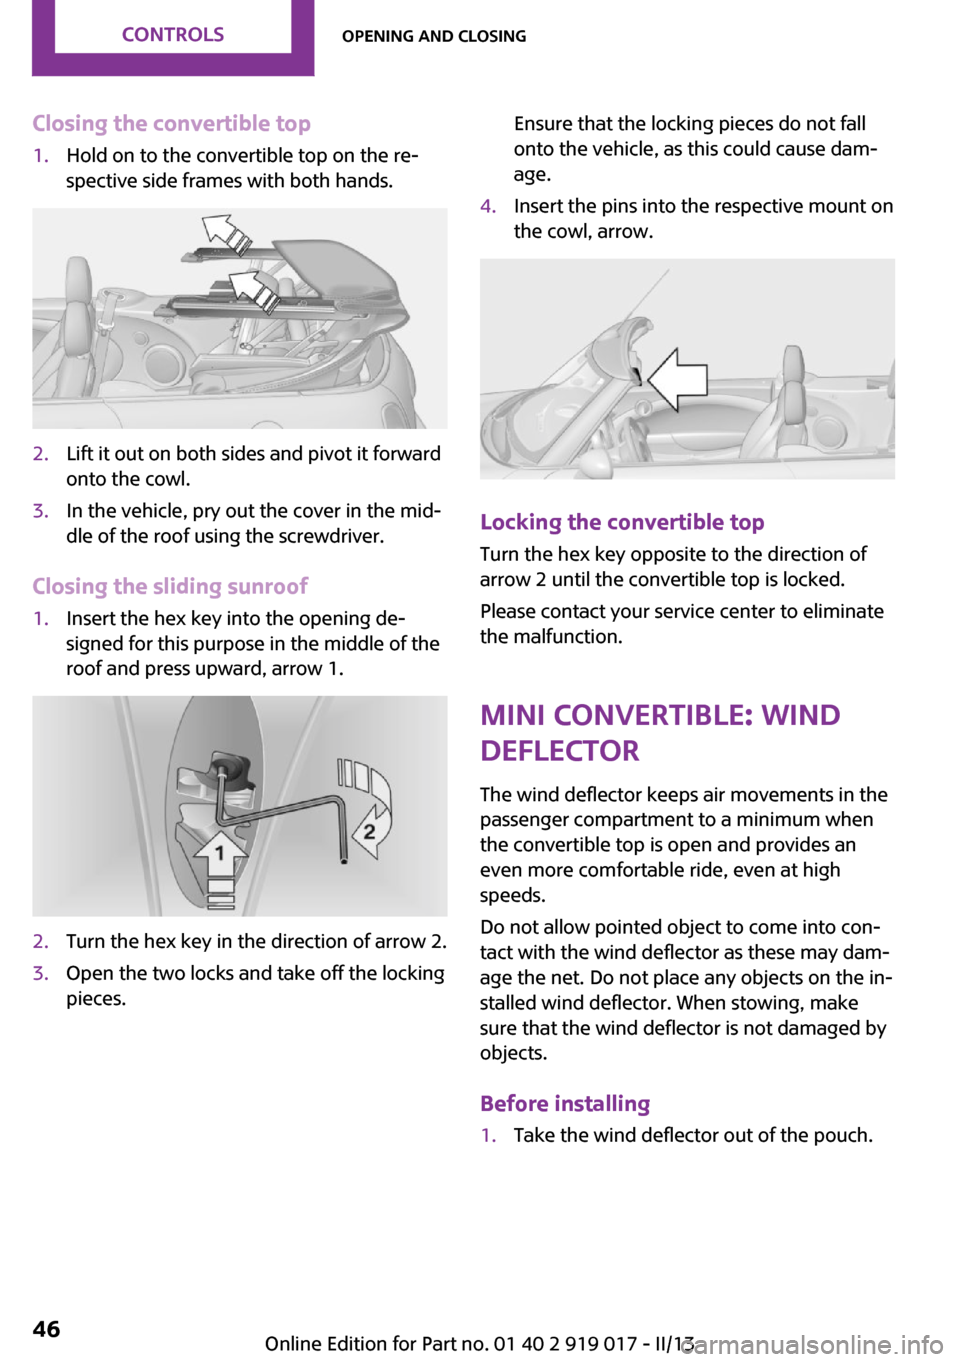
Closing the convertible top1.Hold on to the convertible top on the re‐
spective side frames with both hands.2.Lift it out on both sides and pivot it forward
onto the cowl.3.In the vehicle, pry out the cover in the mid‐
dle of the roof using the screwdriver.
Closing the sliding sunroof
1.Insert the hex key into the opening de‐
signed for this purpose in the middle of the
roof and press upward, arrow 1.2.Turn the hex key in the direction of arrow 2.3.Open the two locks and take off the locking
pieces.Ensure that the locking pieces do not fall
onto the vehicle, as this could cause dam‐
age.4.Insert the pins into the respective mount on
the cowl, arrow.
Locking the convertible top
Turn the hex key opposite to the direction of
arrow 2 until the convertible top is locked.
Please contact your service center to eliminate
the malfunction.
MINI Convertible: wind
deflector
The wind deflector keeps air movements in the
passenger compartment to a minimum when
the convertible top is open and provides an
even more comfortable ride, even at high
speeds.
Do not allow pointed object to come into con‐
tact with the wind deflector as these may dam‐
age the net. Do not place any objects on the in‐
stalled wind deflector. When stowing, make
sure that the wind deflector is not damaged by
objects.
Before installing
1.Take the wind deflector out of the pouch.Seite 46ControlsOpening and closing46
Online Edition for Part no. 01 40 2 919 017 - II/13
Page 47 of 292
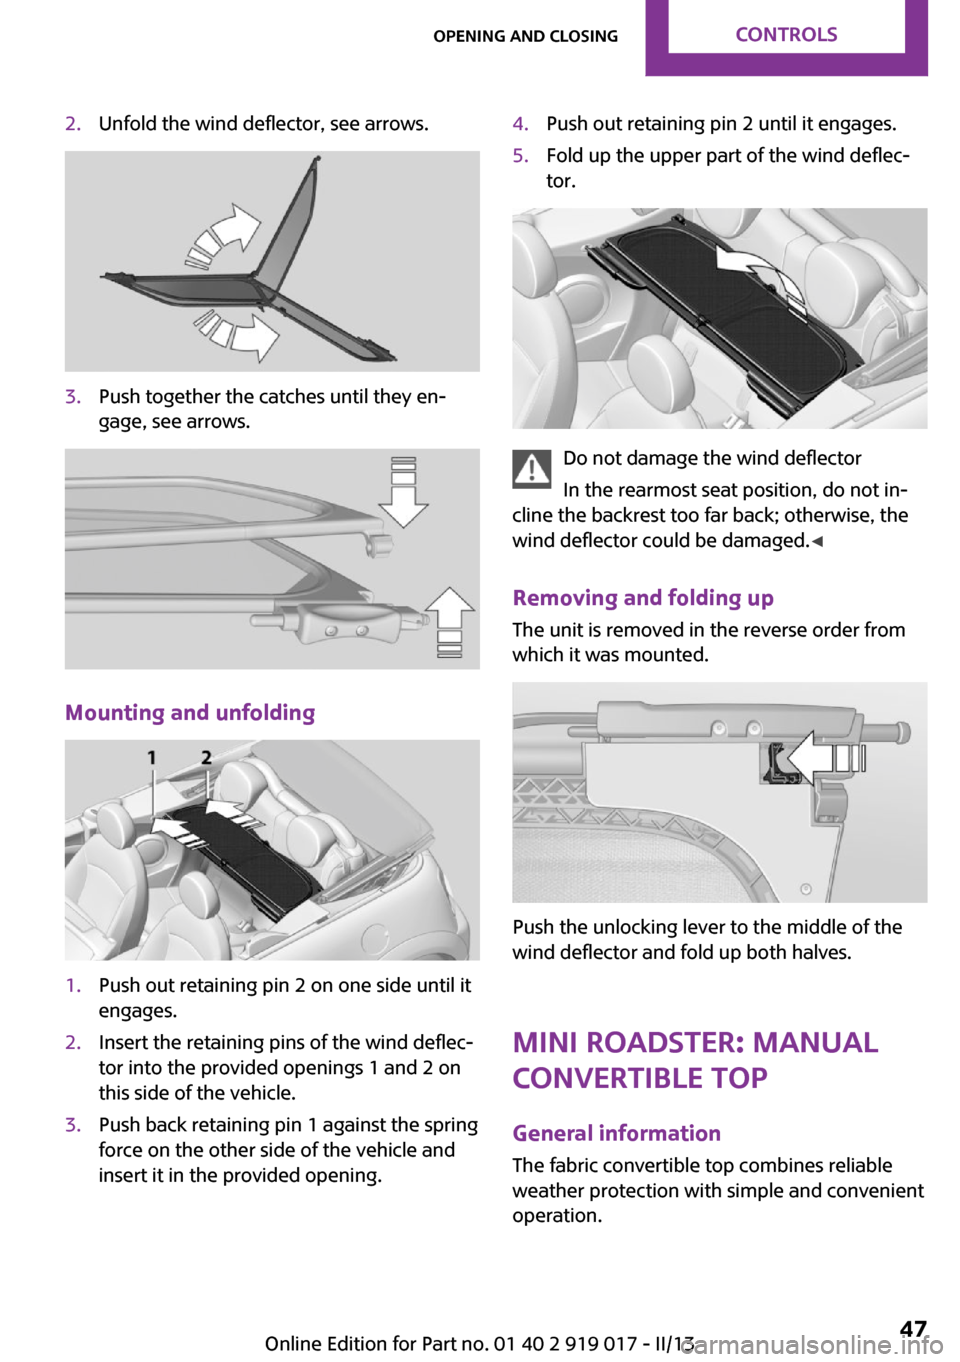
2.Unfold the wind deflector, see arrows.3.Push together the catches until they en‐
gage, see arrows.
Mounting and unfolding
1.Push out retaining pin 2 on one side until it
engages.2.Insert the retaining pins of the wind deflec‐
tor into the provided openings 1 and 2 on
this side of the vehicle.3.Push back retaining pin 1 against the spring
force on the other side of the vehicle and
insert it in the provided opening.4.Push out retaining pin 2 until it engages.5.Fold up the upper part of the wind deflec‐
tor.
Do not damage the wind deflector
In the rearmost seat position, do not in‐
cline the backrest too far back; otherwise, the
wind deflector could be damaged. ◀
Removing and folding up
The unit is removed in the reverse order from
which it was mounted.
Push the unlocking lever to the middle of the
wind deflector and fold up both halves.
MINI Roadster: manual
convertible top
General information The fabric convertible top combines reliable
weather protection with simple and convenient
operation.
Seite 47Opening and closingControls47
Online Edition for Part no. 01 40 2 919 017 - II/13
Page 48 of 292
To ensure that you will continue to enjoy your
MINI Convertible, here are a few tips:▷It is advisable that you close the convertible
top when you park the vehicle. Not only
does the closed convertible top protect the
vehicle interior against unanticipated
weather damage, it also offers a certain
amount of theft protection. However, even
when the convertible top is closed, valua‐
bles should only be stored in the locked
cargo area.▷Do not attach roof rack systems to the
convertible top.
Safety notes on the convertible top
▷Do not leave the convertible top open
for longer than one day while it is
wet; otherwise, damage could be
caused by the moisture.▷Do not place any objects on the convertible
top; otherwise, they could fall during oper‐
ation of the convertible top and cause
damage or injury.▷The convertible top pivots up when it is
opened and closed. When moving the
convertible top in places like garages, en‐
sure that there is a minimum height of
79 inches/2 meters; otherwise, damage
could result.▷Always carry out the convertible top move‐
ment to the end. Driving when the
convertible top is not fully opened or closed
may result in damage or injury.▷During opening and closing, ensure that
people cannot be injured by the convertible
top frame or other moving parts. Keep chil‐
dren away from the opening path of the
convertible top.▷For safety reasons, only move the
convertible top while the vehicle is station‐
ary, if possible.▷Do not place any objects on the convertible
top; otherwise, they could fall during oper‐
ation of the convertible top and cause
damage or injury. ◀
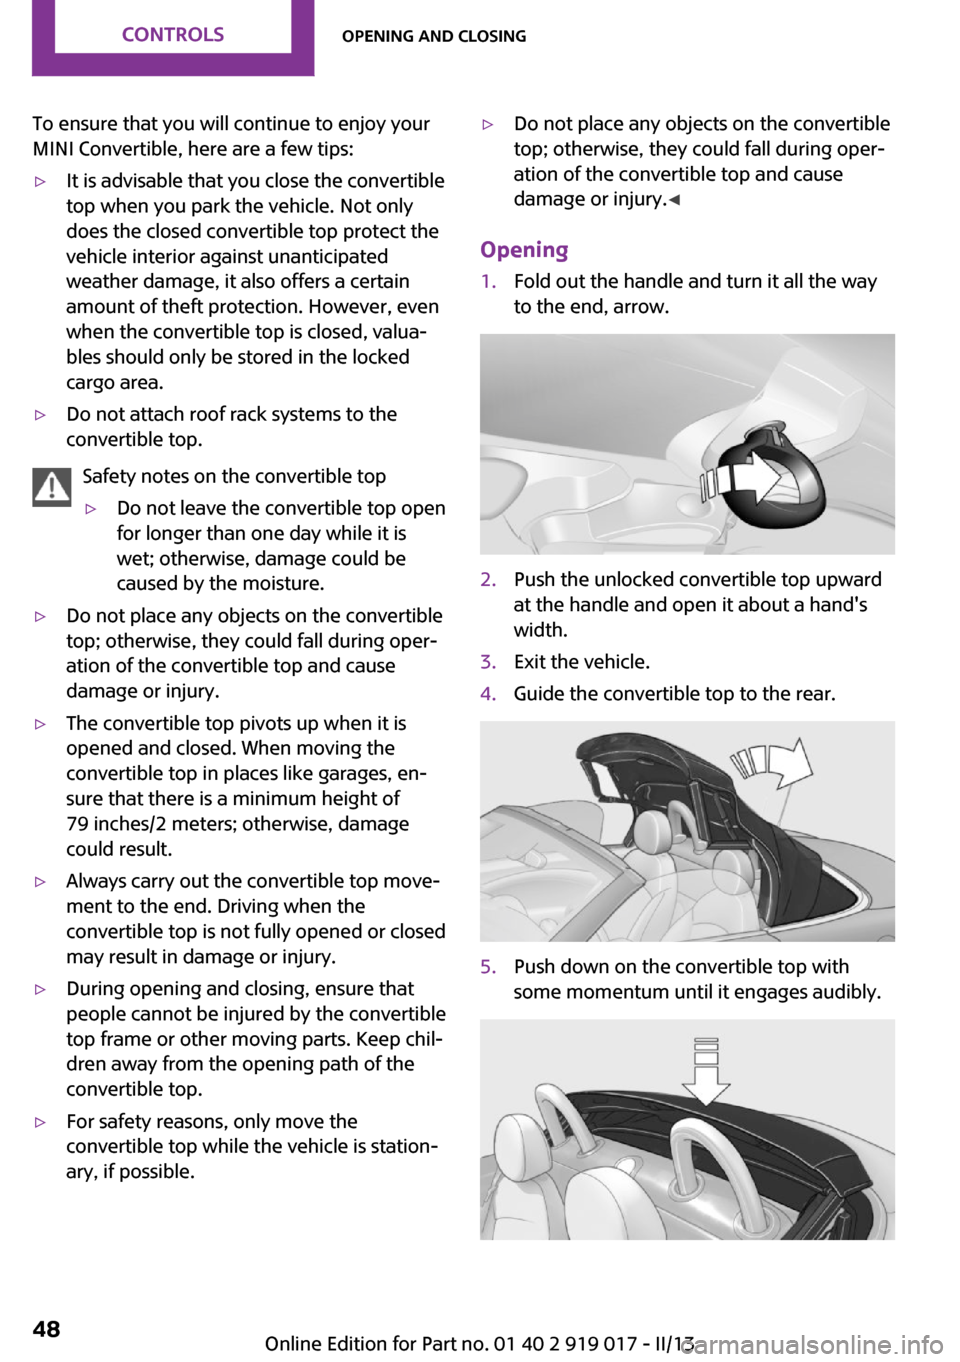
Opening
1.Fold out the handle and turn it all the way
to the end, arrow.2.Push the unlocked convertible top upward
at the handle and open it about a hand's
width.3.Exit the vehicle.4.Guide the convertible top to the rear.5.Push down on the convertible top with
some momentum until it engages audibly.Seite 48ControlsOpening and closing48
Online Edition for Part no. 01 40 2 919 017 - II/13
Page 49 of 292
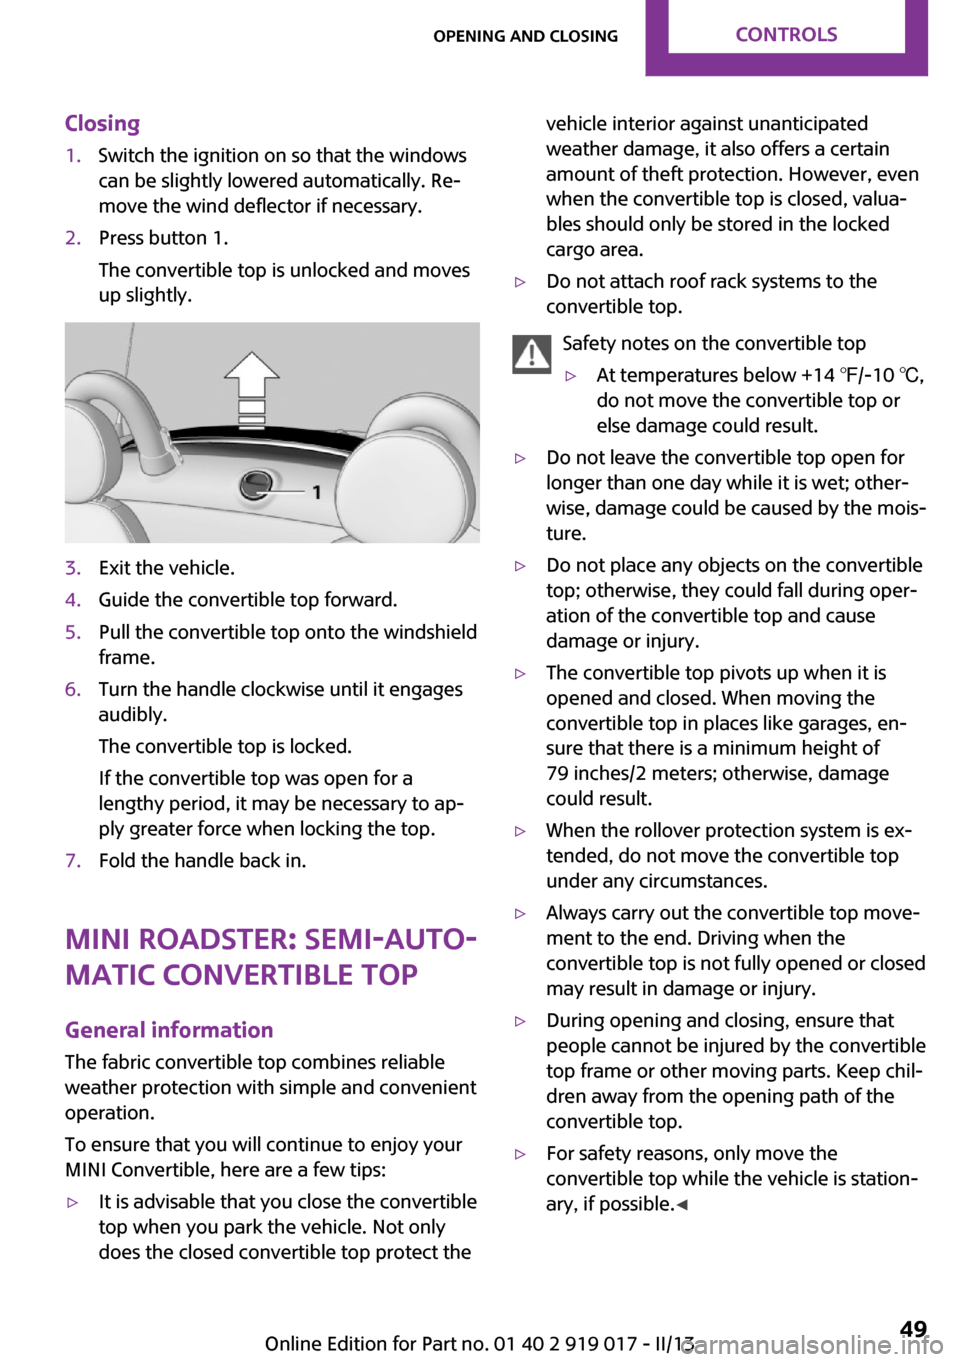
Closing1.Switch the ignition on so that the windows
can be slightly lowered automatically. Re‐
move the wind deflector if necessary.2.Press button 1.
The convertible top is unlocked and moves
up slightly.3.Exit the vehicle.4.Guide the convertible top forward.5.Pull the convertible top onto the windshield
frame.6.Turn the handle clockwise until it engages
audibly.
The convertible top is locked.
If the convertible top was open for a
lengthy period, it may be necessary to ap‐
ply greater force when locking the top.7.Fold the handle back in.
MINI Roadster: semi-auto‐
matic convertible top
General information
The fabric convertible top combines reliable
weather protection with simple and convenient
operation.
To ensure that you will continue to enjoy your
MINI Convertible, here are a few tips:
▷It is advisable that you close the convertible
top when you park the vehicle. Not only
does the closed convertible top protect thevehicle interior against unanticipated
weather damage, it also offers a certain
amount of theft protection. However, even
when the convertible top is closed, valua‐
bles should only be stored in the locked
cargo area.▷Do not attach roof rack systems to the
convertible top.
Safety notes on the convertible top
▷At temperatures below +14 ℉/-10 ℃,
do not move the convertible top or
else damage could result.▷Do not leave the convertible top open for
longer than one day while it is wet; other‐
wise, damage could be caused by the mois‐
ture.▷Do not place any objects on the convertible
top; otherwise, they could fall during oper‐
ation of the convertible top and cause
damage or injury.▷The convertible top pivots up when it is
opened and closed. When moving the
convertible top in places like garages, en‐
sure that there is a minimum height of
79 inches/2 meters; otherwise, damage
could result.▷When the rollover protection system is ex‐
tended, do not move the convertible top
under any circumstances.▷Always carry out the convertible top move‐
ment to the end. Driving when the
convertible top is not fully opened or closed
may result in damage or injury.▷During opening and closing, ensure that
people cannot be injured by the convertible
top frame or other moving parts. Keep chil‐
dren away from the opening path of the
convertible top.▷For safety reasons, only move the
convertible top while the vehicle is station‐
ary, if possible. ◀Seite 49Opening and closingControls49
Online Edition for Part no. 01 40 2 919 017 - II/13