light MITSUBISHI 380 2005 Repair Manual
[x] Cancel search | Manufacturer: MITSUBISHI, Model Year: 2005, Model line: 380, Model: MITSUBISHI 380 2005Pages: 1500, PDF Size: 47.87 MB
Page 706 of 1500
AUTO A/C DIAGNOSIS
HEATER, AIR CONDITIONING AND VENTILATION55-5
AUTO A/C DIAGNOSIS
INTRODUCTIONM1554006200062
After air is taken in through the damper, it is fed to
the evaporator by the blower fan and motor and
cooled. The air cooled by the air mix damper is
mixed appropriately with the warmed air to achieve a
comfortable temperature. If the A/C does not operate
or the cooled air is not discharged, the system com-
ponents or relay may be faulty.
AUTOMATIC AIR CONDITIONING TROUBLESHOOTING STRATEGYM1554004700157
Use these steps to plan your diagnostic strategy. If
you follow them carefully, you will be sure that you
have exhausted most of the possible ways to find a
heater, air conditioning and ventilation fault.
1. Gather information from the customer.2. Verify that the condition described by the
customer exists.
3. Find the malfunction by following the Symptom
Chart.
4. Verify malfunction is eliminated.
DIAGNOSTIC FUNCTIONM1552019800046
HOW TO CONNECT THE DIAGNOSTIC TOOL
(MUT-III)
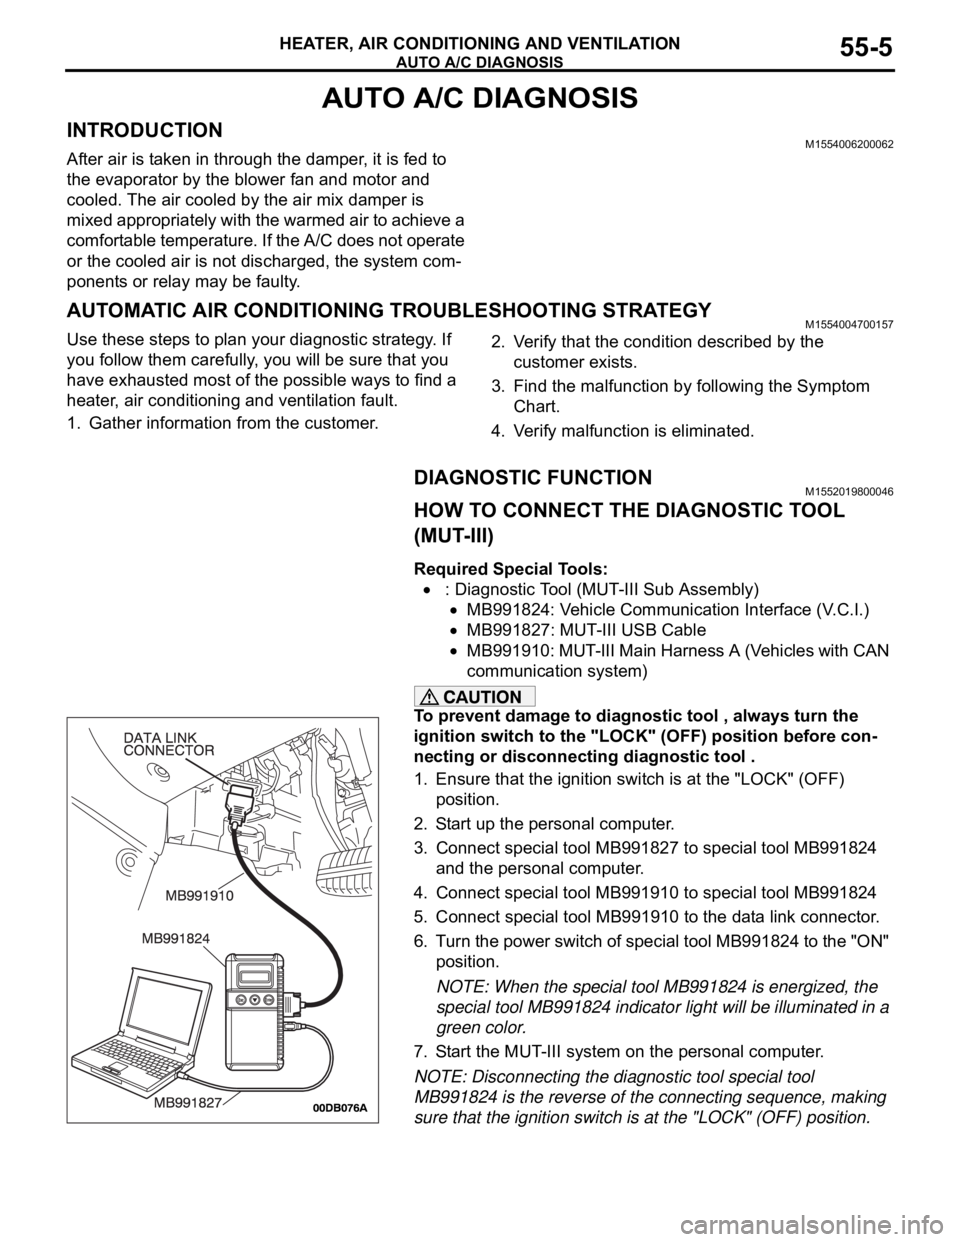
Required Special Tools:
: Diagnostic Tool (MUT-III Sub Assembly)
MB991824: Vehicle Communication Interface (V.C.I.)
MB991827: MUT-III USB Cable
MB991910: MUT-III Main Harness A (Vehicles with CAN
communication system)
To prevent damage to diagnostic tool , always turn the
ignition switch to the "LOCK" (OFF) position before con-
necting or disconnecting diagnostic tool .
1. Ensure that the ignition switch is at the "LOCK" (OFF)
position.
2. Start up the personal computer.
3. Connect special tool MB991827 to special tool MB991824
and the personal computer.
4. Connect special tool MB991910 to special tool MB991824
5. Connect special tool MB991910 to the data link connector.
6. Turn the power switch of special tool MB991824 to the "ON"
position.
NOTE: When the special tool MB991824 is energized, the
special tool MB991824 indicator light will be illuminated in a
green color.
7. Start the MUT-III system on the personal computer.
NOTE: Disconnecting the diagnostic tool special tool
MB991824 is the reverse of the connecting sequence, making
sure that the ignition switch is at the "LOCK" (OFF) position.
Page 769 of 1500

AUTO A/C DIAGNOSIS
HEATER, AIR CONDITIONING AND VENTILATION55-68
SYMPTOM CHART M1552009900495
During diagnosis, a DTC code associated with
other system may be set when the ignition switch
is turned on with connector(s) disconnected. On
completion, confirm all systems for DTC code(s).
If DTC code(s) are set, erase them all.
SYMPTOM INSPECTION
PROCEDUREREFERENCE
PA G E
When the ignition switch is "ON", the A/C does not operate. 1.
P.55-69
When the air outlet changeover control knob is moved to DEFROSTER or
DEFROSTER/FOOT position, the A/C or the inside/outside air
changeover damper motor does not operate.2.
P.55-69
Outside/Inside air changeover is not possible. 3.
P.55-70
When the A/C is operating, temperature inside the passenger
compartment does not decrease (cool air is not emitted).4.
P.55-75
Blower fan and motor do not turn. 5.
P.55-89
Blower air amount cannot be changed. 6.
P.55-100
The A/C indicator flashes. 7.
P.55-104
Defogger function does not operate. 8.
P.55-110
Defogger timer function does not operate. 9.
P.55-121
Malfunction of the A/C-ECU power supply system. 10.
P.55-122
Condenser fan does not operate. 11. REFER TO
GROUP 14
SYMPTOM
CHART P.14-3
When sunlight intensity changes, air outlet temperature does not change. 12
P.55-128
Page 829 of 1500
AUTO A/C DIAGNOSIS
HEATER, AIR CONDITIONING AND VENTILATION55-128
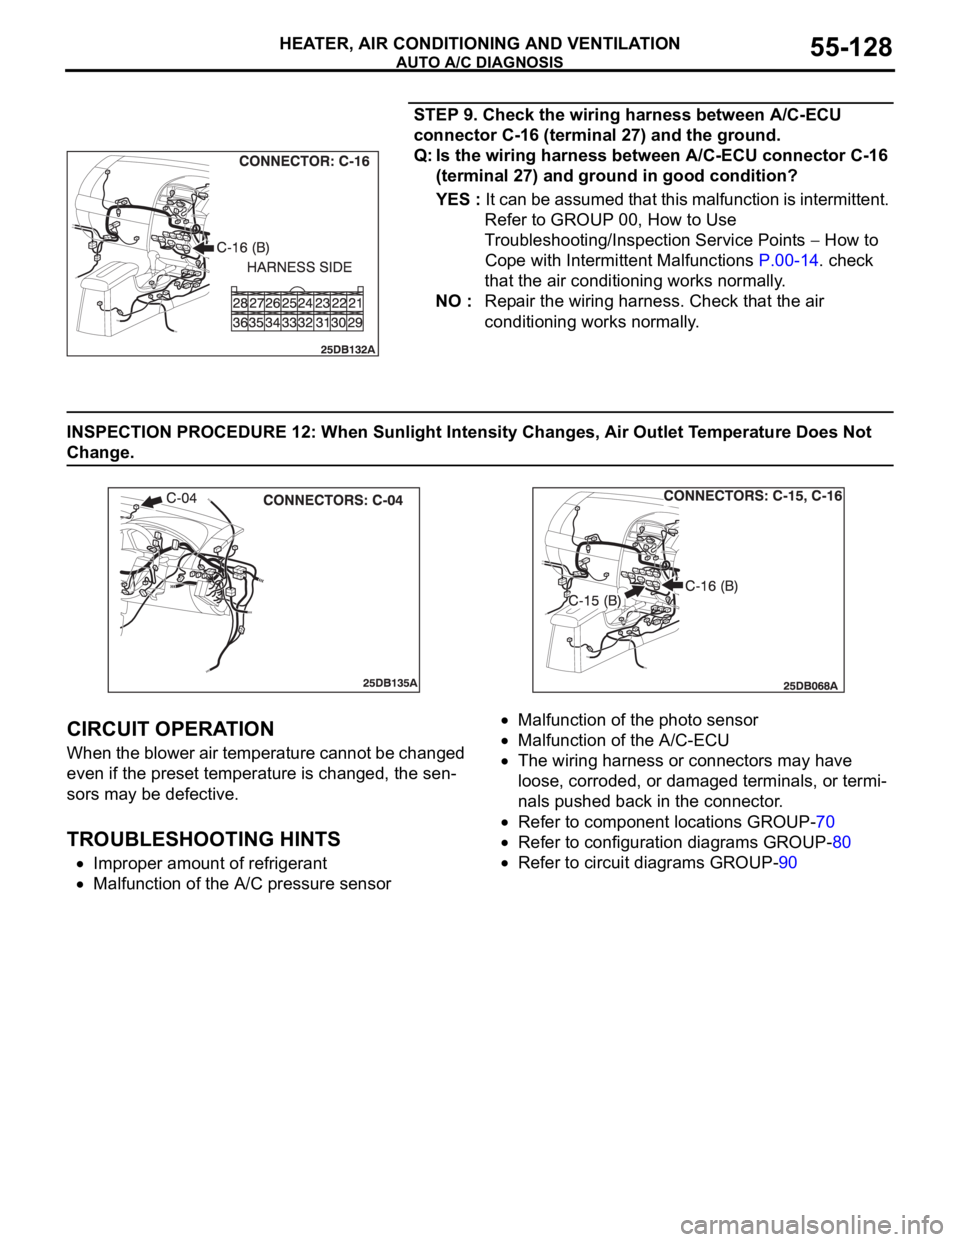
STEP 9. Check the wiring harness between A/C-ECU
connector C-16 (terminal 27) and the ground.
Q: Is the wiring harness between A/C-ECU connector C-16
(terminal 27) and ground in good condition?
YES : It can be assumed that this malfunction is intermittent.
Refer to GROUP 00, How to Use
Troubleshooting/Inspection Service Points
How to
Cope with Intermittent Malfunctions P.00-14. check
that the air conditioning works normally.
NO : Repair the wiring harness. Check that the air
conditioning works normally.
INSPECTION PROCEDURE 12: When Sunlight Intensity Changes, Air Outlet Temperature Does Not
Change.
.
CIRCUIT OPERATION
When the blower air temperature cannot be changed
even if the preset temperature is changed, the sen-
sors may be defective.
.
TROUBLESHOOTING HINTS
Improper amount of refrigerant
Malfunction of the A/C pressure sensor
Malfunction of the photo sensor
Malfunction of the A/C-ECU
The wiring harness or connectors may have
loose, corroded, or damaged terminals, or termi-
nals pushed back in the connector.
Refer to component locations GROUP-70
Refer to configuration diagrams GROUP-80
Refer to circuit diagrams GROUP-90
Page 834 of 1500

AUTO A/C DIAGNOSIS
HEATER, AIR CONDITIONING AND VENTILATION55-133
DATA LIST REFERENCE TABLEM1554005100136
MUT-III
DIAGNOSTIC
TOOL DISPLAYITEM
NO.INSPECTION ITEM INSPECTION REQUIREMENT NORMAL VALUE
Inside
temperature
sensor59 Interior temperature
sensorIgnition switch: ON Inside air
temperature and
temperature
displayed on the
diagnostic tool are
identical.
Outside
temperature
sensor58 Outside temperature
sensorIgnition switch: ON Outside air
temperature and
temperature
displayed on the
diagnostic tool are
identical.
Air thermo sensor 20 Air thermo sensor Ignition switch: ON The temperature
measured behind
the evaporator
matches the
displayed value on
the diagnostic tool
while the engine is
cold.
Pressure sensor 61 A/C pressure sensor Ignition switch: ON Measured refrigerant
pressure is nearly
equal to the value
shown on the
diagnostic tool
(MPa).
Water
temperature
sensor62 Engine coolant
temperature sensor
(Data received by
CAN
Communication)Ignition switch: ON Engine coolant
temperature and
temperature
displayed on the
diagnostic tool are
identical.
Photo sensor 67 Photo sensor Ignition switch: ON Amount of light is
proportional to
voltage displayed on
the diagnostic tool.
Air mix
potentiometer63 Air mixing damper
control motor
potentiometerIgnition switch: ON Damper
positionOpening degree (V)
MAX. HOT Approx. 5
MAX. COOL Approx. 0
Air mix
potentiometer
(Target)64 Target value for air
mixing damper
control motor
potentiometerIgnition switch: ON Damper
positionOpening degree (V)
MAX. HOT Approx. 5
MAX. COOL Approx. 0
Page 836 of 1500

AUTO A/C DIAGNOSIS
HEATER, AIR CONDITIONING AND VENTILATION55-135
Temperature
setting23 Temperature setting
actualIgnition switch: ON The actual setting
corresponds with
diagnostic tool
display.
Vehicle speed 26 Actual vehicle speed Ignition switch: ON The vehicle speed
corresponds with
diagnostic tool
display.
A/C compressor
drive request27 Compressor clutch Engine: ON
Compressor:
ONDiagnostic tool
indication: "ON"
Compressor:
OFFDiagnostic tool
indication: "OFF"
Illumination 15 Display lighting Ignition switch: ON
Lights: ON
Diagnostic tool
indication: "ON"
Lights: OFF
Diagnostic tool
indication: "OFF"
Engine speed 23 Actual engine speed Engine: ON The engine speed
corresponds with
diagnostic tool
display.
In/out air select
switch state3 In/out air select
switch Ignition switch: ON In/out air
switch: ONDiagnostic tool
indication: "pressed"
In/out air
switch: OFFDiagnostic tool
indication: "release"
Rear defogger
relay72 Rear defogger relay Ignition switch: ON
Rear defogger:
ONDiagnostic tool
indication: "ON"
Rear defogger:
OFFDiagnostic tool
indication: "OFF" MUT-III
DIAGNOSTIC
TOOL DISPLAYITEM
NO.INSPECTION ITEM INSPECTION REQUIREMENT NORMAL VALUE
Page 839 of 1500

AUTO A/C DIAGNOSIS
HEATER, AIR CONDITIONING AND VENTILATION55-138
16 Potentiometer power supply Ignition switch: ON 5 V
17 Power transistor (BASE) When the blower speed
selection dial shows Maximum
air volume.1 V
18 Power transistor
(COLLECTOR)When the blower speed
selection dial shows Maximum
air volume.12.1 V
19 Photo sensor Ignition switch: ON 5 V
20 Sensors and potentiometers
groundAlways 0 V
21 Mode selection damper control
motor potentiometer inputWhen the damper is moved to
the FACE position. 4 V
22 Interior temperature sensor Ignition switch: ON 5 V
23 Ambient temperature sensor
inputWhen sensor temperature is
25
C (77F) [4 k]1.9 V
24 Air thermo sensor input When sensor temperature is
25
C (77F) [1.5 k]2.2 V
25 Photo sensor ground Ignition switch: ON 0 V
26 A/C pressure sensor at 2.6 MPa 3.9 V
27 Ground Always 0 V
28 Power supply to the ignition
switch (IG2)Ignition switch: ON Battery positive voltage
29 Air mixing damper control motor
potentiometer inputWhen the damper door is
moved to the MAX. HOT
position.1.4 V
30 Illumination ground Always 0 V
31 ILL power supply Lighting switch: ON Battery positive voltage
34 A/C pressure sensor ground Always 0 V
36 Power supply to the ignition
switch (ACC)Ignition switch: ON Battery positive voltage TERMINAL
NO.CHECK ITEM CHECKING REQUIREMENTS NORMAL CONDITION
Page 844 of 1500
ON-VEHICLE SERVICE
HEATER, AIR CONDITIONING AND VENTILATION55-143
PERFORMANCE TEST M1552001400526
The vehicles to be tested should be parked out of direct sun-
light.
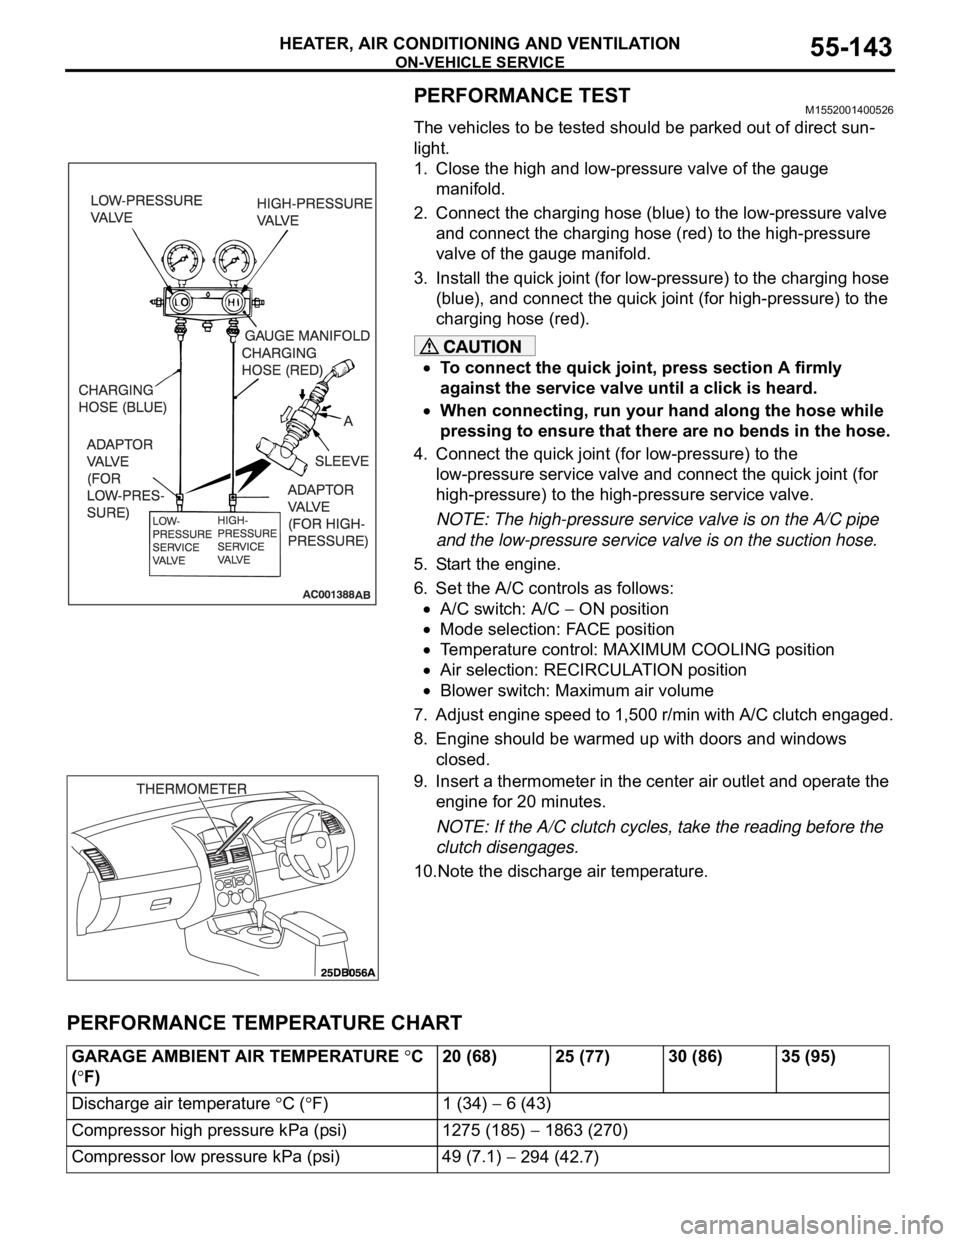
1. Close the high and low-pressure valve of the gauge
manifold.
2. Connect the charging hose (blue) to the low-pressure valve
and connect the charging hose (red) to the high-pressure
valve of the gauge manifold.
3. Install the quick joint (for low-pressure) to the charging hose
(blue), and connect the quick joint (for high-pressure) to the
charging hose (red).
To connect the quick joint, press section A firmly
against the service valve until a click is heard.
When connecting, run your hand along the hose while
pressing to ensure that there are no bends in the hose.
4. Connect the quick joint (for low-pressure) to the
low-pressure service valve and connect the quick joint (for
high-pressure) to the high-pressure service valve.
NOTE: The high-pressure service valve is on the A/C pipe
and the low-pressure service valve is on the suction hose.
5. Start the engine.
6. Set the A/C controls as follows:
A/C switch: A/C ON position
Mode selection: FACE position
Temperature control: MAXIMUM COOLING position
Air selection: RECIRCULATION position
Blower switch: Maximum air volume
7. Adjust engine speed to 1,500 r/min with A/C clutch engaged.
8. Engine should be warmed up with doors and windows
closed.
9. Insert a thermometer in the center air outlet and operate the
engine for 20 minutes.
NOTE: If the A/C clutch cycles, take the reading before the
clutch disengages.
10.Note the discharge air temperature.
PERFORMANCE TEMPERATURE CHART
GARAGE AMBIENT AIR TEMPERATURE C
(
F)20 (68) 25 (77) 30 (86) 35 (95)
Discharge air temperature
C (F) 1 (34) 6 (43)
Compressor high pressure kPa (psi) 1275 (185)
1863 (270)
Compressor low pressure kPa (psi) 49 (7.1)
294 (42.7)
Page 850 of 1500
ON-VEHICLE SERVICE
HEATER, AIR CONDITIONING AND VENTILATION55-149
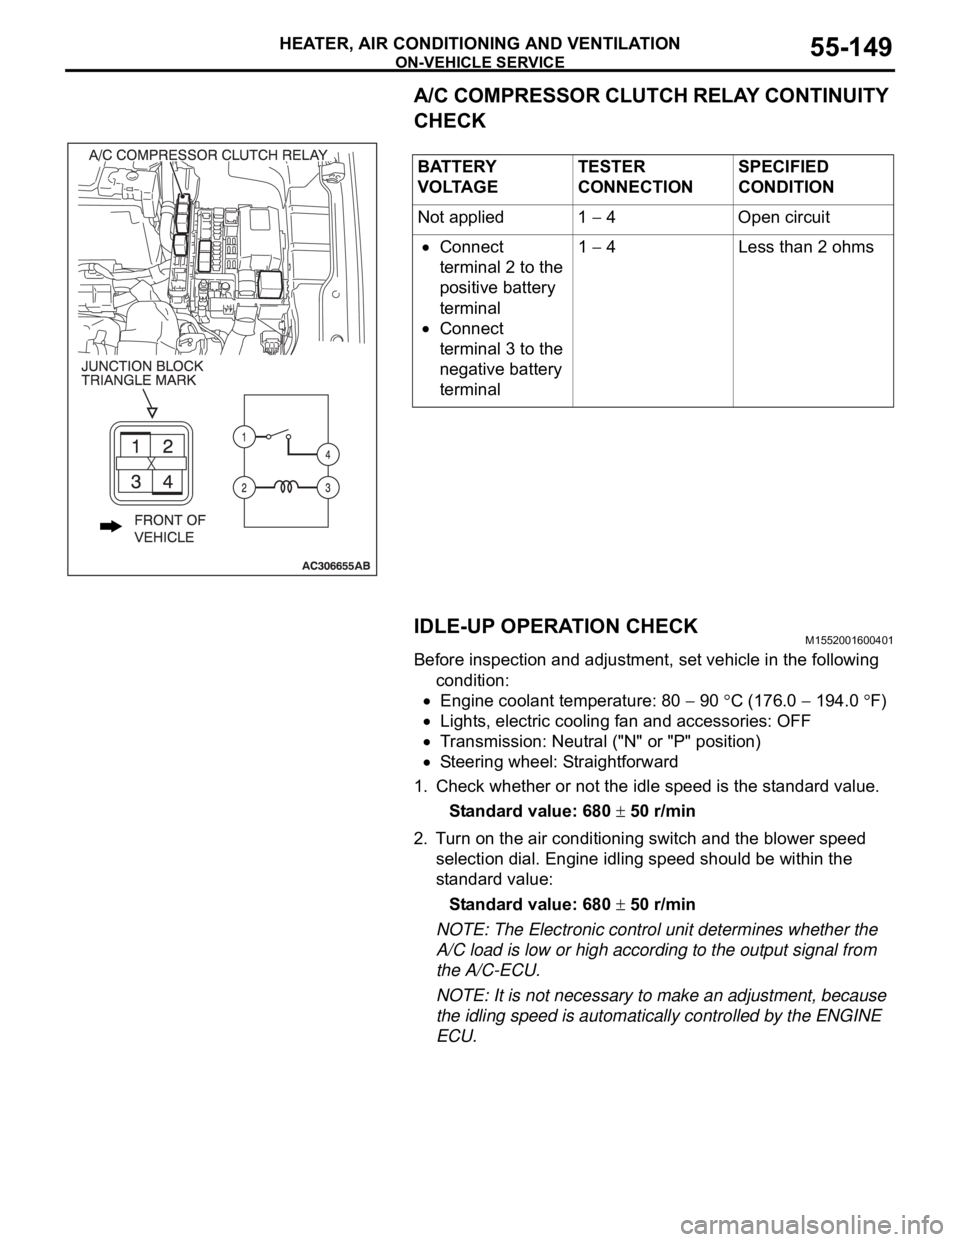
A/C COMPRESSOR CLUTCH RELAY CONTINUITY
CHECK
IDLE-UP OPERATION CHECK
M1552001600401
Before inspection and adjustment, set vehicle in the following
condition:
Engine coolant temperature: 80 90 C (176.0 194.0 F)
Lights, electric cooling fan and accessories: OFF
Transmission: Neutral ("N" or "P" position)
Steering wheel: Straightforward
1. Check whether or not the idle speed is the standard value.
Standard value: 680
50 r/min
2. Turn on the air conditioning switch and the blower speed
selection dial. Engine idling speed should be within the
standard value:
Standard value: 680
50 r/min
NOTE: The Electronic control unit determines whether the
A/C load is low or high according to the output signal from
the A/C-ECU.
NOTE: It is not necessary to make an adjustment, because
the idling speed is automatically controlled by the ENGINE
ECU. BATTERY
V O LTA G ETESTER
CONNECTIONSPECIFIED
CONDITION
Not applied 1
4 Open circuit
Connect
terminal 2 to the
positive battery
terminal
Connect
terminal 3 to the
negative battery
terminal1
4 Less than 2 ohms
Page 853 of 1500
HEATER UNIT, HEATER CORE, BLOWER ASSEMBLY AND EVAPORATOR UNIT
HEATER, AIR CONDITIONING AND VENTILATION55-152
REMOVAL SERVICE POINTS
.
<> SUCTION PIPE AND LIQUID PIPE DISCON-
NECTION
As the compressor oil and receiver are highly moisture
absorbent, use a non-porous material to plug the hose and
nipples.
To prevent the entry of dust or other foreign bodies, plug the
dismantled hose and the nipples of the expansion valves.
.
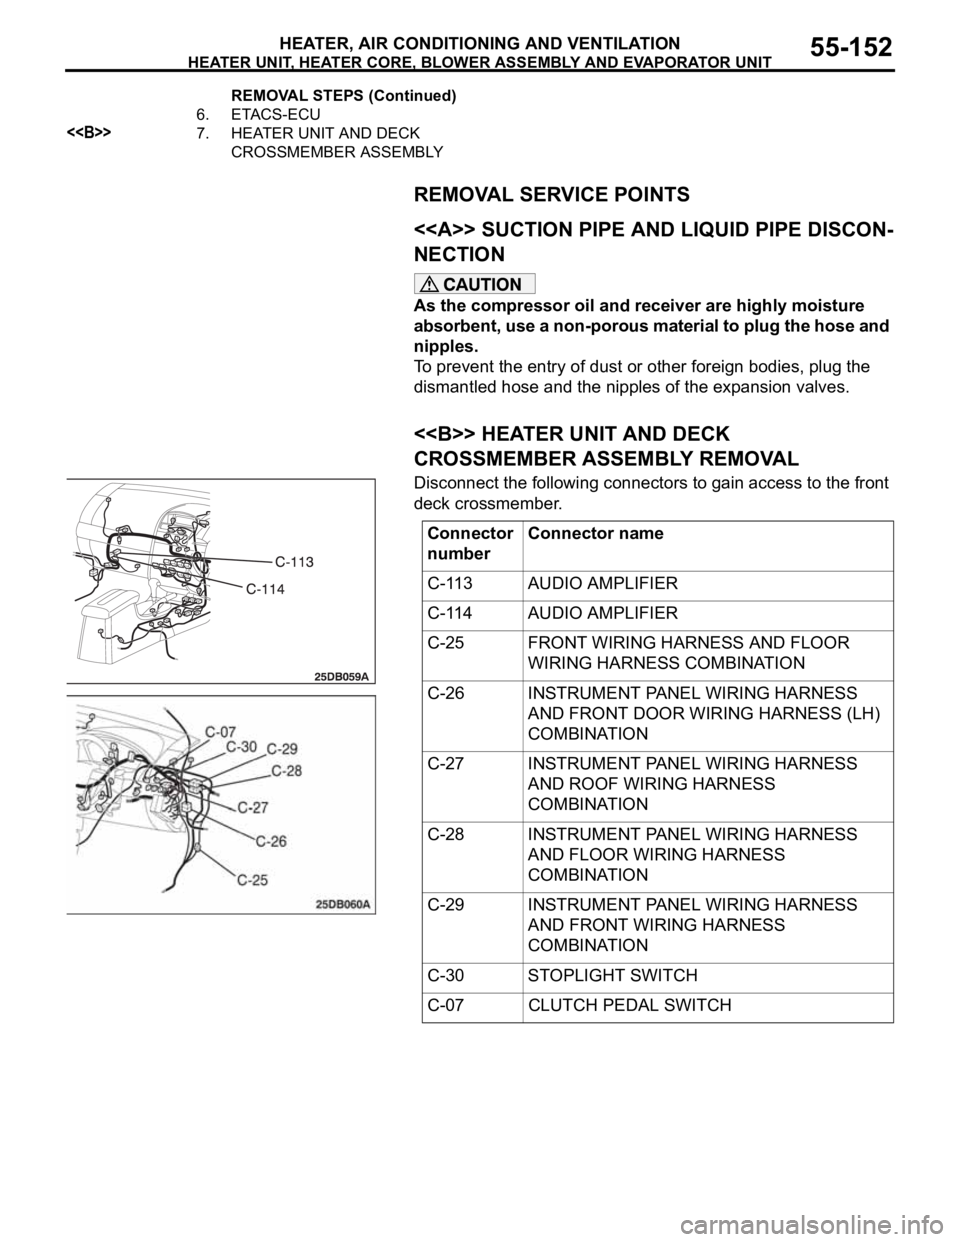
<> HEATER UNIT AND DECK
CROSSMEMBER ASSEMBLY REMOVAL
Disconnect the following connectors to gain access to the front
deck crossmember.
6. ETACS-ECU
<>7. HEATER UNIT AND DECK
CROSSMEMBER ASSEMBLY REMOVAL STEPS (Continued)
Connector
numberConnector name
C-113 AUDIO AMPLIFIER
C-114 AUDIO AMPLIFIER
C-25 FRONT WIRING HARNESS AND FLOOR
WIRING HARNESS COMBINATION
C-26 INSTRUMENT PANEL WIRING HARNESS
AND FRONT DOOR WIRING HARNESS (LH)
COMBINATION
C-27 INSTRUMENT PANEL WIRING HARNESS
AND ROOF WIRING HARNESS
COMBINATION
C-28 INSTRUMENT PANEL WIRING HARNESS
AND FLOOR WIRING HARNESS
COMBINATION
C-29 INSTRUMENT PANEL WIRING HARNESS
AND FRONT WIRING HARNESS
COMBINATION
C-30 STOPLIGHT SWITCH
C-07 CLUTCH PEDAL SWITCH
Page 905 of 1500
HOW TO DIAGNOSE
GENERAL
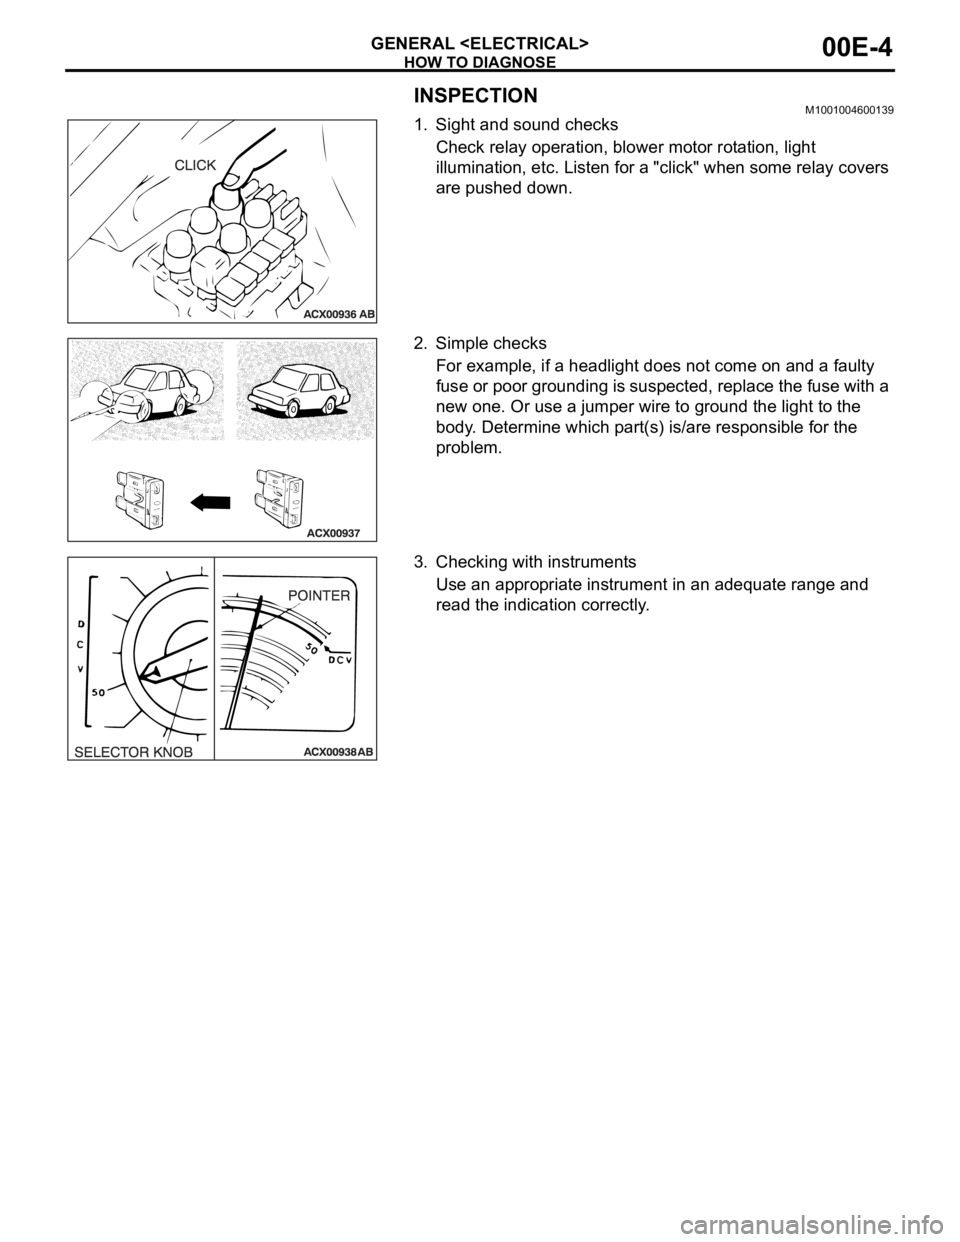
INSPECTIONM1001004600139
1. Sight and sound checks
Check relay operation, blower motor rotation, light
illumination, etc. Listen for a "click" when some relay covers
are pushed down.
2. Simple checks
For example, if a headlight does not come on and a faulty
fuse or poor grounding is suspected, replace the fuse with a
new one. Or use a jumper wire to ground the light to the
body. Determine which part(s) is/are responsible for the
problem.
3. Checking with instruments
Use an appropriate instrument in an adequate range and
read the indication correctly.