service MITSUBISHI 380 2005 Repair Manual
[x] Cancel search | Manufacturer: MITSUBISHI, Model Year: 2005, Model line: 380, Model: MITSUBISHI 380 2005Pages: 1500, PDF Size: 47.87 MB
Page 818 of 1500
AUTO A/C DIAGNOSIS
HEATER, AIR CONDITIONING AND VENTILATION55-117
NOTE: Also check junction block connector C-215 for loose,
corroded, or damaged terminals, or terminals pushed back in
the connector. If junction block connector C-215 is damaged,
repair or replace the connector as described in GROUP 00E,
Harness Connector Inspection P.00E-2.
Q: Is the wiring harness between defogger relay connector
C-201 (terminal 1) and ignition switch (IG2) in good
condition?
YES : It can be assumed that this malfunction is intermittent.
Refer to GROUP 00, How to Use
Troubleshooting/Inspection Service Points
How to
Cope with Intermittent Malfunctions P.00-14.
NO : Repair the wiring harness. Check that the defogger
system works normally.
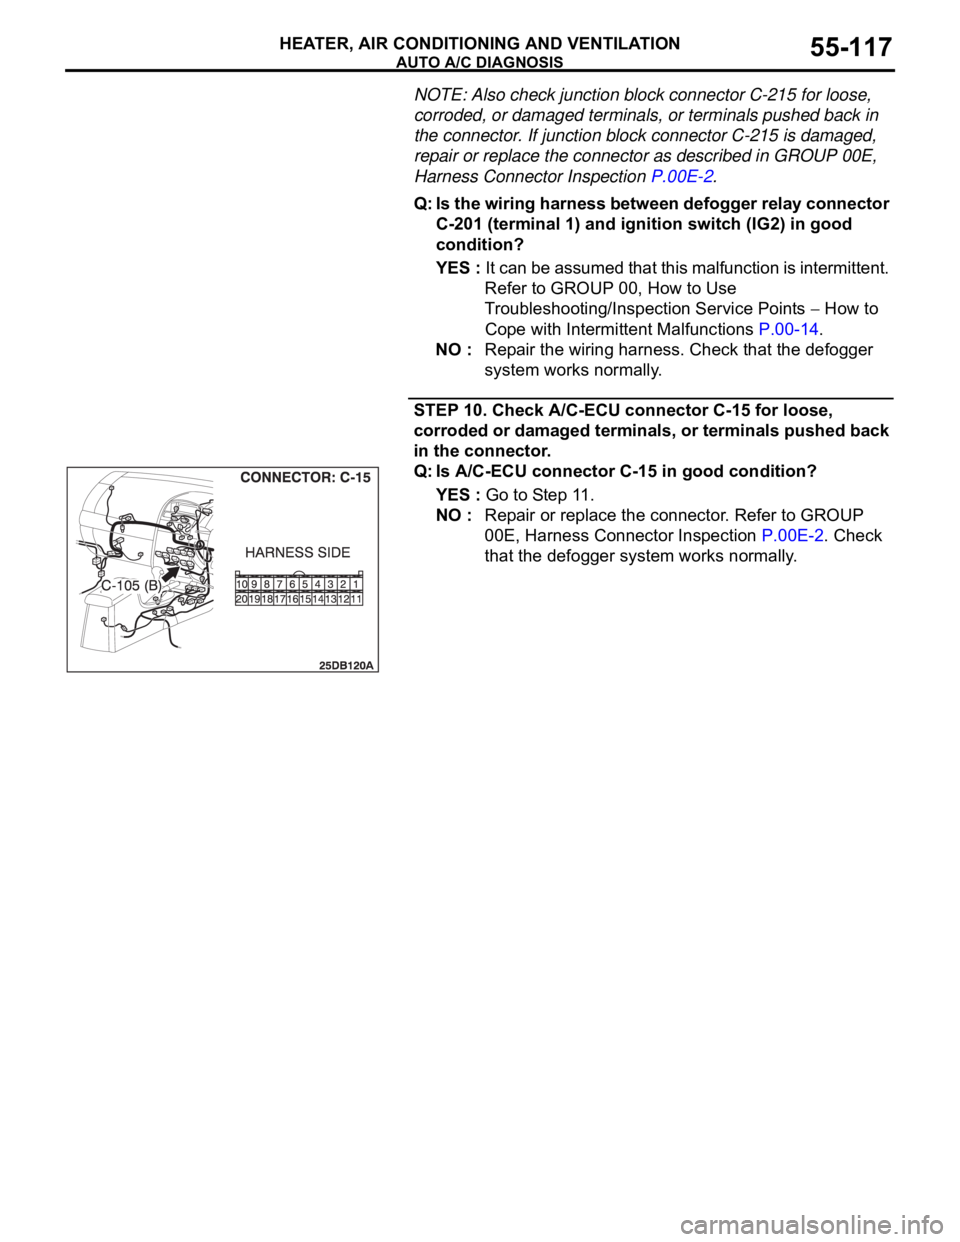
STEP 10. Check A/C-ECU connector C-15 for loose,
corroded or damaged terminals, or terminals pushed back
in the connector.
Q: Is A/C-ECU connector C-15 in good condition?
YES : Go to Step 11.
NO : Repair or replace the connector. Refer to GROUP
00E, Harness Connector Inspection P.00E-2. Check
that the defogger system works normally.
Page 820 of 1500
AUTO A/C DIAGNOSIS
HEATER, AIR CONDITIONING AND VENTILATION55-119
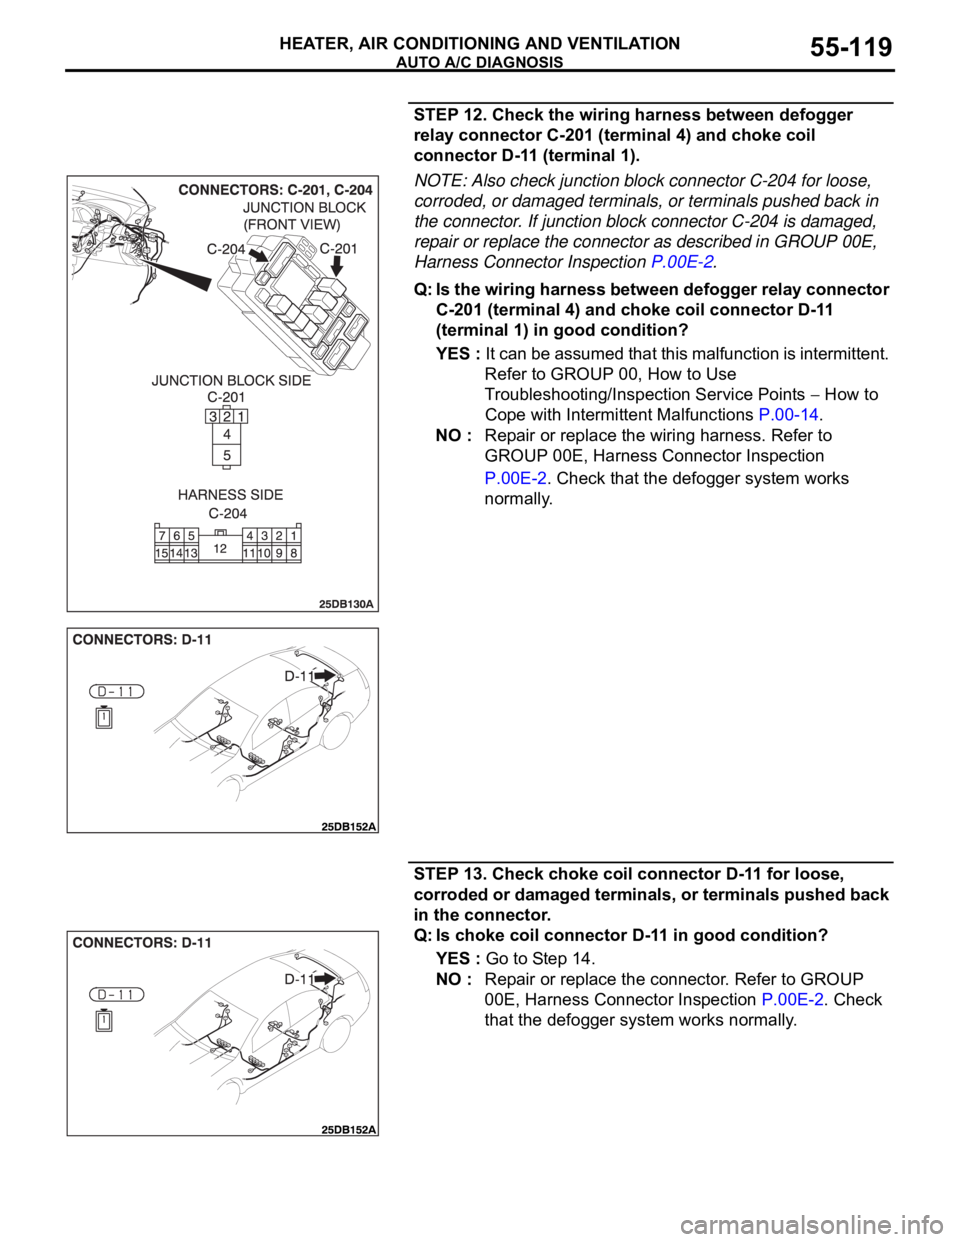
STEP 12. Check the wiring harness between defogger
relay connector C-201 (terminal 4) and choke coil
connector D-11 (terminal 1).
NOTE: Also check junction block connector C-204 for loose,
corroded, or damaged terminals, or terminals pushed back in
the connector. If junction block connector C-204 is damaged,
repair or replace the connector as described in GROUP 00E,
Harness Connector Inspection P.00E-2.
Q: Is the wiring harness between defogger relay connector
C-201 (terminal 4) and choke coil connector D-11
(terminal 1) in good condition?
YES : It can be assumed that this malfunction is intermittent.
Refer to GROUP 00, How to Use
Troubleshooting/Inspection Service Points
How to
Cope with Intermittent Malfunctions P.00-14.
NO : Repair or replace the wiring harness. Refer to
GROUP 00E, Harness Connector Inspection
P.00E-2. Check that the defogger system works
normally.
STEP 13. Check choke coil connector D-11 for loose,
corroded or damaged terminals, or terminals pushed back
in the connector.
Q: Is choke coil connector D-11 in good condition?
YES : Go to Step 14.
NO : Repair or replace the connector. Refer to GROUP
00E, Harness Connector Inspection P.00E-2. Check
that the defogger system works normally.
Page 825 of 1500
AUTO A/C DIAGNOSIS
HEATER, AIR CONDITIONING AND VENTILATION55-124
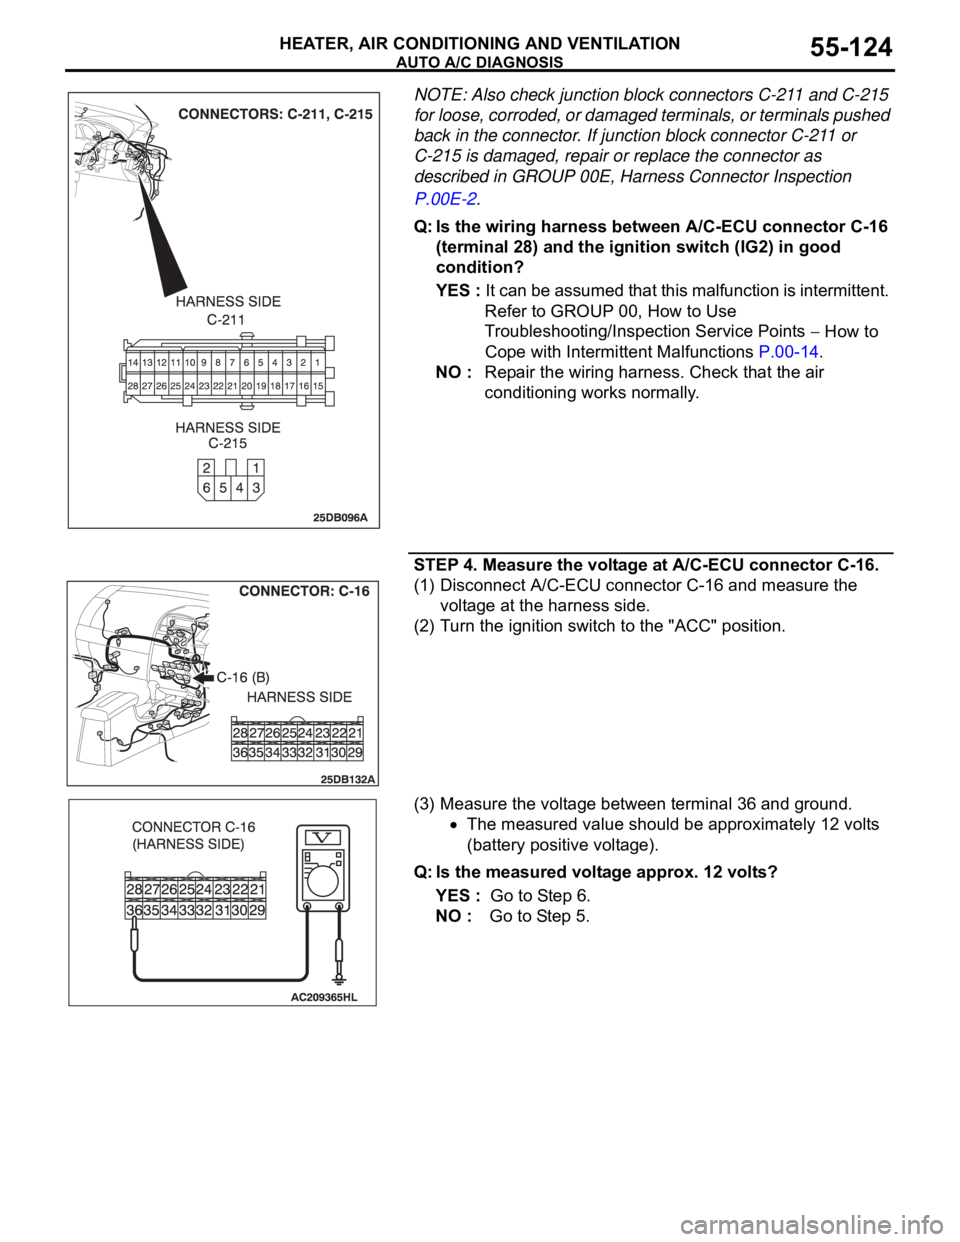
NOTE: Also check junction block connectors C-211 and C-215
for loose, corroded, or damaged terminals, or terminals pushed
back in the connector. If junction block connector C-211 or
C-215 is damaged, repair or replace the connector as
described in GROUP 00E, Harness Connector Inspection
P.00E-2.
Q: Is the wiring harness between A/C-ECU connector C-16
(terminal 28) and the ignition switch (IG2) in good
condition?
YES : It can be assumed that this malfunction is intermittent.
Refer to GROUP 00, How to Use
Troubleshooting/Inspection Service Points
How to
Cope with Intermittent Malfunctions P.00-14.
NO : Repair the wiring harness. Check that the air
conditioning works normally.
STEP 4. Measure the voltage at A/C-ECU connector C-16.
(1) Disconnect A/C-ECU connector C-16 and measure the
voltage at the harness side.
(2) Turn the ignition switch to the "ACC" position.
(3) Measure the voltage between terminal 36 and ground.
The measured value should be approximately 12 volts
(battery positive voltage).
Q: Is the measured voltage approx. 12 volts?
YES : Go to Step 6.
NO : Go to Step 5.
Page 826 of 1500
AUTO A/C DIAGNOSIS
HEATER, AIR CONDITIONING AND VENTILATION55-125
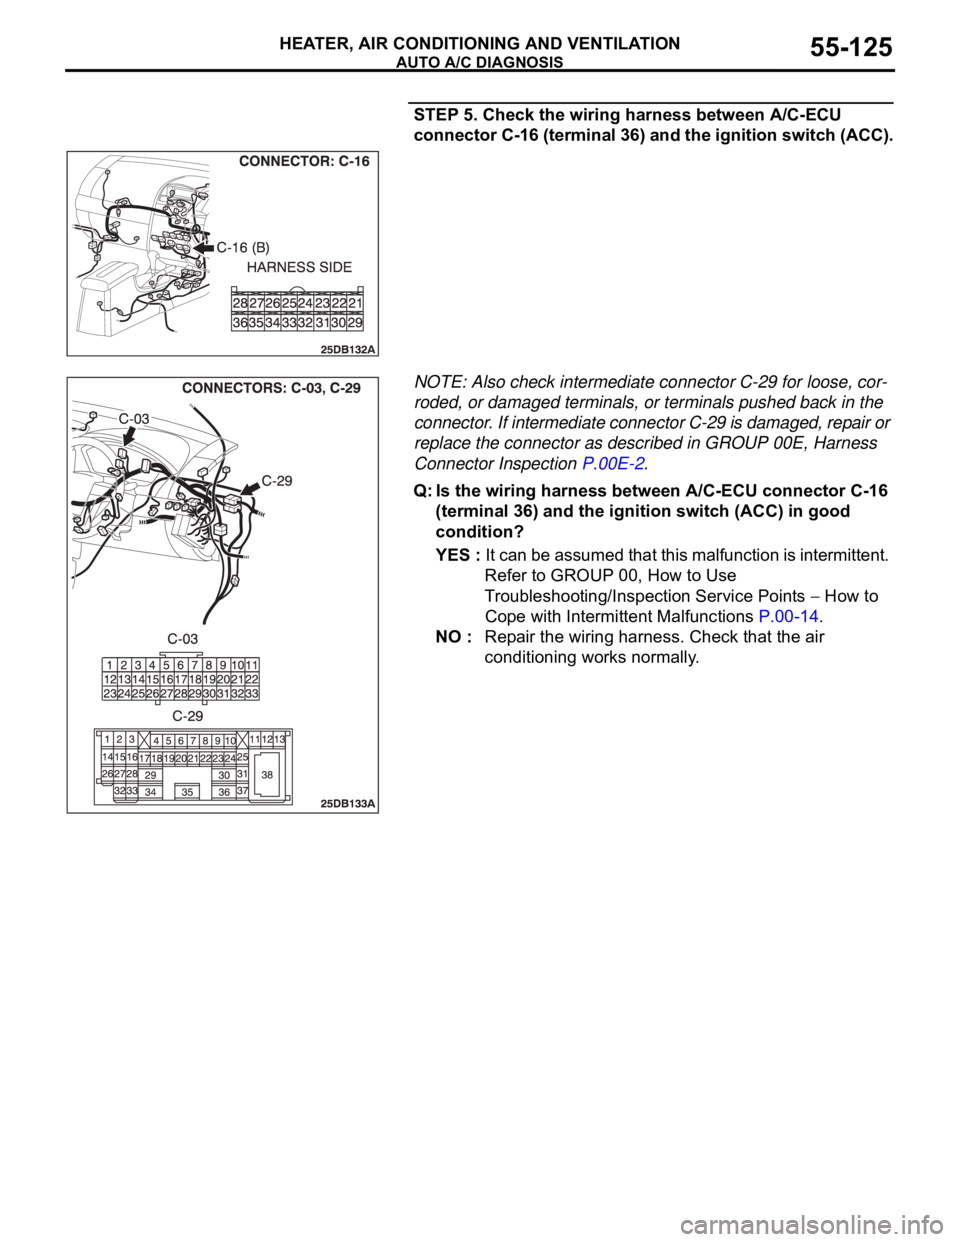
STEP 5. Check the wiring harness between A/C-ECU
connector C-16 (terminal 36) and the ignition switch (ACC).
NOTE: Also check intermediate connector C-29 for loose, cor-
roded, or damaged terminals, or terminals pushed back in the
connector. If intermediate connector C-29 is damaged, repair or
replace the connector as described in GROUP 00E, Harness
Connector Inspection P.00E-2.
Q: Is the wiring harness between A/C-ECU connector C-16
(terminal 36) and the ignition switch (ACC) in good
condition?
YES : It can be assumed that this malfunction is intermittent.
Refer to GROUP 00, How to Use
Troubleshooting/Inspection Service Points
How to
Cope with Intermittent Malfunctions P.00-14.
NO : Repair the wiring harness. Check that the air
conditioning works normally.
Page 828 of 1500
AUTO A/C DIAGNOSIS
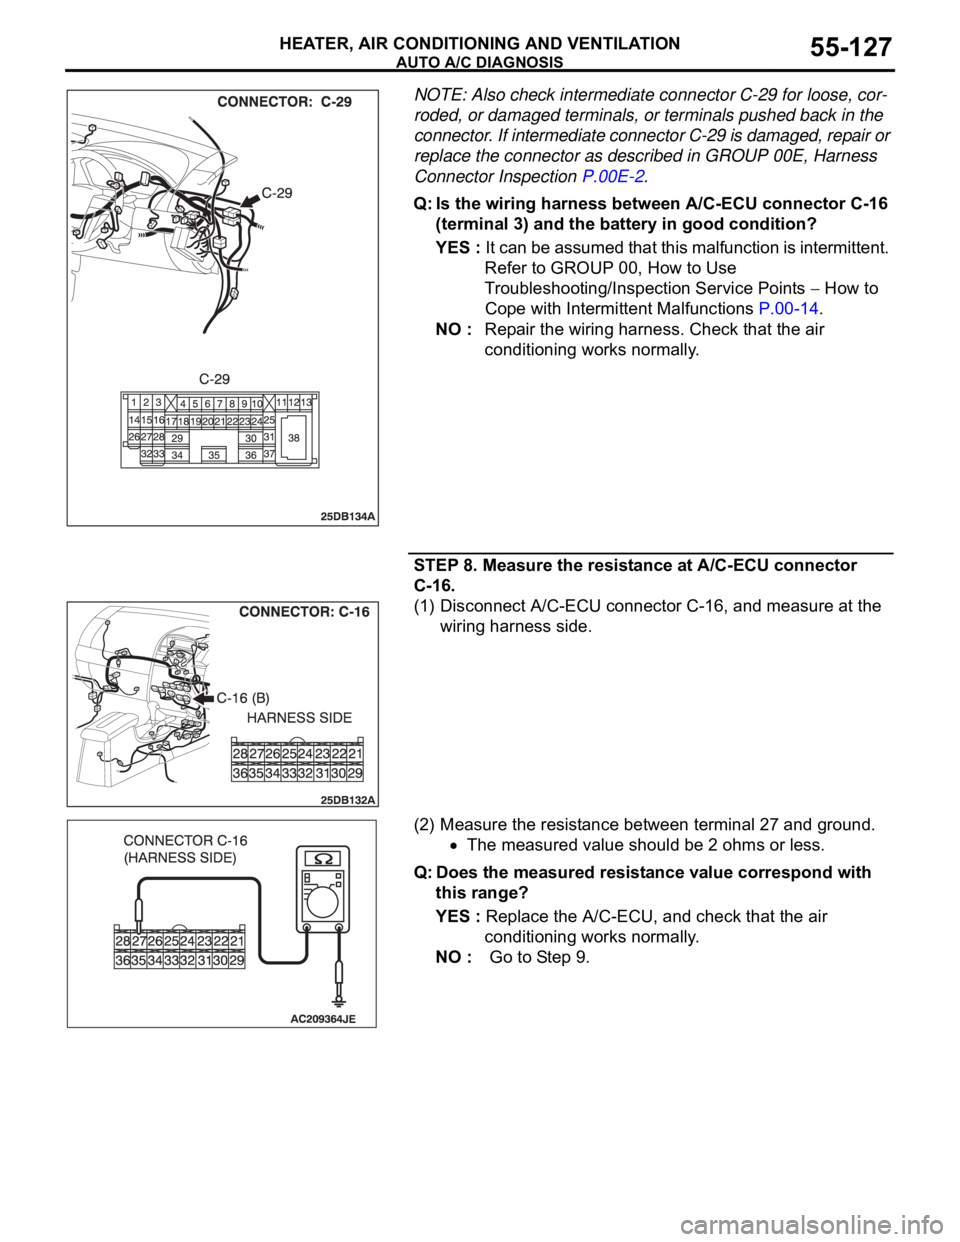
HEATER, AIR CONDITIONING AND VENTILATION55-127
NOTE: Also check intermediate connector C-29 for loose, cor-
roded, or damaged terminals, or terminals pushed back in the
connector. If intermediate connector C-29 is damaged, repair or
replace the connector as described in GROUP 00E, Harness
Connector Inspection P.00E-2.
Q: Is the wiring harness between A/C-ECU connector C-16
(terminal 3) and the battery in good condition?
YES : It can be assumed that this malfunction is intermittent.
Refer to GROUP 00, How to Use
Troubleshooting/Inspection Service Points
How to
Cope with Intermittent Malfunctions P.00-14.
NO : Repair the wiring harness. Check that the air
conditioning works normally.
STEP 8. Measure the resistance at A/C-ECU connector
C-16.
(1) Disconnect A/C-ECU connector C-16, and measure at the
wiring harness side.
(2) Measure the resistance between terminal 27 and ground.
The measured value should be 2 ohms or less.
Q: Does the measured resistance value correspond with
this range?
YES : Replace the A/C-ECU, and check that the air
conditioning works normally.
NO : Go to Step 9.
Page 829 of 1500
AUTO A/C DIAGNOSIS
HEATER, AIR CONDITIONING AND VENTILATION55-128
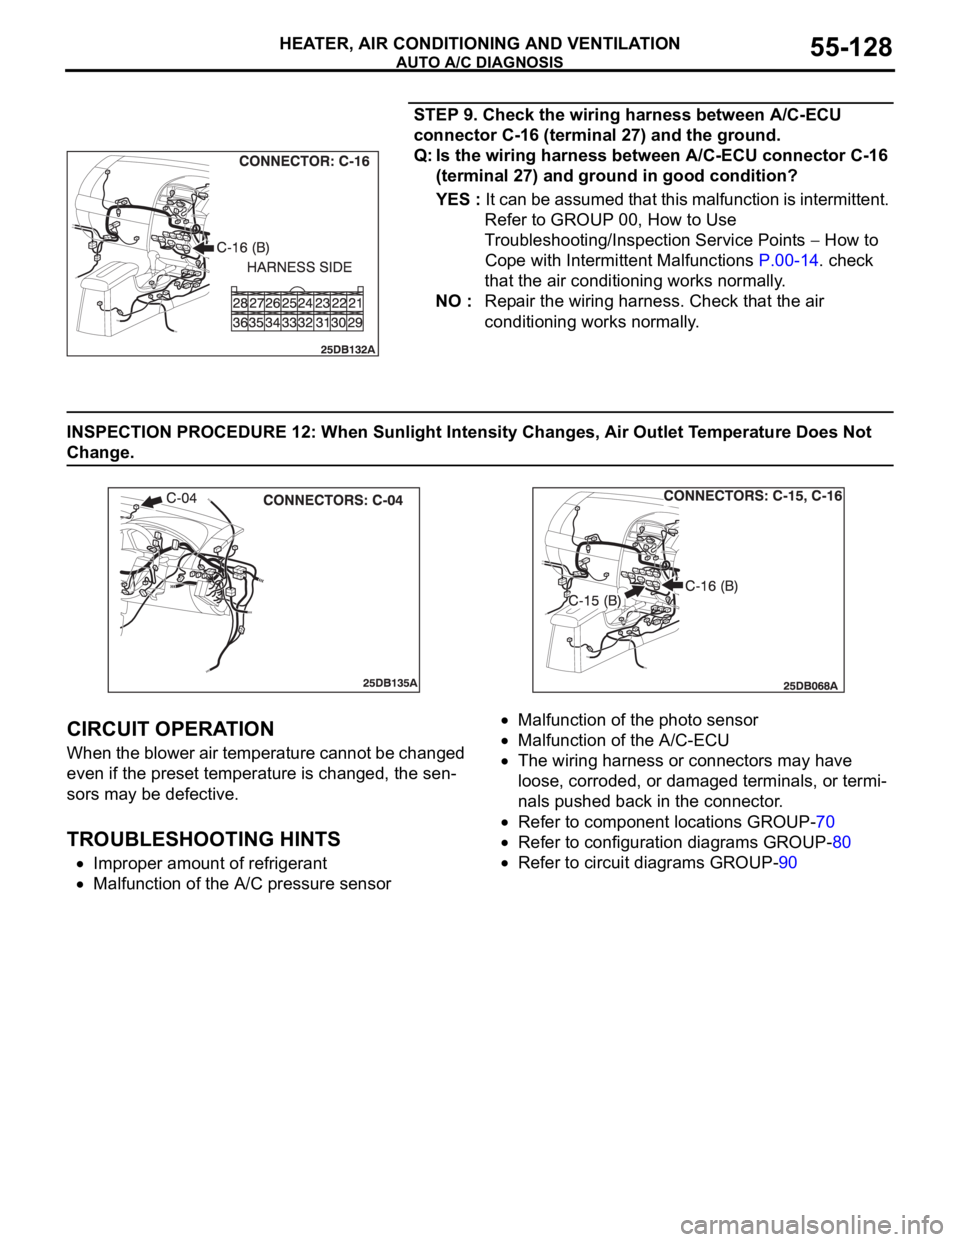
STEP 9. Check the wiring harness between A/C-ECU
connector C-16 (terminal 27) and the ground.
Q: Is the wiring harness between A/C-ECU connector C-16
(terminal 27) and ground in good condition?
YES : It can be assumed that this malfunction is intermittent.
Refer to GROUP 00, How to Use
Troubleshooting/Inspection Service Points
How to
Cope with Intermittent Malfunctions P.00-14. check
that the air conditioning works normally.
NO : Repair the wiring harness. Check that the air
conditioning works normally.
INSPECTION PROCEDURE 12: When Sunlight Intensity Changes, Air Outlet Temperature Does Not
Change.
.
CIRCUIT OPERATION
When the blower air temperature cannot be changed
even if the preset temperature is changed, the sen-
sors may be defective.
.
TROUBLESHOOTING HINTS
Improper amount of refrigerant
Malfunction of the A/C pressure sensor
Malfunction of the photo sensor
Malfunction of the A/C-ECU
The wiring harness or connectors may have
loose, corroded, or damaged terminals, or termi-
nals pushed back in the connector.
Refer to component locations GROUP-70
Refer to configuration diagrams GROUP-80
Refer to circuit diagrams GROUP-90
Page 833 of 1500
AUTO A/C DIAGNOSIS
HEATER, AIR CONDITIONING AND VENTILATION55-132
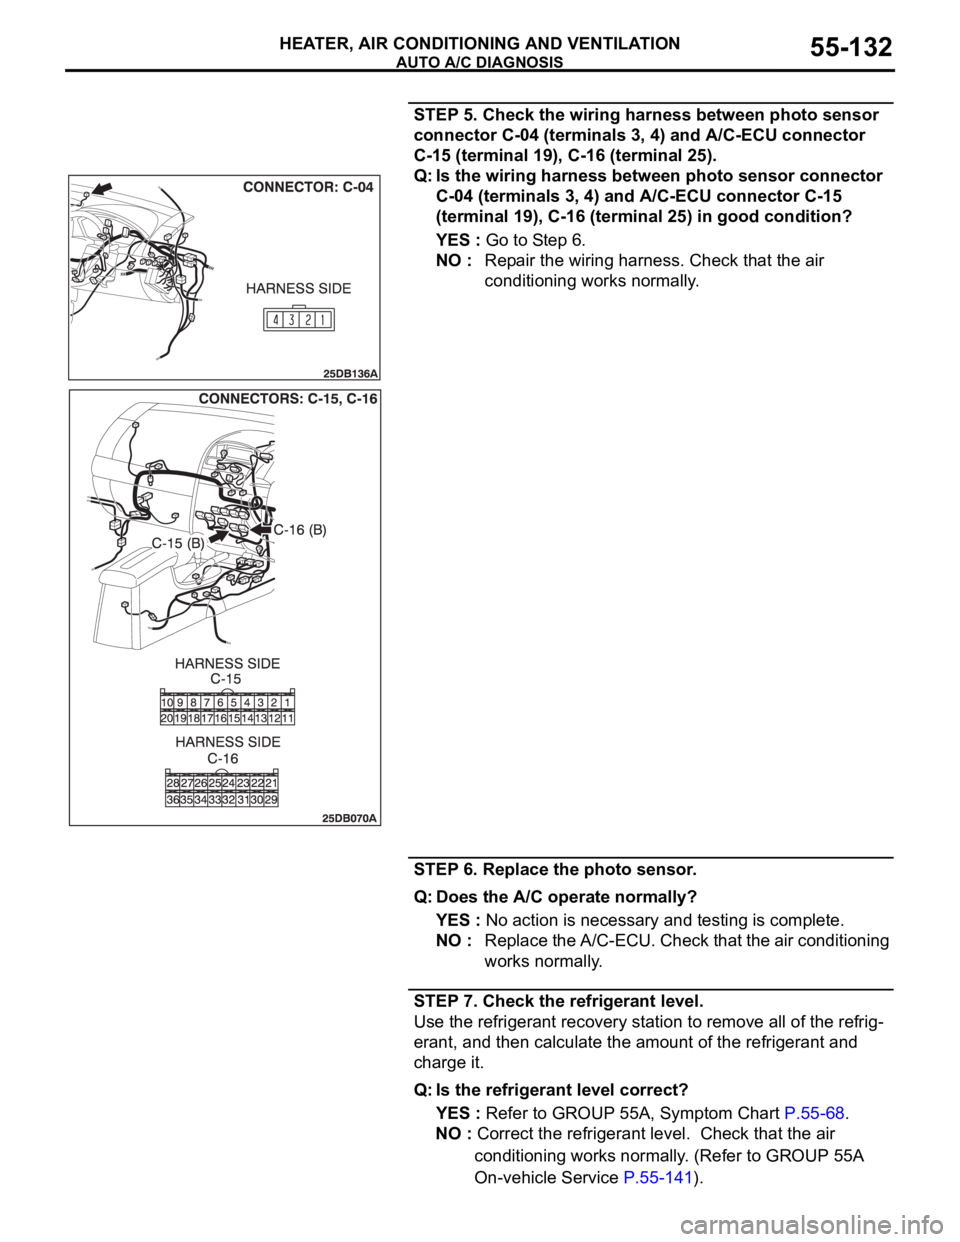
STEP 5. Check the wiring harness between photo sensor
connector C-04 (terminals 3, 4) and A/C-ECU connector
C-15 (terminal 19), C-16 (terminal 25).
Q: Is the wiring harness between photo sensor connector
C-04 (terminals 3, 4) and A/C-ECU connector C-15
(terminal 19), C-16 (terminal 25) in good condition?
YES : Go to Step 6.
NO : Repair the wiring harness. Check that the air
conditioning works normally.
STEP 6. Replace the photo sensor.
Q: Does the A/C operate normally?
YES : No action is necessary and testing is complete.
NO : Replace the A/C-ECU. Check that the air conditioning
works normally.
STEP 7. Check the refrigerant level.
Use the refrigerant recovery station to remove all of the refrig-
erant, and then calculate the amount of the refrigerant and
charge it.
Q: Is the refrigerant level correct?
YES : Refer to GROUP 55A, Symptom Chart P.55-68.
NO : Correct the refrigerant level. Check that the air
conditioning works normally. (Refer to GROUP 55A
On-vehicle Service P.55-141).
Page 842 of 1500
ON-VEHICLE SERVICE
HEATER, AIR CONDITIONING AND VENTILATION55-141
ON-VEHICLE SERVICE
REFRIGERANT LEVEL TESTM1552008400408
Use the refrigerant recovery station to remove all of the refrig-
erant, and then calculate the amount of the refrigerant and
charge it.
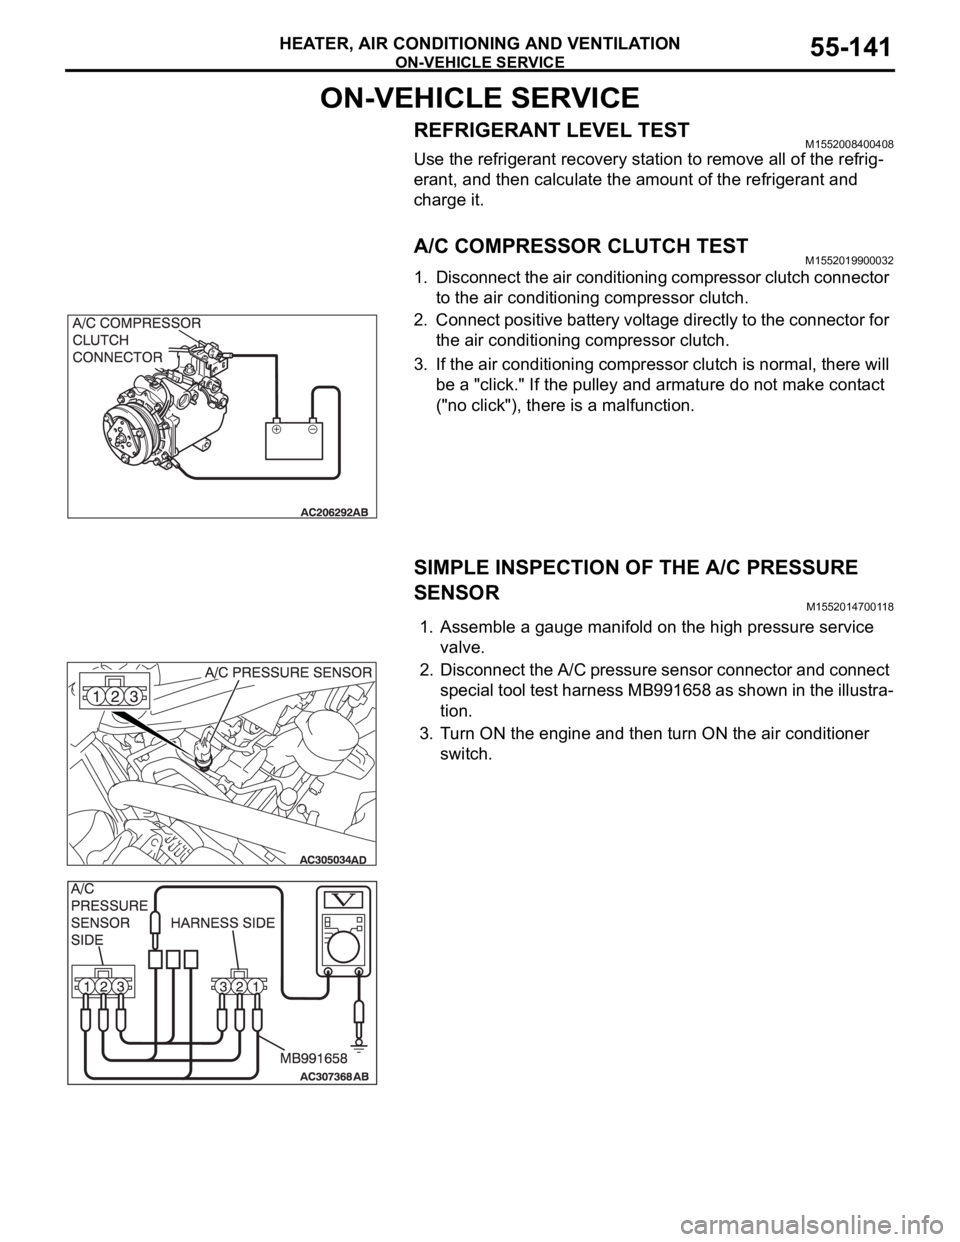
A/C COMPRESSOR CLUTCH TESTM1552019900032
1. Disconnect the air conditioning compressor clutch connector
to the air conditioning compressor clutch.
2. Connect positive battery voltage directly to the connector for
the air conditioning compressor clutch.
3. If the air conditioning compressor clutch is normal, there will
be a "click." If the pulley and armature do not make contact
("no click"), there is a malfunction.
SIMPLE INSPECTION OF THE A/C PRESSURE
SENSOR
M1552014700118
1. Assemble a gauge manifold on the high pressure service
valve.
2. Disconnect the A/C pressure sensor connector and connect
special tool test harness MB991658 as shown in the illustra-
tion.
3. Turn ON the engine and then turn ON the air conditioner
switch.
Page 843 of 1500
ON-VEHICLE SERVICE
HEATER, AIR CONDITIONING AND VENTILATION55-142
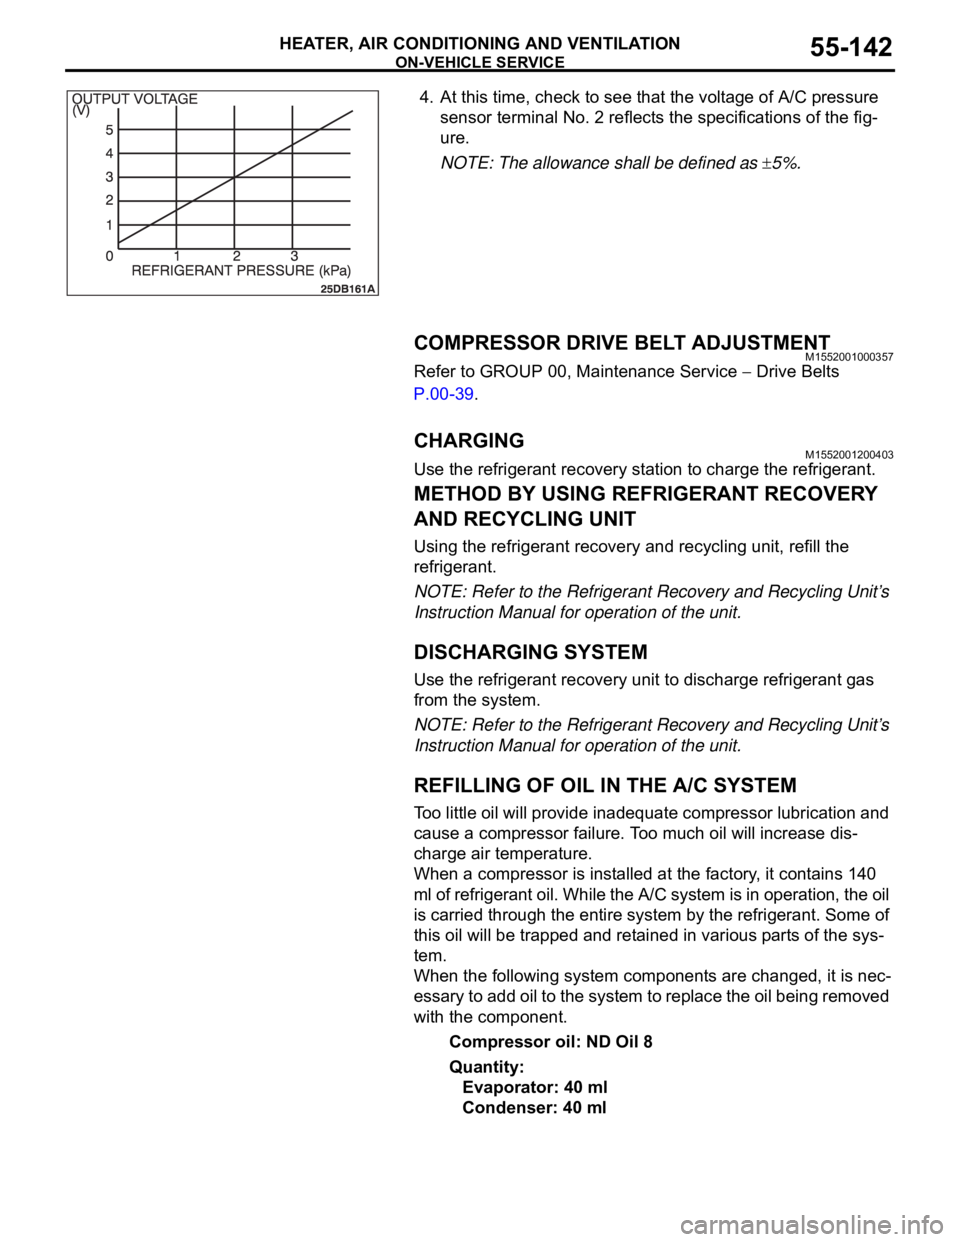
4. At this time, check to see that the voltage of A/C pressure
sensor terminal No. 2 reflects the specifications of the fig-
ure.
NOTE: The allowance shall be defined as
5%.
COMPRESSOR DRIVE BELT ADJUSTMENTM1552001000357
Refer to GROUP 00, Maintenance Service Drive Belts
P.00-39.
CHARGING M1552001200403
Use the refrigerant recovery station to charge the refrigerant.
METHOD BY USING REFRIGERANT RECOVERY
AND RECYCLING UNIT
Using the refrigerant recovery and recycling unit, refill the
refrigerant.
NOTE: Refer to the Refrigerant Recovery and Recycling Unit’s
Instruction Manual for operation of the unit.
DISCHARGING SYSTEM
Use the refrigerant recovery unit to discharge refrigerant gas
from the system.
NOTE: Refer to the Refrigerant Recovery and Recycling Unit’s
Instruction Manual for operation of the unit.
REFILLING OF OIL IN THE A/C SYSTEM
Too little oil will provide inadequate compressor lubrication and
cause a compressor failure. Too much oil will increase dis-
charge air temperature.
When a compressor is installed at the factory, it contains 140
ml of refrigerant oil. While the A/C system is in operation, the oil
is carried through the entire system by the refrigerant. Some of
this oil will be trapped and retained in various parts of the sys-
tem.
When the following system components are changed, it is nec-
essary to add oil to the system to replace the oil being removed
with the component.
Compressor oil: ND Oil 8
Quantity:
Evaporator: 40 ml
Condenser: 40 ml
Page 844 of 1500
ON-VEHICLE SERVICE
HEATER, AIR CONDITIONING AND VENTILATION55-143
PERFORMANCE TEST M1552001400526
The vehicles to be tested should be parked out of direct sun-
light.
1. Close the high and low-pressure valve of the gauge
manifold.
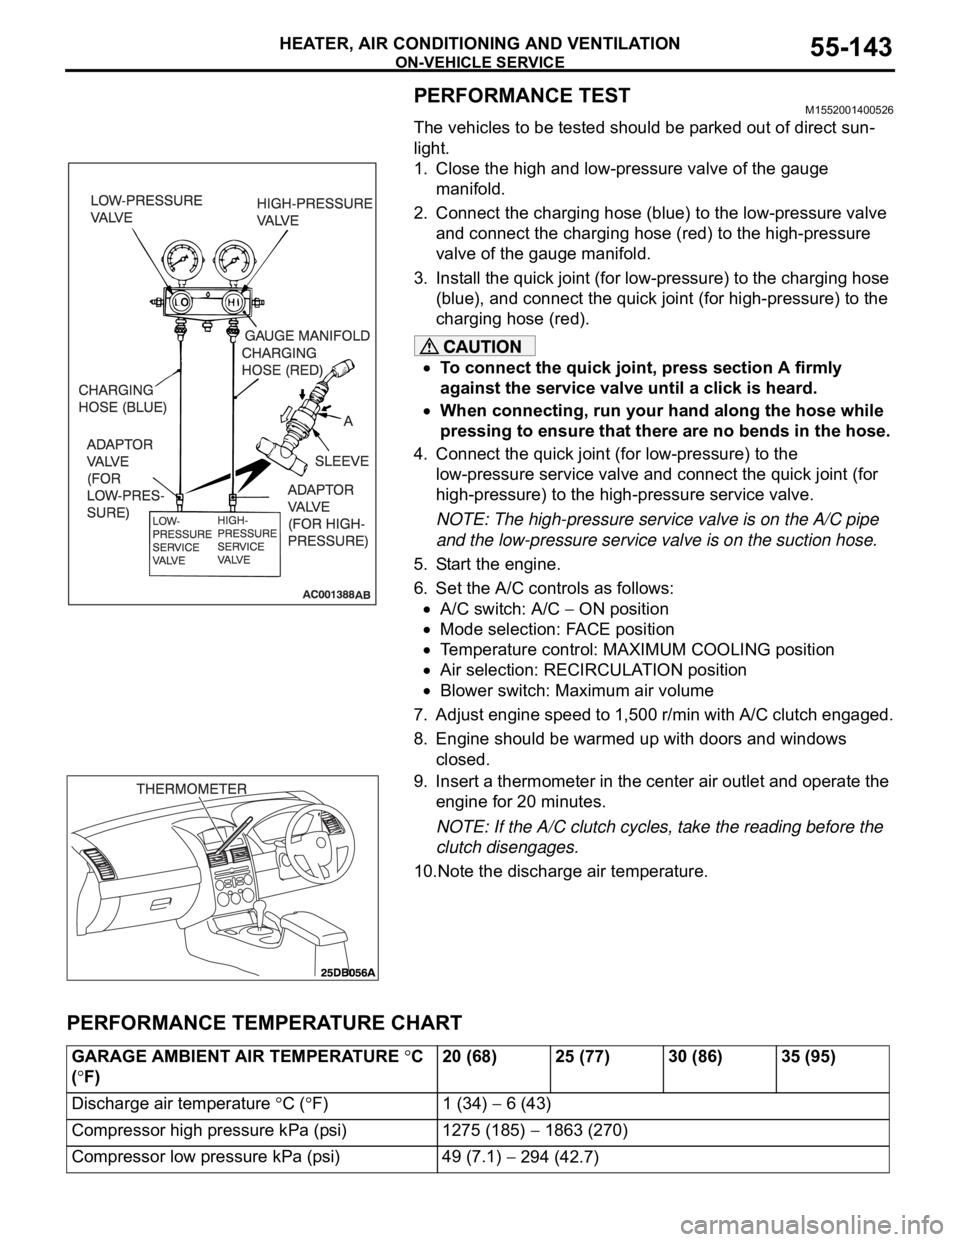
2. Connect the charging hose (blue) to the low-pressure valve
and connect the charging hose (red) to the high-pressure
valve of the gauge manifold.
3. Install the quick joint (for low-pressure) to the charging hose
(blue), and connect the quick joint (for high-pressure) to the
charging hose (red).
To connect the quick joint, press section A firmly
against the service valve until a click is heard.
When connecting, run your hand along the hose while
pressing to ensure that there are no bends in the hose.
4. Connect the quick joint (for low-pressure) to the
low-pressure service valve and connect the quick joint (for
high-pressure) to the high-pressure service valve.
NOTE: The high-pressure service valve is on the A/C pipe
and the low-pressure service valve is on the suction hose.
5. Start the engine.
6. Set the A/C controls as follows:
A/C switch: A/C ON position
Mode selection: FACE position
Temperature control: MAXIMUM COOLING position
Air selection: RECIRCULATION position
Blower switch: Maximum air volume
7. Adjust engine speed to 1,500 r/min with A/C clutch engaged.
8. Engine should be warmed up with doors and windows
closed.
9. Insert a thermometer in the center air outlet and operate the
engine for 20 minutes.
NOTE: If the A/C clutch cycles, take the reading before the
clutch disengages.
10.Note the discharge air temperature.
PERFORMANCE TEMPERATURE CHART
GARAGE AMBIENT AIR TEMPERATURE C
(
F)20 (68) 25 (77) 30 (86) 35 (95)
Discharge air temperature
C (F) 1 (34) 6 (43)
Compressor high pressure kPa (psi) 1275 (185)
1863 (270)
Compressor low pressure kPa (psi) 49 (7.1)
294 (42.7)