check oil MITSUBISHI ASX 2015 Owner's Manual (in English)
[x] Cancel search | Manufacturer: MITSUBISHI, Model Year: 2015, Model line: ASX, Model: MITSUBISHI ASX 2015Pages: 452, PDF Size: 20.1 MB
Page 141 of 452
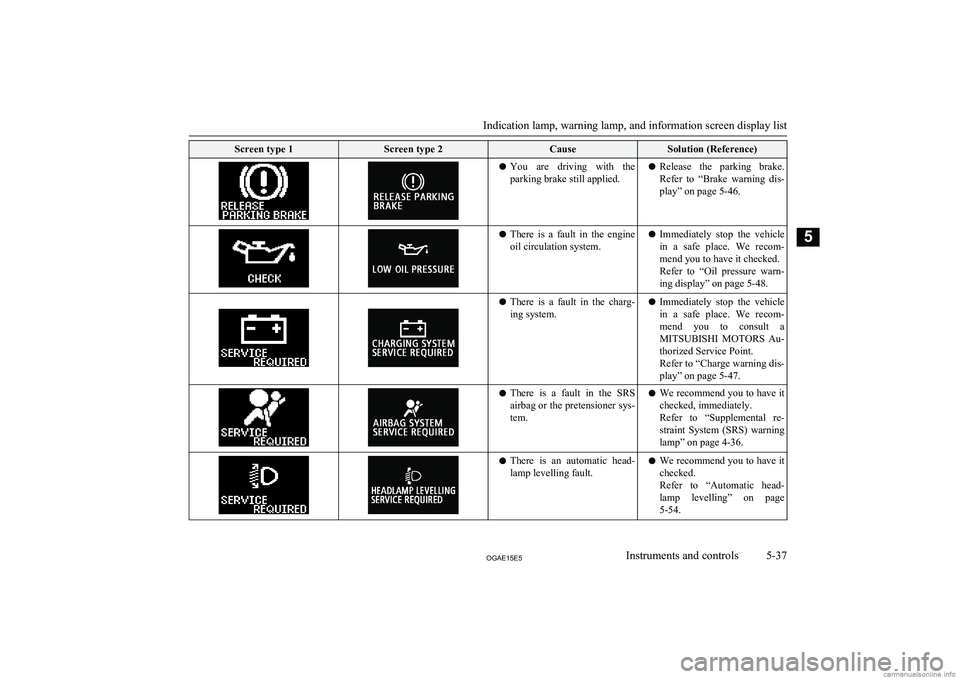
Screen type 1Screen type 2CauseSolution (Reference)lYou are driving with the
parking brake still applied.l Release the parking brake.
Refer to “Brake warning dis- play” on page 5-46.l There is a fault in the engine
oil circulation system.l Immediately stop the vehicle
in a safe place. We recom- mend you to have it checked.
Refer to “Oil pressure warn-
ing display” on page 5-48.l There is a fault in the charg-
ing system.l Immediately stop the vehicle
in a safe place. We recom-mend you to consult a
MITSUBISHI MOTORS Au-
thorized Service Point.
Refer to “Charge warning dis-
play” on page 5-47.l There is a fault in the SRS
airbag or the pretensioner sys-tem.l We recommend you to have it
checked, immediately.
Refer to “Supplemental re-
straint System (SRS) warning
lamp” on page 4-36.l There is an automatic head-
lamp levelling fault.l We recommend you to have it
checked.
Refer to “Automatic head-
lamp levelling” on page 5-54.
Indication lamp, warning lamp, and information screen display list
5-37OGAE15E5Instruments and controls5
Page 143 of 452
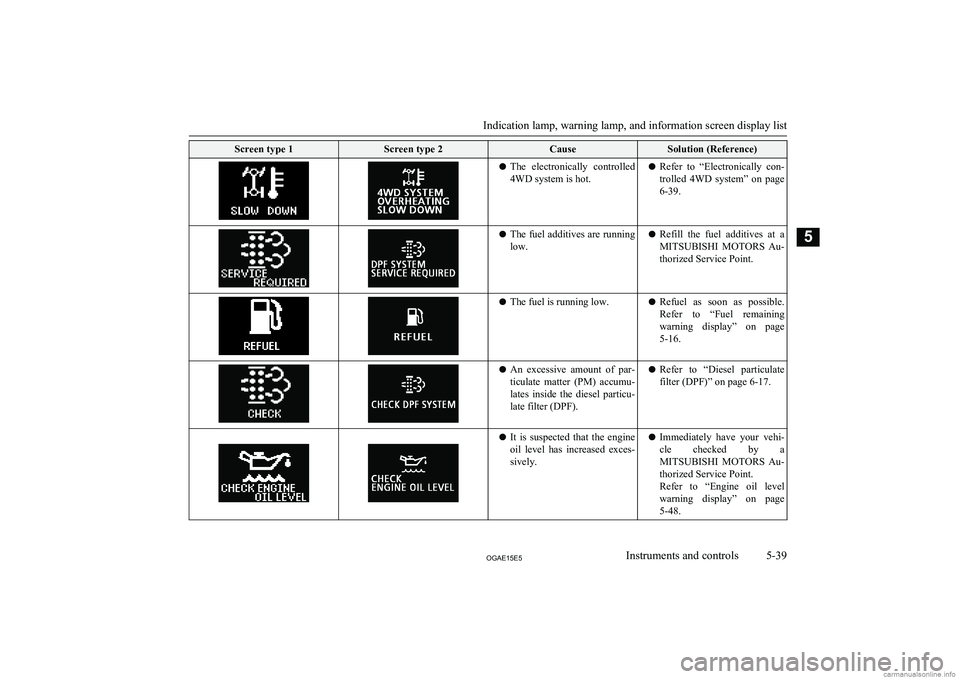
Screen type 1Screen type 2CauseSolution (Reference)lThe electronically controlled
4WD system is hot.l Refer to “Electronically con-
trolled 4WD system” on page 6-39.l The fuel additives are running
low.l Refill the fuel additives at a
MITSUBISHI MOTORS Au-
thorized Service Point.l The fuel is running low.lRefuel as soon as possible.
Refer to “Fuel remaining
warning display” on page 5-16.l An excessive amount of par-
ticulate matter (PM) accumu- lates inside the diesel particu-
late filter (DPF).l Refer to “Diesel particulate
filter (DPF)” on page 6-17.l It is suspected that the engine
oil level has increased exces- sively.l Immediately have your vehi-
cle checked by a
MITSUBISHI MOTORS Au-
thorized Service Point.
Refer to “Engine oil level warning display” on page5-48.
Indication lamp, warning lamp, and information screen display list
5-39OGAE15E5Instruments and controls5
Page 152 of 452
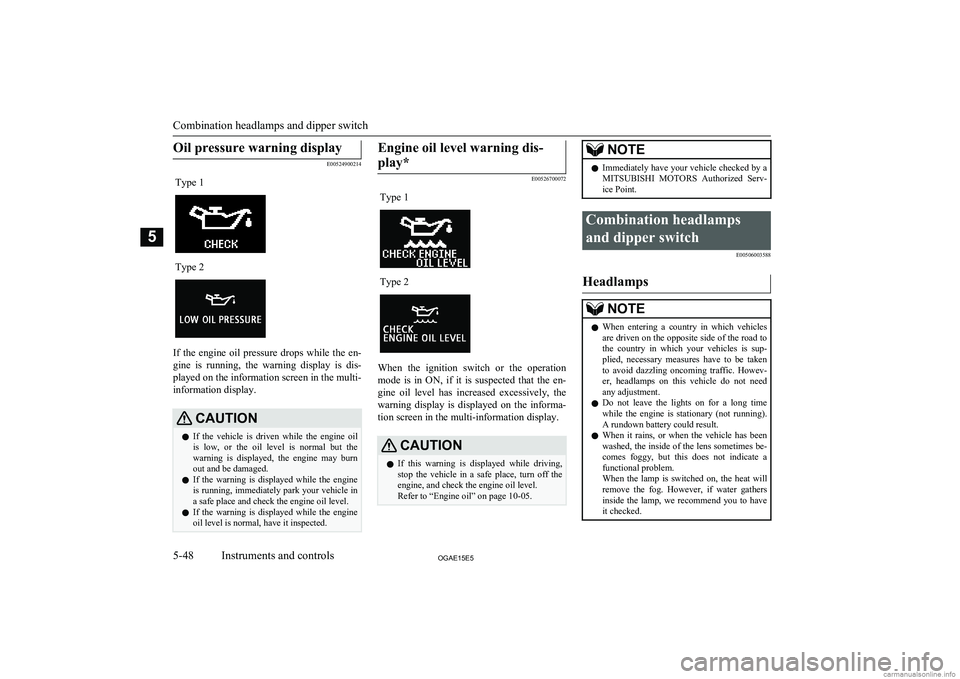
Oil pressure warning display
E00524900214
Type 1Type 2
If the engine oil pressure drops while the en-gine is running, the warning display is dis-
played on the information screen in the multi- information display.
CAUTIONl If the vehicle is driven while the engine oil
is low, or the oil level is normal but the
warning is displayed, the engine may burn out and be damaged.
l If the warning is displayed while the engine
is running, immediately park your vehicle in
a safe place and check the engine oil level.
l If the warning is displayed while the engine
oil level is normal, have it inspected.Engine oil level warning dis-
play*
E00526700072
Type 1Type 2
When the ignition switch or the operation mode is in ON, if it is suspected that the en-
gine oil level has increased excessively, the warning display is displayed on the informa-
tion screen in the multi-information display.
CAUTIONl If this warning is displayed while driving,
stop the vehicle in a safe place, turn off the engine, and check the engine oil level.
Refer to “Engine oil” on page 10-05.NOTEl Immediately have your vehicle checked by a
MITSUBISHI MOTORS Authorized Serv-
ice Point.Combination headlamps
and dipper switch E00506003588
Headlamps
NOTElWhen entering a country in which vehicles
are driven on the opposite side of the road tothe country in which your vehicles is sup- plied, necessary measures have to be takento avoid dazzling oncoming traffic. Howev-
er, headlamps on this vehicle do not need any adjustment.
l Do not leave the lights on for a long time
while the engine is stationary (not running).A rundown battery could result.
l When it rains, or when the vehicle has been
washed, the inside of the lens sometimes be-
comes foggy, but this does not indicate a functional problem.
When the lamp is switched on, the heat will
remove the fog. However, if water gathers
inside the lamp, we recommend you to have it checked.
Combination headlamps and dipper switch
5-48OGAE15E5Instruments and controls5
Page 189 of 452
NOTElIf the Auto Stop & Go (AS&G) system oper-
ates while the air conditioning is operating, both the engine and the air conditioning
compressor will stop. Therefore, the wind- screen and door windows may mist up be-
cause only the blower will operate.
If the windscreen and door windows mist up,
set the mode selection dial to “
” to restart
the engine.
→ “Mode selection dial” on page 7-03
l If the windscreen and door windows mist up
every time the engine stops, it is recommen-
ded to deactivate the Auto Stop & Go
(AS&G) system by pressing the “Auto Stop & Go (AS&G) OFF” switch.
→ “To deactivate” on page 6-22
l If the air conditioning is operating, set the
temperature control dial higher to lengthen
the time that the engine is stopped automati- cally.
Automatically restarting the
engine
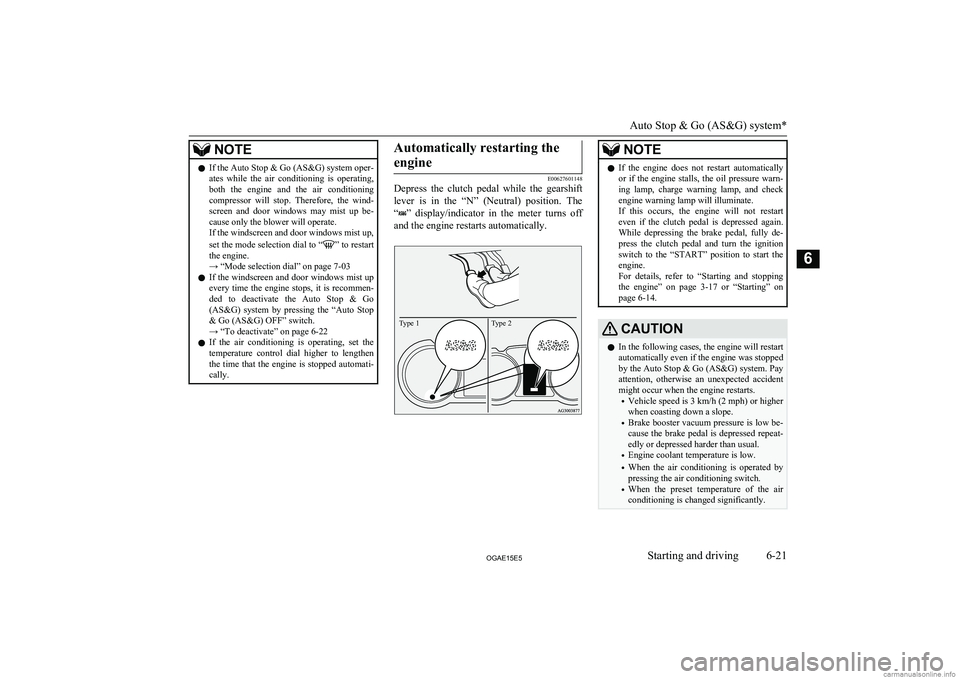
E00627601148
Depress the clutch pedal while the gearshift
lever is in the “N” (Neutral) position. The
“
” display/indicator in the meter turns off
and the engine restarts automatically.
Type 2Type 1
NOTEl If the engine does not restart automatically
or if the engine stalls, the oil pressure warn- ing lamp, charge warning lamp, and check
engine warning lamp will illuminate.
If this occurs, the engine will not restart even if the clutch pedal is depressed again. While depressing the brake pedal, fully de-
press the clutch pedal and turn the ignition switch to the “START” position to start theengine.
For details, refer to “Starting and stopping
the engine” on page 3-17 or “Starting” on
page 6-14.CAUTIONl In the following cases, the engine will restart
automatically even if the engine was stopped
by the Auto Stop & Go (AS&G) system. Pay attention, otherwise an unexpected accidentmight occur when the engine restarts.
• Vehicle speed is 3 km/h (2 mph) or higher
when coasting down a slope.
• Brake booster vacuum pressure is low be-
cause the brake pedal is depressed repeat- edly or depressed harder than usual.
• Engine coolant temperature is low.
• When the air conditioning is operated by
pressing the air conditioning switch.
• When the preset temperature of the air
conditioning is changed significantly.
Auto Stop & Go (AS&G) system*
6-21OGAE15E5Starting and driving6
Page 211 of 452
NOTElIf the vehicle becomes stuck in sandy or
muddy roads, it can often be moved with a
rocking motion. Move the gearshift lever al-
ternately between the 1 st
and “R” (Reverse)
positions ( M/T), the “D” (DRIVE) and “R”
(REVERSE) positions ( A/T or CVT), while
pressing lightly on the accelerator pedal.
l Driving on rough roads can cause rust on the
vehicle; wash the vehicle thoroughly as soon as possible after such use.
Climbing/descending sharp
grades
Your vehicle may not provide sufficient hill
climbing ability and engine braking on steep slopes. Avoid driving on steep slopes even
though the vehicle is a 4-wheel drive vehicle.
Driving through water
E00618900106
If the electrical circuits become wet, further
operation of the vehicle will be impossible;
therefore, avoid driving through water unless absolutely necessary. If driving through wa-ter is unavoidable, use the following proce-
dure:
Check the depth of the water and the terrain before attempting to drive through it. Driveslowly to avoid creating excessive water
splashing.
CAUTIONl Never drive through water that is deep
enough to cover wheel hubs, axles or ex-
haust pipe. Do not change the gearshift lever position ( M/T) or the selector lever position
(A/T or CVT) while driving through water.
Frequent driving through water can adverse-
ly affect the life span of the vehicle; we rec- ommend you to take the necessary measuresto prepare, inspect, and repair the vehicle.
l After driving through water, apply the
brakes to be sure they are functioning prop- erly. If the brakes are wet and not function-
ing properly, dry them out by driving slowly
while lightly depressing the brake pedal. In- spect each part of the vehicle carefully.Inspection and maintenance
following rough roadoperation E00606700338
After operating the vehicle in rough road
conditions, be sure to perform the following inspection and maintenance procedures:
l Check that the vehicle has not been dam-
aged by rocks, gravel, etc.
l Carefully wash the vehicle with water.
Drive the vehicle slowly while lightly
depressing the brake pedal in order to dry out the brakes. If the brakes still do
not function properly, we recommend you to have the brakes checked as soon
as possible.
l Remove the insects, dried grass, etc.
clogging the radiator core.
l After driving through water, check the
engine, transmission and differential oil. If the oil or grease is milky or cloudy be-
cause of water contamination, it must be
replaced with new oil or grease.
l Check the inside of the vehicle. If water
entry is found, dry the carpet etc.
l Inspect the headlamps, If the headlamp
bulb is flooded with water, we recom- mend you to have it drained.Cautions on handling of 4-
wheel drive vehicles E00606800818
Tyres and wheels
Since the driving torque can be applied to the
4 wheels, the driving performance of the ve- hicle when operating in 4-wheel drive is
greatly affected by the condition of the tyres.
Inspection and maintenance following rough road operation
6-43OGAE15E5Starting and driving6
Page 212 of 452
Pay close attention to the tyres.l Install only the specified tyres on all
wheels. Refer to “Tyres and wheels” on page 11-13.
l Be sure all 4 tyres and wheels are the
same size and type.
When it is necessary to replace any of
the tyres or wheels, replace all 4 tyres.
l All tyres should be rotated before the
wear difference between the front and
rear tyres is recognizable.
Good vehicle performance cannot be expec- ted if there is a difference in wear between tyres. Refer to “Tyre rotation” on page 10-15.
l Check the tyre inflation pressure regular-
ly.CAUTIONl Always use tyres of the same size, same
type, and same brand, and which have no
wear differences. Using tyres of different size, type, brands or degree of wear, will in-
crease the differential oil temperature, result-
ing in possible damage to the driving sys-
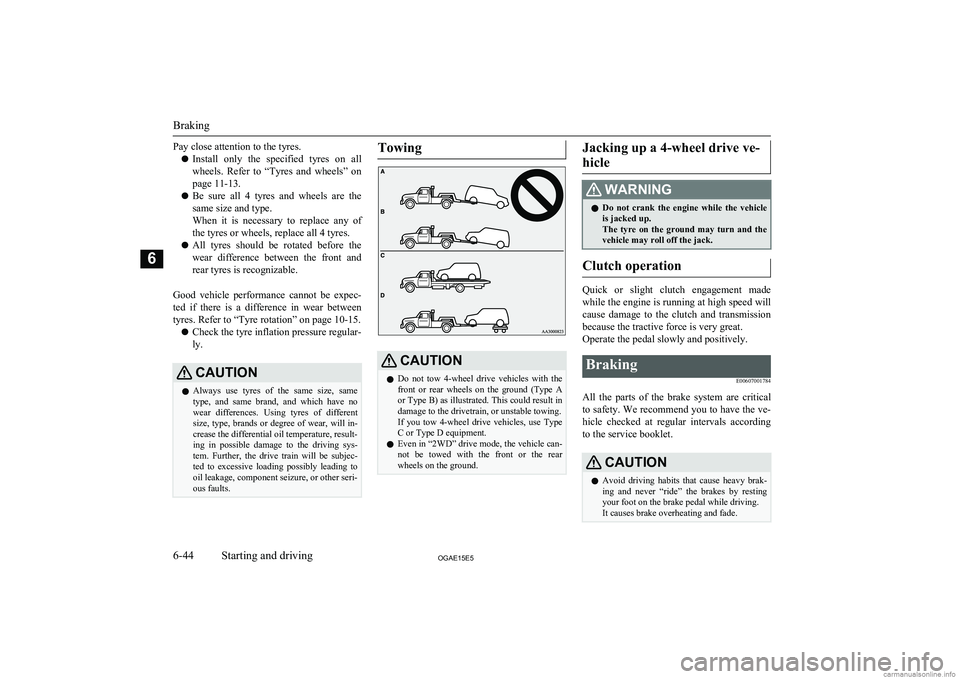
tem. Further, the drive train will be subjec- ted to excessive loading possibly leading tooil leakage, component seizure, or other seri-ous faults.TowingCAUTIONl Do not tow 4-wheel drive vehicles with the
front or rear wheels on the ground (Type Aor Type B) as illustrated. This could result in
damage to the drivetrain, or unstable towing.
If you tow 4-wheel drive vehicles, use Type C or Type D equipment.
l Even in “2WD” drive mode, the vehicle can-
not be towed with the front or the rear wheels on the ground.Jacking up a 4-wheel drive ve-
hicleWARNINGl Do not crank the engine while the vehicle
is jacked up.
The tyre on the ground may turn and the vehicle may roll off the jack.
Clutch operation
Quick or slight clutch engagement made
while the engine is running at high speed will
cause damage to the clutch and transmission because the tractive force is very great.
Operate the pedal slowly and positively.
Braking
E00607001784
All the parts of the brake system are critical
to safety. We recommend you to have the ve- hicle checked at regular intervals according
to the service booklet.
CAUTIONl Avoid driving habits that cause heavy brak-
ing and never “ride” the brakes by resting
your foot on the brake pedal while driving.
It causes brake overheating and fade.
Braking
6-44OGAE15E5Starting and driving6
Page 332 of 452
WARNINGlIf there is none, make sure that the engine
has cooled down before removing the ra-
diator cap (D), because hot steam or boil- ing water otherwise will gush from the filler port and may scald you.
6. Fill the reserve tank with coolant as nee-
ded. (Refer to the “Maintenance” sec- tion.)
CAUTIONl Do not add coolant while the engine is hot.
Suddenly adding cold coolant could damage
the engine. Wait for the engine to cool
down, then add coolant a little at a time.7. Examine the radiator hoses for coolant
leakage and the drive belt for looseness
or damage.
If there is anything wrong with the cool-
ing system or drive belt, we recommend
you to have it checked and repaired.Tool and jack
E00800901500
Storage
The tools and jack are stowed in the luggagecompartment.
The storage location of the tools and jack should be remembered in case of an emer-
gency.
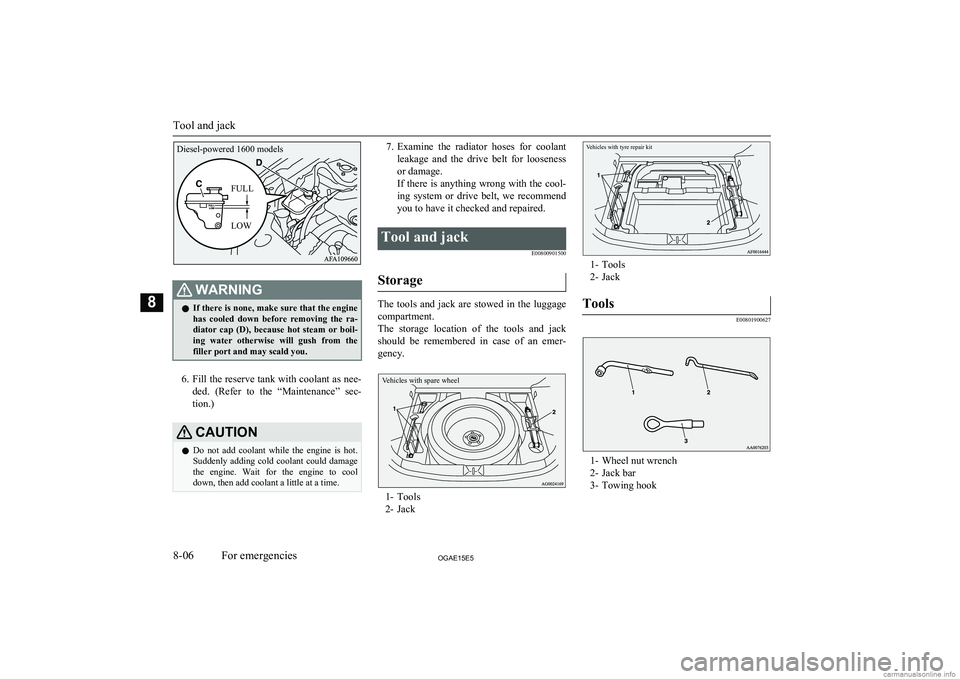
Vehicles with spare wheel
1- Tools
2- Jack
1- Tools
2- Jack
Tools
E00801900627
1- Wheel nut wrench
2- Jack bar
3- Towing hook
Tool and jack
8-06OGAE15E5For emergencies8Diesel-powered 1600 modelsFULL
LOW Vehicles with tyre repair kit
Page 344 of 452
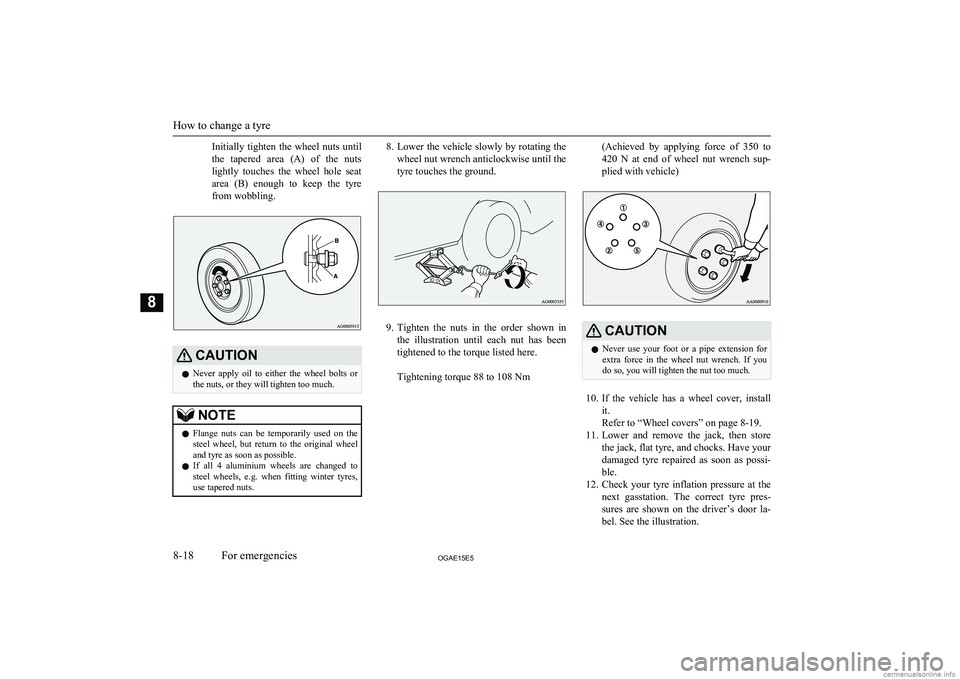
Initially tighten the wheel nuts until
the tapered area (A) of the nuts
lightly touches the wheel hole seat
area (B) enough to keep the tyre from wobbling.CAUTIONl Never apply oil to either the wheel bolts or
the nuts, or they will tighten too much.NOTEl Flange nuts can be temporarily used on the
steel wheel, but return to the original wheel and tyre as soon as possible.
l If all 4 aluminium wheels are changed to
steel wheels, e.g. when fitting winter tyres,
use tapered nuts.8. Lower the vehicle slowly by rotating the
wheel nut wrench anticlockwise until the
tyre touches the ground.
9. Tighten the nuts in the order shown in
the illustration until each nut has been tightened to the torque listed here.
Tightening torque 88 to 108 Nm
(Achieved by applying force of 350 to
420 N at end of wheel nut wrench sup- plied with vehicle)CAUTIONl Never use your foot or a pipe extension for
extra force in the wheel nut wrench. If you
do so, you will tighten the nut too much.
10. If the vehicle has a wheel cover, install
it.
Refer to “Wheel covers” on page 8-19.
11. Lower and remove the jack, then store
the jack, flat tyre, and chocks. Have your
damaged tyre repaired as soon as possi- ble.
12. Check your tyre inflation pressure at the
next gasstation. The correct tyre pres-
sures are shown on the driver’s door la- bel. See the illustration.
How to change a tyre
8-18OGAE15E5For emergencies8
Page 356 of 452
CAUTIONTherefore;• Maintain a distance of approx. 70 cm
or
more between the vehicle body and the
washing nozzle.
• When washing around the door glass,
hold the nozzle at a distance of more than
70 cm and at right angles to the glass sur-
face.
l After washing the vehicle, drive the vehicle
slowly while lightly depressing the brake
pedal several times in order to dry out the brakes.
Leaving the brakes wet could result in re- duced braking performance. Also, there is a
possibility that they could freeze up or be- come inoperative due to rust, rendering the
vehicle unable to move.
l When using an automatic car wash, pay at-
tention to the following items, referring to the operation manual or consulting a car
wash operator. If the following procedure is not followed, it could result in damage to your vehicle.
• The outside mirrors are retracted.
• The antenna is removed.
• The wiper arms are secured in place with
tape.
• If your vehicle is equipped with a rear
spoiler or roof rails, consult a car wash operator before using the car wash.
• If your vehicle has rain sensor wipers,
place the wiper switch lever in the “OFF” position to deactivate the rain sensor.During cold weather
Salt and other chemicals spread on the roads
in some areas in winter can have a harmful effect on the vehicle body. You should there-
fore wash the vehicle as often as possible in accordance with our care-instructions. It is
recommended to have a preservative applied
and the underfloor protection checked before and after the cold weather season.
After washing your vehicle, wipe off all wa- terdrops from the rubber parts around the
doors to prevent the doors from freezing.
NOTEl To prevent freezing of the weatherstripping
on the doors, bonnet, etc., they should be treated with silicone spray.Waxing
E00901000863
Waxing the vehicle will help prevent the ad-
herence of dust and road chemicals to the paintwork. Apply a wax solution after wash- ing the vehicle, or at least once every three
months to assist displacing of water.
Do not wax your vehicle in direct sunlight.
You should wax after the surfaces have
cooled.
CAUTIONl Waxes containing high abrasive compounds
should not be used. Such waxes remove rust and stains effectively from the paintwork but
they are harmful to the lustre on the painted
surface and the plated surface.
Further, they are harmful to glossy surfaces such as grille, garnish, mouldings, etc.
l Do not use petrol or paint thinners to remove
road tar or other contamination to the pain-
ted surface.
l Do not apply wax to sections that have a
black mat paint coating, as doing so could cause uneven discolouration, spots or stains.
If wax gets on such areas, wipe it off using
lukewarm water and a soft cloth.Polishing
E00901100066
The vehicle should only be polished if the
paintwork has become stained or lost its lus- tre. Do not polish parts with a mat coating
and the plastic bumpers. Doing so could cause stains or damage the finish.
Damaged paint
E00901200201
Small cracks and scratches in the paint coat
should be touched up as soon as possible
with MITSUBISHI MOTORS GENUINE
touch-up paint to prevent corrosion.
Cleaning the exterior of your vehicle
9-04OGAE15E5Vehicle care9
Page 357 of 452
Check body areas facing the road or the tyres
carefully for damage to the paint caused by gravels, etc. The paint code number for your
vehicle can be found on the vehicle informa- tion code plate in the engine compartment.Cleaning plastic parts
E00901300707
Use a sponge or chamois leather.
If a car wax adheres on a grey or black rough surface of the bumper, moulding or lamps, the surface becomes white. In such a case,
wipe it off using lukewarm water and soft cloth or chamois leather.
CAUTIONl Do not use a scrubbing brush or other hard
tools as they may damage the plastic part surface.
l Do not use wax containing compound (pol-
ishing powder) which may damage the plas-
tic part surface.
l Do not bring the plastic parts into contact
with petrol, light oil, brake fluids, engine
oils, greases, paint thinners, and sulphuric acid (battery electrolyte) which may crack,stain or discolour the plastic parts.
If they touch the plastic parts, wipe them off
with soft cloth, chamois or the like and an aqueous solution of neutral detergent thenimmediately rinse the affected parts with
water.Chrome parts
E00901400098
In order to prevent spots and corrosion of
chrome parts, wash with water, dry thorough-
ly, and apply a special protective coating.
This should be done more frequently in win- ter.
Aluminium wheels*
E00901500347
1. Remove dirt using a sponge while sprin-
kling water on the vehicle.
2. Use neutral detergent on any dirt that
cannot be removed easily with water.
Rinse off the neutral detergent after
washing the vehicle.
3. Dry the vehicle thoroughly using a cha-
mois leather or a soft cloth.
CAUTIONl Do not use a brush or other hard implement
on the wheels.
Doing so could scratch the wheels.
l Do not use any cleaner that contains an abra-
sive substance or is acidic or alkaline. Doing
so could cause the coating on the wheels to peel or become discoloured or stained.
l Do not directly apply hot water using a
steam cleaner or by any other means.
l Contact with seawater and road deicer can
cause corrosion. Rinse off such substances as soon as possible.Window glass
E00901600117
The window glass can normally be cleaned
using only a sponge and water.
Glass cleaner can be used to remove oil, grease, dead insects, etc. After washing the
glass, wipe dry with a clean, dry, soft cloth. Never use a cloth that is used for cleaning a
painted surface to clean a window. Wax from
the painted surface could get on the glass and lower glass transparency and visibility.
NOTEl To clean the inside of the rear window, al-
ways use a soft cloth and wipe the window
glass along the demister heater element so as not to cause damage.Wiper blades
E00901700062
Use a soft cloth and glass cleaner to remove
grease, dead insects, etc., from the wiper blades. Replace the wiper blades when they
no longer wipe properly. (Refer to page 10-17.)
Cleaning the exterior of your vehicle
9-05OGAE15E5Vehicle care9