ignition MITSUBISHI COLT 2008 Owner's Manual (in English)
[x] Cancel search | Manufacturer: MITSUBISHI, Model Year: 2008, Model line: COLT, Model: MITSUBISHI COLT 2008Pages: 450, PDF Size: 14.57 MB
Page 4 of 450
Overview
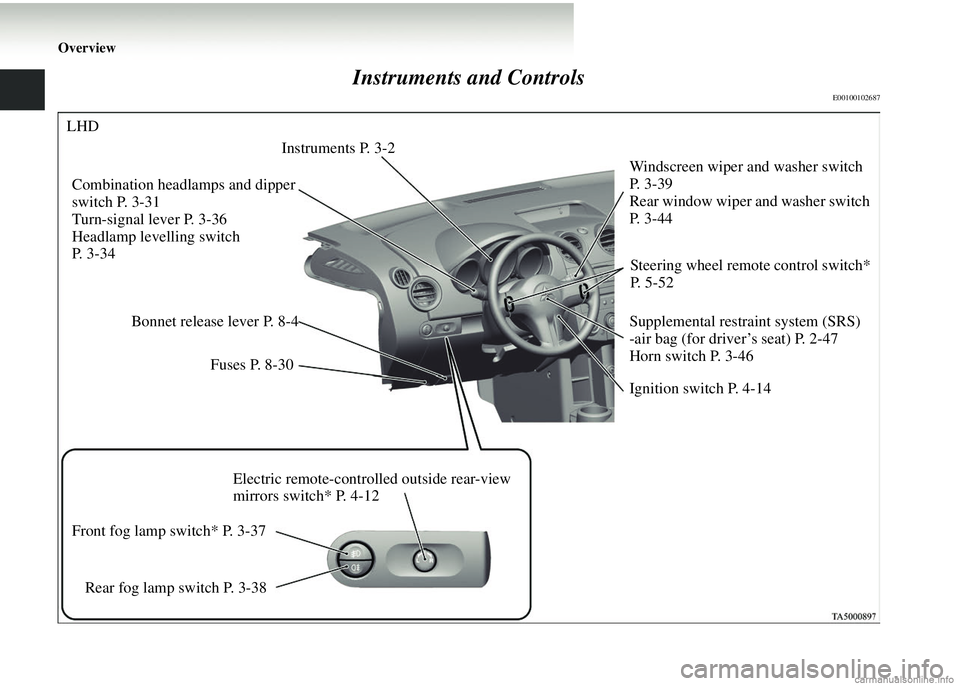
Instruments and Controls
E00100102687
Instruments P. 3-2Windscreen wiper and washer switch
P. 3 - 3 9
Rear window wiper and washer switch
P. 3 - 4 4
Supplemental restraint system (SRS)
-air bag (for driver’s seat) P. 2-47
Horn switch P. 3-46
Combination headlamps and dipper
switch P. 3-31
Turn-signal lever P. 3-36
Headlamp levelling switch
P. 3-34
Ignition switch P. 4-14
Bonnet release lever P. 8-4
Electric remote-controlled outside rear-view
mirrors switch* P. 4-12
Front fog lamp switch* P. 3-37
Rear fog lamp switch P. 3-38 Fuses P. 8-30
Steering wheel remote control switch*
P. 5-52
LHD
Page 5 of 450
Overview
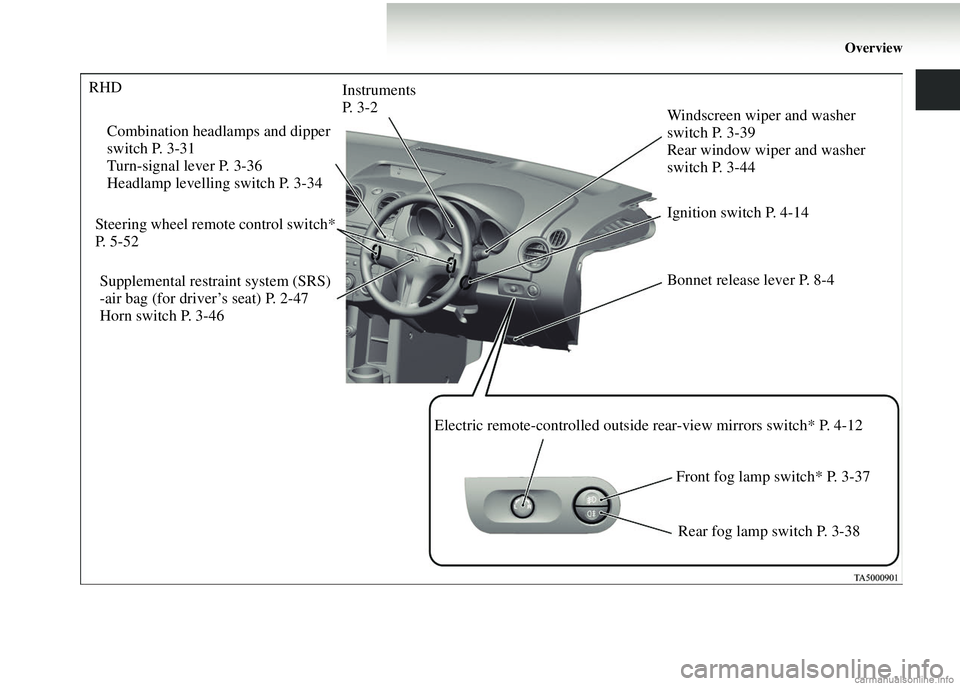
Instruments
P. 3 - 2Windscreen wiper and washer
switch P. 3-39
Rear window wiper and washer
switch P. 3-44
Supplemental restraint system (SRS)
-air bag (for driver’s seat) P. 2-47
Horn switch P. 3-46 Combination headlamps and dipper
switch P. 3-31
Turn-signal lever P. 3-36
Headlamp levelling switch P. 3-34
Bonnet release lever P. 8-4
Electric remote-controlled outside rear-view mirrors switch* P. 4-12 Front fog lamp switch* P. 3-37
Rear fog lamp switch P. 3-38
Steering wheel remote control switch*
P. 5-52
RHD
Ignition switch P. 4-14
Page 34 of 450
1-6 Locking and unlocking
1
To unlock
Press the UNLOCK switch (2) to unlock all the doors and the
tailgate.
If they are unlocked while the room lamp is not illuminated,
the room lamp will be turned on for approximately 15 seconds
and the turn-signal lamps will blink twice.
NOTE● If the UNLOCK switch (2) is pressed and any of the doors
or tailgate is not opened within approximately 30 seconds:
relocking will automatically occur.
● It is possible to modify the functions as follows:
For further information, contact your MITSUBISHI
MOTORS Authorized Service Point.
• The time from pressing of the UNLOCK switch (2) to
the moment of automatic locking can be changed.
• The confirmation function (f lashing of the turn-signal
lamps) can be set to operate only when the doors and
tailgate are locked or only when the doors and tailgate
are unlocked.
• The confirmation function (which indicates locking or unlocking of the doors and ta ilgate with the flash of the
turn-signal lamps) can be deactivated.
• The number of times the turn-signal lamps are flashed by the confirmation function can be changed.
Operation of the Dead Lock System
For vehicles with a Dead Lock System, the Dead Lock System
can be set using the remote controller.
(Refer to “Dead Lock System’’ on page 1-10.)
NOTE● For vehicles with a Dead Lo ck System, the keyless entry
system will not work while the key is in the ignition
switch.
● Pressing the LOCK switch (1) has no effect (no locking
takes place) if a door or the tailgate is open.
● The remote control switch will operate within about 4m
from the vehicle. However, the operating range of the
remote control switch may chan ge if the vehicle is located
near a TV transmitting tower, power station, or radio
broadcasting station.
● If the turn-signal lamps flash 9 times when you press the
remote control switch, the battery may have run down.
Have the battery replaced by a MITSUBISHI MOTORS
Authorized Service Point.
● If your remote control switch is lost or damaged, please
contact your MITSUBISHI MOTORS Authorized Service
Point for a replacement remote control switch.
● If you wish to add a remote control switch, please contact
your MITSUBISHI MOTORS Authorized Service Point.
A maximum of eight remote control switches are availa-
ble for your vehicle.
Page 39 of 450
Locking and unlocking1-11
1
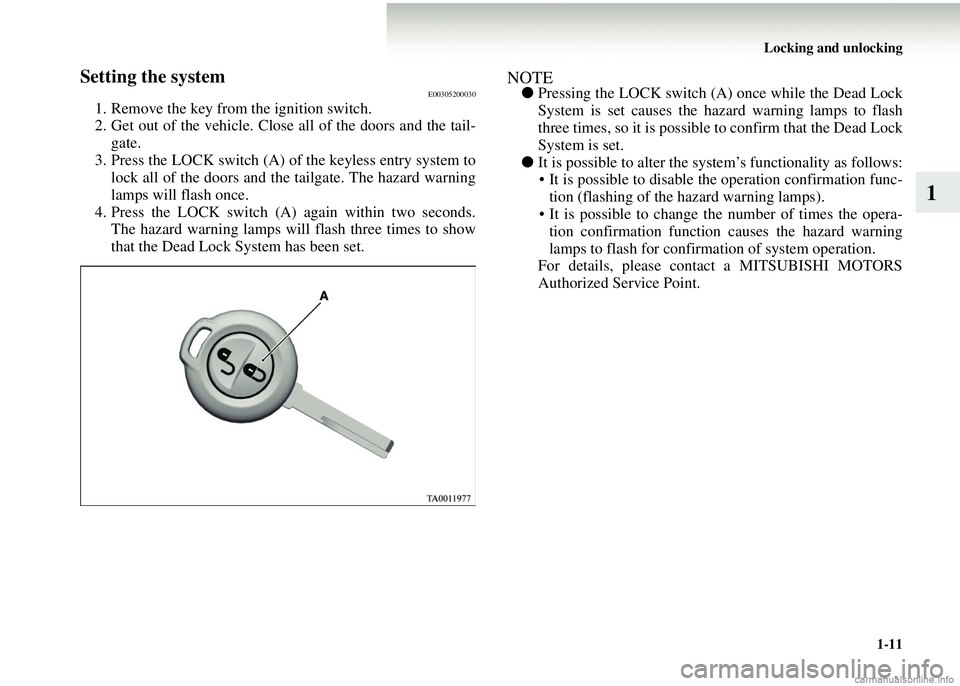
Setting the systemE00305200030
1. Remove the key from the ignition switch.
2. Get out of the vehicle. Close all of the doors and the tail-gate.
3. Press the LOCK switch (A) of the keyless entry system to lock all of the doors and the tailgate. The hazard warning
lamps will flash once.
4. Press the LOCK switch (A) again within two seconds. The hazard warning lamps will flash three times to show
that the Dead Lock System has been set.
NOTE● Pressing the LOCK switch (A ) once while the Dead Lock
System is set causes the hazard warning lamps to flash
three times, so it is possible to confirm that the Dead Lock
System is set.
● It is possible to alter the system’s functionality as follows:
• It is possible to disable the operation confirmation func-
tion (flashing of the hazard warning lamps).
• It is possible to change th e number of times the opera-
tion confirmation function causes the hazard warning
lamps to flash for confirma tion of system operation.
For details, please cont act a MITSUBISHI MOTORS
Authorized Service Point.
Page 43 of 450
Locking and unlocking1-15
1
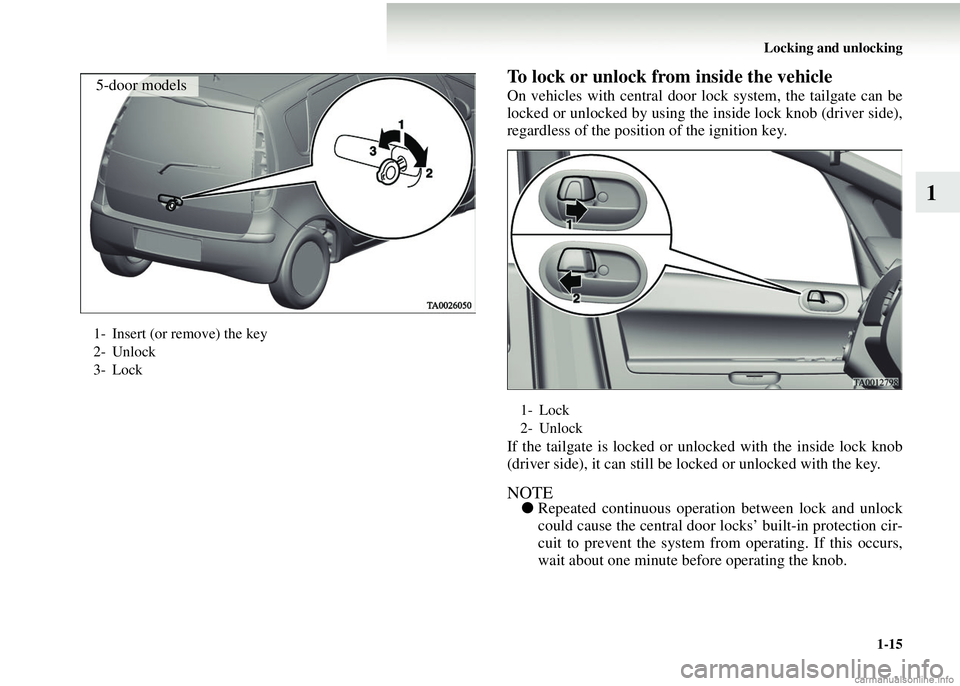
To lock or unlock from inside the vehicle
On vehicles with central door lo ck system, the tailgate can be
locked or unlocked by using the inside lock knob (driver side),
regardless of the position of the ignition key.
If the tailgate is locked or unlo cked with the inside lock knob
(driver side), it can still be locked or unlocked with the key.
NOTE● Repeated continuou s operation between lock and unlock
could cause the central door locks’ built-in protection cir-
cuit to prevent the system from operating. If this occurs,
wait about one minute before operating the knob.
1- Insert (or remove) the key
2- Unlock
3- Lock
5-door models
1- Lock
2- Unlock
Page 46 of 450
1-18 Locking and unlocking
1Electric window control
E00302200042
The electric windows can only be operated with the ignition
switch in the “ON” position.
Electric window control switchE00302300968
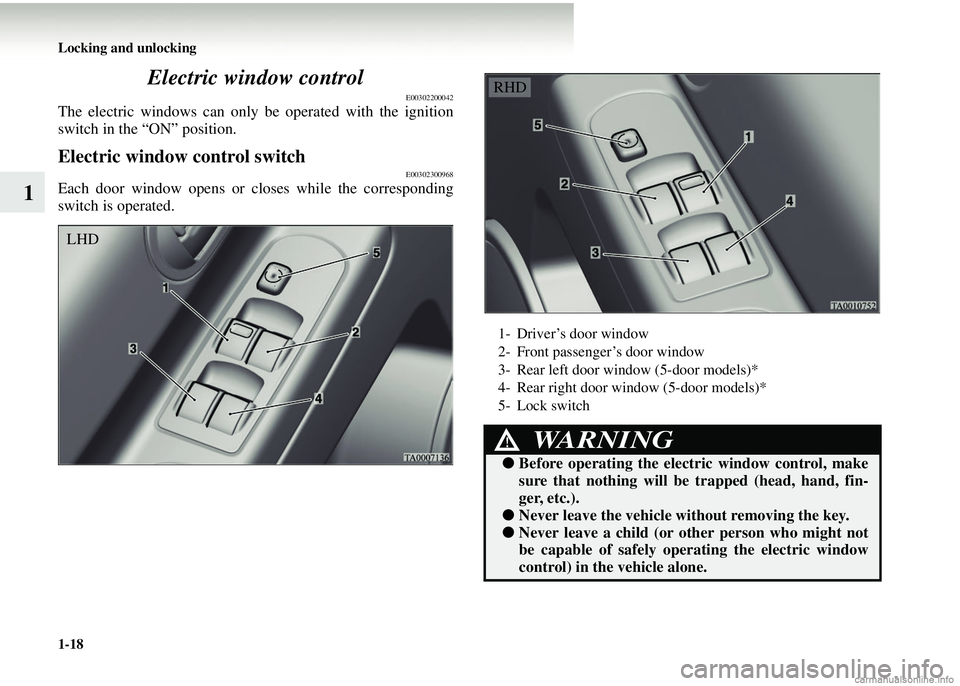
Each door window opens or
closes while the corresponding
switch is operated.
LHD
1- Driver’s door window
2- Front passenger’s door window
3- Rear left door window (5-door models)*
4- Rear right door window (5-door models)*
5- Lock switch
WARNING!
● Before operating the elect ric window control, make
sure that nothing will be trapped (head, hand, fin-
ger, etc.).
● Never leave the vehicle without removing the key.
●Never leave a child (or ot her person who might not
be capable of safely op erating the electric window
control) in the vehicle alone.
RHD
Page 55 of 450
Seat and seat belts2-7
2
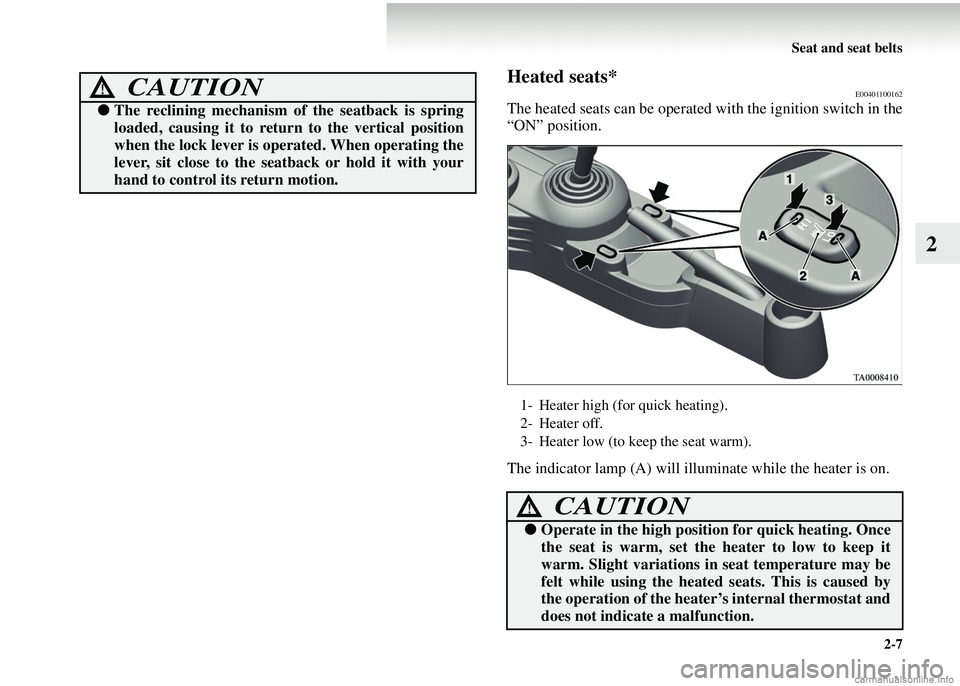
Heated seats*E00401100162
The heated seats can be operated with the ignition switch in the
“ON” position.
The indicator lamp (A) will illuminate while the heater is on.
CAUTION!
● The reclining mechanism of the seatback is spring
loaded, causing it to return to the vertical position
when the lock lever is op erated. When operating the
lever, sit close to the seatback or hold it with your
hand to control its return motion.
1- Heater high (for quick heating).
2- Heater off.
3- Heater low (to keep the seat warm).
CAUTION!
● Operate in the high positi on for quick heating. Once
the seat is warm, set the heater to low to keep it
warm. Slight variations in seat temperature may be
felt while using the heated seats. This is caused by
the operation of the heater ’s internal thermostat and
does not indicate a malfunction.
Page 73 of 450
Seat and seat belts2-25
2
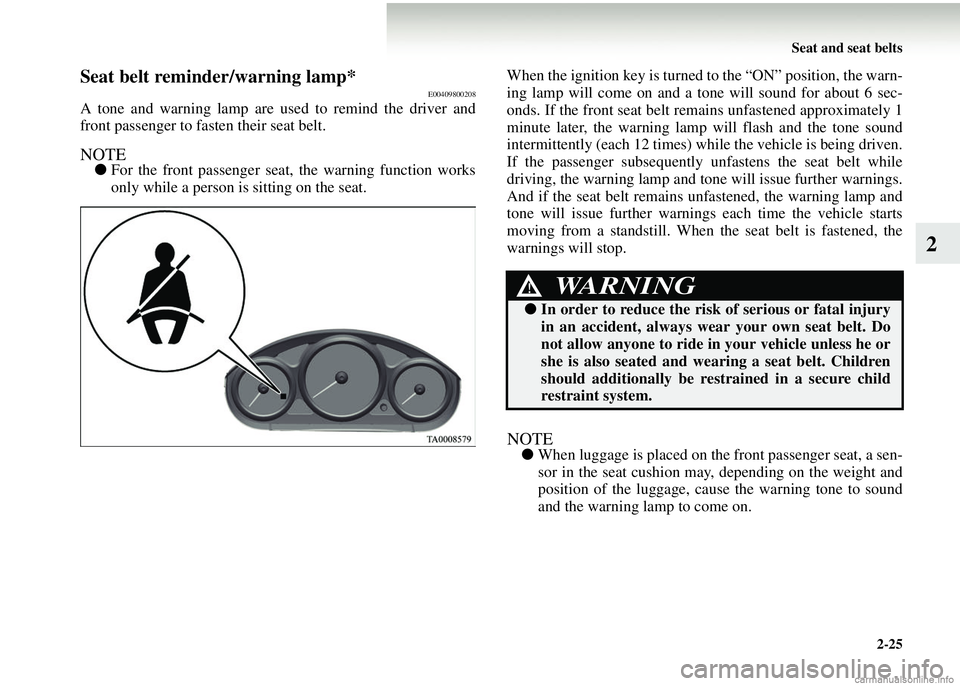
Seat belt reminder/warning lamp*E00409800208
A tone and warning lamp are used to remind the driver and
front passenger to fasten their seat belt.
NOTE●For the front passenger seat, the warning function works
only while a person is sitting on the seat. When the ignition key is turned to the “ON” position, the warn-
ing lamp will come on and a tone will sound for about 6 sec-
onds. If the front seat belt rema
ins unfastened approximately 1
minute later, the warning lamp will flash and the tone sound
intermittently (each 12 times) while the vehicle is being driven.
If the passenger subsequently unfastens the seat belt while
driving, the warning lamp and tone will issue further warnings.
And if the seat belt remains unfastened, the warning lamp and
tone will issue further warnings each time the vehicle starts
moving from a standstill. When th e seat belt is fastened, the
warnings will stop.
NOTE● When luggage is placed on th e front passenger seat, a sen-
sor in the seat cushion may, depending on the weight and
position of the luggage, cause the warning tone to sound
and the warning lamp to come on.
WARNING!
● In order to reduce the risk of serious or fatal injury
in an accident, always wear your own seat belt. Do
not allow anyone to ride in your vehicle unless he or
she is also seated and we aring a seat belt. Children
should additionally be re strained in a secure child
restraint system.
Page 77 of 450
Seat and seat belts2-29
2
Pregnant women restraint
E00405600136
Seat belt pre-tensioner system and force
limiter system
E00405700010
The driver’s seat and front passenger’s seat each have a seat
belt equipped with a pre-tensioner system.
Pre-tensioner systemE00405800936
The pre-tensioner systems will retract their respective seat belts
instantaneously, thus maximizing the seat belt’s effectiveness,
if there is a frontal impact severe enough to injure the driver
and/or front passenger and the ignition switch is in the “ON” or
“START” position.
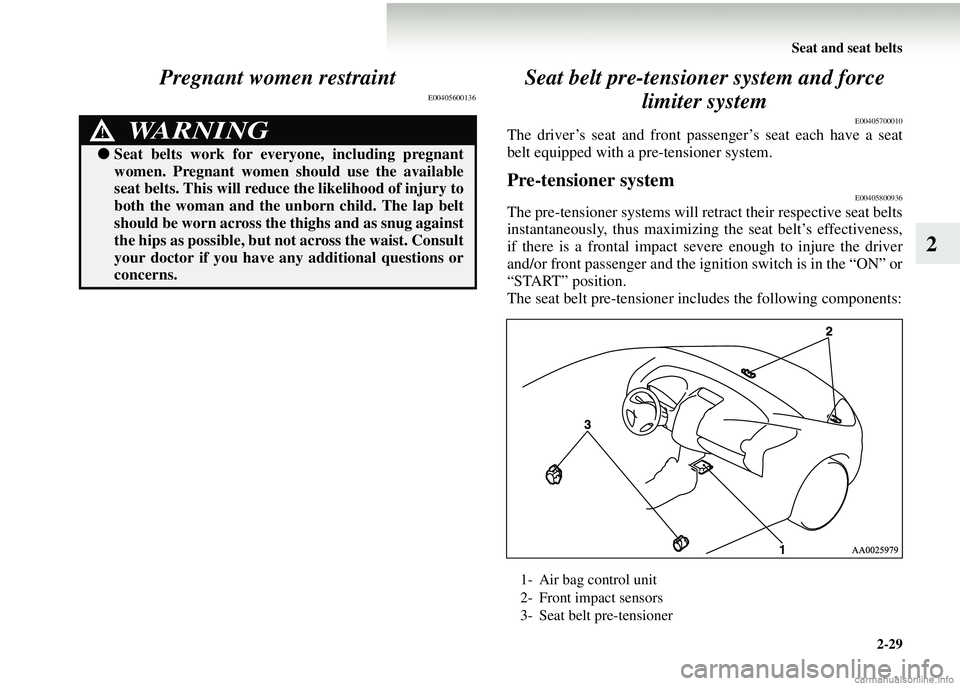
The seat belt pre-tensioner incl udes the following components:
WARNING!
●Seat belts work for everyone, including pregnant
women. Pregnant women should use the available
seat belts. This will reduce the likelihood of injury to
both the woman and the unborn child. The lap belt
should be worn across the thighs and as snug against
the hips as possible, but not across the waist. Consult
your doctor if you have any additional questions or
concerns.
1- Air bag control unit
2- Front impact sensors
3- Seat belt pre-tensioner
Page 100 of 450
2-52 Seat and seat belts
2
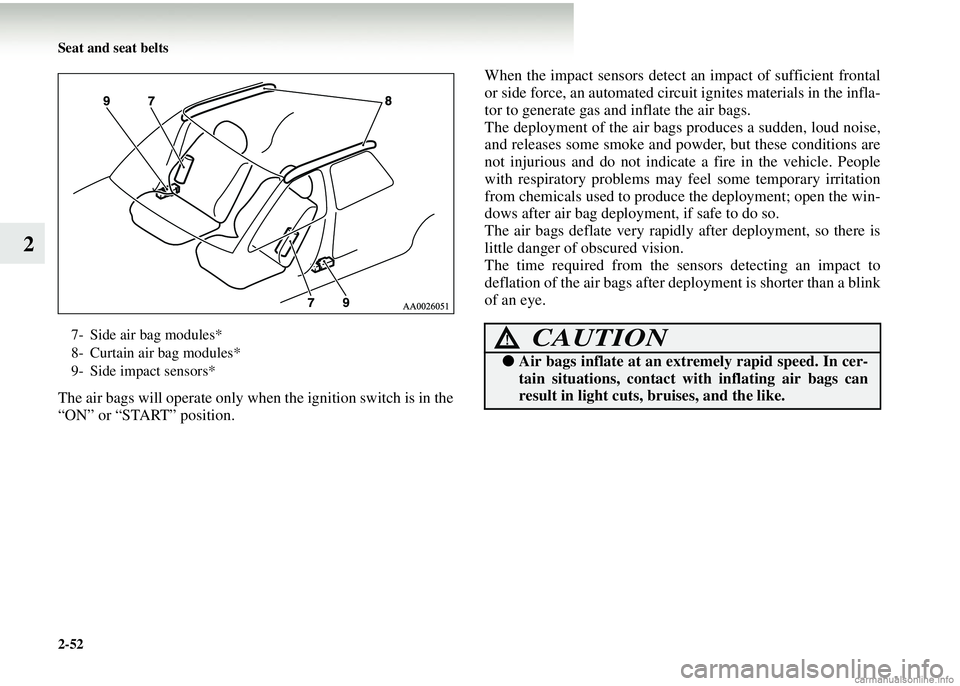
The air bags will operate only when the ignition switch is in the
“ON” or “START” position.When the impact sensors detect
an impact of sufficient frontal
or side force, an automated circuit ignites materials in the infla-
tor to generate gas and inflate the air bags.
The deployment of the air bags produces a sudden, loud noise,
and releases some smoke and powder, but these conditions are
not injurious and do not indicate a fire in the vehicle. People
with respiratory problems may feel some temporary irritation
from chemicals used to produce the deployment; open the win-
dows after air bag deployment, if safe to do so.
The air bags deflate very rapidl y after deployment, so there is
little danger of obscured vision.
The time required from the sensors detecting an impact to
deflation of the air bags after deployment is shorter than a blink
of an eye.
7- Side air bag modules*
8- Curtain air bag modules*
9- Side impact sensors*CAUTION!
● Air bags inflate at an ex tremely rapid speed. In cer-
tain situations, contact with inflating air bags can
result in light cuts, bruises, and the like.