clock MITSUBISHI COLT 2008 (in English) User Guide
[x] Cancel search | Manufacturer: MITSUBISHI, Model Year: 2008, Model line: COLT, Model: MITSUBISHI COLT 2008Pages: 450, PDF Size: 14.57 MB
Page 224 of 450
5-8 For pleasant driving
5
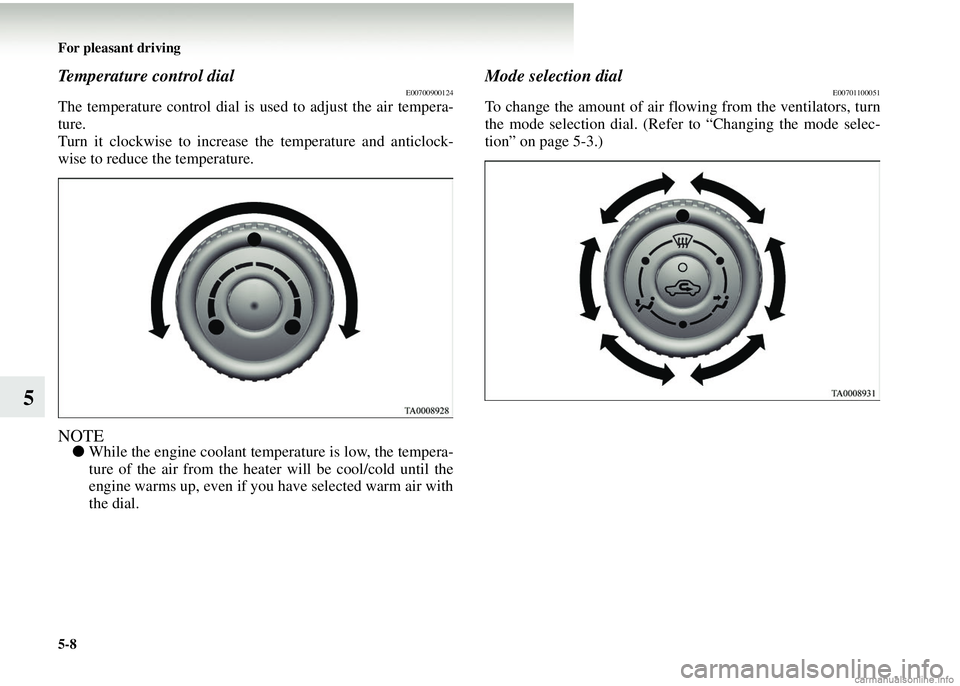
Temperature control dialE00700900124
The temperature control dial is used to adjust the air tempera-
ture.
Turn it clockwise to increase the temperature and anticlock-
wise to reduce the temperature.
NOTE● While the engine coolant temp erature is low, the tempera-
ture of the air from the heater will be cool/cold until the
engine warms up, even if you have selected warm air with
the dial.
Mode selection dialE00701100051
To change the amount of air flowing from the ventilators, turn
the mode selection dial. (Refer to “Changing the mode selec-
tion” on page 5-3.)
Page 226 of 450
5-10 For pleasant driving
5
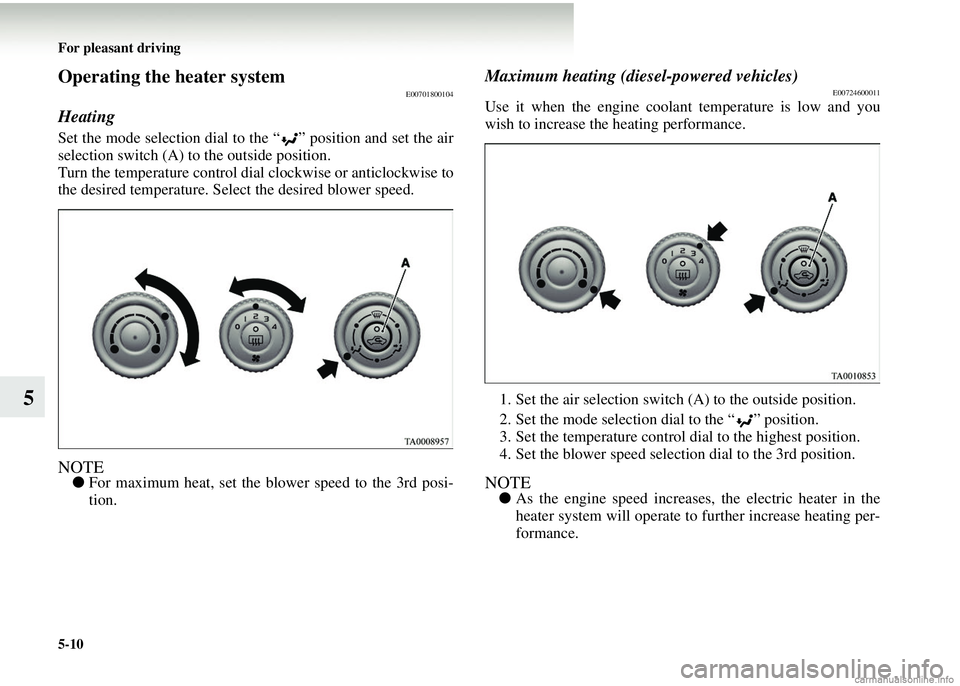
Operating the heater systemE00701800104
Heating
Set the mode selection dial to the “ ” position and set the air
selection switch (A) to the outside position.
Turn the temperature control dial clockwise or anticlockwise to
the desired temperature. Sel ect the desired blower speed.
NOTE●For maximum heat, set the blower speed to the 3rd posi-
tion.
Maximum heating (diesel-powered vehicles)E00724600011
Use it when the engine coolant temperature is low and you
wish to increase the heating performance.
1. Set the air selection switch (A) to the outside position.
2. Set the mode selection dial to the “ ” position.
3. Set the temperature control dial to the highest position.
4. Set the blower speed selection dial to the 3rd position.
NOTE● As the engine speed increases, the electric heater in the
heater system will operate to further increase heating per-
formance.
Page 229 of 450
For pleasant driving5-13
5
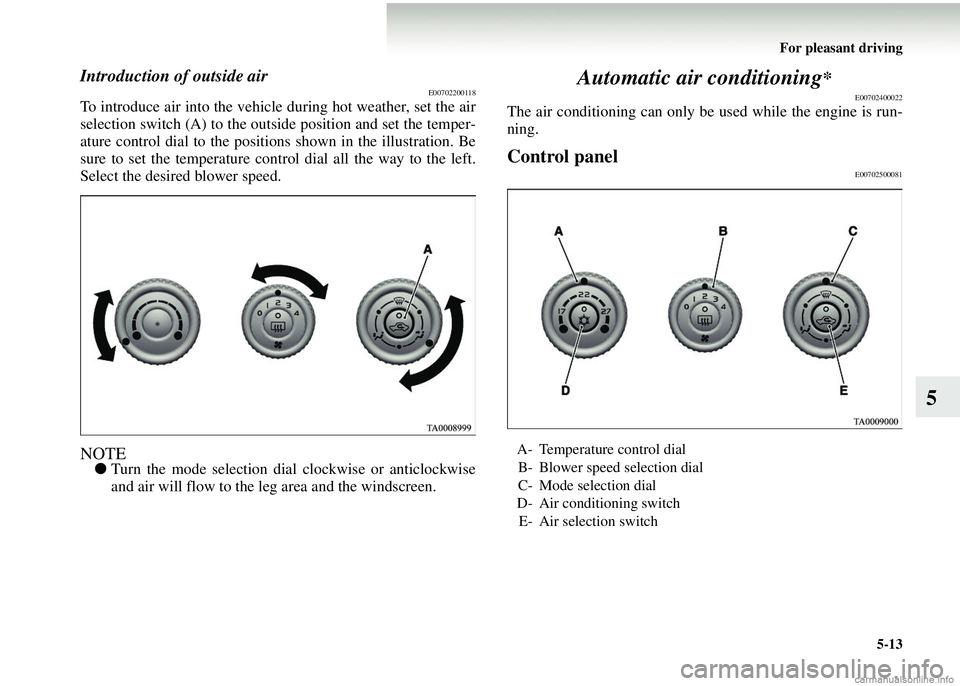
Introduction of outside airE00702200118
To introduce air into the vehicl e during hot weather, set the air
selection switch (A) to the outside position and set the temper-
ature control dial to the positions shown in the illustration. Be
sure to set the temperature contro l dial all the way to the left.
Select the desired blower speed.
NOTE● Turn the mode selection dial clockwise or anticlockwise
and air will flow to the leg area and the windscreen.
Automatic air conditioning*
E00702400022
The air conditioning can only be used while the engine is run-
ning.
Control panelE00702500081
A- Temperature control dial
B- Blower speed selection dial
C- Mode selection dial
D- Air conditioning switch
E- Air selection switch
Page 230 of 450
5-14 For pleasant driving
5
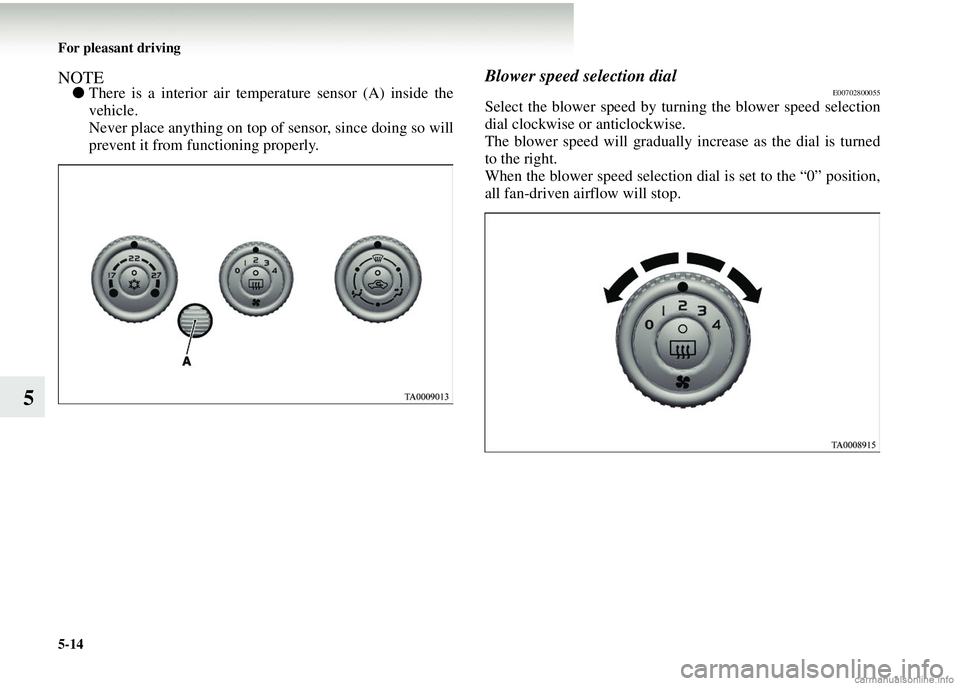
NOTE●There is a interior air temper ature sensor (A) inside the
vehicle.
Never place anything on top of sensor, since doing so will
prevent it from functioning properly.
Blower speed selection dialE00702800055
Select the blower speed by turn ing the blower speed selection
dial clockwise or anticlockwise.
The blower speed will gradually increase as the dial is turned
to the right.
When the blower speed selection dial is set to the “0” position,
all fan-driven airflow will stop.
Page 231 of 450
For pleasant driving5-15
5
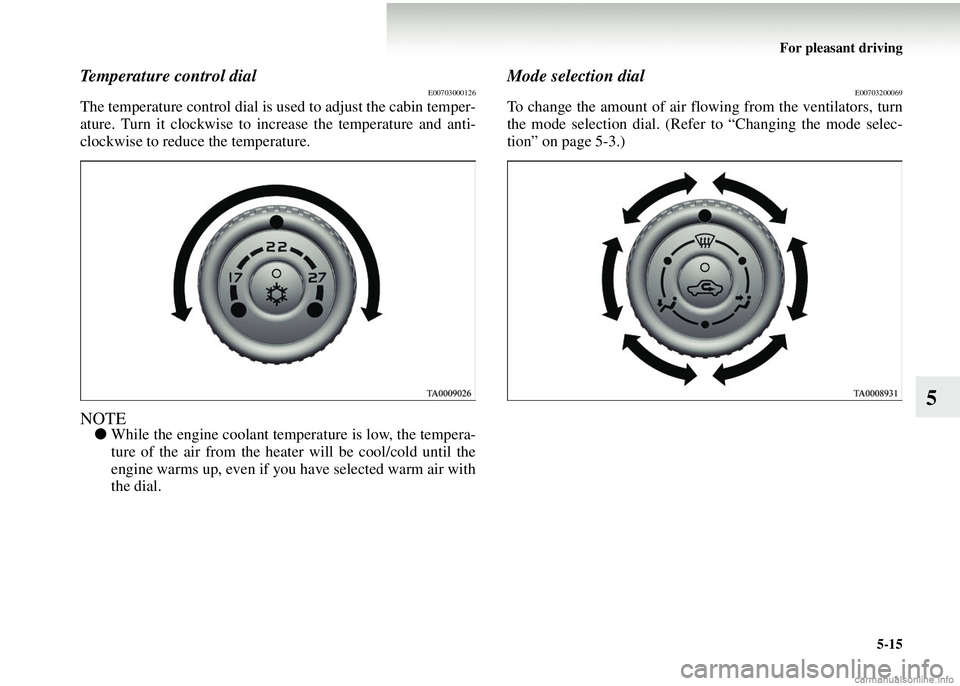
Temperature control dialE00703000126
The temperature control dial is us ed to adjust the cabin temper-
ature. Turn it clockwise to in crease the temperature and anti-
clockwise to reduce the temperature.
NOTE●While the engine coolant temp erature is low, the tempera-
ture of the air from the heater will be cool/cold until the
engine warms up, even if you have selected warm air with
the dial.
Mode selection dialE00703200069
To change the amount of air fl owing from the ventilators, turn
the mode selection dial. (Refer to “Changing the mode selec-
tion” on page 5-3.)
Page 233 of 450
For pleasant driving5-17
5
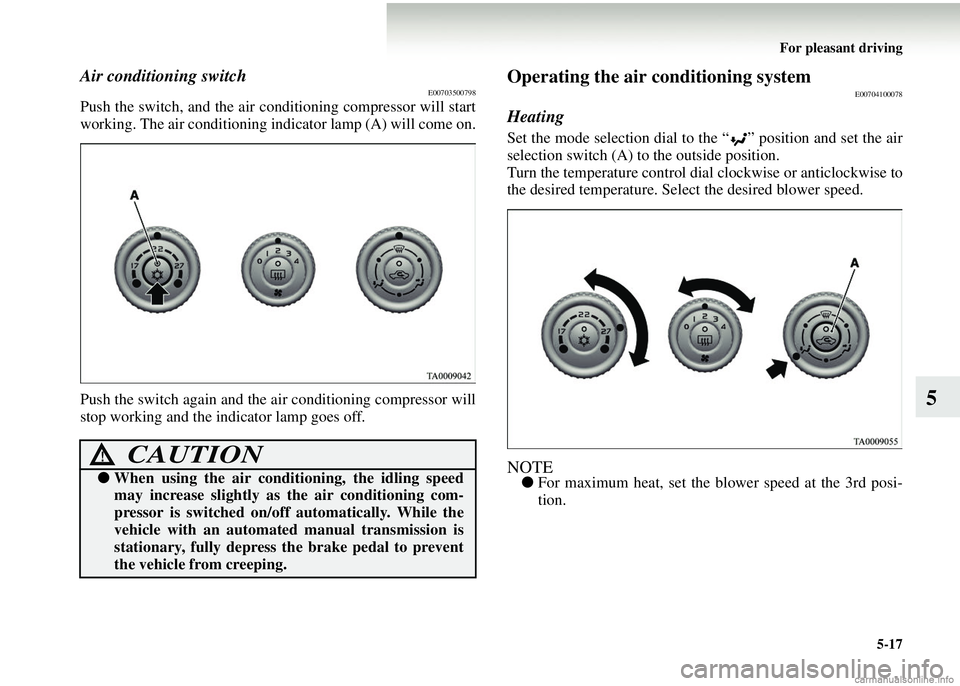
Air conditioning switchE00703500798
Push the switch, and the air conditioning compressor will start
working. The air conditioning indicator lamp (A) will come on.
Push the switch agai n and the air conditioning compressor will
stop working and the indicator lamp goes off.
Operating the air conditioning systemE00704100078
Heating
Set the mode selection dial to the “ ” position and set the air
selection switch (A) to the outside position.
Turn the temperature control dial clockwise or anticlockwise to
the desired temperature. Sel ect the desired blower speed.
NOTE●For maximum heat, set the bl ower speed at the 3rd posi-
tion.
CAUTION!
● When using the air conditi oning, the idling speed
may increase slightly as the air conditioning com-
pressor is switched on/off automatically. While the
vehicle with an automated manual transmission is
stationary, fully depress th e brake pedal to prevent
the vehicle from creeping.
Page 234 of 450
5-18 For pleasant driving
5
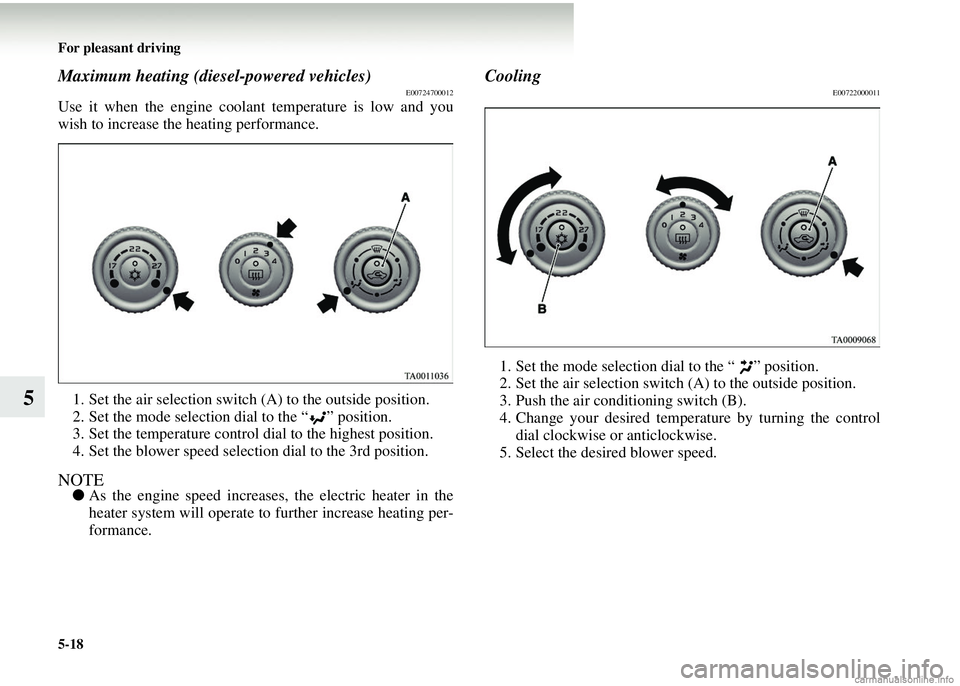
Maximum heating (diesel-powered vehicles)E00724700012
Use it when the engine coolant temperature is low and you
wish to increase the heating performance.1. Set the air selection switch (A) to the outside position.
2. Set the mode selection dial to the “ ” position.
3. Set the temperature control dial to the highest position.
4. Set the blower speed selec tion dial to the 3rd position.
NOTE●As the engine speed increases, the electric heater in the
heater system will operate to further increase heating per-
formance.
CoolingE00722000011
1. Set the mode selection dial to the “ ” position.
2. Set the air selection switch (A) to the outside position.
3. Push the air conditioning switch (B).
4. Change your desired temperature by turning the control dial clockwise or anticlockwise.
5. Select the desired blower speed.
Page 237 of 450
For pleasant driving5-21
5
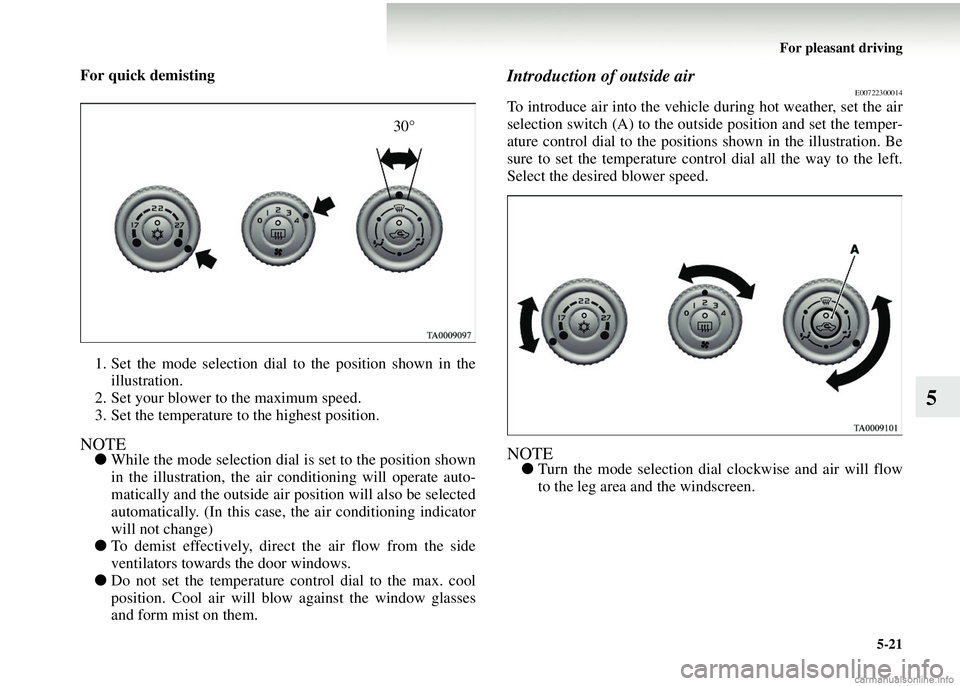
For quick demisting
1. Set the mode selection dial to the position shown in the illustration.
2. Set your blower to the maximum speed.
3. Set the temperature to the highest position.
NOTE● While the mode selection dial is set to the position shown
in the illustration, the air conditioning will operate auto-
matically and the outside air pos ition will also be selected
automatically. (In this case, the air conditioning indicator
will not change)
● To demist effectively, direct the air flow from the side
ventilators towards the door windows.
● Do not set the temperature control dial to the max. cool
position. Cool air will blow against the window glasses
and form mist on them.
Introduction of outside airE00722300014
To introduce air into the vehicle during hot weather, set the air
selection switch (A) to the outside position and set the temper-
ature control dial to the positions shown in the illustration. Be
sure to set the temperature control dial all the way to the left.
Select the desired blower speed.
NOTE●Turn the mode selection dial clockwise and air will flow
to the leg area and the windscreen.
30°
Page 243 of 450
For pleasant driving5-27
5
To adjust the volumeE00708700085
VOL (Volume control)
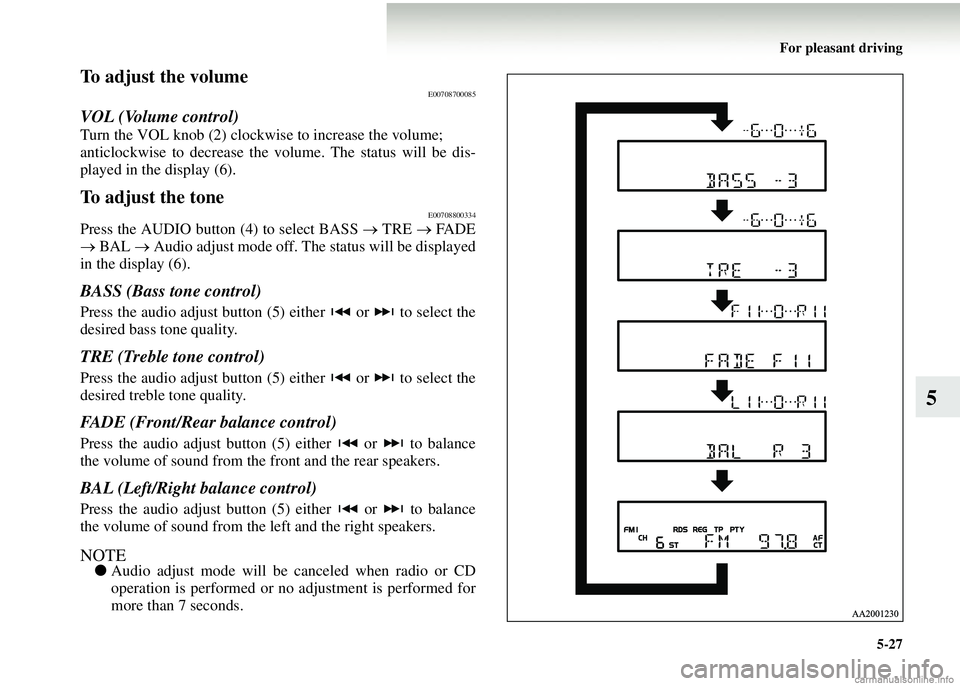
Turn the VOL knob (2) clockwise to increase the volume;
anticlockwise to decrease the vo lume. The status will be dis-
played in the display (6).
To adjust the toneE00708800334
Press the AUDIO button (4) to select BASS → TRE → FA D E
→ BAL → Audio adjust mode off. The status will be displayed
in the display (6).
BASS (Bass tone control)
Press the audio adjust button (5) either or to select the
desired bass tone quality.
TRE (Treble tone control)
Press the audio adjust button (5) either or to select the
desired treble tone quality.
FADE (Front/Rear balance control)
Press the audio adjust button (5) either or to balance
the volume of sound from the front and the rear speakers.
BAL (Left/Right balance control)
Press the audio adjust button (5) either or to balance
the volume of sound from the left and the right speakers.
NOTE● Audio adjust mode will be canceled when radio or CD
operation is performed or no adjustment is performed for
more than 7 seconds.
Page 248 of 450
5-32 For pleasant driving
5
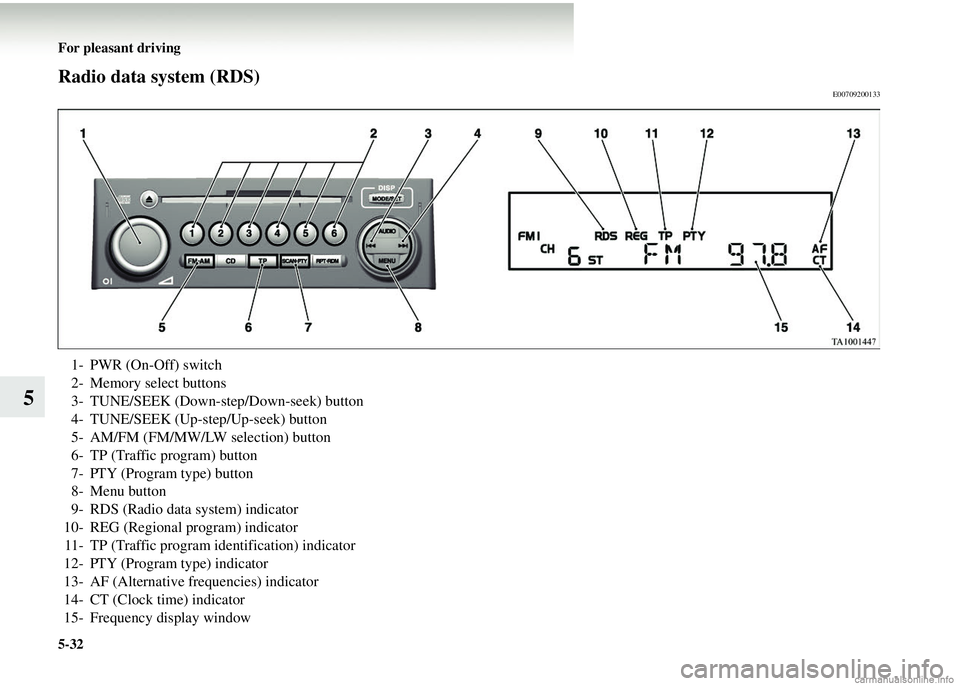
Radio data system (RDS)E00709200133
1- PWR (On-Off) switch
2- Memory select buttons
3- TUNE/SEEK (Down-step/Down-seek) button
4- TUNE/SEEK (Up-step/Up-seek) button
5- AM/FM (FM/MW/LW selection) button
6- TP (Traffic program) button
7- PTY (Program type) button
8- Menu button
9- RDS (Radio data system) indicator
10- REG (Regional program) indicator 11- TP (Traffic program identification) indicator
12- PTY (Program type) indicator
13- AF (Alternative frequencies) indicator
14- CT (Clock time) indicator
15- Frequency display window