key MITSUBISHI COLT 2011 (in English) User Guide
[x] Cancel search | Manufacturer: MITSUBISHI, Model Year: 2011, Model line: COLT, Model: MITSUBISHI COLT 2011Pages: 274, PDF Size: 17.88 MB
Page 37 of 274
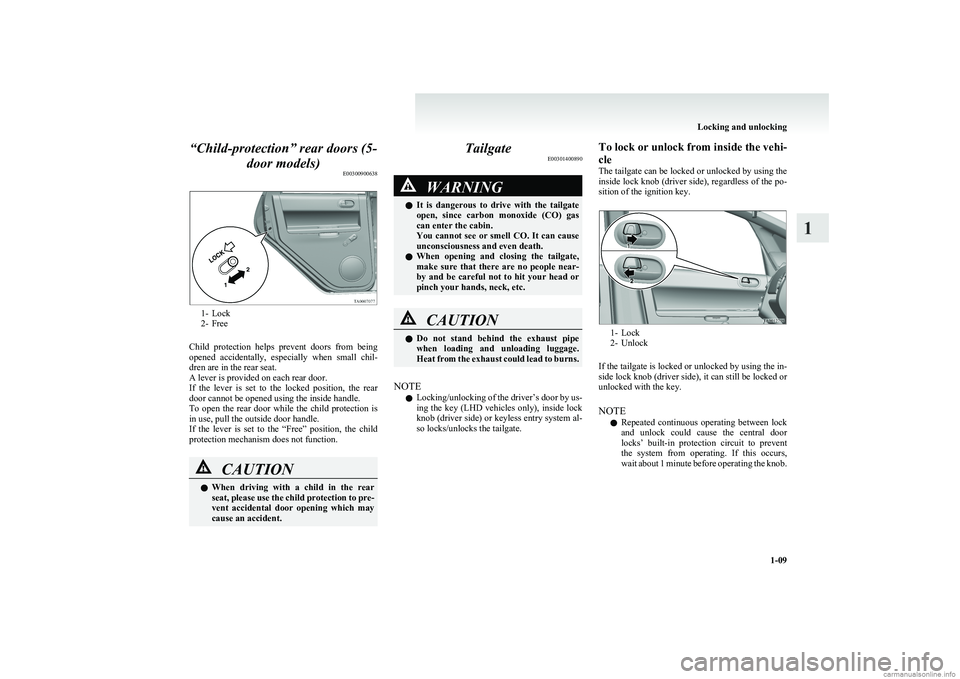
“Child-protection” rear doors (5-door models) E00300900638
1- Lock
2- Free
Child protection helps prevent doors from being
opened accidentally, especially when small chil-
dren are in the rear seat.
A lever is provided on each rear door.
If the lever is set to the locked position, the rear
door cannot be opened using the inside handle.
To open the rear door while the child protection is
in use, pull the outside door handle.
If the lever is set to the “Free” position, the child
protection mechanism does not function.
CAUTIONl When driving with a child in the rear
seat, please use the child protection to pre-
vent accidental door opening which may
cause an accident.Tailgate E00301400890WARNINGlIt is dangerous to drive with the tailgate
open, since carbon monoxide (CO) gas
can enter the cabin.
You cannot see or smell CO. It can cause
unconsciousness and even death.
l When opening and closing the tailgate,
make sure that there are no people near-
by and be careful not to hit your head or
pinch your hands, neck, etc.CAUTIONl Do not stand behind the exhaust pipe
when loading and unloading luggage.
Heat from the exhaust could lead to burns.
NOTE
l Locking/unlocking of the driver’s door by us-
ing the key (LHD vehicles only), inside lock
knob (driver side) or keyless entry system al-
so locks/unlocks the tailgate.
To lock or unlock from inside the vehi-
cle
The tailgate can be locked or unlocked by using the
inside lock knob (driver side), regardless of the po-
sition of the ignition key.
1- Lock
2- Unlock
If the tailgate is locked or unlocked by using the in-
side lock knob (driver side), it can still be locked or
unlocked with the key.
NOTE l Repeated continuous operating between lock
and unlock could cause the central door
locks’ built-in protection circuit to prevent
the system from operating. If this occurs,
wait about 1 minute before operating the knob.
Locking and unlocking
1-09
1
Page 39 of 274
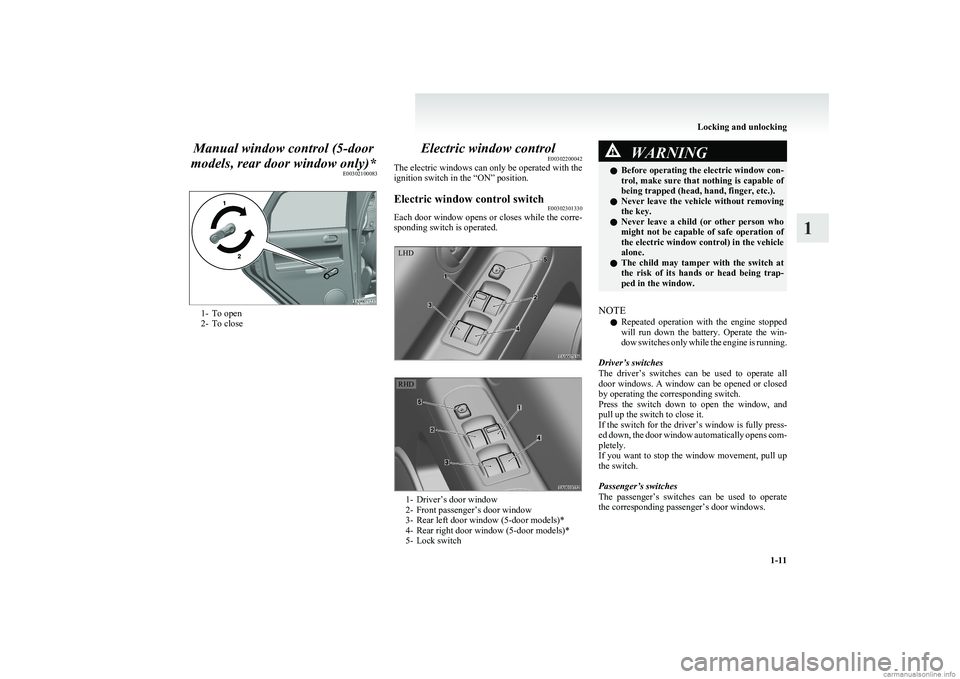
Manual window control (5-door
models, rear door window only)* E00302100083
1- To open
2- To close
Electric window control E00302200042
The electric windows can only be operated with the
ignition switch in the “ON” position.Electric window control switch E00302301330
Each door window opens or closes while the corre-
sponding switch is operated.
1- Driver’s door window
2- Front passenger’s door window
3- Rear left door window (5-door models)*
4- Rear right door window (5-door models)*
5- Lock switch
WARNINGl Before operating the electric window con-
trol, make sure that nothing is capable of
being trapped (head, hand, finger, etc.).
l Never leave the vehicle without removing
the key.
l Never leave a child (or other person who
might not be capable of safe operation of
the electric window control) in the vehicle
alone.
l The child may tamper with the switch at
the risk of its hands or head being trap-
ped in the window.
NOTE
l Repeated operation with the engine stopped
will run down the battery. Operate the win-
dow switches only while the engine is running.
Driver’s switches
The driver’s switches can be used to operate all
door windows. A window can be opened or closed
by operating the corresponding switch.
Press the switch down to open the window, and
pull up the switch to close it.
If the switch for the driver’s window is fully press-
ed down, the door window automatically opens com-
pletely.
If you want to stop the window movement, pull up
the switch.
Passenger’s switches
The passenger’s switches can be used to operate
the corresponding passenger’s door windows.
Locking and unlocking
1-11
1LHD RHD
Page 51 of 274
CAUTIONlThe seat belts must not be twisted when
worn.
3. Pull the belt slightly to adjust slackness as de-
sired.
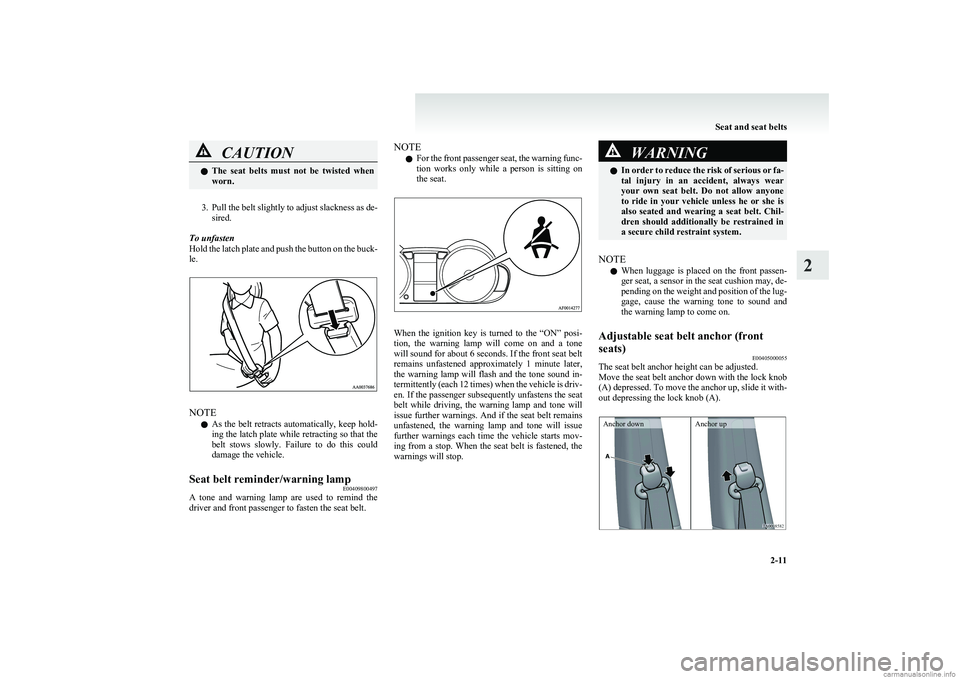
To unfasten
Hold the latch plate and push the button on the buck-
le.
NOTE
l As the belt retracts automatically, keep hold-
ing the latch plate while retracting so that the
belt stows slowly. Failure to do this could
damage the vehicle.
Seat belt reminder/warning lamp E00409800497
A tone and warning lamp are used to remind the
driver and front passenger to fasten the seat belt.
NOTE
l For the front passenger seat, the warning func-
tion works only while a person is sitting on
the seat.
When the ignition key is turned to the “ON” posi-
tion, the warning lamp will come on and a tone
will sound for about 6 seconds. If the front seat belt
remains unfastened approximately 1 minute later,
the warning lamp will flash and the tone sound in-
termittently (each 12 times) when the vehicle is driv-
en. If the passenger subsequently unfastens the seat
belt while driving, the warning lamp and tone will
issue further warnings. And if the seat belt remains
unfastened, the warning lamp and tone will issue
further warnings each time the vehicle starts mov-
ing from a stop. When the seat belt is fastened, the
warnings will stop.
WARNINGl In order to reduce the risk of serious or fa-
tal injury in an accident, always wear
your own seat belt. Do not allow anyone
to ride in your vehicle unless he or she is
also seated and wearing a seat belt. Chil-
dren should additionally be restrained in
a secure child restraint system.
NOTE
l When luggage is placed on the front passen-
ger seat, a sensor in the seat cushion may, de-
pending on the weight and position of the lug-
gage, cause the warning tone to sound and
the warning lamp to come on.
Adjustable seat belt anchor (front
seats) E00405000055
The seat belt anchor height can be adjusted.
Move the seat belt anchor down with the lock knob
(A) depressed. To move the anchor up, slide it with-
out depressing the lock knob (A).
Anchor downAnchor up
Seat and seat belts
2-11
2
Page 56 of 274
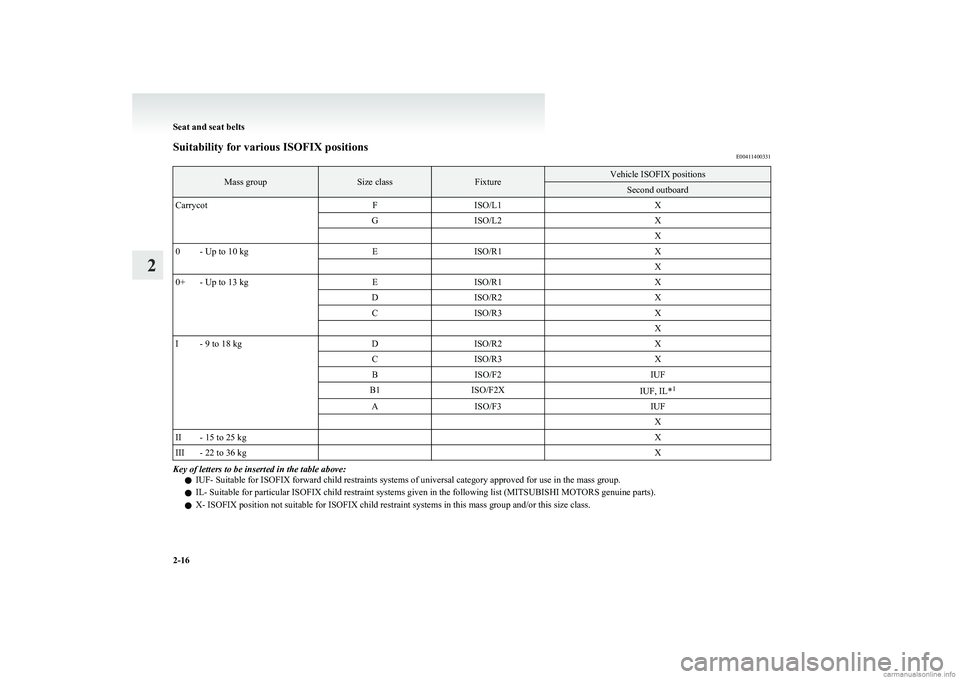
Suitability for various ISOFIX positionsE00411400331Mass groupSize classFixtureVehicle ISOFIX positionsSecond outboardCarrycotFISO/L1XGISO/L2X X0- Up to 10 kgEISO/R1X X0+- Up to 13 kgEISO/R1XDISO/R2XCISO/R3X XI- 9 to 18 kgDISO/R2XCISO/R3XBISO/F2IUFB1ISO/F2XIUF, IL*1AISO/F3IUF XII- 15 to 25 kg XIII- 22 to 36 kg XKey of letters to be inserted in the table above:
l
IUF- Suitable for ISOFIX forward child restraints systems of universal category approved for use in the mass group.
l IL- Suitable for particular ISOFIX child restraint systems given in the following list (MITSUBISHI MOTORS genuine parts).
l X- ISOFIX position not suitable for ISOFIX child restraint systems in this mass group and/or this size class.
Seat and seat belts
2-16
2
Page 58 of 274
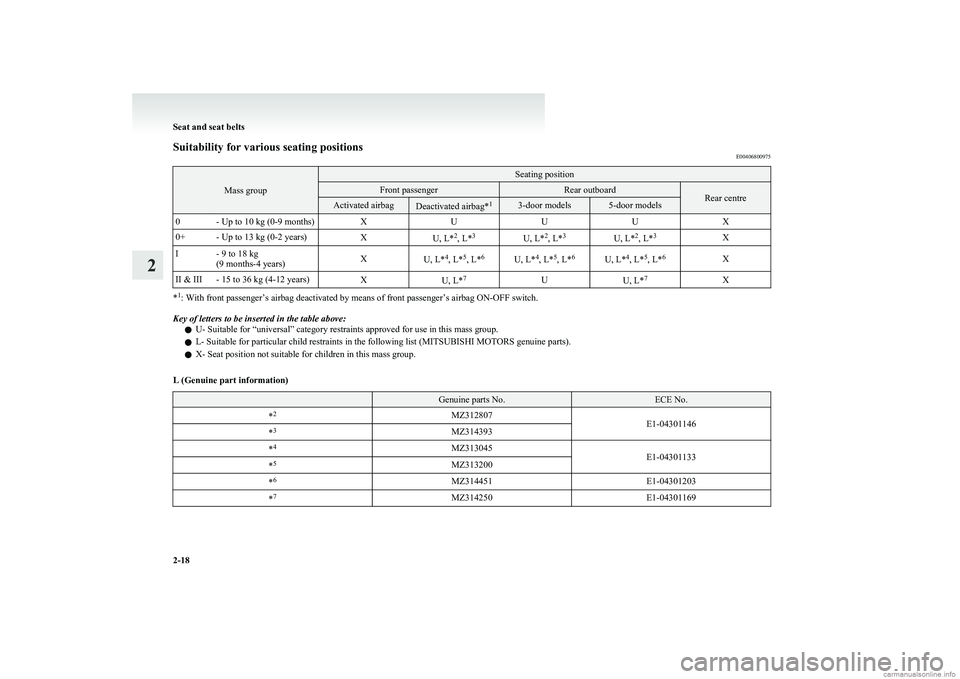
Suitability for various seating positionsE00406800975
Mass group
Seating positionFront passengerRear outboardRear centreActivated airbagDeactivated airbag*13-door models5-door models0- Up to 10 kg (0-9 months)XUUUX0+- Up to 13 kg (0-2 years)XU, L*2
, L* 3U, L* 2
, L* 3U, L* 2
, L* 3XI- 9 to 18 kg
(9 months-4 years)XU, L* 4
, L* 5
, L* 6U, L* 4
, L* 5
, L* 6U, L* 4
, L* 5
, L* 6XII & III- 15 to 36 kg (4-12 years)XU, L* 7UU, L*7X
*1
: With front passenger’s airbag deactivated by means of front passenger’s airbag ON-OFF switch.
Key of letters to be inserted in the table above:
l U- Suitable for “universal” category restraints approved for use in this mass group.
l L- Suitable for particular child restraints in the following list (MITSUBISHI MOTORS genuine parts).
l X- Seat position not suitable for children in this mass group.
L (Genuine part information) Genuine parts No.ECE No.*2MZ312807E1-04301146*3MZ314393*4MZ313045E1-04301133*5MZ313200*6MZ314451E1-04301203*7MZ314250E1-04301169
Seat and seat belts
2-18
2
Page 66 of 274
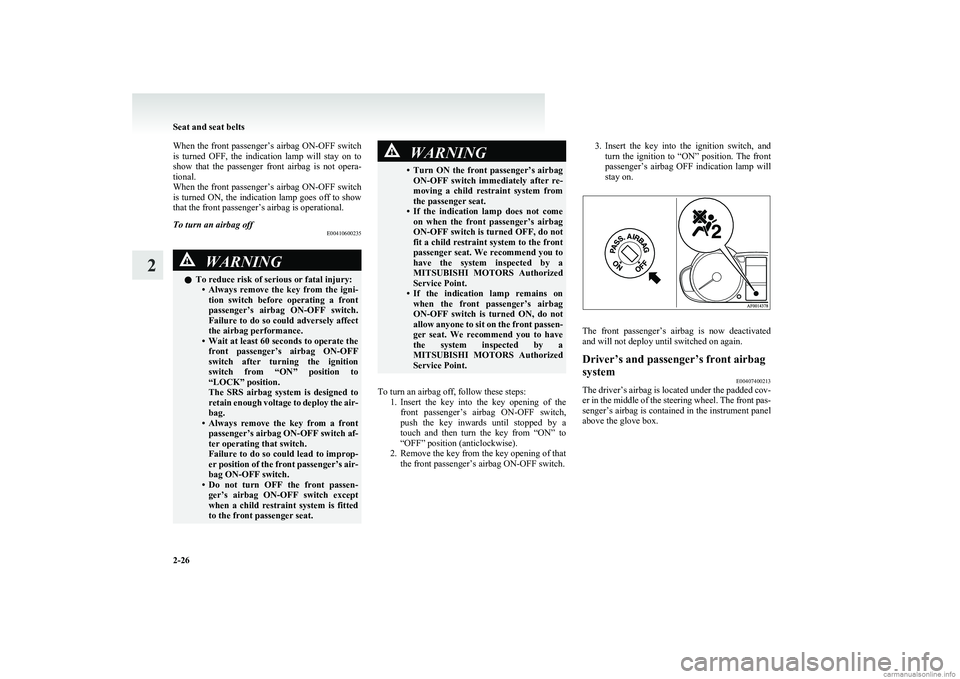
When the front passenger’s airbag ON-OFF switch
is turned OFF, the indication lamp will stay on to
show that the passenger front airbag is not opera-
tional.
When the front passenger’s airbag ON-OFF switch
is turned ON, the indication lamp goes off to show
that the front passenger’s airbag is operational.To turn an airbag off E00410600235WARNINGlTo reduce risk of serious or fatal injury:
•Always remove the key from the igni-
tion switch before operating a front
passenger’s airbag ON-OFF switch.
Failure to do so could adversely affect
the airbag performance.
• Wait at least 60 seconds to operate the
front passenger’s airbag ON-OFF
switch after turning the ignition
switch from “ON” position to
“LOCK” position.
The SRS airbag system is designed to
retain enough voltage to deploy the air-
bag.
• Always remove the key from a front
passenger’s airbag ON-OFF switch af-
ter operating that switch.
Failure to do so could lead to improp-
er position of the front passenger’s air-
bag ON-OFF switch.
• Do not turn OFF the front passen-
ger’s airbag ON-OFF switch except
when a child restraint system is fitted
to the front passenger seat.WARNING• Turn ON the front passenger’s airbag
ON-OFF switch immediately after re-
moving a child restraint system from
the passenger seat.
• If the indication lamp does not come
on when the front passenger’s airbag
ON-OFF switch is turned OFF, do not
fit a child restraint system to the front
passenger seat. We recommend you to
have the system inspected by a
MITSUBISHI MOTORS Authorized
Service Point.
• If the indication lamp remains on
when the front passenger’s airbag
ON-OFF switch is turned ON, do not
allow anyone to sit on the front passen-
ger seat. We recommend you to have
the system inspected by a
MITSUBISHI MOTORS Authorized
Service Point.
To turn an airbag off, follow these steps: 1.Insert the key into the key opening of the
front passenger’s airbag ON-OFF switch,
push the key inwards until stopped by a
touch and then turn the key from “ON” to
“OFF” position (anticlockwise).
2. Remove the key from the key opening of that the front passenger’s airbag ON-OFF switch.
3.Insert the key into the ignition switch, and
turn the ignition to “ON” position. The front
passenger’s airbag OFF indication lamp will
stay on.
The front passenger’s airbag is now deactivated
and will not deploy until switched on again.
Driver’s and passenger’s front airbag
system E00407400213
The driver’s airbag is located under the padded cov-
er in the middle of the steering wheel. The front pas-
senger’s airbag is contained in the instrument panel
above the glove box.
Seat and seat belts
2-26
2
Page 73 of 274
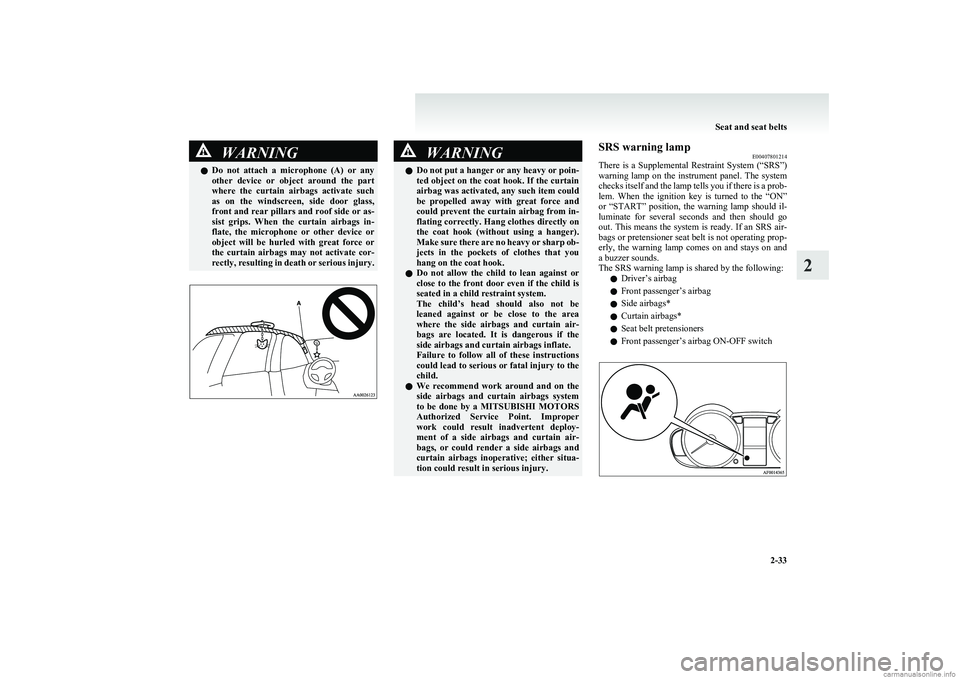
WARNINGlDo not attach a microphone (A) or any
other device or object around the part
where the curtain airbags activate such
as on the windscreen, side door glass,
front and rear pillars and roof side or as-
sist grips. When the curtain airbags in-
flate, the microphone or other device or
object will be hurled with great force or
the curtain airbags may not activate cor-
rectly, resulting in death or serious injury.WARNINGl Do not put a hanger or any heavy or poin-
ted object on the coat hook. If the curtain
airbag was activated, any such item could
be propelled away with great force and
could prevent the curtain airbag from in-
flating correctly. Hang clothes directly on
the coat hook (without using a hanger).
Make sure there are no heavy or sharp ob-
jects in the pockets of clothes that you
hang on the coat hook.
l Do not allow the child to lean against or
close to the front door even if the child is
seated in a child restraint system.
The child’s head should also not be
leaned against or be close to the area
where the side airbags and curtain air-
bags are located. It is dangerous if the
side airbags and curtain airbags inflate.
Failure to follow all of these instructions
could lead to serious or fatal injury to the
child.
l We recommend work around and on the
side airbags and curtain airbags system
to be done by a MITSUBISHI MOTORS
Authorized Service Point. Improper
work could result inadvertent deploy-
ment of a side airbags and curtain air-
bags, or could render a side airbags and
curtain airbags inoperative; either situa-
tion could result in serious injury.SRS warning lamp E00407801214
There is a Supplemental Restraint System (“SRS”)
warning lamp on the instrument panel. The system
checks itself and the lamp tells you if there is a prob-
lem. When the ignition key is turned to the “ON”
or “START” position, the warning lamp should il-
luminate for several seconds and then should go
out. This means the system is ready. If an SRS air-
bags or pretensioner seat belt is not operating prop-
erly, the warning lamp comes on and stays on and
a buzzer sounds.
The SRS warning lamp is shared by the following:
l Driver’s airbag
l Front passenger’s airbag
l Side airbags*
l Curtain airbags*
l Seat belt pretensioners
l Front passenger’s airbag ON-OFF switch
Seat and seat belts
2-33
2
Page 95 of 274
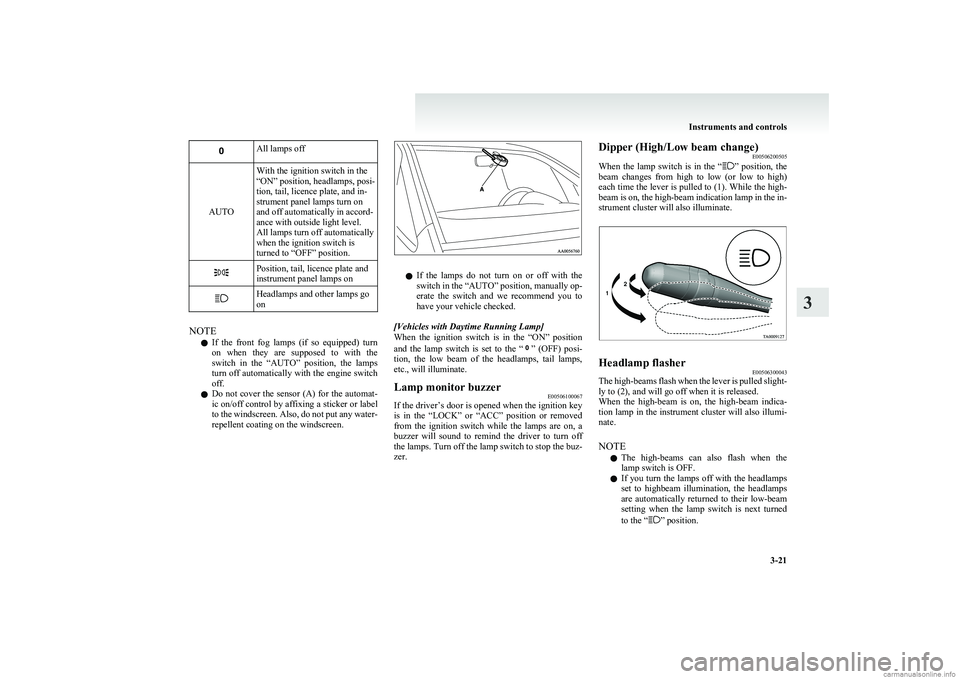
All lamps off
AUTO
With the ignition switch in the
“ON” position, headlamps, posi-
tion, tail, licence plate, and in-
strument panel lamps turn on
and off automatically in accord-
ance with outside light level.
All lamps turn off automatically
when the ignition switch is
turned to “OFF” position.Position, tail, licence plate and
instrument panel lamps onHeadlamps and other lamps go
on
NOTE
l If the front fog lamps (if so equipped) turn
on when they are supposed to with the
switch in the “AUTO” position, the lamps
turn off automatically with the engine switch
off.
l Do not cover the sensor (A) for the automat-
ic on/off control by affixing a sticker or label
to the windscreen. Also, do not put any water-
repellent coating on the windscreen.
l If the lamps do not turn on or off with the
switch in the “AUTO” position, manually op-
erate the switch and we recommend you to
have your vehicle checked.
[Vehicles with Daytime Running Lamp]
When the ignition switch is in the “ON” position
and the lamp switch is set to the “
” (OFF) posi-
tion, the low beam of the headlamps, tail lamps,
etc., will illuminate.
Lamp monitor buzzer E00506100067
If the driver’s door is opened when the ignition key
is in the “LOCK” or “ACC” position or removed
from the ignition switch while the lamps are on, a
buzzer will sound to remind the driver to turn off
the lamps. Turn off the lamp switch to stop the buz-
zer.
Dipper (High/Low beam change) E00506200505
When the lamp switch is in the “
” position, the
beam changes from high to low (or low to high)
each time the lever is pulled to (1). While the high-
beam is on, the high-beam indication lamp in the in-
strument cluster will also illuminate.
Headlamp flasher E00506300043
The high-beams flash when the lever is pulled slight-
ly to (2), and will go off when it is released.
When the high-beam is on, the high-beam indica-
tion lamp in the instrument cluster will also illumi-
nate.
NOTE l The high-beams can also flash when the
lamp switch is OFF.
l If you turn the lamps off with the headlamps
set to highbeam illumination, the headlamps
are automatically returned to their low-beam
setting when the lamp switch is next turned
to the “
” position.
Instruments and controls
3-21
3 ������
������
������
������
������
������
������
������
Page 96 of 274
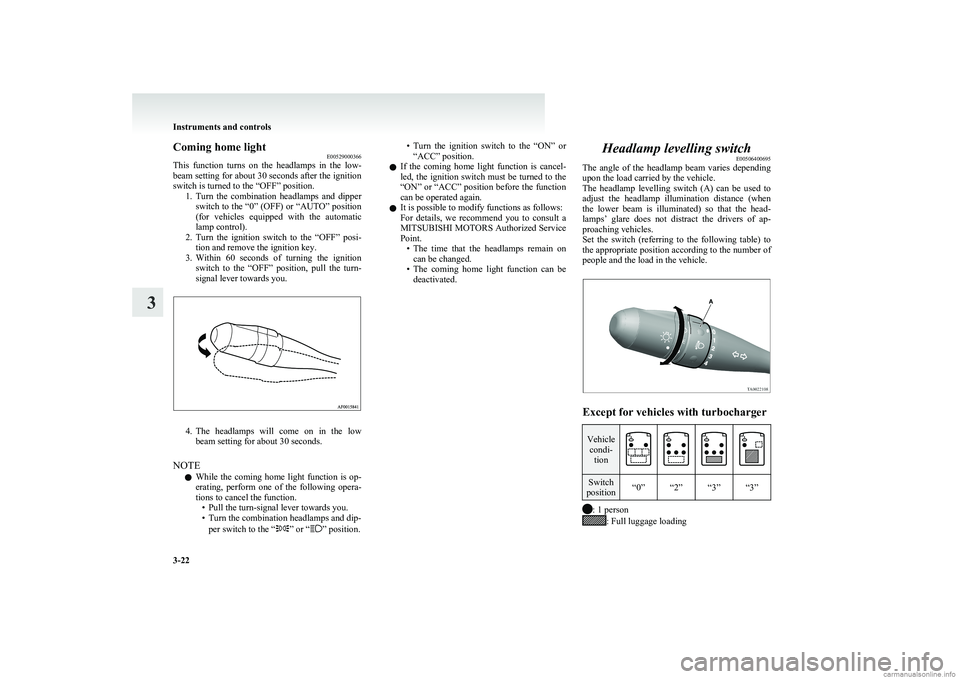
Coming home lightE00529000366
This function turns on the headlamps in the low-
beam setting for about 30 seconds after the ignition
switch is turned to the “OFF” position. 1.Turn the combination headlamps and dipper
switch to the “0” (OFF) or “AUTO” position
(for vehicles equipped with the automatic
lamp control).
2. Turn the ignition switch to the “OFF” posi-
tion and remove the ignition key.
3. Within 60 seconds of turning the ignition
switch to the “OFF” position, pull the turn-
signal lever towards you.
4. The headlamps will come on in the low
beam setting for about 30 seconds.
NOTE l While the coming home light function is op-
erating, perform one of the following opera-
tions to cancel the function. • Pull the turn-signal lever towards you.
• Turn the combination headlamps and dip-
per switch to the “
” or “” position.
•Turn the ignition switch to the “ON” or
“ACC” position.
l If the coming home light function is cancel-
led, the ignition switch must be turned to the
“ON” or “ACC” position before the function
can be operated again.
l It is possible to modify functions as follows:
For details, we recommend you to consult a
MITSUBISHI MOTORS Authorized Service
Point. •The time that the headlamps remain on
can be changed.
• The coming home light function can be
deactivated.Headlamp levelling switch E00506400695
The angle of the headlamp beam varies depending
upon the load carried by the vehicle.
The headlamp levelling switch (A) can be used to
adjust the headlamp illumination distance (when
the lower beam is illuminated) so that the head-
lamps’ glare does not distract the drivers of ap-
proaching vehicles.
Set the switch (referring to the following table) to
the appropriate position according to the number of
people and the load in the vehicle.
Except for vehicles with turbocharger
Vehicle condi- tionSwitch
position“0”“2”“3”“3”
: 1 person: Full luggage loading
Instruments and controls
3-22
3
Page 97 of 274
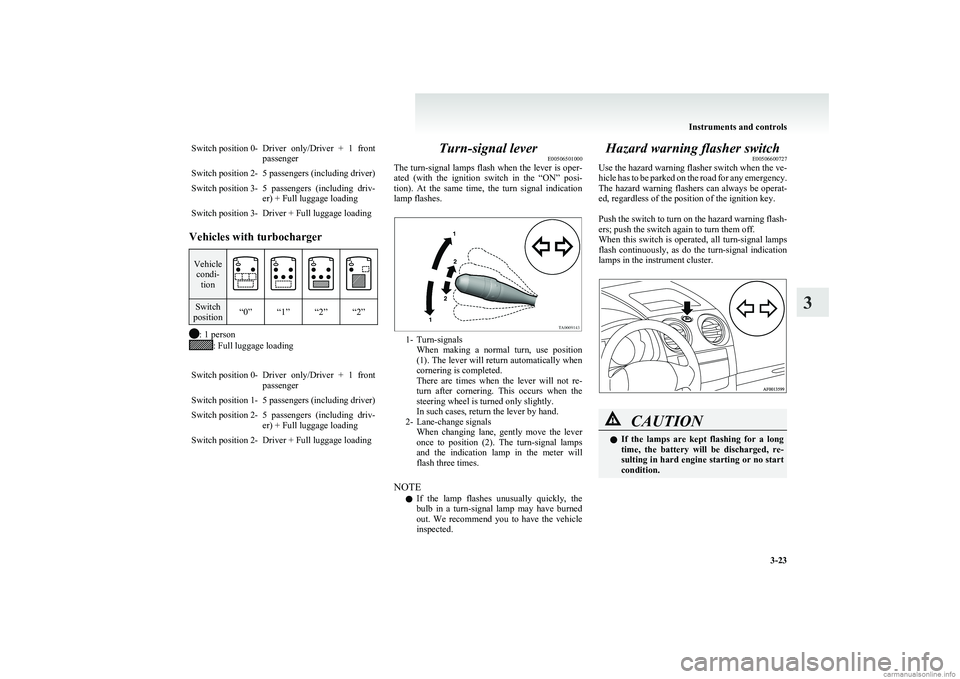
Switch position 0-Driver only/Driver + 1 front
passengerSwitch position 2-5 passengers (including driver)Switch position 3-5 passengers (including driv-
er) + Full luggage loadingSwitch position 3-Driver + Full luggage loading
Vehicles with turbocharger
Vehicle condi- tionSwitch
position“0”“1”“2”“2”
: 1 person: Full luggage loading
Switch position 0-Driver only/Driver + 1 front
passengerSwitch position 1-5 passengers (including driver)Switch position 2-5 passengers (including driv-
er) + Full luggage loadingSwitch position 2-Driver + Full luggage loadingTurn-signal lever E00506501000
The turn-signal lamps flash when the lever is oper-
ated (with the ignition switch in the “ON” posi-
tion). At the same time, the turn signal indication
lamp flashes.
1- Turn-signals When making a normal turn, use position
(1). The lever will return automatically when
cornering is completed.
There are times when the lever will not re-
turn after cornering. This occurs when the
steering wheel is turned only slightly.
In such cases, return the lever by hand.
2- Lane-change signals When changing lane, gently move the lever
once to position (2). The turn-signal lamps
and the indication lamp in the meter will
flash three times.
NOTE l If the lamp flashes unusually quickly, the
bulb in a turn-signal lamp may have burned
out. We recommend you to have the vehicle
inspected.
Hazard warning flasher switch E00506600727
Use the hazard warning flasher switch when the ve-
hicle has to be parked on the road for any emergency.
The hazard warning flashers can always be operat-
ed, regardless of the position of the ignition key.
Push the switch to turn on the hazard warning flash-
ers; push the switch again to turn them off.
When this switch is operated, all turn-signal lamps
flash continuously, as do the turn-signal indication
lamps in the instrument cluster.CAUTIONl If the lamps are kept flashing for a long
time, the battery will be discharged, re-
sulting in hard engine starting or no start
condition.
Instruments and controls
3-23
3