key MITSUBISHI COLT 2011 (in English) Owner's Guide
[x] Cancel search | Manufacturer: MITSUBISHI, Model Year: 2011, Model line: COLT, Model: MITSUBISHI COLT 2011Pages: 274, PDF Size: 17.88 MB
Page 180 of 274
Interior lampsE00712000799
The interior lamps go on when a door or tailgate is
opened.
When all doors and tailgate are closed, the interior
lamps are illuminated and dimmed gradually for 15
seconds then go out.
However, the interior lamps go out immediately
without being dimmed in the following cases:
l The ignition switch is turned “ON”.
l All doors and tailgate are locked using the
key mechanism of the driver’s door, the lock
knob of the driver’s door, or the remote con-
trol switch of the keyless entry system.
NOTE l The dimming period is adjustable.
For further information, we recommend you
to consult a MITSUBISHI MOTORS Author-
ized Service Point.
l If you leave the lamps on without running
the engine, you will run down the battery. Be-
fore you leave the vehicle, make sure that all
the lamps are off.Room lamp with map lamps E00724300018
Room lamp
Opening a door or the tailgate makes the room
lamp come on.
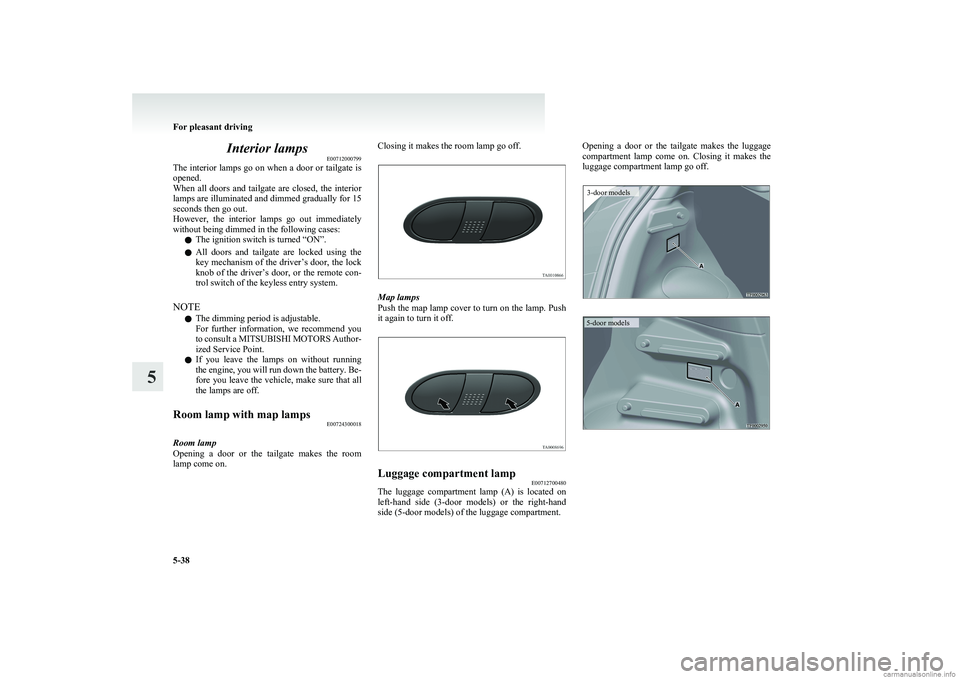
Closing it makes the room lamp go off.
Map lamps
Push the map lamp cover to turn on the lamp. Push
it again to turn it off.
Luggage compartment lamp E00712700480
The luggage compartment lamp (A) is located on
left-hand side (3-door models) or the right-hand
side (5-door models) of the luggage compartment.
Opening a door or the tailgate makes the luggage
compartment lamp come on. Closing it makes the
luggage compartment lamp go off.3-door models5-door models
For pleasant driving
5-38
5
Page 194 of 274
3.On vehicles with manual transmission, turn
the ignition key to the “LOCK” position,
move the gearshift lever to the “R” (Reverse)
position.
On vehicles with automated manual transmis-
sion, move the allshift lever to the “R” (Re-
verse) position, turn the ignition key to the
“LOCK” position.
With an automated manual transmission ve-
hicle, confirm that that “R” is shown by the
allshift indicator display.
4. Turn on the hazard warning flashers and set
up a warning triangle, flashing signal lamp,
etc., at an adequate distance from the vehi-
cle, and have all your passengers leave the ve-
hicle.
5. Take out the tyre sealant bottle and the com-
pressor.
NOTE l In cold conditions (when the ambient temper-
ature is 0 °C or lower). Warm the bottle in-
side the vehicle.
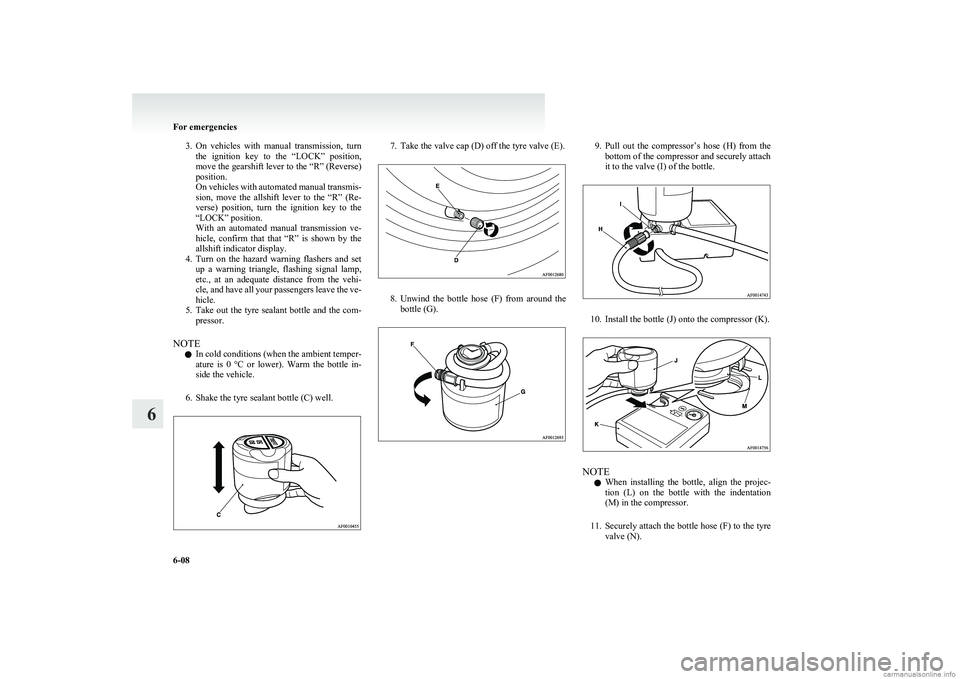
6. Shake the tyre sealant bottle (C) well.7. Take the valve cap (D) off the tyre valve (E).
8. Unwind the bottle hose (F) from around the
bottle (G).
9. Pull out the compressor’s hose (H) from the
bottom of the compressor and securely attach
it to the valve (I) of the bottle.
10. Install the bottle (J) onto the compressor (K).
NOTE
l When installing the bottle, align the projec-
tion (L) on the bottle with the indentation
(M) in the compressor.
11. Securely attach the bottle hose (F) to the tyre
valve (N).
For emergencies
6-08
6
Page 198 of 274
Jacking up the vehicleE00801001218
1. Park the vehicle on level and stable ground.
2. Set the parking brake firmly.
3. On vehicles with manual transmission, turn
the ignition key to the “LOCK” position,
move the gearshift lever to the “R” (Reverse)
position.
On vehicles with automated manual transmis-
sion, move the allshift lever to the “R” (Re-
verse) position, turn the ignition key to the
“LOCK” position.
With an automated manual transmission ve-
hicle, confirm that there is a “A” or “1” in
the allshift indicator display.
4. Turn on the hazard warning flashers and set
up a warning triangle, flashing signal lamp,
etc., at an adequate distance from the vehi-
cle, and have all your passengers leave the ve-
hicle.
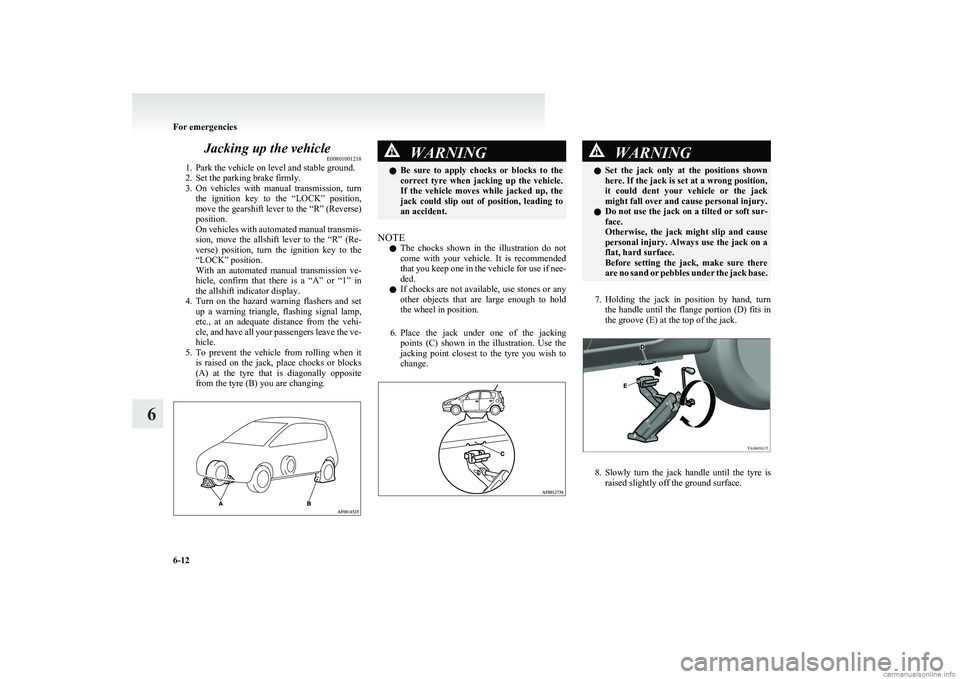
5. To prevent the vehicle from rolling when it
is raised on the jack, place chocks or blocks
(A) at the tyre that is diagonally opposite
from the tyre (B) you are changing.WARNINGl Be sure to apply chocks or blocks to the
correct tyre when jacking up the vehicle.
If the vehicle moves while jacked up, the
jack could slip out of position, leading to
an accident.
NOTE
l The chocks shown in the illustration do not
come with your vehicle. It is recommended
that you keep one in the vehicle for use if nee-
ded.
l If chocks are not available, use stones or any
other objects that are large enough to hold
the wheel in position.
6. Place the jack under one of the jacking
points (C) shown in the illustration. Use the
jacking point closest to the tyre you wish to
change.
WARNINGl Set the jack only at the positions shown
here. If the jack is set at a wrong position,
it could dent your vehicle or the jack
might fall over and cause personal injury.
l Do not use the jack on a tilted or soft sur-
face.
Otherwise, the jack might slip and cause
personal injury. Always use the jack on a
flat, hard surface.
Before setting the jack, make sure there
are no sand or pebbles under the jack base.
7. Holding the jack in position by hand, turn
the handle until the flange portion (D) fits in
the groove (E) at the top of the jack.
8. Slowly turn the jack handle until the tyre is
raised slightly off the ground surface.
For emergencies
6-12
6
Page 201 of 274
How to change a tyreE00801202086
Before changing a tyre, first stop your vehicle in a
safe, flat location. 1. Park the vehicle on level and stable ground.
2. Set the parking brake firmly.
3. On vehicles with manual transmission, turn
the ignition key to the “LOCK” position,
move the gearshift lever to the “R” (Reverse)
position.
On vehicles with automated manual transmis-
sion, move the allshift lever to the “R” (Re-
verse) position, turn the ignition key to the
“LOCK” position.
With an automated manual transmission ve-
hicle, confirm that that “R” is shown by the
allshift indicator display.
4. Turn on the hazard warning flashers and set
up a warning triangle, flashing signal lamp,
etc., at an adequate distance from the vehi-
cle, and have all your passengers leave the ve-
hicle.
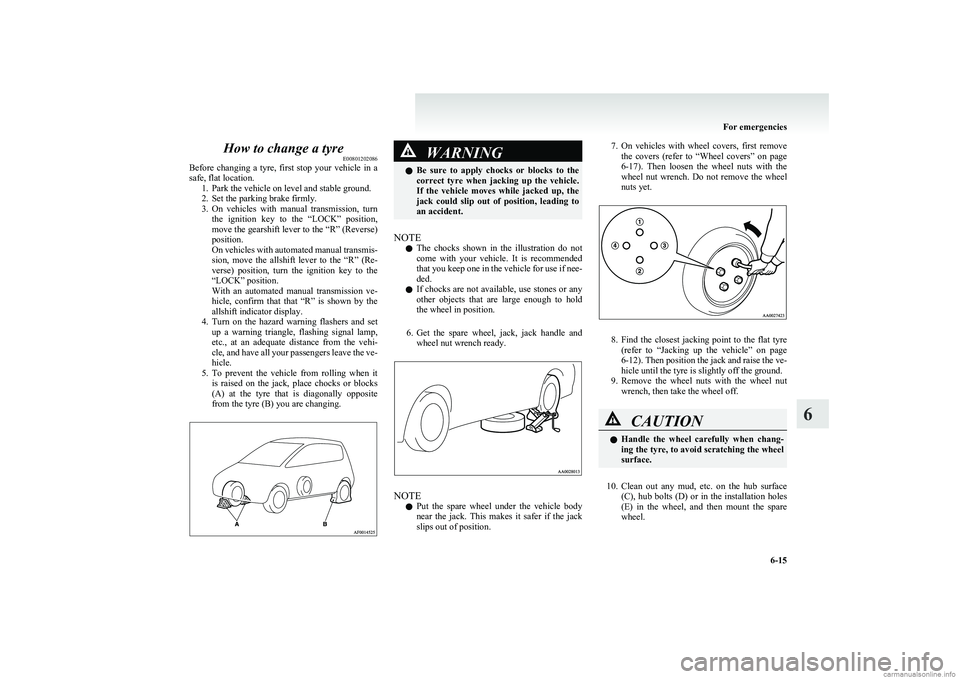
5. To prevent the vehicle from rolling when it
is raised on the jack, place chocks or blocks
(A) at the tyre that is diagonally opposite
from the tyre (B) you are changing.WARNINGl Be sure to apply chocks or blocks to the
correct tyre when jacking up the vehicle.
If the vehicle moves while jacked up, the
jack could slip out of position, leading to
an accident.
NOTE
l The chocks shown in the illustration do not
come with your vehicle. It is recommended
that you keep one in the vehicle for use if nee-
ded.
l If chocks are not available, use stones or any
other objects that are large enough to hold
the wheel in position.
6. Get the spare wheel, jack, jack handle and
wheel nut wrench ready.
NOTE
l Put the spare wheel under the vehicle body
near the jack. This makes it safer if the jack
slips out of position.
7. On vehicles with wheel covers, first remove
the covers (refer to “Wheel covers” on page
6-17 ). Then loosen the wheel nuts with the
wheel nut wrench. Do not remove the wheel
nuts yet.
8. Find the closest jacking point to the flat tyre
(refer to “Jacking up the vehicle” on page
6-12 ). Then position the jack and raise the ve-
hicle until the tyre is slightly off the ground.
9. Remove the wheel nuts with the wheel nut
wrench, then take the wheel off.
CAUTIONl Handle the wheel carefully when chang-
ing the tyre, to avoid scratching the wheel
surface.
10. Clean out any mud, etc. on the hub surface
(C), hub bolts (D) or in the installation holes
(E) in the wheel, and then mount the spare
wheel.
For emergencies
6-15
6
Page 205 of 274
The regulations concerning towing may differ from
country to country. It is recommended that you
obey the regulations of the area where you are driv-
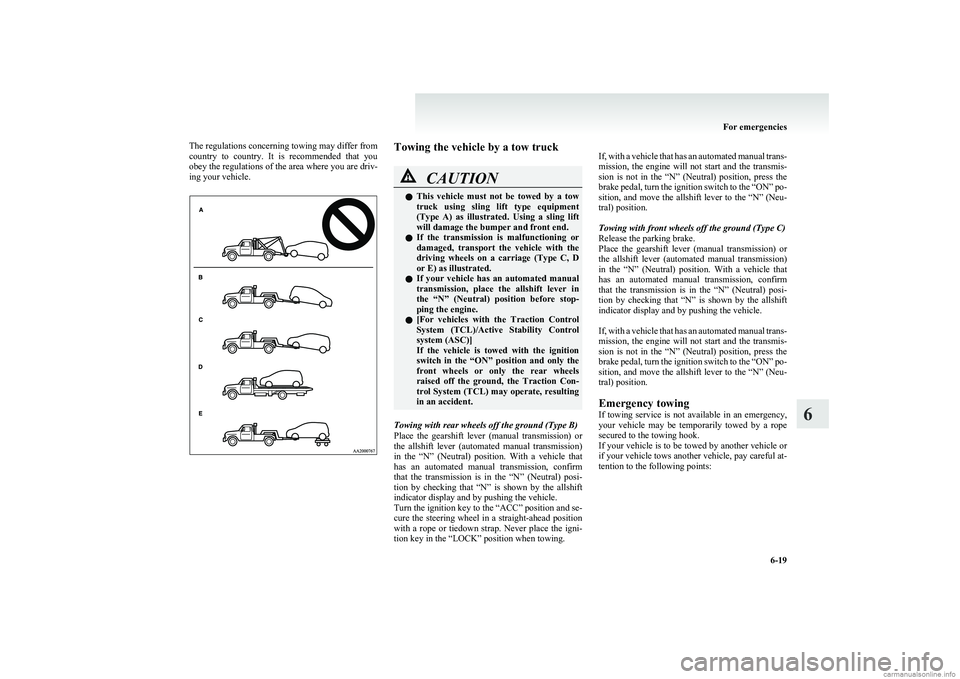
ing your vehicle.Towing the vehicle by a tow truckCAUTIONl This vehicle must not be towed by a tow
truck using sling lift type equipment
(Type A) as illustrated. Using a sling lift
will damage the bumper and front end.
l If the transmission is malfunctioning or
damaged, transport the vehicle with the
driving wheels on a carriage (Type C, D
or E) as illustrated.
l If your vehicle has an automated manual
transmission, place the allshift lever in
the “N” (Neutral) position before stop-
ping the engine.
l [
For vehicles with the Traction Control
System (TCL)/Active Stability Control
system (ASC)]
If the vehicle is towed with the ignition
switch in the “ON” position and only the
front wheels or only the rear wheels
raised off the ground, the Traction Con-
trol System (TCL) may operate, resulting
in an accident.
Towing with rear wheels off the ground (Type B)
Place the gearshift lever (manual transmission) or
the allshift lever (automated manual transmission)
in the “N” (Neutral) position. With a vehicle that
has an automated manual transmission, confirm
that the transmission is in the “N” (Neutral) posi-
tion by checking that “N” is shown by the allshift
indicator display and by pushing the vehicle.
Turn the ignition key to the “ACC” position and se-
cure the steering wheel in a straight-ahead position
with a rope or tiedown strap. Never place the igni-
tion key in the “LOCK” position when towing.
If, with a vehicle that has an automated manual trans-
mission, the engine will not start and the transmis-
sion is not in the “N” (Neutral) position, press the
brake pedal, turn the ignition switch to the “ON” po-
sition, and move the allshift lever to the “N” (Neu-
tral) position.
Towing with front wheels off the ground (Type C)
Release the parking brake.
Place the gearshift lever (manual transmission) or
the allshift lever (automated manual transmission)
in the “N” (Neutral) position. With a vehicle that
has an automated manual transmission, confirm
that the transmission is in the “N” (Neutral) posi-
tion by checking that “N” is shown by the allshift
indicator display and by pushing the vehicle.
If, with a vehicle that has an automated manual trans-
mission, the engine will not start and the transmis-
sion is not in the “N” (Neutral) position, press the
brake pedal, turn the ignition switch to the “ON” po-
sition, and move the allshift lever to the “N” (Neu-
tral) position.
Emergency towing
If towing service is not available in an emergency,
your vehicle may be temporarily towed by a rope
secured to the towing hook.
If your vehicle is to be towed by another vehicle or
if your vehicle tows another vehicle, pay careful at-
tention to the following points:
For emergencies
6-19
6
Page 206 of 274
CAUTIONlIf your vehicle has an automated manual
transmission, place the allshift lever in
the “N” (Neutral) position before stop-
ping the engine.
If your vehicle is to be towed by another vehicle
1.Take out the towing hook and wheel nut
wrench (if so equipped). (Refer to “Tools
jack and tyre repair kit” on page 6-06.)
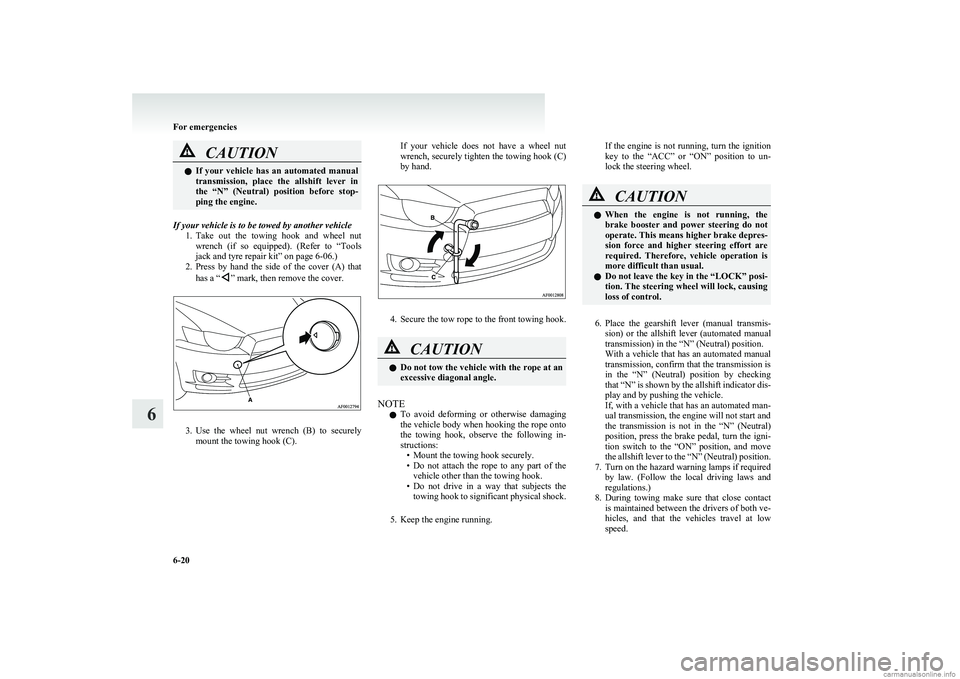
2. Press by hand the side of the cover (A) that
has a “
” mark, then remove the cover.
3. Use the wheel nut wrench (B) to securely
mount the towing hook (C).
If your vehicle does not have a wheel nut
wrench, securely tighten the towing hook (C)
by hand.
4. Secure the tow rope to the front towing hook.
CAUTIONl Do not tow the vehicle with the rope at an
excessive diagonal angle.
NOTE
l To avoid deforming or otherwise damaging
the vehicle body when hooking the rope onto
the towing hook, observe the following in-
structions: • Mount the towing hook securely.
• Do not attach the rope to any part of the
vehicle other than the towing hook.
• Do not drive in a way that subjects the
towing hook to significant physical shock.
5. Keep the engine running.
If the engine is not running, turn the ignition
key to the “ACC” or “ON” position to un-
lock the steering wheel.CAUTIONl When the engine is not running, the
brake booster and power steering do not
operate. This means higher brake depres-
sion force and higher steering effort are
required. Therefore, vehicle operation is
more difficult than usual.
l Do not leave the key in the “LOCK” posi-
tion. The steering wheel will lock, causing
loss of control.
6. Place the gearshift lever (manual transmis-
sion) or the allshift lever (automated manual
transmission) in the “N” (Neutral) position.
With a vehicle that has an automated manual
transmission, confirm that the transmission is
in the “N” (Neutral) position by checking
that “N” is shown by the allshift indicator dis-
play and by pushing the vehicle.
If, with a vehicle that has an automated man-
ual transmission, the engine will not start and
the transmission is not in the “N” (Neutral)
position, press the brake pedal, turn the igni-
tion switch to the “ON” position, and move
the allshift lever to the “N” (Neutral) position.
7. Turn on the hazard warning lamps if required by law. (Follow the local driving laws and
regulations.)
8. During towing make sure that close contact
is maintained between the drivers of both ve-
hicles, and that the vehicles travel at low
speed.
For emergencies
6-20
6
Page 216 of 274
Service precautionsE01000100458
Adequate care of your vehicle at regular intervals
serves to preserve the value and appearance as long
as possible.
Maintenance items as described in this owner’s man-
ual can be performed by the owner.
We recommend you to have the periodic inspection
and maintenance performed by a MITSUBISHI
MOTORS Authorized Service Point or another spe-
cialist. In the event a malfunction or other problem
is discovered, we recommend you to have it
checked and repaired. This section contains infor-
mation on inspection maintenance procedures that
you can do yourself. Follow the instructions and
cautions for each of the various procedures.WARNINGl When checking or servicing the inside of
the engine compartment, make sure the
engine is switched off and has had a
chance to cool down.
l If it is necessary to do work in the engine
compartment with the engine running, be
especially careful that your clothing, hair,
etc., does not become caught by the fans,
drive belts, or other moving parts.
l The fan may turn on automatically even
if the engine is not running; turn the igni-
tion key to “LOCK” position and remove
the key to ensure safety while you work
in the engine compartment.
l Do not smoke, cause sparks or allow open
flames around fuel or battery. The fumes
are flammable.WARNINGl Be extremely cautious when working
around the battery. It contains poisonous
and corrosive sulphuric acid.
l Do not get under your vehicle with just
the body jack supporting it. Always use
automotive jack stands.
l Improper handling of components and
materials used in the vehicle can endan-
ger your personal safety. We recommend
you to consult a specialist for necessary in-
formation.Catalytic converter E01000201140
For ordinary use, there are no particular precau-
tions except that of using unleaded petrol.
The exhaust gas scavenging devices used with the
catalytic converter are extremely efficient for the re-
duction of noxious gases. The catalytic converter is
installed in the exhaust system.
It is important to keep the engine properly tuned to
ensure proper catalyst operation and prevent possi-
ble catalyst damage.CAUTIONl Damage to the catalytic converter can re-
sult if your vehicle is not kept in proper
operating condition. In the event of an en-
gine malfunction particularly involving
engine misfire or other apparent loss of
performance, have your vehicle serviced
promptly. Continued operation of your ve-
hicle with a severe overheated condition
may result in possible damage to the con-
verter and vehicle.WARNINGl As with any vehicle, do not park or oper-
ate this vehicle in areas where combusti-
ble materials such as dry grass or leaves
can come in contact with a hot exhaust
since a fire could occur.
l Paint should not be applied to the catalyt-
ic converter.
Maintenance
8-02
8
Page 266 of 274
F
Fluid capacities and lubricants 9-16
Fluid Brake fluid 8-09,9-16
Clutch fluid 8-09,9-16
Engine coolant 8-07,9-16
Washer fluid 8-09,9-16
For cold and snowy weather 8-18
Front fog lamps Bulb capacity 8-24
Indication lamp 3-17
Replacement 8-26
Switch 3-24
Front passenger’s airbag ON-OFF switch 2-25
Front seat 2-04
Front turn-signal lamps Bulb capacity 8-24
Replacement 8-26
Frozen road warning 3-10
Fuel consumption 9-14
Fuel Filling the fuel tank 02
Fuel selection 02
Fuel tank filler door release lever 03
Modification/alterations to the electrical or fuel
systems 05
Tank capacity 03
Fuse load capacity 8-19
Fuse replacement 8-21
Fuses 8-19
Fusible links 8-19
G
Gauges 3-02,3-16
General maintenance 8-18
Genuine parts 05
Glove box 5-39
H
Handling of compact discs 5-32
Hazard warning flasher switch 3-23
Hazard warning indication lamps 3-17
Head restraints 2-06
Headlamp levelling switch 3-22
Headlamps Bulb capacity 8-23
Headlamp flasher 3-21
Replacement 8-25
Switch 3-20
Heated mirror 4-09
Heated seats 2-06
Heater 5-04
High coolant temperature warning lamp 3-19
High-beam indication lamp 3-17
High-mounted stop lamp Bulb capacity 8-24
High-mounted stop lamps Replacement 8-30
Hinges and latches lubrication 8-18
Horn switch 3-30
How to drive a vehicle with an automated manual
transmission 4-22
I
If the vehicle breaks down 6-02
Ignition switch 4-10
Indication and warning lamps 3-16
Indication lamps 3-17
Inside rear-view mirror 4-08
Installation of accessories 04
Instruments 3-02
Interior lamps 5-38
J
Jacking up the vehicle 6-12
Jack 6-11 Storage 6-06
Jump starting (Emergency starting) 6-02
K
Keyless entry system 1-03
Keys 1-02
L
Labeling 9-02
Lamp monitor buzzer 3-21
Leakage (Fuel, engine coolant, oil and exhaust
gas) 8-18
Licence plate lamps Bulb capacity 8-24
Replacement 8-31
Lubricants 9-16
Luggage compartment lamp 5-38 Bulb capacity 8-24
Replacement 8-32
Luggage floor boxes 5-41
Luggage floor cargo 5-40
LW/MW/FM electronic tuning radio with CD play-
er 5-12
M
Manual transmission 4-16Oil 9-16
Map lamps 5-38
Mirror Inside rear-view mirror 4-08
Outside rear-view mirrors 4-08
Alphabetical index
2