window MITSUBISHI COLT 2011 (in English) User Guide
[x] Cancel search | Manufacturer: MITSUBISHI, Model Year: 2011, Model line: COLT, Model: MITSUBISHI COLT 2011Pages: 274, PDF Size: 17.88 MB
Page 18 of 274
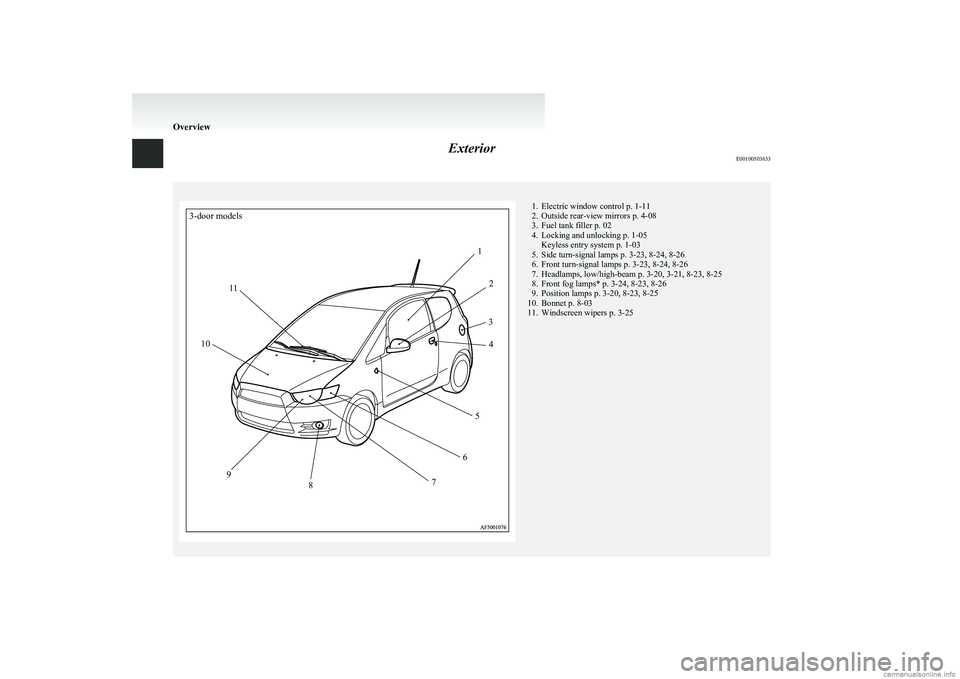
ExteriorE00100503633
3-door models12345678910111. Electric window control p. 1-11
2. Outside rear-view mirrors p. 4-08
3. Fuel tank filler p. 02
4. Locking and unlocking p. 1-05 Keyless entry system p. 1-03
5. Side turn-signal lamps p. 3-23, 8-24, 8-26
6. Front turn-signal lamps p. 3-23, 8-24, 8-26
7. Headlamps, low/high-beam p. 3-20, 3-21, 8-23, 8-25
8. Front fog lamps* p. 3-24, 8-23, 8-26
9. Position lamps p. 3-20, 8-23, 8-25
10. Bonnet p. 8-03
11. Windscreen wipers p. 3-25
Overview
Page 19 of 274
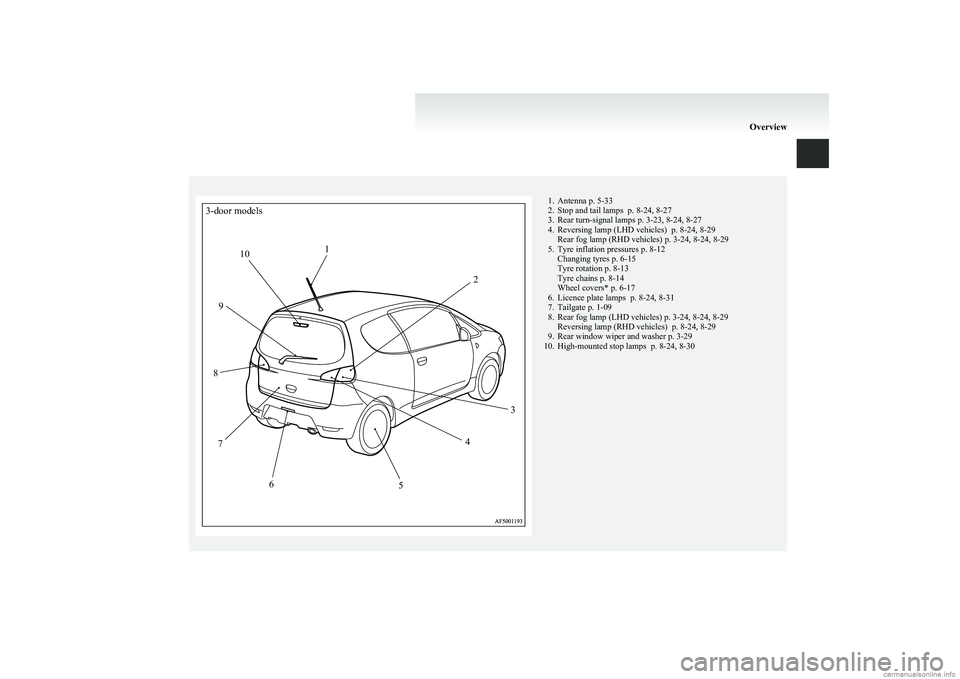
3-door models123456789101. Antenna p. 5-33
2. Stop and tail lamps p. 8-24, 8-27
3. Rear turn-signal lamps p. 3-23, 8-24, 8-27
4. Reversing lamp (LHD vehicles) p. 8-24, 8-29 Rear fog lamp (RHD vehicles) p. 3-24, 8-24, 8-29
5. Tyre inflation pressures p. 8-12 Changing tyres p. 6-15
Tyre rotation p. 8-13
Tyre chains p. 8-14
Wheel covers* p. 6-17
6. Licence plate lamps p. 8-24, 8-31
7. Tailgate p. 1-09
8. Rear fog lamp (LHD vehicles) p. 3-24, 8-24, 8-29 Reversing lamp (RHD vehicles) p. 8-24, 8-29
9. Rear window wiper and washer p. 3-29
10. High-mounted stop lamps p. 8-24, 8-30
Overview
Page 20 of 274
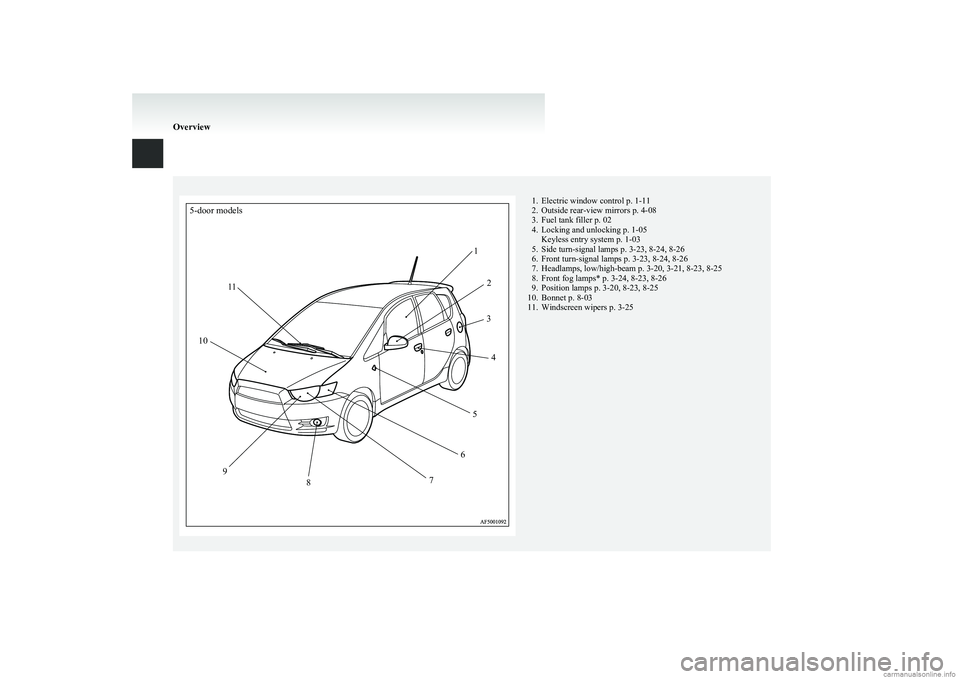
5-door models12345678910111. Electric window control p. 1-11
2. Outside rear-view mirrors p. 4-08
3. Fuel tank filler p. 02
4. Locking and unlocking p. 1-05 Keyless entry system p. 1-03
5. Side turn-signal lamps p. 3-23, 8-24, 8-26
6. Front turn-signal lamps p. 3-23, 8-24, 8-26
7. Headlamps, low/high-beam p. 3-20, 3-21, 8-23, 8-25
8. Front fog lamps* p. 3-24, 8-23, 8-26
9. Position lamps p. 3-20, 8-23, 8-25
10. Bonnet p. 8-03
11. Windscreen wipers p. 3-25
Overview
Page 21 of 274
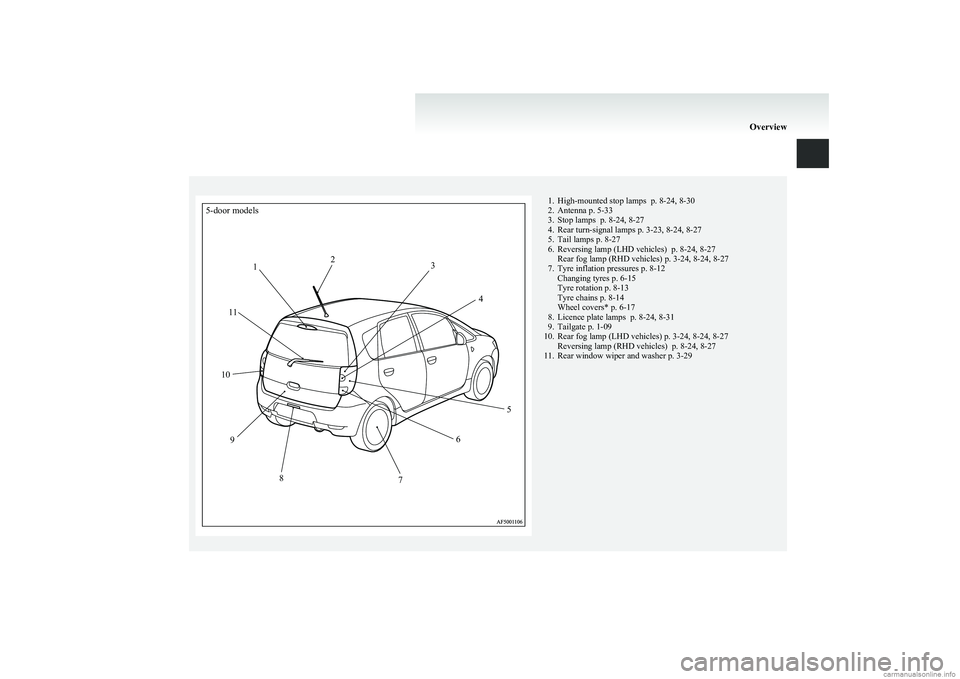
5-door models12345678910111. High-mounted stop lamps p. 8-24, 8-30
2. Antenna p. 5-33
3. Stop lamps p. 8-24, 8-27
4. Rear turn-signal lamps p. 3-23, 8-24, 8-27
5. Tail lamps p. 8-27
6. Reversing lamp (LHD vehicles) p. 8-24, 8-27 Rear fog lamp (RHD vehicles) p. 3-24, 8-24, 8-27
7. Tyre inflation pressures p. 8-12 Changing tyres p. 6-15
Tyre rotation p. 8-13
Tyre chains p. 8-14
Wheel covers* p. 6-17
8. Licence plate lamps p. 8-24, 8-31
9. Tailgate p. 1-09
10. Rear fog lamp (LHD vehicles) p. 3-24, 8-24, 8-27 Reversing lamp (RHD vehicles) p. 8-24, 8-27
11. Rear window wiper and washer p. 3-29
Overview
Page 25 of 274
WARNINGlKeep the doors and windows closed while
refueling the vehicle. If they were open,
fuel vapour could get into the cabin.
Fuel tank capacity
47 litres
Refueling 1. Before filling with fuel, stop the engine.
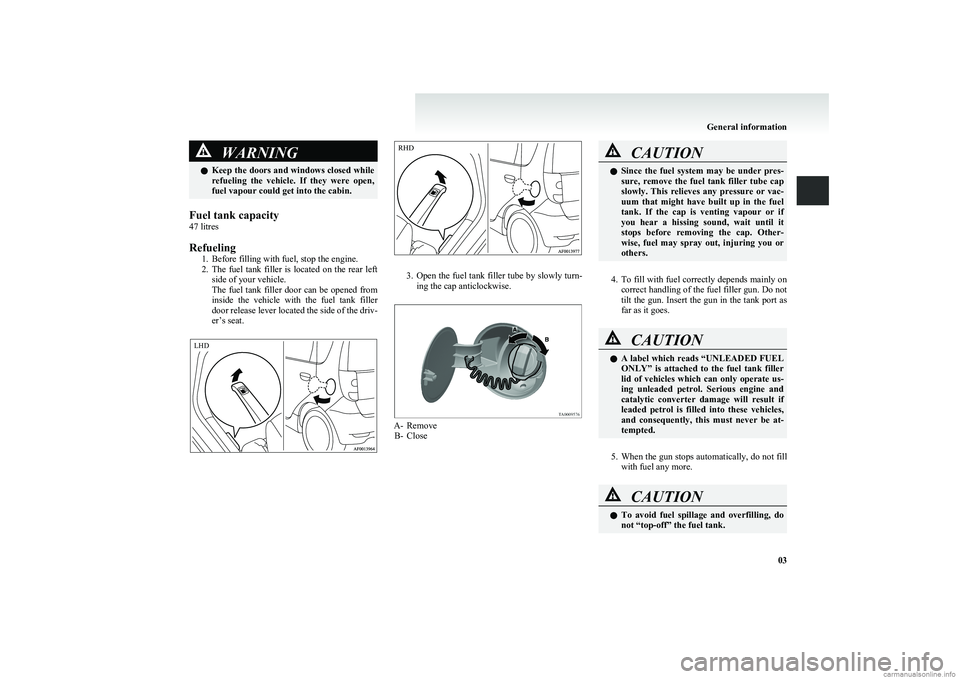
2. The fuel tank filler is located on the rear left
side of your vehicle.
The fuel tank filler door can be opened from
inside the vehicle with the fuel tank filler
door release lever located the side of the driv-
er’s seat.
3. Open the fuel tank filler tube by slowly turn-
ing the cap anticlockwise.
A- Remove B- Close
CAUTIONl Since the fuel system may be under pres-
sure, remove the fuel tank filler tube cap
slowly. This relieves any pressure or vac-
uum that might have built up in the fuel
tank. If the cap is venting vapour or if
you hear a hissing sound, wait until it
stops before removing the cap. Other-
wise, fuel may spray out, injuring you or
others.
4. To fill with fuel correctly depends mainly on
correct handling of the fuel filler gun. Do not
tilt the gun. Insert the gun in the tank port as
far as it goes.
CAUTIONl A label which reads “UNLEADED FUEL
ONLY” is attached to the fuel tank filler
lid of vehicles which can only operate us-
ing unleaded petrol. Serious engine and
catalytic converter damage will result if
leaded petrol is filled into these vehicles,
and consequently, this must never be at-
tempted.
5. When the gun stops automatically, do not fill
with fuel any more.
CAUTIONl To avoid fuel spillage and overfilling, do
not “top-off” the fuel tank.
General information
03 LHD RHD
Page 29 of 274
Keys.............................................................................................. 1-02
Electronic immobilizer (Anti-theft starting system) .....................1-02
Keyless entry system .................................................................... 1-03
Doors ............................................................................................ 1-05
Central door locks ......................................................................... 1-07
Dead Lock System* ...................................................................... 1-07
“Child-protection” rear doors (5-door models) ............................1-09
Tailgate ......................................................................................... 1-09
Manual window control (5-door models, rear door win- dow only)* ................................................................................ 1-11
Electric window control................................................................1-11Locking and unlocking1
Page 36 of 274
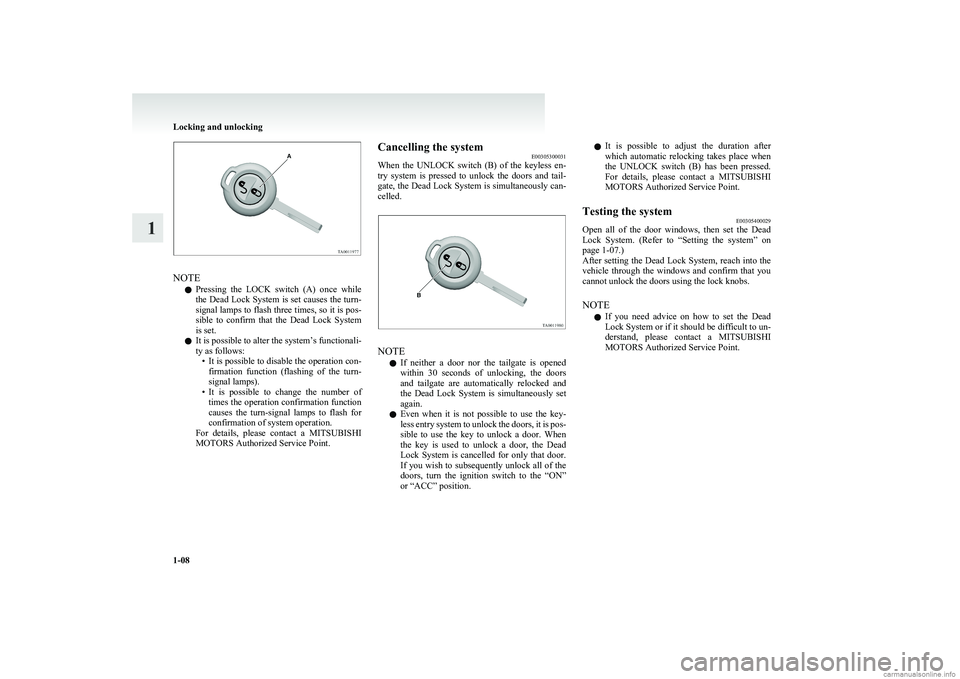
NOTEl Pressing the LOCK switch (A) once while
the Dead Lock System is set causes the turn-
signal lamps to flash three times, so it is pos-
sible to confirm that the Dead Lock System
is set.
l It is possible to alter the system’s functionali-
ty as follows: •It is possible to disable the operation con-
firmation function (flashing of the turn-
signal lamps).
• It is possible to change the number of
times the operation confirmation function
causes the turn-signal lamps to flash for
confirmation of system operation.
For details, please contact a MITSUBISHI
MOTORS Authorized Service Point.
Cancelling the system E00305300031
When the UNLOCK switch (B) of the keyless en-
try system is pressed to unlock the doors and tail-
gate, the Dead Lock System is simultaneously can-
celled.
NOTE
l If neither a door nor the tailgate is opened
within 30 seconds of unlocking, the doors
and tailgate are automatically relocked and
the Dead Lock System is simultaneously set
again.
l Even when it is not possible to use the key-
less entry system to unlock the doors, it is pos-
sible to use the key to unlock a door. When
the key is used to unlock a door, the Dead
Lock System is cancelled for only that door.
If you wish to subsequently unlock all of the
doors, turn the ignition switch to the “ON”
or “ACC” position.
l It is possible to adjust the duration after
which automatic relocking takes place when
the UNLOCK switch (B) has been pressed.
For details, please contact a MITSUBISHI
MOTORS Authorized Service Point.Testing the system E00305400029
Open all of the door windows, then set the Dead
Lock System. (Refer to “Setting the system” on
page 1-07.)
After setting the Dead Lock System, reach into the
vehicle through the windows and confirm that you
cannot unlock the doors using the lock knobs.
NOTE l If you need advice on how to set the Dead
Lock System or if it should be difficult to un-
derstand, please contact a MITSUBISHI
MOTORS Authorized Service Point.
Locking and unlocking
1-08
1
Page 39 of 274
Manual window control (5-door
models, rear door window only)* E00302100083
1- To open
2- To close
Electric window control E00302200042
The electric windows can only be operated with the
ignition switch in the “ON” position.Electric window control switch E00302301330
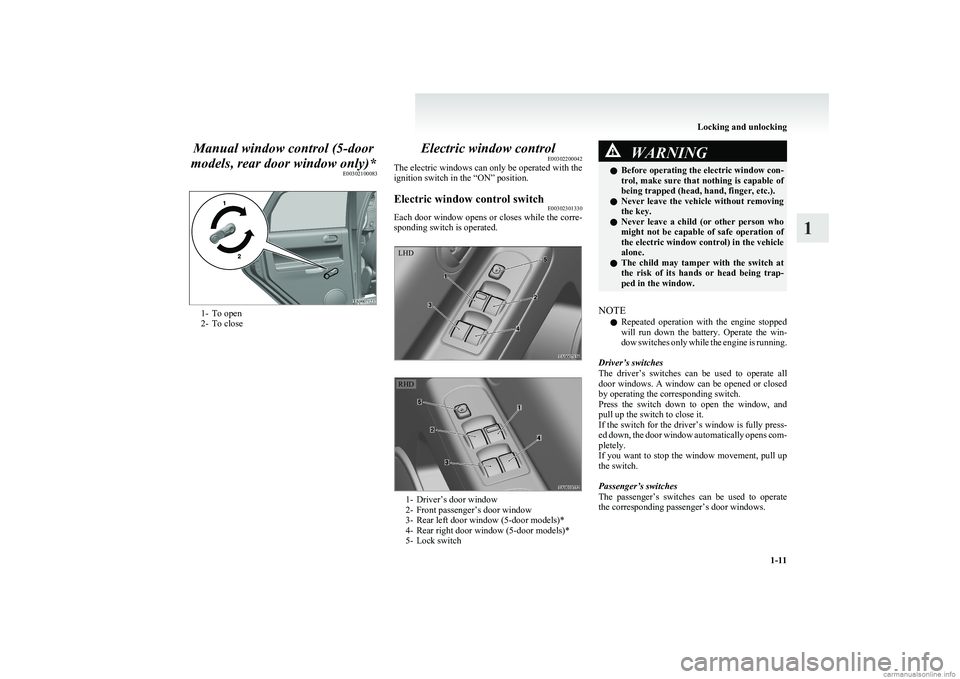
Each door window opens or closes while the corre-
sponding switch is operated.
1- Driver’s door window
2- Front passenger’s door window
3- Rear left door window (5-door models)*
4- Rear right door window (5-door models)*
5- Lock switch
WARNINGl Before operating the electric window con-
trol, make sure that nothing is capable of
being trapped (head, hand, finger, etc.).
l Never leave the vehicle without removing
the key.
l Never leave a child (or other person who
might not be capable of safe operation of
the electric window control) in the vehicle
alone.
l The child may tamper with the switch at
the risk of its hands or head being trap-
ped in the window.
NOTE
l Repeated operation with the engine stopped
will run down the battery. Operate the win-
dow switches only while the engine is running.
Driver’s switches
The driver’s switches can be used to operate all
door windows. A window can be opened or closed
by operating the corresponding switch.
Press the switch down to open the window, and
pull up the switch to close it.
If the switch for the driver’s window is fully press-
ed down, the door window automatically opens com-
pletely.
If you want to stop the window movement, pull up
the switch.
Passenger’s switches
The passenger’s switches can be used to operate
the corresponding passenger’s door windows.
Locking and unlocking
1-11
1LHD RHD
Page 40 of 274
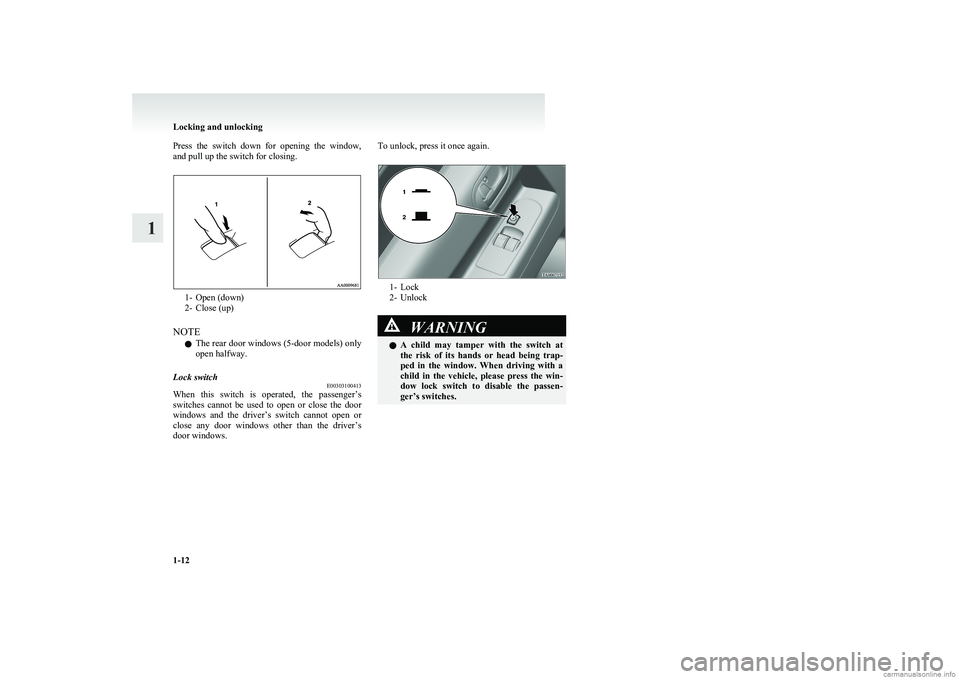
Press the switch down for opening the window,
and pull up the switch for closing.
1- Open (down)
2- Close (up)
NOTE l The rear door windows (5-door models) only
open halfway.
Lock switch E00303100413
When this switch is operated, the passenger’s
switches cannot be used to open or close the door
windows and the driver’s switch cannot open or
close any door windows other than the driver’s
door windows.
To unlock, press it once again.
1- Lock
2- Unlock
WARNINGl A child may tamper with the switch at
the risk of its hands or head being trap-
ped in the window. When driving with a
child in the vehicle, please press the win-
dow lock switch to disable the passen-
ger’s switches.
Locking and unlocking
1-12
1
Page 63 of 274
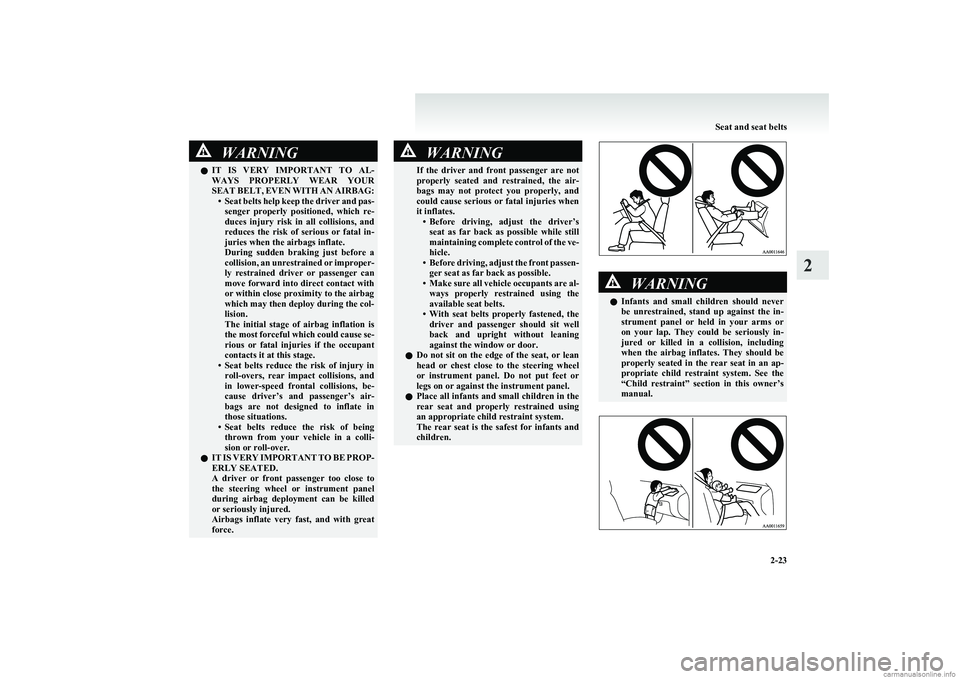
WARNINGlIT IS VERY IMPORTANT TO AL-
WAYS PROPERLY WEAR YOUR
SEAT BELT, EVEN WITH AN AIRBAG: •Seat belts help keep the driver and pas-
senger properly positioned, which re-
duces injury risk in all collisions, and
reduces the risk of serious or fatal in-
juries when the airbags inflate.
During sudden braking just before a
collision, an unrestrained or improper-
ly restrained driver or passenger can
move forward into direct contact with
or within close proximity to the airbag
which may then deploy during the col-
lision.
The initial stage of airbag inflation is
the most forceful which could cause se-
rious or fatal injuries if the occupant
contacts it at this stage.
• Seat belts reduce the risk of injury in
roll-overs, rear impact collisions, and
in lower-speed frontal collisions, be-
cause driver’s and passenger’s air-
bags are not designed to inflate in
those situations.
• Seat belts reduce the risk of being
thrown from your vehicle in a colli-
sion or roll-over.
l IT IS VERY IMPORTANT TO BE PROP-
ERLY SEATED.
A driver or front passenger too close to
the steering wheel or instrument panel
during airbag deployment can be killed
or seriously injured.
Airbags inflate very fast, and with great
force.WARNINGIf the driver and front passenger are not
properly seated and restrained, the air-
bags may not protect you properly, and
could cause serious or fatal injuries when
it inflates. •Before driving, adjust the driver’s
seat as far back as possible while still
maintaining complete control of the ve-
hicle.
• Before driving, adjust the front passen-
ger seat as far back as possible.
• Make sure all vehicle occupants are al-
ways properly restrained using the
available seat belts.
• With seat belts properly fastened, the
driver and passenger should sit well
back and upright without leaning
against the window or door.
l Do not sit on the edge of the seat, or lean
head or chest close to the steering wheel
or instrument panel. Do not put feet or
legs on or against the instrument panel.
l Place all infants and small children in the
rear seat and properly restrained using
an appropriate child restraint system.
The rear seat is the safest for infants and
children.WARNINGl Infants and small children should never
be unrestrained, stand up against the in-
strument panel or held in your arms or
on your lap. They could be seriously in-
jured or killed in a collision, including
when the airbag inflates. They should be
properly seated in the rear seat in an ap-
propriate child restraint system. See the
“Child restraint” section in this owner’s
manual.
Seat and seat belts
2-23
2