steering MITSUBISHI COLT 2011 (in English) Owner's Guide
[x] Cancel search | Manufacturer: MITSUBISHI, Model Year: 2011, Model line: COLT, Model: MITSUBISHI COLT 2011Pages: 274, PDF Size: 17.88 MB
Page 133 of 274
lThe ABS warning lamp can illuminate if the
battery voltage is insufficient when the en-
gine is started. In this case, it does not indi-
cate an ABS fault.
Charge the battery by allowing the engine to
idle for a while.
If the battery has been charged but the ABS
warning lamp continues to illuminate or illu-
minates intermittently, we recommend you
to consult a MITSUBISHI MOTORS Author-
ized Service Point.
If the ABS warning lamp and brake warning
lamp illuminate at the same time
l The brake force distribution function may
not work, so hard braking could make the ve-
hicle unstable.
Avoid hard braking and high-speed driving.
Stop the vehicle in a safe place and we rec-
ommend you to consult a MITSUBISHI
MOTORS Authorized Service Point.
NOTE l Immediately after the vehicle starts moving
after engine start up, a whining sound of a mo-
tor will be heard from the engine compart-
ment. If the brake pedal is depressed at that
moment, a brake pedal pulsating is felt.
This whining sound and pulsation are due to
the self-diagnosis operation of the ABS and
does not indicate a malfunction.
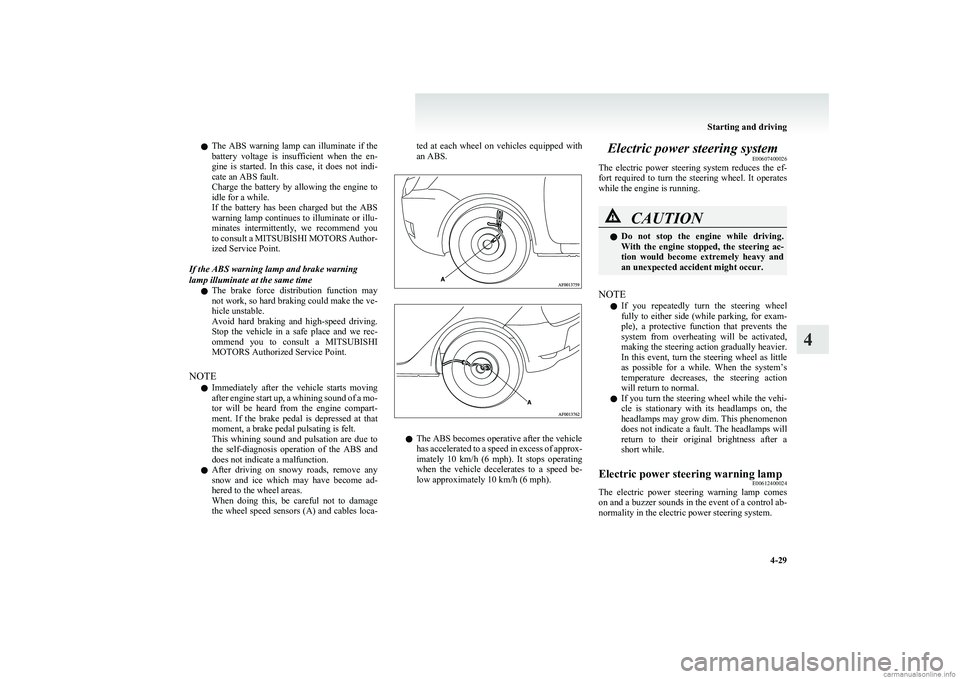
l After driving on snowy roads, remove any
snow and ice which may have become ad-
hered to the wheel areas.
When doing this, be careful not to damage
the wheel speed sensors (A) and cables loca-ted at each wheel on vehicles equipped with
an ABS.
l The ABS becomes operative after the vehicle
has accelerated to a speed in excess of approx-
imately 10 km/h (6 mph). It stops operating
when the vehicle decelerates to a speed be-
low approximately 10 km/h (6 mph).
Electric power steering system E00607400026
The electric power steering system reduces the ef-
fort required to turn the steering wheel. It operates
while the engine is running.CAUTIONl Do not stop the engine while driving.
With the engine stopped, the steering ac-
tion would become extremely heavy and
an unexpected accident might occur.
NOTE
l If you repeatedly turn the steering wheel
fully to either side (while parking, for exam-
ple), a protective function that prevents the
system from overheating will be activated,
making the steering action gradually heavier.
In this event, turn the steering wheel as little
as possible for a while. When the system’s
temperature decreases, the steering action
will return to normal.
l If you turn the steering wheel while the vehi-
cle is stationary with its headlamps on, the
headlamps may grow dim. This phenomenon
does not indicate a fault. The headlamps will
return to their original brightness after a
short while.
Electric power steering warning lamp E00612400024
The electric power steering warning lamp comes
on and a buzzer sounds in the event of a control ab-
normality in the electric power steering system.
Starting and driving
4-29
4
Page 134 of 274
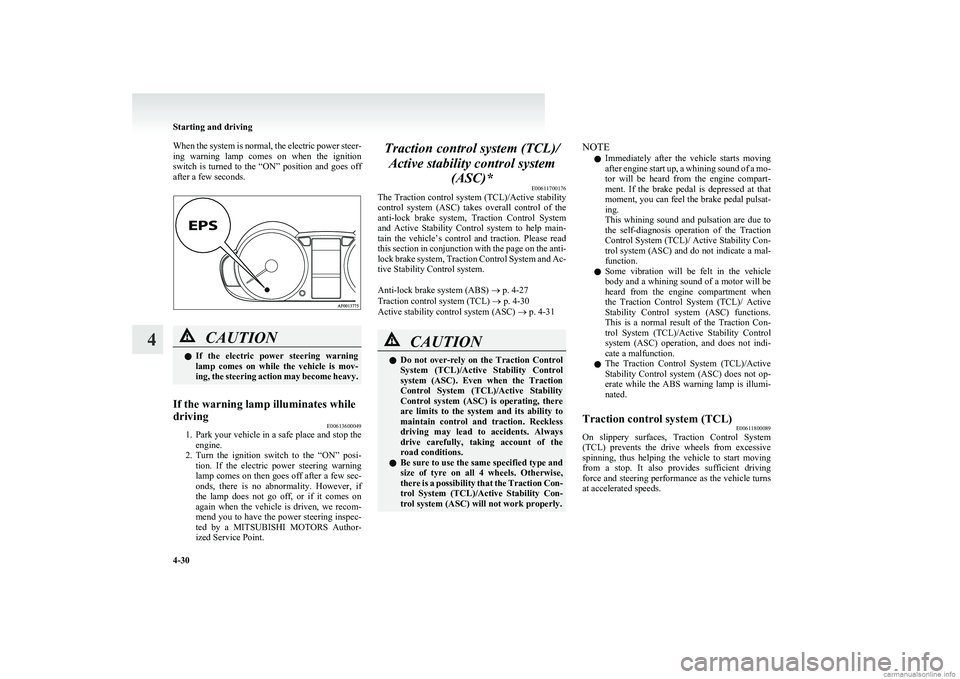
When the system is normal, the electric power steer-
ing warning lamp comes on when the ignition
switch is turned to the “ON” position and goes off
after a few seconds.CAUTIONl If the electric power steering warning
lamp comes on while the vehicle is mov-
ing, the steering action may become heavy.If the warning lamp illuminates while
driving E00613600049
1.Park your vehicle in a safe place and stop the
engine.
2. Turn the ignition switch to the “ON” posi-
tion. If the electric power steering warning
lamp comes on then goes off after a few sec-
onds, there is no abnormality. However, if
the lamp does not go off, or if it comes on
again when the vehicle is driven, we recom-
mend you to have the power steering inspec-
ted by a MITSUBISHI MOTORS Author-
ized Service Point.
Traction control system (TCL)/
Active stability control system (ASC)* E00611700176
The Traction control system (TCL)/Active stability
control system (ASC) takes overall control of the
anti-lock brake system, Traction Control System
and Active Stability Control system to help main-
tain the vehicle’s control and traction. Please read
this section in conjunction with the page on the anti-
lock brake system, Traction Control System and Ac-
tive Stability Control system.
Anti-lock brake system (ABS) ® p. 4-27
Traction control system (TCL) ® p. 4-30
Active stability control system (ASC) ® p. 4-31CAUTIONl Do not over-rely on the Traction Control
System (TCL)/Active Stability Control
system (ASC). Even when the Traction
Control System (TCL)/Active Stability
Control system (ASC) is operating, there
are limits to the system and its ability to
maintain control and traction. Reckless
driving may lead to accidents. Always
drive carefully, taking account of the
road conditions.
l Be sure to use the same specified type and
size of tyre on all 4 wheels. Otherwise,
there is a possibility that the Traction Con-
trol System (TCL)/Active Stability Con-
trol system (ASC) will not work properly.NOTE
l Immediately after the vehicle starts moving
after engine start up, a whining sound of a mo-
tor will be heard from the engine compart-
ment. If the brake pedal is depressed at that
moment, you can feel the brake pedal pulsat-
ing.
This whining sound and pulsation are due to
the self-diagnosis operation of the Traction
Control System (TCL)/ Active Stability Con-
trol system (ASC) and do not indicate a mal-
function.
l Some vibration will be felt in the vehicle
body and a whining sound of a motor will be
heard from the engine compartment when
the Traction Control System (TCL)/ Active
Stability Control system (ASC) functions.
This is a normal result of the Traction Con-
trol System (TCL)/Active Stability Control
system (ASC) operation, and does not indi-
cate a malfunction.
l The Traction Control System (TCL)/Active
Stability Control system (ASC) does not op-
erate while the ABS warning lamp is illumi-
nated.Traction control system (TCL) E00611800089
On slippery surfaces, Traction Control System
(TCL) prevents the drive wheels from excessive
spinning, thus helping the vehicle to start moving
from a stop. It also provides sufficient driving
force and steering performance as the vehicle turns
at accelerated speeds.
Starting and driving
4-30
4
Page 135 of 274
CAUTIONlWhen driving a vehicle on a snowy or icy
road, be sure to install snow tyres and
drive the vehicle at moderate speeds.
NOTE
l When moving out of mud or fresh snow, press-
ing the accelerator pedal may not allow the
engine speed to increase.
Active stability control system (ASC) E00612000091
The Active Stability Control system (ASC) is de-
signed to help maintain the vehicle’s control in slip-
pery conditions, or during rapid steering manoeu-
vres. It works by controlling the engine output and
brake on each wheel.
NOTE l The Active Stability Control system (ASC)
functions at speeds of approximately
10 km/h (6 mph) or higher.
Traction control system (TCL)/Active
stability control system (ASC) indica-
tion lamp E00612100119
The Traction Control System (TCL) and Active Sta-
bility Control system (ASC) share the same indica-
tion lamp.
The indication lamp should illuminate when the ig-
nition switch is turned to the “ON” position, and
should go off after a few seconds. Always make
sure that the lamp goes off before begining to drive.
If the indication lamp stays on or does not illumi-
nate when the ignition switch is turned to the “ON”
position, we recommend you to consult a
MITSUBISHI MOTORS Authorized Service Point.
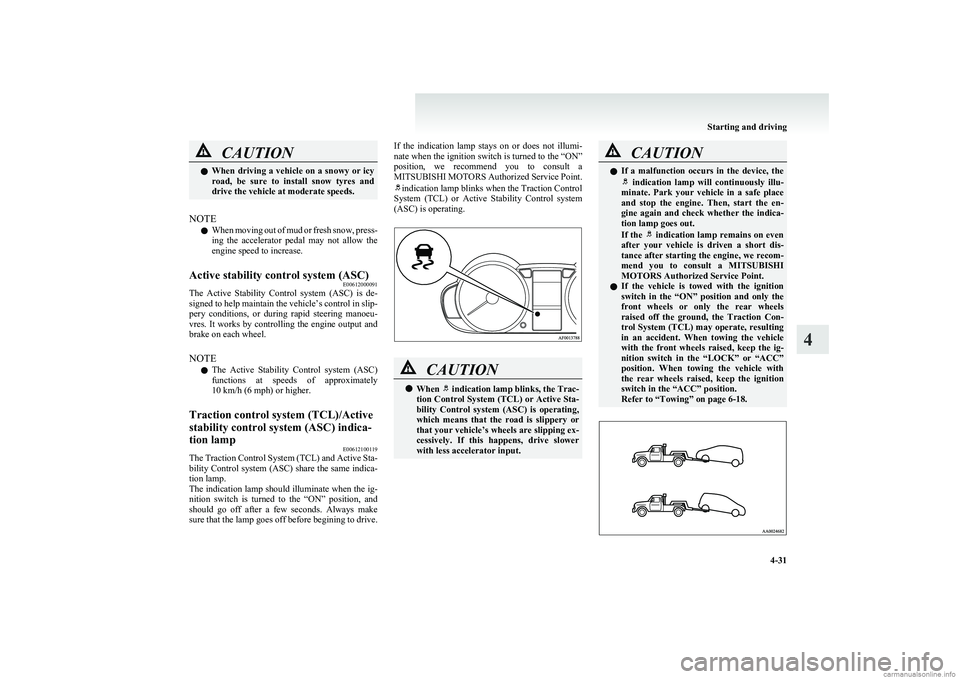
indication lamp blinks when the Traction Control
System (TCL) or Active Stability Control system
(ASC) is operating.
CAUTIONl When indication lamp blinks, the Trac-
tion Control System (TCL) or Active Sta-
bility Control system (ASC) is operating,
which means that the road is slippery or
that your vehicle’s wheels are slipping ex-
cessively. If this happens, drive slower
with less accelerator input.CAUTIONl If a malfunction occurs in the device, the indication lamp will continuously illu-
minate. Park your vehicle in a safe place
and stop the engine. Then, start the en-
gine again and check whether the indica-
tion lamp goes out.
If the
indication lamp remains on even
after your vehicle is driven a short dis-
tance after starting the engine, we recom-
mend you to consult a MITSUBISHI
MOTORS Authorized Service Point.
l If the vehicle is towed with the ignition
switch in the “ON” position and only the
front wheels or only the rear wheels
raised off the ground, the Traction Con-
trol System (TCL) may operate, resulting
in an accident. When towing the vehicle
with the front wheels raised, keep the ig-
nition switch in the “LOCK” or “ACC”
position. When towing the vehicle with
the rear wheels raised, keep the ignition
switch in the “ACC” position.
Refer to “Towing” on page 6-18.
Starting and driving
4-31
4
Page 143 of 274
Ventilators.................................................................................... 5-02
Heater*..........................................................................................5-04
Automatic air conditioning* ......................................................... 5-07
Important operation tips for the air conditioning..........................5-11
Air purifier .................................................................................... 5-12
LW/MW/FM electronic tuning radio with CD player* ................5-12
To use the external audio input function ......................................5-27
Steering wheel audio remote control switches* ...........................5-28
Error codes .................................................................................... 5-30
Handling of compact discs ........................................................... 5-32
Antenna ......................................................................................... 5-33
Digital clock* ............................................................................... 5-34
Sun visors ..................................................................................... 5-36
Vanity mirror ................................................................................ 5-37
Accessory socket .......................................................................... 5-37
Interior lamps ................................................................................ 5-38
Storage spaces...............................................................................5-39
Cup holder .................................................................................... 5-42
Rear shelf panel* .......................................................................... 5-42
Coat hooks* .................................................................................. 5-43For pleasant driving5
Page 170 of 274
2. Press the AUX button (2).The display (3) will show “AUX” and then
the external audio input mode will be activa-
ted.
3. To deactivate the external audio input mode,
press the AUX button (2). To switch to anoth-
er mode.CAUTIONl Do not operate the connected audio equip-
ment while driving.
This could distract you and an accident
might occur.
NOTE
l The connected audio equipment cannot be op-
erated with the vehicle’s audio system.
l Depending on the connected audio equip-
ment, it may produce noise from the speakers.
l Use the connected audio equipment’s own
power source, such as its battery.
Noise may be produced from the speakers if
the connected audio equipment is used while
charging it using the accessory socket of the
vehicle.
l Do not activate the external audio input
mode when no audio equipment is connected.
Otherwise, noise may be produced from the
speakers.
l Connect audio equipment when the external
audio input mode is deactivated or lower the
vehicle’s speaker volume before connecting it.
Noise may be produced from the speakers if
audio equipment is connected after the exter-
nal audio input mode is activated.
l Compared to the CD player mode and radio
mode, the vehicle’s speaker volume will be
lower in the external audio input mode. There-
fore, be careful when switching from the ex-
ternal audio input mode to the CD player
mode or radio mode since the speaker vol-
ume will be higher.
l Do not use excessive force on the connection
cord. Otherwise, the cord and connectors
may be damaged.
l If the connection cord alone is left connected
to the auxiliary audio connector, noise may
be produced from the speakers.
l For information on how to connect and oper-
ate the commercially available audio equip-
ment, refer to the owner’s manual for the com-
mercially available audio equipment.Steering wheel audio remote
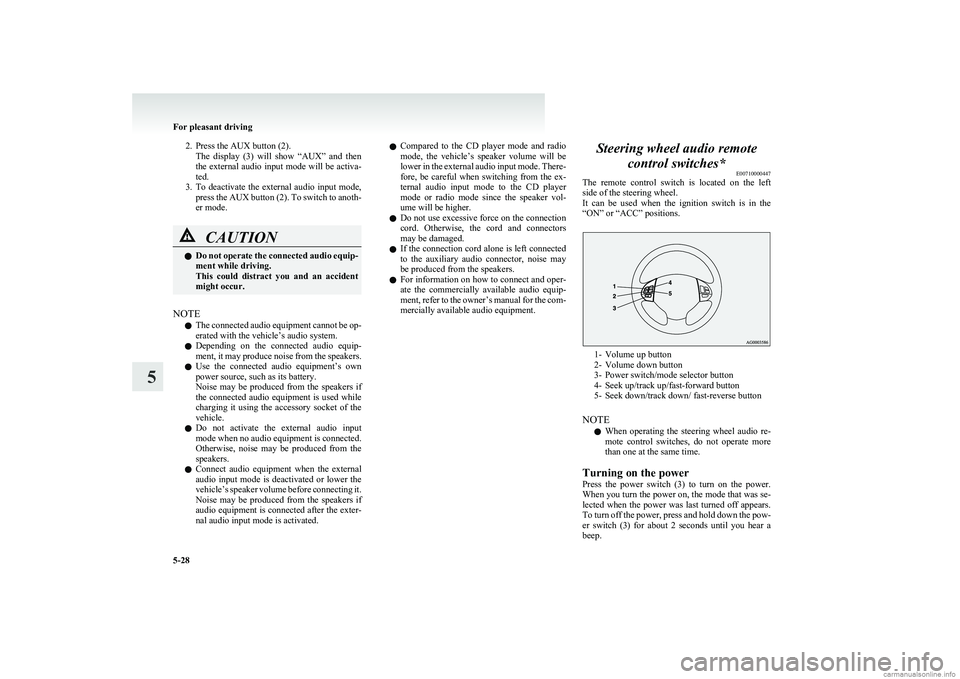
control switches* E00710000447
The remote control switch is located on the left
side of the steering wheel.
It can be used when the ignition switch is in the
“ON” or “ACC” positions.
1- Volume up button
2- Volume down button
3- Power switch/mode selector button
4- Seek up/track up/fast-forward button
5- Seek down/track down/ fast-reverse button
NOTE l When operating the steering wheel audio re-
mote control switches, do not operate more
than one at the same time.
Turning on the power
Press the power switch (3) to turn on the power.
When you turn the power on, the mode that was se-
lected when the power was last turned off appears.
To turn off the power, press and hold down the pow-
er switch (3) for about 2 seconds until you hear a
beep.
For pleasant driving
5-28
5
Page 188 of 274
If the vehicle breaks downE00800101254
If the vehicle breaks down on the road, move it to
the shoulder and use the hazard warning flashers and/
or the warning triangle etc.
Refer to “Hazard warning flasher switch” on page
3-23.
If the engine stops/fails
Vehicle operation and control are affected if the en-
gine stops.
Before moving the vehicle to a safe area, be aware
of the following:
l The brake booster becomes inoperative and
the pedal effort will increase. Press down the
brake pedal harder than usual.
l Since the power steering system is no longer
operative, the steering wheel feels heavy
when turning it.Emergency starting E00800501900
If the engine cannot be started because the battery
is weak or dead, the battery from another vehicle
can be used with jumper cables to start the engine.WARNINGl To start the engine using jumper cables
connected to another vehicle, perform the
correct procedures according to the in-
struction below. Incorrect procedures
could result in a fire or explosion or dam-
age to the vehicles.
1. Get the vehicles close enough so the jumper
cables can reach, but be sure the vehicles
aren’t touching each other.
If they are, it could cause a ground connec-
tion you don’t want. The vehicle will not
start, and the bad grounding could damage
the electrical systems.
CAUTIONl Check the other vehicle. It must have a 12-
volt battery.
If the other system isn’t 12-volt, shorting
can damage both vehicles.2. You could be injured if the vehicles move.
Set the parking brake firmly on each vehicle.
Put an automatic transmission in “P”
(PARK) or a manual transmission and an au-
tomated manual transmission in “N” (Neu-
tral). With an automated manual transmis-
sion vehicle, confirm that “N” is shown by
the allshift indicator display. Turn off the ig-
nition switch.WARNINGl Turn off the ignition on both vehicles be-
forehand. Make sure that the cables or
your clothes cannot be caught by the fan
or drive belt. Personal injury could result.
NOTE
l Turn off all lamps, heater and other electrical
loads. This will avoid sparks and help save
both batteries.
3. Make sure battery electrolyte is at the proper
level. Refer to “Battery” on page 8-10.
WARNINGl If electrolyte fluid is not visible, or ap-
pears to be frozen, Do Not Attempt Jump
Starting!
A battery might rupture or explode if the
temperature is below the freezing point
or if it is not filled to the proper level.
For emergencies
6-02
6
Page 199 of 274
WARNINGlStop jacking up the vehicle as soon as the
tyre is raised off the ground. It is danger-
ous to raise the vehicle any higher.
l Do not get under your vehicle while using
the jack.
l Do not bump the raised vehicle or leave it
sitting on the jack for a long time. Both
are very dangerous.
l Do not use a jack except the one that
came with your vehicle.
l The jack should not be used for any pur-
pose other than to change a tyre.
l No one should be in your vehicle when us-
ing the jack.
l Do not start or run the engine while your
vehicle is on the jack.
l Do not turn the raised wheel. The tyres
still on the ground could turn and make
your vehicle fall off the jack.Spare wheel* E00801101394
Check the air pressure of the spare tyre frequently
and make sure it is ready for emergency use at any
time.
Maintaining the spare wheel at the highest speci-
fied air pressure will ensure that it can always be
used under any conditions (city/high-speed driving,
varying load weight, etc.).
The spare wheel is stored beneath the luggage floor
board of the luggage compartment.
Compact spare wheel
The compact spare tyre is designed to save space in
the luggage compartment and its lighter weight
makes it easier to use if a flat tyre occurs.CAUTIONl The pressure should be periodically
checked and maintained at the specified
pressure while the tyre is stowed.
Driving with an insufficient tyre pressure
can lead to an accident. If you have no
choice but to drive with an insufficient
tyre pressure, keep your speed down and
inflate the tyre to the correct pressure as
soon as possible. (Refer to “Tyre inflation
pressures” on page 8-12.)
l The compact spare wheel is for tempora-
ry use only and should be removed as
soon as the original wheel can be re-
paired or replaced.
l The vehicle must not be driven at speeds
in excess of 80 km/h (50 mph) while using
the compact spare wheel.CAUTIONl The compact spare tyre is not as good as
a standard tyre in controllability and sta-
bility. When the compact spare tyre is
used, avoid quick starts, sudden braking
and sharp steering.
l Avoid driving through automatic vehicle
washers and over obstacles that could pos-
sibly damage the vehicle’s undercarriage.
Because the compact spare wheel is small-
er than the original wheel, the ground
clearance is slightly reduced.
l The compact spare wheel is specifically de-
signed for your vehicle and it should not
be used on any other vehicle.
l Do not use tyre chains with your compact
spare wheel. Because of the smaller tyre
size, a tyre chain will not fit properly.
This could cause damage to the wheel
and result in loss of the chain.
If a front tyre becomes flat when using
tyre chains, first replace a rear wheel
with the compact spare wheel and then
use the removed rear wheel to replace the
flat front wheel so that you can continue
to use the chains.
For emergencies
6-13
6
Page 203 of 274
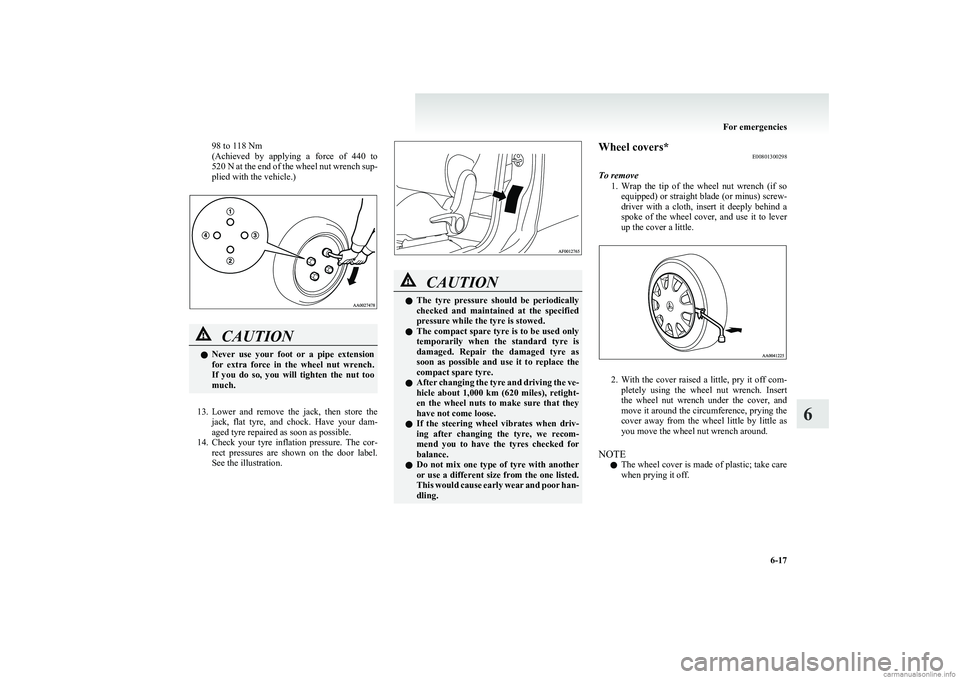
98 to 118 Nm
( Achieved by applying a force of 440 to
520 N at the end of the wheel nut wrench sup-
plied with the vehicle.)CAUTIONl Never use your foot or a pipe extension
for extra force in the wheel nut wrench.
If you do so, you will tighten the nut too
much.
13. Lower and remove the jack, then store the
jack, flat tyre, and chock. Have your dam-
aged tyre repaired as soon as possible.
14. Check your tyre inflation pressure. The cor-
rect pressures are shown on the door label.
See the illustration.
CAUTIONl The tyre pressure should be periodically
checked and maintained at the specified
pressure while the tyre is stowed.
l The compact spare tyre is to be used only
temporarily when the standard tyre is
damaged. Repair the damaged tyre as
soon as possible and use it to replace the
compact spare tyre.
l After changing the tyre and driving the ve-
hicle about 1,000 km (620 miles), retight-
en the wheel nuts to make sure that they
have not come loose.
l If the steering wheel vibrates when driv-
ing after changing the tyre, we recom-
mend you to have the tyres checked for
balance.
l Do not mix one type of tyre with another
or use a different size from the one listed.
This would cause early wear and poor han-
dling.Wheel covers* E00801300298
To remove 1.Wrap the tip of the wheel nut wrench (if so
equipped) or straight blade (or minus) screw-
driver with a cloth, insert it deeply behind a
spoke of the wheel cover, and use it to lever
up the cover a little.
2. With the cover raised a little, pry it off com-
pletely using the wheel nut wrench. Insert
the wheel nut wrench under the cover, and
move it around the circumference, prying the
cover away from the wheel little by little as
you move the wheel nut wrench around.
NOTE l The wheel cover is made of plastic; take care
when prying it off.
For emergencies
6-17
6
Page 205 of 274
The regulations concerning towing may differ from
country to country. It is recommended that you
obey the regulations of the area where you are driv-
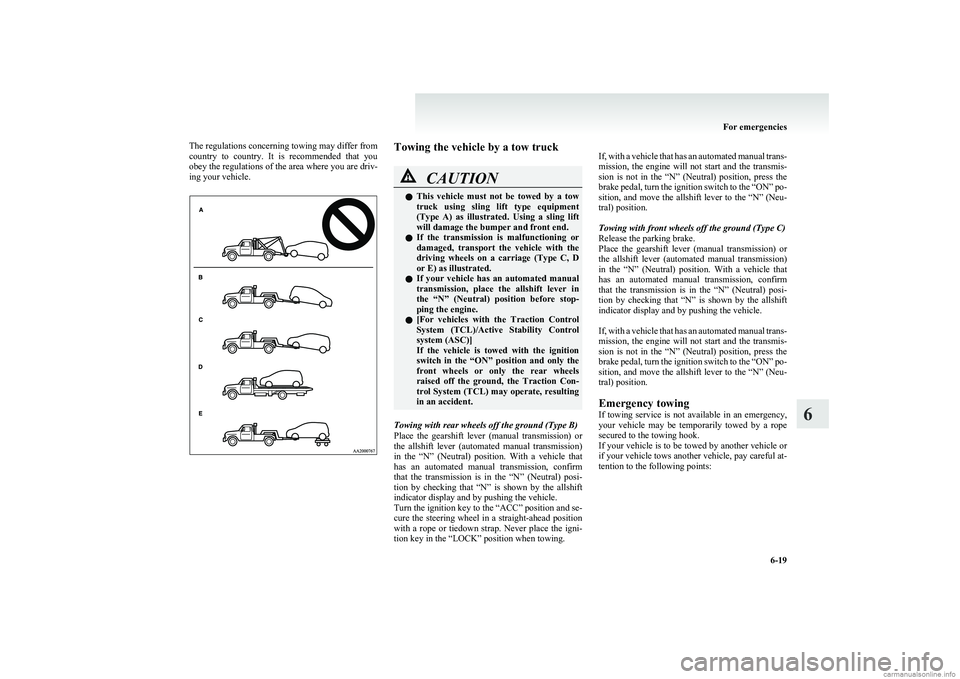
ing your vehicle.Towing the vehicle by a tow truckCAUTIONl This vehicle must not be towed by a tow
truck using sling lift type equipment
(Type A) as illustrated. Using a sling lift
will damage the bumper and front end.
l If the transmission is malfunctioning or
damaged, transport the vehicle with the
driving wheels on a carriage (Type C, D
or E) as illustrated.
l If your vehicle has an automated manual
transmission, place the allshift lever in
the “N” (Neutral) position before stop-
ping the engine.
l [
For vehicles with the Traction Control
System (TCL)/Active Stability Control
system (ASC)]
If the vehicle is towed with the ignition
switch in the “ON” position and only the
front wheels or only the rear wheels
raised off the ground, the Traction Con-
trol System (TCL) may operate, resulting
in an accident.
Towing with rear wheels off the ground (Type B)
Place the gearshift lever (manual transmission) or
the allshift lever (automated manual transmission)
in the “N” (Neutral) position. With a vehicle that
has an automated manual transmission, confirm
that the transmission is in the “N” (Neutral) posi-
tion by checking that “N” is shown by the allshift
indicator display and by pushing the vehicle.
Turn the ignition key to the “ACC” position and se-
cure the steering wheel in a straight-ahead position
with a rope or tiedown strap. Never place the igni-
tion key in the “LOCK” position when towing.
If, with a vehicle that has an automated manual trans-
mission, the engine will not start and the transmis-
sion is not in the “N” (Neutral) position, press the
brake pedal, turn the ignition switch to the “ON” po-
sition, and move the allshift lever to the “N” (Neu-
tral) position.
Towing with front wheels off the ground (Type C)
Release the parking brake.
Place the gearshift lever (manual transmission) or
the allshift lever (automated manual transmission)
in the “N” (Neutral) position. With a vehicle that
has an automated manual transmission, confirm
that the transmission is in the “N” (Neutral) posi-
tion by checking that “N” is shown by the allshift
indicator display and by pushing the vehicle.
If, with a vehicle that has an automated manual trans-
mission, the engine will not start and the transmis-
sion is not in the “N” (Neutral) position, press the
brake pedal, turn the ignition switch to the “ON” po-
sition, and move the allshift lever to the “N” (Neu-
tral) position.
Emergency towing
If towing service is not available in an emergency,
your vehicle may be temporarily towed by a rope
secured to the towing hook.
If your vehicle is to be towed by another vehicle or
if your vehicle tows another vehicle, pay careful at-
tention to the following points:
For emergencies
6-19
6
Page 206 of 274
CAUTIONlIf your vehicle has an automated manual
transmission, place the allshift lever in
the “N” (Neutral) position before stop-
ping the engine.
If your vehicle is to be towed by another vehicle
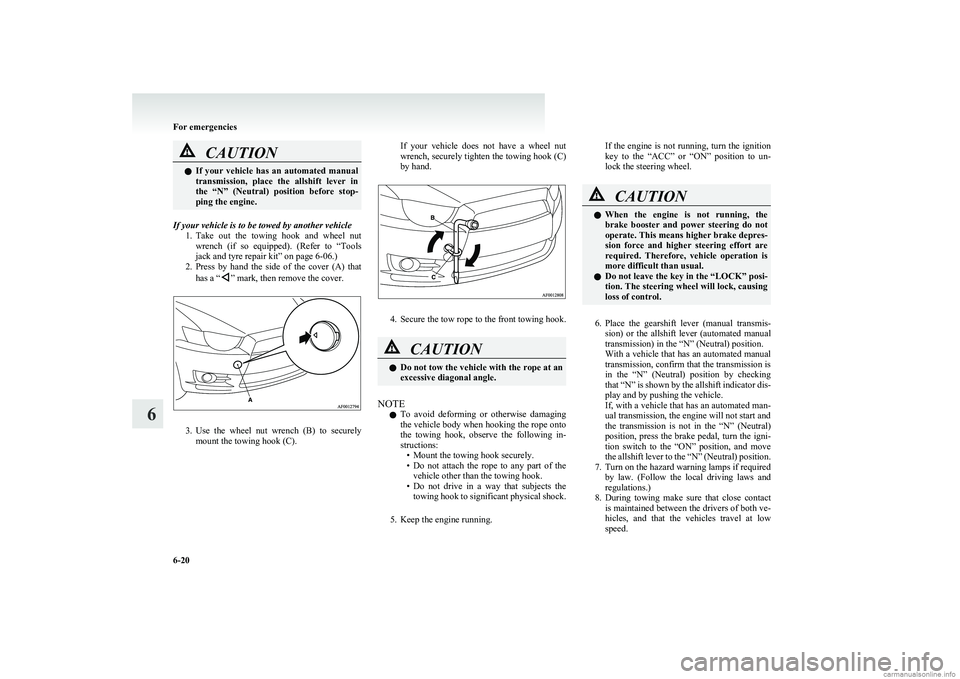
1.Take out the towing hook and wheel nut
wrench (if so equipped). (Refer to “Tools
jack and tyre repair kit” on page 6-06.)
2. Press by hand the side of the cover (A) that
has a “
” mark, then remove the cover.
3. Use the wheel nut wrench (B) to securely
mount the towing hook (C).
If your vehicle does not have a wheel nut
wrench, securely tighten the towing hook (C)
by hand.
4. Secure the tow rope to the front towing hook.
CAUTIONl Do not tow the vehicle with the rope at an
excessive diagonal angle.
NOTE
l To avoid deforming or otherwise damaging
the vehicle body when hooking the rope onto
the towing hook, observe the following in-
structions: • Mount the towing hook securely.
• Do not attach the rope to any part of the
vehicle other than the towing hook.
• Do not drive in a way that subjects the
towing hook to significant physical shock.
5. Keep the engine running.
If the engine is not running, turn the ignition
key to the “ACC” or “ON” position to un-
lock the steering wheel.CAUTIONl When the engine is not running, the
brake booster and power steering do not
operate. This means higher brake depres-
sion force and higher steering effort are
required. Therefore, vehicle operation is
more difficult than usual.
l Do not leave the key in the “LOCK” posi-
tion. The steering wheel will lock, causing
loss of control.
6. Place the gearshift lever (manual transmis-
sion) or the allshift lever (automated manual
transmission) in the “N” (Neutral) position.
With a vehicle that has an automated manual
transmission, confirm that the transmission is
in the “N” (Neutral) position by checking
that “N” is shown by the allshift indicator dis-
play and by pushing the vehicle.
If, with a vehicle that has an automated man-
ual transmission, the engine will not start and
the transmission is not in the “N” (Neutral)
position, press the brake pedal, turn the igni-
tion switch to the “ON” position, and move
the allshift lever to the “N” (Neutral) position.
7. Turn on the hazard warning lamps if required by law. (Follow the local driving laws and
regulations.)
8. During towing make sure that close contact
is maintained between the drivers of both ve-
hicles, and that the vehicles travel at low
speed.
For emergencies
6-20
6