steering MITSUBISHI COLT 2011 (in English) Owner's Guide
[x] Cancel search | Manufacturer: MITSUBISHI, Model Year: 2011, Model line: COLT, Model: MITSUBISHI COLT 2011Pages: 274, PDF Size: 17.88 MB
Page 208 of 274
Operation under adverse drivingconditions E00801701840
If your vehicle becomes stuck in sand,
mud or snow
If the vehicle becomes stuck in snow, sand, or
mud, it can often be moved by a rocking motion.
For vehicle with manual transmission, move the
gearshift lever alternately between 1 st
and Reverse,
while applying slight pressure to the accelerator ped-
al.
With an automated manual transmission vehicle,
place the allshift lever in the “A” (automatic mode)
position to select automatic mode or select 1 st
or
2 nd
gear in the manual mode or place the allshift lev-
er in the “R” (Reverse) position for reverse. Con-
firm that there is an “A”, “1”, “2” or “R” in the all-
shift indicator display, then gently press the acceler-
ator pedal. Do not press the accelerator pedal while
moving the allshift lever.
Avoid racing the engine or spinning the wheels. Pro-
longed efforts to free a stuck vehicle may result in
overheating and transmission failure. Allow the en-
gine to idle for a few minutes to let the transmis-
sion cool between rocking attempts.
If the vehicle remains stuck after several rocking at-
tempts, seek other assistance.WARNINGl When attempting to rock your vehicle out
of a stuck position, be sure that the area
around the vehicle is clear of people and
physical objects. The rocking motion may
cause the vehicle to suddenly launch for-
ward or backward, causing injury or dam-
age to nearby people or objects.
On a flooded road
l Avoid flooded roads. Water could enter the
brake discs, resulting in temporarily ineffec-
tive brakes. In such cases, lightly depress the
brake pedal to see if the brakes operate prop-
erly. If they do not, lightly depress the pedal
several times while driving in order to dry
the brake pads.
l When driving in rain or on a road with many
puddles a layer of water may form between
the tyres and the road surface.
This reduces a tyre’s frictional resistance on
the road, resulting in loss of steering stability
and braking capability.
To cope with this, observe the following items:
(a)Drive your vehicle at slow speed. (b)Do not drive on worn tyres. Always
maintain the specified tyre inflation
pressures.
On a snow-covered or frozen road
l When driving on a snow-covered or frozen
road, it is recommended that you use snow
tyres or tyre chains.
Refer to the “Snow tyres” and “Tyre chains”
sections.
l Avoid high-speed operation, sudden acceler-
ation, abrupt brake application and sharp cor-
nering.
l Depressing the brake pedal during travel on
snowy or icy roads may cause tyre slippage
and skidding. When traction between the
tyres and the road is reduced the wheels may
skid and the vehicle cannot readily be
brought to a stop by conventional braking
techniques. Braking will differ, depending
upon whether you have anti-lock brake sys-
tem (ABS). As your vehicle is equipped with
anti-lock brake system (ABS), brake by press-
ing the brake pedal hard, and keeping it press-
ed.
l Allow extra distance between your vehicle
and the vehicle in front of you, and avoid sud-
den braking.
On a bumpy or rutted road l Drive as slow as possible when driving on
bumpy or rutted roads.CAUTIONl The impact on tyres and/or wheels when
driving on a bumpy or rutted road can
damage the tyre and/or wheel.
For emergencies
6-22
6
Page 229 of 274
The speed limit for tyre chain is 50 km/h (30 mph)
and remove the tyre chains as soon as possible on
snow free roads.WARNINGl DO NOT use a jack when fitting the
chains, as in thsee conditions, the tyres
may slip on the icy road causing the vehi-
cle to slip off the jack.CAUTIONl Practice fitting the chains before you
need them.
Don’t expect help from other people in
the cold.
l Choose a clear straight stretch of road
where you can pull over and still be seen
while you are fitting the chains.
l Do not fit chains before you need them.
This will wear out your tyres and the
road surface.
l After driving around 100-300 metres
,
stop and retighten the chains.
l Care should be taken with extremes of
steering lock to prevent possible contact
between the chains and the vehicle body.
l Drive carefully and do not exceed
50 km/h (30 mph). Remember, fitting
chains is not going to stop accidents from
happening.
l When tyre chains are installed, take care
that they do not damage the disc wheel or
body.CAUTIONl Do not install a tyre chain on an emergen-
cy wheel which is compact in size. If one
of the front wheels has punctured, re-
place it with one of the rear wheels and in-
stall the compact spare wheel in that
place before fitting a tyre chain.
l An aluminium wheel can be damaged by
a tyre chain while driving. When fitting a
tyre chain on an aluminium wheel, take
care that any part of the chain and fitting
cannot be brought into contact with the
wheel.
l Remove the wheel covers before instal-
ling a tyre chain, otherwise they may be
damaged by the tyre chain. (Refer to
“Wheel covers” on page 6-17.)
l When installing or removing the tyre
chains, take care that hands and other
parts of your body are not injured by the
sharp edges of the vehicle body.
l Install the chains only on the rear tyres
and tighten them as tightly as possible
with the ends securely fastened.
NOTE
l The laws and regulations concerning the use
of tyre chains vary. Find out and follow the
laws and regulations of the area you’re driv-
ing in.
In most countries, it is prohibited by law to
use tyre chains on roads without snow.
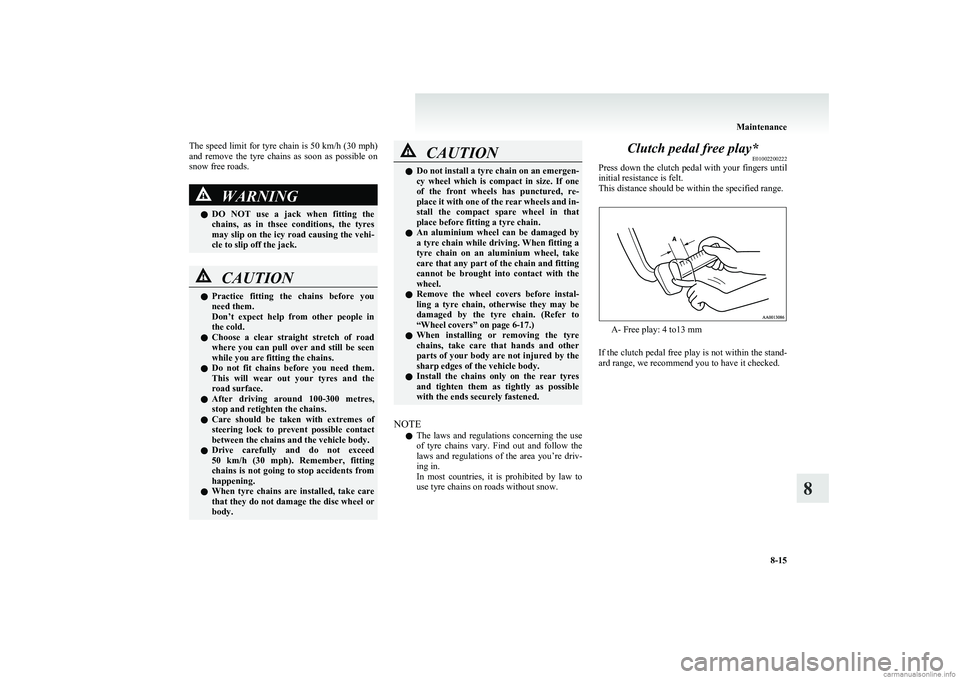
Clutch pedal free play* E01002200222
Press down the clutch pedal with your fingers until
initial resistance is felt.
This distance should be within the specified range.
A- Free play: 4 to13 mm
If the clutch pedal free play is not within the stand-
ard range, we recommend you to have it checked.
Maintenance
8-15
8
Page 259 of 274
Other specificationsE01101000950Item1100 models, 1300 models1500 modelsFuel systemFuel controlElectric controlled injectionFuel pumpElectric motor typeClutchDry single disc clutch, hydraulic actionSteering systemRack and pinion type, electric power assistedSuspensionFrontIndependent type, MacPherson strut, coil springRearTorsion beam rigid type
Service brakes
TypeHydraulic, dual diagonal circuit with power assistance and anti-lock brake system with electronic brake
force distribution functionFrontVentilated disc brakesRearDrum brakes, Disc brakes*Disc brakesParking brakesParking brake acts mechanically on rear wheels
*: Optional equipment
Specifications
9-13
9
Page 265 of 274
A
Accessory (Installation) 04
Accessory socket 5-37
Active stability control system (ASC) 4-30 Indication lamp 4-31
Additional equipment 8-18
Air conditioning Automatic air conditioning 5-07
Important operation tips for the air condition-
ing 5-11
Air purifier 5-12
Airbag 2-22
Front passenger’s airbag OFF indication
lamp 2-25
Front passenger’s airbag ON-OFF switch 2-25
Antenna 5-33
Anti-lock brake system (ABS) 4-27 Warning lamp 4-28
Audio Error codes 5-30
Handling of compact discs 5-32
LW/MW/FM electronic tuning radio with CD
player 5-12
Auto Stop & Go (AS&G) system 4-13
Automated manual transmission 4-19 Oil 9-16
Automatic air conditioning 5-07
B
Battery 8-10Charge warning lamp 3-19
Discharged battery (Emergency starting) 6-02
Specification 9-11
Bonnet 8-03
Brake Anti-lock brake 4-27
Brake assist system 4-27
Braking 4-25
Fluid 8-09,9-16
Parking brake 4-06
Parking brake lever stroke 8-16
Pedal free play 8-16
Warning lamp 3-17
Bulb capacity 8-23
C
Capacities 9-16
Cargo loads 4-36
Catalytic converter 8-02
Central door locks 1-07
Changing a fuse 8-21
Charge warning lamp 3-19
Chassis number 9-02
Check engine warning lamp 3-18
Child restraint 2-13
Child-protection rear doors 1-09
Cleaning Exterior of your vehicle 7-03
Genuine leather 7-02
Interior of your vehicle 7-02
Plastic, vinyl leather, etc 7-02
Clock 5-34
Clutch Fluid 8-09
Pedal free play 8-15
Coat hooks 5-43
Combination headlamps and dipper switch 3-20
Coming home light 3-22
Compact spare wheel 6-13
Cool box 5-39
Coolant (engine) 8-07,9-16
Cruise control 4-32
Cup holder 5-42
D
Dead Lock System 1-07
Demister (rear window) 3-29
Digital clock 5-34
Dipper (High/Low beam change) 3-21
Door ajar warning lamp 3-19
Doors Central door locks 1-07
Child-protection 1-09
Dead Lock System 1-07
Lock and unlock 1-05
Driving, alcohol and drugs 4-02
E
Economical driving 4-02
Electric power steering system 4-29
Electric remote-controlled outside rear-view mir-
rors 4-09
Electric window control 1-11
Electrical system 9-11
Electronic immobilizer (Anti-theft starting sys-
tem) 1-02
Emergency starting 6-02
Emergency stop signal system 4-26
Engine
Coolant 8-07,9-16
High coolant temperature warning lamp 3-19
Number 9-03
Oil 8-05
Oil and filter 9-16
Overheating 6-04
Specifications 9-09
Used engine oils safety instructions and disposal
information 05
Error codes 5-30
Exterior and interior lamp operation 8-18
Alphabetical index
1
Page 267 of 274
Modification/alterations to the electrical or fuel sys-
tems 05
Multi-information display 3-04
O
Oil pressure warning lamp 3-19
Oil Automated manual transmission oil 9-16
Engine oil 8-05
Manual transmission oil 9-16
Operation under adverse driving conditions 6-22
Other specifications 9-13
Outside rear-view mirrors 4-08
Electric remote-controlled outside rear-view mir-
rors 4-09
Manual remote-controlled outside rear-view mir-
rors 4-09
Overheating 6-04
P
Parking 4-07Parking brake 4-06
Parking brake lever stroke 8-16
Position lamps Bulb capacity 8-24
Replacement 8-25
Power steering System 4-29
Precautions to observe when using wipers and wash-
ers 3-29
Pregnant women restraint 2-12
Puncture (Tyre changing) 6-15
R
Radio
LW/MW/FM electronic tuning radio with CD
player 5-12
Rain sensor 3-26
Rear combination lamps Bulb capacity 8-24
Replacement 8-27
Rear fog lamp Bulb capacity 8-24
Indication lamp 3-17
Replacement 8-27,8-29
Switch 3-24
Rear shelf panel 5-42
Rear turn-signal lamps Bulb capacity 8-24
Replacement 8-27
Rear window demister switch 3-29
Rear-view mirror Inside 4-08
Outside 4-08
Replacement of lamp bulbs 8-23
Reversing lamps Bulb capacity 8-24
Replacement 8-27,8-29
Room lamp 5-38
Room lamps & map lamps Bulb capacity 8-24
Replacement 8-31
Running-in recommendations 4-04
S
Safe driving techniques 4-03
Seat belt 2-10 Adjustable seat belt anchor 2-11
Child restraint 2-13
Inspection 2-22
Pregnant women restraint 2-12
Pretensioner 2-13
Seat belt reminder/warning lamp 2-11
Seat Adjustment 2-04
Arrangement 2-03
Front seat 2-04
Head restraints 2-06
Heated seats 2-06
Service precaution 8-02
Side turn-signal lamps Bulb capacity 8-24
Replacement 8-26
Snow tyres 8-14
Spare wheel 6-13
Spark plug 9-11
Specifications 9-02
Speedometer 3-03
Starting 4-11
Steering Power steering system 4-29
Steering wheel height adjustment 4-07
Steering wheel lock 4-11
Stop lamps Bulb capacity 8-23
Replacement 8-27
Storage spaces 5-39
Sun visors 5-36
Supplemental restraint system 2-22 Curtain airbag system 2-30
How the Supplemental Restraint System
works 2-25
Servicing 2-34
Side airbag system 2-30
Warning lamp 2-33
T
Tachometer 3-03
Tail lamp Bulb capacity 8-24
Replacement 8-27
Alphabetical index
3