turn signal MITSUBISHI COLT 2011 (in English) Owner's Guide
[x] Cancel search | Manufacturer: MITSUBISHI, Model Year: 2011, Model line: COLT, Model: MITSUBISHI COLT 2011Pages: 274, PDF Size: 17.88 MB
Page 160 of 274
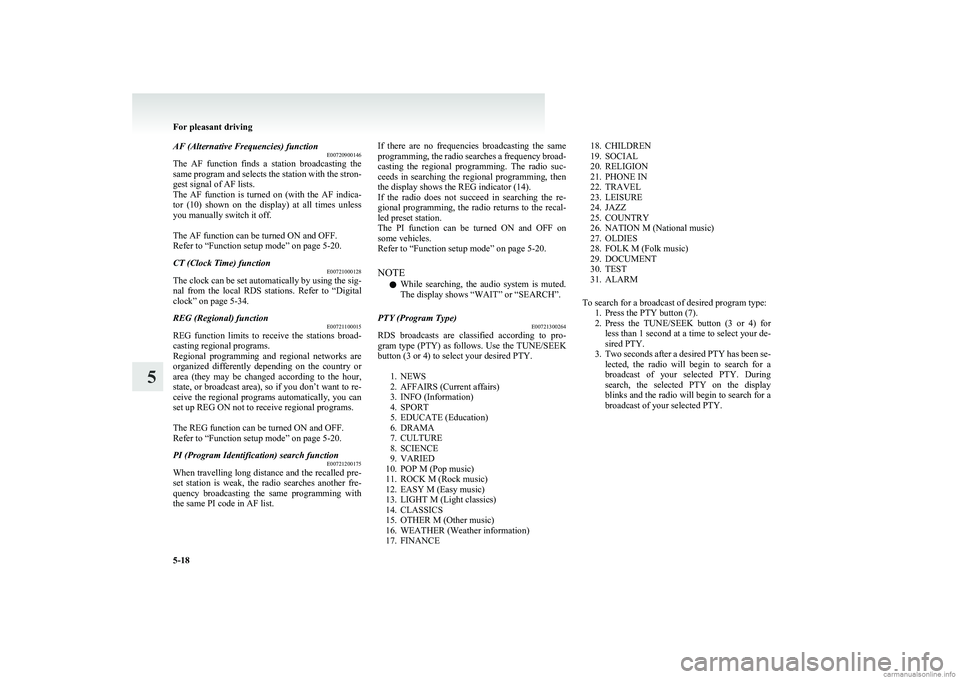
AF (Alternative Frequencies) functionE00720900146
The AF function finds a station broadcasting the
same program and selects the station with the stron-
gest signal of AF lists.
The AF function is turned on (with the AF indica-
tor (10) shown on the display) at all times unless
you manually switch it off.
The AF function can be turned ON and OFF.
Refer to “Function setup mode” on page 5-20.CT (Clock Time) function E00721000128
The clock can be set automatically by using the sig-
nal from the local RDS stations. Refer to “Digital
clock” on page 5-34.
REG (Regional) function E00721100015
REG function limits to receive the stations broad-
casting regional programs.
Regional programming and regional networks are
organized differently depending on the country or
area (they may be changed according to the hour,
state, or broadcast area), so if you don’t want to re-
ceive the regional programs automatically, you can
set up REG ON not to receive regional programs.
The REG function can be turned ON and OFF.
Refer to “Function setup mode” on page 5-20.
PI (Program Identification) search function E00721200175
When travelling long distance and the recalled pre-
set station is weak, the radio searches another fre-
quency broadcasting the same programming with
the same PI code in AF list.
If there are no frequencies broadcasting the same
programming, the radio searches a frequency broad-
casting the regional programming. The radio suc-
ceeds in searching the regional programming, then
the display shows the REG indicator (14).
If the radio does not succeed in searching the re-
gional programming, the radio returns to the recal-
led preset station.
The PI function can be turned ON and OFF on
some vehicles.
Refer to “Function setup mode” on page 5-20.
NOTE l While searching, the audio system is muted.
The display shows “WAIT” or “SEARCH”.PTY (Program Type) E00721300264
RDS broadcasts are classified according to pro-
gram type (PTY) as follows. Use the TUNE/SEEK
button (3 or 4) to select your desired PTY.
1. NEWS
2. AFFAIRS (Current affairs)
3. INFO (Information)
4. SPORT
5. EDUCATE (Education)
6. DRAMA
7. CULTURE
8. SCIENCE
9. VARIED
10. POP M (Pop music)
11. ROCK M (Rock music)
12. EASY M (Easy music)
13. LIGHT M (Light classics)
14. CLASSICS
15. OTHER M (Other music)
16. WEATHER (Weather information)
17. FINANCE
18. CHILDREN
19. SOCIAL
20. RELIGION
21. PHONE IN
22. TRAVEL
23. LEISURE
24. JAZZ
25. COUNTRY
26. NATION M (National music)
27. OLDIES
28. FOLK M (Folk music)
29. DOCUMENT
30. TEST
31. ALARM
To search for a broadcast of desired program type: 1. Press the PTY button (7).
2. Press the TUNE/SEEK button (3 or 4) for
less than 1 second at a time to select your de-
sired PTY.
3. Two seconds after a desired PTY has been se-
lected, the radio will begin to search for a
broadcast of your selected PTY. During
search, the selected PTY on the display
blinks and the radio will begin to search for a
broadcast of your selected PTY.
For pleasant driving
5-18
5
Page 162 of 274
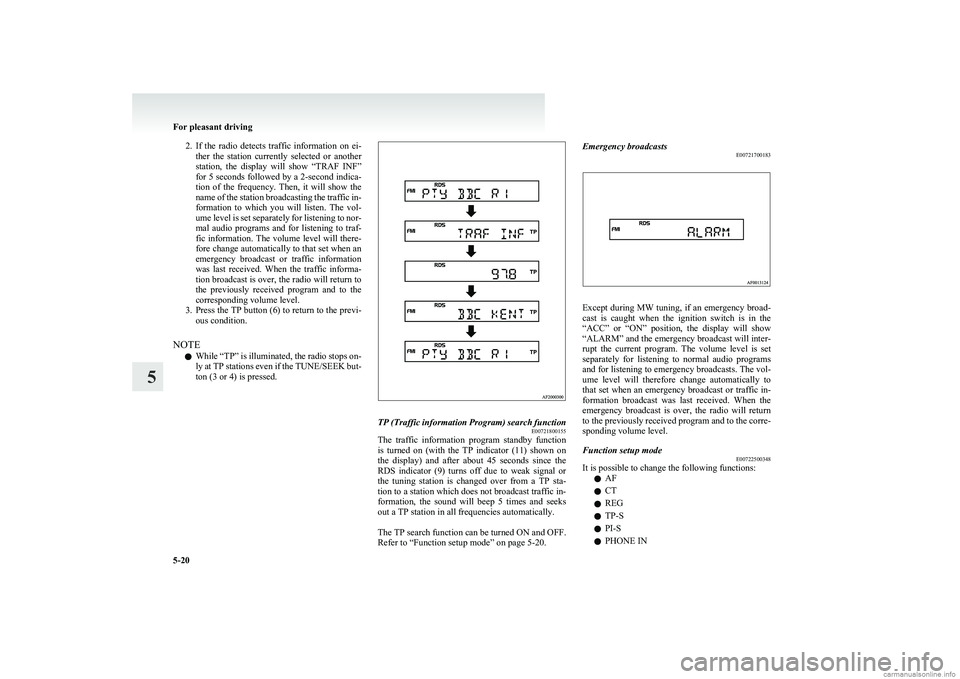
2.If the radio detects traffic information on ei-
ther the station currently selected or another
station, the display will show “TRAF INF”
for 5 seconds followed by a 2-second indica-
tion of the frequency. Then, it will show the
name of the station broadcasting the traffic in-
formation to which you will listen. The vol-
ume level is set separately for listening to nor-
mal audio programs and for listening to traf-
fic information. The volume level will there-
fore change automatically to that set when an
emergency broadcast or traffic information
was last received. When the traffic informa-
tion broadcast is over, the radio will return to
the previously received program and to the
corresponding volume level.
3. Press the TP button (6) to return to the previ-
ous condition.
NOTE l While “TP” is illuminated, the radio stops on-
ly at TP stations even if the TUNE/SEEK but-
ton (3 or 4) is pressed.TP (Traffic information Program) search function E00721800155
The traffic information program standby function
is turned on (with the TP indicator (11) shown on
the display) and after about 45 seconds since the
RDS indicator (9) turns off due to weak signal or
the tuning station is changed over from a TP sta-
tion to a station which does not broadcast traffic in-
formation, the sound will beep 5 times and seeks
out a TP station in all frequencies automatically.
The TP search function can be turned ON and OFF.
Refer to “Function setup mode” on page 5-20.
Emergency broadcasts E00721700183
Except during MW tuning, if an emergency broad-
cast is caught when the ignition switch is in the
“ACC” or “ON” position, the display will show
“ALARM” and the emergency broadcast will inter-
rupt the current program. The volume level is set
separately for listening to normal audio programs
and for listening to emergency broadcasts. The vol-
ume level will therefore change automatically to
that set when an emergency broadcast or traffic in-
formation broadcast was last received. When the
emergency broadcast is over, the radio will return
to the previously received program and to the corre-
sponding volume level.
Function setup mode E00722500348
It is possible to change the following functions:
l AF
l CT
l REG
l TP-S
l PI-S
l PHONE IN
For pleasant driving
5-20
5
Page 194 of 274
3.On vehicles with manual transmission, turn
the ignition key to the “LOCK” position,
move the gearshift lever to the “R” (Reverse)
position.
On vehicles with automated manual transmis-
sion, move the allshift lever to the “R” (Re-
verse) position, turn the ignition key to the
“LOCK” position.
With an automated manual transmission ve-
hicle, confirm that that “R” is shown by the
allshift indicator display.
4. Turn on the hazard warning flashers and set
up a warning triangle, flashing signal lamp,
etc., at an adequate distance from the vehi-
cle, and have all your passengers leave the ve-
hicle.
5. Take out the tyre sealant bottle and the com-
pressor.
NOTE l In cold conditions (when the ambient temper-
ature is 0 °C or lower). Warm the bottle in-
side the vehicle.
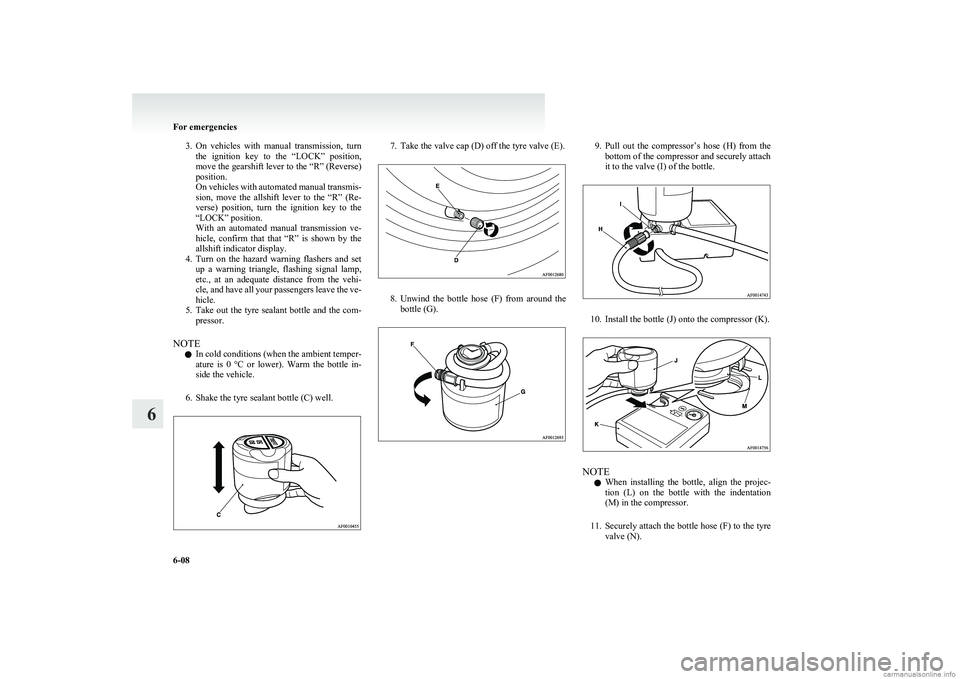
6. Shake the tyre sealant bottle (C) well.7. Take the valve cap (D) off the tyre valve (E).
8. Unwind the bottle hose (F) from around the
bottle (G).
9. Pull out the compressor’s hose (H) from the
bottom of the compressor and securely attach
it to the valve (I) of the bottle.
10. Install the bottle (J) onto the compressor (K).
NOTE
l When installing the bottle, align the projec-
tion (L) on the bottle with the indentation
(M) in the compressor.
11. Securely attach the bottle hose (F) to the tyre
valve (N).
For emergencies
6-08
6
Page 198 of 274
Jacking up the vehicleE00801001218
1. Park the vehicle on level and stable ground.
2. Set the parking brake firmly.
3. On vehicles with manual transmission, turn
the ignition key to the “LOCK” position,
move the gearshift lever to the “R” (Reverse)
position.
On vehicles with automated manual transmis-
sion, move the allshift lever to the “R” (Re-
verse) position, turn the ignition key to the
“LOCK” position.
With an automated manual transmission ve-
hicle, confirm that there is a “A” or “1” in
the allshift indicator display.
4. Turn on the hazard warning flashers and set
up a warning triangle, flashing signal lamp,
etc., at an adequate distance from the vehi-
cle, and have all your passengers leave the ve-
hicle.
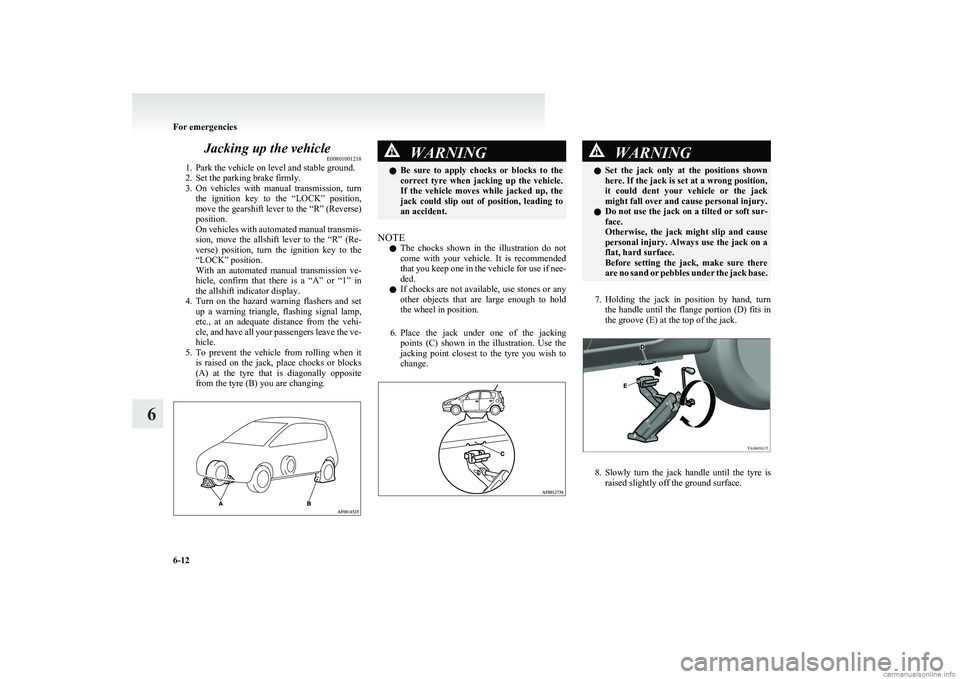
5. To prevent the vehicle from rolling when it
is raised on the jack, place chocks or blocks
(A) at the tyre that is diagonally opposite
from the tyre (B) you are changing.WARNINGl Be sure to apply chocks or blocks to the
correct tyre when jacking up the vehicle.
If the vehicle moves while jacked up, the
jack could slip out of position, leading to
an accident.
NOTE
l The chocks shown in the illustration do not
come with your vehicle. It is recommended
that you keep one in the vehicle for use if nee-
ded.
l If chocks are not available, use stones or any
other objects that are large enough to hold
the wheel in position.
6. Place the jack under one of the jacking
points (C) shown in the illustration. Use the
jacking point closest to the tyre you wish to
change.
WARNINGl Set the jack only at the positions shown
here. If the jack is set at a wrong position,
it could dent your vehicle or the jack
might fall over and cause personal injury.
l Do not use the jack on a tilted or soft sur-
face.
Otherwise, the jack might slip and cause
personal injury. Always use the jack on a
flat, hard surface.
Before setting the jack, make sure there
are no sand or pebbles under the jack base.
7. Holding the jack in position by hand, turn
the handle until the flange portion (D) fits in
the groove (E) at the top of the jack.
8. Slowly turn the jack handle until the tyre is
raised slightly off the ground surface.
For emergencies
6-12
6
Page 201 of 274
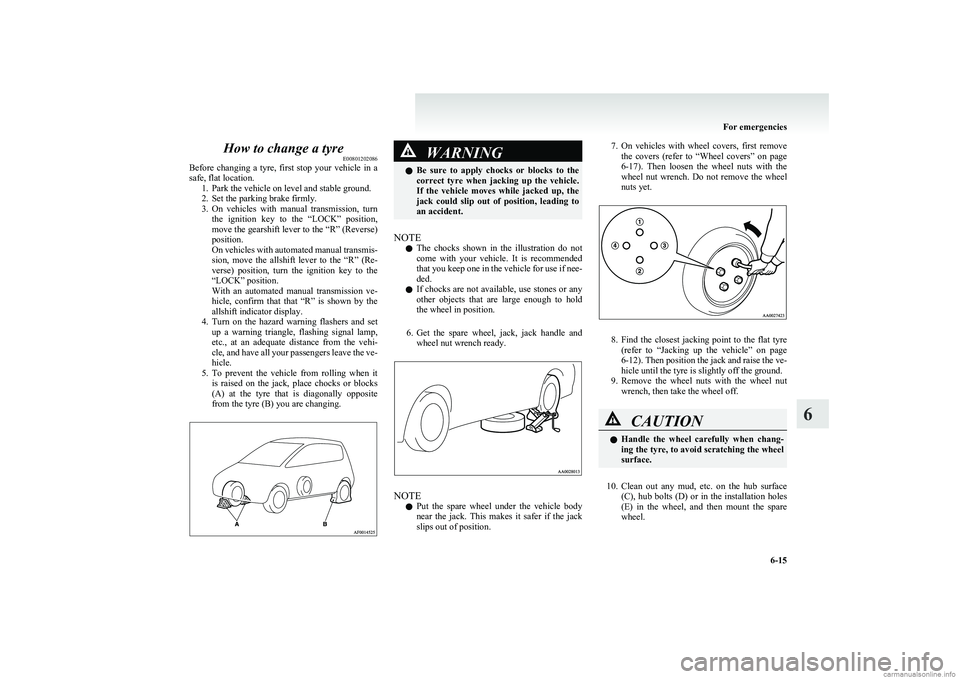
How to change a tyreE00801202086
Before changing a tyre, first stop your vehicle in a
safe, flat location. 1. Park the vehicle on level and stable ground.
2. Set the parking brake firmly.
3. On vehicles with manual transmission, turn
the ignition key to the “LOCK” position,
move the gearshift lever to the “R” (Reverse)
position.
On vehicles with automated manual transmis-
sion, move the allshift lever to the “R” (Re-
verse) position, turn the ignition key to the
“LOCK” position.
With an automated manual transmission ve-
hicle, confirm that that “R” is shown by the
allshift indicator display.
4. Turn on the hazard warning flashers and set
up a warning triangle, flashing signal lamp,
etc., at an adequate distance from the vehi-
cle, and have all your passengers leave the ve-
hicle.
5. To prevent the vehicle from rolling when it
is raised on the jack, place chocks or blocks
(A) at the tyre that is diagonally opposite
from the tyre (B) you are changing.WARNINGl Be sure to apply chocks or blocks to the
correct tyre when jacking up the vehicle.
If the vehicle moves while jacked up, the
jack could slip out of position, leading to
an accident.
NOTE
l The chocks shown in the illustration do not
come with your vehicle. It is recommended
that you keep one in the vehicle for use if nee-
ded.
l If chocks are not available, use stones or any
other objects that are large enough to hold
the wheel in position.
6. Get the spare wheel, jack, jack handle and
wheel nut wrench ready.
NOTE
l Put the spare wheel under the vehicle body
near the jack. This makes it safer if the jack
slips out of position.
7. On vehicles with wheel covers, first remove
the covers (refer to “Wheel covers” on page
6-17 ). Then loosen the wheel nuts with the
wheel nut wrench. Do not remove the wheel
nuts yet.
8. Find the closest jacking point to the flat tyre
(refer to “Jacking up the vehicle” on page
6-12 ). Then position the jack and raise the ve-
hicle until the tyre is slightly off the ground.
9. Remove the wheel nuts with the wheel nut
wrench, then take the wheel off.
CAUTIONl Handle the wheel carefully when chang-
ing the tyre, to avoid scratching the wheel
surface.
10. Clean out any mud, etc. on the hub surface
(C), hub bolts (D) or in the installation holes
(E) in the wheel, and then mount the spare
wheel.
For emergencies
6-15
6
Page 238 of 274
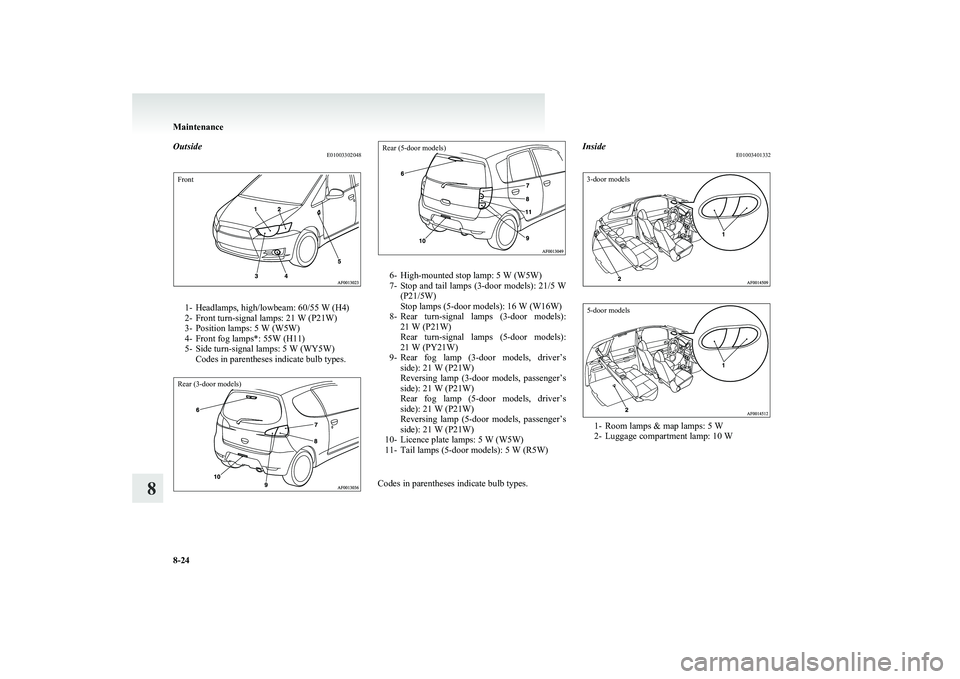
OutsideE01003302048Front
1- Headlamps, high/lowbeam: 60/55 W (H4)
2- Front turn-signal lamps: 21 W (P21W)
3- Position lamps: 5 W (W5W)
4- Front fog lamps*: 55W (H11)
5- Side turn-signal lamps: 5 W (WY5W) Codes in parentheses indicate bulb types.
Rear (3-door models)Rear (5-door models)
6- High-mounted stop lamp: 5 W (W5W)
7- Stop and tail lamps (3-door models): 21/5 W
(P21/5W)
Stop lamps (5-door models): 16 W (W16W)
8- Rear turn-signal lamps (3-door models):
21 W (P21W)
Rear turn-signal lamps (5-door models):
21 W (PY21W)
9- Rear fog lamp (3-door models, driver’s
side): 21 W (P21W)
Reversing lamp (3-door models, passenger’s
side): 21 W (P21W)
Rear fog lamp (5-door models, driver’s
side): 21 W (P21W)
Reversing lamp (5-door models, passenger’s
side): 21 W (P21W)
10- Licence plate lamps: 5 W (W5W)
11- Tail lamps (5-door models): 5 W (R5W)
Codes in parentheses indicate bulb types.
Inside E010034013323-door models5-door models
1- Room lamps & map lamps: 5 W
2- Luggage compartment lamp: 10 W
Maintenance
8-24
8
Page 240 of 274
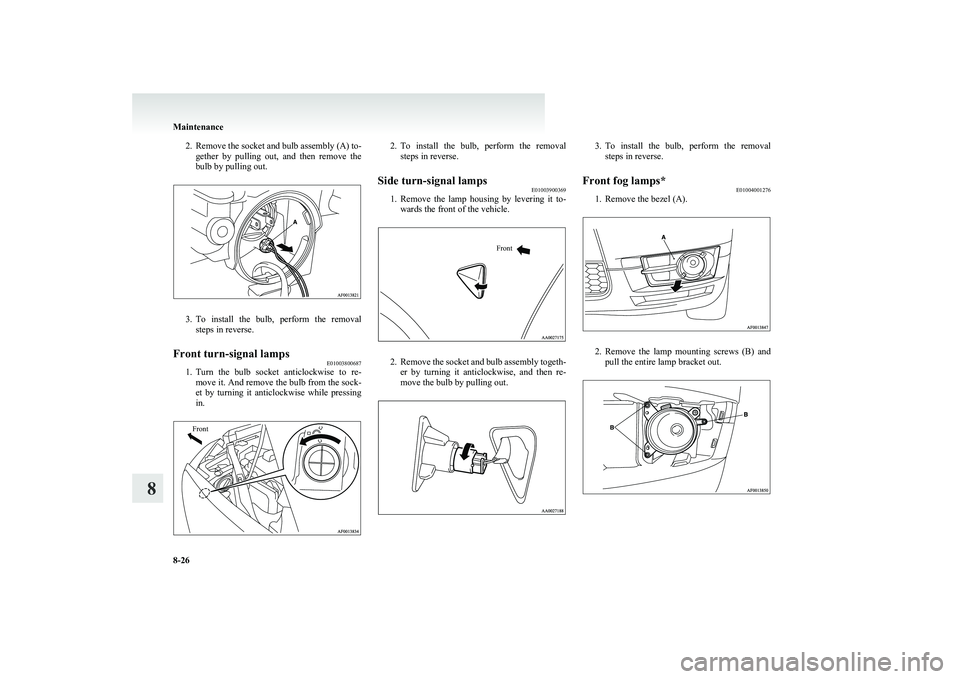
2.Remove the socket and bulb assembly (A) to-
gether by pulling out, and then remove the
bulb by pulling out.
3. To install the bulb, perform the removal
steps in reverse.
Front turn-signal lamps E01003800687
1.Turn the bulb socket anticlockwise to re-
move it. And remove the bulb from the sock-
et by turning it anticlockwise while pressing
in.
Front2. To install the bulb, perform the removal
steps in reverse.Side turn-signal lamps E01003900369
1.Remove the lamp housing by levering it to-
wards the front of the vehicle.
Front
2. Remove the socket and bulb assembly togeth-
er by turning it anticlockwise, and then re-
move the bulb by pulling out.
3. To install the bulb, perform the removal
steps in reverse.Front fog lamps* E01004001276
1. Remove the bezel (A).
2.Remove the lamp mounting screws (B) and
pull the entire lamp bracket out.
Maintenance
8-26
8
Page 242 of 274
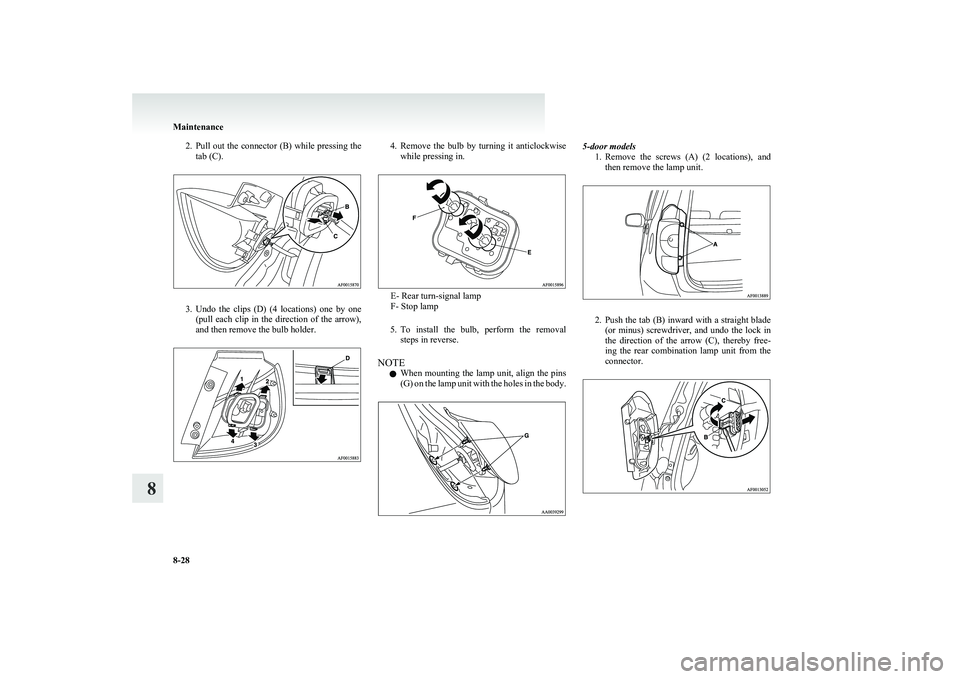
2.Pull out the connector (B) while pressing the
tab (C).
3. Undo the clips (D) (4 locations) one by one
(pull each clip in the direction of the arrow),
and then remove the bulb holder.
4. Remove the bulb by turning it anticlockwise
while pressing in.
E- Rear turn-signal lamp
F- Stop lamp
5. To install the bulb, perform the removal
steps in reverse.
NOTE l When mounting the lamp unit, align the pins
(G) on the lamp unit with the holes in the body.
5-door models
1.Remove the screws (A) (2 locations), and
then remove the lamp unit.
2. Push the tab (B) inward with a straight blade
(or minus) screwdriver, and undo the lock in
the direction of the arrow (C), thereby free-
ing the rear combination lamp unit from the
connector.
Maintenance
8-28
8
Page 243 of 274
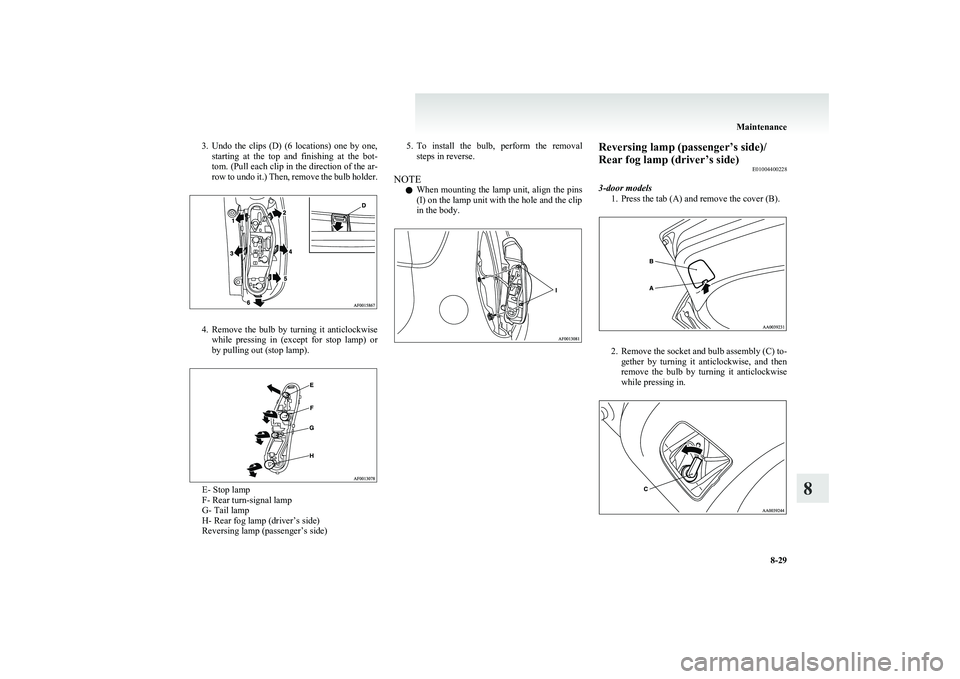
3.Undo the clips (D) (6 locations) one by one,
starting at the top and finishing at the bot-
tom. (Pull each clip in the direction of the ar-
row to undo it.) Then, remove the bulb holder.
4. Remove the bulb by turning it anticlockwise
while pressing in (except for stop lamp) or
by pulling out (stop lamp).
E- Stop lamp
F- Rear turn-signal lamp
G- Tail lamp
H- Rear fog lamp (driver’s side)
Reversing lamp (passenger’s side)
5. To install the bulb, perform the removal
steps in reverse.
NOTE l When mounting the lamp unit, align the pins
(I) on the lamp unit with the hole and the clip
in the body.Reversing lamp (passenger’s side)/
Rear fog lamp (driver’s side) E01004400228
3-door models 1. Press the tab (A) and remove the cover (B).
2.Remove the socket and bulb assembly (C) to-
gether by turning it anticlockwise, and then
remove the bulb by turning it anticlockwise
while pressing in.
Maintenance
8-29
8
Page 266 of 274
F
Fluid capacities and lubricants 9-16
Fluid Brake fluid 8-09,9-16
Clutch fluid 8-09,9-16
Engine coolant 8-07,9-16
Washer fluid 8-09,9-16
For cold and snowy weather 8-18
Front fog lamps Bulb capacity 8-24
Indication lamp 3-17
Replacement 8-26
Switch 3-24
Front passenger’s airbag ON-OFF switch 2-25
Front seat 2-04
Front turn-signal lamps Bulb capacity 8-24
Replacement 8-26
Frozen road warning 3-10
Fuel consumption 9-14
Fuel Filling the fuel tank 02
Fuel selection 02
Fuel tank filler door release lever 03
Modification/alterations to the electrical or fuel
systems 05
Tank capacity 03
Fuse load capacity 8-19
Fuse replacement 8-21
Fuses 8-19
Fusible links 8-19
G
Gauges 3-02,3-16
General maintenance 8-18
Genuine parts 05
Glove box 5-39
H
Handling of compact discs 5-32
Hazard warning flasher switch 3-23
Hazard warning indication lamps 3-17
Head restraints 2-06
Headlamp levelling switch 3-22
Headlamps Bulb capacity 8-23
Headlamp flasher 3-21
Replacement 8-25
Switch 3-20
Heated mirror 4-09
Heated seats 2-06
Heater 5-04
High coolant temperature warning lamp 3-19
High-beam indication lamp 3-17
High-mounted stop lamp Bulb capacity 8-24
High-mounted stop lamps Replacement 8-30
Hinges and latches lubrication 8-18
Horn switch 3-30
How to drive a vehicle with an automated manual
transmission 4-22
I
If the vehicle breaks down 6-02
Ignition switch 4-10
Indication and warning lamps 3-16
Indication lamps 3-17
Inside rear-view mirror 4-08
Installation of accessories 04
Instruments 3-02
Interior lamps 5-38
J
Jacking up the vehicle 6-12
Jack 6-11 Storage 6-06
Jump starting (Emergency starting) 6-02
K
Keyless entry system 1-03
Keys 1-02
L
Labeling 9-02
Lamp monitor buzzer 3-21
Leakage (Fuel, engine coolant, oil and exhaust
gas) 8-18
Licence plate lamps Bulb capacity 8-24
Replacement 8-31
Lubricants 9-16
Luggage compartment lamp 5-38 Bulb capacity 8-24
Replacement 8-32
Luggage floor boxes 5-41
Luggage floor cargo 5-40
LW/MW/FM electronic tuning radio with CD play-
er 5-12
M
Manual transmission 4-16Oil 9-16
Map lamps 5-38
Mirror Inside rear-view mirror 4-08
Outside rear-view mirrors 4-08
Alphabetical index
2