light MITSUBISHI ECLIPSE 1990 Owner's Manual
[x] Cancel search | Manufacturer: MITSUBISHI, Model Year: 1990, Model line: ECLIPSE, Model: MITSUBISHI ECLIPSE 1990Pages: 391, PDF Size: 15.27 MB
Page 85 of 391
ELECTRICAL - Theft-alarm System8-33ARMING THE SYSTEM
After the following procedures have been completed, the SECURITY light illuminates for about 20 seconds,
and when illumination stops, the system is armed.
(1) Pull out the ignition key from the key cylinder.
(2) Open a door. (The other door is closed.)
(3) Lock the door with the key or the
keyless-locking method.
(The central door locking system will then function to lock all doors.)
NOTE(1) The system is set regardless of whether the hood and liftgate are open or
closed, and is armed as
soon as the light goes out.
(2) Even after the system has been armed, if the key is used to open the liftgate, the system will not be
activated; when the liftgate is then
closed, moreover, the system will be armed.
DISARMING THE SYSTEM
(1) The system will be disarmed if the key is used to unlock a door.
(2) If the system is armed while the driver is still in the vehicle, the system can be disarmed by inserting the
ignition key and turning it to the ACC or ON position.
(3) If the door lock is unlocked while closing the door or the door is ajar.
(4) If the door is unfastened while the SECURITY light illuminates.
ACTIVATING THE ALARM
(1) if an attempt is made to open a door, the liftgate or the hood, without using the key, while the system is
armed, the horn will sound intermittently and the headlights will flash on and off for approximately
three,
minutes.Furthermore, the starter circuit is interrupted at this time also, making starting of the engine impossible.
(2) if a further attempt at *forcible entry is made after the first three-minute alarm has finished, the
three-minute alarm will be activated again.
DEACTIVATING THE ALARM
(1) To deactivate the alarm, insert the key into the door’s key cylinder and turn the key.
(2) The alarm is deactivated and the system is disarmed when the iiftgate is unlocked with the key.
CHECKING THE SYSTEM OPERATION
The activation/operation of the system can be checked by following the steps below.
(1) Turn the ignition key to the ON position and then use the power-window switch to fully open the window
at the driver’s seat side.
(2) Turn the ignition key to the LOCK position and then remove the key from the ignition.
(3) Open only the driver’s door, and close all the other doors, as well as the hood and the rear hatch.
(4) Lock the driver’s door by the key or the
keyless-locking method.
(5) All doors will then be
locked, and the SECURITY light (within the combination meter) will illuminate; check
to be sure that illumination stops in about 20 seconds.
(6) After about two seconds have passed after the SECURITY light illumination stopped, reach through the
window of the driver’s door, pull up the lock lever to unlock the door, and then open the door.
(7) Check to be sure that, when the door is opened, the horn starts sounding and the headlights flash on and
Off.
(8) To stop the alarm, insert the key into the door’s key cylinder and turn the key.
!?iEeck the alarm for the opening of the liftgate or hood open the liftgate (or the hood) by using the
remote liftgate release lever (or the hood release lever),
located at the driver’s seat side either before the
alarm is activated by the opening of a door, or after the finish of the first three-minute alarm.
Page 119 of 391
FUEL SYSTEM -Fuel Supply and Fuel Pressure Control14-7FUEL TANK
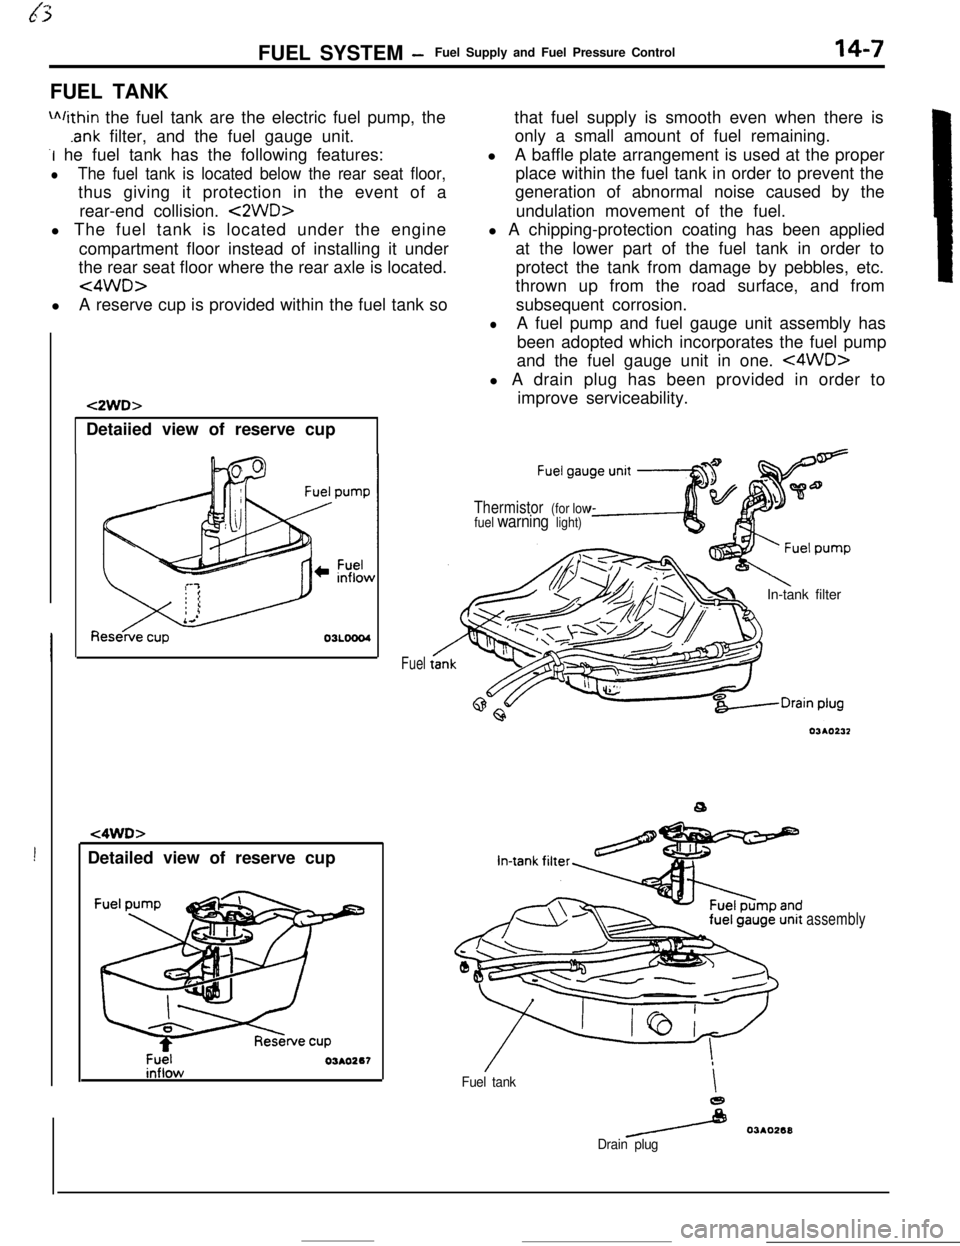
m/ithin the fuel tank are the electric fuel pump, the
.ank filter, and the fuel gauge unit.
-I he fuel tank has the following features:
lThe fuel tank is located below the rear seat floor,thus giving it protection in the event of a
rear-end collision.
<2WD>l The fuel tank is located under the engine
compartment floor instead of installing it under
the rear seat floor where the rear axle is located.
<4WD>lA reserve cup is provided within the fuel tank so
!Detailed view of reserve cup
t2WD>Detaiied view of reserve cup
t4WD>
Fuel03AO267
Fuelthat fuel supply is smooth even when there is
only a small amount of fuel remaining.
lA baffle plate arrangement is used at the proper
place within the fuel tank in order to prevent the
generation of abnormal noise caused by the
undulation movement of the fuel.
l A chipping-protection coating has been applied
at the lower part of the fuel tank in order to
protect the tank from damage by pebbles, etc.
thrown up from the road surface, and from
subsequent corrosion.
lA fuel pump and fuel gauge unit assembly has
been adopted which incorporates the fuel pump
and the fuel gauge unit in one.
<4WD>l A drain plug has been provided in order to
improve serviceability.
Thermistor (for low
fuel warning light)In-tank filter
Fuel tankI
e
/ 03AO268
Drain plug
assembly
Page 132 of 391
FUEL SYSTEM - Sensors
CRANK ANGLE SENSOR
II
DiscSensor
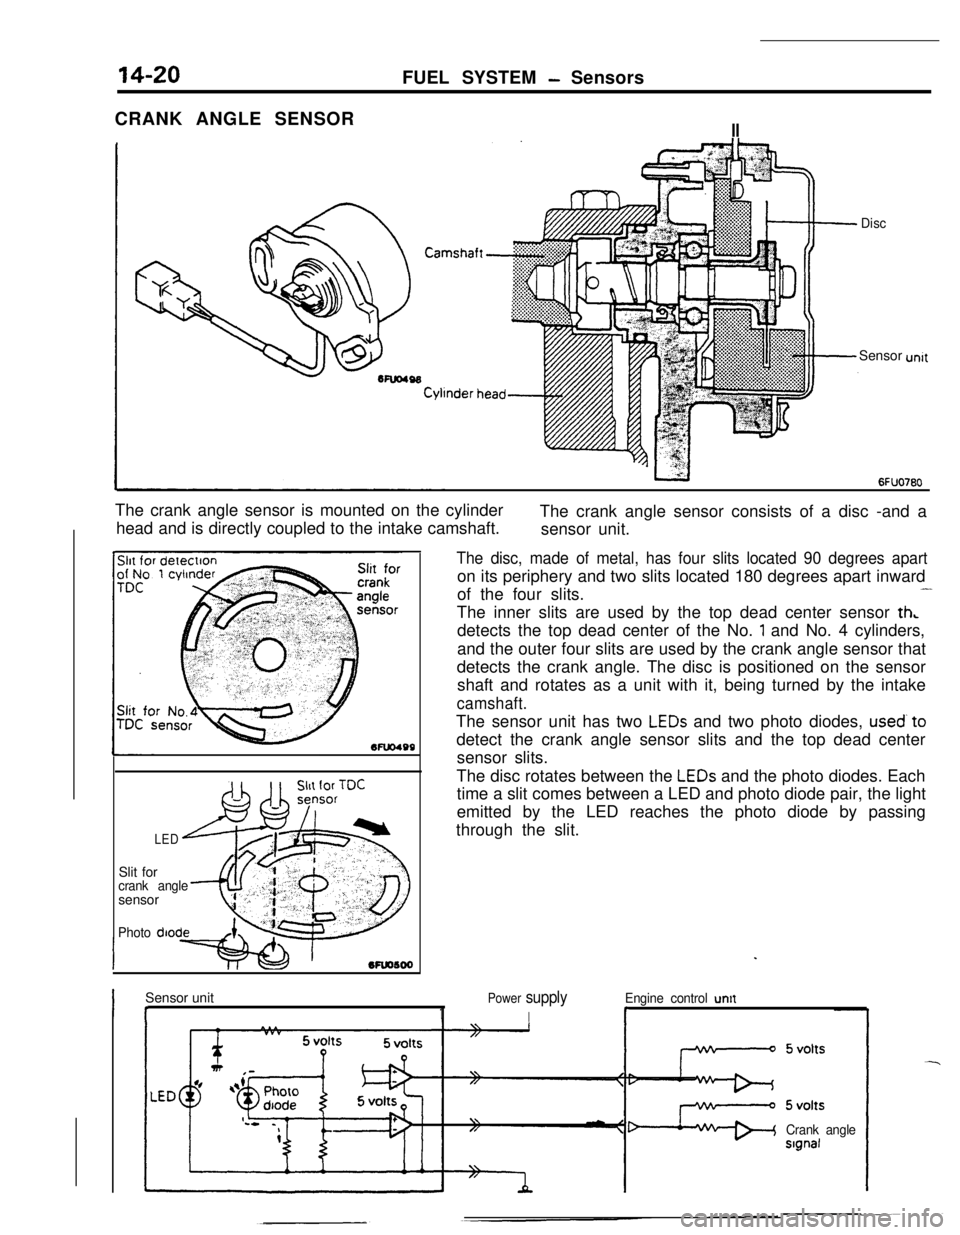
The crank angle sensor is mounted on the cylinder
head and is directly coupled to the intake camshaft.The crank angle sensor consists of a disc -and a
sensor unit.
Mu0499Slit for
crank anglesensor
Photo diode
LED
The disc, made of metal, has four slits located 90 degrees aparton its periphery and two slits located 180 degrees apart inward
of the four slits.
-The inner slits are used by the top dead center sensor
th,detects the top dead center of the No.
1 and No. 4 cylinders,
and the outer four slits are used by the crank angle sensor that
detects the crank angle. The disc is positioned on the sensor
shaft and rotates as a unit with it, being turned by the intake
camshaft.The sensor unit has two
LEDs and two photo diodes, used’to
detect the crank angle sensor slits and the top dead center
sensor slits.
The disc rotates between the
LEDs and the photo diodes. Each
time a slit comes between a LED and photo diode pair, the light
emitted by the LED reaches the photo diode by passing
through the slit.
Sensor unit
I I1
Power supply
I
Engine control untt
r
Crank angleslgnal
Page 133 of 391
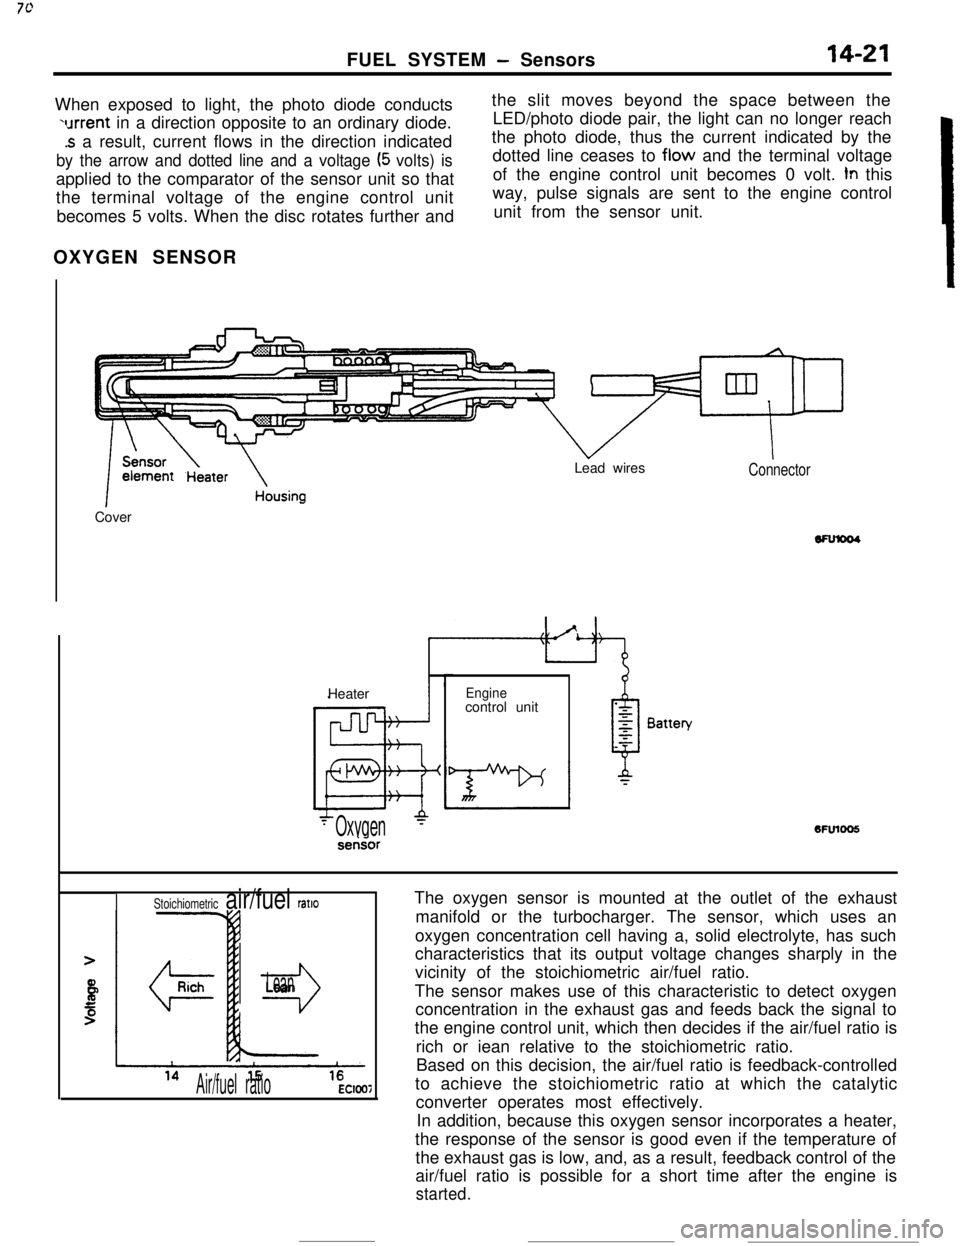
FUEL SYSTEM - Sensors14-21When exposed to light, the photo diode conducts
urrent in a direction opposite to an ordinary diode.
.s a result, current flows in the direction indicated
by the arrow and dotted line and a voltage (5 volts) isapplied to the comparator of the sensor unit so that
the terminal voltage of the engine control unit
becomes 5 volts. When the disc rotates further andthe slit moves beyond the space between the
LED/photo diode pair, the light can no longer reach
the photo diode, thus the current indicated by the
dotted line ceases to flow and the terminal voltage
of the engine control unit becomes 0 volt.
tn this
way, pulse signals are sent to the engine control
unit from the sensor unit.
OXYGEN SENSOR
k
1 ~~~~t13ate~ousingCoverLead wiresConnectorHeater
Enginecontrol unit6FUlOO5
- Oxygen‘-serisor
The oxygen sensor is mounted at the outlet of the exhaust
manifold or the turbocharger. The sensor, which uses an
oxygen concentration cell having a, solid electrolyte, has such
characteristics that its output voltage changes sharply in the
vicinity of the stoichiometric air/fuel ratio.
The sensor makes use of this characteristic to detect oxygen
concentration in the exhaust gas and feeds back the signal to
the engine control unit, which then decides if the air/fuel ratio is
rich or iean relative to the stoichiometric ratio.
Based on this decision, the air/fuel ratio is feedback-controlled
to achieve the stoichiometric ratio at which the catalytic
converter operates most effectively.
In addition, because this oxygen sensor incorporates a heater,
the response of the sensor is good even if the temperature of
the exhaust gas is low, and, as a result, feedback control of the
air/fuel ratio is possible for a short time after the engine is
started.
Stoichiometric air/fuel ratlo
r3
Lean
Air/fuel ratioEC1007
Page 140 of 391

---_-
14-28FUEL SYSTEM- Ennine Control Unit
The engine control unit has an
onboard diagnosis
function, which is used mainly to diagnose the
sensors, thus facilitating system checks and troub-leshooting. It also has a fail-safe/backup function tc
ensure passenger and vehicle safety.
Onboard self-
diagnosisMainly for detecting failure of sensors
and foroutputting diagnosis code.
for detecting failure of sensors, etc. related
toemission control and to turn ON warning light
(Malfunction indicator light).
> Codes can be read by voltmeter.
ENGINE CHECK light is turned
2 ON.
The engine control unit is mounted in the passenger compart-
ment, at the location indicated in the illustration.,
Page 141 of 391
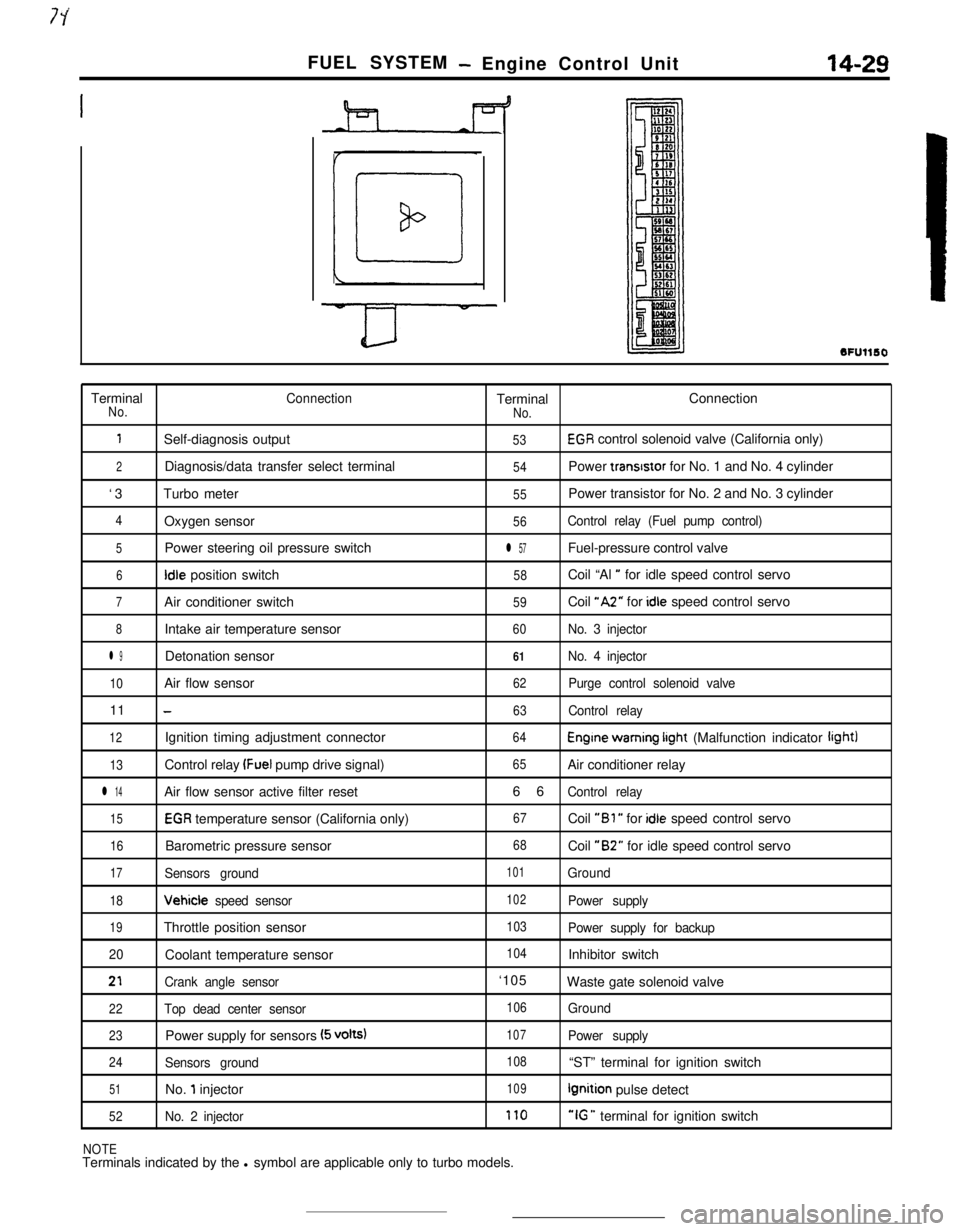
FUEL SYSTEM- Engine Control Unit14-29
SFUllSOTerminal
ConnectionTerminalConnectionNo.
No.
1Self-diagnosis output53EGR control solenoid valve (California only)
2Diagnosis/data transfer select terminal54Power transrstor for No. 1 and No. 4 cylinder
‘3Turbo meter
55Power transistor for No. 2 and No. 3 cylinder
4Oxygen sensor56Control relay (Fuel pump control)
5Power steering oil pressure switchl 57Fuel-pressure control valve
6Idle position switch58Coil “Al ” for idle speed control servo
7Air conditioner switch59Coil “A2” for idle speed control servo
8Intake air temperature sensor60No. 3 injector
l 9Detonation sensor61No. 4 injector
10Air flow sensor62Purge control solenoid valve11
-63Control relay
12Ignition timing adjustment connector64Engine warning irght (Malfunction indicator light)
13Control relay (Fuel pump drive signal)65Air conditioner relay
l 14Air flow sensor active filter reset66Control relay
15EGR temperature sensor (California only)67Coil “Bl ” for idle speed control servo
16Barometric pressure sensor68Coil “B2” for idle speed control servo
17Sensors ground101Ground
18Vehicle speed sensor102Power supply
19Throttle position sensor103Power supply for backup
20Coolant temperature sensor
104Inhibitor switch
21Crank angle sensor‘105
Waste gate solenoid valve
22Top dead center sensor106Ground
23Power supply for sensors (5 volts)107Power supply
24Sensors ground108“ST” terminal for ignition switch
51No. 1 injector109Ignition pulse detect
52No. 2 injector170“IG ” terminal for ignition switch
NOTETerminals indicated by the l symbol are applicable only to turbo models.
Page 142 of 391
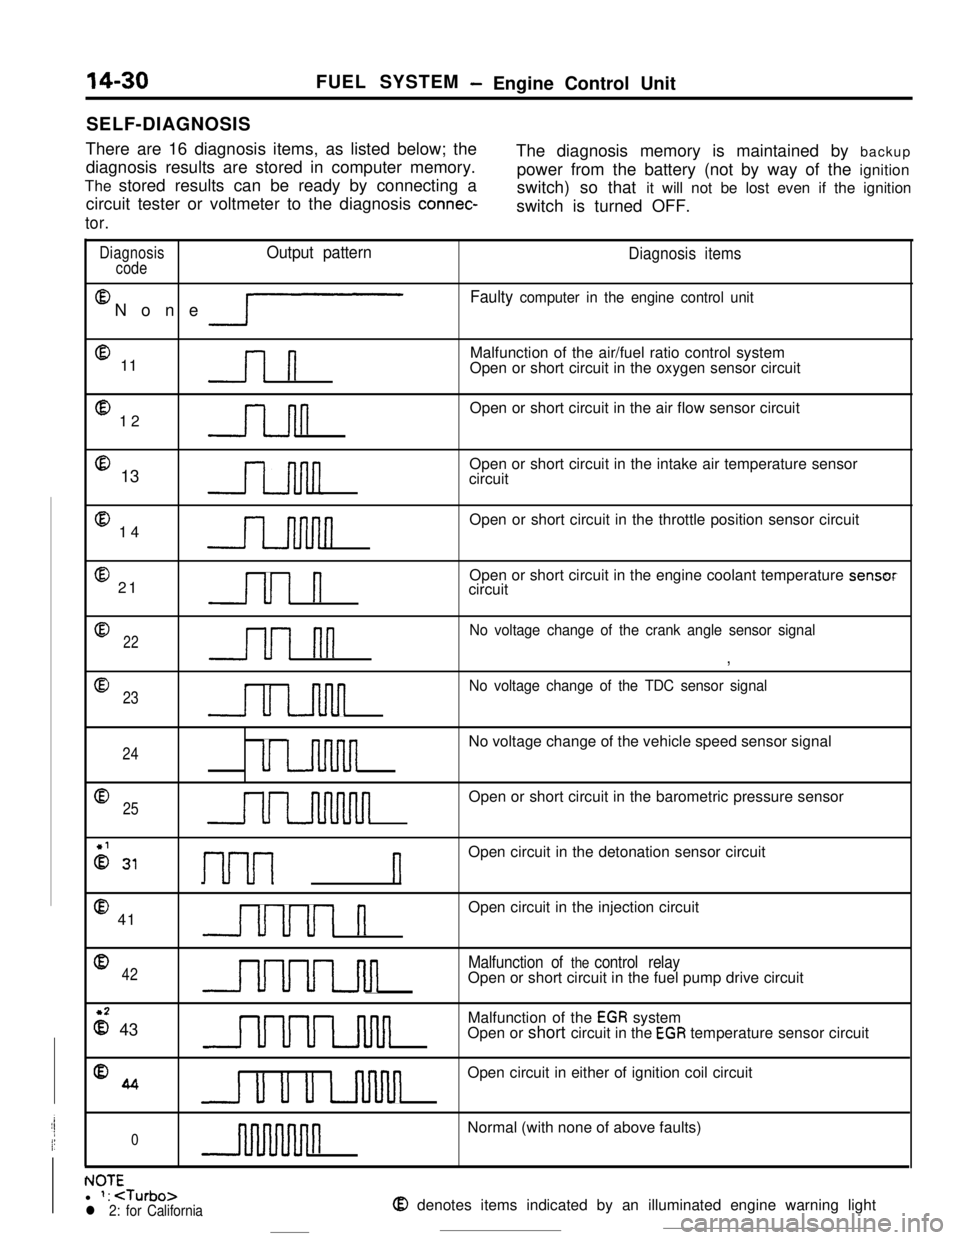
14-30SELF-DIAGNOSISFUEL SYSTEM- Engine Control Unit
There are 16 diagnosis items, as listed below; the
diagnosis results are stored in computer memory.The diagnosis memory is maintained by backup
The stored results can be ready by connecting apower from the battery (not by way of the ignition
circuit tester or voltmeter to the diagnosis
connec-switch) so that it will not be lost even if the ignition
switch is turned OFF.
tor.
DiagnosisOutput pattern
codeEl
None
lP
@ 11l-l
@ 12n@ 13
@ 14
@ 21Ul n
Diagnosis items
Faulty computer in the engine control unitMalfunction of the air/fuel ratio control system
Open or short circuit in the oxygen sensor circuit
Open or short circuit in the air flow sensor circuit
Open or short circuit in the intake air temperature sensor
circuit
Open or short circuit in the throttle position sensor circuit
Open or short circuit in the engine coolant temperature sensor
circuit
022u1 nn
No voltage change of the crank angle sensor signal
,
@
23
u u-inn
No voltage change of the TDC sensor signal
24uu-uvinnnnNo voltage change of the vehicle speed sensor signal
Q25uuuuuunnnnnOpen or short circuit in the barometric pressure sensor
2 31I-~-~---~ nOpen circuit in the detonation sensor circuit
@ 41uuul nOpen circuit in the injection circuit
042UUuLJul
Malfunction of the control relayOpen or short circuit in the fuel pump drive circuit
z 43UUULnlulMalfunction of the
EGR system
Open or short circuit in the EGR temperature sensor circuit
%4u u u uvinnOpen circuit in either of ignition coil circuit
0nNormal (with none of above faults)
. IA-r-NUltl 1:
Page 143 of 391
FUEL SYSTEM - Engine Control Unit14-31
r
L
IMPI
Ground
1 Engine control unit
Engine wam-
$b?Stionindicator
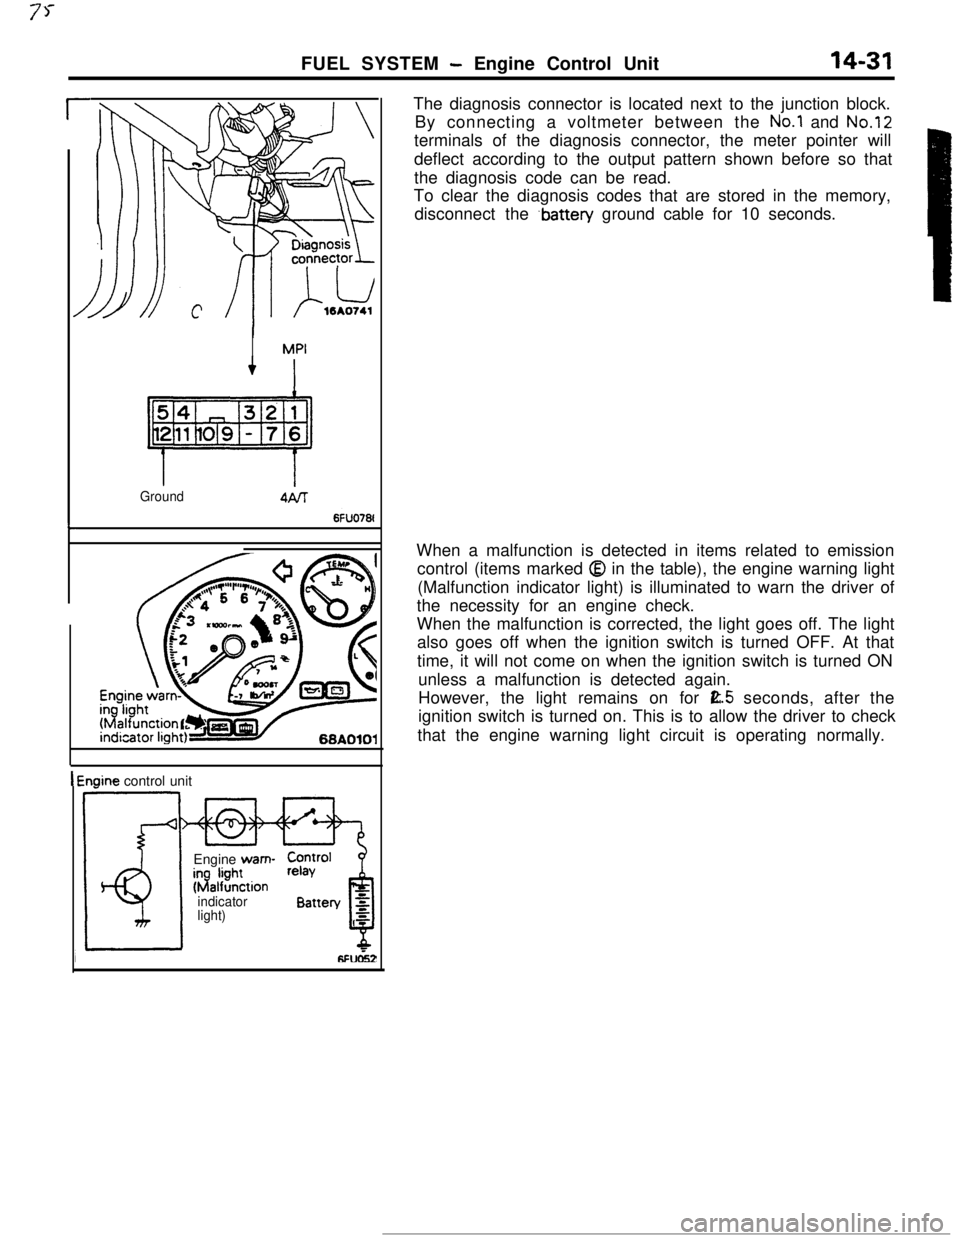
light)The diagnosis connector is located next to the junction block.
By connecting a voltmeter between the
No.1 and No.12terminals of the diagnosis connector, the meter pointer will
deflect according to the output pattern shown before so that
the diagnosis code can be read.
To clear the diagnosis codes that are stored in the memory,
disconnect the
.battery ground cable for 10 seconds.
When a malfunction is detected in items related to emission
control (items marked
Q in the table), the engine warning light
(Malfunction indicator light) is illuminated to warn the driver of
the necessity for an engine check.
When the malfunction is corrected, the light goes off. The light
also goes off when the ignition switch is turned OFF. At that
time, it will not come on when the ignition switch is turned ON
unless a malfunction is detected again.
However, the light remains on for
E.5 seconds, after the
ignition switch is turned on. This is to allow the driver to check
that the engine warning light circuit is operating normally.
Page 144 of 391
__.-~-..- -
FUEL SYSTEM- Ermine Control Unit
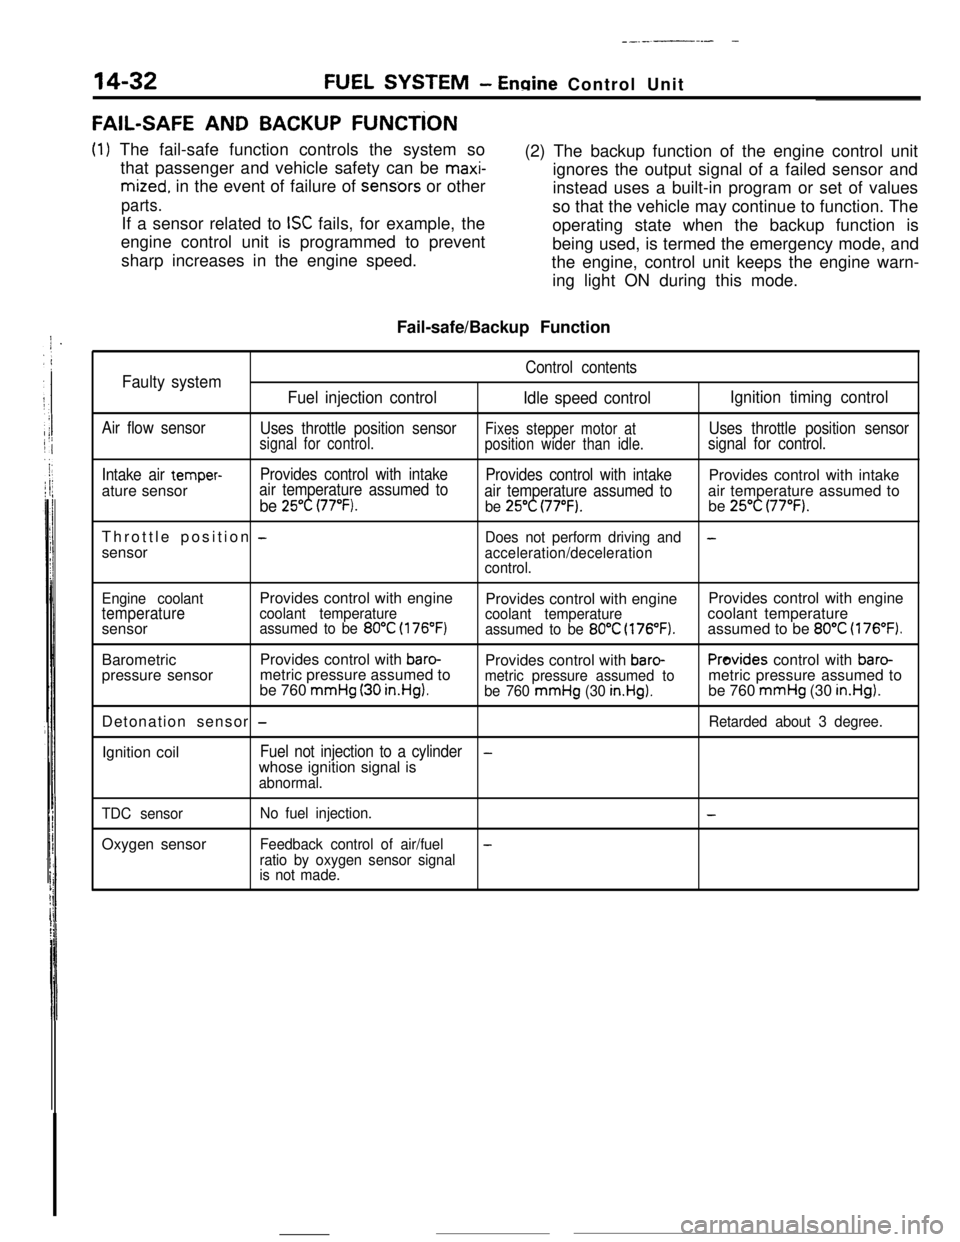
FAIL-SAFE AND BACKUP FUNCTiON
(1) The fail-safe function controls the system so
that passenger and vehicle safety can be
maxi-
mized. in the event of failure of sens.ors or other
parts.If a sensor related to
ISC fails, for example, the
engine control unit is programmed to prevent
sharp increases in the engine speed.(2) The backup function of the engine control unit
ignores the output signal of a failed sensor and
instead uses a built-in program or set of values
so that the vehicle may continue to function. The
operating state when the backup function is
being used, is termed the emergency mode, and
the engine, control unit keeps the engine warn-
ing light ON during this mode.
Fail-safe/Backup Function
Control contentsFaulty system
Fuel injection control
Idle speed controlIgnition timing control
Air flow sensor
Uses throttle position sensorFixes stepper motor atUses throttle position sensorsignal for control.
position wider than idle.signal for control.
Intake air
temper-Provides control with intake
Provides control with intakeProvides control with intake
ature sensorair temperature assumed to
be 25°C (77°F).air temperature assumed toair temperature assumed tobe 25°C (77°F).be 25°C (77°F).Throttle position
-Does not perform driving and-sensor
acceleration/deceleration
control.
Engine coolantProvides control with engine
Provides control with engineProvides control with engine
temperaturecoolant temperature
coolant temperaturecoolant temperature
sensorassumed to be 80°C (176°F)assumed to be 80°C (176°F).assumed to be 80°C (176°F).BarometricProvides control with
baro-Provides control with baro-Provides control with baro-pressure sensormetric pressure assumed to
be 760
mmHg (30 in.HgI.metric pressure assumed tometric pressure assumed tobe 760 mmHg (30 in.Hg).be 760 mmHg (30 in.Hg).Detonation sensor
-Retarded about 3 degree.Ignition coil
Fuel not injection to a cylinder-whose ignition signal is
abnormal.
TDC sensorOxygen sensor
No fuel injection.-
Feedback control of air/fuel-
ratio by oxygen sensor signal
is not made.
Page 171 of 391
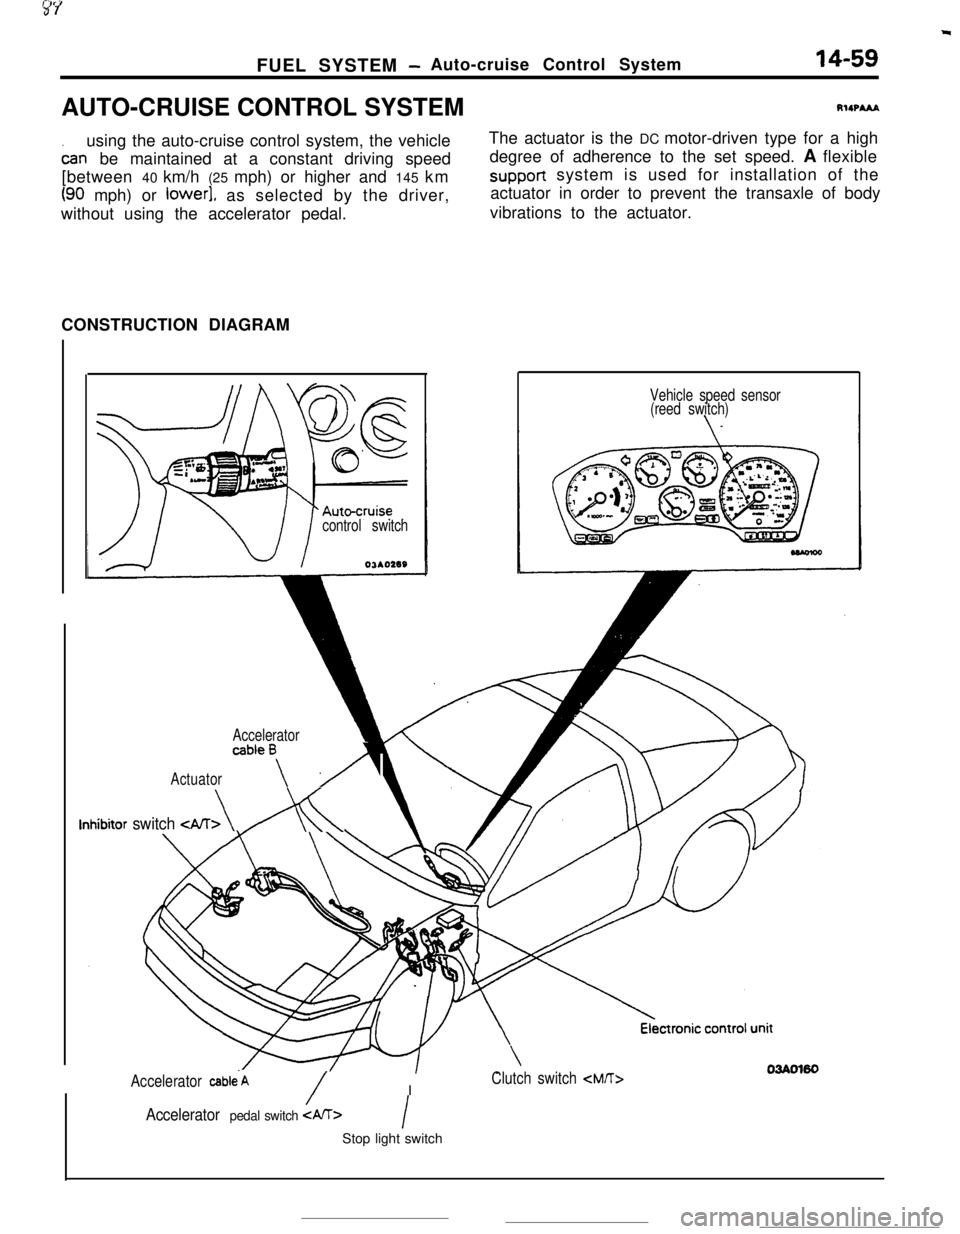
FUEL SYSTEM -Auto-cruise Control System14-59AUTO-CRUISE CONTROL SYSTEMRIIPA&A
using the auto-cruise control system, the vehicle
oar-rbe maintained at a constant driving speed
[between 40 km/h (25 mph) or higher and 145 km
(90 mph) or lower], as selected by the driver,
without using the accelerator pedal.The actuator is the DC motor-driven type for a high
degree of adherence to the set speed. A flexiblesupport system is used for installation of the
actuator in order to prevent the transaxle of body
vibrations to the actuator.
CONSTRUCTION DIAGRAM
control switchOJAO2SS
Accelerator
Actuator
ab’ea\ A
Inhibitor switch
(reed switch)
Accelerator cab1e.A/IClutch switch
/Accelerator pedal switch IStop light switch