brake fluid MITSUBISHI ECLIPSE 1993 Workshop Manual
[x] Cancel search | Manufacturer: MITSUBISHI, Model Year: 1993, Model line: ECLIPSE, Model: MITSUBISHI ECLIPSE 1993Pages: 57, PDF Size: 4.18 MB
Page 3 of 57
BRAKES
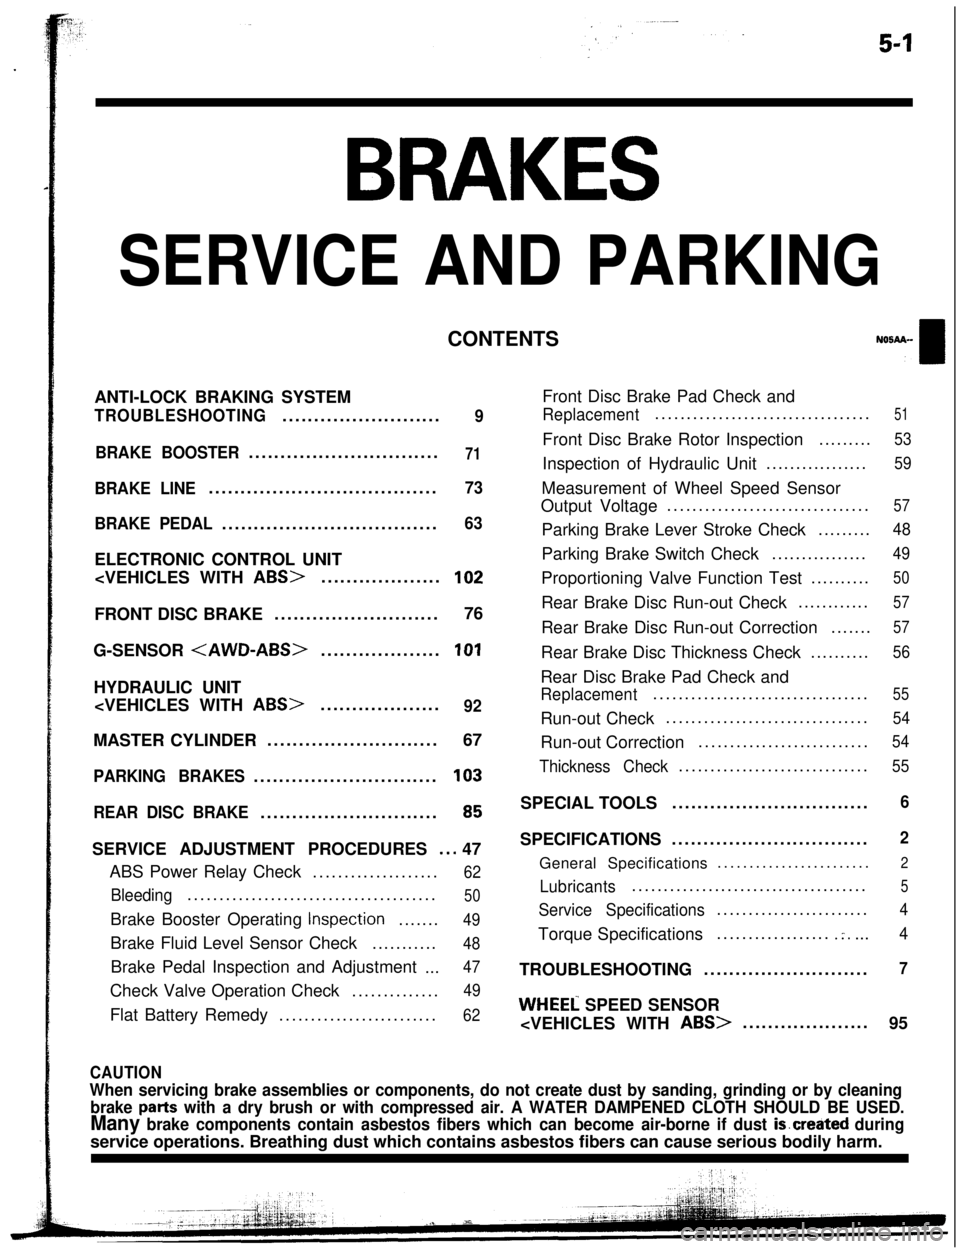
SERVICE AND PARKINGCONTENTS
ANTI-LOCK BRAKING SYSTEM
TROUBLESHOOTING.........................9
BRAKE BOOSTER..............................
71
BRAKE LINE....................................73
BRAKE PEDAL..................................
63ELECTRONIC CONTROL UNIT
G-SENSOR
PARKING BRAKES.............................103
REAR DISC BRAKE............................
65SERVICE ADJUSTMENT PROCEDURES
..a 47
ABS Power Relay Check....................
62
Bleeding.......................................50Brake Booster Operating
Inspection.......49Brake Fluid Level Sensor Check...........
48Brake Pedal Inspection and Adjustment
...
47Check Valve Operation Check..............
49Flat Battery Remedy.........................
62Front Disc Brake Pad Check and
Replacement..................................51Front Disc Brake Rotor Inspection.........
53Inspection of Hydraulic Unit.................
59Measurement of Wheel Speed Sensor
Output Voltage................................
57Parking Brake Lever Stroke Check.........
48Parking Brake Switch Check................
49Proportioning Valve Function Test..........
50Rear Brake Disc Run-out Check............
57Rear Brake Disc Run-out Correction.......
57Rear Brake Disc Thickness Check..........
56Rear Disc Brake Pad Check and
Replacement..................................55Run-out Check................................
54Run-out Correction...........................
54
Thickness Check..............................55SPECIAL TOOLS...............................
6SPECIFICATIONS...............................
2General Specifications........................
2
Lubricants.....................................5
Service Specifications........................4Torque Specifications..................
.:....4TROUBLESHOOTING..........................
7
WHEEL SPEED SENSOR
95
CAUTION
When servicing brake assemblies or components, do not create dust by sanding, grinding or by cleaning
brake
parts with a dry brush or with compressed air. A WATER DAMPENED CLOTH SHOULD BE USED.
Many brake components contain asbestos fibers which can become air-borne if dust is.created duringservice operations. Breathing dust which contains asbestos fibers can cause serious bodily harm.
Page 7 of 57
-
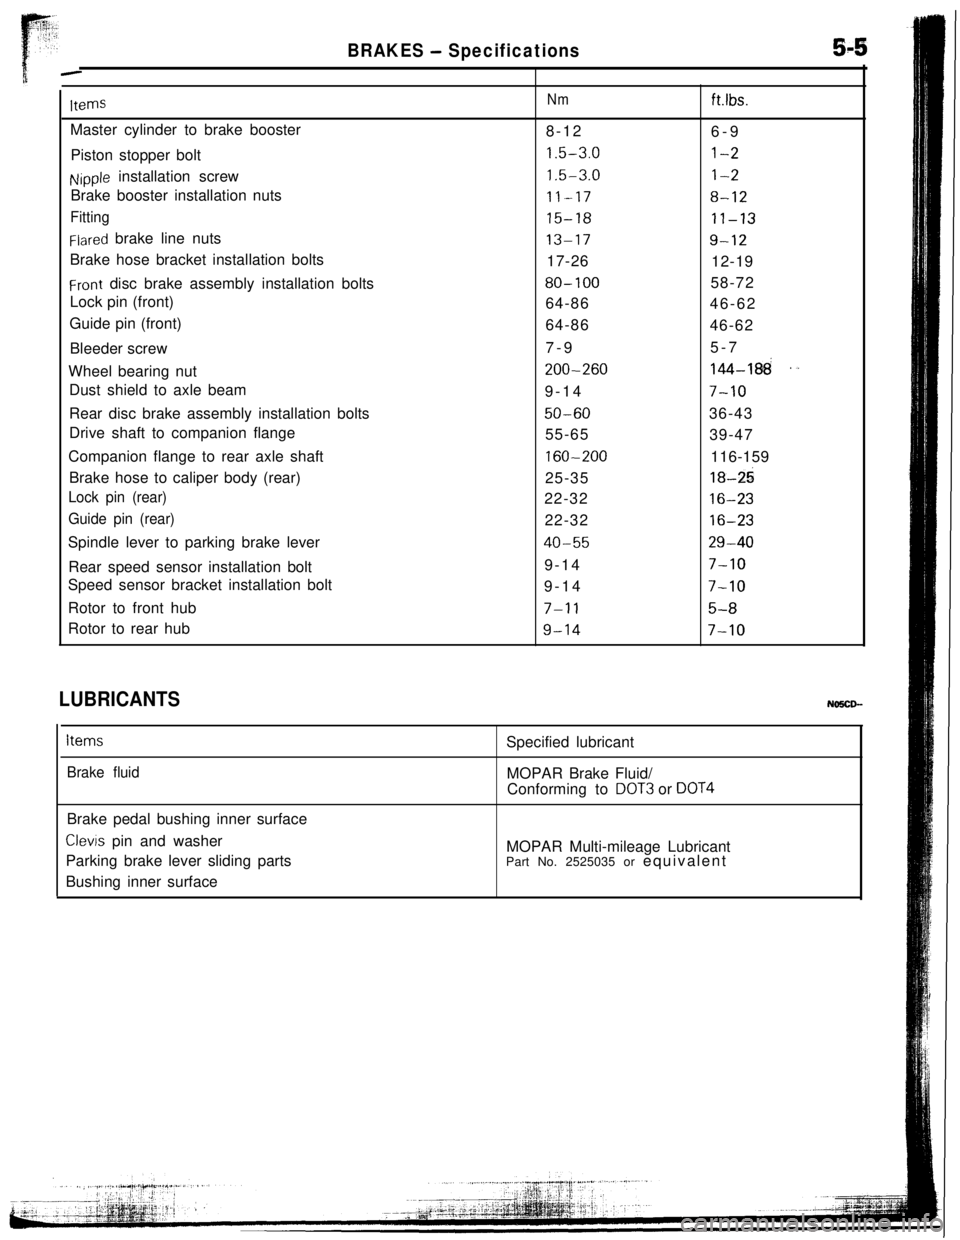
BRAKES - Specifications
ItemsMaster cylinder to brake booster
Piston stopper bolt
Nipple installation screw
Brake booster installation nuts
Fitting
Flared brake line nuts
Brake hose bracket installation bolts
Front disc brake assembly installation bolts
Lock pin (front)
Guide pin (front)
Bleeder screw
Wheel bearing nut
Dust shield to axle beam
Rear disc brake assembly installation bolts
Drive shaft to companion flange
Companion flange to rear axle shaft
Brake hose to caliper body (rear)
Lock pin (rear)
Guide pin (rear)Spindle lever to parking brake lever
Rear speed sensor installation bolt
Speed sensor bracket installation bolt
Rotor to front hub
Rotor to rear hub
Nm8-12
1.5-3.0
1.5-3.0
11-17
15-18
13-1717-26
80-10064-86
64-86
7-9
200-2609-14
50-6055-65
160-20025-35
22-32
22-32
40-559-14
9-14
7-l 1
9-14
ft.lbs.6-9
l-2
l-2
8-12
11-13
9-1212-19
58-72
46-62
46-62
5-7
144-188”
7-1036-43
39-47
116-159
18-25
16-23
16-23
29-40
7-10
7-10
5-a
7-10
LUBRICANTSNo!xD-
Items
Brake fluidSpecified lubricant
MOPAR Brake Fluid/
Conforming to
DOT3 or DOT4Brake pedal bushing inner surface
Clevls pin and washer
Parking brake lever sliding parts
Bushing inner surfaceMOPAR Multi-mileage Lubricant
Part No. 2525035 or equivalent
Page 8 of 57
5-50BRAKES - Service Adjustment Proi?edur&
Brakebooster
sideSpring
’
/
Valve
Pressure
gaugePressure
PropGtioning valve14LO181input pressure
14uoo55
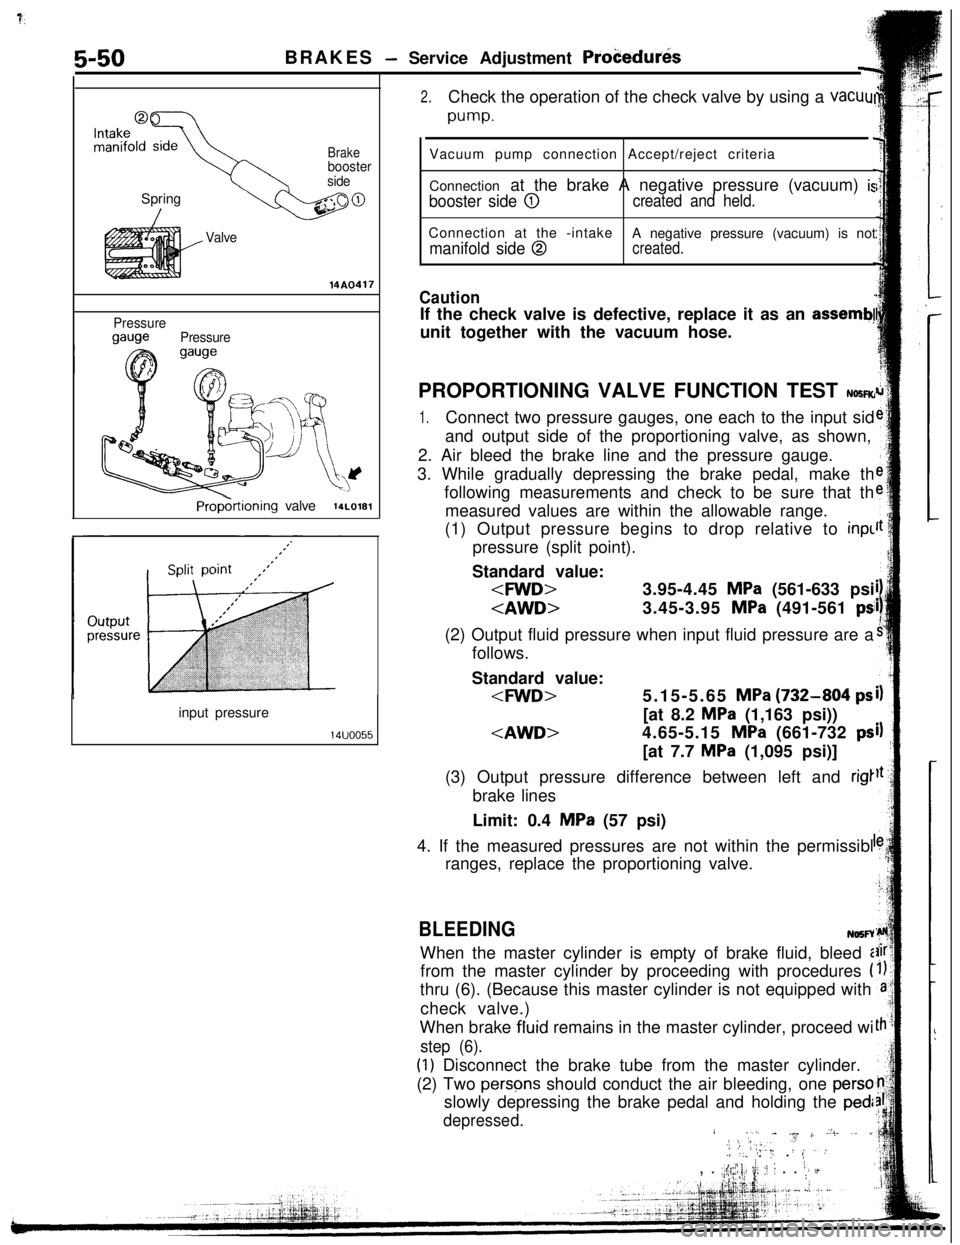
2.Check the operation of the check valve by using a vacuul
pump.Vacuum pump connection Accept/reject criteria
Connection at the brake A negative pressure (vacuum)
is
booster side @created and held.Connection at the -intake
manifold side @A negative pressure (vacuum) is notcreated.
CautionIf the check valve is defective, replace it as an
assemb!unit together with the vacuum hose.
PROPORTIONING VALVE FUNCTION TEST
NO!iR(r
1.Connect two pressure gauges, one each to the input sid
and output side of the proportioning valve, as shown,
2. Air bleed the brake line and the pressure gauge.
3. While gradually depressing the brake pedal, make th
following measurements and check to be sure that th
measured values are within the allowable range.
(1) Output pressure begins to drop relative to inpl
pressure (split point).
Standard value:
follows.
Standard value:
MPa (1,163 psi))
MPa (1,095 psi)]
(3) Output pressure difference between left and
rig1brake lines
Limit: 0.4
MPa (57 psi)
4. If the measured pressures are not within the permissibl
ranges, replace the proportioning valve.
BLEEDINGNo5FYWhen the master cylinder is empty of brake fluid, bleed i
from the master cylinder by proceeding with procedures
(thru (6). (Because this master cylinder is not equipped with
check valve.)
When brake fluid remains in the master cylinder, proceed wi
step (6).
(1) Disconnect the brake tube from the master cylinder.
(2) Two
persqs should conduct the air bleeding, one persoslowly depressing the brake pedal and holding the
ped:
depressed.i .I..[ j,‘I- .~ j, Z’:. ~. jl2;:‘,.Y .‘.:./ ‘:” ‘: ,, . 8,, .
.;$y; ii; :: 1 . . i;, d
Page 9 of 57
BRAKES - Service Adjustment Procedures5-51
2314A0454When new
When worn14G0017
1
14 LO169check the sliding coWsTm~3..“.W% ,Y :sleeve and guide pin-~I ._. ;;:i ‘.(3) In this condition, the other person should use a finger to
close the outlet part of the, master cylinder, and then the
first person should release the brake pedal.
(4) Steps (2) and (3) should be repeated three or four times,
and then the master cylinder should be filled with brake
fluid to the specified level.
NOTE
The air is completely bled from the master cylinder by steps
(1) to (4).
(5) Connect the brake tube to the master cylinder.
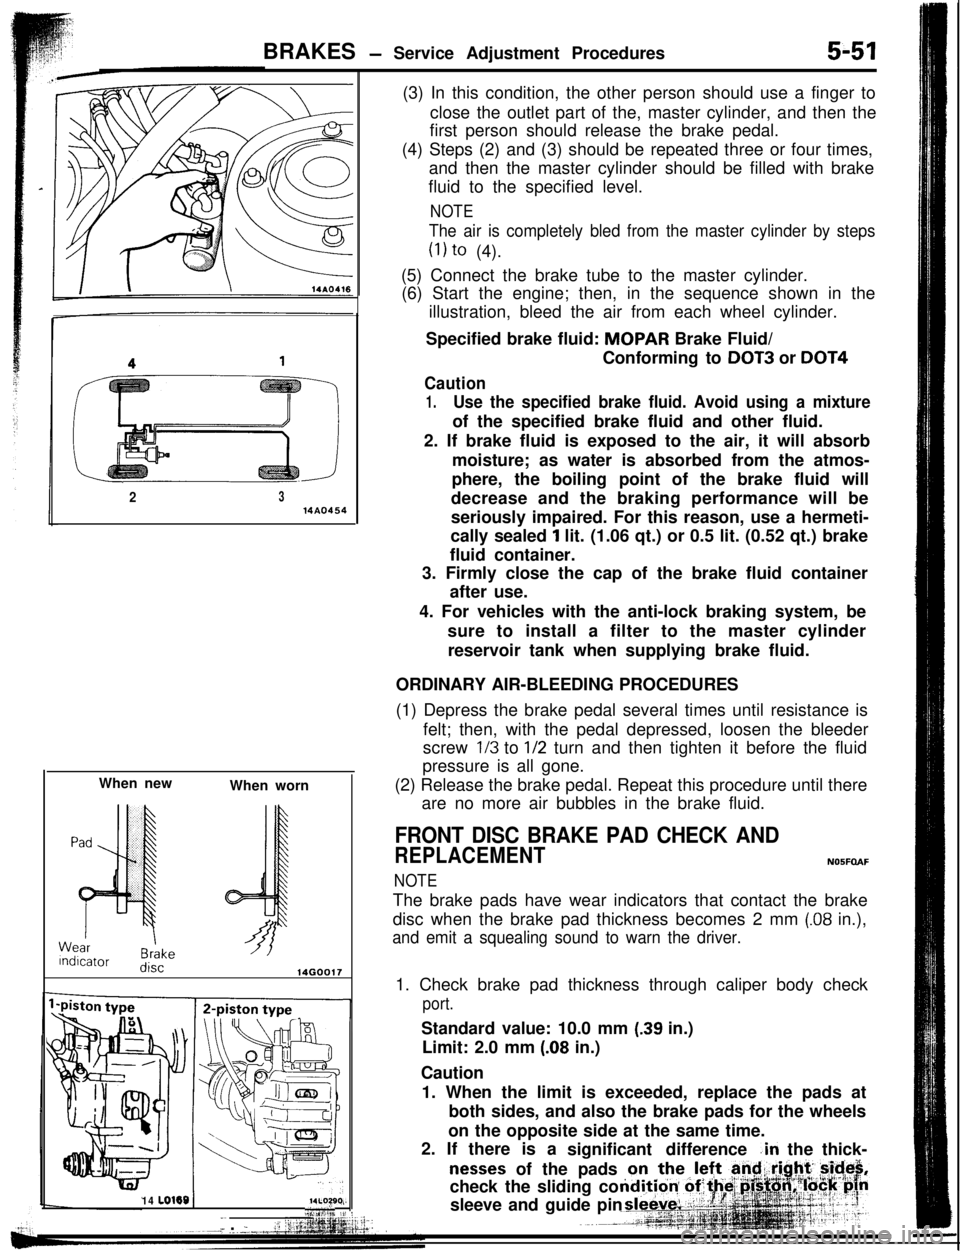
(6) Start the engine; then, in the sequence shown in the
illustration, bleed the air from each wheel cylinder.
Specified brake fluid: MOPAR Brake Fluid/
Conforming to
DOT3 or DOT4
Caution
1.Use the specified brake fluid. Avoid using a mixtureof the specified brake fluid and other fluid.
2. If brake fluid is exposed to the air, it will absorb
moisture; as water is absorbed from the atmos-
phere, the boiling point of the brake fluid will
decrease and the braking performance will be
seriously impaired. For this reason, use a hermeti-
cally sealed
1 lit. (1.06 qt.) or 0.5 lit. (0.52 qt.) brake
fluid container.
3. Firmly close the cap of the brake fluid container
after use.
4. For vehicles with the anti-lock braking system, be
sure to install a filter to the master cylinder
reservoir tank when supplying brake fluid.
ORDINARY AIR-BLEEDING PROCEDURES
(1) Depress the brake pedal several times until resistance is
felt; then, with the pedal depressed, loosen the bleeder
screw
l/3 to l/2 turn and then tighten it before the fluid
pressure is all gone.
(2) Release the brake pedal. Repeat this procedure until there
are no more air bubbles in the brake fluid.
FRONT DISC BRAKE PAD CHECK AND
REPLACEMENTN05FOAF
NOTEThe brake pads have wear indicators that contact the brake
disc when the brake pad thickness becomes 2 mm
(.08 in.),
and emit a squealing sound to warn the driver.1. Check brake pad thickness through caliper body check
port.Standard value: 10.0 mm
(.39 in.)
Limit: 2.0 mm
(.08 in.)
Caution
1. When the limit is exceeded, replace the pads at
both sides, and also the brake pads for the wheels
on the opposite side at the same time.
2. If there is a
significant difference
.in the thick-
nesses of the pads
Page 15 of 57
N0sJa
4LVI
:e the
cuu<
‘=JD4\
;HER
and
!htly.
Wg
CK3a
nd
3ly
he
P.BRAKES
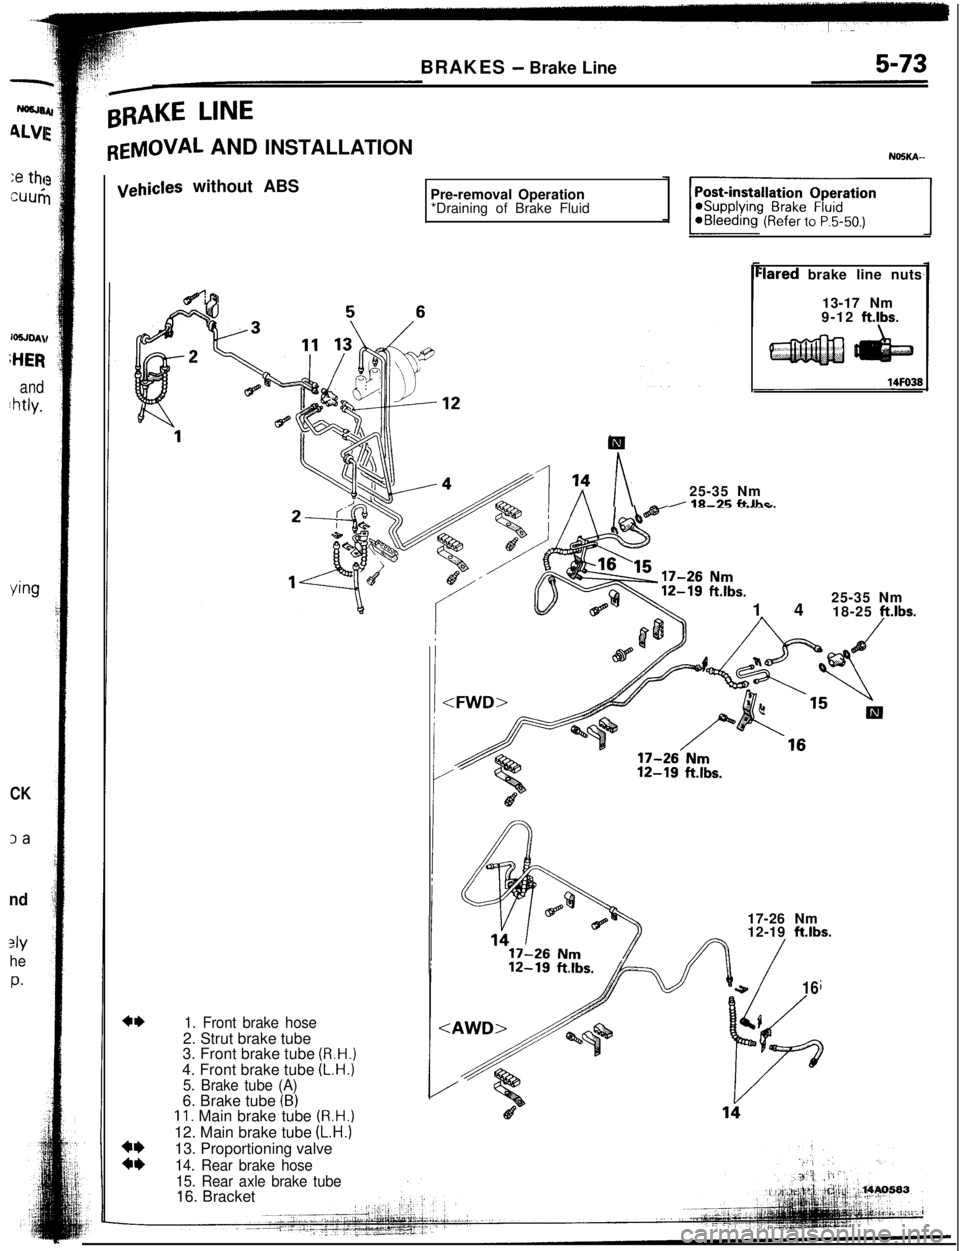
- Brake Line
BRAKE LINE
REMOVAL AND INSTALLATIONNOSKA--
1. Front brake hose2. Strut brake tube
3. Front brake tube
(R.H.)4. Front brake tube
(L.H.)5. Brake tube (A)6. Brake tube (B)11. Main brake tube (R.H.)12. Main brake tube
(L.H.)13. Proportioning valve
14. Rear brake hose
15. Rear axle brake tube
._-
Ill
n25-35 NmI 111-7G f-t Ihr:lared brake line nuts
13-17 Nm
9-12
ftlbs.
vehicles without ABS
Pre-removal Operation
*Draining of Brake Fluid
1425-35 Nm
18-25
ft.lbs.17-26 Nm
12-19
ft.lbs.
+1616. Bracket
Page 16 of 57
a-.
i.-J
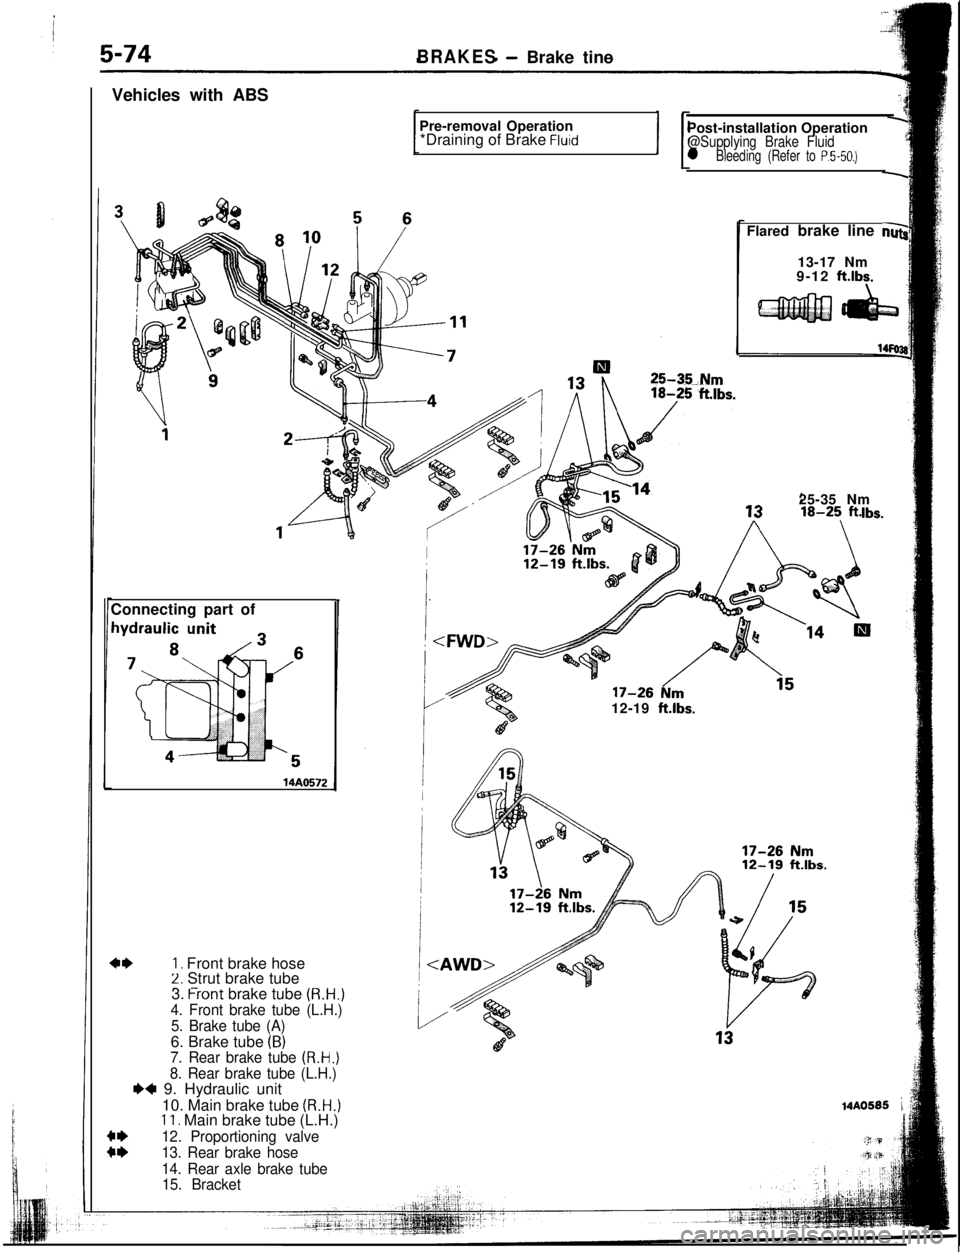
5-74BRAKES- Brake tine
Vehicles with ABS
Pre-removal Operation
*Draining of Brake
Fluid
,“iPost-installation OperationA
@Supplying Brake Fluid1
l Bleeding (Refer to P.5-50.)
-Connecting part of
14AO572
I. Front brake hose2. Strut brake tube- -25-35 Nm
Ibs.12-19
ft.lbs.Flared brake line
ns13-17 Nm
9-12
ftlbs.
15. Bracket3.
f-ront brake tube (R.H.)
4. Front brake tube (L.H.)
5. Brake tube (A)6. Brake tube
(B)7. Rear brake tube (R.H.)
8. Rear brake tube (L.H.)I)+ 9. Hydraulic unit
10. Main brake tube
(R.H.)11. Main brake tube (L.H.)
::
12. Proportioning valve
13. Rear brake hose
14. Rear axle brake tube
14AO585 ;
Page 18 of 57
! -;-596
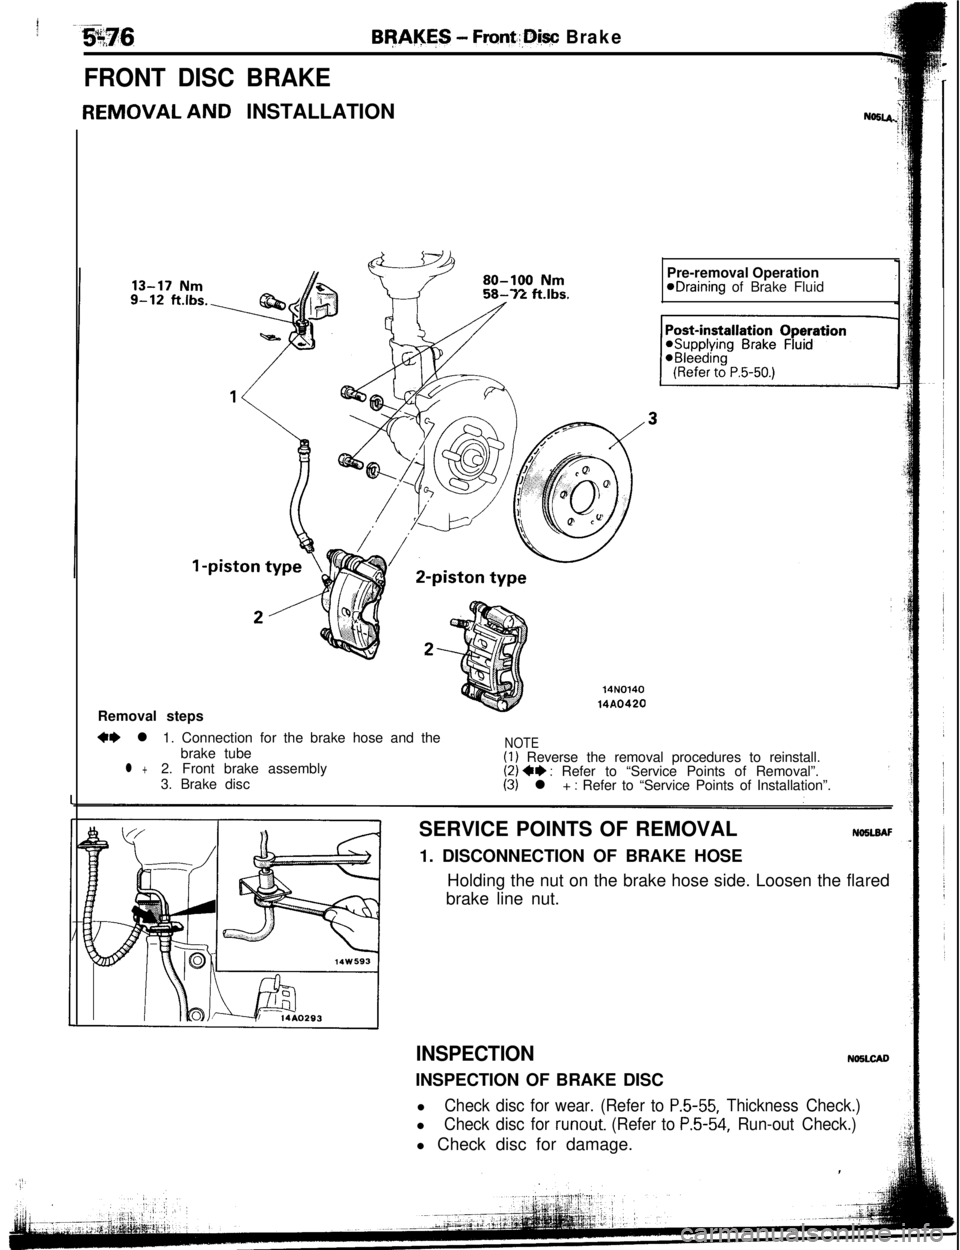
FRONT DISC BRAKE
Bf?Al$ES - Front.:,Diw Brake
REMOVAL AND INSTALLATIONN=U.
3U- IL l-LIDS.Y-i A
14N014014A0420Pre-removal Operation
eDraining of Brake Fluid
Removal steps
+e l1. Connection for the brake hose and the
brake tubeNOTE
l +2. Front brake assembly(1) Reverse the removal procedures to reinstall.
3. Brake disc(2) ++ : Refer to “Service Points of Removal”.(3) l + : Refer to “Service Points of Installation”.
SERVICE POINTS OF REMOVAL
No5LsAF1. DISCONNECTION OF BRAKE HOSE
Holding the nut on the brake hose side. Loosen the flared
brake line nut.
INSPECTIONNNiLCIDINSPECTION OF BRAKE DISC
l
Check disc for wear. (Refer to P.5-55, Thickness Check.)l
Check disc for runout. (Refer to P.5-54, Run-out Check.)l Check disc for damage.
Page 21 of 57
Boot. ring14KO541460054L
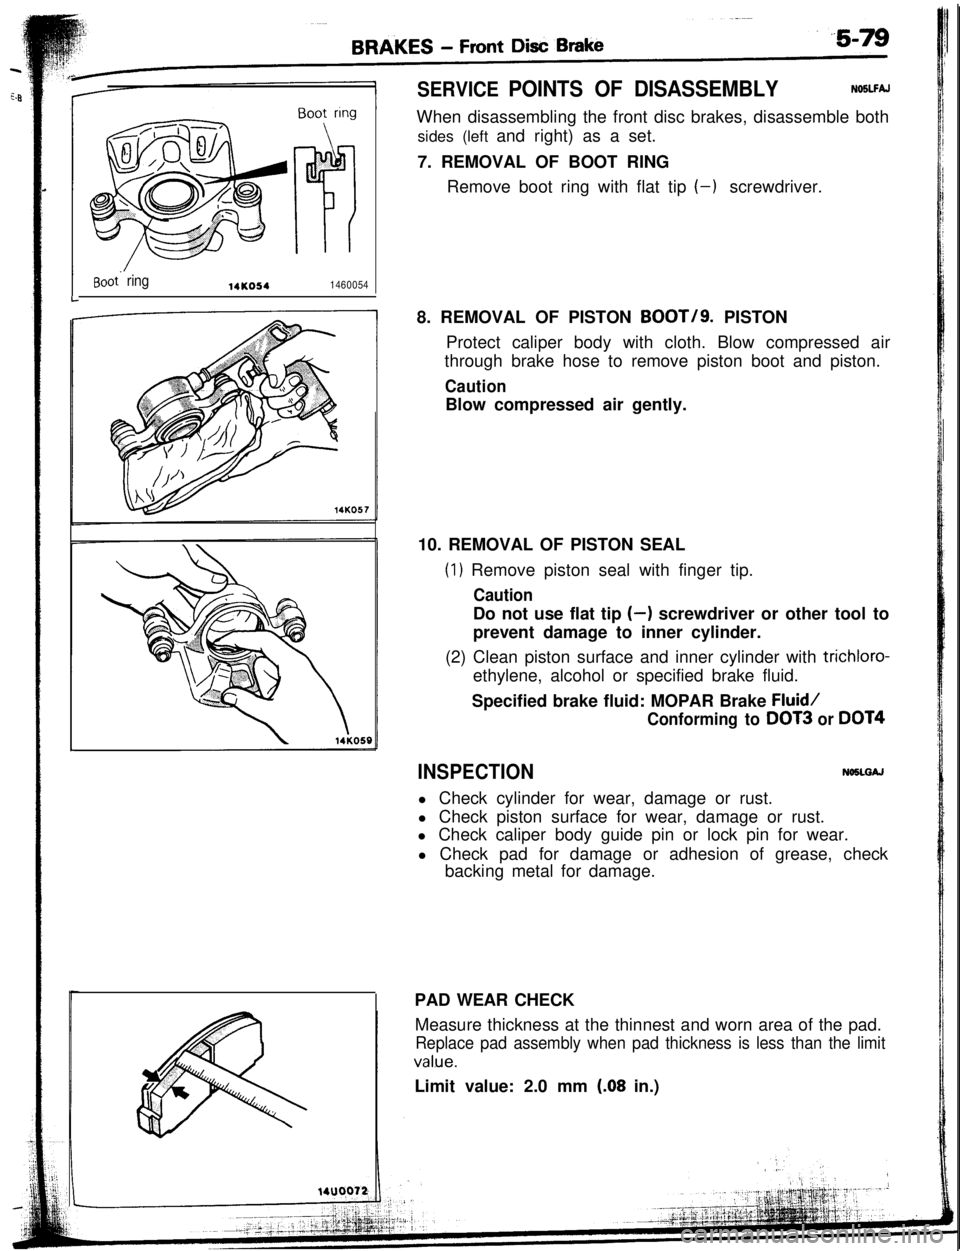
SERVICE POINTS OF DISASSEMBLYNOSLFAJWhen disassembling the front disc brakes, disassemble both
sides (left and right) as a set.
7. REMOVAL OF BOOT RING
Remove boot ring with flat tip (-1 screwdriver.
8. REMOVAL OF PISTON BOOT/g. PISTON
Protect caliper body with cloth. Blow compressed air
through brake hose to remove piston boot and piston.
CautionBlow compressed air gently.
10. REMOVAL OF PISTON SEAL
(1) Remove piston seal with finger tip.
CautionDo not use flat tip
(-) screwdriver or other tool to
prevent damage to inner cylinder.
(2) Clean piston surface and inner cylinder with
trichloro-ethylene, alcohol or specified brake fluid.
Specified brake fluid: MOPAR Brake
Fluid/
Conforming to DOT3 or DOT4
INSPECTIONNOXGAJ
l Check cylinder for wear, damage or rust.
l Check piston surface for wear, damage or rust.
l Check caliper body guide pin or lock pin for wear.
l Check pad for damage or adhesion of grease, check
backing metal for damage.
PAD WEAR CHECK
Measure thickness at the thinnest and worn area of the pad.
Replace pad assembly when pad thickness is less than the limit
value.Limit value: 2.0 mm
(.08 in.)
Page 22 of 57
----aI’-I
5-80BRAKES - Front Disc Brake
I-
Pad and wear
indicator assemblyPad assembly
Grease14FOO97
14KOIQPiston boot
’14KO70
Grease
L
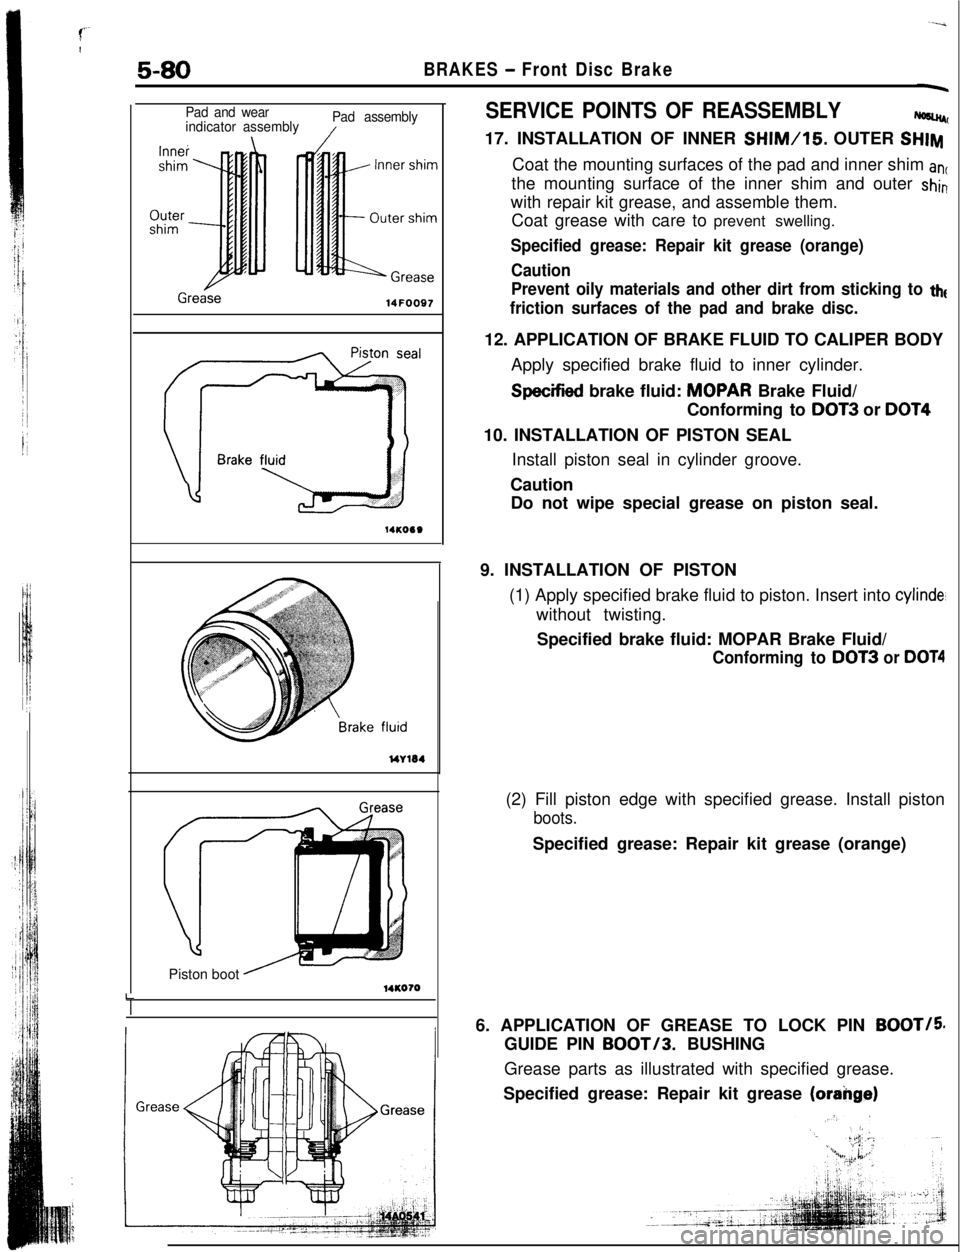
SERVICE POINTS OF REASSEMBLYWC17. INSTALLATION OF INNER
SHIM/15. OUTER SHIMCoat the mounting surfaces of the pad and inner shim
antthe mounting surface of the inner shim and outer
shinwith repair kit grease, and assemble them.
Coat grease with care to prevent swelling.
Specified grease: Repair kit grease (orange)
Caution
Prevent oily materials and other dirt from sticking to
tht
friction surfaces of the pad and brake disc.12. APPLICATION OF BRAKE FLUID TO CALIPER BODY
Apply specified brake fluid to inner cylinder.
Specified brake fluid: MDPAR Brake Fluid/
Conforming to DOT3 or
DOT410. INSTALLATION OF PISTON SEAL
Install piston seal in cylinder groove.
Caution
Do not wipe special grease on piston seal.
9. INSTALLATION OF PISTON
(1) Apply specified brake fluid to piston. Insert into
cylinde’without twisting.
Specified brake fluid: MOPAR Brake Fluid/
Conforming to DOT3 or DOT4(2) Fill piston edge with specified grease. Install piston
boots.Specified grease: Repair kit grease (orange)
6. APPLICATION OF GREASE TO LOCK PIN
BOOT/5GUIDE PIN BOOT/3. BUSHING
Grease parts as illustrated with specified grease.
Specified grease: Repair kit grease
(orange)
Page 25 of 57
BRAKES 7 Front Disc Brake5-83
14AO55314A0552
\Piston seal\
14AO551
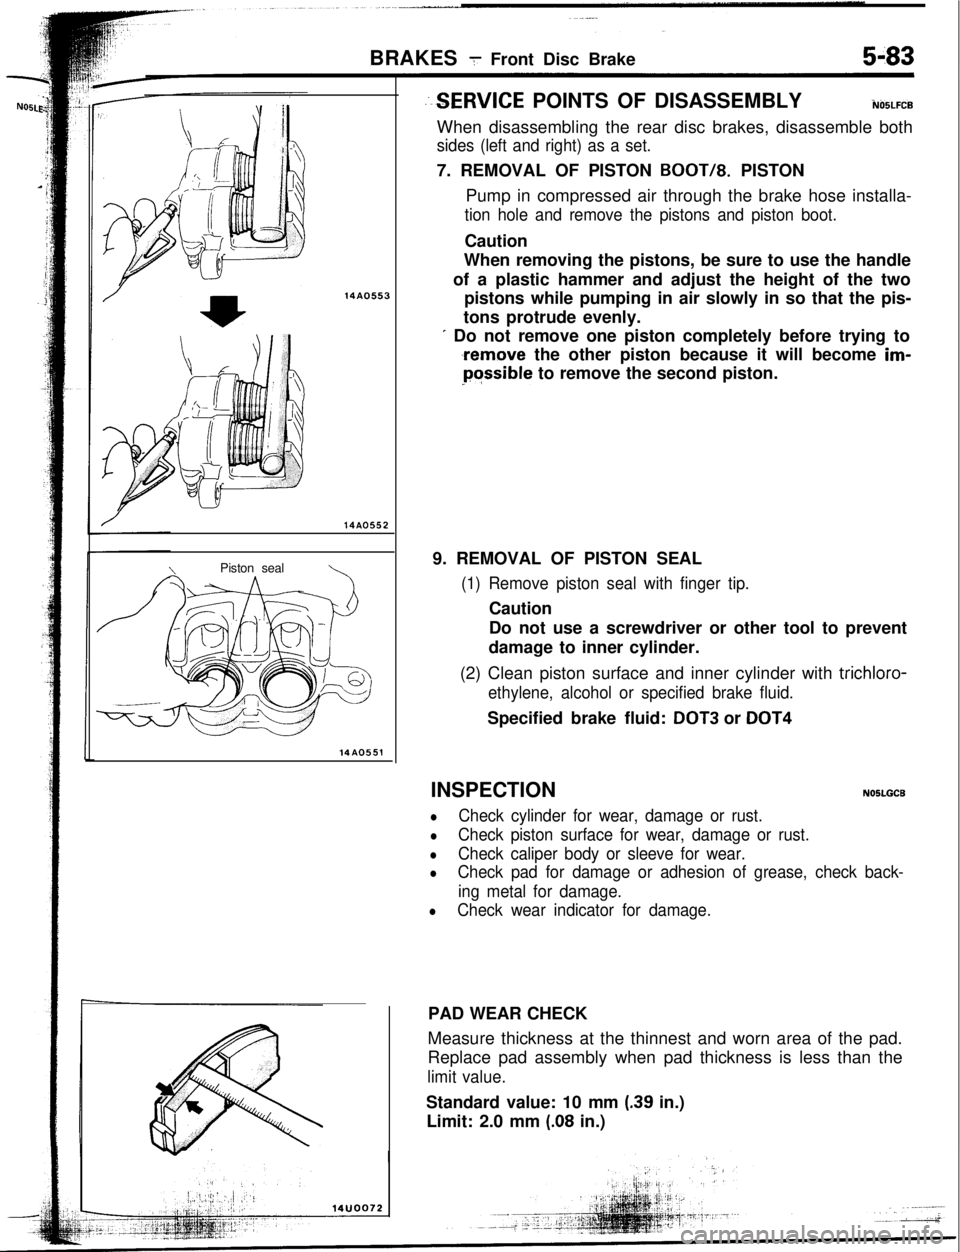
--SERVICE POINTS OF DISASSEMBLYiUO5LFCBWhen disassembling the rear disc brakes, disassemble both
sides (left and right) as a set.7. REMOVAL OF PISTON
BOOT/8. PISTON
Pump in compressed air through the brake hose installa-
tion hole and remove the pistons and piston boot.Caution
When removing the pistons, be sure to use the handle
of a plastic hammer and adjust the height of the two
pistons while pumping in air slowly in so that the pis-
tons protrude evenly.
I Do not remove one piston completely before trying to
,remove the other piston because it will become im-Possible to remove the second piston.
9. REMOVAL OF PISTON SEAL
(1) Remove piston seal with finger tip.Caution
Do not use a screwdriver or other tool to prevent
damage to inner cylinder.
(2) Clean piston surface and inner cylinder with trichloro-
ethylene, alcohol or specified brake fluid.Specified brake fluid:
DOT3 or DOT4INSPECTION
NOSLGCB
lCheck cylinder for wear, damage or rust.
lCheck piston surface for wear, damage or rust.
lCheck caliper body or sleeve for wear.
lCheck pad for damage or adhesion of grease, check back-
ing metal for damage.
lCheck wear indicator for damage.PAD WEAR CHECK
Measure thickness at the thinnest and worn area of the pad.
Replace pad assembly when pad thickness is less than the
limit value.Standard value: 10 mm
(.39 in.)
Limit: 2.0 mm
(.08 in.)