height MITSUBISHI ECLIPSE CROSS 2020 (in English) User Guide
[x] Cancel search | Manufacturer: MITSUBISHI, Model Year: 2020, Model line: ECLIPSE CROSS, Model: MITSUBISHI ECLIPSE CROSS 2020Pages: 427, PDF Size: 78.05 MB
Page 187 of 427
Forward Collision Mitigation sy
stem (FCM) (if so equipped)
5-106 Features and controls
5
N00577700145
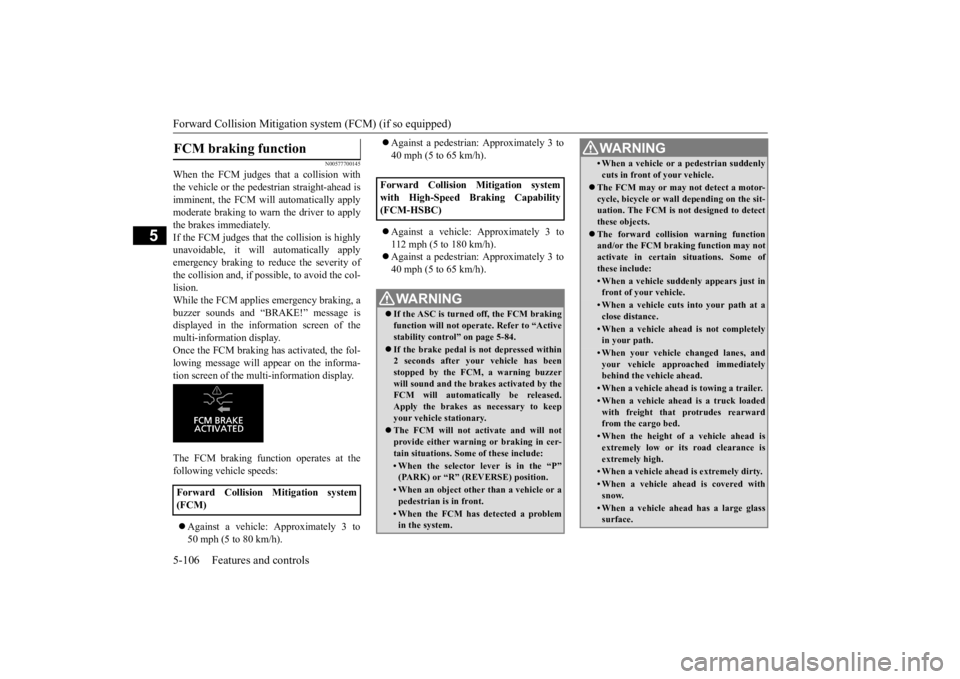
When the FCM judges that a collision with the vehicle or the pedestrian straight-ahead isimminent, the FCM will automatically apply moderate braking to warn the driver to apply the brakes immediately.If the FCM judges that the collision is highly unavoidable, it will automatically apply emergency braking to reduce the severity ofthe collision and, if possible, to avoid the col-lision. While the FCM applies emergency braking, a buzzer sounds and “BRAKE!” message isdisplayed in the information screen of the multi-information display. Once the FCM braking has activated, the fol-lowing message will appear on the informa- tion screen of the multi-information display. The FCM braking function operates at the following vehicle speeds: Against a vehicle: Approximately 3 to 50 mph (5 to 80 km/h).
Against a pedestrian: Approximately 3 to 40 mph (5 to 65 km/h). Against a vehicle: Approximately 3 to 112 mph (5 to 180 km/h). Against a pedestrian: Approximately 3 to 40 mph (5 to 65 km/h).
FCM braking function
Forward Collision Mitigation system(FCM)
Forward Collision Mitigation systemwith High-Speed Braking Capability(FCM-HSBC)
WA R N I N G If the ASC is turned off, the FCM braking function will not operate. Refer to “Activestability control” on page 5-84. If the brake pedal is not depressed within 2 seconds after your vehicle has been stopped by the FCM, a warning buzzer will sound and the brakes activated by theFCM will automatically be released. Apply the brakes as necessary to keep your vehicle stationary. The FCM will not activate and will not provide either warning or braking in cer-tain situations. Some of these include:• When the selector lever is in the “P” (PARK) or “R” (REVERSE) position.• When an object other than a vehicle or apedestrian is in front.• When the FCM has detected a problemin the system.
• When a vehicle or a pedestrian suddenlycuts in front of your vehicle.
The FCM may or may not detect a motor- cycle, bicycle or wall depending on the sit-uation. The FCM is not designed to detect these objects. The forward collision warning function and/or the FCM braking function may not activate in certain situations. Some ofthese include:• When a vehicle suddenly appears just infront of your vehicle.• When a vehicle cuts into your path at aclose distance.• When a vehicle ahead is not completelyin your path.• When your vehicle changed lanes, andyour vehicle approached immediately behind the vehicle ahead.• When a vehicle ahead is towing a trailer.• When a vehicle ahead is a truck loaded with freight that protrudes rearward from the cargo bed.• When the height of a vehicle ahead isextremely low or its road clearance is extremely high.• When a vehicle ahead is extremely dirty.• When a vehicle ahead is covered withsnow.• When a vehicle ahead has a large glasssurface.WA R N I N G
BK0277700US.book
106 ページ 2019年3月8日 金曜日 午前9時23分
Page 195 of 427
Blind Spot Warning (BSW) (with Lane
Change Assist) (if so equipped)
5-114 Features and controls
5
N00593500112
When the ignition switch is turned to the “ON” position or the operation mode is put in
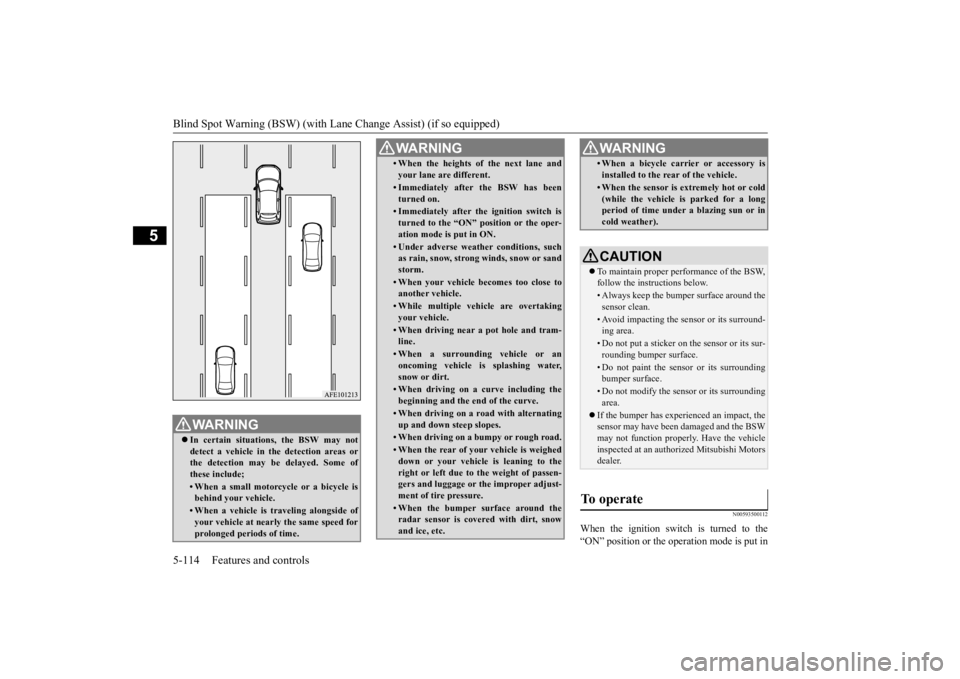
WA R N I N G In certain situations, the BSW may not detect a vehicle in the detection areas orthe detection may be delayed. Some of these include;• When a small motorcycle or a bicycle isbehind your vehicle.• When a vehicle is traveling alongside ofyour vehicle at nearly the same speed for prolonged periods of time.
• When the heights of the next lane and your lane are different.• Immediately after the BSW has been turned on.• Immediately after the ignition switch isturned to the “ON” position or the oper-ation mode is put in ON.• Under adverse weather conditions, suchas rain, snow, strong winds, snow or sand storm.• When your vehicle becomes too close toanother vehicle.• While multiple vehicle are overtakingyour vehicle.• When driving near a pot hole and tram-line.• When a surrounding vehicle or anoncoming vehicle is splashing water, snow or dirt.• When driving on a curve including thebeginning and the end of the curve.• When driving on a road with alternatingup and down steep slopes.• When driving on a bumpy or rough road.• When the rear of your vehicle is weighed down or your vehicle is leaning to the right or left due to the weight of passen- gers and luggage or the improper adjust- ment of tire pressure. • When the bumper surface around theradar sensor is covered with dirt, snowand ice, etc.WA R N I N G
• When a bicycle carrier or accessory is installed to the rear of the vehicle.• When the sensor is extremely hot or cold (while the vehicle is parked for a longperiod of time under a blazing sun or in cold weather).CAUTION To maintain proper performance of the BSW, follow the instructions below.• Always keep the bumper surface around thesensor clean.• Avoid impacting the sensor or its surround-ing area.• Do not put a sticker on the sensor or its sur-rounding bumper surface.• Do not paint the sensor or its surroundingbumper surface.• Do not modify the sensor or its surroundingarea.
If the bumper has experienced an impact, the sensor may have been damaged and the BSWmay not function properly. Have the vehicle inspected at an authorized Mitsubishi Motors dealer.
To operate
WA R N I N G
BK0277700US.book
114 ページ 2019年3月8日 金曜日 午前9時23分
Page 223 of 427
Instrument cluster 5-142 Features and controls
5
N00594200028
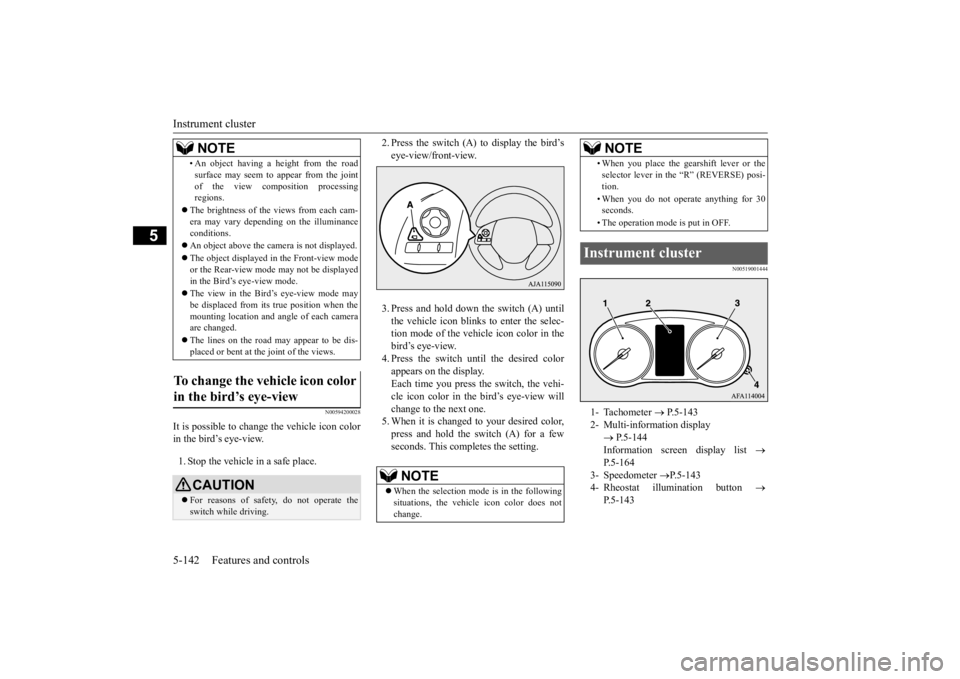
It is possible to change the vehicle icon color in the bird’s eye-view. 1. Stop the vehicle in a safe place.
2. Press the switch (A) to display the bird’s eye-view/front-view. 3. Press and hold down the switch (A) until the vehicle icon blinks to enter the selec- tion mode of the vehicle icon color in the bird’s eye-view.4. Press the switch until the desired color appears on the display. Each time you press the switch, the vehi-cle icon color in the bird’s eye-view willchange to the next one. 5. When it is changed to your desired color, press and hold the switch (A) for a fewseconds. This completes the setting.
N00519001444
• An object having a height from the road surface may seem to appear from the joint of the view composition processing regions.
The brightness of the views from each cam- era may vary depending on the illuminance conditions. An object above the camera is not displayed. The object displayed in the Front-view mode or the Rear-view mode may not be displayed in the Bird’s eye-view mode. The view in the Bird’s eye-view mode may be displaced from its true position when themounting location and angle of each camera are changed. The lines on the road may appear to be dis- placed or bent at the joint of the views.
To change the vehicle icon color in the bird’s eye-view
CAUTION For reasons of safety, do not operate the switch while driving.NOTE
NOTE
When the selection mode is in the following situations, the vehicle icon color does not change.
• When you place the gearshift lever or theselector lever in the “R” (REVERSE) posi- tion. • When you do not operate anything for 30 seconds. • The operation mode is put in OFF.
Instrument cluster 1- Tachometer
P.5-143
2- Multi-information display
P.5-144 Information screen display list
P.5-164
3- Speedometer
P.5-143
4- Rheostat illumination button
P.5-143NOTE
BK0277700US.book
142 ページ 2019年3月8日 金曜日 午前9時23分
Page 321 of 427
Trailer towing 6-12 Driving safety
6
Recommendations for towing up to this limit are as follows.
The tongue weight of any trailer is important because it affects the vehicle capacity weight. The vehicle capacity weight includes anycargo you may carry, and the people who will be riding in the vehicle. If you will tow a trailer, you must include the tongue weight ofthe trailer in your calculation of the vehicle capacity weight. For more information regarding vehicle capacity weight, refer to“Tire and loading information placard” onpage 6-7. Do not exceed the maximum tongue weight for your vehicle. After you’ve loaded your trailer, weigh the trailer and then the tongue, separately, to see if the weights are proper.Keep the trailer tongue load at 10 % of the loaded trailer weight for dead weight hitches. Tongue loads can be adjusted by proper dis-
tribution of the load in the trailer. This can be checked by separately weighing the loaded trailer and then the tongue. The GAWRs are printed on the certification label which is riveted on the door sill on the driver’s side.Refer to “Vehicle labeling” on page 11-2. Choose a proper hitch and ball, and make sure it is installed at a height that is compati-ble with the trailer. Use a good equalizing hitch which uniformly distributes the trailer tongue load throughoutthe frame.
Maximum trailer weight Vehicle condi-
tion
Maximum trailer weight
1 or 2 persons
seated
With brake 2,000 lb
(907 kg)
Without brake 1,250 lb
(567 kg)
3–5 persons
seated
With brake 1,500 lb
(680 kg)
Without brake 1,250 lb
(567 kg)
Tongue weight Vehicle condi-
tion
Maximum tongue weight
1 or 2 persons
seated
With brake 200 lb (91 kg) Without brake 125 lb
(57 kg)
3–5 persons
seated
With brake 150 lb (68 kg) Without brake 125 lb
(57 kg)
Gross axle weight rating (GAWR) Trailer hitches
WA R N I N G If you make any holes in the body of your vehicle for installing a trailer hitch, be sure to seal the holes later when you remove the hitch. If you don’t seal them, deadly carbon monoxide (CO) from your exhaust can enter your
vehicle. Refer to
“Exhaust system” on page 9-22.
BK0277700US.bo
ok 12 ページ 2019年3月8日 金曜日 午前9時23分
Page 378 of 427
Tires
Vehicle care and maintenance 9-13
9
Sidewall: portion of a tire between the tread and bead. Section width: the li
near distance between
the exteriors of the sidewalls of aninflated tire, excluding elevations due to labeling, decoration, or protective bands. Bead: the part of the tire that is made of steel wires, wrapped or reinforced by ply cords and that is shaped to fit the rim. Ply: a layer of rubber-coated parallel cords. Cord: the strands forming the plies in the tire. Rim: a metal support for a tire or a tire and tube assembly upon which the tire beads are seated. Rim diameter: nominal diameter of the bead seat. Groove: the space between two adjacent tread ribs.
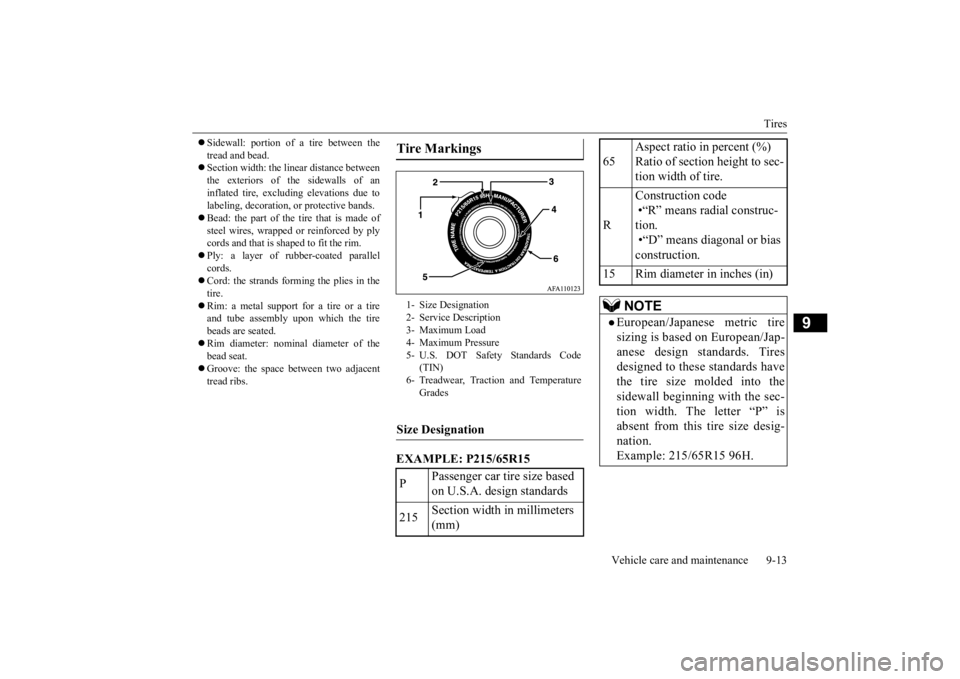
EXAMPLE: P215/65R15Tire Markings 1- Size Designation 2- Service Description 3- Maximum Load4- Maximum Pressure 5- U.S. DOT Safety Standards Code
(TIN)
6- Treadwear, Traction and Temperature
Grades
Size Designation P
Passenger car tire size based on U.S.A. design standards
215
Section width in millimeters (mm)
65
Aspect ratio in percent (%) Ratio of section height to sec- tion width of tire.
R
Construction code •“R” means radial construc- tion. •“D” means diagonal or bias construction.
15 Rim diameter in inches (in)
NOTE
European/Japanese metric tire sizing is based on European/Jap-anese design standards. Tires designed to these standards have the tire size molded into thesidewall beginning with the sec- tion width. The letter “P” is absent from this tire size desig-nation. Example: 215/65R15 96H.
BK0277700US.bo
ok 13 ページ 2019年3月8日 金曜日 午前9時23分
Page 415 of 427
Vehicle dimensions 11-4 Specifications
11
N01147501681
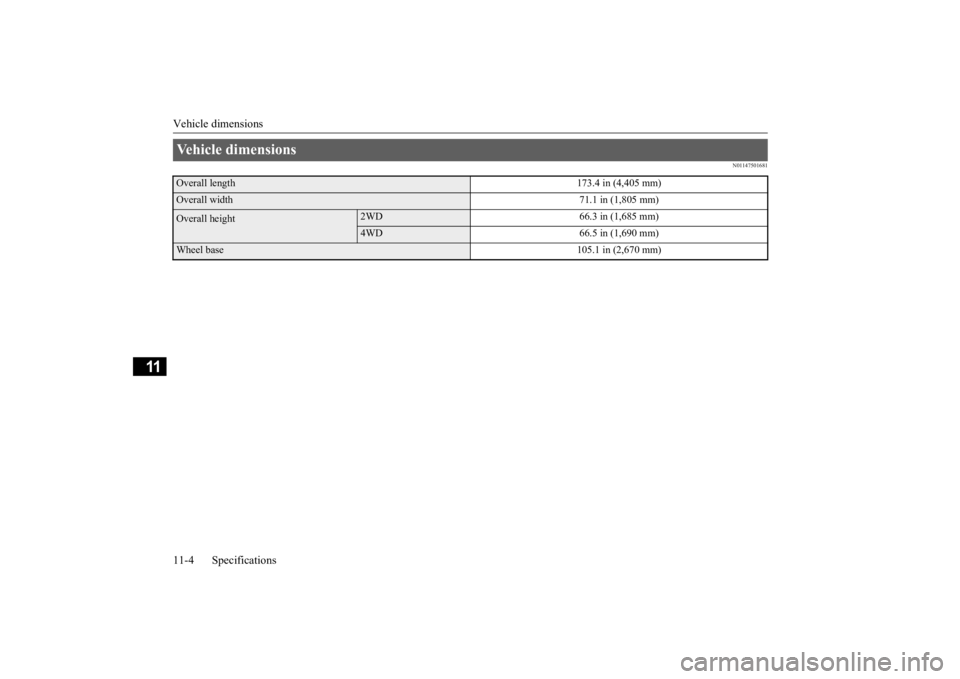
Vehicle dimensions Overall length
173.4 in (4,405 mm)
Overall width
71.1 in (1,805 mm)
Overall height
2WD 66.3 in (1,685 mm)4WD 66.5 in (1,690 mm)
Wheel base
105.1 in (2,670 mm)
BK0277700US.bo
ok 4 ページ 2019年3月8日 金曜日 午前9時23分
Page 423 of 427
Alphabetical index 12-4
12
Overheating
......................
...................
8-4
P
Parking
.........................
.......................
6-6
Parking brake
................
.................
5-49
Parking brake lever stroke
...................
9-19
Parking lights
Bulb location and capacity
...............
9-28
Replacement
.................
.................
9-30
Polishing
.......................
.....................
9-38
Power brakes
.....................
.................
5-76
Power outlet
..................
...................
5-211
Power panoramic sunroof
....................
5-46
Power windows
.................
.................
5-43
Puncture (Tire changing)
.......................
8-6
R
Radiator cap
......................
...................
9-8
Radio
General information about your radio 7-23
Reading lights
Bulb location and capacity
...............
9-29
Rear axle oil
...............
.................
9-9
, 11-7
Rear combination lights
Bulb location and capacity
...............
9-28
Replacement
.................
.................
9-32
Rear Cross Traffic Alert
....................
5-119
Rear seat adjustment
.............................
4-6
Rear side-marker lights
Bulb location and capacity
...............
9-28
Rear turn signal light
Bulb location and capacity
...............
9-28
Replacement
...................
................
9-32
Rear-view camera
.............................
5-131
Rearview mirror
Inside rearview mirror
.....................
5-54
Outside rearview mirrors
.................
5-56
Replacement of light bulbs
...................
9-27
Replacing tires and wheels
...................
9-16
Reporting Safety Defects
.....................
10-2
S
Safe driving techniques
.........................
6-4
S-AWC (Super-All Wheel Control)
......
5-70
Seat belt
......................
.......................
4-13
Adjustable seat belt shoulder anchor
.4-19
Child restraint systems
.....................
4-22
Front passenger seat belt warning light
.....
4-19 Maintenance and inspection
.............
4-30
Seat belt extender
............................
4-20
Seat belt force limiter
......................
4-22
Seat belt pre-tensioners
....................
4-21
Seat belt use during pregnancy
.........
4-21
Seats
...........................
........................
4-2
Arm rest
..................
..................
4-6
, 4-8
Front seats
....................
...................
4-3
Head restraints
.................
................
4-9
Making a cargo area
........................
4-12
Rear seats
.....................
...................
4-6
Seats and restraint systems
................
4-3
Service brake
.....................
.................
5-76
Service precautions
...............
................
9-2
Side turn signal light
Bulb location and capacity
...............
9-28
Snow tires
.....................
.....................
9-18
Spark plugs
...................
.....................
9-20
Starting the engine
.....................
5-25
, 5-61
Steering
Steering wheel height and reach adjustment5-53
Stop lights
Bulb location and capacity
...............
9-28
Storage spaces
...................
...............
5-221
Sun visors
.....................
...................
5-210
Super-all wheel control (S-AWC)
S-AWC drive mode display
.............
5-71
S-AWC drive mode-selector
............
5-71
S-AWC operation display
................
5-72
Supplemental Restraint System
............
4-30
How the Supplemental Restraint System works
.....................
.....................
4-33
Maintenance service
.......................
4-44
BK0277700US.bo
ok 4 ページ 2019年3月8日 金曜日 午前9時23分