remove seats MITSUBISHI ECLIPSE CROSS 2020 Owner's Manual (in English)
[x] Cancel search | Manufacturer: MITSUBISHI, Model Year: 2020, Model line: ECLIPSE CROSS, Model: MITSUBISHI ECLIPSE CROSS 2020Pages: 427, PDF Size: 78.05 MB
Page 42 of 427
Rear seats
Seat and restraint systems 4-7
4
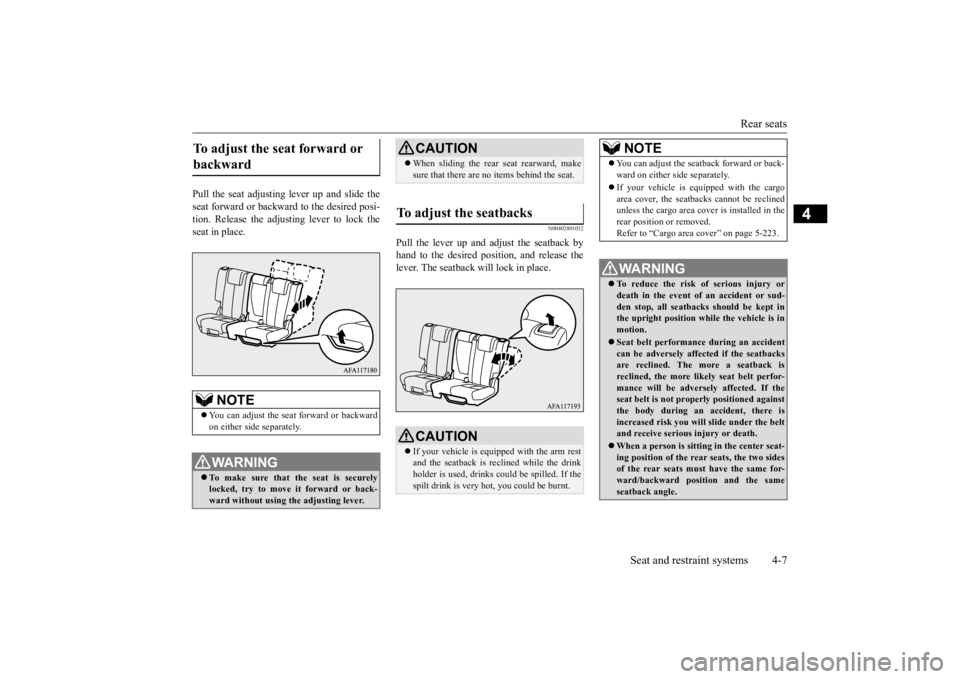
Pull the seat adjusting lever up and slide the seat forward or backwa
rd to the desired posi-
tion. Release the adjusting lever to lock the seat in place.
N00402801032
Pull the lever up and adjust the seatback by hand to the desired position, and release the lever. The seatback will lock in place.
To adjust the seat forward or backward
NOTE
You can adjust the seat forward or backward on either side separately.WA R N I N G To make sure that the seat is securely locked, try to move it forward or back-ward without using the adjusting lever.
CAUTION When sliding the rear seat rearward, make sure that there are no items behind the seat.
To adjust the seatbacks
CAUTION If your vehicle is equipped with the arm rest and the seatback is reclined while the drink holder is used, drinks could be spilled. If the spilt drink is very hot, you could be burnt.
NOTE
You can adjust the seatback forward or back- ward on either side separately. If your vehicle is equipped with the cargo area cover, the seatbacks cannot be reclinedunless the cargo area cover is installed in the rear position or removed. Refer to “Cargo area cover” on page 5-223.WA R N I N G To reduce the risk of serious injury or death in the event of an accident or sud- den stop, all seatbacks should be kept inthe upright position while the vehicle is in motion. Seat belt performance during an accident can be adversely affected if the seatbacks are reclined. The more a seatback isreclined, the more likely seat belt perfor- mance will be adversely affected. If the seat belt is not properly positioned againstthe body during an accident, there is increased risk you will slide under the belt and receive serious injury or death. When a person is sitting in the center seat- ing position of the rear seats, the two sides of the rear seats must have the same for- ward/backward position and the sameseatback angle.
BK0277700US.bo
ok 7 ページ 2019年3月8日 金曜日 午前9時23分
Page 46 of 427
Head restraints
Seat and restraint systems 4-11
4
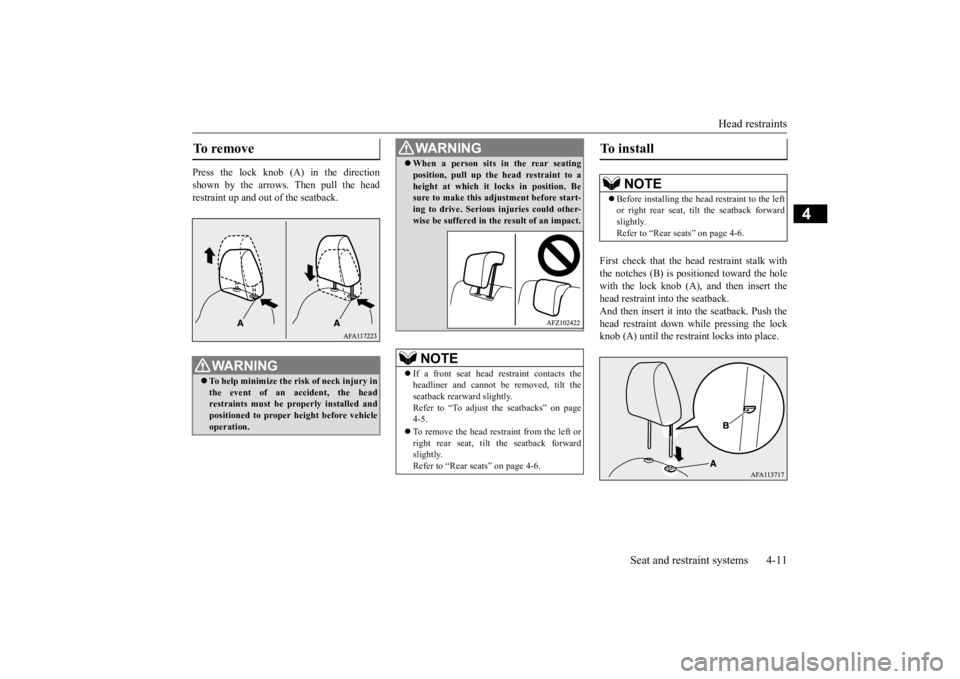
Press the lock knob (A) in the direction shown by the arrows. Then pull the head restraint up and out of the seatback.
First check that the head restraint stalk with the notches (B) is positioned toward the holewith the lock knob (A), and then insert the head restraint into the seatback. And then insert it into the seatback. Push thehead restraint down while pressing the lock knob (A) until the restraint locks into place.
To remove
WA R N I N G To help minimize the risk of neck injury in the event of an accident, the head restraints must be properly installed and positioned to proper height before vehicleoperation.
WA R N I N G When a person sits in the rear seating position, pull up the head restraint to a height at which it locks in position. Be sure to make this adjustment before start- ing to drive. Serious injuries could other-wise be suffered in th
e result of an impact.
NOTE
If a front seat head restraint contacts the headliner and cannot be removed, tilt the seatback rearward slightly.Refer to “To adjust the seatbacks” on page 4-5. To remove the head restraint from the left or right rear seat, tilt the seatback forward slightly. Refer to “Rear seats” on page 4-6.
To install
NOTE
Before installing the head restraint to the left or right rear seat, tilt the seatback forward slightly. Refer to “Rear seats” on page 4-6.
BK0277700US.bo
ok 11 ページ 2019年3月8日 金曜日 午前9時23分
Page 55 of 427
Seat belts 4-20 Seat and restraint systems
4
N00406501138
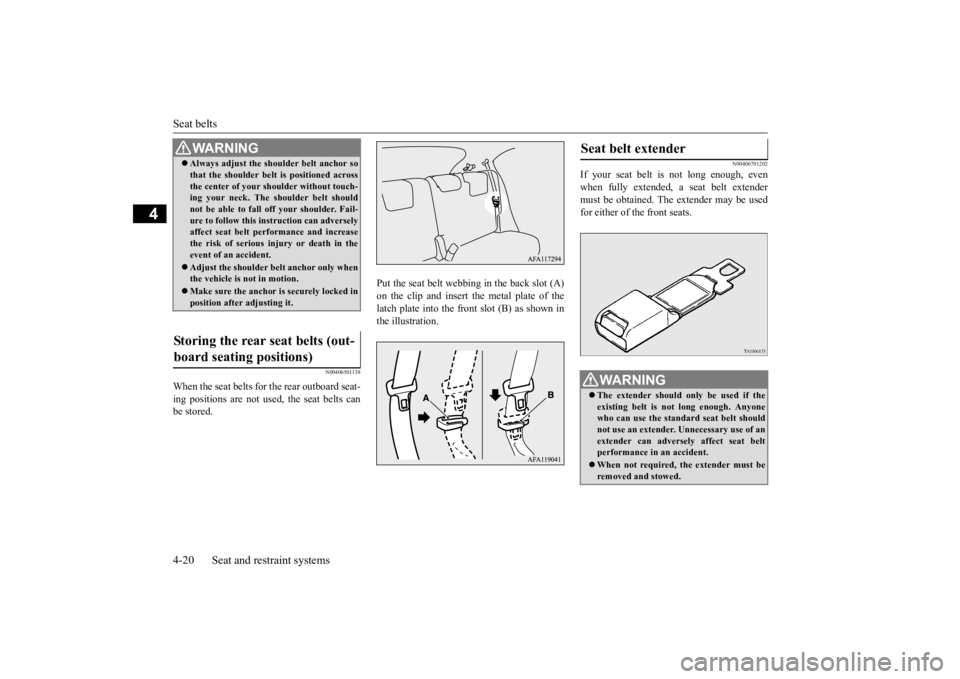
When the seat belts for the rear outboard seat- ing positions are not used, the seat belts can be stored.
Put the seat belt webbing in the back slot (A) on the clip and insert the metal plate of thelatch plate into the front slot (B) as shown in the illustration.
N00406701202
If your seat belt is not long enough, even when fully extended, a seat belt extendermust be obtained. The extender may be used for either of the front seats.
WA R N I N G Always adjust the shoulder belt anchor so that the shoulder belt is positioned across the center of your shoulder without touch- ing your neck. The shoulder belt should not be able to fall off your shoulder. Fail-ure to follow this instruction can adversely affect seat belt performance and increase the risk of serious injury or death in theevent of an accident. Adjust the shoulder belt anchor only when the vehicle is not in motion. Make sure the anchor is securely locked in position after adjusting it.
Storing the rear seat belts (out- board seating positions)
Seat belt extender
WA R N I N G The extender should only be used if the existing belt is not long enough. Anyonewho can use the standard seat belt should not use an extender. Unnecessary use of an extender can adversely affect seat beltperformance in an accident. When not required, the extender must be removed and stowed.
BK0277700US.bo
ok 20 ページ 2019年3月8日 金曜日 午前9時23分
Page 61 of 427
Child restraint systems 4-26 Seat and restraint systems
4
N00419001212
N00419101314
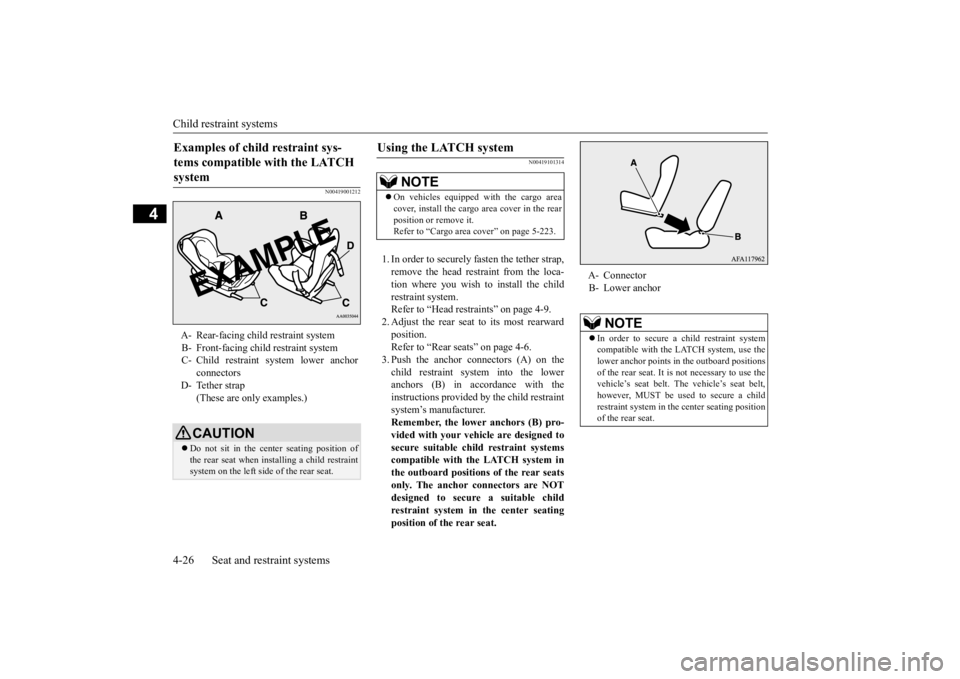
1. In order to securely fasten the tether strap, remove the head restraint from the loca-tion where you wish to install the child restraint system. Refer to “Head restraints” on page 4-9.2. Adjust the rear seat to its most rearward position. Refer to “Rear seats” on page 4-6.3. Push the anchor connectors (A) on the child restraint system into the lower anchors (B) in accordance with theinstructions provided by the child restraint system’s manufacturer. Remember, the lower anchors (B) pro-vided with your vehicle are designed to secure suitable child restraint systems compatible with the LATCH system inthe outboard positions of the rear seats only. The anchor connectors are NOT designed to secure a suitable childrestraint system in the center seating position of the rear seat.
Examples of child restraint sys- tems compatible with the LATCH system A- Rear-facing child restraint system B- Front-facing child restraint systemC- Child restraint system lower anchor
connectors
D- Tether strap
(These are only examples.)CAUTION Do not sit in the center seating position of the rear seat when installing a child restraint system on the left side of the rear seat.
Using the LATCH system
NOTE
On vehicles equipped with the cargo area cover, install the cargo area cover in the rear position or remove it. Refer to “Cargo area cover” on page 5-223.
A- Connector B- Lower anchor
NOTE
In order to secure a child restraint system compatible with the LATCH system, use the lower anchor points in the outboard positions of the rear seat. It is not necessary to use thevehicle’s seat belt. The vehicle’s seat belt, however, MUST be used to secure a child restraint system in the center seating positionof the rear seat.
BK0277700US.bo
ok 26 ページ 2019年3月8日 金曜日 午前9時23分
Page 63 of 427
Child restraint systems 4-28 Seat and restraint systems
4
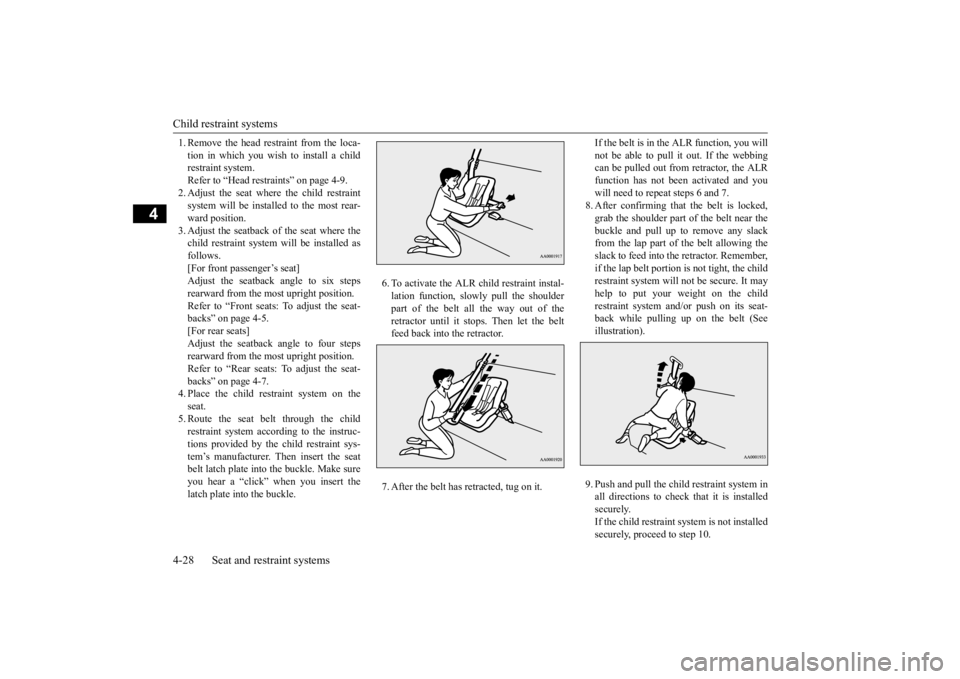
1. Remove the head restraint from the loca- tion in which you wish to install a child restraint system. Refer to “Head restraints” on page 4-9.2. Adjust the seat where the child restraint system will be installed to the most rear- ward position.3. Adjust the seatback of the seat where the child restraint system will be installed as follows.[For front passenger’s seat]Adjust the seatback angle to six steps rearward from the most upright position. Refer to “Front seats:
To adjust the seat-
backs” on page 4-5. [For rear seats] Adjust the seatback angle to four stepsrearward from the most upright position. Refer to “Rear seats: To adjust the seat- backs” on page 4-7.4. Place the child restraint system on the seat. 5. Route the seat belt through the childrestraint system according to the instruc- tions provided by the child restraint sys- tem’s manufacturer. Then insert the seatbelt latch plate into the buckle. Make sure you hear a “click” when you insert the latch plate into the buckle.
6. To activate the ALR child restraint instal- lation function, slow
ly pull the shoulder
part of the belt all the way out of theretractor until it stops. Then let the belt feed back into the retractor. 7. After the belt has retracted, tug on it.
If the belt is in the ALR function, you will not be able to pull it out. If the webbing can be pulled out from retractor, the ALR function has not been activated and youwill need to repeat steps 6 and 7. 8. After confirming that the belt is locked, grab the shoulder part of the belt near thebuckle and pull up to remove any slack from the lap part of the belt allowing the slack to feed into the retractor. Remember,if the lap belt portion is not tight, the childrestraint system will not be secure. It may help to put your weight on the child restraint system and/or push on its seat-back while pulling up on the belt (See illustration). 9. Push and pull the ch
ild restraint system in
all directions to check that it is installed securely.If the child restraint system is not installed securely, proceed to step 10.
BK0277700US.bo
ok 28 ページ 2019年3月8日 金曜日 午前9時23分
Page 64 of 427
![MITSUBISHI ECLIPSE CROSS 2020 Owners Manual (in English) Child restraint systems
Seat and restraint systems 4-29
4
10. [For front passenger’s seat]
Repeat steps 8 and 9. [For rear seats] Adjust the seatback angle forward untilthe child restraint system MITSUBISHI ECLIPSE CROSS 2020 Owners Manual (in English) Child restraint systems
Seat and restraint systems 4-29
4
10. [For front passenger’s seat]
Repeat steps 8 and 9. [For rear seats] Adjust the seatback angle forward untilthe child restraint system](/img/19/34871/w960_34871-63.png)
Child restraint systems
Seat and restraint systems 4-29
4
10. [For front passenger’s seat]
Repeat steps 8 and 9. [For rear seats] Adjust the seatback angle forward untilthe child restraint system is firmly secured, and then check that the seatback is locked in place. Then push and pull thechild restraint system in all directions to check that it is installed securely. If your child restraint system requires theuse of a tether strap, fasten the tether strapin accordance with the following step 11.
11. Latch the tether strap hook (A) of the
child restraint system to the tether anchorbar (B) and tighten the tether strap so it is securely fastened.
12. Before putting your child in the restraint,
push and pull the restraint in all directionsto be sure it is firmly secure. Do thisbefore each use. If the child restraint sys- tem is not firmly secure, repeat steps 4 through 11.
13. To remove a child restraint system from
the vehicle and deactivate the ALR mode, remove the child from the restraint.Unlatch the buckle. Then remove the belt from the restraint and let the belt fully retract.
14. Reinstall the head restraint.
Refer to “Head restraints” on page 4-9.
N00407601628
Children who have outgrown a child restraint system should be seated in the rear seat andwear the seat belt. If the shoulder belt crosses their face or neck, and/or the lap belt crosses their stomach, a commercially available
booster seat must be used to raise the child so that the shoulder belt crosses their shoulder and the lap belt remains positioned low across their hips. The booster seat should fitthe vehicle seat and have a label certifying compliance with Federal Motor Vehicle Safety Standards or Motor Vehicle RestraintSystems and Booster Seats Safety Regula- tions.
WA R N I N G Child restraint system tether anchors are designed only to withstand loads from cor- rectly fitted child restraint systems. Under no circumstances are they to be used for adult seat belts, harnesses, for attachingother items, or equipment to the vehicle.
Children who have outgrown child restraint systems
WA R N I N G Any child who is too small to properly wear a seat belt must be properly restrained in an appropriate child restraint system, to reduce their risk ofserious injury or death in an accident. A child should never be left unattended in, or unsupervised around, your vehicle. When you leave the vehicle, always take the child out as well. Children can die from he
at stroke if left or
trapped inside the vehicle, especially onhot days. Keep your vehicle locked when not in use. Keep your vehicle keys away from chil- dren.
BK0277700US.bo
ok 29 ページ 2019年3月8日 金曜日 午前9時23分
Page 79 of 427
Supplemental Restraint System (SRS) - airbag 4-44 Seat and restraint systems
4
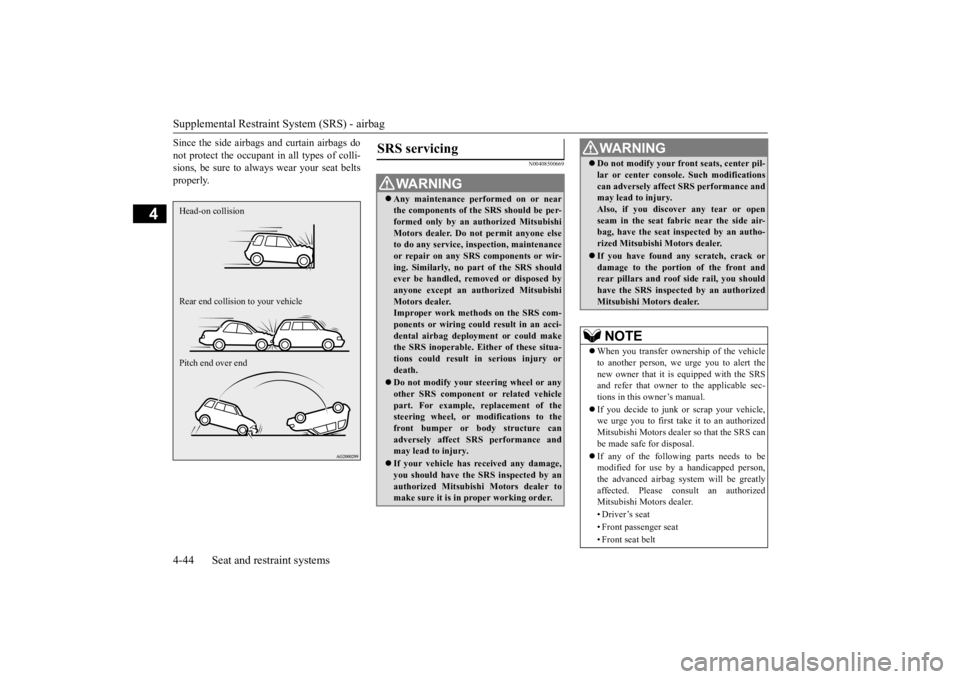
Since the side airbags and curtain airbags do not protect the occupant in all types of colli- sions, be sure to always wear your seat belts properly.
N00408500669
Head-on collision Rear end collision to your vehicle Pitch end over end
SRS servicing
WA R N I N G Any maintenance performed on or near the components of the SRS should be per- formed only by an authorized Mitsubishi Motors dealer. Do not permit anyone elseto do any service, inspection, maintenance or repair on any SRS components or wir- ing. Similarly, no part of the SRS shouldever be handled, removed or disposed by anyone except an authorized Mitsubishi Motors dealer.Improper work methods on the SRS com- ponents or wiring could result in an acci- dental airbag deployment or could makethe SRS inoperable. Either of these situa- tions could result in serious injury or death. Do not modify your steering wheel or any other SRS component or related vehiclepart. For example, replacement of the steering wheel, or modifications to the front bumper or body structure canadversely affect SRS performance and may lead to injury. If your vehicle has received any damage, you should have the SRS inspected by an authorized Mitsubishi Motors dealer to make sure it is in proper working order.
Do not modify your front seats, center pil- lar or center console. Such modifications can adversely affect SRS performance and may lead to injury. Also, if you discover any tear or openseam in the seat fabric near the side air- bag, have the seat inspected by an autho- rized Mitsubishi Motors dealer. If you have found any scratch, crack or damage to the portion of the front andrear pillars and roof side rail, you should have the SRS inspected by an authorized Mitsubishi Motors dealer.NOTE
When you transfer ownership of the vehicle to another person, we urge you to alert the new owner that it is equipped with the SRS and refer that owner to the applicable sec-tions in this owner’s manual. If you decide to junk or scrap your vehicle, we urge you to first take
it to an authorized
Mitsubishi Motors dealer so that the SRS can be made safe for disposal. If any of the following parts needs to be modified for use by a handicapped person, the advanced airbag system will be greatly affected. Please consult an authorizedMitsubishi Motors dealer. • Driver’s seat• Front passenger seat • Front seat beltWA R N I N G
BK0277700US.bo
ok 44 ページ 2019年3月8日 金曜日 午前9時23分
Page 305 of 427
Cargo area cover (if so equipped) 5-224 Features and controls
5
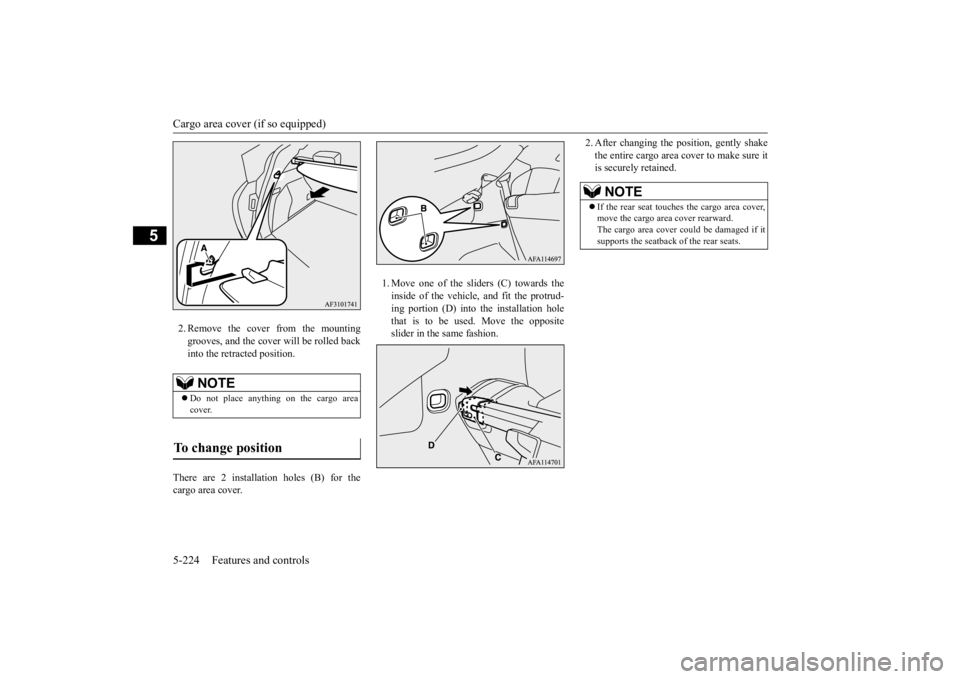
2. Remove the cover from the mounting grooves, and the cover will be rolled backinto the retracted position.
There are 2 installation holes (B) for the cargo area cover.
1. Move one of the sliders (C) towards the inside of the vehicle, and fit the protrud-ing portion (D) into the installation hole that is to be used. Move the opposite slider in the same fashion.
2. After changing the position, gently shake the entire cargo area cover to make sure it is securely retained.
NOTE
Do not place anything on the cargo area cover.
To change position
NOTE
If the rear seat touches the cargo area cover, move the cargo area cover rearward. The cargo area cover could be damaged if itsupports the seatback of the rear seats.
BK0277700US.book
224 ページ 2019年3月8日 金曜日 午前9時23分
Page 401 of 427
Cleaning the outside of your vehicle 9-36 Vehicle care and maintenance
9
N00945500128
1. To maintain the value of your new vehi- cle, maintain the upholstery carefully and keep the interior clean. Use a vacuum cleaner and brush to cleanthe seats. If stained, vinyl and synthetic leather should be cleaned with an appro- priate cleaner. Cloth fabrics can becleaned with either upholstery cleaner or a 3% solution of gentle soap in lukewarm water.2. Clean the carpeting with a vacuum cleaner and remove any stains with carpet cleaner. Oil and grease can be removed bylightly dabbing with a clean white cloth and spot remover.
N00945601285
1. To clean, lightly wipe the leather with a soft cloth soaked in a 5 % solution of gen-tle soap and water. 2. To rinse, dip the cloth in fresh water, wring it out well, and wipe off all thesoap. 3. To preserve and protect, use a leather pro- tecting agent on the genuine leather sur-face.
N00945700058
To protect your vehicle’s finish, wash it often and thoroughly. If desired, you may wax your vehicle using a nonabrasive automobile wax.
N00945800033
Industrial pollution, road tar, bird droppings,tree sap, insect remains, sea water and otherforeign matters can damage the finish on your vehicle. Generally, the longer any foreign materialstays on the finish, the worse the damage. Wash your vehicle as soon as possible when- ever the finish gets soiled.
NOTE
Do not use cleaners, conditioners, and pro- tectants containing silicones or wax. Such products, when applied to the instru- ment panels or other parts, may cause reflec- tions on the windshield and obscure vision.Also, if such products get on the switches of the electrical accessories, it may lead to fail- ure of these accessories.
Upholstery
NOTE
If fuzzing is difficult to remove from the seat upholstery, draw a suitable defuzzing brush over the surface in one direction.
Genuine leather
(if so equipped)
NOTE
If genuine leather is wet with water, wipe it with a dry, soft cloth. If left damp, mildew may grow. The genuine leather surface can be damaged if brushed with a nylon or synthetic fiber brush. Organic solvents such as benzine, kerosene, alcohol, gasoline, or acid or alkaline solvents can discolor the genuine leather surface and should not be used. Genuine leather can mildew if not kept clean. Clean up any oil stains immediately.
The genuine leather surface may harden and shrink if it is exposed to direct sunlight for long hours. When your vehicle is parked, place it in the shade as much as possible. When the temperature of the vehicle interior rises in summer, vinyl products left on the genuine leather seat may deteriorate andstick to the seat.
Cleaning the outside of your vehicle Foreign material
NOTE
BK0277700US.bo
ok 36 ページ 2019年3月8日 金曜日 午前9時23分