brake pads MITSUBISHI ENDEAVOR 2004 Service Repair Manual
[x] Cancel search | Manufacturer: MITSUBISHI, Model Year: 2004, Model line: ENDEAVOR, Model: MITSUBISHI ENDEAVOR 2004Pages: 3870, PDF Size: 98.47 MB
Page 716 of 3870
DIAGNOSI
S
STEP 1. Check the brake disc and pads for wear or cutting.
Q: Is there a wear or cutting?
YES: Repair or replace the part. Then go to Step 4 .
NO: Go to Step 2.
STEP 2. Check the calipers for rust.
Q: Is there a rust?
YES: Remove the rust. Then go to Step 4 .
NO: Go to Step 3.
STEP 3. Adjust the brake pedal or brake booster pushrod.
Refer to ON
-VEHICLE SERVICE
or MASTER CYLINDER ASSEMBLY
AND BRAKE BOOSTER
.
Q: Are the brake pedal and the brake booster pushrod adjusted correctly?
YES: Go to Step 4.
NO: Adjust the brake pedal or the brake booster pushrod. Then go to Step
4.
STEP 4. Recheck symptom.
Q: Is the symptom eliminated?
YES: The procedure is complete.
NO: Start over at Step 1 . If a new symptom surfaces, refer to the
SYMPTOM CHART .
INSPECTION PROCEDURE 7: SQUEALING NOISE WHEN BRAKES ARE NOT APPLIED DIAGNOSIS
STEP 1. Check whether the backing plate is bent or loose and interfering
with the drum
.
2004 Mitsubishi Endeavor LS
2004 BRAKES Basic Brake System - Endeavor
Page 717 of 3870
Q: Is there a fault?
YES: Replace the part. Then go to Step 10 .
NO: Go to Step 2.
STEP 2. Check whether the drum is damaged due to interference with the
backing plate or shoe.
Q: Is there a damage?
YES: Replace the part. Then go to Step 10 .
NO: Go to Step 3.
STEP 3. Check the brake drum for wear and the shoe spring for damage.
Q: Is there a wear or damage?
YES: Replace the part. Then go to Step 10 .
NO: Go to Step 4.
STEP 4. Check the brake discs for rust.
Q: Are the brake discs rusted?
YES: Remove the rust by using sand paper. If still rusted, turn the rotors
with an on-the-car brake lathe. Then go to Step 10 .
NO: Go to Step 5.
STEP 5. Check the brake pads for correct installation.
Q: Are the pads installed incorrectly?
YES: Repair the pads. Then go to Step 10 .
NO: Go to Step 6.
STEP 6. Check the calipers for correct installation.
Q: Are the calipers installed incorrectly?
YES: Re
pair the cali
pers. Then
go to Ste
p 10 .
2004 Mitsubishi Endeavor LS
2004 BRAKES Basic Brake System - Endeavor
Page 744 of 3870
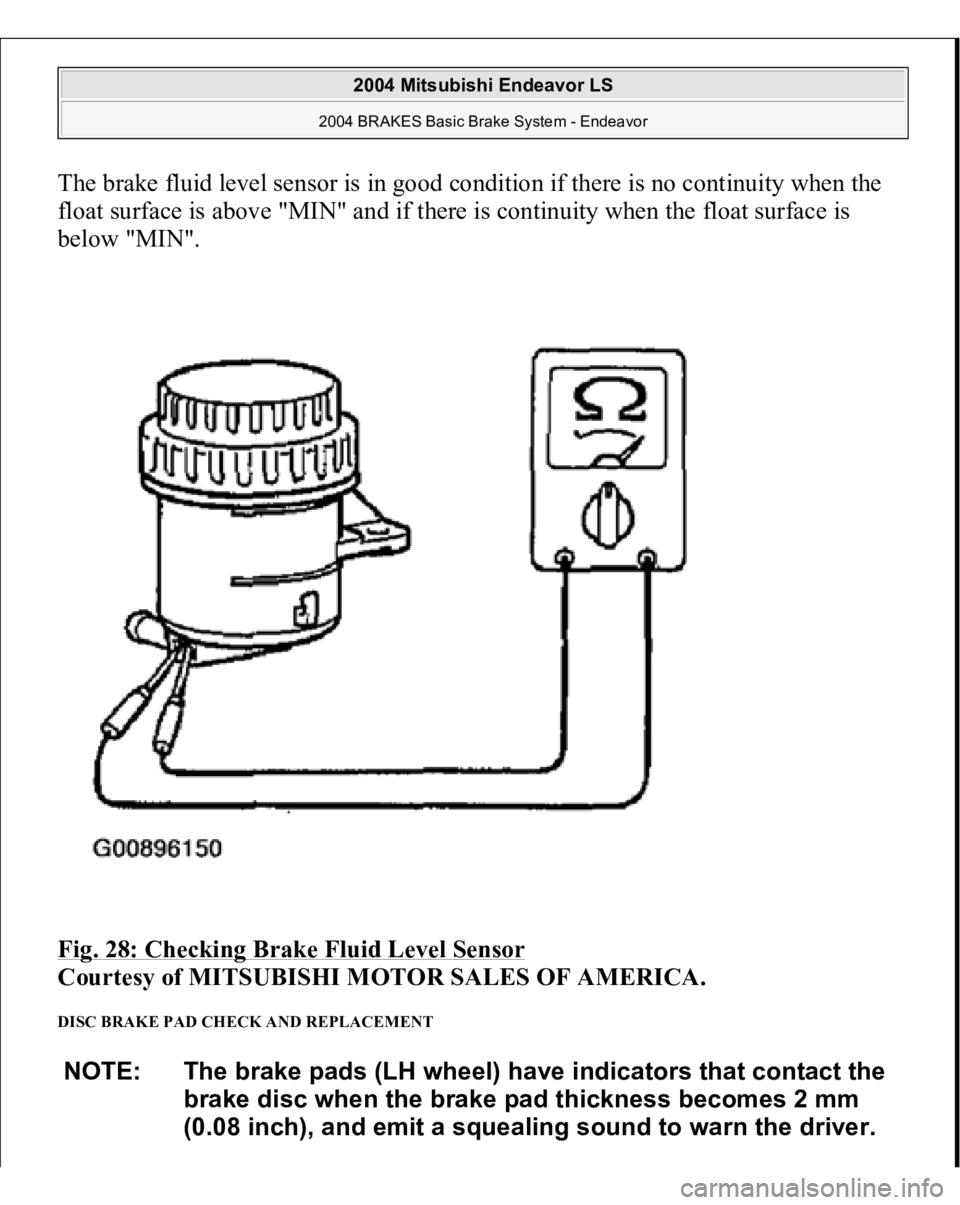
The brake fluid level sensor is in good condition if there is no continuity when the
float surface is above "MIN" and if there is continuity when the float surface is
below "MIN".
Fig. 28: Checking Brake Fluid Level Sensor
Courtesy of MITSUBISHI MOTOR SALES OF AMERICA.
DISC BRAKE PAD CHECK AND REPLACEMENT NOTE: The brake pads (LH wheel) have indicators that contact the
brake disc when the brake pad thickness becomes 2 mm
(0.08 inch), and emit a squealing sound to warn the driver.
2004 Mitsubishi Endeavor LS
2004 BRAKES Basic Brake System - Endeavor
Page 745 of 3870
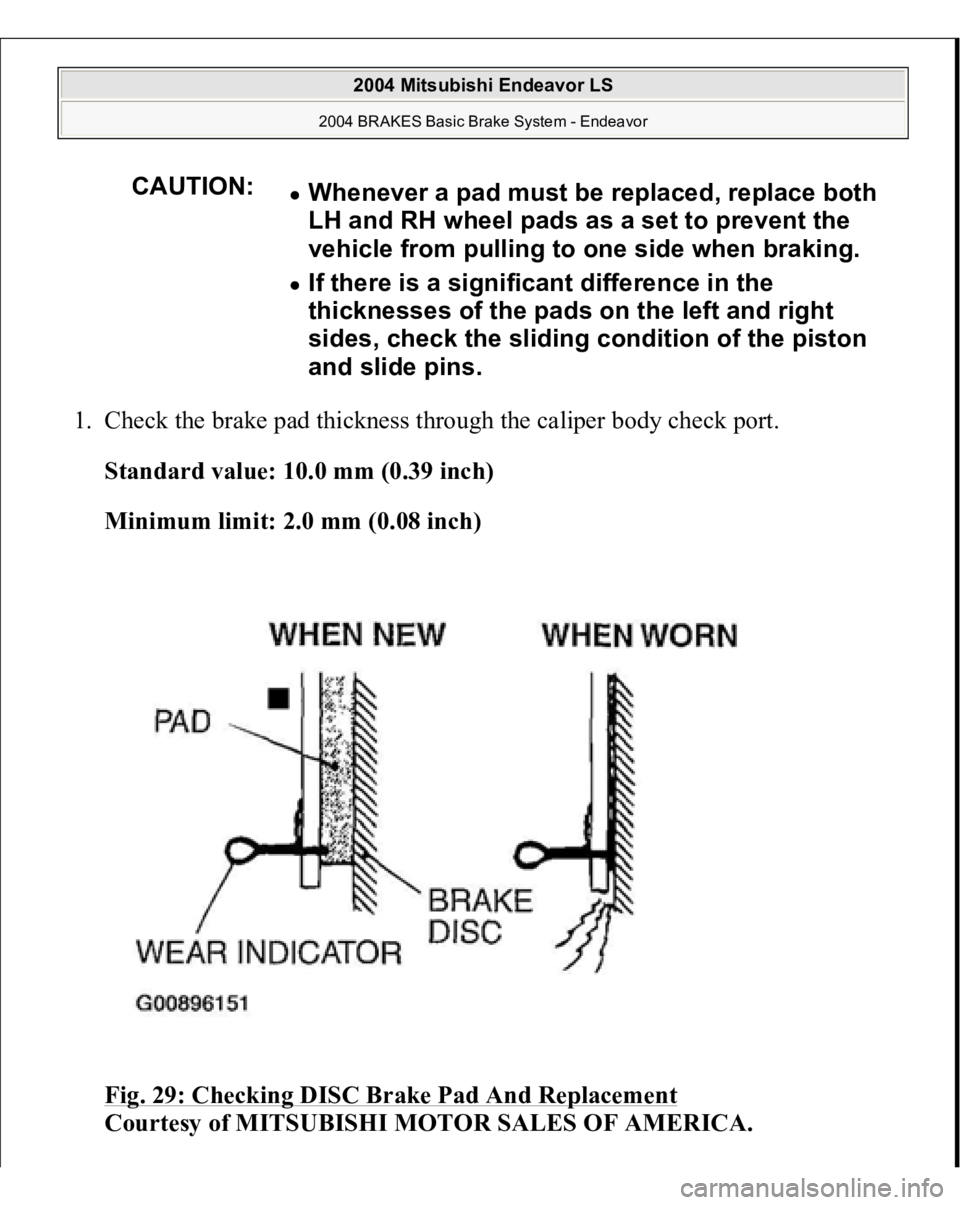
1. Check the brake pad thickness through the caliper body check port.
Standard value: 10.0 mm (0.39 inch)
Minimum limit: 2.0 mm (0.08 inch)
Fig. 29: Checking DISC Brake Pad And Replacement
Courtesy of MITSUBISHI MOTOR SALES OF AMERICA.
CAUTION:
Whenever a pad must be replaced, replace both
LH and RH wheel pads as a set to prevent the
vehicle from pulling to one side when braking. If there is a significant difference in the
thicknesses of the pads on the left and right
sides, check the sliding condition of the piston
and slide pins.
2004 Mitsubishi Endeavor LS
2004 BRAKES Basic Brake System - Endeavor
Page 749 of 3870
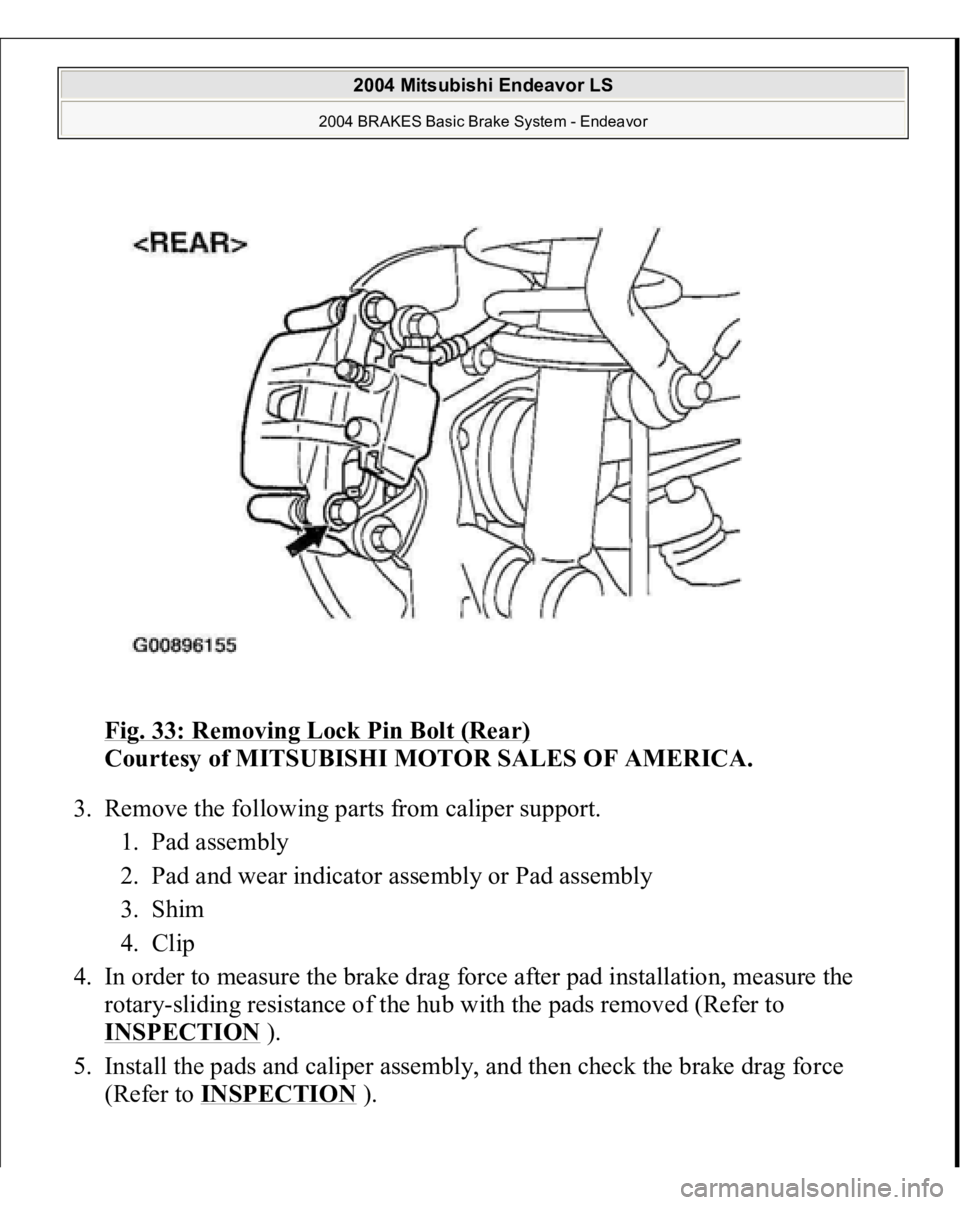
Fig. 33: Removing Lock Pin Bolt (Rear)
Courtesy of MITSUBISHI MOTOR SALES OF AMERICA.
3. Remove the following parts from caliper support.
1. Pad assembly
2. Pad and wear indicator assembly or Pad assembly
3. Shim
4. Clip
4. In order to measure the brake drag force after pad installation, measure the
rotary-sliding resistance of the hub with the pads removed (Refer to
INSPECTION
).
5. Install the pads and caliper assembly, and then check the brake drag force
(Refer to INSPECTION
).
2004 Mitsubishi Endeavor LS
2004 BRAKES Basic Brake System - Endeavor
Page 774 of 3870
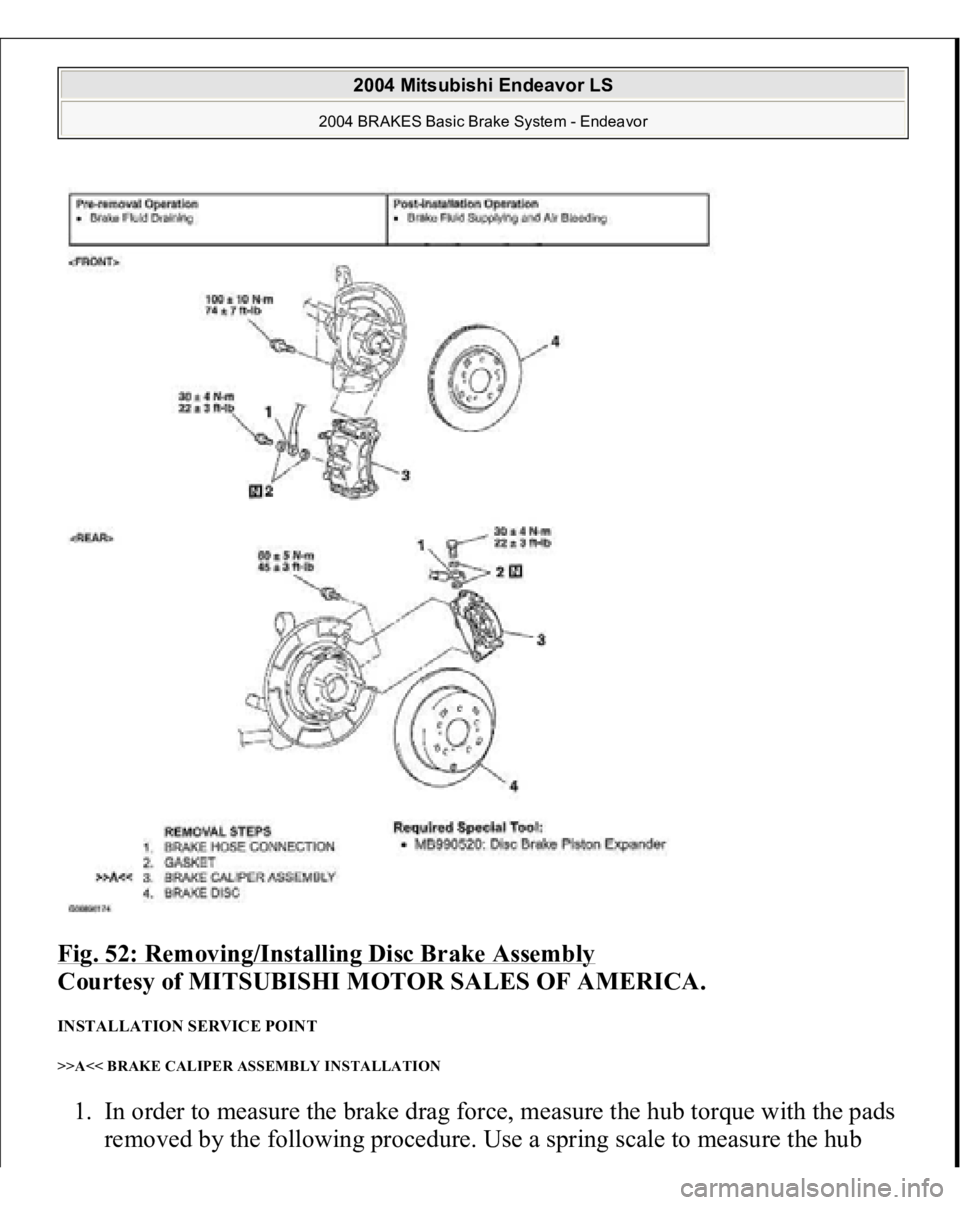
Fig. 52: Removing/Installing Disc Brake Assembly
Courtesy of MITSUBISHI MOTOR SALES OF AMERICA.
INSTALLATION SERVICE POINT >>A<< BRAKE CALIPER ASSEMBLY INSTALLATION 1. In order to measure the brake drag force, measure the hub torque with the pads
removed by the following procedure. Use a spring scale to measure the hub
2004 Mitsubishi Endeavor LS
2004 BRAKES Basic Brake System - Endeavor
Page 775 of 3870
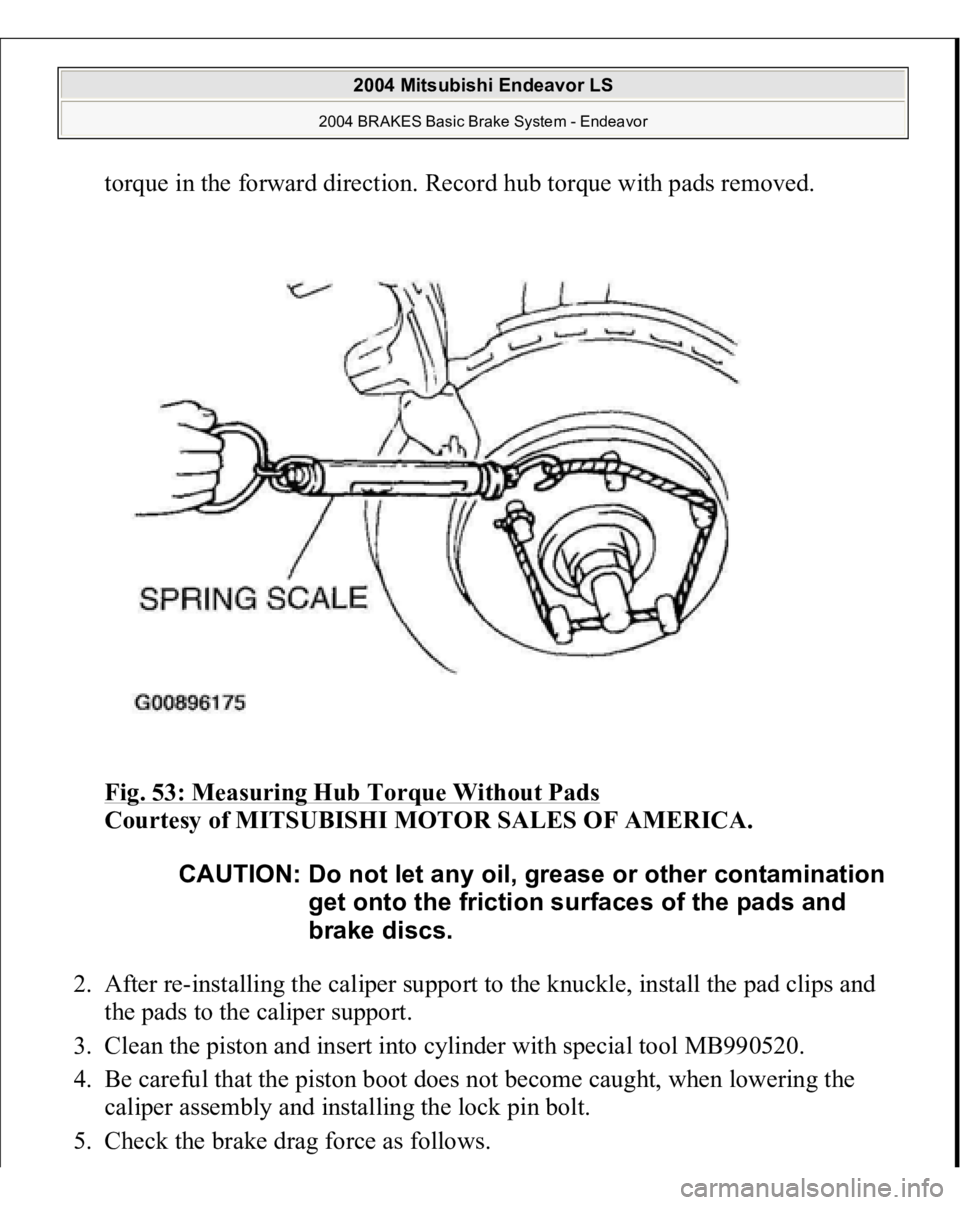
torque in the forward direction. Record hub torque with pads removed.
Fig. 53: Measuring Hub Torque Without Pads
Courtesy of MITSUBISHI MOTOR SALES OF AMERICA.
2. After re-installing the caliper support to the knuckle, install the pad clips and
the pads to the caliper support.
3. Clean the piston and insert into cylinder with special tool MB990520.
4. Be careful that the piston boot does not become caught, when lowering the
caliper assembly and installing the lock pin bolt.
5. Check the brake drag force as follows.
CAUTION: Do not let any oil, grease or other contamination
get onto the friction surfaces of the pads and
brake discs.
2004 Mitsubishi Endeavor LS
2004 BRAKES Basic Brake System - Endeavor
Page 776 of 3870
![MITSUBISHI ENDEAVOR 2004 Service Repair Manual 1. Start the engine and hold the brake pedal down for 5 seconds. [Pedal
depression force: approximately 200 N (45 pound)]
2. Stop the engine.
3. Turn the brake disc forward 10 times.
4. Use a s](/img/19/57105/w960_57105-775.png "MITSUBISHI ENDEAVOR 2004 Service Repair Manual 1. Start the engine and hold the brake pedal down for 5 seconds. [Pedal
depression force: approximately 200 N (45 pound)]
2. Stop the engine.
3. Turn the brake disc forward 10 times.
4. Use a s")
1. Start the engine and hold the brake pedal down for 5 seconds. [Pedal
depression force: approximately 200 N (45 pound)]
2. Stop the engine.
3. Turn the brake disc forward 10 times.
4. Use a spring scale to measure the hub torque with pads installed in the
same direction as earlier.
5. Calculate the drag force of the disc brake [difference between hub torque
with pads installed and hub torque with pads removed].
Standard value: 68 N (15 pounds) or less
Fig. 54: Measuring Drag Force
Courtes
y of MITSUBISHI MOTOR SALES OF AMERICA
.
2004 Mitsubishi Endeavor LS
2004 BRAKES Basic Brake System - Endeavor
Page 777 of 3870
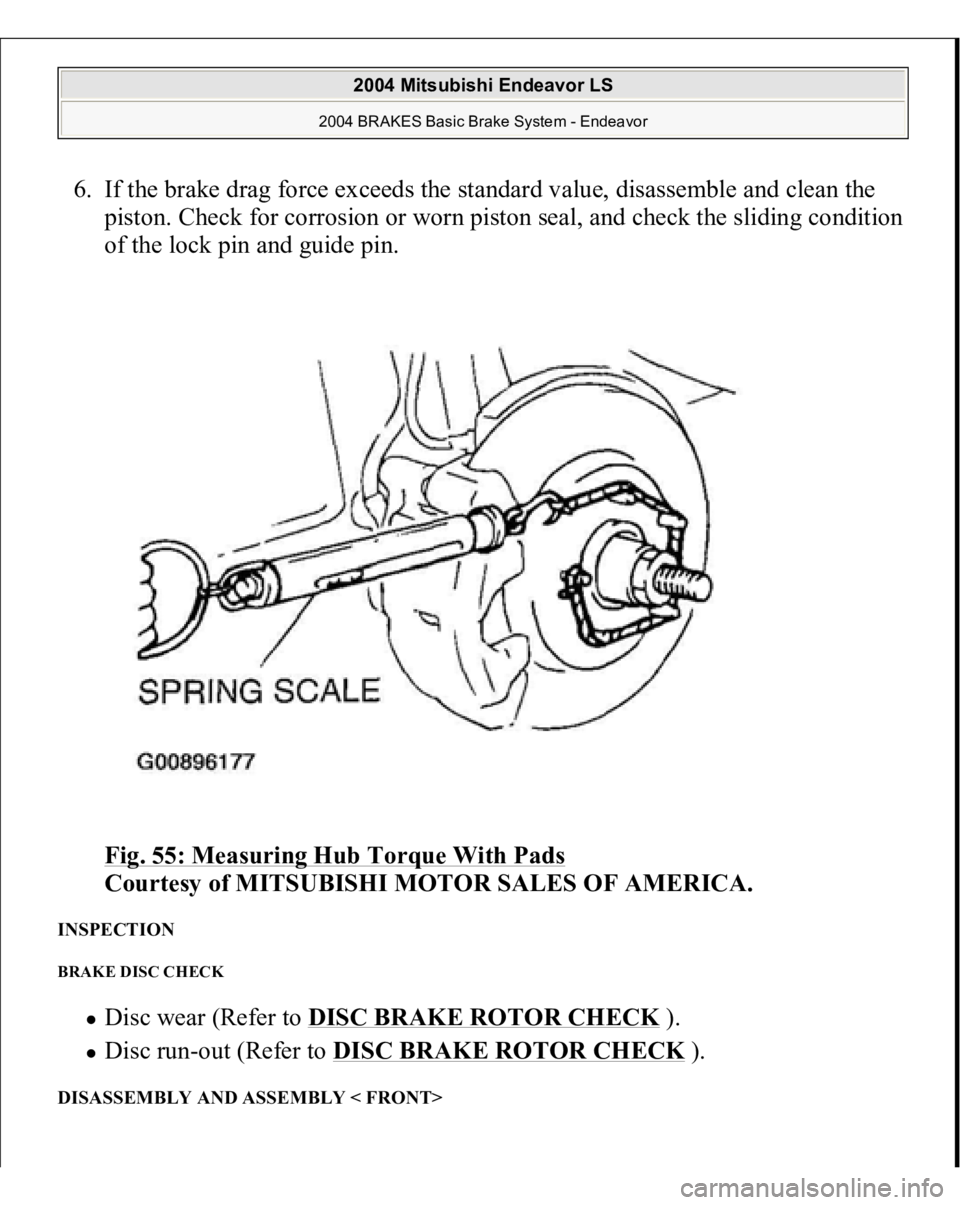
6. If the brake drag force exceeds the standard value, disassemble and clean the
piston. Check for corrosion or worn piston seal, and check the sliding condition
of the lock pin and guide pin.
Fig. 55: Measuring Hub Torque With Pads
Courtesy of MITSUBISHI MOTOR SALES OF AMERICA.
INSPECTION BRAKE DISC CHECK
Disc wear (Refer to DISC BRAKE ROTOR CHECK
).
Disc run-out (Refer to DISC BRAKE ROTOR CHECK
).
DISASSEMBLY AND ASSEMBLY < FRONT>
2004 Mitsubishi Endeavor LS
2004 BRAKES Basic Brake System - Endeavor
Page 787 of 3870
Attach a guide pin (with "g" on the bolt head) at the bleeder nipple side of the
caliper body and a lock pin (with "l" on the bolt head) at the opposite side. INSPECTION
Check the cylinder for wear, damage or rust. Check the piston surface for wear, damage or rust. Check the caliper body or sleeve for wear. Check the pad for damage or adhesion of grease, check the backing metal for
damage.
PAD WEAR CHECK 1. Measure thickness at the thinnest and most worn area of the pad.
Standard value: 10 mm (0.39 inch)
Minimum limit: 2.0 mm (0.08 inch)
WARNING:
Always replace both brake pads on each wheel
as a set (both front wheels or both rear wheels).
Failure to do so will result in uneven braking,
which may cause unreliable brake operation. If there is significant difference in the thickness
of the pads on the left and right sides, check the
sliding condition of the piston and slide pins.
2004 Mitsubishi Endeavor LS
2004 BRAKES Basic Brake System - Endeavor