warning MITSUBISHI ENDEAVOR 2004 Service Repair Manual
[x] Cancel search | Manufacturer: MITSUBISHI, Model Year: 2004, Model line: ENDEAVOR, Model: MITSUBISHI ENDEAVOR 2004Pages: 3870, PDF Size: 98.47 MB
Page 230 of 3870
YES: The procedure is complete.
NO: Go to Step 1 .
INSPECTION PROCEDURE 3: WHEN THE IGNITION KEY IS TURNED TO ON (ENGINE STOPPED), THE
BRAKE/ABS WARNING LIGHT DOES NOT ILLUMINATE, INSPECTION PROCEDURE 4: THE BRAKE/ABS
WARNING LIGHT REMAINS ILLUMINATED AFTER THE ENGINE IS STARTED
2004 Mitsubishi Endeavor LS
2004 BRAKES Anti-Lock Braking System (ABS) - Endeavor
Page 232 of 3870
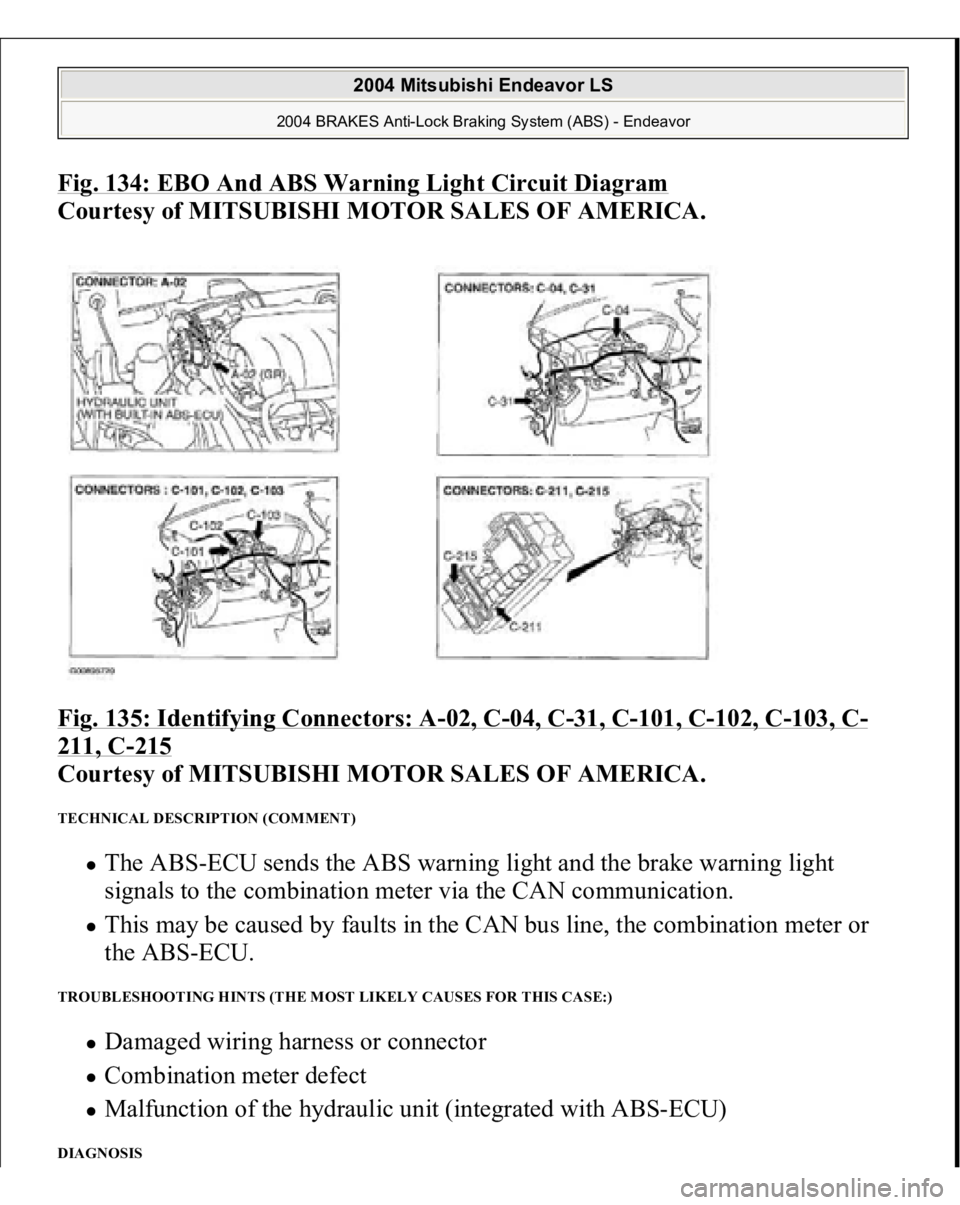
Fig. 134: EBO And ABS Warning Light Circuit Diagram
Courtesy of MITSUBISHI MOTOR SALES OF AMERICA.
Fig. 135: Identifying Connectors: A
-02, C
-04, C
-31, C
-101, C
-102, C
-103, C
-
211, C
-215
Courtesy of MITSUBISHI MOTOR SALES OF AMERICA.
TECHNICAL DESCRIPTION (COMMENT)
The ABS-ECU sends the ABS warning light and the brake warning light
signals to the combination meter via the CAN communication. This may be caused by faults in the CAN bus line, the combination meter or
the ABS-ECU.
TROUBLESHOOTING HINTS (THE MOST LIKELY CAUSES FOR THIS CASE:)
Damaged wiring harness or connector Combination meter defect Malfunction of the hydraulic unit (integrated with ABS-ECU)
DIAGNOSIS
2004 Mitsubishi Endeavor LS
2004 BRAKES Anti-Lock Braking System (ABS) - Endeavor
Page 255 of 3870
4. After checking that the selector lever is in "P" range, start the engine.
5. Select "Interactive Diagnosis" from the start-up screen.
6. Select "System Select."
7. Choose "ABS" from the "CHASSIS" tab.
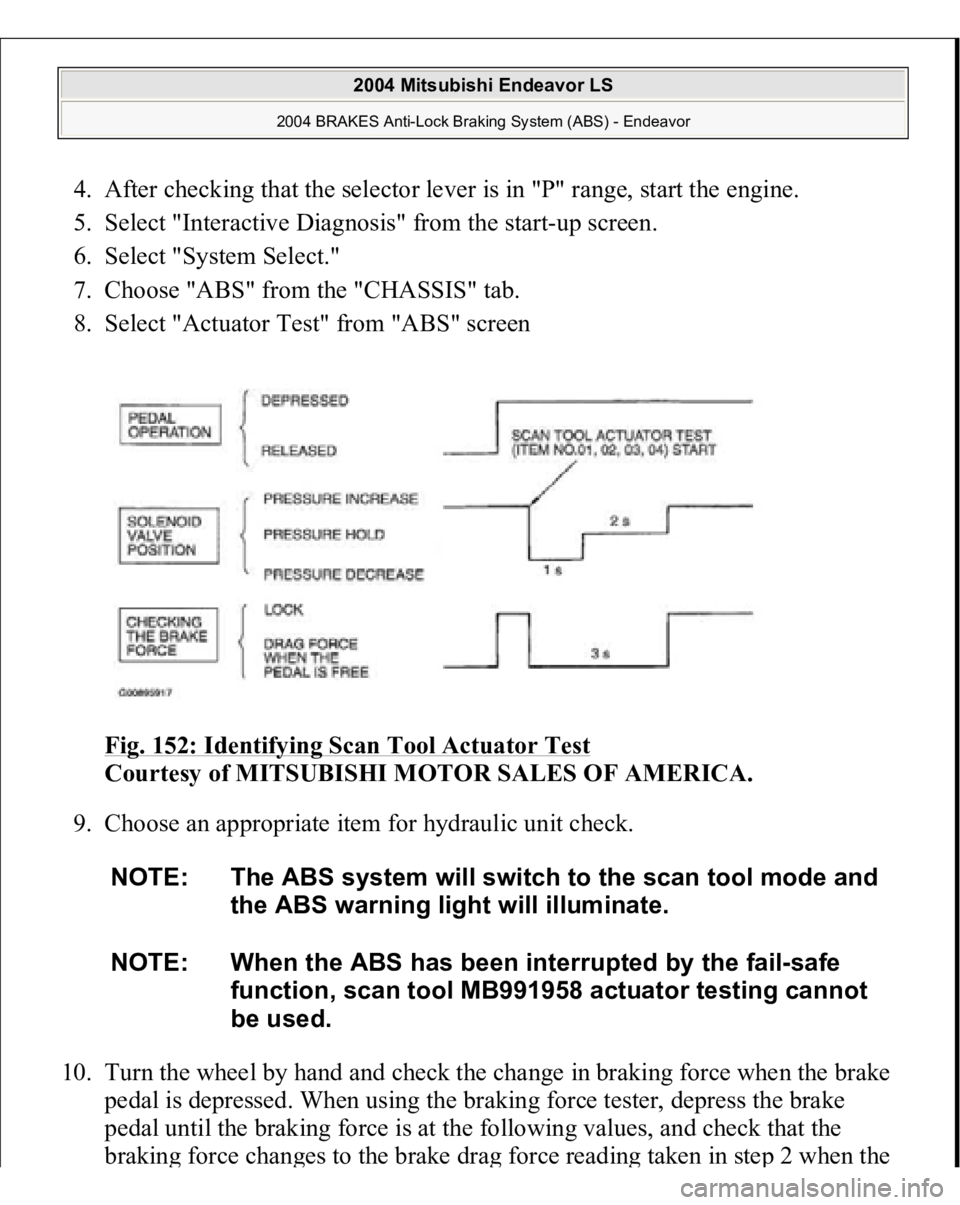
8. Select "Actuator Test" from "ABS" screen
Fig. 152: Identifying Scan Tool Actuator Test
Courtesy of MITSUBISHI MOTOR SALES OF AMERICA.
9. Choose an appropriate item for hydraulic unit check.
10. Turn the wheel by hand and check the change in braking force when the brake
pedal is depressed. When using the braking force tester, depress the brake
pedal until the braking force is at the following values, and check that the
brakin
g force chan
ges to the brake dra
g force readin
g taken in ste
p 2 when the
NOTE: The ABS system will switch to the scan tool mode and
the ABS warning light will illuminate.
NOTE: When the ABS has been interrupted by the fail-safe
function, scan tool MB991958 actuator testing cannot
be used.
2004 Mitsubishi Endeavor LS
2004 BRAKES Anti-Lock Braking System (ABS) - Endeavor
Page 256 of 3870
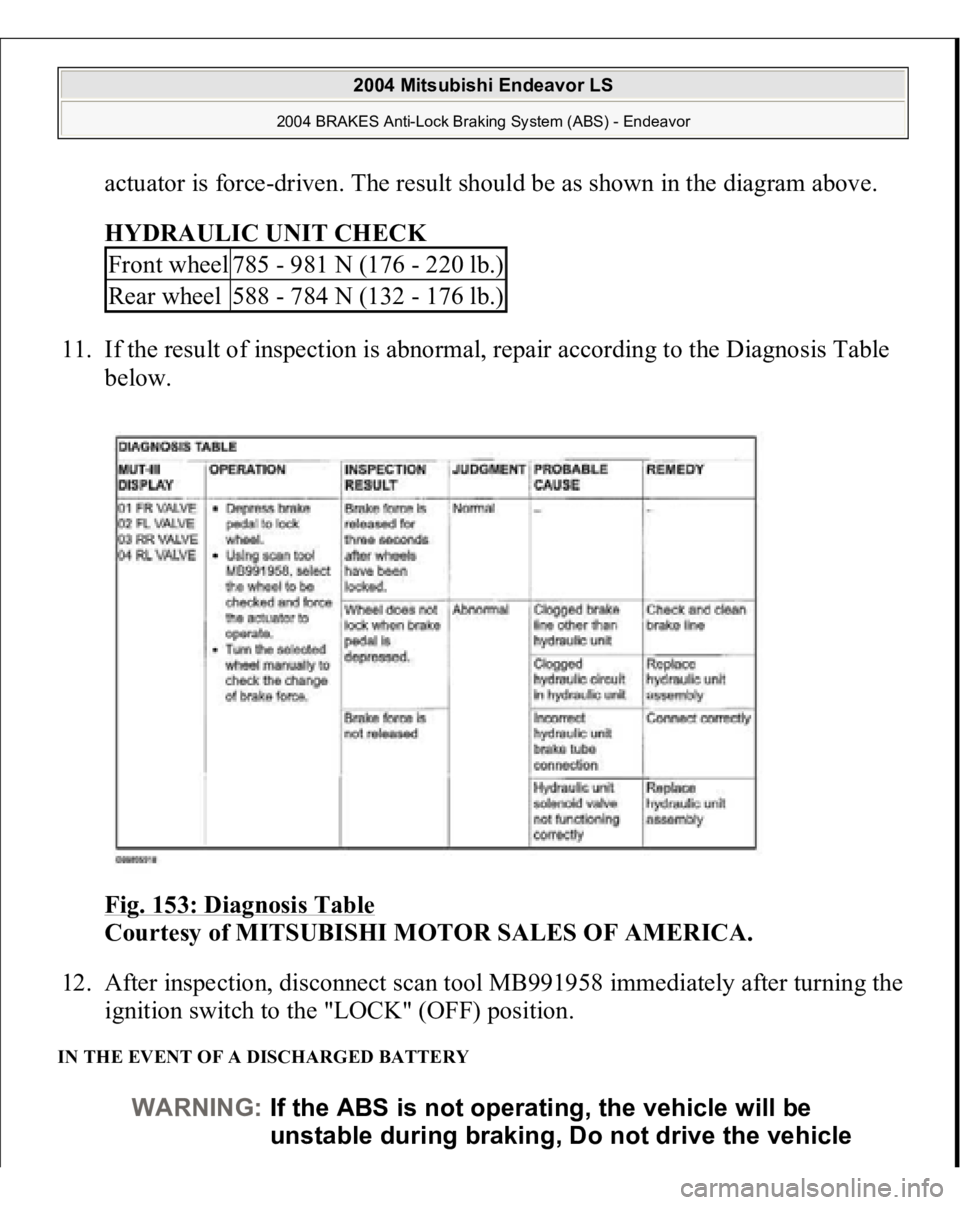
actuator is force-driven. The result should be as shown in the diagram above.
HYDRAULIC UNIT CHECK
11. If the result of inspection is abnormal, repair according to the Diagnosis Table
below.
Fig. 153: Diagnosis Table
Courtesy of MITSUBISHI MOTOR SALES OF AMERICA.
12. After inspection, disconnect scan tool MB991958 immediately after turning the
ignition switch to the "LOCK" (OFF) position.
IN THE EVENT OF A DISCHARGED BATTERY
Front wheel
785 - 981 N (176 - 220 lb.)
Rear wheel
588 - 784 N (132 - 176 lb.)
WARNING:If the ABS is not operating, the vehicle will be
unstable during braking, Do not drive the vehicle
2004 Mitsubishi Endeavor LS
2004 BRAKES Anti-Lock Braking System (ABS) - Endeavor
Page 259 of 3870
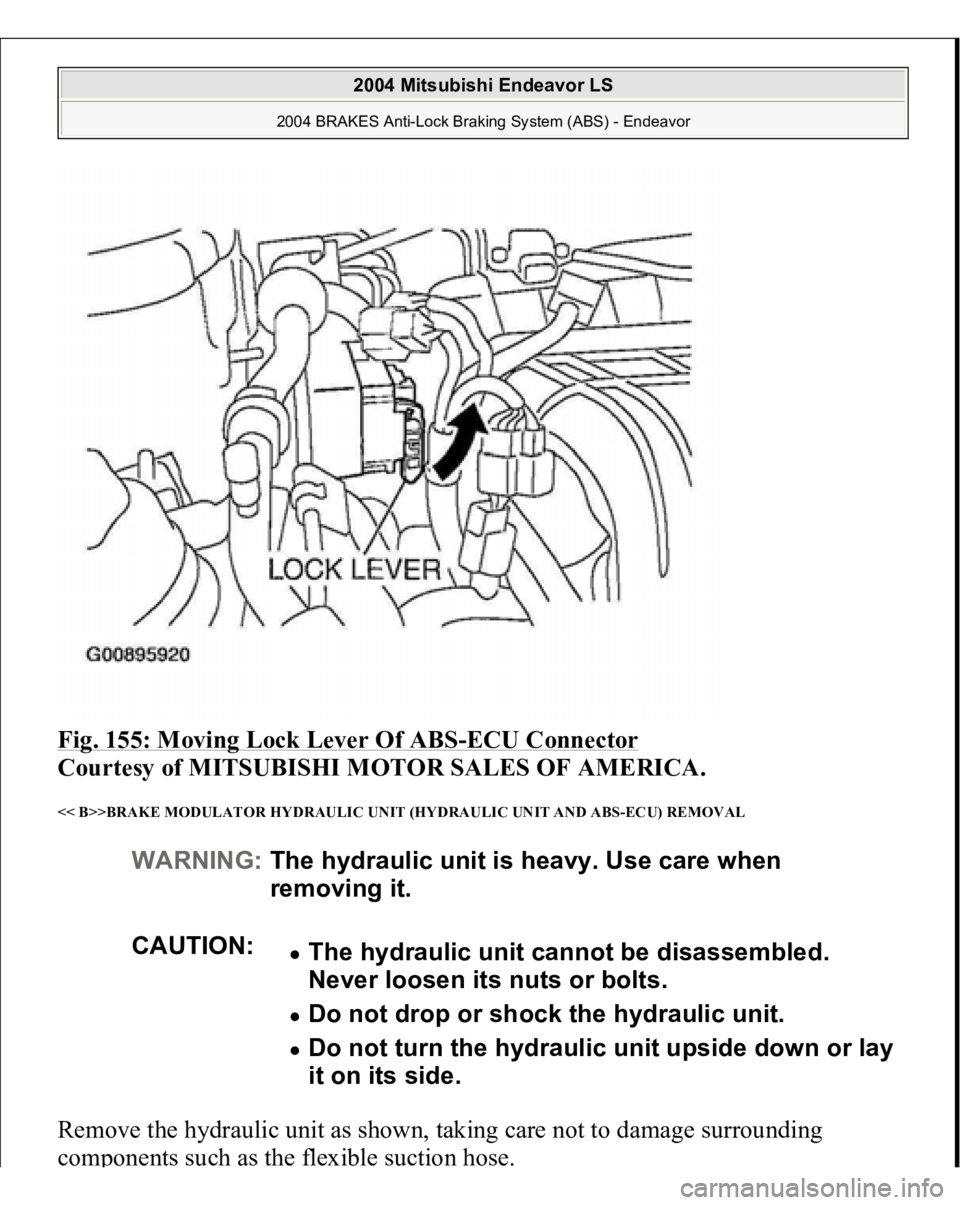
Fig. 155: Moving Lock Lever Of ABS
-ECU Connector
Courtesy of MITSUBISHI MOTOR SALES OF AMERICA.
<< B>>BRAKE MODULATOR HYDRAULIC UNIT (HYDRAULIC UNIT AND ABS-ECU) REMOVAL Remove the hydraulic unit as shown, taking care not to damage surrounding
com
ponents such as the flexible suction hose.WARNING:The hydraulic unit is heavy. Use care when
removing it.
CAUTION:
The hydraulic unit cannot be disassembled.
Never loosen its nuts or bolts. Do not drop or shock the hydraulic unit. Do not turn the hydraulic unit upside down or lay
it on its side.
2004 Mitsubishi Endeavor LS
2004 BRAKES Anti-Lock Braking System (ABS) - Endeavor
Page 273 of 3870
2004 ACCESSORIES/SAFETY EQUIPMENT
Mitsubishi - Air Bag Restraint Systems
DESCRIPTION & OPERATION Supplemental Restraint System (SRS) components on vehicles with single-stage air
bag systems include single-stage driver-side and passenger-side air bag modules,
side impact air bag modules, seat belt pretensioners, front impact sensors, side
impact sensors, SRS Electronic Control Unit (SRS ECU) and an AIR BAG warning
light or SRS warning light.
SRS components on vehicles with dual-stage air bag systems include dual-stage
driver-side and passenger-side air bag modules, side impact air bag modules, seat
belt pretensioners, front impact sensors, side impact sensors, SRS Electronic
Control Unit (SRS ECU), occupant classification sensor, occupant classification
sensor ECU, seat belt switches, AIR BAG warning light or SRS warning light,
PASSENGER AIR BAG OFF warning light and a PASSENGER SEAT BELT
warning light. COMPONENT LOCATIONS Refer to illustration for SRS com
ponent locations. See
Fig. 1
&
Fig. 2
.
WARNING:Accidental air bag deployment is possible. Personal
injury may result. Read and follow all WARNINGS
and AIR BAG SAFETY PRECAUTIONS
before
working on air bag system or related components.
2004 Mitsubishi Endeavor Limited
2004 ACCESSORIES/SAFETY EQUIPMENT Mitsubishi - Air Bag Restraint Systems
2004 Mitsubishi Endeavor Limited
2004 ACCESSORIES/SAFETY EQUIPMENT Mitsubishi - Air Bag Restraint Systems
Page 275 of 3870
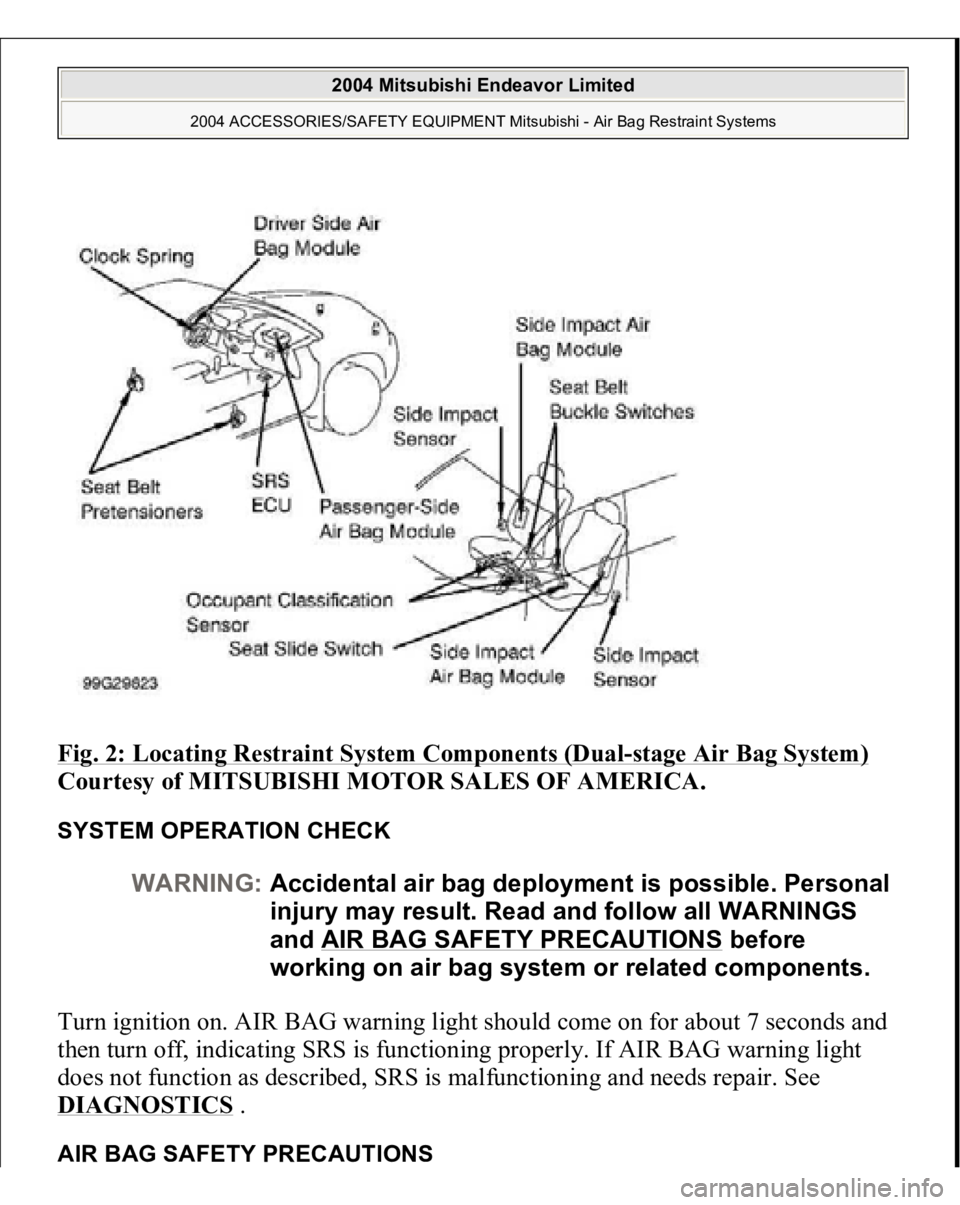
Fig. 2: Locating Restraint System Components (Dual
-stage Air Bag System)
Courtesy of MITSUBISHI MOTOR SALES OF AMERICA.
SYSTEM OPERATION CHECK Turn ignition on. AIR BAG warning light should come on for about 7 seconds and
then turn off, indicating SRS is functioning properly. If AIR BAG warning light
does not function as described, SRS is malfunctioning and needs repair. See DIAGNOSTICS
.
AIR BAG SAFETY PRECAUTION
S
WARNING:Accidental air bag deployment is possible. Personal
injury may result. Read and follow all WARNINGS
and AIR BAG SAFETY PRECAUTIONS
before
working on air bag system or related components.
2004 Mitsubishi Endeavor Limited
2004 ACCESSORIES/SAFETY EQUIPMENT Mitsubishi - Air Bag Restraint Systems
Page 276 of 3870
Observe these precautions when servicing the air bag system:
Disable SRS before servicing any SRS component. Failure to do this may
result in accidental air bag deployment and possible personal injury. See DISABLING & ACTIVATING AIR BAG SYSTEM
.
After disabling SRS, wait at least 60 seconds before servicing SRS. After servicing, always turn ignition on from outside of vehicle in case of
accidental air bag module deployment. After servicing, check AIR BAG warning light to verify system operation. See SYSTEM OPERATION CHECK
.
Always wear safety glasses when servicing or handling an SRS component. Hearing protection must be worn when performing deployment procedures. DO NOT expose air bag modules, clockspring or SRS ECU to temperatures
greater than 200°F (93°C ). DO NOT expose seat belt pretensioners to temperatures greater than 194°F
(90°C ). When placing a live air bag module on a bench or other surface, always place
air bag module with trim cover facing up and away from surface. This will
reduce motion of air bag module if accidental deployment occurs. After air bag module deploys, surrounding surfaces may contain deposits of
sodium hydroxide, which irritates skin. Always wear safety glasses, rubber
gloves and a long-sleeved shirt during clean-up. Wash hands using mild soap
and water. Follow correct clean-up and disposal procedures. See
DISPOSAL
PROCEDURES
.
Because of critical system operating requirements, DO NOT service any SRS
components. Repairs are only made by replacing defective components. DO NOT allow any electrical source near inflator on back of air bag module. When carrying a live (undeployed) air bag module, trim cover must be pointed
away from body to minimize injury in case of accidental air bag deployment. If instructed to probe wire harness, do so from harness side of connector. DO NOT probe a wire through insulator. Wire will be damaged and eventually
fail due to corrosion. When
performin
g electrical tests,
prevent accidental shortin
g of terminals.
2004 Mitsubishi Endeavor Limited
2004 ACCESSORIES/SAFETY EQUIPMENT Mitsubishi - Air Bag Restraint Systems
Page 277 of 3870
Such shorts can damage fuses or components and may cause a second
Diagnostic Trouble Code (DTC) to set, making diagnosis of original problem
more difficult. Never use an analog volt/ohm meter or test light in place of a Digital Volt/Ohm
Meter (DVOM). Use only a DVOM with a maximum test current of 2 mA
(milliamps) at minimum range of resistance measurement. If SRS is not fully functional for any reason, DO NOT drive vehicle until
system is repaired and fully functional. DO NOT remove bulbs, modules,
sensors, or other components or in any way disable system from operating
normally. If SRS is not functional, park vehicle until repairs are made.
DISABLING & ACTIVATING AIR BAG SYSTEM To disable system, turn ignition off. Disconnect negative battery cable. Shield cable
end with electrical tape. Wait at least 60 seconds before servicing air bag system.
To activate system, reconnect negative battery cable. Check system operation. See SYSTEM OPERATION CHECK
.
DISPOSAL PROCEDURES DEPLOYED AIR BAG OR SEAT BELT PRETENSIONER Place deployed component in a strong plastic bag and seal tightly. Dispose of
component as you would any other part. No other special disposal procedure is
required. UNDEPLOYED AIR BAG OR SEAT BELT PRETENSIONER
WARNING:Accidental air bag deployment is possible. Personal
injury may result. Read and follow all WARNINGS
and AIR BAG SAFETY PRECAUTIONS
before
working on air bag system or related components.
NOTE: Undeployed air bag modules must be deployed before
disposal. Disposing of an undeployed air bag may violate
federal, state and/or local laws. This also applies to vehicles
that are to be scrapped.
2004 Mitsubishi Endeavor Limited
2004 ACCESSORIES/SAFETY EQUIPMENT Mitsubishi - Air Bag Restraint Systems
Page 278 of 3870
On-vehicle Deployment 1. Before proceeding, see
AIR BAG SAFETY PRECAUTIONS
. Move vehicle
to an isolated area. Open all doors and windows. Disconnect and shield
negative battery cable end. Disconnect positive battery cable. Remove battery
from vehicle. Wait at least 60 seconds before continuing.
2. To deploy driver-side air bag module, remove steering column lower cover.
Disconnect lower clockspring Yellow 4-pin connector. Cut harness side of
connector from wire harness and strip ends of driver-side air bag module wires
on harness side of clockspring connector. See
WIRING DIAGRAMS
.
3. To deploy passenger-side air bag module, remove glove box and glove box
outer case. Disconnect passenger-side air bag module Red connector.
4. To deploy side impact air bag module, disconnect appropriate side impact air
bag module Red connector, located under front seat.
5. To deploy seat belt pretensioner, disconnect appropriate seat belt pretensioner
connector, located at seat belt pretensioner.
6. Fabricate a de
ployment harness usin
g two wires at least 20 feet
(6.1 m
) in
WARNING:Air bag modules and seat belt pretensioners make
loud noises during deployment. Air bag module and
seat belt pretensioner deployment could cause
personal injury. Always deploy components
outdoors and away from people. Never deploy air
bag modules with trim cover face down.
NOTE: If vehicle is to be scrapped, perform On-vehicle
deployment. See ON
-VEHICLE DEPLOYMENT
. If vehicle
will continue to be operated, perform Off-vehicle
Deployment. See OFF
-VEHICLE DEPLOYMENT
.
NOTE: Driver-side and passenger-side air bag modules will be
either single-stage or dual-stage. Consult wiring
diagrams to ensure correct wires are cut and spliced
prior to deployment. See WIRING DIAGRAMS
.
2004 Mitsubishi Endeavor Limited
2004 ACCESSORIES/SAFETY EQUIPMENT Mitsubishi - Air Bag Restraint Systems