height MITSUBISHI GRANDIS 2008 Owner's Manual (in English)
[x] Cancel search | Manufacturer: MITSUBISHI, Model Year: 2008, Model line: GRANDIS, Model: MITSUBISHI GRANDIS 2008Pages: 458, PDF Size: 18.52 MB
Page 4 of 458
Overview
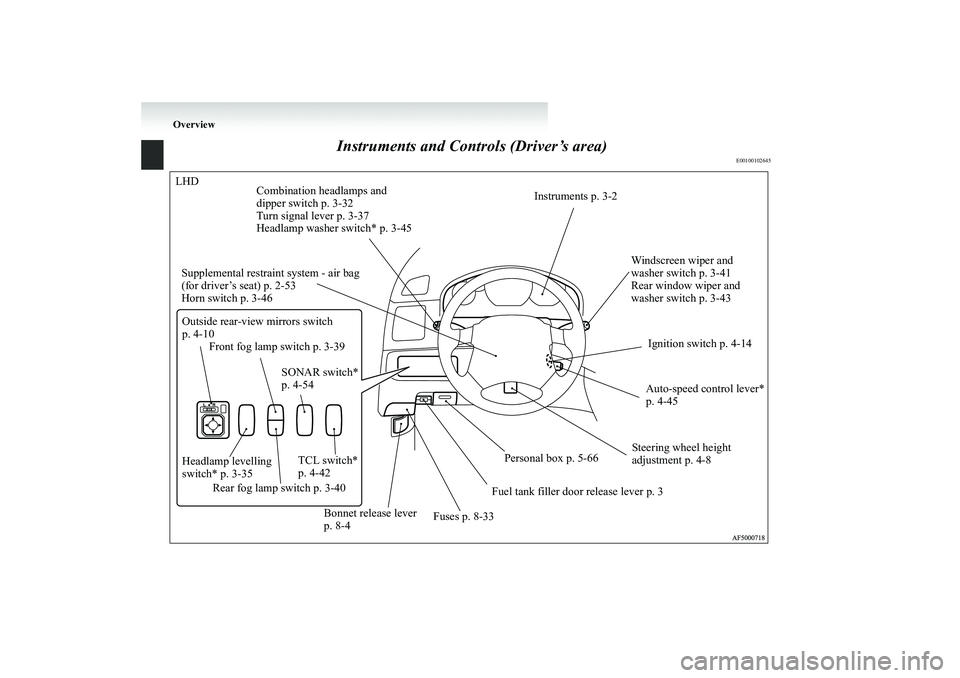
Instruments and Controls (Driver’s area)
E00100102645
LHD
Instruments p. 3-2
Windscreen wiper and
washer switch p. 3-41
Rear window wiper and
washer switch p. 3-43 Supplemental restraint system - air bag
(for driver’s seat) p. 2-53
Horn switch p. 3-46Combination headlamps and
dipper switch p. 3-32
Turn signal lever p. 3-37
Headlamp washer switch* p. 3-45
Ignition switch p. 4-14
Personal box p. 5-66
Bonnet release lever
p. 8-4 Outside rear-view mirrors switch
p. 4-10
Front fog lamp switch p. 3-39
Fuses p. 8-33Fuel tank filler door release lever p. 3 Headlamp levelling
switch* p. 3-35TCL switch*
p. 4-42
Rear fog lamp switch p. 3-40Auto-speed control lever*
p. 4-45 SONAR switch*
p. 4-54
Steering wheel height
adjustment p. 4-8BK-XP08E1ENUK.en-uk.book Page 1 Monday, August 13, 2007 2:20 PM
Page 5 of 458
Overview
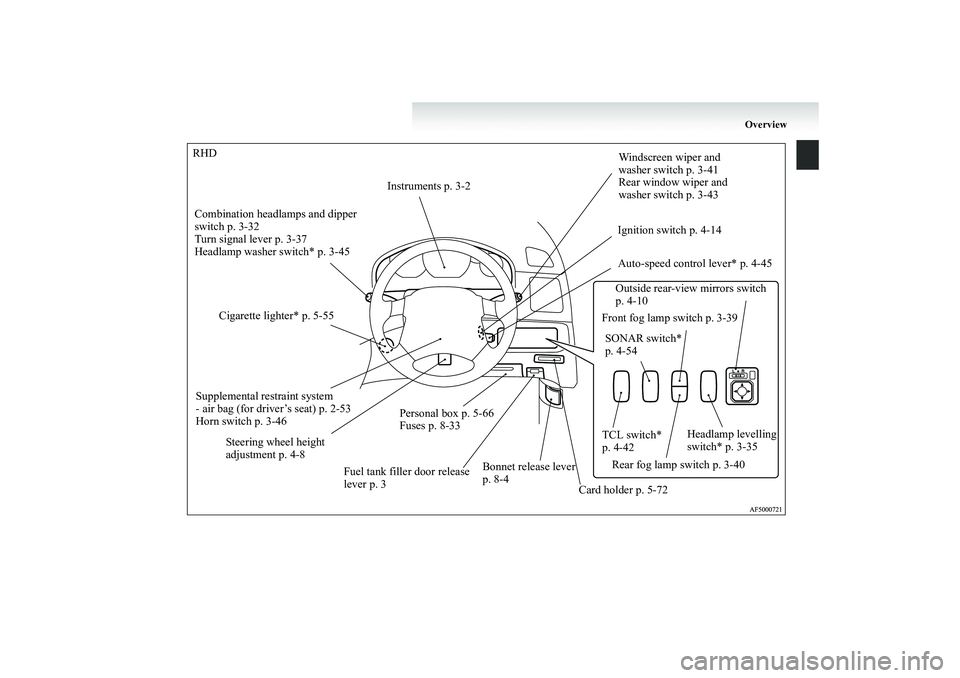
RHD
Instruments p. 3-2Windscreen wiper and
washer switch p. 3-41
Rear window wiper and
washer switch p. 3-43
Supplemental restraint system
- air bag (for driver’s seat) p. 2-53
Horn switch p. 3-46 Combination headlamps and dipper
switch p. 3-32
Turn signal lever p. 3-37
Headlamp washer switch* p. 3-45Ignition switch p. 4-14
Personal box p. 5-66
Fuses p. 8-33
Bonnet release lever
p. 8-4Outside rear-view mirrors switch
p. 4-10
Front fog lamp switch p. 3-39
Steering wheel height
adjustment p. 4-8
Fuel tank filler door release
lever p. 3 Cigarette lighter* p. 5-55
Card holder p. 5-72Headlamp levelling
switch* p. 3-35 TCL switch*
p. 4-42
Rear fog lamp switch p. 3-40Auto-speed control lever* p. 4-45
SONAR switch*
p. 4-54
BK-XP08E1ENUK.en-uk.book Page 2 Monday, August 13, 2007 2:20 PM
Page 50 of 458
2-2 Seat and seat belts
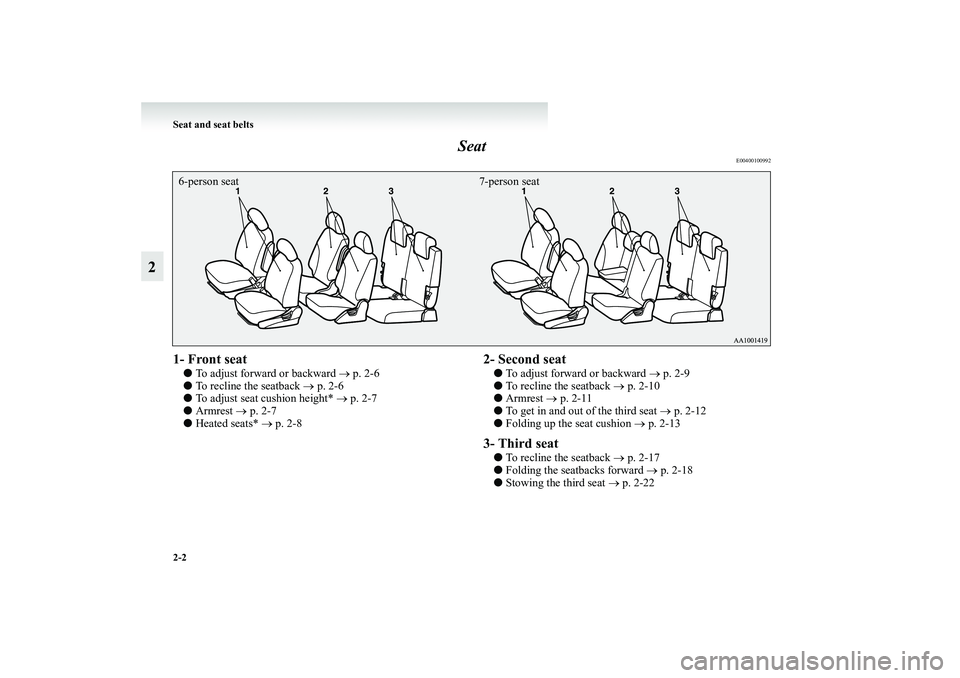
2Seat
E00400100992
1- Front seat ●To adjust forward or backward → p. 2-6
●To recline the seatback → p. 2-6
●To adjust seat cushion height* → p. 2-7
●Armrest → p. 2-7
●Heated seats* → p. 2-8
2- Second seat●To adjust forward or backward → p. 2-9
●To recline the seatback → p. 2-10
●Armrest → p. 2-11
●To get in and out of the third seat → p. 2-12
●Folding up the seat cushion → p. 2-133- Third seat●To recline the seatback → p. 2-17
●Folding the seatbacks forward → p. 2-18
●Stowing the third seat → p. 2-22
6-person seat 7-person seatBK-XP08E1ENUK.en-uk.book Page 2 Monday, August 13, 2007 2:20 PM
Page 55 of 458
Seat and seat belts
2-7
2
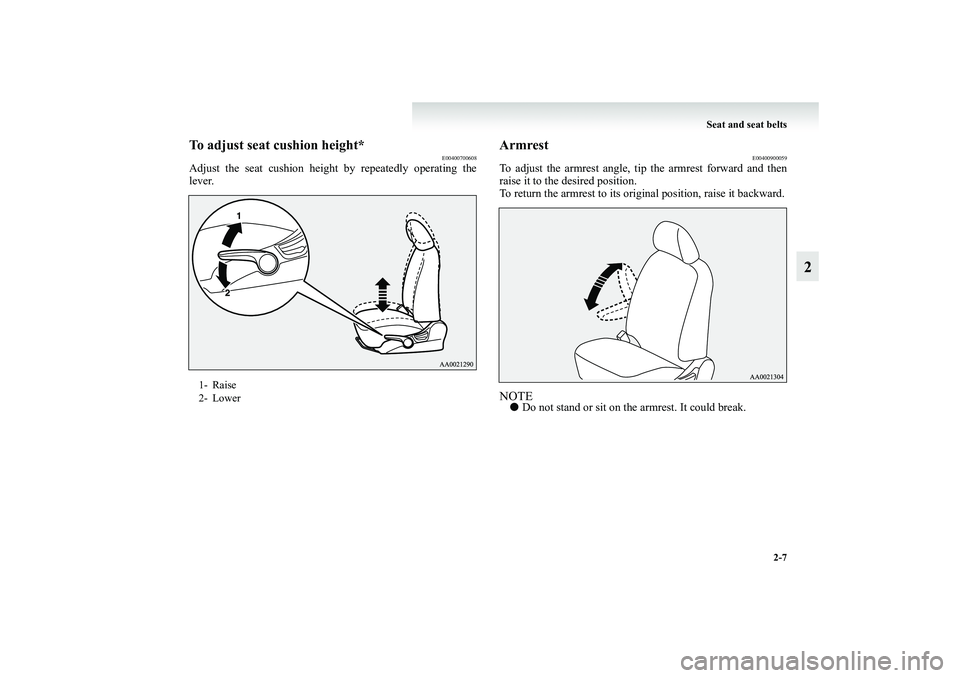
To adjust seat cushion height*
E00400700608
Adjust the seat cushion height by repeatedly operating the
lever.
Armrest
E00400900059
To adjust the armrest angle, tip the armrest forward and then
raise it to the desired position.
To return the armrest to its original position, raise it backward.NOTE●Do not stand or sit on the armrest. It could break.
1- Raise
2- Lower
BK-XP08E1ENUK.en-uk.book Page 7 Monday, August 13, 2007 2:20 PM
Page 57 of 458
Seat and seat belts
2-9
2 Second seat
E00402000227
When a person is sitting in the middle seating position of the
second seat in a cabin with 7-person seats, adjust the head
restraints to heights at which they lock in position. Refer to
“Head restraints” on page 2-19.NOTE●It is possible to adjust each side of the second seats for-
ward and backward independently of the other side, to
adjust the seatback angle independently on each side, and
to fold up the seat cushion independently on each side.
To adjust forward or backward
E00402100097
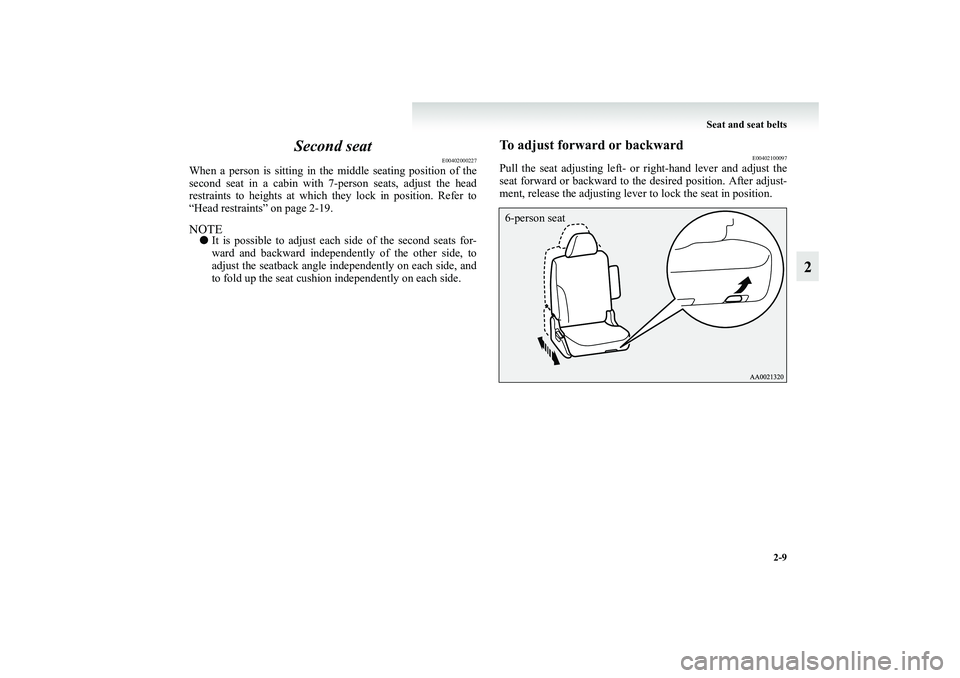
Pull the seat adjusting left- or right-hand lever and adjust the
seat forward or backward to the desired position. After adjust-
ment, release the adjusting lever to lock the seat in position.6-person seat
BK-XP08E1ENUK.en-uk.book Page 9 Monday, August 13, 2007 2:20 PM
Page 61 of 458
Seat and seat belts
2-13
2
Folding up the seat cushion
E00409700021
It is possible to create a luggage area by folding up the seat
cushion and moving the seat forward.
WARNING
!●Do not drive the vehicle with the seatback folded
forward. The seat is not retained with the seatback
in this position, so serious injuries could be suffered
in the event of hard braking or a collision.
CAUTION
!●The reclining mechanism of the seatback is spring
loaded, causing it to return to the vertical position
when the lock lever is operated. When using the
lever, sit close to the seatback or hold it with your
hand to control its return motion.●Use a foot to operate the pedal (2).
WARNING
!●Do not allow a passenger to sit on the seat or a child
to play on it with the seat cushion folded up.
Otherwise, serious injuries could be suffered in the
event of hard braking.
CAUTION
!●Do not stack luggage above the seatback height.
Secure the luggage firmly.
Otherwise, serious accidents could result due to
restricted rear vision or unrestrained objects enter-
ing the passenger compartment during sudden
braking.
BK-XP08E1ENUK.en-uk.book Page 13 Monday, August 13, 2007 2:20 PM
Page 65 of 458
Seat and seat belts
2-17
2 Third seat
E00402700208
When sitting in the third seat, adjust the head restraints to
heights at which they lock in position. Refer to “Head
restraints” on page 2-19.To recline the seatback
E00402800140
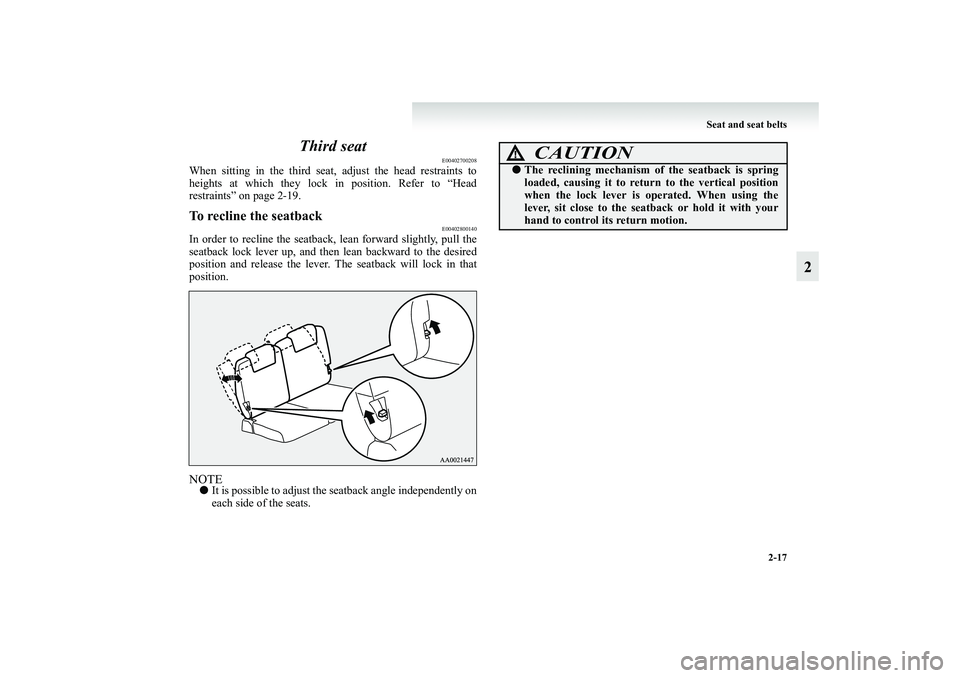
In order to recline the seatback, lean forward slightly, pull the
seatback lock lever up, and then lean backward to the desired
position and release the lever. The seatback will lock in that
position.NOTE●It is possible to adjust the seatback angle independently on
each side of the seats.
CAUTION
!●The reclining mechanism of the seatback is spring
loaded, causing it to return to the vertical position
when the lock lever is operated. When using the
lever, sit close to the seatback or hold it with your
hand to control its return motion.
BK-XP08E1ENUK.en-uk.book Page 17 Monday, August 13, 2007 2:20 PM
Page 66 of 458
2-18 Seat and seat belts
2
Folding the seatbacks forward
E00402900024
Larger objects can be loaded into the vehicle if a seatback is
folded forwards.
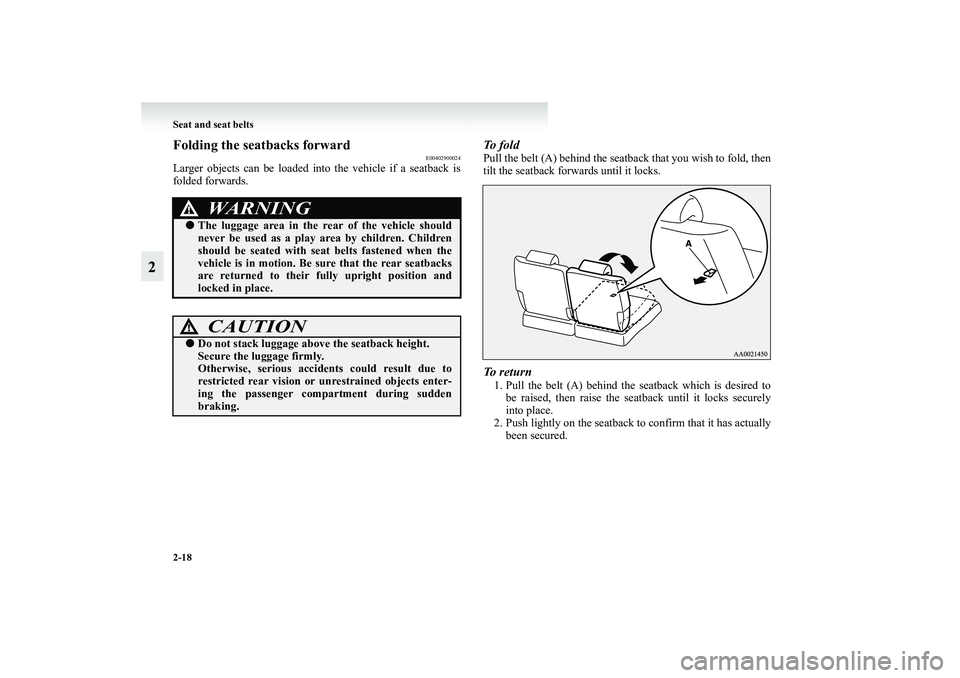
To f o l dPull the belt (A) behind the seatback that you wish to fold, then
tilt the seatback forwards until it locks.To r e t u r n1. Pull the belt (A) behind the seatback which is desired to
be raised, then raise the seatback until it locks securely
into place.
2. Push lightly on the seatback to confirm that it has actually
been secured.
WARNING
!●The luggage area in the rear of the vehicle should
never be used as a play area by children. Children
should be seated with seat belts fastened when the
vehicle is in motion. Be sure that the rear seatbacks
are returned to their fully upright position and
locked in place.
CAUTION
!●Do not stack luggage above the seatback height.
Secure the luggage firmly.
Otherwise, serious accidents could result due to
restricted rear vision or unrestrained objects enter-
ing the passenger compartment during sudden
braking.
BK-XP08E1ENUK.en-uk.book Page 18 Monday, August 13, 2007 2:20 PM
Page 67 of 458
Seat and seat belts
2-19
2 Head restraints
E00403300953
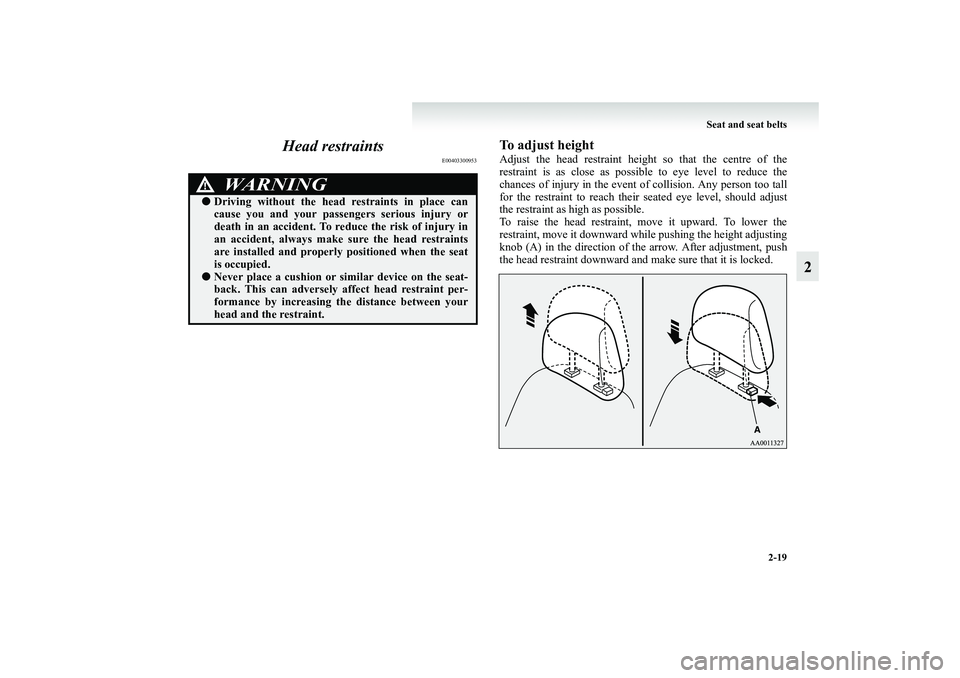
To adjust heightAdjust the head restraint height so that the centre of the
restraint is as close as possible to eye level to reduce the
chances of injury in the event of collision. Any person too tall
for the restraint to reach their seated eye level, should adjust
the restraint as high as possible.
To raise the head restraint, move it upward. To lower the
restraint, move it downward while pushing the height adjusting
knob (A) in the direction of the arrow. After adjustment, push
the head restraint downward and make sure that it is locked.
WARNING
!●Driving without the head restraints in place can
cause you and your passengers serious injury or
death in an accident. To reduce the risk of injury in
an accident, always make sure the head restraints
are installed and properly positioned when the seat
is occupied.●Never place a cushion or similar device on the seat-
back. This can adversely affect head restraint per-
formance by increasing the distance between your
head and the restraint.
BK-XP08E1ENUK.en-uk.book Page 19 Monday, August 13, 2007 2:20 PM
Page 68 of 458
2-20 Seat and seat belts
2
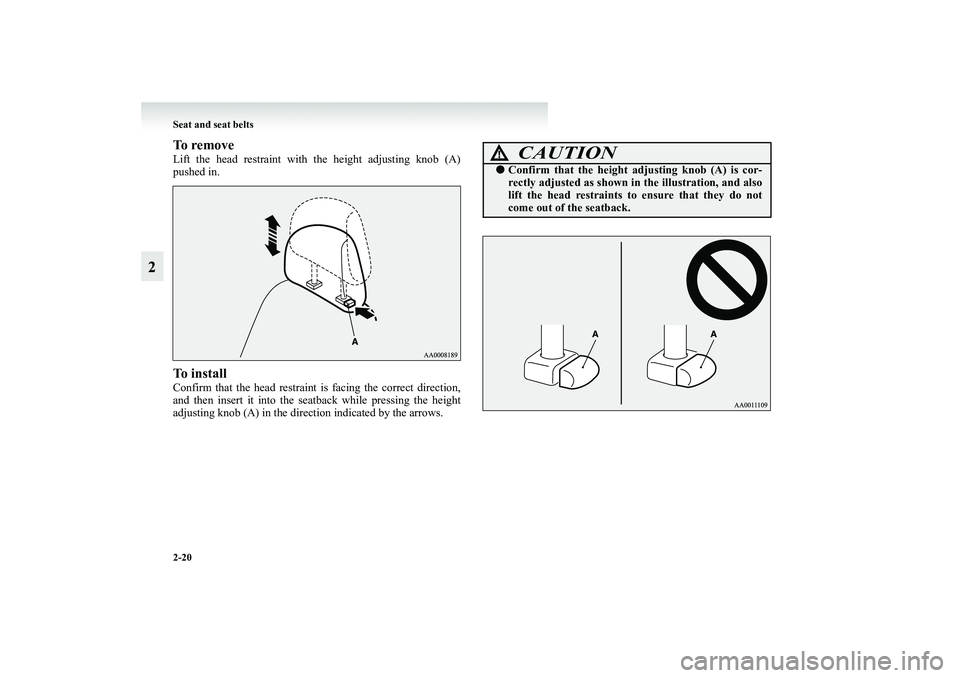
To removeLift the head restraint with the height adjusting knob (A)
pushed in.To installConfirm that the head restraint is facing the correct direction,
and then insert it into the seatback while pressing the height
adjusting knob (A) in the direction indicated by the arrows.
CAUTION
!●Confirm that the height adjusting knob (A) is cor-
rectly adjusted as shown in the illustration, and also
lift the head restraints to ensure that they do not
come out of the seatback.
BK-XP08E1ENUK.en-uk.book Page 20 Monday, August 13, 2007 2:20 PM