roof MITSUBISHI I-MIEV 2011 Owners Manual
[x] Cancel search | Manufacturer: MITSUBISHI, Model Year: 2011, Model line: I-MIEV, Model: MITSUBISHI I-MIEV 2011Pages: 193, PDF Size: 12.2 MB
Page 25 of 193
WARNING
l Do not touch the metal terminal of the reg-
ular charging connection (E) and the reg-
ular charging plug.
Doing so could cause an electric shock and/
or malfunction. CAUTION
l
Do
not leave for a long time with the in-
ner lid opened. It becomes impossible to
charge if foreign material enters the regu-
lar charging connection.
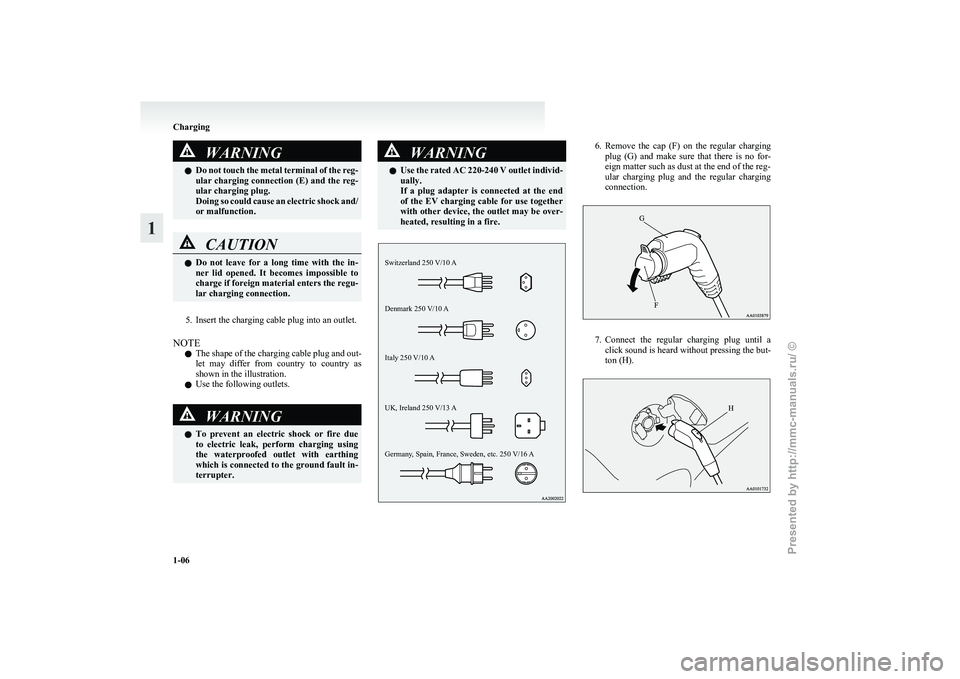
5. Insert the charging cable plug into an outlet.
NOTE l The
shape of the charging cable plug and out-
let may differ from country to country as
shown in the illustration.
l Use the following outlets. WARNING
l To
prevent an electric shock or fire due
to electric leak, perform charging using
the waterproofed outlet with earthing
which is connected to the ground fault in-
terrupter. WARNING
l Use
the rated AC 220-240 V outlet individ-
ually.
If a plug adapter is connected at the end
of the EV charging cable for use together
with other device, the outlet may be over-
heated, resulting in a fire.
Switzerland 250 V/10 A
Denmark 250 V/10 A
Italy 250 V/10 A
UK, Ireland 250 V/13 A
Germany, Spain, France, Sweden, etc. 250 V/16 A 6. Remove
the cap (F) on the regular charging
plug (G) and make sure that there is no for-
eign matter such as dust at the end of the reg-
ular charging plug and the regular charging
connection. 7. Connect
the regular charging plug until a
click sound is heard without pressing the but-
ton (H). Charging
1-06
1
Presented by http://mmc-manuals.ru/ \251
Page 65 of 193
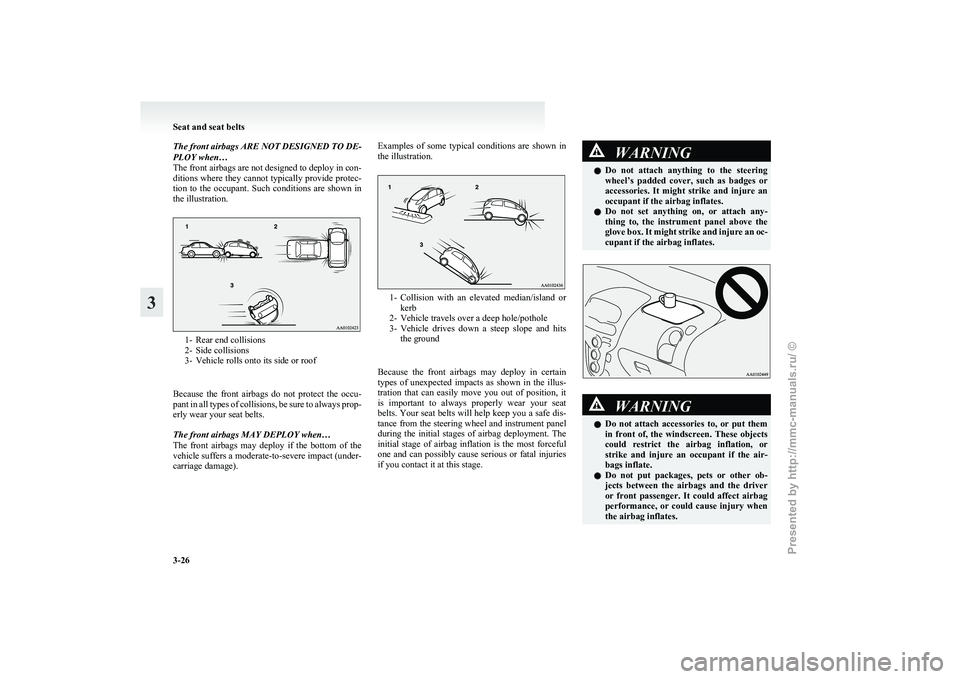
The front airbags ARE NOT DESIGNED TO DE-
PLOY when…
The
front airbags are not designed to deploy in con-
ditions where they cannot typically provide protec-
tion to the occupant. Such conditions are shown in
the illustration. 1- Rear end collisions
2-
Side collisions
3- Vehicle rolls onto its side or roof
Because the front airbags do not protect the occu-
pant in all types of collisions, be sure to always prop-
erly wear your seat belts.
The front airbags MAY DEPLOY when…
The front airbags may deploy if the bottom of the
vehicle suffers a moderate-to-severe impact (under-
carriage damage). Examples of some typical conditions are shown in
the illustration.
1- Collision
with an elevated median/island or
kerb
2- Vehicle travels over a deep hole/pothole
3- Vehicle drives down a steep slope and hits the ground
Because the front airbags may deploy in certain
types of unexpected impacts as shown in the illus-
tration that can easily move you out of position, it
is important to always properly wear your seat
belts. Your seat belts will help keep you a safe dis-
tance from the steering wheel and instrument panel
during the initial stages of airbag deployment. The
initial stage of airbag inflation is the most forceful
one and can possibly cause serious or fatal injuries
if you contact it at this stage. WARNING
l Do
not attach anything to the steering
wheel’s padded cover, such as badges or
accessories. It might strike and injure an
occupant if the airbag inflates.
l Do not set anything on, or attach any-
thing to, the instrument panel above the
glove box. It might strike and injure an oc-
cupant if the airbag inflates. WARNING
l Do
not attach accessories to, or put them
in front of, the windscreen. These objects
could restrict the airbag inflation, or
strike and injure an occupant if the air-
bags inflate.
l Do not put packages, pets or other ob-
jects between the airbags and the driver
or front passenger. It could affect airbag
performance, or could cause injury when
the airbag inflates. Seat and seat belts
3-26
3
Presented by http://mmc-manuals.ru/ \251
Page 66 of 193
WARNING
l Right after the airbag inflation, several
airbag system components will be hot. Do
not touch these components. There is a
danger of being burnt.
l The airbag system is designed to work on-
ly once. Once the airbags have deployed,
they will not work again. They must
promptly be replaced, and we recom-
mend you to have the entire airbag sys-
tem inspected by a MITSUBISHI
MOTORS Authorized Service Point.
Side airbag system E00407600518
The side airbags (A) are contained in the driver and
front passenger seatbacks.
The
side airbag is designed to inflate only on the
side of the vehicle that is impacted, even with no
passenger in the front seat. The label shown here is attached to the seatbacks
with a side airbag.
Curtain airbag system
E00409100562
The curtain airbags are contained in the front pil-
lars
and roof side rail. The curtain airbag is de-
signed to inflate only on the side of the vehicle that
is impacted, even with no passenger in the front
seat or rear seat. Deployment of side airbags and cur-
tain airbags
E00407701457
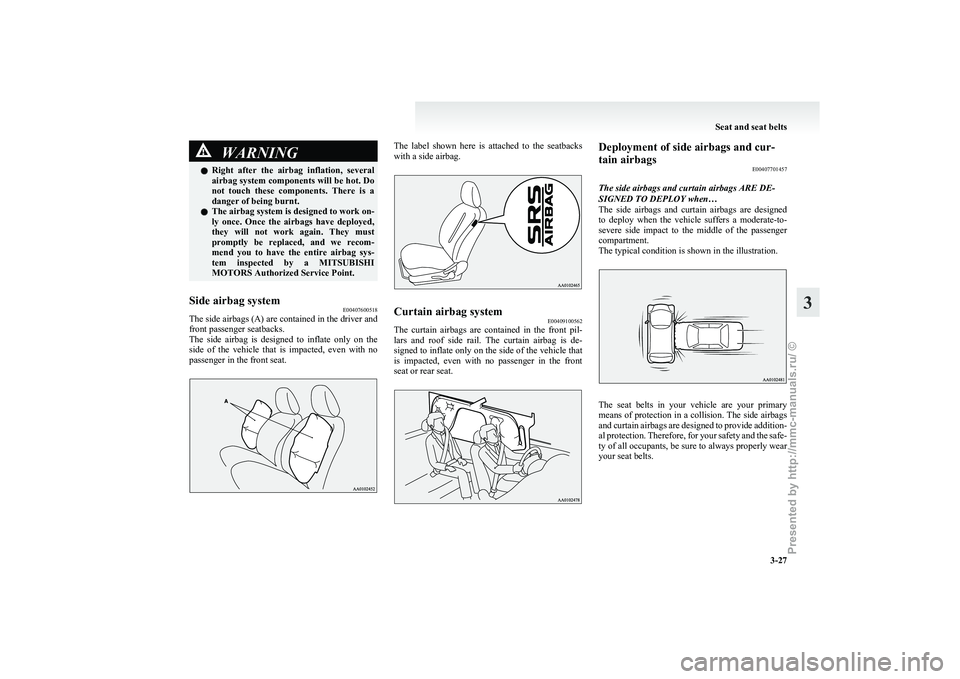
The side airbags and curtain airbags ARE DE-
SIGNED TO DEPLOY when…
The
side airbags and curtain airbags are designed
to deploy when the vehicle suffers a moderate-to-
severe side impact to the middle of the passenger
compartment.
The typical condition is shown in the illustration. The seat belts in your vehicle are your primary
means
of protection in a collision. The side airbags
and curtain airbags are designed to provide addition-
al protection. Therefore, for your safety and the safe-
ty of all occupants, be sure to always properly wear
your seat belts. Seat and seat belts
3-27 3
Presented by http://mmc-manuals.ru/ \251
Page 67 of 193
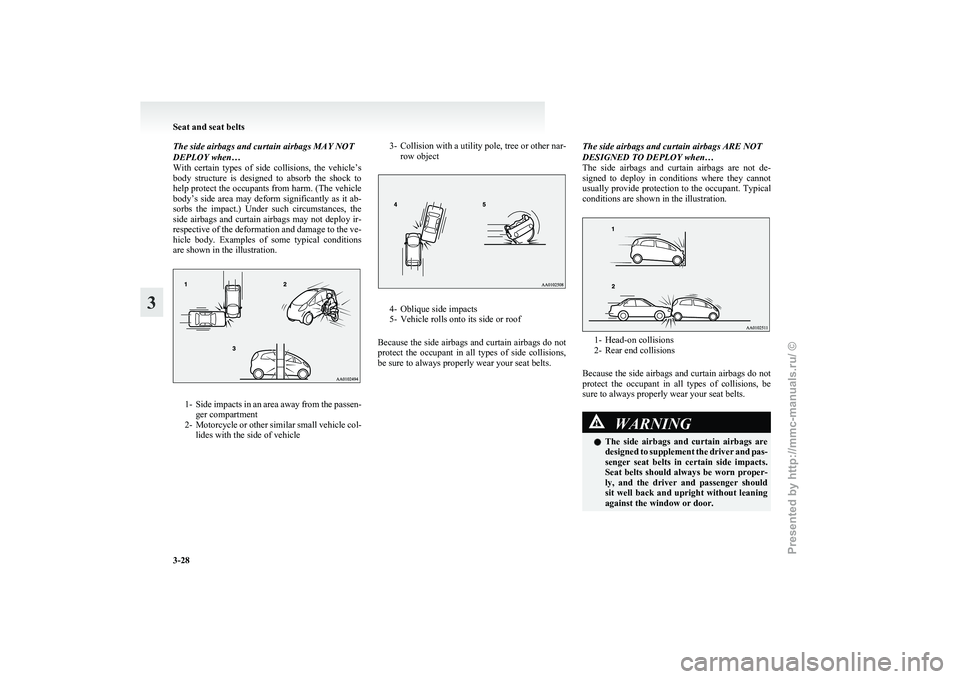
The side airbags and curtain airbags MAY NOT
DEPLOY when…
With
certain types of side collisions, the vehicle’s
body structure is designed to absorb the shock to
help protect the occupants from harm. (The vehicle
body’s side area may deform significantly as it ab-
sorbs the impact.) Under such circumstances, the
side airbags and curtain airbags may not deploy ir-
respective of the deformation and damage to the ve-
hicle body. Examples of some typical conditions
are shown in the illustration. 1- Side
impacts in an area away from the passen-
ger compartment
2- Motorcycle or other similar small vehicle col- lides with the side of vehicle 3- Collision
with a utility pole, tree or other nar-
row object 4- Oblique side impacts
5-
Vehicle rolls onto its side or roof
Because the side airbags and curtain airbags do not
protect the occupant in all types of side collisions,
be sure to always properly wear your seat belts. The side airbags and curtain airbags ARE NOT
DESIGNED TO DEPLOY when…
The
side airbags and curtain airbags are not de-
signed to deploy in conditions where they cannot
usually provide protection to the occupant. Typical
conditions are shown in the illustration. 1- Head-on collisions
2-
Rear end collisions
Because the side airbags and curtain airbags do not
protect the occupant in all types of collisions, be
sure to always properly wear your seat belts. WARNING
l The
side airbags and curtain airbags are
designed to supplement the driver and pas-
senger seat belts in certain side impacts.
Seat belts should always be worn proper-
ly, and the driver and passenger should
sit well back and upright without leaning
against the window or door. Seat and seat belts
3-28
3
Presented by http://mmc-manuals.ru/ \251
Page 68 of 193
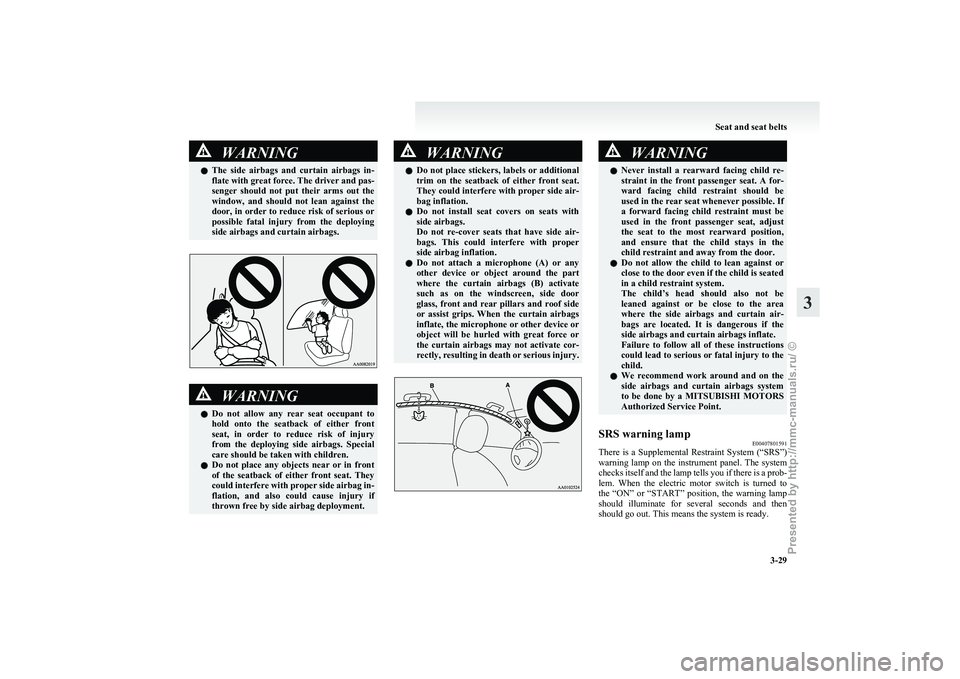
WARNING
l The side airbags and curtain airbags in-
flate with great force. The driver and pas-
senger should not put their arms out the
window, and should not lean against the
door, in order to reduce risk of serious or
possible fatal injury from the deploying
side airbags and curtain airbags. WARNING
l Do
not allow any rear seat occupant to
hold onto the seatback of either front
seat, in order to reduce risk of injury
from the deploying side airbags. Special
care should be taken with children.
l Do not place any objects near or in front
of the seatback of either front seat. They
could interfere with proper side airbag in-
flation, and also could cause injury if
thrown free by side airbag deployment. WARNING
l Do
not place stickers, labels or additional
trim on the seatback of either front seat.
They could interfere with proper side air-
bag inflation.
l Do not install seat covers on seats with
side airbags.
Do not re-cover seats that have side air-
bags. This could interfere with proper
side airbag inflation.
l Do not attach a microphone (A) or any
other device or object around the part
where the curtain airbags (B) activate
such as on the windscreen, side door
glass, front and rear pillars and roof side
or assist grips. When the curtain airbags
inflate, the microphone or other device or
object will be hurled with great force or
the curtain airbags may not activate cor-
rectly, resulting in death or serious injury. WARNING
l Never install a rearward facing child re-
straint in the front passenger seat. A for-
ward facing child restraint should be
used in the rear seat whenever possible. If
a forward facing child restraint must be
used in the front passenger seat, adjust
the seat to the most rearward position,
and ensure that the child stays in the
child restraint and away from the door.
l Do not allow the child to lean against or
close to the door even if the child is seated
in a child restraint system.
The child’s head should also not be
leaned against or be close to the area
where the side airbags and curtain air-
bags are located. It is dangerous if the
side airbags and curtain airbags inflate.
Failure to follow all of these instructions
could lead to serious or fatal injury to the
child.
l We recommend work around and on the
side airbags and curtain airbags system
to be done by a MITSUBISHI MOTORS
Authorized Service Point.
SRS warning lamp E00407801591
There is a Supplemental Restraint System (“SRS”)
warning
lamp on the instrument panel. The system
checks itself and the lamp tells you if there is a prob-
lem. When the electric motor switch is turned to
the “ON” or “START” position, the warning lamp
should illuminate for several seconds and then
should go out. This means the system is ready. Seat and seat belts
3-29 3
Presented by http://mmc-manuals.ru/ \251
Page 69 of 193
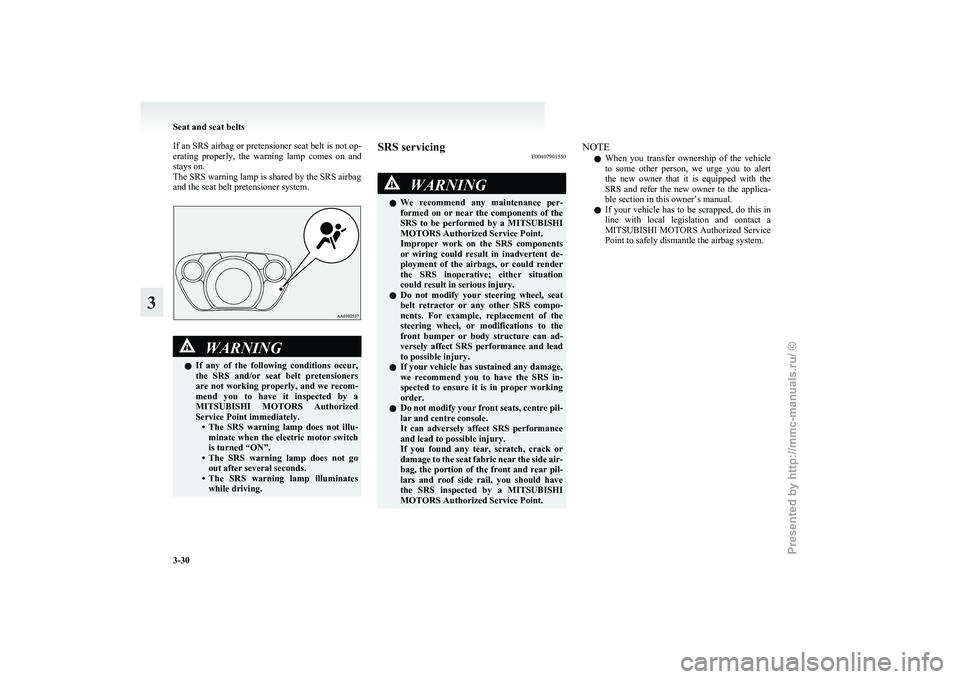
If an SRS airbag or pretensioner seat belt is not op-
erating
properly, the warning lamp comes on and
stays on.
The SRS warning lamp is shared by the SRS airbag
and the seat belt pretensioner system. WARNING
l If
any of the following conditions occur,
the SRS and/or seat belt pretensioners
are not working properly, and we recom-
mend you to have it inspected by a
MITSUBISHI MOTORS Authorized
Service Point immediately. • The SRS warning lamp does not illu-minate when the electric motor switch
is turned “ON”.
• The SRS warning lamp does not go out after several seconds.
• The SRS warning lamp illuminates while driving. SRS servicing
E00407901550 WARNING
l We
recommend any maintenance per-
formed on or near the components of the
SRS to be performed by a MITSUBISHI
MOTORS Authorized Service Point.
Improper work on the SRS components
or wiring could result in inadvertent de-
ployment of the airbags, or could render
the SRS inoperative; either situation
could result in serious injury.
l Do not modify your steering wheel, seat
belt retractor or any other SRS compo-
nents. For example, replacement of the
steering wheel, or modifications to the
front bumper or body structure can ad-
versely affect SRS performance and lead
to possible injury.
l If your vehicle has sustained any damage,
we recommend you to have the SRS in-
spected to ensure it is in proper working
order.
l Do not modify your front seats, centre pil-
lar and centre console.
It can adversely affect SRS performance
and lead to possible injury.
If you found any tear, scratch, crack or
damage to the seat fabric near the side air-
bag, the portion of the front and rear pil-
lars and roof side rail, you should have
the SRS inspected by a MITSUBISHI
MOTORS Authorized Service Point. NOTE
l When
you transfer ownership of the vehicle
to some other person, we urge you to alert
the new owner that it is equipped with the
SRS and refer the new owner to the applica-
ble section in this owner’s manual.
l If your vehicle has to be scrapped, do this in
line with local legislation and contact a
MITSUBISHI MOTORS Authorized Service
Point to safely dismantle the airbag system. Seat and seat belts
3-30
3
Presented by http://mmc-manuals.ru/ \251
Page 108 of 193
Cargo loads
E00609901413
Cargo load precautions CAUTION
l
Do not load cargo or luggage higher than
the top of the seatback. Be sure that your
cargo or luggage cannot move once your
vehicle is moving. Having the driver’s vi-
sion blocked, and your cargo being
thrown inside the cabin if you suddenly
have to brake can cause a serious acci-
dent or injury.
l Load heavy cargo or luggage in the front
of the vehicle. If the load in the back of
the vehicle is too heavy, steering may be-
come unstable.
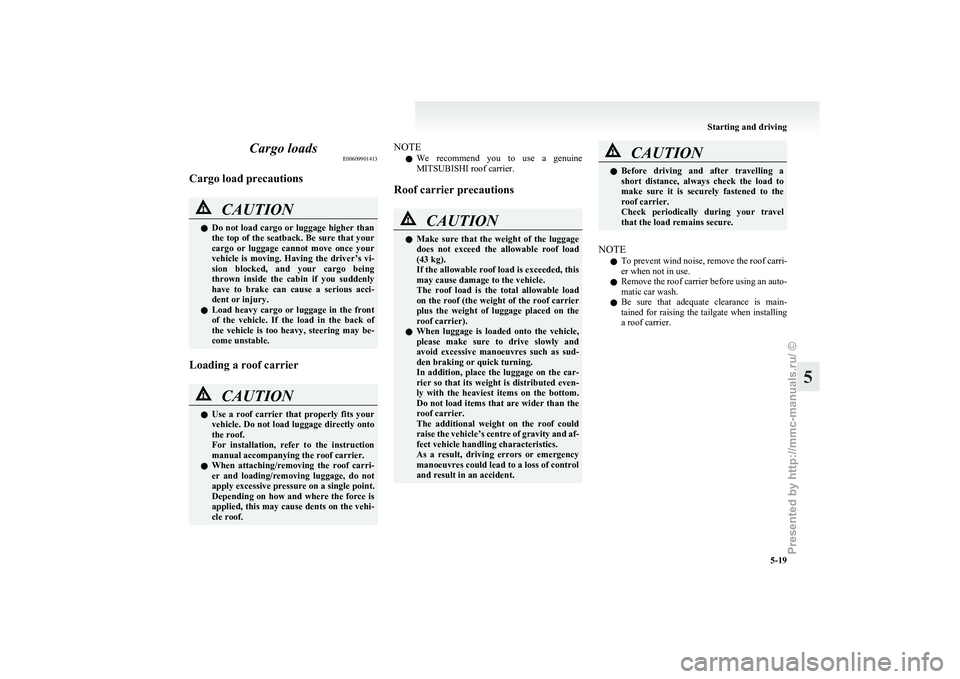
Loading a roof carrier CAUTION
l
Use
a roof carrier that properly fits your
vehicle. Do not load luggage directly onto
the roof.
For installation, refer to the instruction
manual accompanying the roof carrier.
l When attaching/removing the roof carri-
er and loading/removing luggage, do not
apply excessive pressure on a single point.
Depending on how and where the force is
applied, this may cause dents on the vehi-
cle roof. NOTE
l We
recommend you to use a genuine
MITSUBISHI roof carrier.
Roof carrier precautions CAUTION
l
Make
sure that the weight of the luggage
does not exceed the allowable roof load
(43 kg).
If the allowable roof load is exceeded, this
may cause damage to the vehicle.
The roof load is the total allowable load
on the roof (the weight of the roof carrier
plus the weight of luggage placed on the
roof carrier).
l When luggage is loaded onto the vehicle,
please make sure to drive slowly and
avoid excessive manoeuvres such as sud-
den braking or quick turning.
In addition, place the luggage on the car-
rier so that its weight is distributed even-
ly with the heaviest items on the bottom.
Do not load items that are wider than the
roof carrier.
The additional weight on the roof could
raise the vehicle’s centre of gravity and af-
fect vehicle handling characteristics.
As a result, driving errors or emergency
manoeuvres could lead to a loss of control
and result in an accident. CAUTION
l
Before
driving and after travelling a
short distance, always check the load to
make sure it is securely fastened to the
roof carrier.
Check periodically during your travel
that the load remains secure.
NOTE l To
prevent wind noise, remove the roof carri-
er when not in use.
l Remove the roof carrier before using an auto-
matic car wash.
l Be sure that adequate clearance is main-
tained for raising the tailgate when installing
a roof carrier. Starting and driving
5-19 5
Presented by http://mmc-manuals.ru/ \251
Page 119 of 193
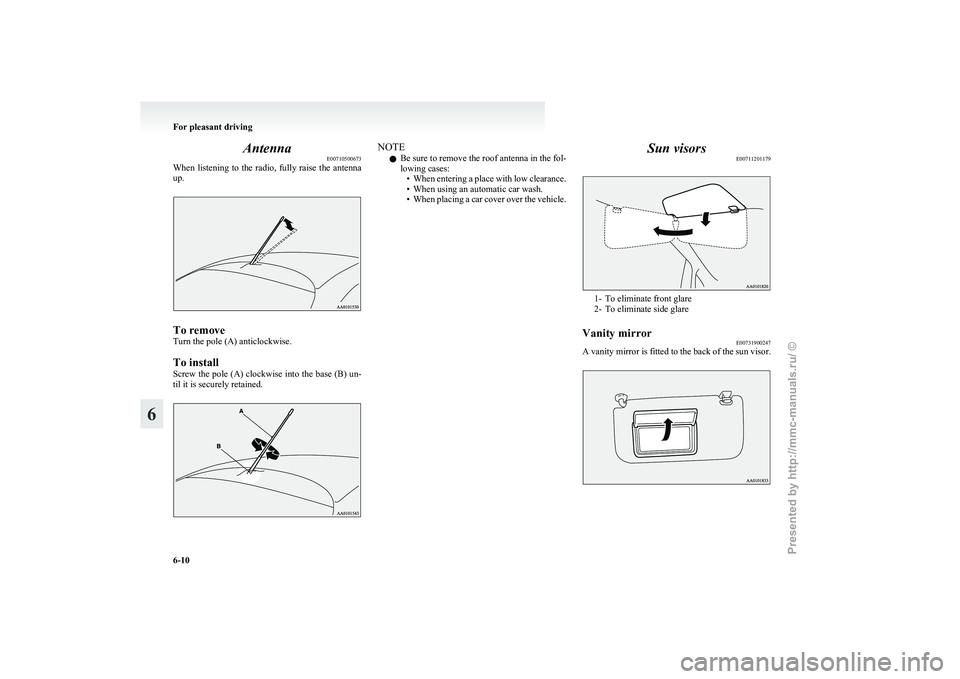
Antenna
E00710500673
When
listening to the radio, fully raise the antenna
up. To remove
Turn the pole (A) anticlockwise.
To install
Screw
the pole (A) clockwise into the base (B) un-
til it is securely retained. NOTE
l Be
sure to remove the roof antenna in the fol-
lowing cases: • When entering a place with low clearance.
• When using an automatic car wash.
• When placing a car cover over the vehicle. Sun visors
E00711201179 1- To eliminate front glare
2-
To eliminate side glare
Vanity mirror E00731900247
A vanity mirror is fitted to the back of the sun visor. For pleasant driving
6-10
6
Presented by http://mmc-manuals.ru/ \251
Page 133 of 193
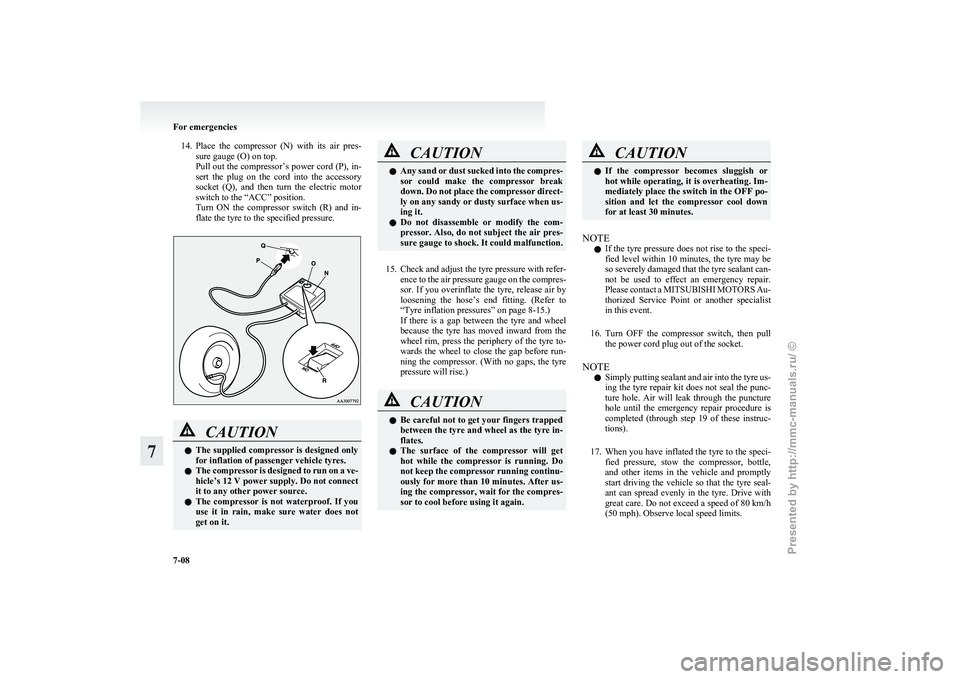
14. Place the compressor (N) with its air pres-
sure gauge (O) on top.
Pull out the compressor’s power cord (P), in-
sert the plug on the cord into the accessory
socket (Q), and then turn the electric motor
switch to the “ACC” position.
Turn ON the compressor switch (R) and in-
flate the tyre to the specified pressure. CAUTION
l
The
supplied compressor is designed only
for inflation of passenger vehicle tyres.
l The compressor is designed to run on a ve-
hicle’s 12 V power supply. Do not connect
it to any other power source.
l The compressor is not waterproof. If you
use it in rain, make sure water does not
get on it. CAUTION
l
Any
sand or dust sucked into the compres-
sor could make the compressor break
down. Do not place the compressor direct-
ly on any sandy or dusty surface when us-
ing it.
l Do not disassemble or modify the com-
pressor. Also, do not subject the air pres-
sure gauge to shock. It could malfunction.
15. Check
and adjust the tyre pressure with refer- ence to the air pressure gauge on the compres-
sor. If you overinflate the tyre, release air by
loosening the hose’s end fitting. (Refer to
“Tyre inflation pressures” on page 8-15.)
If there is a gap between the tyre and wheel
because the tyre has moved inward from the
wheel rim, press the periphery of the tyre to-
wards the wheel to close the gap before run-
ning the compressor. (With no gaps, the tyre
pressure will rise.) CAUTION
l
Be
careful not to get your fingers trapped
between the tyre and wheel as the tyre in-
flates.
l The surface of the compressor will get
hot while the compressor is running. Do
not keep the compressor running continu-
ously for more than 10 minutes. After us-
ing the compressor, wait for the compres-
sor to cool before using it again. CAUTION
l
If
the compressor becomes sluggish or
hot while operating, it is overheating. Im-
mediately place the switch in the OFF po-
sition and let the compressor cool down
for at least 30 minutes.
NOTE l If
the tyre pressure does not rise to the speci-
fied level within 10 minutes, the tyre may be
so severely damaged that the tyre sealant can-
not be used to effect an emergency repair.
Please contact a MITSUBISHI MOTORS Au-
thorized Service Point or another specialist
in this event.
16. Turn OFF the compressor switch, then pull the power cord plug out of the socket.
NOTE l Simply putting sealant and air into the tyre us-
ing the tyre repair kit does not seal the punc-
ture hole. Air will leak through the puncture
hole until the emergency repair procedure is
completed (through step 19 of these instruc-
tions).
17. When you have inflated the tyre to the speci- fied pressure, stow the compressor, bottle,
and other items in the vehicle and promptly
start driving the vehicle so that the tyre seal-
ant can spread evenly in the tyre. Drive with
great care. Do not exceed a speed of 80 km/h
(50 mph). Observe local speed limits. For emergencies
7-08
7
Presented by http://mmc-manuals.ru/ \251
Page 186 of 193
Puncture
Tyre repair kit 7-04
Q Quick charging 1-08
RReady indicator 4-09
Rear combination lamps
Bulb capacity
8-24
Replacement 8-33
Rear fog lamp Bulb capacity 8-24
Indication lamp 4-09
Replacement 8-32
Switch 4-15
Rear room lamp Bulb capacity 8-24
Rear seat 3-05
Rear turn-signal lamps Bulb capacity 8-24
Replacement 8-30,8-33
Rear window demister switch 4-18
Rear-view mirror Inside 5-05
Outside 5-05
Refill capacities 9-07
Regenerative braking 02
Regular charging 1-04
Replacement of lamp bulbs 8-23
Reversing lamps Bulb capacity 8-24
Replacement 8-33
Roof carrier precaution 5-19
Room lamp (front) 6-12
Room lamp (rear) 6-13 SSafe driving techniques 5-03
Seat belt 3-08
Child restraint 3-11
Force limiter
3-11
Inspection 3-20
Pregnant women restraint 3-10
Pretensioner 3-11
Seat belt reminder/warning lamp (for driver and
front passenger) 3-09
Warning lamp (for rear passenger) 3-10
Seats Adjustment 3-03
Front seat 3-03
Head restraints 3-07
Heated seat 3-04
Rear seat 3-05
Secret box 6-14
Selector lever 5-09
Service precaution 8-06
Service reminder 4-03,4-04
Side turn-signal lamps Bulb capacity 8-24
Replacement 8-30,8-33
Snow tyres 8-16
Specifications 9-02
Speedometer 4-02
Starting the electric motor unit 5-08
Steering wheel lock 5-08
Stop lamps Bulb capacity 8-24
Replacement 8-33
Storage spaces 6-14 Glove box 6-14
Secret box 6-14
Sun visors 6-10
Supplemental restraint system 3-20 Servicing 3-30
Warning lamp 3-29
T Tail lamps
Bulb capacity
8-24
Replacement 8-33
Tailgate 2-08
Towing 7-10
Traction battery 02
Transmission 5-09 Driving the vehicle 5-11
Selector lever 5-09
Selector lever position indicator 5-10
Tripmeter 4-03,4-04
Turn-signal indication lamps 4-09
Turn-signal lever 4-14
Tyre repair kit 7-04
Tyres 8-14 Inflation pressures 8-15
Size (tyre and wheel) 9-05
Snow tyres 8-16
Tread wear indicators 8-16
Tyre chains 8-17
Tyre repair kit 7-04
Tyre rotation 8-16
V Vanity mirror 6-10
Vehicle care precautions
8-02
Vehicle dimensions 9-03
Vehicle identification number 9-02
Vehicle information code plate 9-02
Vehicle labeling 9-02
Ventilators 6-02 Alphabetical index
3
Presented by http://mmc-manuals.ru/ \251