stop start MITSUBISHI I-MIEV 2011 Owners Manual
[x] Cancel search | Manufacturer: MITSUBISHI, Model Year: 2011, Model line: I-MIEV, Model: MITSUBISHI I-MIEV 2011Pages: 193, PDF Size: 12.2 MB
Page 16 of 193
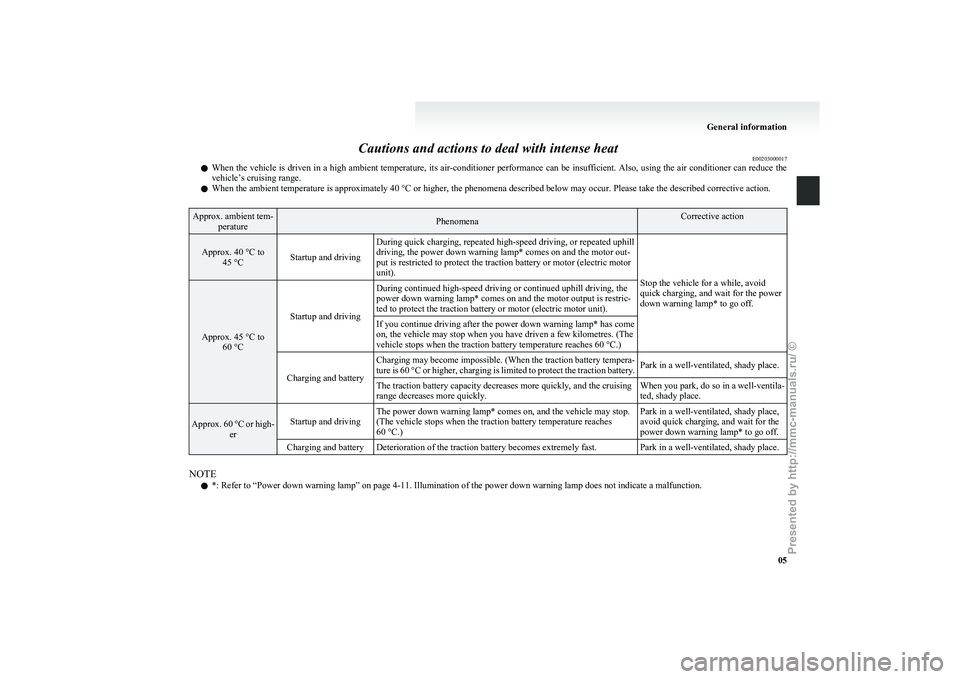
Cautions and actions to deal with intense heat
E00203000017
l When
the vehicle is driven in a high ambient temperature, its air-conditioner performance can be insufficient. Also, using the air conditioner can reduce the
vehicle’s cruising range.
l When the ambient temperature is approximately 40 °C or higher, the phenomena described below may occur. Please take the described corrective action. Approx. ambient tem-
perature Phenomena Corrective action
Approx. 40 °C to
45 °C Startup and driving During quick charging, repeated high-speed driving, or repeated uphill
driving, the power down warning lamp* comes on and the motor out-
put is restricted to protect the traction battery or motor (electric motor
unit).
Stop the vehicle for a while, avoid
quick charging, and wait for the power
down warning lamp* to go off.Approx. 45 °C to
60 °C Startup and driving
During continued high-speed driving or continued uphill driving, the
power down warning lamp* comes on and the motor output is restric-
ted to protect the traction battery or motor (electric motor unit).
If you continue driving after the power down warning lamp* has come
on, the vehicle may stop when you have driven a few kilometres. (The
vehicle stops when the traction battery temperature reaches
60 °C.)
Charging and battery Charging may become impossible. (When the traction battery tempera-
ture
is 60 °C or higher, charging is limited to protect the traction battery. Park in a well-ventilated, shady place.
The traction battery capacity decreases more quickly, and the cruising
range decreases more quickly. When you park, do so in a well-ventila-
ted, shady place.Approx. 60 °C or high-
er Startup and driving
The power down warning lamp* comes on, and the vehicle may stop.
(The vehicle stops when the traction battery temperature reaches
60 °C.) Park in a well-ventilated, shady place,
avoid quick charging, and wait for the
power down warning lamp* to go off.
Charging and battery Deterioration of the traction battery becomes extremely fast. Park in a well-ventilated, shady place. NOTE
l *: Refer to “Power down warning lamp” on page
4-11. Illumination of the power down warning lamp does not indicate a malfunction. General information
05
Presented by http://mmc-manuals.ru/ \251
Page 18 of 193
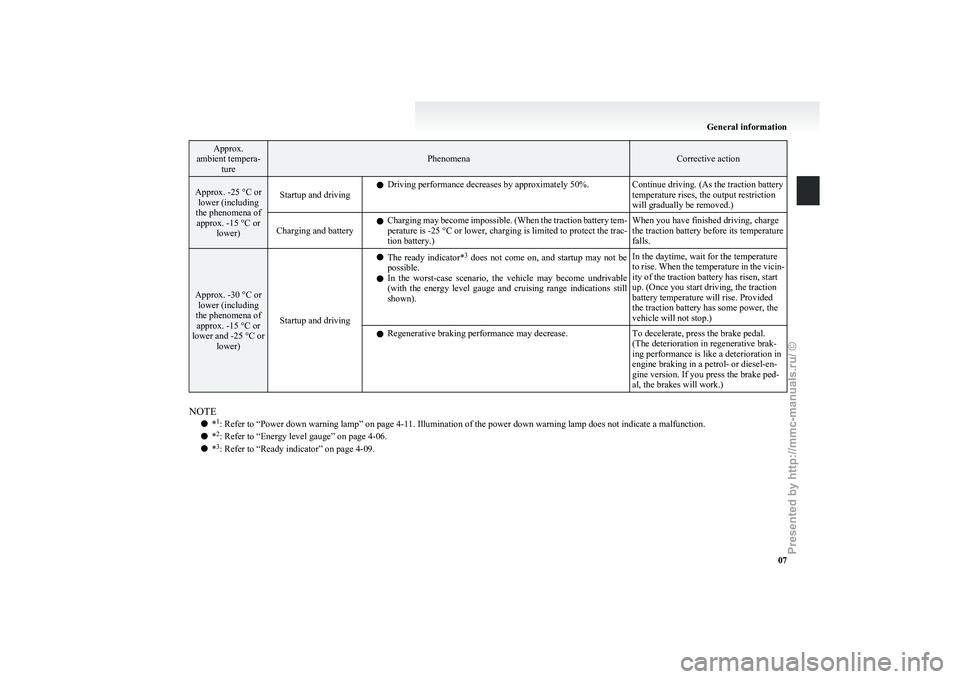
Approx.
ambient tempera- ture Phenomena Corrective action
Approx. -25 °C or
lower (including
the phenomena of approx. -15 °C or lower) Startup and driving
l
Driving performance decreases by approximately 50%. Continue driving. (As the traction battery
temperature rises, the output restriction
will gradually be removed.)
Charging and battery l
Charging
may become impossible. (When the traction battery tem-
perature is -25 °C or lower, charging is limited to protect the trac-
tion battery.) When you have finished driving, charge
the traction battery before its temperature
falls.Approx. -30 °C or
lower (including
the phenomena of approx. -15 °C or
lower and -25 °C or lower) Startup and driving l
The
ready indicator* 3
does not come on, and startup may not be
possible.
l In the worst-case scenario, the vehicle may become undrivable
(with the energy level gauge and cruising range indications still
shown). In the daytime, wait for the temperature
to
rise. When the temperature in the vicin-
ity of the traction battery has risen, start
up. (Once you start driving, the traction
battery temperature will rise. Provided
the traction battery has some power, the
vehicle will not stop.)
l Regenerative braking performance may decrease.
To decelerate, press the brake pedal.
(The deterioration in regenerative brak-
ing performance is like a deterioration in
engine braking in a petrol- or diesel-en-
gine version. If you press the brake ped-
al, the brakes will work.)NOTE
l *1
: Refer to “Power down warning lamp” on page
4-11. Illumination of the power down warning lamp does not indicate a malfunction.
l *2
: Refer to “Energy level gauge” on page 4-06.
l *3
: Refer to “Ready indicator” on page 4-09. General information
07
Presented by http://mmc-manuals.ru/ \251
Page 21 of 193
Battery
E08300100014
There
are two types of batteries installed in your ve-
hicle: a traction battery for operating the motor (elec-
tric motor unit) and air conditioning as well as an
auxiliary battery for starting the electric motor unit
and operating the lamps, wipers, etc. This chapter
explains charging of the traction battery.
NOTE
l The auxiliary battery is automatically charg-
ed while the ready indicator is illuminated or
during charge for the traction battery. Refer
to “Ready indicator” on page 4-09.
l If the auxiliary battery is flat, the electric mo-
tor unit cannot be started. Refer to “Emergen-
cy starting” on page 7-02. Basic knowledge for charging
E08300200015
There
are two types of charging: regular charging
and quick charging.
Regular charging is performed through the on-
board charger using rated AC 220-240 V outlet as
the power source.
The rated AC voltage may differ from country to
country.
Quick charging is performed with the quick charg-
er compatible with i-MiEV.
NOTE
l Repeatedly performing only quick charging
may reduce the battery capacity. In usual
charge, regular charging is recommended.
l To maintain the capacity of the traction bat-
tery, the following is recommended:
• Fully charge the vehicle in regular charg-ing every two weeks.
• Do not repeat charging near the full charge level.
l The quick charging gives priority when the
regular charging and the quick charging are
performed at the same time.
At this time, the regular charging will be stop-
ped.
l The progress of the battery capacity loss de-
pends on the vehicle usage and the environ-
ment.
We recommend to perform normal charging
from 2 segments or less to charge completely
at least once in 3 months.
The procedure lets the battery remaining indi-
cator adjusted automatically. Guideline for charging time
E08300700010
The
regular charging time (from 1 bar of energy lev-
el gauge to full charge) is different according to the
current value.
l 230 V/16 A → about 6 hours
l 230 V/13 A → about 7 hours
l 230 V/10 A → about 8 hours
About 30 minutes with quick charger (About 80 %
of full charge)
NOTE l The charging time may vary depending on
the battery condition, operation environment
of the vehicle and specification of the quick
charger. Charging
1-02
1
Presented by http://mmc-manuals.ru/ \251
Page 26 of 193
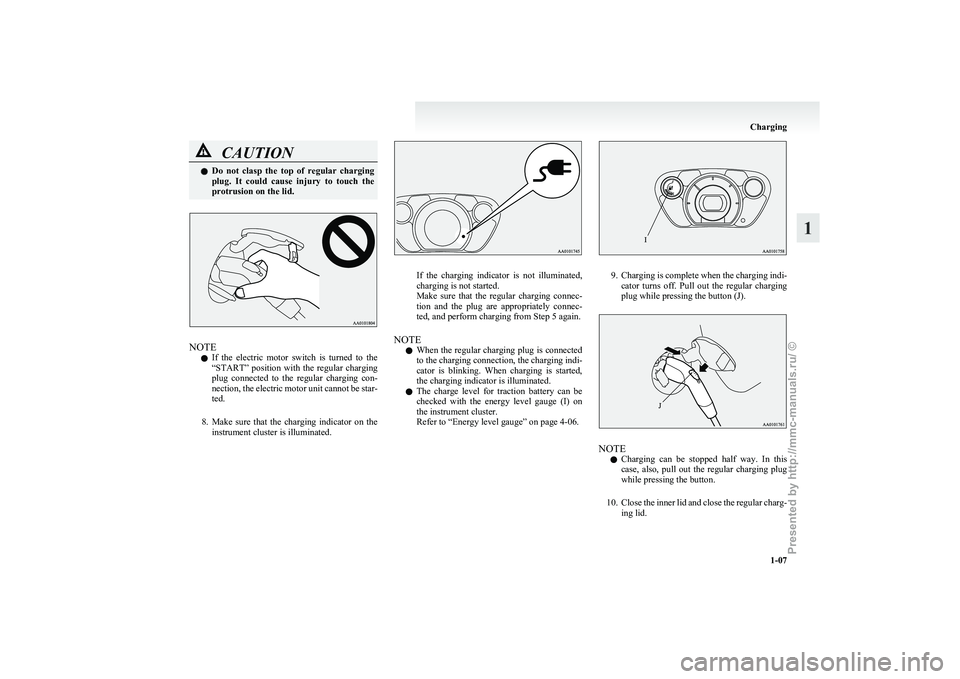
CAUTION
l
Do not clasp the top of regular charging
plug. It could cause injury to touch the
protrusion on the lid. NOTE
l If
the electric motor switch is turned to the
“START” position with the regular charging
plug connected to the regular charging con-
nection, the electric motor unit cannot be star-
ted.
8. Make sure that the charging indicator on the instrument cluster is illuminated. If the charging indicator is not illuminated,
charging is not started.
Make
sure that the regular charging connec-
tion and the plug are appropriately connec-
ted, and perform charging from Step 5 again.
NOTE l When the regular charging plug is connected
to the charging connection, the charging indi-
cator is blinking. When charging is started,
the charging indicator is illuminated.
l The charge level for traction battery can be
checked with the energy level gauge (I) on
the instrument cluster.
Refer to “Energy level gauge” on page 4-06. 9. Charging
is complete when the charging indi-
cator turns off. Pull out the regular charging
plug while pressing the button (J). NOTE
l Charging
can be stopped half way. In this
case, also, pull out the regular charging plug
while pressing the button.
10. Close the inner lid and close the regular charg- ing lid. Charging
1-07 1
Presented by http://mmc-manuals.ru/ \251
Page 48 of 193
NOTE
l You
can check if the belt locks by pulling it
forward quickly.
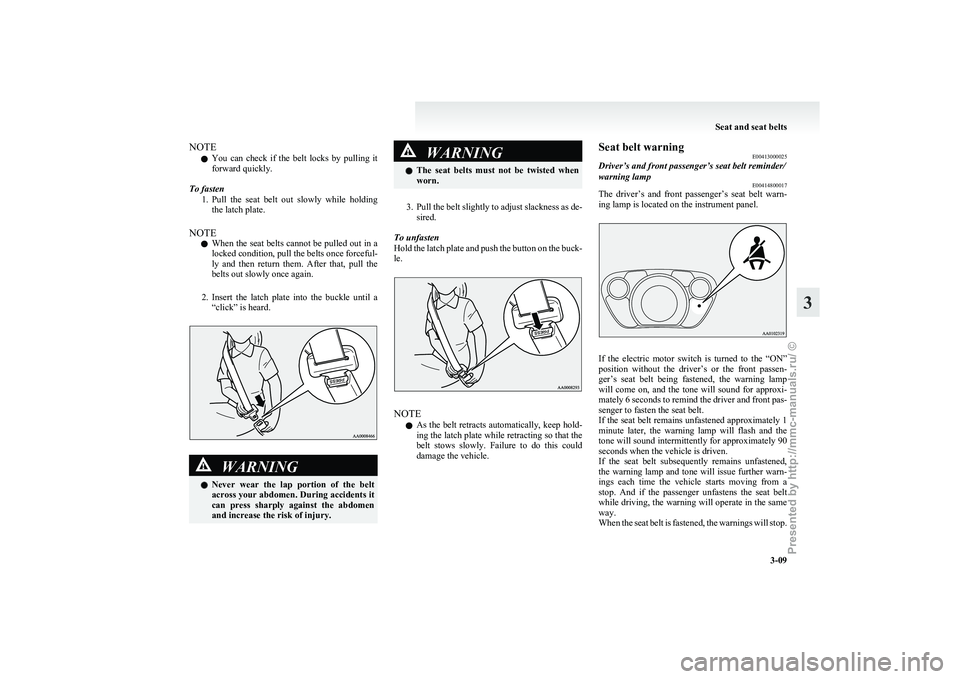
To fasten 1. Pull the seat belt out slowly while holdingthe latch plate.
NOTE l When the seat belts cannot be pulled out in a
locked condition, pull the belts once forceful-
ly and then return them. After that, pull the
belts out slowly once again.
2. Insert the latch plate into the buckle until a “click” is heard. WARNING
l Never
wear the lap portion of the belt
across your abdomen. During accidents it
can press sharply against the abdomen
and increase the risk of injury. WARNING
l The
seat belts must not be twisted when
worn.
3. Pull
the belt slightly to adjust slackness as de- sired.
To unfasten
Hold the latch plate and push the button on the buck-
le. NOTE
l As
the belt retracts automatically, keep hold-
ing the latch plate while retracting so that the
belt stows slowly. Failure to do this could
damage the vehicle. Seat belt warning
E00413000025
Driver’s and front passenger’s seat belt reminder/
warning lamp E00414800017
The driver’s and front passenger’s seat belt warn-
ing lamp is located on the instrument panel. If the electric motor switch is turned to the “ON”
position
without the driver’s or the front passen-
ger’s seat belt being fastened, the warning lamp
will come on, and the tone will sound for approxi-
mately 6 seconds to remind the driver and front pas-
senger to fasten the seat belt.
If the seat belt remains unfastened approximately 1
minute later, the warning lamp will flash and the
tone will sound intermittently for approximately 90
seconds when the vehicle is driven.
If the seat belt subsequently remains unfastened,
the warning lamp and tone will issue further warn-
ings each time the vehicle starts moving from a
stop. And if the passenger unfastens the seat belt
while driving, the warning will operate in the same
way.
When the seat belt is fastened, the warnings will stop. Seat and seat belts
3-09 3
Presented by http://mmc-manuals.ru/ \251
Page 79 of 193
NOTE
l Depressing
the brake pedal repeat-
edly may turn on the brake warn-
ing lamp and brake warning buz-
zer. It is normal if the lamp goes
out and the buzzer stops sounding
after a few seconds. CAUTION
l
In
the situations listed below,
brake performance may be com-
promised or the vehicle may be-
come unstable if brakes are ap-
plied suddenly; consequently,
avoid driving at high speeds or
applying the brakes suddenly.
Furthermore, the vehicle
should be brought to a stop in a
safe location and to have it
checked. • The brake warning lampdoes not illuminate when
the parking brake is applied
or does not turn off when
the parking brake is re-
leased.
• The brake warning lamp re- mains illuminated during
driving.
• The brake warning lamp and ABS warning lamp are
both illuminated at the
same time. Refer to “ABS
warning lamp” on page
5-14.
• The brake warning buzzer will not stop sounding. CAUTION
l
The
vehicle should be brought
to a halt in the following man-
ner when brake performance
has deteriorated. • Depress the brake pedalharder than usual.
Even if the brake pedal
moves down to the very end
of its possible stroke, keep it
pressed down hard.
• Should the brakes fail, use regenerative braking to re-
duce your speed and careful-
ly pull the parking brake lev-
er.
Depress the brake pedal to
operate the stop lamp to
alert the vehicles behind you.
NOTE l Operation
sounds of the brake elec-
tric vacuum pump may be heard
from the electric motor unit room
just after the electric motor switch
has been turned “ON” or when the
brake pedal is depressed.
This occurs when the brake elec-
tric vacuum pump is operating nor-
mally and does not indicate faulty
operation. Auxiliary battery charge warn-
ing lamp
E00502701219
This
warning lamp will illuminate when
there is a fault with the charging system
of the auxiliary battery.
Normally, when the electric motor
switch is turned to the “ON” position,
this warning lamp will illuminate. When
the electric motor unit is started, the
lamp goes out. CAUTION
l
If
it illuminates while the ready
indicator is illuminated, there is
a problem in the charging sys-
tem. In this case, immediately
park your vehicle in a safe
place and we recommend you
to have it checked. Door ajar warning lamp
E00503300840
This
lamp illuminates when either of the
doors (also, the tailgate) is not complete-
ly closed.
If the vehicle speed exceeds about
8 km/h (5 mph) with a door ajar, the warn-
ing lamp will flash 16 times and, at the
same time, the buzzer will sound 16
times to notify the driver that a door is
ajar. Instruments and controls
4-10
4
Presented by http://mmc-manuals.ru/ \251
Page 92 of 193
Safe driving techniques
E00600300635
Driving
safety and protection against injury cannot
be fully ensured. However, we recommend that
you pay extra attention to the following:
Seat belts
Before starting the vehicle, make sure that you and
your passengers have fastened your seat belts.
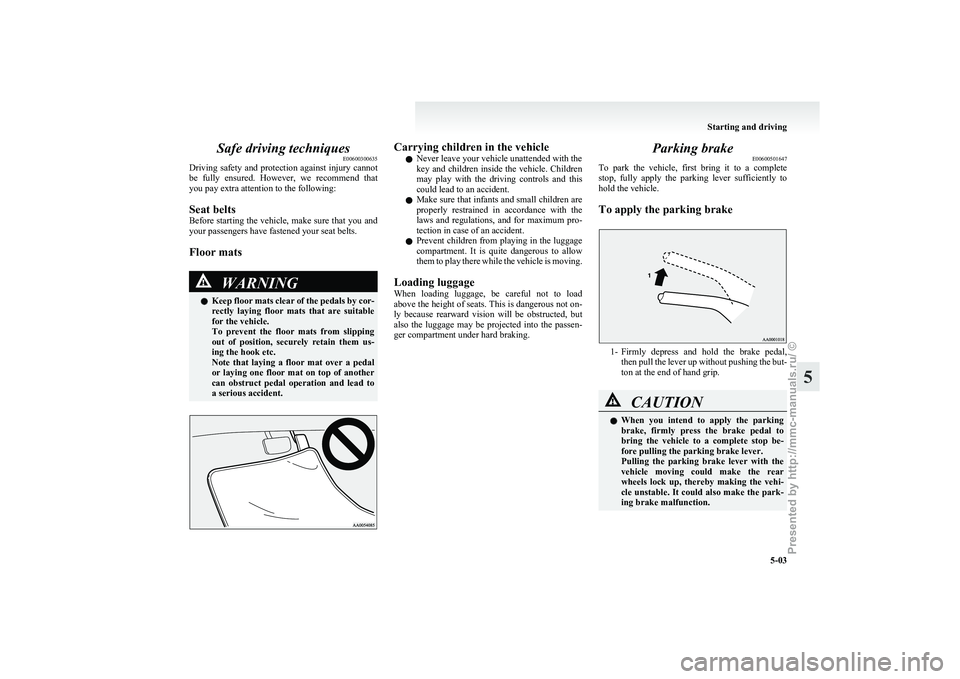
Floor mats WARNING
l Keep
floor mats clear of the pedals by cor-
rectly laying floor mats that are suitable
for the vehicle.
To prevent the floor mats from slipping
out of position, securely retain them us-
ing the hook etc.
Note that laying a floor mat over a pedal
or laying one floor mat on top of another
can obstruct pedal operation and lead to
a serious accident. Carrying children in the vehicle
l Never leave your vehicle unattended with the
key
and children inside the vehicle. Children
may play with the driving controls and this
could lead to an accident.
l Make sure that infants and small children are
properly restrained in accordance with the
laws and regulations, and for maximum pro-
tection in case of an accident.
l Prevent children from playing in the luggage
compartment. It is quite dangerous to allow
them to play there while the vehicle is moving.
Loading luggage
When loading luggage, be careful not to load
above the height of seats. This is dangerous not on-
ly because rearward vision will be obstructed, but
also the luggage may be projected into the passen-
ger compartment under hard braking. Parking brake
E00600501647
To
park the vehicle, first bring it to a complete
stop, fully apply the parking lever sufficiently to
hold the vehicle.
To apply the parking brake 1- Firmly
depress and hold the brake pedal,
then pull the lever up without pushing the but-
ton at the end of hand grip. CAUTION
l
When
you intend to apply the parking
brake, firmly press the brake pedal to
bring the vehicle to a complete stop be-
fore pulling the parking brake lever.
Pulling the parking brake lever with the
vehicle moving could make the rear
wheels lock up, thereby making the vehi-
cle unstable. It could also make the park-
ing brake malfunction. Starting and driving
5-03 5
Presented by http://mmc-manuals.ru/ \251
Page 96 of 193
Heated mirror*
E00601200514
To
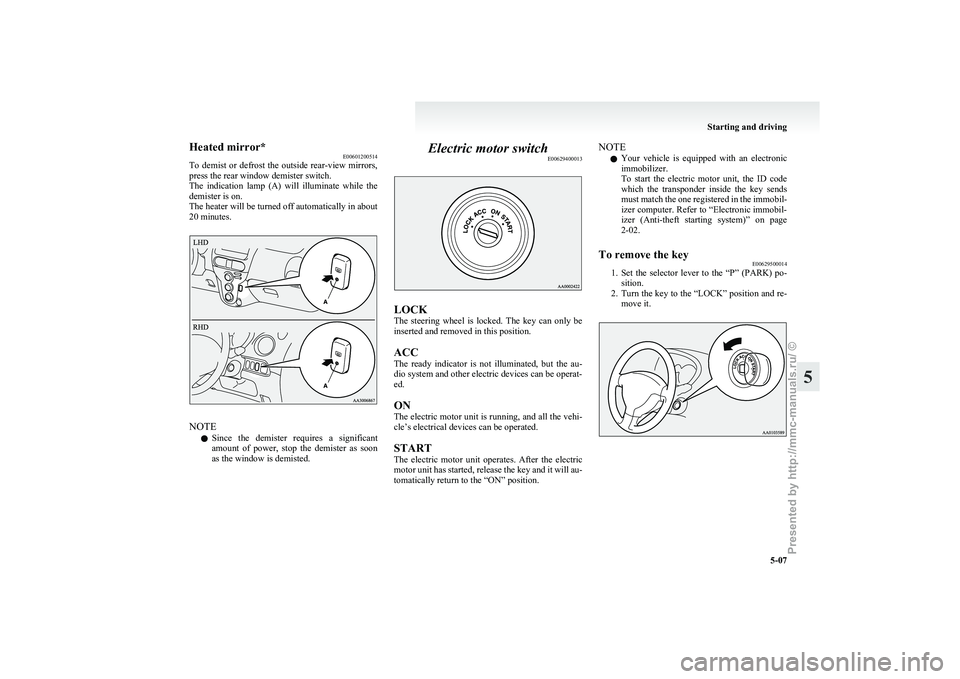
demist or defrost the outside rear-view mirrors,
press the rear window demister switch.
The indication lamp (A) will illuminate while the
demister is on.
The heater will be turned off automatically in about
20 minutes. NOTE
l Since
the demister requires a significant
amount of power, stop the demister as soon
as the window is demisted. Electric motor switch
E00629400013 LOCK
The
steering wheel is locked. The key can only be
inserted and removed in this position.
ACC
The ready indicator is not illuminated, but the au-
dio system and other electric devices can be operat-
ed.
ON
The electric motor unit is running, and all the vehi-
cle’s electrical devices can be operated.
START
The electric motor unit operates. After the electric
motor unit has started, release the key and it will au-
tomatically return to the “ON” position. NOTE
l Your
vehicle is equipped with an electronic
immobilizer.
To start the electric motor unit, the ID code
which the transponder inside the key sends
must match the one registered in the immobil-
izer computer. Refer to “Electronic immobil-
izer (Anti-theft starting system)” on page
2-02.
To remove the key E00629500014
1. Set
the selector lever to the “P” (PARK) po-
sition.
2. Turn the key to the “LOCK” position and re- move it. Starting and driving
5-07 5
Presented by http://mmc-manuals.ru/ \251
Page 100 of 193
WARNING
l Avoid sudden regenerative braking when
driving on wet or icy roads. Using sudden
regenerative braking under these condi-
tions could cause the vehicle to skid, re-
sulting in a serious accident.
NOTE l When
the traction battery level is nearly full
or the traction battery temperature is low, the
regenerative braking performance may be
weakened. In this case, drive the vehicle at a
low speed.
“C” COMFORT
This position gives weaker regenerative braking
than the “D” (DRIVE) position. It enables relaxed
driving in circumstances in which you do not accel-
erate or decelerate much (for example, suburban
driving). It is intended for long cruising. Driving the vehicle
E00629700016
Operation of the transmission E00629800020 CAUTION
l
Before
selecting a position with the elec-
tric motor unit running and the vehicle
stationary, fully depress the brake pedal
to prevent the vehicle from creeping.
The vehicle will begin to move as soon as
the transmission is engaged, the brakes
should only be released when you are
ready to drive away.
l Depress the brake pedal with the right
foot at all times.
Using the left foot could cause driver move-
ment delay in case of an emergency.
l Operating the accelerator pedal while the
other foot is resting on the brake pedal
will affect braking efficiency and may
cause premature wear of brake pads.
Waiting E00630900018
For short waiting periods, such as at traffic signals
the
vehicle can be left in selector lever position and
held stationary with the service brake.
For longer waiting periods with the electric motor
unit running, place the selector lever in the “N”
(NEUTRAL) position and apply the parking brake,
while holding the vehicle stationary with the serv-
ice brake. CAUTION
l
Never
hold the vehicle stationary while in
transmission on a hill with the accelera-
tor, always apply the parking brake and/
or service brake.
Parking E00631000016
To park the vehicle, first bring it to a complete
stop,
fully engage the parking brake, and then
move the selector lever to the “P” (PARK) position.
If you are going to leave the vehicle unattended, al-
ways switch off the electric motor unit and carry
the key.
NOTE
l On a slope, be sure to apply the parking
brake before moving the selector lever to the
“P” (PARK) position. If you move the selec-
tor lever to the “P” (PARK) position before
applying the parking brake, it may be diffi-
cult to disengage the selector lever from the
“P” (PARK) position when you next drive
the vehicle, requiring application of a strong
force to the selector lever to move it from the
“P” (PARK) position. Starting and driving
5-11 5
Presented by http://mmc-manuals.ru/ \251
Page 101 of 193
Inspection and maintenance
following rough road operation E00606700383
After
operating the vehicle in rough road condi-
tions, be sure to perform the following inspection
and maintenance procedures:
l Check that the vehicle has not been damaged
by rocks, gravel, etc.
l Carefully wash the vehicle with water.
Drive the vehicle slowly while lightly depress-
ing the brake pedal in order to dry out the
brakes. If the brakes still do not function prop-
erly, we recommend you to have the brakes
checked as soon as possible.
l Remove the insects, dried grass, etc. clog-
ging the radiator core.
l Check the inside of the vehicle. If water en-
try is found, dry the carpet etc.
l Inspect the headlamps, If the headlamp bulb
is flooded with water, we recommend you to
have it drained. Braking
E00607001830
All
the parts of the brake system are critical to safe-
ty. We recommend you to have the vehicle
checked at regular intervals according to the serv-
ice booklet. CAUTION
l
Avoid
driving habits that cause heavy
braking and never “ride” the brakes by
resting your foot on the brake pedal
while driving.
It causes brake overheating and fading.
Brake system
The
service brake is divided into two brake cir-
cuits. And your vehicle is equipped with power
brakes. If one brake circuit fails, the other is availa-
ble to stop the vehicle. If you should lose the pow-
er assist for some reason, the brakes will still work.
In these situations, even if the brake pedal moves
down to the very end of its possible stroke or re-
sists being depressed, keep depressing the brake ped-
al down harder and further than usual; stop driving
as soon as possible and have the brake system re-
paired. WARNING
l Do
not turn off the electric motor unit
while your vehicle is in motion. If you
turn off the electric motor unit while driv-
ing, the power assistance for the braking
system will stop working and your brakes
will not work effectively. WARNING
l If
the power assist is lost or if either
brake hydraulic system stops working
properly, have your vehicle checked im-
mediately.
Warning lamp
The
brake warning lamp illuminates to indicate a
fault in the braking system. Refer to “Brake warn-
ing lamp” on page 4-09.
When brakes are wet
Check the brake system while driving at a low
speed immediately after starting, especially when
the brakes are wet, to confirm they work normally.
A film of water can be formed on the brake discs
or brake drums and prevent normal braking after
driving in heavy rain or through large puddles, or
after the vehicle is washed. If this occurs, dry the
brakes out by driving slowly while lightly depress-
ing the brake pedal.
When driving downhill
It is important to take advantage of regenerative
braking by shifting to the “B” (BRAKE) position
while driving on steep downhill roads in order to
prevent the brakes from overheating. Starting and driving
5-12
5
Presented by http://mmc-manuals.ru/ \251