display MITSUBISHI iMiEV 2013 (in English) Owner's Guide
[x] Cancel search | Manufacturer: MITSUBISHI, Model Year: 2013, Model line: iMiEV, Model: MITSUBISHI iMiEV 2013Pages: 258, PDF Size: 13 MB
Page 165 of 258
To play from a USB memory device
E00762500379
1. Press
the POWER button to turn on the au-
dio system. The system turns on in the last
mode used.
2. Connect your USB memory device to the USB input terminal.
Refer to “How to connect a USB memory de-
vice” on page 6-33.
3. Press the CD button to switch to the USB mode. The mode changes as follows every
time the CD button is pressed.
CD mode → USB mode → CD mode
The USB indicator is illuminated and then
the USB mode will be activated.
4. Once the device is selected, playback starts and the indicator appears on the display.
NOTE l Depending on the condition of your USB de-
vice, it may take a longer time before the play-
back starts.
5. To stop the playback, change over to a differ- ent mode.
NOTE l To adjust the volume and tone, refer to “To
adjust the volume” and “To adjust the tone”.
Supported compressed music files E00758300376
This audio can play MP3, WMA, AAC and WAV
files
recorded in a USB memory device. This audio
supports up to 65,535 files in 700 folders on 8 levels. Folder selection order/file playback order (exam-
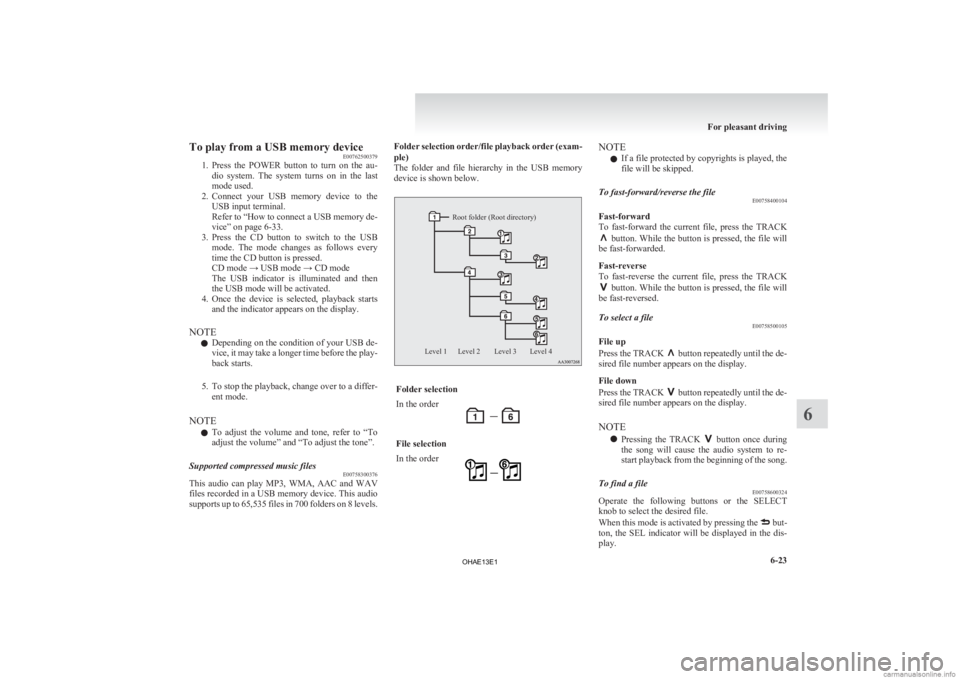
ple)
The
folder and file hierarchy in the USB memory
device is shown below.
Root folder (Root directory)
Level 4
Level 3
Level 2
Level 1 Folder selection
In the order
File selection
In the order NOTE
l If a file protected by copyrights is played, the
file will be skipped.
To fast-forward/reverse the file E00758400104
Fast-forward
To fast-forward the current file, press the TRACK button. While the button is pressed, the file will
be fast-forwarded.
Fast-reverse
To
fast-reverse the current file, press the TRACK button. While the button is pressed, the file will
be fast-reversed.
To select a file E00758500105
File up
Press
the TRACK button repeatedly until the de-
sired file number appears on the display.
File down
Press
the TRACK button repeatedly until the de-
sired file number appears on the display.
NOTE
l Pressing
the TRACK button once during
the
song will cause the audio system to re-
start playback from the beginning of the song.
To find a file E00758600324
Operate the following buttons or the SELECT
knob to select the desired file.
When
this mode is activated by pressing the but-
ton,
the SEL indicator will be displayed in the dis-
play. For pleasant driving
6-23 6
OHAE13E1
Page 166 of 258
button
:Press the button to start this
mode or cancel the selection.
SELECT knob : Turn the knob to show the fold- er or file. button
: Press the button to select the
folder or file.
NOTE l If
no operation is performed for 10 seconds
or more or another button is operated after
the SELECT knob has been turned, search-
ing of the desired file is cancelled.
l If no operation is performed for 5 seconds or
more after the file is displayed, playback
starts.
l When the SEL indicator is not shown on the
display and the SELECT knob is operated,
the volume adjustment is effective.
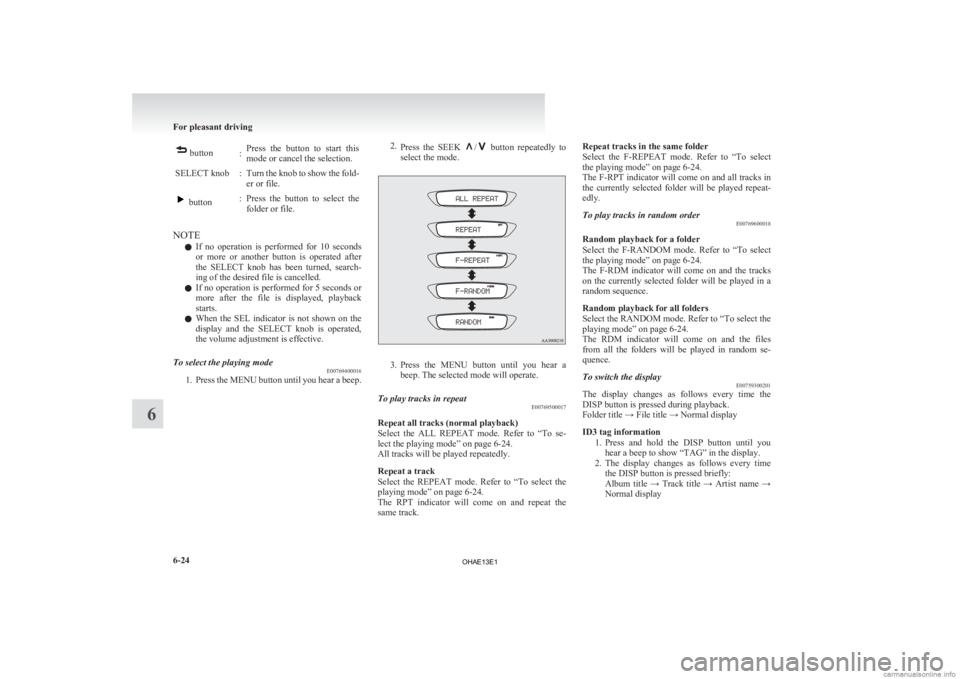
To select the playing mode E00769400016
1. Press
the MENU button until you hear a beep. 2.
Press
the SEEK / button repeatedly to
select the mode. 3. Press
the MENU button until you hear a
beep. The selected mode will operate.
To play tracks in repeat E00769500017
Repeat all tracks (normal playback)
Select
the ALL REPEAT mode. Refer to “To se-
lect the playing mode” on page 6-24.
All tracks will be played repeatedly.
Repeat a track
Select the REPEAT mode. Refer to “To select the
playing mode” on page 6-24.
The RPT indicator will come on and repeat the
same track. Repeat tracks in the same folder
Select
the F-REPEAT mode. Refer to “To select
the playing mode” on page 6-24.
The F-RPT indicator will come on and all tracks in
the currently selected folder will be played repeat-
edly.
To play tracks in random order E00769600018
Random playback for a folder
Select
the F-RANDOM mode. Refer to “To select
the playing mode” on page 6-24.
The F-RDM indicator will come on and the tracks
on the currently selected folder will be played in a
random sequence.
Random playback for all folders
Select the RANDOM mode. Refer to “To select the
playing mode” on page 6-24.
The RDM indicator will come on and the files
from all the folders will be played in random se-
quence.
To switch the display E00759300201
The display changes as follows every time the
DISP button is pressed during playback.
Folder title → File title → Normal display
ID3 tag information
1. Press
and hold the DISP button until you
hear a beep to show “TAG” in the display.
2. The display changes as follows every time the DISP button is pressed briefly:
Album title → Track title → Artist name →
Normal display For pleasant driving
6-24
6
OHAE13E1
Page 167 of 258
NOTE
l Press
and hold the DISP button again until
you hear a beep, and the tag information dis-
play returns to the folder title display.
l Up to 11 characters are shown in the display
at once. If the title is cut off in the middle,
press the PAGE button. The next characters
are displayed every time this button is pressed.
l If no title is stored, “NO TITLE” is shown in
the display.
l Characters that cannot be displayed are sub-
stituted by “ ”. For pleasant driving
6-25 6
OHAE13E1
Page 168 of 258
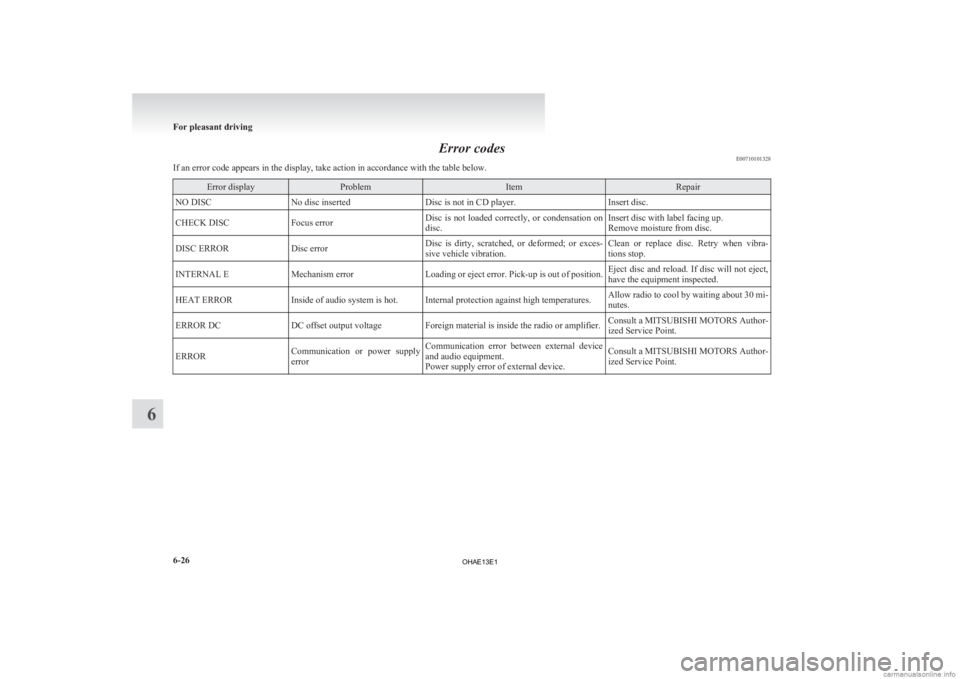
Error codes
E00710101328
If an error code appears in the display, take action in accordance with the table below. Error display Problem Item Repair
NO DISC No disc inserted Disc is not in CD player. Insert disc.
CHECK DISC Focus error Disc is not loaded correctly, or condensation on
disc. Insert disc with label facing up.
Remove moisture from disc.
DISC ERROR Disc error Disc is dirty, scratched, or deformed; or exces-
sive vehicle vibration. Clean or replace disc. Retry when vibra-
tions stop.
INTERNAL E Mechanism error Loading or eject error. Pick-up is out of position. Eject disc and reload. If disc will not eject,
have the equipment inspected.
HEAT ERROR Inside of audio system is hot. Internal protection against high temperatures. Allow radio to cool by waiting about 30 mi-
nutes.
ERROR DC DC offset output voltage Foreign material is inside the radio or amplifier. Consult a MITSUBISHI MOTORS Author-
ized Service Point.
ERROR Communication or power supply
error Communication error between external device
and audio equipment.
Power supply error of external device. Consult a MITSUBISHI MOTORS Author-
ized Service Point.For pleasant driving
6-26
6
OHAE13E1
Page 169 of 258
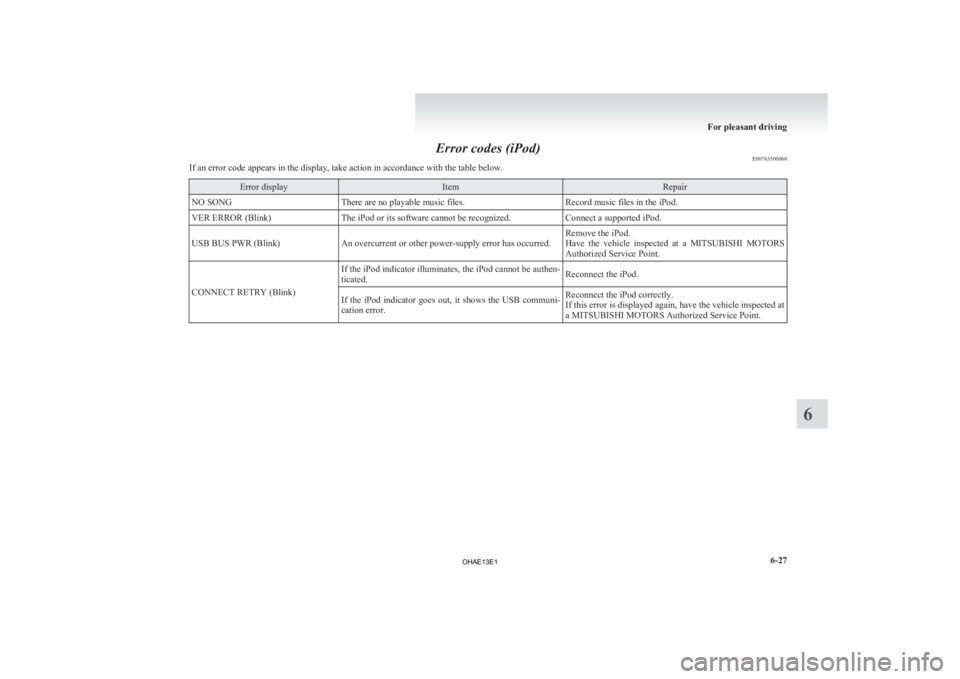
Error codes (iPod)
E00763500060
If an error code appears in the display, take action in accordance with the table below. Error display Item Repair
NO SONG There are no playable music files. Record music files in the iPod.
VER ERROR (Blink) The iPod or its software cannot be recognized. Connect a supported iPod.
USB BUS PWR (Blink) An overcurrent or other power-supply error has occurred. Remove the iPod.
Have
the vehicle inspected at a MITSUBISHI MOTORS
Authorized Service Point.
CONNECT RETRY (Blink) If the iPod indicator illuminates, the iPod cannot be authen-
ticated.
Reconnect the iPod.
If the iPod indicator goes out, it shows the USB communi-
cation error. Reconnect the iPod correctly.
If
this error is displayed again, have the vehicle inspected at
a MITSUBISHI MOTORS Authorized Service Point. For pleasant driving
6-27 6
OHAE13E1
Page 170 of 258
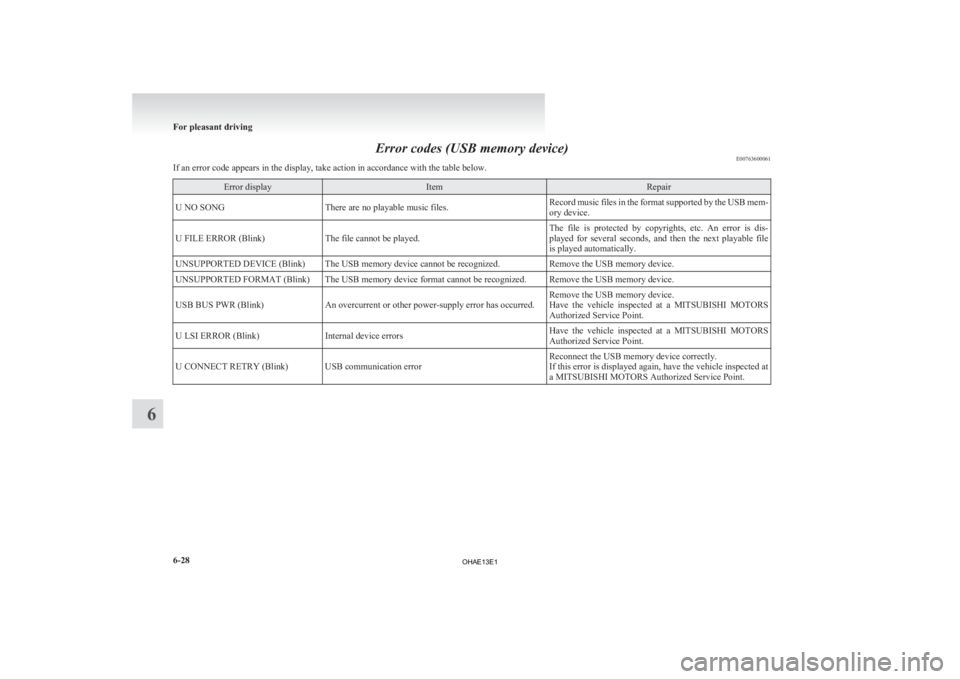
Error codes (USB memory device)
E00763600061
If an error code appears in the display, take action in accordance with the table below. Error display Item Repair
U NO SONG There are no playable music files. Record music files in the format supported by the USB mem-
ory device.
U FILE ERROR (Blink) The file cannot be played. The file is protected by copyrights, etc. An error is dis-
played
for several seconds, and then the next playable file
is played automatically.
UNSUPPORTED DEVICE (Blink) The USB memory device cannot be recognized. Remove the USB memory device.
UNSUPPORTED FORMAT (Blink) The USB memory device format cannot be recognized. Remove the USB memory device.
USB BUS PWR (Blink) An overcurrent or other power-supply error has occurred. Remove the USB memory device.
Have
the vehicle inspected at a MITSUBISHI MOTORS
Authorized Service Point.
U LSI ERROR (Blink) Internal device errors Have the vehicle inspected at a MITSUBISHI MOTORS
Authorized Service Point.
U CONNECT RETRY (Blink) USB communication error Reconnect the USB memory device correctly.
If
this error is displayed again, have the vehicle inspected at
a MITSUBISHI MOTORS Authorized Service Point. For pleasant driving
6-28
6
OHAE13E1
Page 173 of 258
Digital clock*
E00711800527
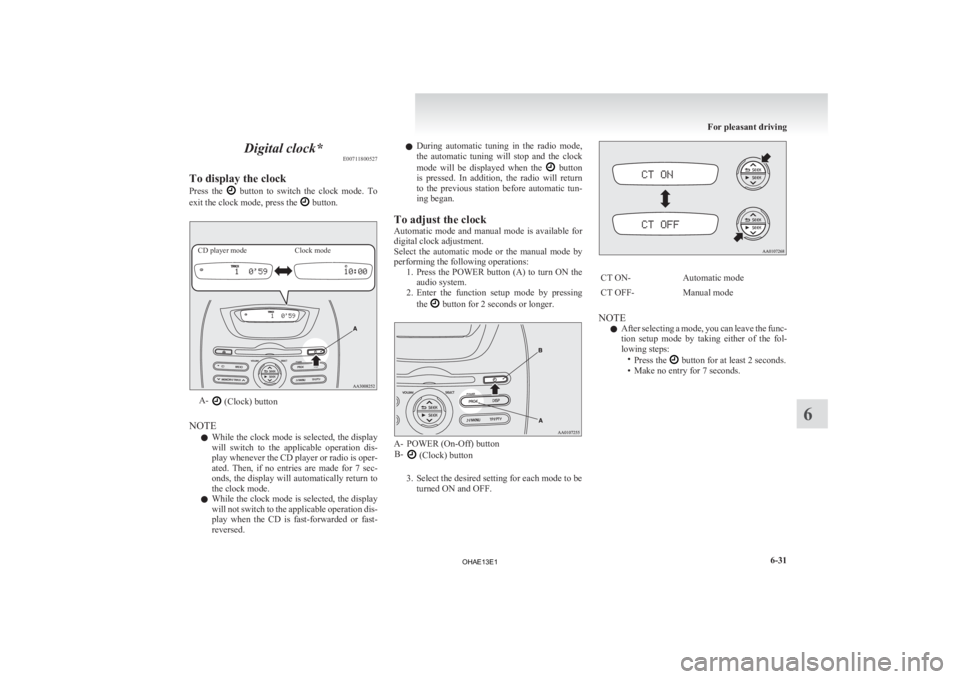
To display the clock
Press
the button to switch the clock mode. To
exit the clock mode, press the button.
CD player mode
Clock modeA-
(Clock) button
NOTE l While
the clock mode is selected, the display
will switch to the applicable operation dis-
play whenever the CD player or radio is oper-
ated. Then, if no entries are made for 7 sec-
onds, the display will automatically return to
the clock mode.
l While the clock mode is selected, the display
will not switch to the applicable operation dis-
play when the CD is fast-forwarded or fast-
reversed. l
During
automatic tuning in the radio mode,
the automatic tuning will stop and the clock
mode will be displayed when the button
is
pressed. In addition, the radio will return
to the previous station before automatic tun-
ing began.
To adjust the clock
Automatic mode and manual mode is available for
digital clock adjustment.
Select the automatic mode or the manual mode by
performing the following operations: 1. Press the POWER button (A) to turn ON theaudio system.
2. Enter the function setup mode by pressing
the button for 2 seconds or longer.
A- POWER (On-Off) button
B- (Clock) button
3.
Select the desired setting for each mode to be turned ON and OFF. CT ON-
Automatic mode
CT OFF- Manual mode
NOTE l After
selecting a mode, you can leave the func-
tion setup mode by taking either of the fol-
lowing steps: •Press the button for at least 2 seconds.
•
Make no entry for 7 seconds. For pleasant driving
6-31 6
OHAE13E1
Page 174 of 258
Automatic mode
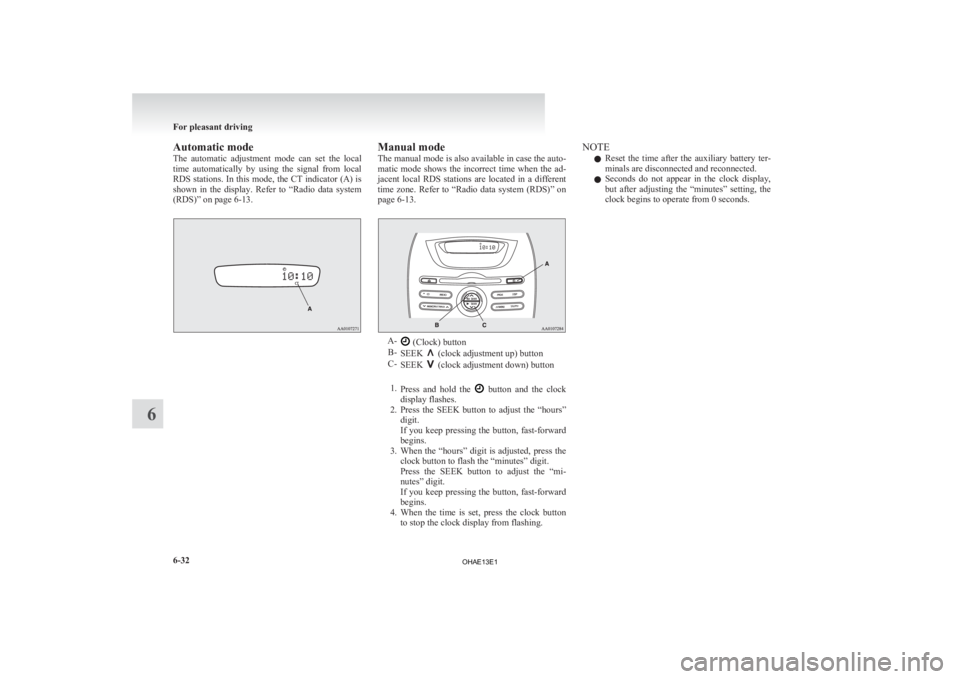
The
automatic adjustment mode can set the local
time automatically by using the signal from local
RDS stations. In this mode, the CT indicator (A) is
shown in the display. Refer to “Radio data system
(RDS)” on page 6-13. Manual mode
The
manual mode is also available in case the auto-
matic mode shows the incorrect time when the ad-
jacent local RDS stations are located in a different
time zone. Refer to “Radio data system (RDS)” on
page 6-13. A-
(Clock) button
B- SEEK (clock adjustment up) button
C- SEEK (clock adjustment down) button
1. Press
and hold the button and the clock
display flashes.
2. Press
the SEEK button to adjust the “hours”
digit.
If you keep pressing the button, fast-forward
begins.
3. When the “hours” digit is adjusted, press the clock button to flash the “minutes” digit.
Press the SEEK button to adjust the “mi-
nutes” digit.
If you keep pressing the button, fast-forward
begins.
4. When the time is set, press the clock button to stop the clock display from flashing. NOTE
l Reset
the time after the auxiliary battery ter-
minals are disconnected and reconnected.
l Seconds do not appear in the clock display,
but after adjusting the “minutes” setting, the
clock begins to operate from 0 seconds. For pleasant driving
6-32
6
OHAE13E1