stop start MITSUBISHI L200 2004 (in English) Owner's Guide
[x] Cancel search | Manufacturer: MITSUBISHI, Model Year: 2004, Model line: L200, Model: MITSUBISHI L200 2004Pages: 264, PDF Size: 4.14 MB
Page 138 of 264
FOR PLEASANT DRIVING
How to operate the APS
(Auto Program Sensor) system
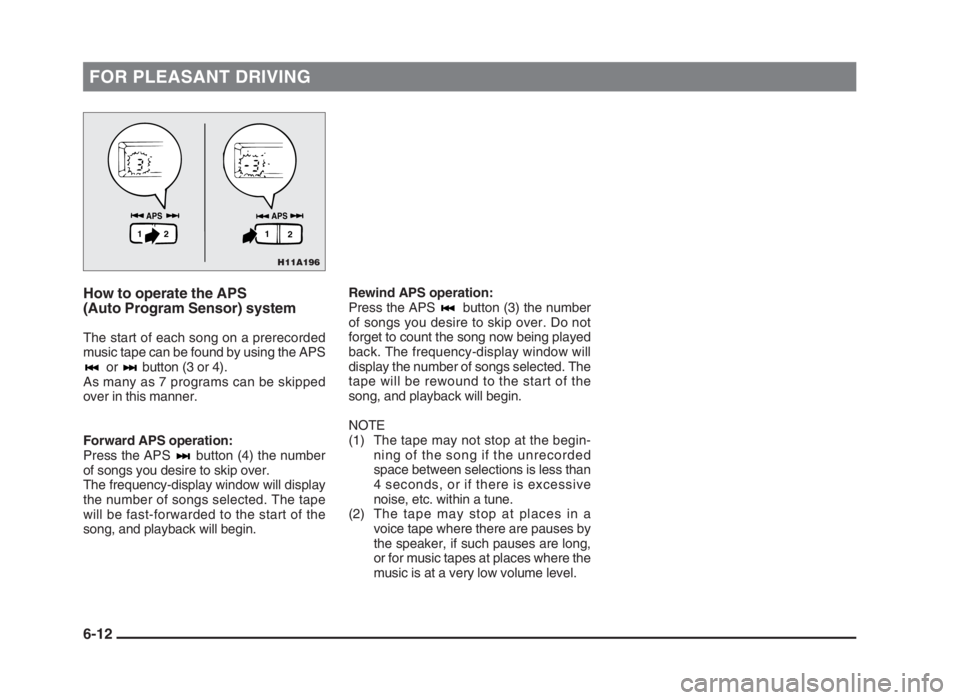
The start of each song on a prerecorded
music tape can be found by using the APS
or button (3 or 4).
As many as 7 programs can be skipped
over in this manner.
Forward APS operation:
Press the APS button (4) the number
of songs you desire to skip over.
The frequency-display window will display
the number of songs selected. The tape
will be fast-forwarded to the start of the
song, and playback will begin.
Rewind APS operation:
Press the APS button (3) the number
of songs you desire to skip over. Do not
forget to count the song now being played
back. The frequency-display window will
display the number of songs selected. The
tape will be rewound to the start of the
song, and playback will begin.
NOTE
(1) The tape may not stop at the begin-
ning of the song if the unrecorded
space between selections is less than
4 seconds, or if there is excessive
noise, etc. within a tune.
(2) The tape may stop at places in a
voice tape where there are pauses by
the speaker, if such pauses are long,
or for music tapes at places where the
music is at a very low volume level.
6-12
H11A196
APS APS
2 21 1
06engL2_240082_4 22-01-2004 13:07 Page 6-12
Page 140 of 264
FOR PLEASANT DRIVING
To listen to a CD
1. Press the CD button (4), and the CD
mode will be selected, starting a play-
back.
NOTE
If the system is equipped with a CD auto-
changer, press the DISC button (5), to se-
lect another disc.
Every time the side of the DISC button
is pressed, the next disc is selected and
every time the side of the button is
pressed, changeover to the previous disc
is made.
2. To adjust the volume and tone, refer
to the section “How to adjust the vol-
ume and tone” on page 6-4.
3. To stop the CD, turn off the power by
pressing the PWR switch (1) to make
changeover to the other mode by
pressing the TAPE button (2) or UML
button (3).
4. For information concerning the han-
dling of compact discs, refer to the
section “Handling of compact discs”
on page 6-17.
How to fast forward/reverse the
disc
Fast forward
The disc is fast forwarded only while the
button (9) is kept pressed. Release the
button, and playback will start.
Fast reverse
The disc is turned back only while the
button (8) is kept pressed. Release the
button, and playback will start.
To find the start of a desired track
The start of each track on a disc can
be found by using the or button
(6 or 7).
Track up:
Press the button (7) the number of
tracks to skip over.
The frequency-display window will display
the number of tracks selected.
Track down:
Press the button (6) the number of
tracks to skip over.
The frequency-display window will display
the number of tracks selected.
How to repeat the same track
You can repeatedly listen to the same
track by pressing the RPT button (10).
Press the RPT button, and the RPT indi-
cator (15) will light.
To release, press the button again.
To change the order of discs
played back
Press the RDM button (11), and the RDM
indicator (16) will light and random tracks
for playback will be selected randomly
from all discs loaded into the CD auto-
changer. To release, press the button
again.
6-14
06engL2_240082_4 22-01-2004 13:07 Page 6-14
Page 176 of 264
FOR EMERGENCIES
If the vehicle breaks down
EN40B-Dc
If the vehicle breaks down on the road,
move it to the shoulder and use the
hazard warning flashers.
If the engine stops/fails
Vehicle operation and control are affected
if the engine stops. Before moving the ve-
hicle to a safe area, be aware of the fol-
lowing.
(1) The brake booster becomes inopera-
tive and the pedal effort will increase.
Press down the brake pedal harder
than usual.
(2) For vehicles with power steering,
since the power steering pump is no
longer operative, the steering wheel
feels heavy when turning it. Turn the
wheel with more effort than usual.
Operation under adverse
driving conditions
EI43APD
If your vehicle is stuck: in sand,
mud or snow
If the vehicle becomes stuck in snow,
sand, or mud, it can often be moved a
rocking motion. Move the selector lever
alternately between the “L” (LOW) and “R”
(REVERSE) position (with manual trans-
mission, between 1st and Reverse), while
applying slight pressure to the accelerator
pedal.
Avoid racing the engine or spinning the
wheels. Prolonged efforts to free a stuck
vehicle may result in overheating and
transmission failure. Allow the engine to
idle for a few minutes to let the transmis-
sion cool between rocking attempts.
If the vehicle remains stuck after several
rocking attempts, seek other assistance.
WARNINGWhen attempting to rock your vehi-
cle out of a stuck position, be sure
that the area around the vehicle is
clear of people and physical objects.
The rocking motion may cause the
vehicle to suddenly launch forward
or backward, causing injury or dam-
age to nearby people or objects.
On 2WD models, it is recommended to
start the vehicle with parking brake par-
tially, but not completely, applied by
slightly pulling the parking brake lever. Af-
ter the vehicle has become free, do not
forget to release the parking brake.
NOTE
Depress the accelerator pedal gradually
when starting the vehicle.
8-2
08engL2_240082_4 22-01-2004 13:10 Page 8-2
Page 196 of 264
FOR EMERGENCIES
(4) Be sure the towing speed is within the
legal limit. In addition, if the vehicle is
equipped with an automatic transmis-
sion, make sure that the towing speed
and distance given below are never
exceeded.
Towing speed: 50 km/h
Towing distance: 50 km
(5) If the transmission is malfunctioning
or damaged, or if the vehicle is
equipped with an automatic transmis-
sion must be towed farther than
50 km, tow the vehicle by a tow truck.
(6) Turn the ignition switch to the “ACC”
or “ON” position to unlock the steering
wheel.
CAUTION(1) As the engine is not running, the
brake booster and power steer-
ing pump do not operate. This
means higher brake depression
force and higher steering effort
are required. Therefore, vehicle
operation is more difficult than
usual.
(2) Do not leave the key in the
“LOCK” position. If the key is re-
moved while driving, the steer-
ing will be locked causing loss
of control.
(7) Turn on the hazard warning lamps.
(8) During towing make sure that close
contact is maintained between the dri-
vers of both vehicles, and that the ve-
hicles travel at low speed. Avoid
abrupt starting or stopping.
WARNINGAvoid sudden braking, sudden ac-
celeration and sharp turning; such
operation could cause damage to
the towing hooks or the tow rope.
People in the vicinity could be in-
jured as a result.
CAUTIONWhen going down a long slope, the
brakes may overheat, reducing ef-
fectiveness. Have your vehicle
towed on a trailer.
(9) Towing should only be done by a pro-
fessional tow service if it will involve
towing on winding roads, hills or in
heavy traffic. If you have any doubts,
use a professional tow service.
(10) When the towing hooks are used, be
very careful so that the rope may not
cause damage to the body.
CAUTIONTo prevent entry of exhaust gas from
the towing vehicle, set the air selec-
tion lever to the recirculation posi-
tion.
8-22
08engL2_240082_4 22-01-2004 13:10 Page 8-22
Page 204 of 264
FOR EMERGENCIES
CAUTION(1) Do not attempt to start the en-
gine by pulling or pushing the
vehicle.
It could damage your vehicle.
(2) Always wear protective eye gog-
gles when working near the
battery.
(3) Keep the battery out of the reach
of children.
NOTE
On vehicles with the anti-lock brake
system, if the vehicle is started in motion
without fully charging the battery, irregular
rotation of the engine might cause the
anti-lock brake warning lamp to illuminate.
Refer to “Anti-lock brake system (ABS)”
on page 5-33.
What to do if the engine
speed becomes unstable
after the battery is
replaced
EN38B-G
If the engine speed becomes unstable af-
ter the battery is replaced, reset the en-
gine using the following method:
1. Stop the vehicle in a safe place.
2. Place the gearshift lever (manual
transmission) in the “N” (Neutral) po-
sition or the selector lever (automatic
transmission) in the “P” (PARK) posi-
tion.
Stop the engine.
3. Restart the engine.
4. Turn off the heater/air conditioning.
5. Allow the engine to warm up until the
needle in the water temperature
gauge stabilizes near the centre of
the gauge.
6. Stop and restart the engine.
7. Allow the engine to idle for approxi-
mately 10 minutes.
8. When the engine speed stabilizes,
the resetting procedure is complete.
NOTE
If the engine speed remains unstable after
the resetting procedure has been per-
formed, have the vehicle inspected by an
authorized MITSUBISHI dealer.
FusesEN09A-Na
Fuse block
To prevent damage to the electric system
due to short-circuiting or overloading,
each individual circuit is provided with a
fuse.
There are fuse boxes in the passenger
compartment and in the engine compart-
ment.
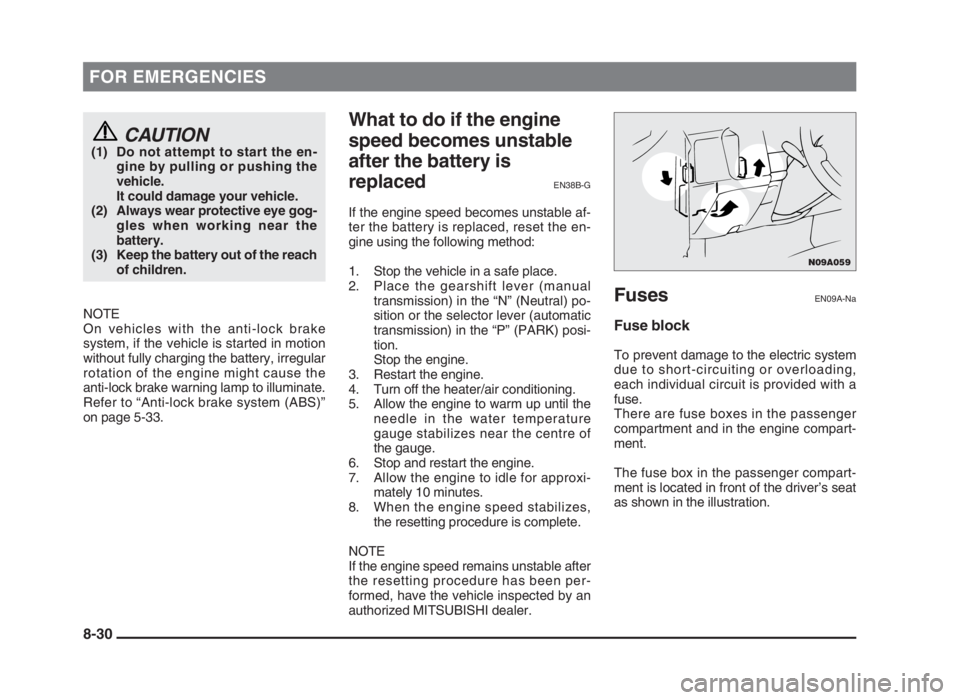
The fuse box in the passenger compart-
ment is located in front of the driver’s seat
as shown in the illustration.
8-30
N09A059
08engL2_240082_4 22-01-2004 13:10 Page 8-30
Page 221 of 264
MAINTENANCE
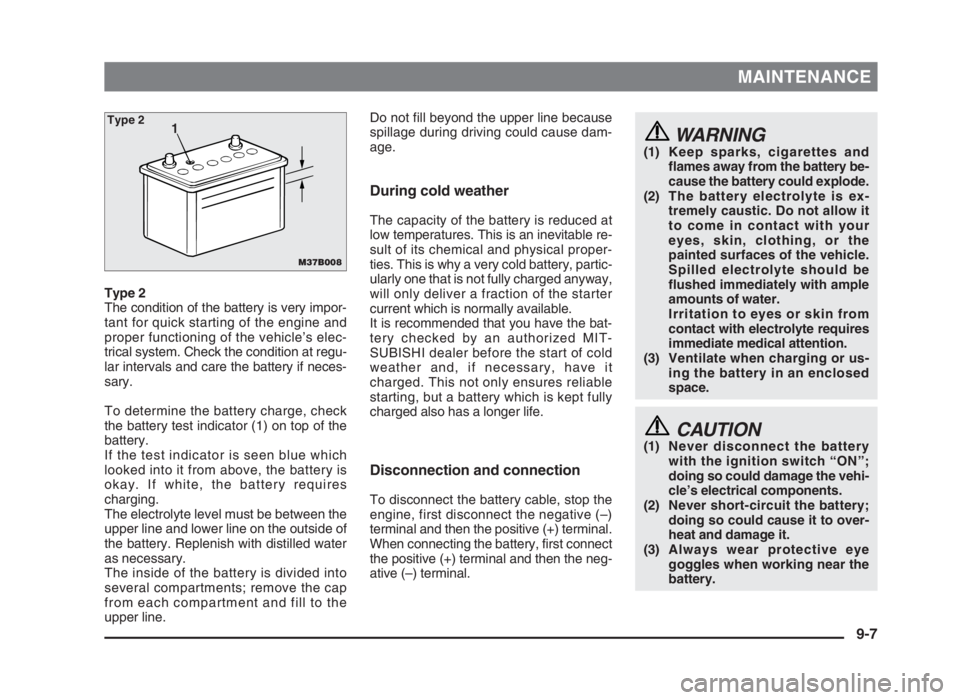
Type 2
The condition of the battery is very impor-
tant for quick starting of the engine and
proper functioning of the vehicle’s elec-
trical system. Check the condition at regu-
lar intervals and care the battery if neces-
sary.
To determine the battery charge, check
the battery test indicator (1) on top of the
battery.
If the test indicator is seen blue which
looked into it from above, the battery is
okay. If white, the battery requires
charging.
The electrolyte level must be between the
upper line and lower line on the outside of
the battery. Replenish with distilled water
as necessary.
The inside of the battery is divided into
several compartments; remove the cap
from each compartment and fill to the
upper line.
WARNING(1) Keep sparks, cigarettes and
flames away from the battery be-
cause the battery could explode.
(2) The battery electrolyte is ex-
tremely caustic. Do not allow it
to come in contact with your
eyes, skin, clothing, or the
painted surfaces of the vehicle.
Spilled electrolyte should be
flushed immediately with ample
amounts of water.
Irritation to eyes or skin from
contact with electrolyte requires
immediate medical attention.
(3) Ventilate when charging or us-
ing the battery in an enclosed
space.
CAUTION(1) Never disconnect the battery
with the ignition switch “ON”;
doing so could damage the vehi-
cle’s electrical components.
(2) Never short-circuit the battery;
doing so could cause it to over-
heat and damage it.
(3) Always wear protective eye
goggles when working near the
battery.
Do not fill beyond the upper line because
spillage during driving could cause dam-
age.
During cold weather
The capacity of the battery is reduced at
low temperatures. This is an inevitable re-
sult of its chemical and physical proper-
ties. This is why a very cold battery, partic-
ularly one that is not fully charged anyway,
will only deliver a fraction of the starter
current which is normally available.
It is recommended that you have the bat-
tery checked by an authorized MIT-
SUBISHI dealer before the start of cold
weather and, if necessary, have it
charged. This not only ensures reliable
starting, but a battery which is kept fully
charged also has a longer life.
Disconnection and connection
To disconnect the battery cable, stop the
engine, first disconnect the negative (–)
terminal and then the positive (+) terminal.
When connecting the battery, first connect
the positive (+) terminal and then the neg-
ative (–) terminal.
9-7
M37B008
1Type 2
09engL2_240082_4 22-01-2004 13:12 Page 9-7
Page 231 of 264
MAINTENANCE
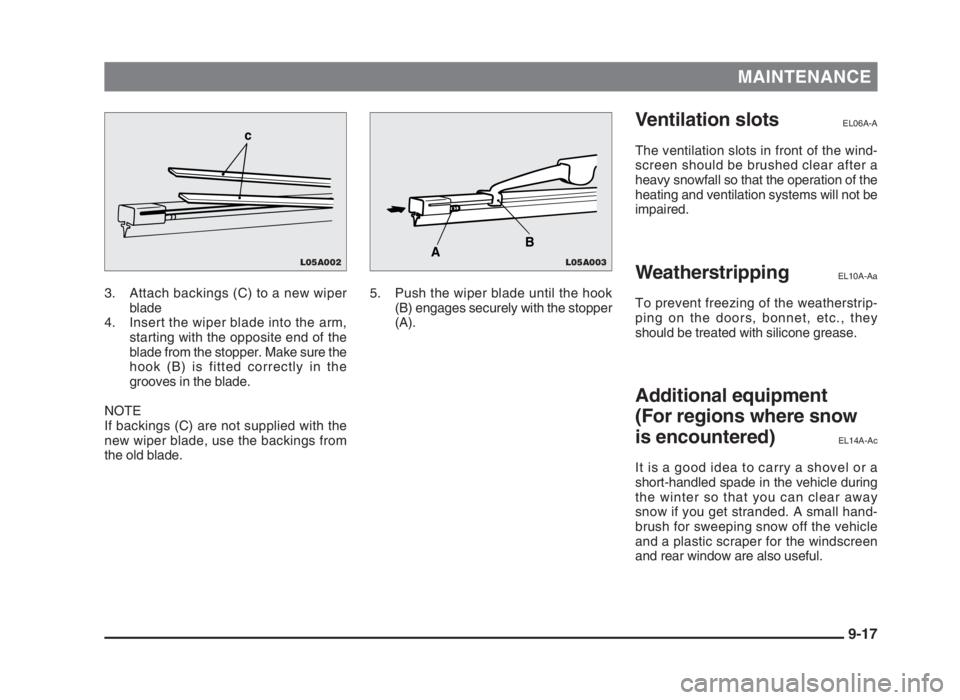
3. Attach backings (C) to a new wiper
blade
4. Insert the wiper blade into the arm,
starting with the opposite end of the
blade from the stopper. Make sure the
hook (B) is fitted correctly in the
grooves in the blade.
NOTE
If backings (C) are not supplied with the
new wiper blade, use the backings from
the old blade.
Ventilation slotsEL06A-A
The ventilation slots in front of the wind-
screen should be brushed clear after a
heavy snowfall so that the operation of the
heating and ventilation systems will not be
impaired.
WeatherstrippingEL10A-Aa
To prevent freezing of the weatherstrip-
ping on the doors, bonnet, etc., they
should be treated with silicone grease.
Additional equipment
(For regions where snow
is encountered)
EL14A-Ac
It is a good idea to carry a shovel or a
short-handled spade in the vehicle during
the winter so that you can clear away
snow if you get stranded. A small hand-
brush for sweeping snow off the vehicle
and a plastic scraper for the windscreen
and rear window are also useful. 5. Push the wiper blade until the hook
(B) engages securely with the stopper
(A).
9-17
L05A002
c
L05A003AB
09engL2_240082_4 22-01-2004 13:13 Page 9-17
Page 260 of 264
INDEX
Gauges ........................................................ 4-3
Genuine parts ............................................ 1-15
Glove box .................................................. 6-35
Hazard warning flasher switch .................. 4-18
Hazard warning indication lamp .................. 4-7
Headlamp
Headlamp levelling switch ...................... 4-14
Headlamps
Headlamps, Dipper, Passing .................. 4-12
Replacement ........................................... 8-35
Washer switch......................................... 4-17
Head restraints ............................................ 3-5
Heated seats ............................................... 3-7
Heater/Air conditioning .............................. 6-19
High-beam indication lamp .......................... 4-7
Hinges and latches lubrication................... 9-16
Horn switch ................................................ 4-20
Ignition switch .............................................. 5-9
Inclinometer ................................................. 4-4
Indication and warning lamps ...................... 4-6
Inside rear-view mirror ............................... 5-37
Installation of accessories ......................... 1-13
Instruments .................................................. 4-2
Jack ............................................................. 8-5
Jack handle ................................................. 8-7
Jacking up the vehicle ................................. 8-8
Jump starting (Emergency starting) .......... 8-27
Keyless entry system................................... 2-5
Keys............................................................. 2-2Leakage (Fuel, engine coolant,
oil and exhaust gas) ................................ 9-14
Light
Bulb capacity........................................... 8-34
Headlamps .............................................. 4-12
Room lamps ............................................ 4-20
Limited-slip differential ............................... 5-35
Low fuel indication lamp .............................. 4-7
Manual transmission
Driving speed .......................................... 5-14
Shifting .................................................... 5-14
Manual window control ................................ 2-9
Meter, gauge and indication/warning
lamp operation ........................................ 9-14
Meter illumination control........................... 4-20
Mirrors
Day/Night Type inside rear-view mirror .. 5-37
Electric remote-controlled
outside rear-view mirrors ...................... 5-38
Vanity mirror............................................ 6-32
Octane rating ............................................... 5-3
Odometer/Tripmeter .................................... 4-3
Oil pressure warning lamp ........................... 4-9
Oil
Engine oil ....................................... 9-2, 10-26
Manual transmission oil ........................ 10-26
Operation under adverse
driving conditions ...................................... 8-2
Overheating (Engine) ................................ 8-23Parking ............................................. 5-20, 5-32
Parking brake ............................................ 5-30
Performance ....................... 10-5, 10-11, 10-18
Pillar antenna............................................. 6-18
Polishing ...................................................... 7-6
Power steering
Fluid ............................................... 9-9, 10-26
System .................................................... 5-37
Pregnant women restraint ......................... 3-20
Punctured .................................................. 8-16
Quarter window ......................................... 2-11
Rear differential lock .................................. 5-23
Rear fog lamp switch ................................. 4-19
Rear gate ................................................... 2-12
Rear heater................................................ 6-30
Rear seat ..................................................... 3-5
Rear secret box ......................................... 6-37
Rear window demister switch .................... 4-18
Rear-view mirrors ...................................... 5-37
Removal of water from the fuel filter
(diesel-powered vehicles only) ............... 8-26
Replacement of lamp bulbs ....................... 8-34
Front turn-signal and position lamps ....... 8-36
Headlamps .............................................. 8-35
High-mounted stop lamps ....................... 8-38
Side turn-signal lamps ............................ 8-36
Number-plate lamps ............................... 8-37
Rear combination lamps ......................... 8-37
Rear fog lamps........................................ 8-38
Rheostat .................................................... 4-20
Roof drip moulding .................................... 1-14
Room lamps .............................................. 4-20
10-28
10engL2_240082_4 22-01-2004 13:14 Page 10-28