parking brake MITSUBISHI L200 2004 Owner's Manual (in English)
[x] Cancel search | Manufacturer: MITSUBISHI, Model Year: 2004, Model line: L200, Model: MITSUBISHI L200 2004Pages: 264, PDF Size: 4.14 MB
Page 3 of 264
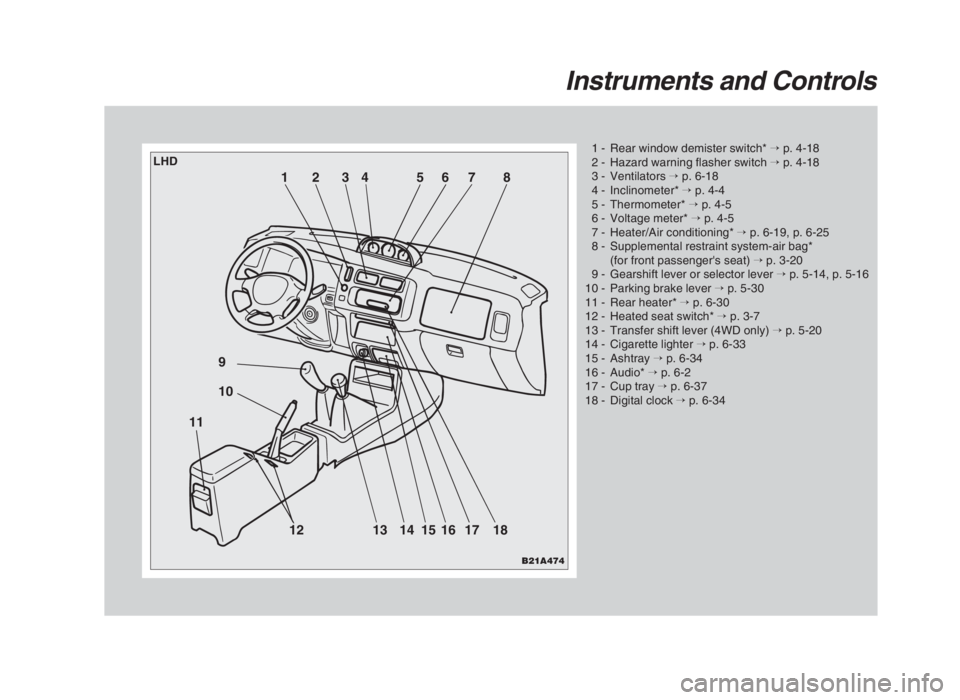
Instruments and Controls
1 - Rear window demister switch*→p. 4-18
2 - Hazard warning flasher switch→p. 4-18
3 - Ventilators→p. 6-18
4 - Inclinometer*→p. 4-4
5 - Thermometer*→p. 4-5
6 - Voltage meter*→p. 4-5
7 - Heater/Air conditioning*→p. 6-19, p. 6-25
8 - Supplemental restraint system-air bag*
(for front passenger's seat)→p. 3-20
9 - Gearshift lever or selector lever→p. 5-14, p. 5-16
10 - Parking brake lever→p. 5-30
11 - Rear heater*→p. 6-30
12 - Heated seat switch*→p. 3-7
13 - Transfer shift lever (4WD only)→p. 5-20
14 - Cigarette lighter→p. 6-33
15 - Ashtray→p. 6-34
16 - Audio*→p. 6-2
17 - Cup tray→p. 6-37
18 - Digital clock→p. 6-34
B21A474
12 9
10
11
13 14 15 16 17 18 2 1345678
LHD
01engL2_240082_4 22-01-2004 12:58 Page 1-3
Page 5 of 264
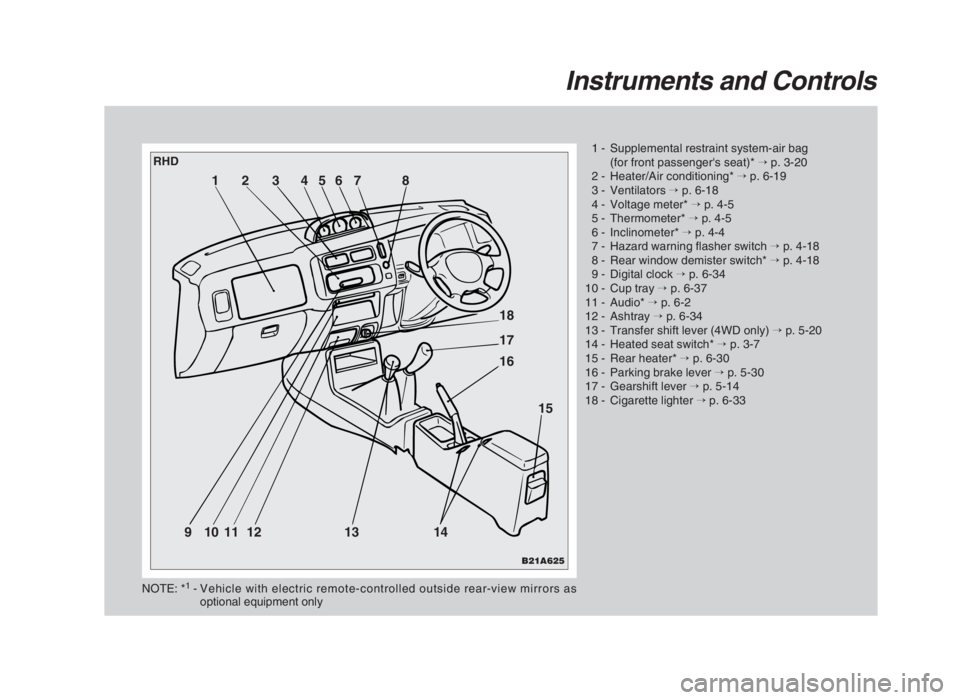
Instruments and Controls
1 - Supplemental restraint system-air bag
(for front passenger's seat)*→p. 3-20
2 - Heater/Air conditioning*→p. 6-19
3 - Ventilators→p. 6-18
4 - Voltage meter*→p. 4-5
5 - Thermometer*→p. 4-5
6 - Inclinometer*→p. 4-4
7 - Hazard warning flasher switch→p. 4-18
8 - Rear window demister switch*→p. 4-18
9 - Digital clock→p. 6-34
10 - Cup tray→p. 6-37
11 - Audio*→p. 6-2
12 - Ashtray→p. 6-34
13 - Transfer shift lever (4WD only)→p. 5-20
14 - Heated seat switch*→p. 3-7
15 - Rear heater*→p. 6-30
16 - Parking brake lever→p. 5-30
17 - Gearshift lever→p. 5-14
18 - Cigarette lighter→p. 6-33
NOTE: *1- Vehicle with electric remote-controlled outside rear-view mirrors as
optional equipment only
B21A625
1234567 8
18
17
16
15
9101112 13 14
RHD
01engL2_240082_4 22-01-2004 12:58 Page 1-5
Page 73 of 264
INSTRUMENTS AND CONTROLS
Oil pressure warning lamp - redED25A-Ai
This lamp illuminates when the ignition key is
turned “ON”, and goes off after the engine has
started. If it illuminates while the engine is run-
ning, the oil pressure is too low.
If the warning lamp illuminates while the engine is
running, turn the engine off. And contact your near-
est authorized MITSUBISHI dealer for inspection.
CAUTION(1) If this lamp illuminates when the engine
oil level is not low, contact your nearest
authorized MITSUBISHI dealer for in-
spection.
(2) This warning lamp does not indicate
the amount of oil in the crankcase. This
must be determined by checking the oil
level on the dipstick, while the engine
is switched off.
(3) If you continue driving with low engine
oil level or with this warning lamp illu-
minated, engine seizure may occur.
NOTE
The oil pressure warning lamp should not be
treated as an indication of the engine’s oil level.
The oil level must be checked using the dipstick.
Fuel filter indication lamp - amber
(diesel-powered vehicles only)
ED59A-Bc
This lamp illuminates when the ignition switch is
turned to the “ON” position and goes off after the
engine has started. If it lamps up while the engine
is running, it indicates that water has accumul-
ated inside the fuel filter; if this happens, remove
the water from the fuel filter.
When the lamp goes out, you can resume driving.
If it either does not go out or comes on from time to
time, have the vehicle inspected at an authorized
MITSUBISHI dealer.
Brake warning lamp - redED23A-Ie
With the ignition switch “ON”, the brake warning
lamp illuminates under the following conditions:
(1)
When the parking brake lever has been engaged.(2) When the brake fluid level in the reservoir
falls to a low level.
(3) If a malfunction develops in the brake servo
system. (Diesel-powered vehicles only)
(4)
If the brake warning lamp and charge warning
lamp come on at the same time while the en-
gine is running, it is possible that the alternator
belt is broken. (Diesel-powered vehicles only)
4-9
04engL2_240082_4 22-01-2004 13:19 Page 4-9
Page 74 of 264
INSTRUMENTS AND CONTROLS
CAUTIONIf the brake warning lamp does not illumi-
nate when you pull the parking brake lever,
or if it does not go out when you release
the lever, contact your nearest authorized
MITSUBISHI dealer immediately.
If the brake warning lamp illuminates while driv-
ing, it could mean braking system deterioration.
Park your vehicle in a safe place and follow these
procedures:
1.
If, when pressing the brake pedal, braking is poor,
press your foot harder against the brake pedal.
2. Should the brakes fail, use engine braking to
reduce your speed and slowly pull the park-
ing brake lever to park your vehicle.
Depress the brake pedal to operate the stop
lamp (brake lamp) to alert the vehicles be-
hind you.
CAUTIONSudden application of the parking brake is
dangerous and can lock the rear wheels.
Diesel preheat warning lamp - amber
(diesel-powered vehicles only)
ED58A-Hb
The warning lamp illuminates when the ignition
switch is placed in the “ON” position. As the glow
plug becomes hot, the lamp goes out and the en-
gine can be started.
NOTE
(1) If the engine is cold, the diesel preheat warn-
ing lamp is on for a longer time.
(2) When the engine has not been started within
about 5 seconds after the diesel preheat
warning lamp went out, return the ignition key
to the “LOCK” position. Then, turn the key to
the “ON” position to preheat the engine
again.
(3) When the engine is warm, the diesel preheat
warning lamp does not come on even if the
ignition key is placed in the “ON” position.
4-10
04engL2_240082_4 22-01-2004 13:19 Page 4-10
Page 87 of 264
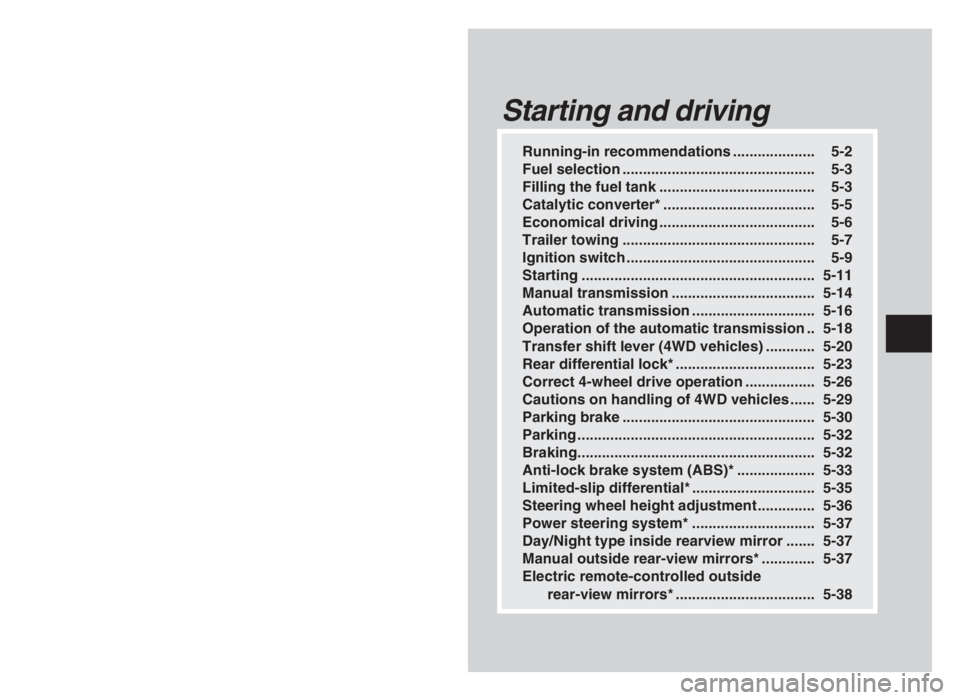
Running-in recommendations .................... 5-2
Fuel selection ............................................... 5-3
Filling the fuel tank ...................................... 5-3
Catalytic converter* ..................................... 5-5
Economical driving ...................................... 5-6
Trailer towing ............................................... 5-7
Ignition switch .............................................. 5-9
Starting ......................................................... 5-11
Manual transmission ................................... 5-14
Automatic transmission .............................. 5-16
Operation of the automatic transmission .. 5-18
Transfer shift lever (4WD vehicles) ............ 5-20
Rear differential lock* .................................. 5-23
Correct 4-wheel drive operation ................. 5-26
Cautions on handling of 4WD vehicles ...... 5-29
Parking brake ............................................... 5-30
Parking .......................................................... 5-32
Braking.......................................................... 5-32
Anti-lock brake system (ABS)* ................... 5-33
Limited-slip differential* .............................. 5-35
Steering wheel height adjustment .............. 5-36
Power steering system* .............................. 5-37
Day/Night type inside rearview mirror ....... 5-37
Manual outside rear-view mirrors* ............. 5-37
Electric remote-controlled outside
rear-view mirrors* .................................. 5-38
Starting and driving
5
05engL2_240082_4 22-01-2004 13:04 Page 5-1
Page 98 of 264
STARTING AND DRIVING
5-12
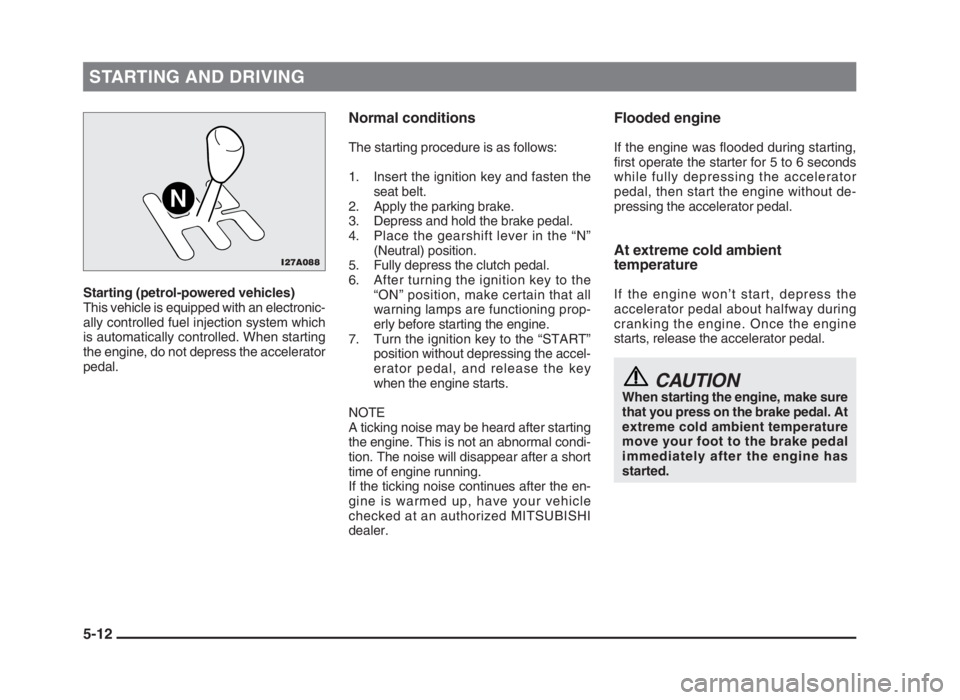
Starting (petrol-powered vehicles)
This vehicle is equipped with an electronic-
ally controlled fuel injection system which
is automatically controlled. When starting
the engine, do not depress the accelerator
pedal.
Normal conditions
The starting procedure is as follows:
1. Insert the ignition key and fasten the
seat belt.
2. Apply the parking brake.
3. Depress and hold the brake pedal.
4. Place the gearshift lever in the “N”
(Neutral) position.
5. Fully depress the clutch pedal.
6. After turning the ignition key to the
“ON” position, make certain that all
warning lamps are functioning prop-
erly before starting the engine.
7. Turn the ignition key to the “START”
position without depressing the accel-
erator pedal, and release the key
when the engine starts.
NOTE
A ticking noise may be heard after starting
the engine. This is not an abnormal condi-
tion. The noise will disappear after a short
time of engine running.
If the ticking noise continues after the en-
gine is warmed up, have your vehicle
checked at an authorized MITSUBISHI
dealer.
Flooded engine
If the engine was flooded during starting,
first operate the starter for 5 to 6 seconds
while fully depressing the accelerator
pedal, then start the engine without de-
pressing the accelerator pedal.
At extreme cold ambient
temperature
If the engine won’t start, depress the
accelerator pedal about halfway during
cranking the engine. Once the engine
starts, release the accelerator pedal.
CAUTIONWhen starting the engine, make sure
that you press on the brake pedal. At
extreme cold ambient temperature
move your foot to the brake pedal
immediately after the engine has
started.
I27A088
05engL2_240082_4 22-01-2004 13:04 Page 5-12
Page 99 of 264
STARTING AND DRIVING
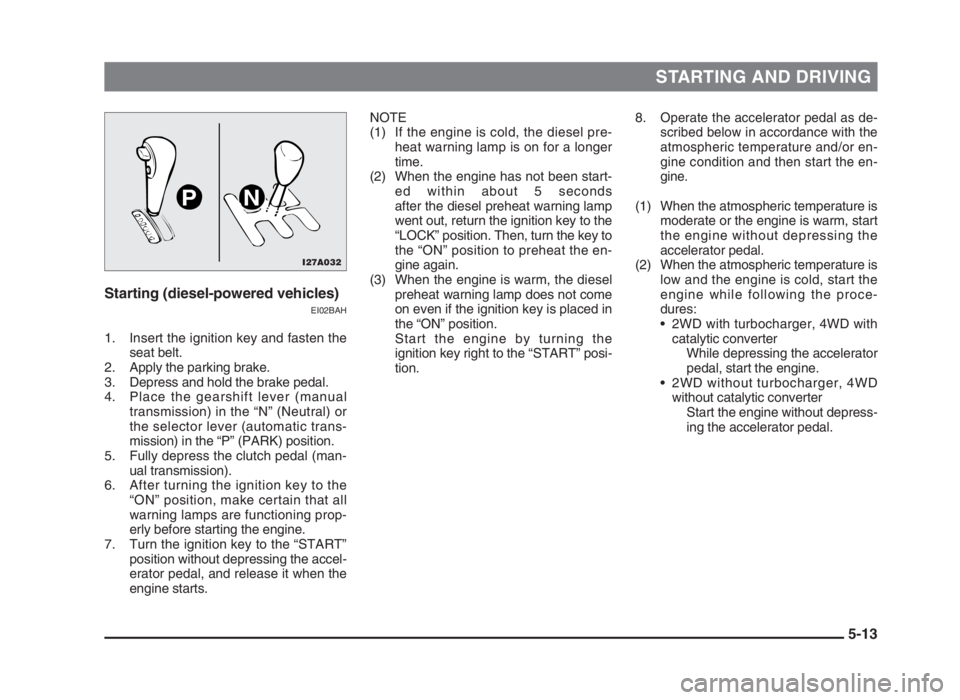
5-13 Starting (diesel-powered vehicles)
EI02BAH
1. Insert the ignition key and fasten the
seat belt.
2. Apply the parking brake.
3. Depress and hold the brake pedal.
4. Place the gearshift lever (manual
transmission) in the “N” (Neutral) or
the selector lever (automatic trans-
mission) in the “P” (PARK) position.
5. Fully depress the clutch pedal (man-
ual transmission).
6. After turning the ignition key to the
“ON” position, make certain that all
warning lamps are functioning prop-
erly before starting the engine.
7. Turn the ignition key to the “START”
position without depressing the accel-
erator pedal, and release it when the
engine starts.8.
Operate the accelerator pedal as de-
scribed below in accordance with the
atmospheric temperature and/or en-
gine condition and then start the en-
gine.
(1) When the atmospheric temperature is
moderate or the engine is warm, start
the engine without depressing the
accelerator pedal.
(2) When the atmospheric temperature is
low and the engine is cold, start the
engine while following the proce-
dures:
• 2WD with turbocharger, 4WD with
catalytic converter
While depressing the accelerator
pedal, start the engine.
• 2WD without turbocharger, 4WD
without catalytic converter
Start the engine without depress-
ing the accelerator pedal. NOTE
(1) If the engine is cold, the diesel pre-
heat warning lamp is on for a longer
time.
(2) When the engine has not been start-
ed within about 5 seconds
after the diesel preheat warning lamp
went out, return the ignition key to the
“LOCK” position. Then, turn the key to
the “ON” position to preheat the en-
gine again.
(3) When the engine is warm, the diesel
preheat warning lamp does not come
on even if the ignition key is placed in
the “ON” position.
Start the engine by turning the
ignition key right to the “START” posi-
tion.
I27A032
PN
05engL2_240082_4 22-01-2004 13:04 Page 5-13
Page 105 of 264
STARTING AND DRIVING
5-19 Passing acceleration
EI04F-Bb
For quick acceleration when passing, de-
pressing the accelerator pedal all the way
to the floor will cause the transmission to
automatically shift from 4th gear to 3rd
gear, from 3rd gear to 2nd gear or from
2nd gear to 1st gear, in accordance with
the driving speed, without having to move
the selector lever from either the “D” or “2”
positions.
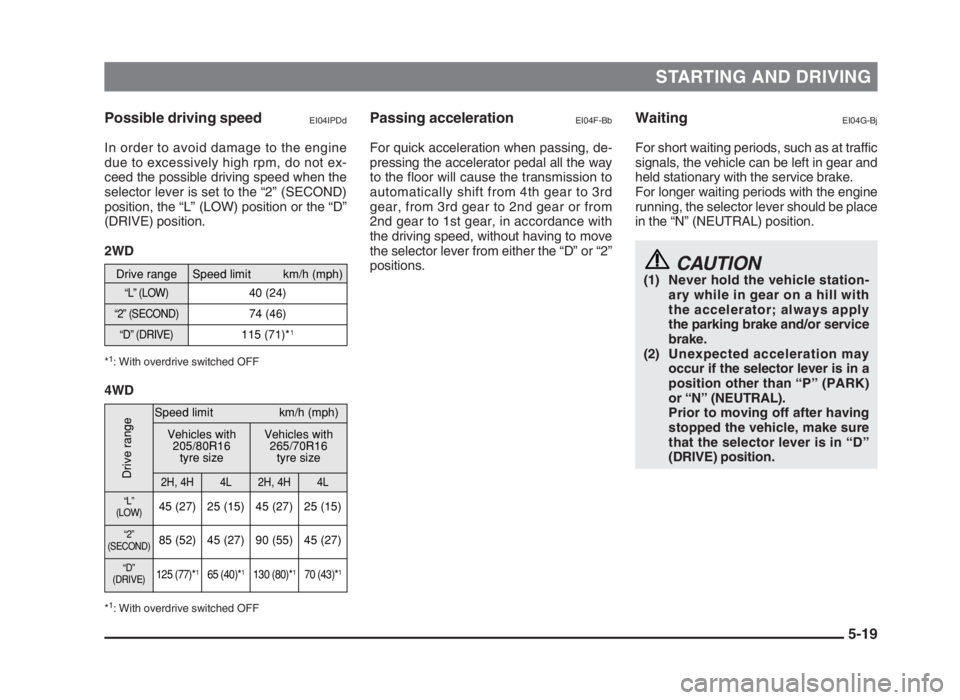
Possible driving speedEI04IPDd
In order to avoid damage to the engine
due to excessively high rpm, do not ex-
ceed the possible driving speed when the
selector lever is set to the “2” (SECOND)
position, the “L” (LOW) position or the “D”
(DRIVE) position.
2WD
*1: With overdrive switched OFF
4WD
*1: With overdrive switched OFF
WaitingEI04G-Bj
For short waiting periods, such as at traffic
signals, the vehicle can be left in gear and
held stationary with the service brake.
For longer waiting periods with the engine
running, the selector lever should be place
in the “N” (NEUTRAL) position.
CAUTION(1) Never hold the vehicle station-
ary while in gear on a hill with
the accelerator; always apply
the parking brake and/or service
brake.
(2) Unexpected acceleration may
occur if the selector lever is in a
position other than “P” (PARK)
or “N” (NEUTRAL).
Prior to moving off after having
stopped the vehicle, make sure
that the selector lever is in “D”
(DRIVE) position.
Drive range
Speed limit km/h (mph)
“L” (LOW)
40 (24)
“2” (SECOND)
74 (46)
“D” (DRIVE)
115 (71)*
1
Drive range
Speed limit km/h (mph)
Vehicles with
205/80R16
tyre sizeVehicles with
265/70R16
tyre size
2H, 4H4L2H, 4H4L
“L”
(LOW)45 (27) 25 (15) 45 (27) 25 (15)
“2”
(SECOND)85 (52) 45 (27) 90 (55) 45 (27)
“D”
(DRIVE)125 (77)*165 (40)*1130 (80)*170 (43)*1
05engL2_240082_4 22-01-2004 13:05 Page 5-19
Page 106 of 264
STARTING AND DRIVING
5-20 Parking
EI04H-Be
To park the vehicle, first bring it to a com-
plete stop, fully engage the parking brake,
and then move the selector lever to the “P”
(PARK) position.
If you are going to leave the vehicle unat-
tended, always switch off the engine and
remove the ignition key.
NOTE
On a slope, be sure to apply the parking
brake before moving the selector lever to
the “P” (PARK) position. If you move the
selector lever to the “P” (PARK) position
without first applying the parking brake, a
stronger than normal resistance force may
be encountered. In this situation, move
the selector lever strongly when you next
wish to drive.
Transfer shift lever
(4WD vehicles)
EI03B-W
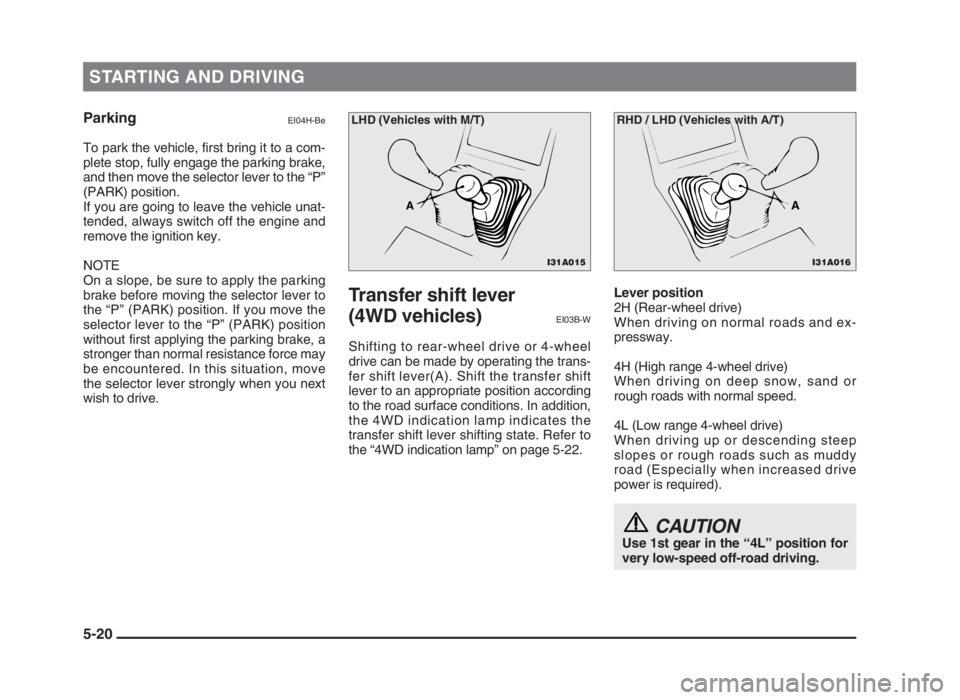
Shifting to rear-wheel drive or 4-wheel
drive can be made by operating the trans-
fer shift lever(A). Shift the transfer shift
lever to an appropriate position according
to the road surface conditions. In addition,
the 4WD indication lamp indicates the
transfer shift lever shifting state. Refer to
the “4WD indication lamp” on page 5-22.Lever position
2H (Rear-wheel drive)
When driving on normal roads and ex-
pressway.
4H (High range 4-wheel drive)
When driving on deep snow, sand or
rough roads with normal speed.
4L (Low range 4-wheel drive)
When driving up or descending steep
slopes or rough roads such as muddy
road (Especially when increased drive
power is required).
CAUTIONUse 1st gear in the “4L” position for
very low-speed off-road driving.
I31A015
A
LHD (Vehicles with M/T)
I31A016
A
RHD / LHD (Vehicles with A/T)
05engL2_240082_4 22-01-2004 13:05 Page 5-20
Page 113 of 264
STARTING AND DRIVING
5-27
CAUTIONS(1) Do not force the vehicle to driver
recklessly on sandy surfaces. In
comparison with normal road
surfaces, the engine and other
drive-system components are
put under excessive strain when
driving on such a surface, and
this could lead to accidents.
(2) If any of following conditions
occur while the vehicle is being
driven, immediately park your
vehicle in a safe place and follow
this procedure:
• The needle in the temperature
gauge approaches the over-
heating zone.
Refer to the “Engine overheat-
ing” on page 8-23.
• A/T fluid temperature warning
lamp illuminates.
Refer to the “A/T warning
lamp” on page 4-8.
(4) If it is necessary to drive in extremely
muddy conditions, the use of tyre
chains is recommended. Because the
extent of muddy conditions is difficult
to judge and the vehicle could be-
come bogged down very deeply, op-
eration should be at a low speed. If
possible, get out of the vehicle and
check the conditions ahead before
proceeding.
(5) Driving over roads in coastal areas or
roads on which anti-skid preparations
have been spread can cause rust
on the vehicle; wash the vehicle
thoroughly as soon as possible after
such use.
WARNINGWhen attempting to rock your vehi-
cle out of a stuck position, be sure
that the area around the vehicle is
clear of people and physical objects.
The rocking motion may cause the
vehicle to suddenly launch forward
or backward, causing injury or dam-
age to nearby people or objects.
NOTE
(1) Avoid sudden braking, acceleration,
and turning; such operations could
result in the vehicle becoming stuck.
(2) If the vehicle becomes stuck in sandy
or muddy roads, it can often be
moved by a rocking motion. Move the
selector lever alternately between the
“D” (DRIVE) and “R” (REVERSE)
position, (with manual transmission,
between 1st and Reverse), while
applying slight pressure to the accel-
erator pedal.
(3) It is recommended to start the vehicle
with parking brake partially, but not
completely, applied by slightly pulling
the parking brake lever.
After the vehicle has become free, do
not forget to release the parking
brake.
05engL2_240082_4 22-01-2004 13:05 Page 5-27