warning light MITSUBISHI L200 2004 Owner's Manual (in English)
[x] Cancel search | Manufacturer: MITSUBISHI, Model Year: 2004, Model line: L200, Model: MITSUBISHI L200 2004Pages: 264, PDF Size: 4.14 MB
Page 3 of 264
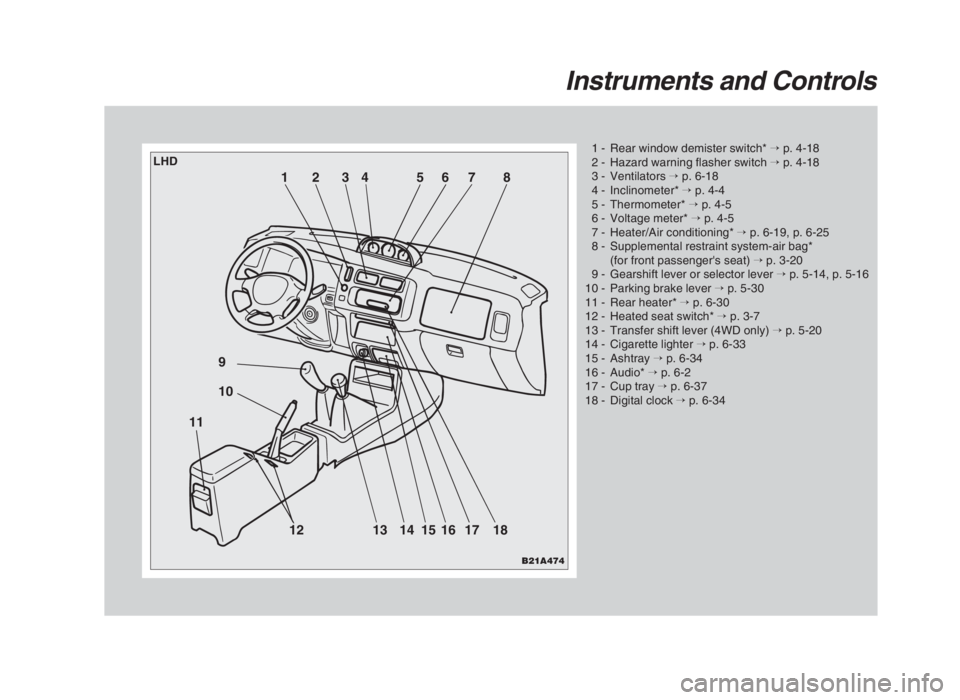
Instruments and Controls
1 - Rear window demister switch*→p. 4-18
2 - Hazard warning flasher switch→p. 4-18
3 - Ventilators→p. 6-18
4 - Inclinometer*→p. 4-4
5 - Thermometer*→p. 4-5
6 - Voltage meter*→p. 4-5
7 - Heater/Air conditioning*→p. 6-19, p. 6-25
8 - Supplemental restraint system-air bag*
(for front passenger's seat)→p. 3-20
9 - Gearshift lever or selector lever→p. 5-14, p. 5-16
10 - Parking brake lever→p. 5-30
11 - Rear heater*→p. 6-30
12 - Heated seat switch*→p. 3-7
13 - Transfer shift lever (4WD only)→p. 5-20
14 - Cigarette lighter→p. 6-33
15 - Ashtray→p. 6-34
16 - Audio*→p. 6-2
17 - Cup tray→p. 6-37
18 - Digital clock→p. 6-34
B21A474
12 9
10
11
13 14 15 16 17 18 2 1345678
LHD
01engL2_240082_4 22-01-2004 12:58 Page 1-3
Page 5 of 264
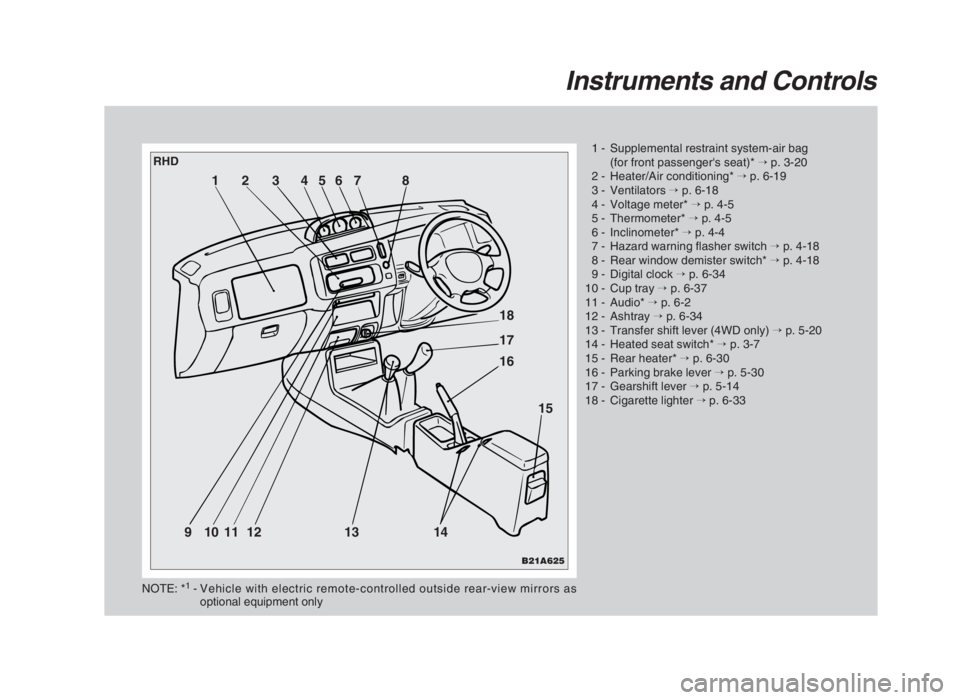
Instruments and Controls
1 - Supplemental restraint system-air bag
(for front passenger's seat)*→p. 3-20
2 - Heater/Air conditioning*→p. 6-19
3 - Ventilators→p. 6-18
4 - Voltage meter*→p. 4-5
5 - Thermometer*→p. 4-5
6 - Inclinometer*→p. 4-4
7 - Hazard warning flasher switch→p. 4-18
8 - Rear window demister switch*→p. 4-18
9 - Digital clock→p. 6-34
10 - Cup tray→p. 6-37
11 - Audio*→p. 6-2
12 - Ashtray→p. 6-34
13 - Transfer shift lever (4WD only)→p. 5-20
14 - Heated seat switch*→p. 3-7
15 - Rear heater*→p. 6-30
16 - Parking brake lever→p. 5-30
17 - Gearshift lever→p. 5-14
18 - Cigarette lighter→p. 6-33
NOTE: *1- Vehicle with electric remote-controlled outside rear-view mirrors as
optional equipment only
B21A625
1234567 8
18
17
16
15
9101112 13 14
RHD
01engL2_240082_4 22-01-2004 12:58 Page 1-5
Page 28 of 264
LOCKING AND UNLOCKING
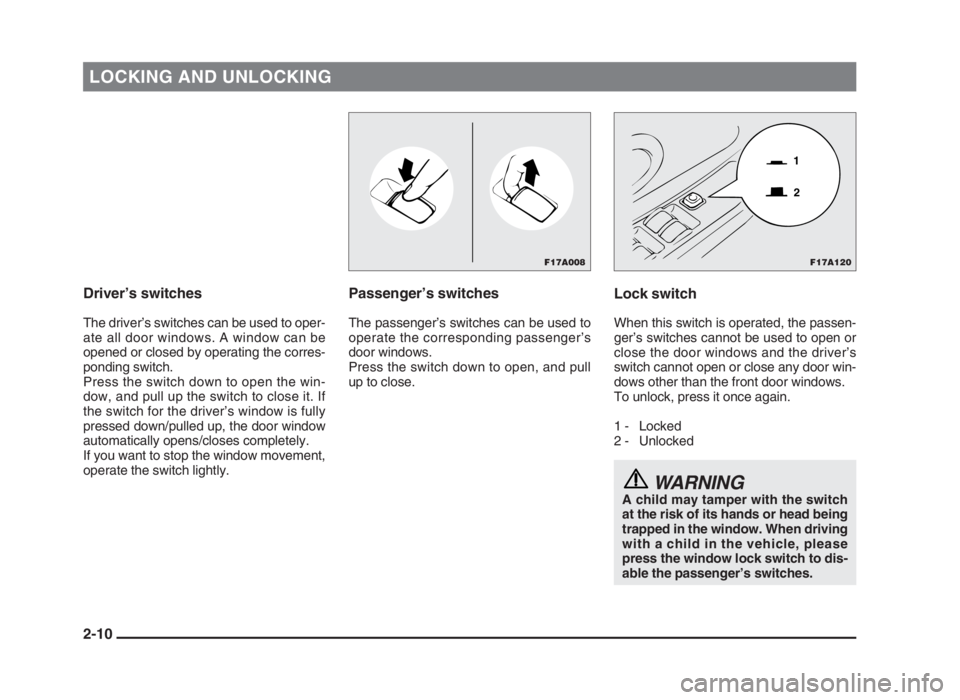
Driver’s switches
The driver’s switches can be used to oper-
ate all door windows. A window can be
opened or closed by operating the corres-
ponding switch.
Press the switch down to open the win-
dow, and pull up the switch to close it. If
the switch for the driver’s window is fully
pressed down/pulled up, the door window
automatically opens/closes completely.
If you want to stop the window movement,
operate the switch lightly.
Passenger’s switches
The passenger’s switches can be used to
operate the corresponding passenger’s
door windows.
Press the switch down to open, and pull
up to close.
Lock switch
When this switch is operated, the passen-
ger’s switches cannot be used to open or
close the door windows and the driver’s
switch cannot open or close any door win-
dows other than the front door windows.
To unlock, press it once again.
1 - Locked
2 - Unlocked
WARNINGA child may tamper with the switch
at the risk of its hands or head being
trapped in the window. When driving
with a child in the vehicle, please
press the window lock switch to dis-
able the passenger’s switches.
2-10
F17A120
1
2
F17A008
02engL2_240082_4 22-01-2004 12:59 Page 2-10
Page 35 of 264
SEAT AND SEAT BELTS
Front seatEG21B-V
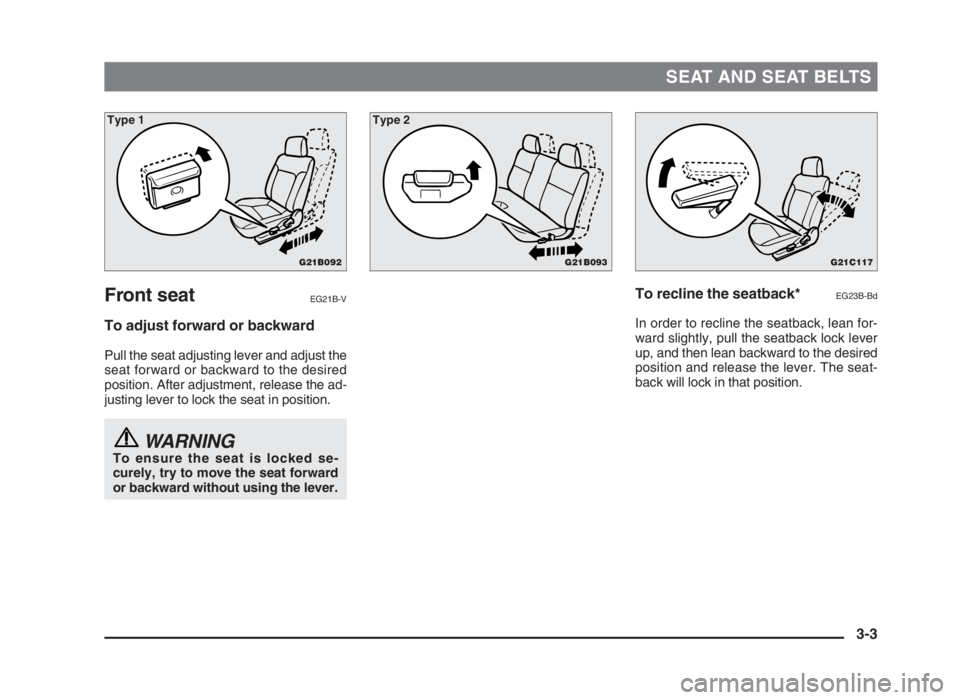
To adjust forward or backward
Pull the seat adjusting lever and adjust the
seat forward or backward to the desired
position. After adjustment, release the ad-
justing lever to lock the seat in position.
WARNINGTo ensure the seat is locked se-
curely, try to move the seat forward
or backward without using the lever.
To recline the seatback*EG23B-Bd
In order to recline the seatback, lean for-
ward slightly, pull the seatback lock lever
up, and then lean backward to the desired
position and release the lever. The seat-
back will lock in that position.
3-3
G21B092
Type 1
G21B093
Type 2
G21C117
03engL2_240082_4 22-01-2004 13:01 Page 3-3
Page 40 of 264
SEAT AND SEAT BELTS
CAUTION(1) Switch off seat heaters when not
in use.
(2) Operate in the high position for
quick heating. Once the seat is
warm, set the heater to low to
keep it warm. Slight variations in
the seat temperature may be felt
while using the heated seats.
This is caused by the operation
of the heater’s internal thermo-
stat and does not indicate a mal-
function.
(3) If the following types of persons
use the heated seats, they might
become too hot or receive minor
burns (red skin, heat blisters,
etc.):
• Children, elderly persons, ill
people
• People with sensitive skin
• Excessively tired people
• People under the influence of
alcohol or sleep inducing
medication (cold medicine,
etc.)
(4) Do not use a blanket, cushion,
or other material with high heat
insulation properties on the seat
while using the heater; this
might cause the heater element
to overheat.
(5) Turn the heater off immediately
if it appears to be malfunction-
ing during use.
NOTE
(1) Do not place heavy objects on the
seat or stick pins, needles, or other
pointed objects into it.
(2) When cleaning the seat, do not use
benzene, gasoline, alcohol, or other
organic solvents; this might damage
not only the surface of the seat, but
also the heater element.
(3) If water or any other liquid is spilled on
the seat, allow it to dry thoroughly
before attempting to use the heater.Seat beltsEG28AAPe
To protect you and your passengers in the
event of an accident, it is most important
that the seat belts are worn correctly when
you drive.
WARNING(1) Never wear the shoulder portion
of the seat belt under the arm or
other position which is incor-
rect.
(2) One seat belt should be used by
only one person. Doing other-
wise can be dangerous.
(3) The seat belt will provide its
wearer with maximum protec-
tion if the recliner seatback is
placed in fully upright position.
When the seatback is reclined,
there is greater risk that the pas-
senger will slide under the belt,
especially in a forward impact
accident, and may be injured by
the belt or by striking the instru-
ment panel or seatbacks.
3-8
03engL2_240082_4 22-01-2004 13:01 Page 3-8
Page 97 of 264
STARTING AND DRIVING
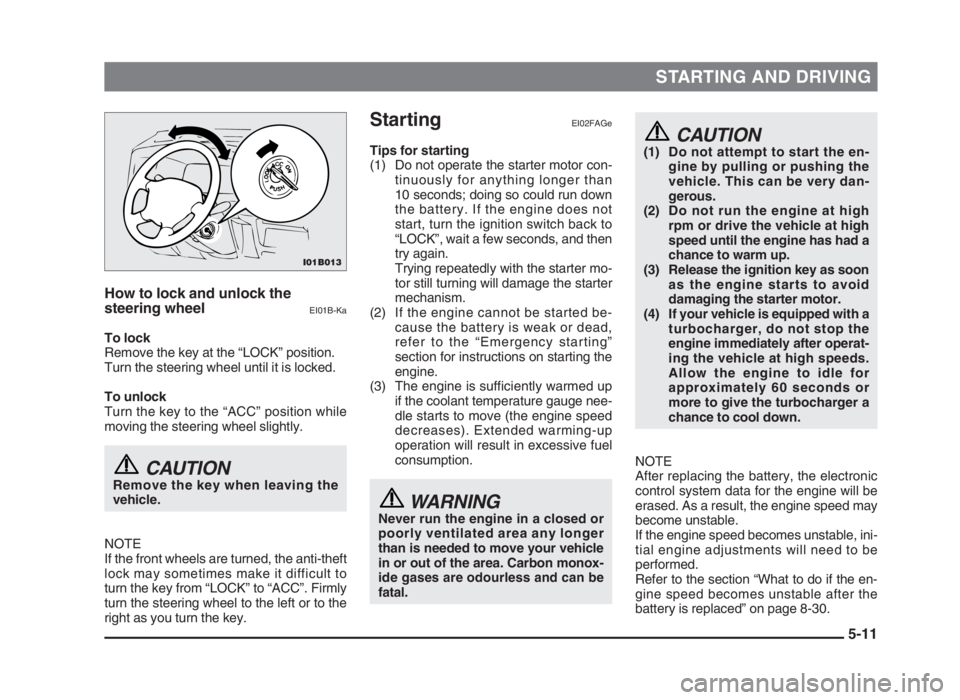
5-11 How to lock and unlock the
steering wheel
EI01B-Ka
To lock
Remove the key at the “LOCK” position.
Turn the steering wheel until it is locked.
To unlock
Turn the key to the “ACC” position while
moving the steering wheel slightly.
CAUTIONRemove the key when leaving the
vehicle.
NOTE
If the front wheels are turned, the anti-theft
lock may sometimes make it difficult to
turn the key from “LOCK” to “ACC”. Firmly
turn the steering wheel to the left or to the
right as you turn the key.
CAUTION(1) Do not attempt to start the en-
gine by pulling or pushing the
vehicle. This can be very dan-
gerous.
(2) Do not run the engine at high
rpm or drive the vehicle at high
speed until the engine has had a
chance to warm up.
(3) Release the ignition key as soon
as the engine starts to avoid
damaging the starter motor.
(4) If your vehicle is equipped with a
turbocharger, do not stop the
engine immediately after operat-
ing the vehicle at high speeds.
Allow the engine to idle for
approximately 60 seconds or
more to give the turbocharger a
chance to cool down.
NOTE
After replacing the battery, the electronic
control system data for the engine will be
erased. As a result, the engine speed may
become unstable.
If the engine speed becomes unstable, ini-
tial engine adjustments will need to be
performed.
Refer to the section “What to do if the en-
gine speed becomes unstable after the
battery is replaced” on page 8-30.
StartingEI02FAGe
Tips for starting
(1) Do not operate the starter motor con-
tinuously for anything longer than
10 seconds; doing so could run down
the battery. If the engine does not
start, turn the ignition switch back to
“LOCK”, wait a few seconds, and then
try again.
Trying repeatedly with the starter mo-
tor still turning will damage the starter
mechanism.
(2) If the engine cannot be started be-
cause the battery is weak or dead,
refer to the “Emergency starting”
section for instructions on starting the
engine.
(3) The engine is sufficiently warmed up
if the coolant temperature gauge nee-
dle starts to move (the engine speed
decreases). Extended warming-up
operation will result in excessive fuel
consumption.
WARNING
Never run the engine in a closed or
poorly ventilated area any longer
than is needed to move your vehicle
in or out of the area. Carbon monox-
ide
gases are odourless and can be
fatal.
I01B013
05engL2_240082_4 22-01-2004 13:04 Page 5-11
Page 113 of 264
STARTING AND DRIVING
5-27
CAUTIONS(1) Do not force the vehicle to driver
recklessly on sandy surfaces. In
comparison with normal road
surfaces, the engine and other
drive-system components are
put under excessive strain when
driving on such a surface, and
this could lead to accidents.
(2) If any of following conditions
occur while the vehicle is being
driven, immediately park your
vehicle in a safe place and follow
this procedure:
• The needle in the temperature
gauge approaches the over-
heating zone.
Refer to the “Engine overheat-
ing” on page 8-23.
• A/T fluid temperature warning
lamp illuminates.
Refer to the “A/T warning
lamp” on page 4-8.
(4) If it is necessary to drive in extremely
muddy conditions, the use of tyre
chains is recommended. Because the
extent of muddy conditions is difficult
to judge and the vehicle could be-
come bogged down very deeply, op-
eration should be at a low speed. If
possible, get out of the vehicle and
check the conditions ahead before
proceeding.
(5) Driving over roads in coastal areas or
roads on which anti-skid preparations
have been spread can cause rust
on the vehicle; wash the vehicle
thoroughly as soon as possible after
such use.
WARNINGWhen attempting to rock your vehi-
cle out of a stuck position, be sure
that the area around the vehicle is
clear of people and physical objects.
The rocking motion may cause the
vehicle to suddenly launch forward
or backward, causing injury or dam-
age to nearby people or objects.
NOTE
(1) Avoid sudden braking, acceleration,
and turning; such operations could
result in the vehicle becoming stuck.
(2) If the vehicle becomes stuck in sandy
or muddy roads, it can often be
moved by a rocking motion. Move the
selector lever alternately between the
“D” (DRIVE) and “R” (REVERSE)
position, (with manual transmission,
between 1st and Reverse), while
applying slight pressure to the accel-
erator pedal.
(3) It is recommended to start the vehicle
with parking brake partially, but not
completely, applied by slightly pulling
the parking brake lever.
After the vehicle has become free, do
not forget to release the parking
brake.
05engL2_240082_4 22-01-2004 13:05 Page 5-27
Page 114 of 264
STARTING AND DRIVING
5-28 Climbing sharp grades
Set the transfer shift lever to “4L” to max-
imize the engine torque.
WARNING(1) Go straight up. Do not try to
traverse across a steep slope.
(2) If you begin to lose traction,
ease off the accelerator pedal
and gently turn the steering
wheel alternately left and right to
regain adequate traction again.
NOTE
(1) Choose as smooth a slope as possi-
ble with few stones or other obsta-
cles.
(2) The climbing ability is approximate
35° grade on dry pavement.
(3) Before attempting to drive up the
slope, walk up it to confirm that the
vehicle can handle the gradient.
Descending sharp grades
Set the transfer shift lever to “4L”, use the
engine brake (downshifting) and descend
slowly.
WARNINGAvoid snaking down a sharp gra-
dient. Descend the grade as straight
as possible.
NOTE
(1) When descending a sharp grade, if the
brakes are applied suddenly because
of an obstacle encountered, control of
the vehicle could be lost. Before de-
scending the slope, walk down it and
confirm the path.
(2) Before descending a grade, it is neces-
sary to choose the appropriate gear.
Avoid changing gears or depressing the
clutch while descending the grade.
(3) MITSUBISHI is not responsible to the
operator for any damage or injury
caused or liability incurred by the im-
proper and negligent operation of a ve-
hicle. All techniques of vehicle opera-
tion described herein depend on the
skill and experience of the operator
and other participating parties, and any
deviation from the recommended oper-
ating instructions above is at their own
risk.
Turning sharp corners
When turning a sharp corner in “4H” or
“4L” position at low speed, a slight differ-
ence in steering may be experienced
similar to as if the brakes were applied.
This is called tight corner braking and
results from each of the four tyres being at
a different distance from the corner.
The phenomenon is peculiar to 4-wheel
drive vehicles. If this occurs, either
straighten the steering wheel, or change
to rear-wheel drive.
Crossing a stream (fording)
4-wheel drive vehicles are not necessarily
waterproof. If the electrical circuits be-
come wet, further operation of the vehicle
will be impossible; therefore, avoid cross-
ing streams unless absolutely necessary.
If crossing a stream is unavoidable, use
the following procedure:
(1) Check depths of a stream and geo-
graphical features before attempting
to cross a stream and ford the stream
where the water is as shallow as prac-
ticable.
(2) Set the transfer shift lever to “4L”.
(3) Drive slowly at a speed of approxi-
mately 5 km/h (3 mph) to avoid
splashing too much water.
05engL2_240082_4 22-01-2004 13:05 Page 5-28
Page 117 of 264
STARTING AND DRIVING
5-31
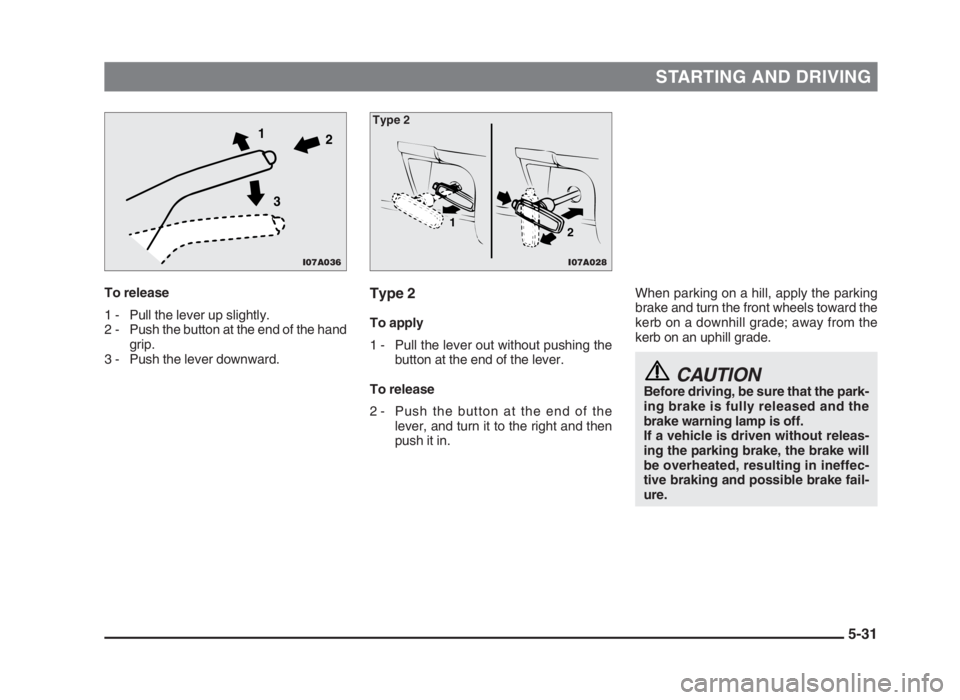
To release
1 - Pull the lever up slightly.
2 - Push the button at the end of the hand
grip.
3 - Push the lever downward.When parking on a hill, apply the parking
brake and turn the front wheels toward the
kerb on a downhill grade; away from the
kerb on an uphill grade.
CAUTIONBefore driving, be sure that the park-
ing brake is fully released and the
brake warning lamp is off.
If a vehicle is driven without releas-
ing the parking brake, the brake will
be overheated, resulting in ineffec-
tive braking and possible brake fail-
ure.
Type 2
To apply
1 - Pull the lever out without pushing the
button at the end of the lever.
To release
2 - Push the button at the end of the
lever, and turn it to the right and then
push it in.
I07A036
1
2
3
I07A028
1
2
Type 2
05engL2_240082_4 22-01-2004 13:05 Page 5-31
Page 118 of 264
STARTING AND DRIVING
5-32
ParkingEI22A-Ak
Parking on a slope
Fully engage the parking brake, and then
move the gearshift lever to 1st (on an up-
hill) or reverse (on a downhill) position on
manual transmission vehicle.
On automatic transmission vehicle, move
the selector lever to “P” (PARK) position.
When parking on a hill, apply chocks to
wheels for greater safety.
Parking with the engine running
Do not keep the engine running in a
closed or poorly ventilated place. Carbon
monoxide gas is odourless and extremely
poisonous and dangerous.
Where you park
Do not park in a place where there are in-
flammable objects such as dry grass,
leaves, etc. because the exhaust system
with catalyst produces very high tempera-
tures. This may cause a fire.
When leaving the vehicle
Always remove the key from the ignition
switch and lock all doors when leaving the
vehicle unattended.
Always try to park your vehicle in a well lit
area.
BrakingEI23A-Me
All the parts of the brake system are cri-
tical to safety. Have the vehicle serviced
by an authorized MITSUBISHI dealer at
regular intervals according to the service
booklet.
Brake system
(1) The service brake is divided into two
brake circuits so that when one brake
circuit fails, the other is available to
stop the vehicle. If this occurs, how-
ever, the brake pedal must be de-
pressed further than usual; stop driv-
ing as soon as possible and have the
brake system repaired at the nearest
authorized MITSUBISHI dealer.
(2) The brake boosting force is lost after
the brake pedal is depressed once or
twice while the engine is off. If this oc-
curs, the brake will require greater force
than usual. This is especially important
when the vehicle is being towed.
(3) On diesel-powered vehicles, the
brake booster will no longer function if
the V-belt is broken, and the brake
failure warning lamp will illuminate to
inform the driver. If this happens, use
engine braking (down-shifting) to re-
duce the speed of the vehicle and
then depress the brake pedal withmore force than usual to stop the
vehicle in a safe place, and have the
brake system serviced at the nearest
authorized MITSUBISHI dealer.
Warning lamp
The brake warning lamp lets you know if
your brake system is working properly.
Read “Brake warning lamp” on page 4-9.
When brakes are wet
Check the brake system while driving at a
low speed immediately after starting, es-
pecially when the brakes are wet, to con-
firm they work normally.
A film of water can form on the brake discs
or brake drums and prevent normal func-
tioning after driving in heavy rain or
through large puddles, or after the vehicle
is washed. If this occurs, dry the brakes
out by driving slowly while lightly depress-
ing the brake pedal.
When driving downhill
It is important to take advantage of the en-
gine braking by shifting to a lower gear
while driving on steep downhill roads in
order to prevent the brakes from overheat-
ing.
05engL2_240082_4 22-01-2004 13:05 Page 5-32