warning light MITSUBISHI L200 2014 (in English) Owner's Guide
[x] Cancel search | Manufacturer: MITSUBISHI, Model Year: 2014, Model line: L200, Model: MITSUBISHI L200 2014Pages: 362, PDF Size: 20.97 MB
Page 163 of 362
WARNINGlDo not leave any objects near the brake
pedal or let a floor mat slide under it; do-
ing so could prevent the full pedal stroke
that would be necessary in an emergency.
Make sure that the pedal can be operated
freely at all times. Make sure the floor
mat is securely held in place.
Brake pads and linings
l Avoid hard braking situations.
New brakes need to be broken-in by moder-
ate use for the first 200 km (124 miles).
l The disc brakes are provided with a warning
device which emits a shrieking metallic
sound while braking if the brake pads have
reached their wear limit.
If you hear this sound, have the brake pads re-
placed.
WARNINGl Driving with worn brake pads will make
it harder to stop, and can cause an acci-
dent.Brake assist system* E00627000392
The brake assist system is a device assisting drivers
who cannot depress the brake pedal firmly when it
is necessary to do so (such as in emergency stop sit-
uations) and provides greater braking force.
If the brake pedal is depressed suddenly, the brakes
will be applied with more force than usual.CAUTIONl The brake assist system is not a device de-
signed to exercise braking force greater
than its capacity. Make sure to always
keep a sufficient distance between vehi-
cles in front of you without relying too
much on the brake assist system.
NOTE
l Once the brake assist system is operational,
it maintains great braking force even if the
brake pedal is lightly released.
To stop its operation, completely remove
your foot from the brake pedal.
l When the brake assist system is in use while
driving, you may feel the brake pedal at-
tempt to resist, the pedal moves in small mo-
tions in conjunction with the operation noise,
or the vehicle body and the steering wheel vi-
brate. This occurs when the brake assist sys-
tem is operating normally and does not indi-
cate faulty operation. Continue to firmly de-
press the brake pedal.
l When the active stability & traction control
(ASTC) indication lamp is illuminated, the
brake assist system may not function.
Anti-lock brake system (ABS)* E00607100775
Environmental conditions can have an effect on
braking. During sudden braking when there is
snow, ice, oil, water etc. on the road surface, a skid
may occur. In this situation, steering control and
braking effectiveness is reduced and the stopping
distance is increased. The vehicle may also go into
an uncontrolled spin.
The ABS helps prevent the wheels from locking dur-
ing braking, thus maintaining directional stability,
ensuring controllability and providing optimum
braking force.
Driving hints l With ABS fitted, steering during sudden brak-
ing (when the ABS functions) differs slightly
from when the brakes are not being applied.
Steer the vehicle carefully in these conditions.
l Always maintain the same distance from the
vehicle in front of you as you would for a ve-
hicle not equipped with ABS.
Compared with vehicles not fitted with ABS,
your vehicle may require a longer stopping
distance in the following cases: • Driving on gravel or snow-covered roads.
• Driving with tyre chains installed.
• Driving on roads where the road surface
is pitted or has other differences in sur-
face height.
• Driving on bumpy roads or other poor driv-
ing surfaces.
Starting and driving
4-39
OKTE14E2
4
Page 165 of 362
If the warning lamp illuminates while
driving E00607300663
If only the ABS warning lamp illuminates l Avoid hard braking and high-speed driving.
Stop the vehicle in a safe place.
Restart the engine and check to see whether
the lamp goes out after a few minutes driv-
ing; if it then remains off during driving,
there is no problem.
However, if the lamp does not go out, or if it
lights up again when the vehicle is driven,
we recommend you to have the vehicle
checked as soon as possible.
l The ABS warning lamp can illuminate if the
battery voltage is insufficient when the en-
gine is started. In this case, it does not indi-
cate an ABS fault.
Charge the battery by allowing the engine to
idle for a while.
If the battery has been charged but the ABS
warning lamp continues to illuminate or illu-
minates intermittently, have the vehicle in-
spected.
If the ABS warning lamp and brake warning
lamp illuminate at the same time
l The ABS and brake force distribution func-
tion may not work, so hard braking could
make the vehicle unstable.
Avoid hard braking and high-speed driving.
Stop the vehicle in a safe place and contact a
MITSUBISHI MOTORS Authorized Service
Point.NOTE
l Immediately after the vehicle starts moving
after engine start up, a whining sound of a mo-
tor will be heard from the engine compart-
ment. If the brake pedal is depressed at that
moment, you can feel the brake pedal pulsat-
ing.
This pulsation is due to the self-diagnosis op-
eration of the ABS and does not indicate a
malfunction.
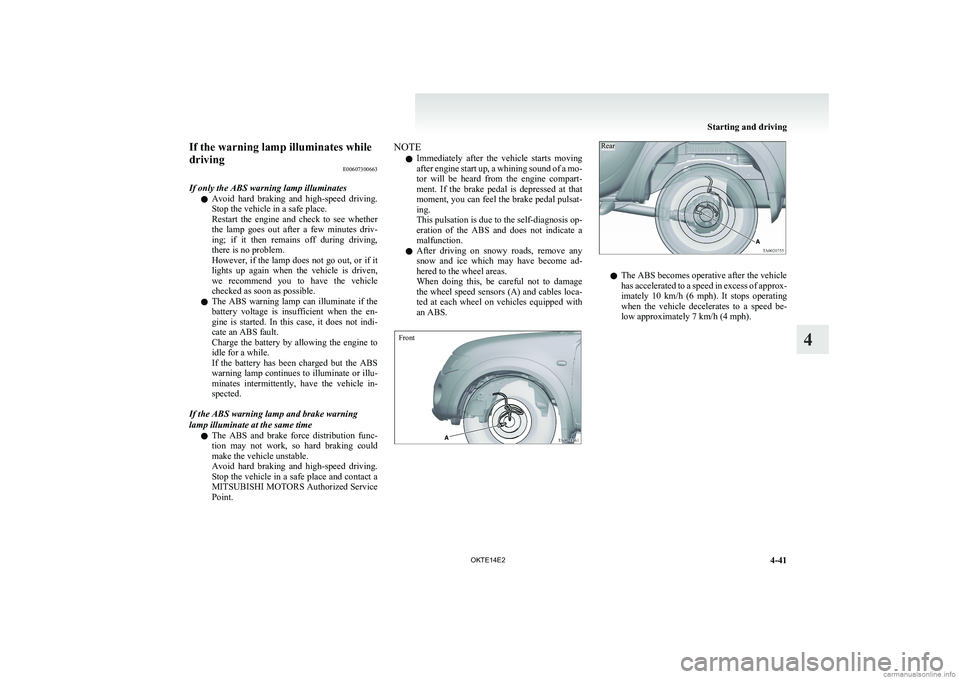
l After driving on snowy roads, remove any
snow and ice which may have become ad-
hered to the wheel areas.
When doing this, be careful not to damage
the wheel speed sensors (A) and cables loca-
ted at each wheel on vehicles equipped with
an ABS.FrontRear
l The ABS becomes operative after the vehicle
has accelerated to a speed in excess of approx-
imately 10 km/h (6 mph). It stops operating
when the vehicle decelerates to a speed be-
low approximately 7 km/h (4 mph).
Starting and driving
4-41
OKTE14E2
4
Page 177 of 362
Ventilators.................................................................................... 5-02
Heater/Manual air conditioning* ..................................................5-03
Automatic air conditioning* ......................................................... 5-08
Important operation tips for the air conditioning..........................5-12
Air purifier* .................................................................................. 5-12
LW/MW/FM electronic tuning radio with CD player* ................5-13
To play tracks from USB device* ................................................5-28
To play tracks from a Bluetooth ®
device (vehicles with
Bluetooth ®
2.0 interface)..........................................................5-37
To use the external audio input function* ....................................5-40
Steering wheel remote control switch* ........................................5-41
Error codes .................................................................................... 5-43
Error codes (iPod) ......................................................................... 5-45
Error codes (USB memory device) ..............................................5-47
Audio system anti-theft feature .................................................... 5-49
Handling of compact discs ........................................................... 5-49
Antenna ......................................................................................... 5-51
Link System* ................................................................................ 5-52
Bluetooth ®
2.0 interface ............................................................... 5-52
USB input terminal* ..................................................................... 5-68
Sun visors ..................................................................................... 5-70
Vanity mirror* .............................................................................. 5-71
Ashtray..........................................................................................5-71
Cigarette lighter ............................................................................ 5-72
Accessory socket* ........................................................................ 5-73
Digital clock* ............................................................................... 5-74
Interior lamps ................................................................................ 5-74
Storage spaces...............................................................................5-76
Cup holder* .................................................................................. 5-79
Bottle holder ................................................................................. 5-80Convenient hook
........................................................................... 5-80
Coat hook* .................................................................................... 5-81
First-aid kit and warning triangle securing bands* ......................5-81For pleasant driving
OKTE14E2
5
Page 276 of 362
WARNINGlBe sure to apply chocks or blocks to the
correct tyre when jacking up the vehicle.
If the vehicle moves while jacked up, the
jack could slip out of position, leading to
an accident.
NOTE
l The chocks shown in the illustration do not
come with your vehicle. It is recommended
that you keep one in the vehicle for use if nee-
ded.
l If chocks are not available, use stones or any
other objects that are large enough to hold
the wheel in position.
6. Get the spare wheel, jack, jack handle and
wheel nut wrench ready.
NOTE
l Put the spare wheel under the vehicle body
near the flat tyre. This makes it safer if the
jack slips out of position.
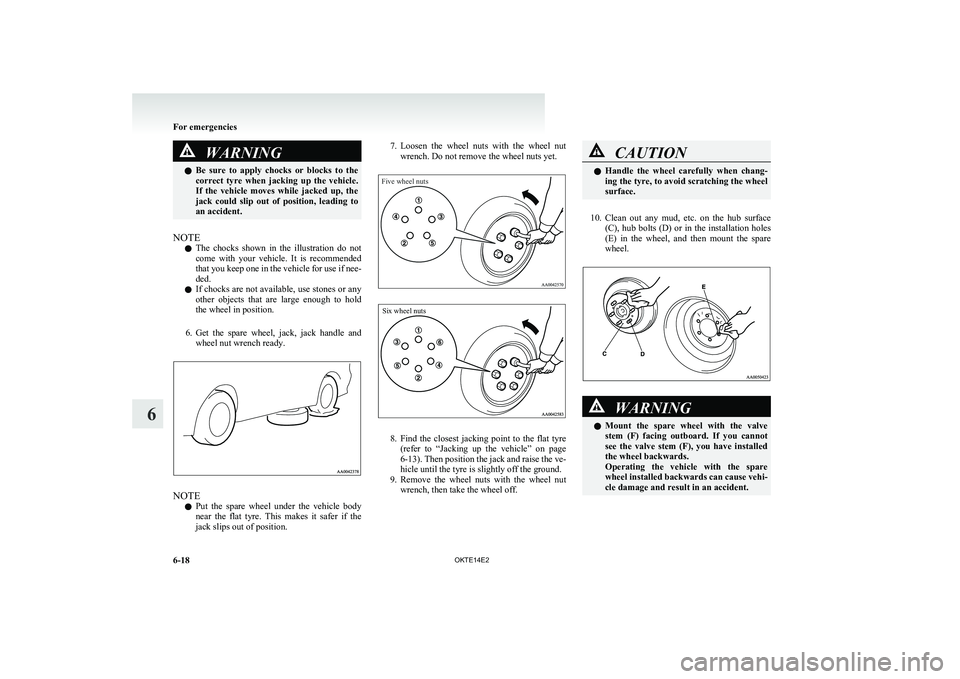
7. Loosen the wheel nuts with the wheel nut
wrench. Do not remove the wheel nuts yet.Five wheel nutsSix wheel nuts
8. Find the closest jacking point to the flat tyre
(refer to “Jacking up the vehicle” on page
6-13 ). Then position the jack and raise the ve-
hicle until the tyre is slightly off the ground.
9. Remove the wheel nuts with the wheel nut
wrench, then take the wheel off.
CAUTIONl Handle the wheel carefully when chang-
ing the tyre, to avoid scratching the wheel
surface.
10. Clean out any mud, etc. on the hub surface
(C), hub bolts (D) or in the installation holes
(E) in the wheel, and then mount the spare
wheel.
WARNINGl Mount the spare wheel with the valve
stem (F) facing outboard. If you cannot
see the valve stem (F), you have installed
the wheel backwards.
Operating the vehicle with the spare
wheel installed backwards can cause vehi-
cle damage and result in an accident.
For emergencies
6-18 OKTE14E2
6
Page 282 of 362
Operation under adverse drivingconditions E00801702762
If your vehicle becomes stuck in sand,
mud or snow
If the vehicle becomes stuck in snow, sand, or
mud, it can often be moved with a rocking motion.
Move the selector lever alternately between the
Sport Mode and “R” (REVERSE) position (with
manual transmission, between 1 st
and Reverse),
while applying slight pressure to the accelerator ped-
al.
Avoid racing the engine or spinning the wheels. Pro-
longed efforts to free a stuck vehicle may result in
overheating and transmission failure. Allow the en-
gine to idle for a few minutes to let the transmis-
sion cool between rocking attempts.
If the vehicle remains stuck after several rocking at-
tempts, seek other assistance.WARNINGl When attempting to rock your vehicle out
of a stuck position, be sure that the area
around the vehicle is clear of people and
physical objects. The rocking motion may
cause the vehicle to suddenly launch for-
ward or backward, causing injury or dam-
age to nearby people or objects.
On 2WD vehicles, it is recommended to start the ve-
hicle with parking brake partially, but not complete-
ly, applied by slightly pulling the parking brake lev-
er.
After the vehicle has become free, do not forget to
release the parking brake.
NOTE
l Depress the accelerator pedal gradually when
starting the vehicle.
On a flooded road l Avoid flooded roads. Water could enter the
brake discs, resulting in temporarily ineffec-
tive brakes. In such cases, lightly depress the
brake pedal to see if the brakes operate prop-
erly. If they do not, lightly depress the pedal
several times while driving in order to dry
the brake pads.
l When driving in rain or on a road with many
puddles a layer of water may form between
the tyres and the road surface.
This reduces a tyre’s frictional resistance on
the road, resulting in loss of steering stability
and braking capability.
To cope with this, observe the following items: (a)Drive your vehicle at slow speed. (b)Do not drive on worn tyres. Always
maintain the specified tyre inflation
pressures.
On a snow-covered or frozen road
l When driving on a snow-covered or frozen
road, it is recommended that you use snow
tyres or tyre chains.
Refer to the “Snow tyres” and “Tyre chains”
sections.
l Avoid high-speed operation, sudden acceler-
ation, abrupt brake application and sharp cor-
nering.
l Depressing the brake pedal during travel on
snowy or icy roads may cause tyre slippage
and skidding. When traction between the
tyres and the road is reduced the wheels may
skid and the vehicle cannot readily be
brought to a stop by conventional braking
techniques. Braking will differ, depending
upon whether you have anti-lock brake sys-
tem (ABS). If you do have ABS, brake by
pressing the brake system pedal hard, and
keeping it pressed. If you do not have ABS,
pump the brake pedal with short rapid jabs,
each time fully applying and fully releasing
for greatest effect.
l Allow extra distance between your vehicle
and the vehicle in front of you, and avoid sud-
den braking.
l Accumulation of ice on the braking system
can cause the wheels to lock. Pull away from
a standstill slowly after confirming safety
around the vehicle.CAUTIONl Do not press the accelerator pedal rapid-
ly. If the wheels break free of the ice, the
vehicle could suddenly start moving and
possibly cause an accident.
On a bumpy or rutted road
l Drive as slow as possible when driving on
bumpy or rutted roads.
For emergencies
6-24 OKTE14E2
6
Page 296 of 362
NOTEl Use of additives is not recommended since
they may reduce the effectiveness of addi-
tives already included in the engine oil. It
may result in failure of the mechanical assem-
bly.Engine coolant E01000502153
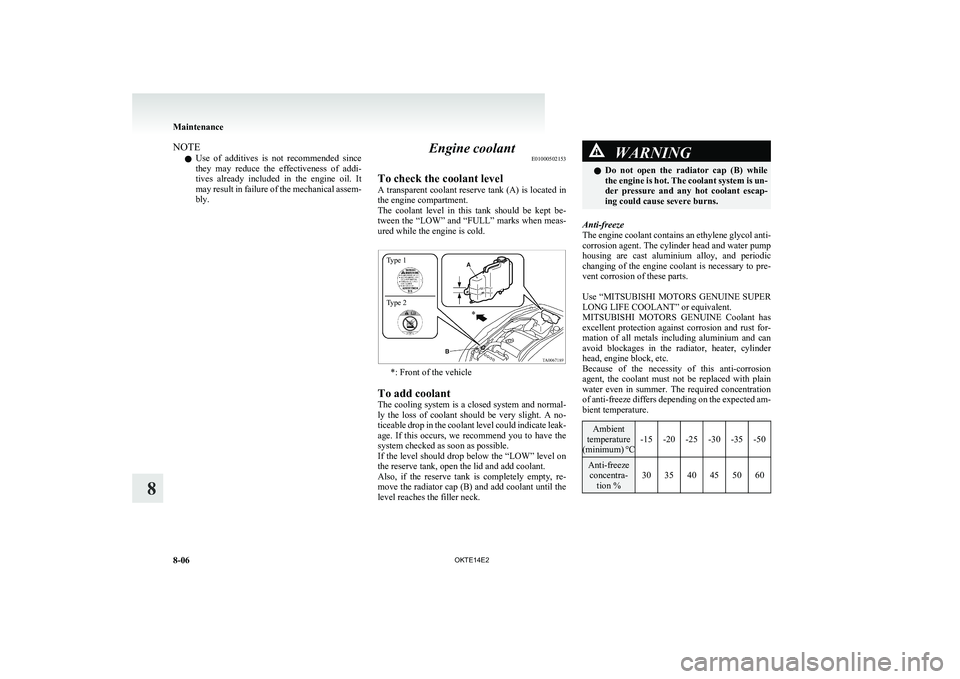
To check the coolant level
A transparent coolant reserve tank (A) is located in
the engine compartment.
The coolant level in this tank should be kept be-
tween the “LOW” and “FULL” marks when meas-
ured while the engine is cold.
*: Front of the vehicle
To add coolant
The cooling system is a closed system and normal-
ly the loss of coolant should be very slight. A no-
ticeable drop in the coolant level could indicate leak-
age. If this occurs, we recommend you to have the
system checked as soon as possible.
If the level should drop below the “LOW” level on
the reserve tank, open the lid and add coolant.
Also, if the reserve tank is completely empty, re-
move the radiator cap (B) and add coolant until the
level reaches the filler neck.
WARNINGl Do not open the radiator cap (B) while
the engine is hot. The coolant system is un-
der pressure and any hot coolant escap-
ing could cause severe burns.
Anti-freeze
The engine coolant contains an ethylene glycol anti-
corrosion agent. The cylinder head and water pump
housing are cast aluminium alloy, and periodic
changing of the engine coolant is necessary to pre-
vent corrosion of these parts.
Use “ MITSUBISHI MOTORS GENUINE SUPER
LONG LIFE COOLANT” or equivalent.
MITSUBISHI MOTORS GENUINE Coolant has
excellent protection against corrosion and rust for-
mation of all metals including aluminium and can
avoid blockages in the radiator, heater, cylinder
head, engine block, etc.
Because of the necessity of this anti-corrosion
agent, the coolant must not be replaced with plain
water even in summer. The required concentration
of anti-freeze differs depending on the expected am-
bient temperature.
Ambient
temperature
( minimum) °C-15-20-25-30-35-50Anti-freeze
concentra- tion %303540455060
Maintenance
8-06 OKTE14E2
8Type 1
Type 2
Page 298 of 362
Washer fluidE01000700672
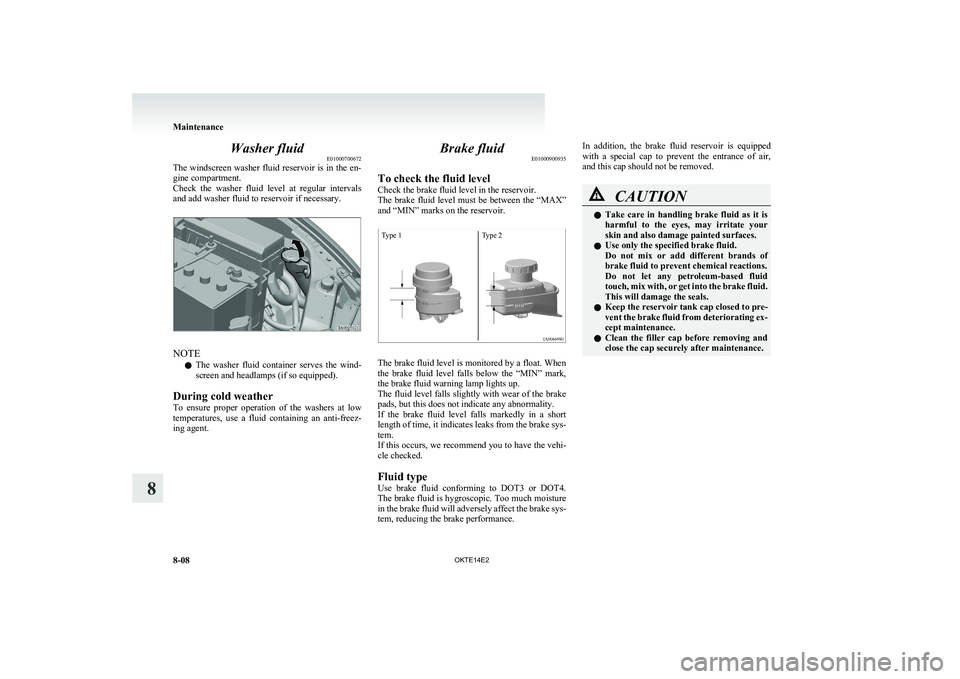
The windscreen washer fluid reservoir is in the en-
gine compartment.
Check the washer fluid level at regular intervals
and add washer fluid to reservoir if necessary.
NOTE
l The washer fluid container serves the wind-
screen and headlamps (if so equipped).
During cold weather
To ensure proper operation of the washers at low
temperatures, use a fluid containing an anti-freez-
ing agent.
Brake fluid E01000900935
To check the fluid level
Check the brake fluid level in the reservoir.
The brake fluid level must be between the “MAX”
and “MIN” marks on the reservoir.
The brake fluid level is monitored by a float. When
the brake fluid level falls below the “MIN” mark,
the brake fluid warning lamp lights up.
The fluid level falls slightly with wear of the brake
pads, but this does not indicate any abnormality.
If the brake fluid level falls markedly in a short
length of time, it indicates leaks from the brake sys-
tem.
If this occurs, we recommend you to have the vehi-
cle checked.
Fluid type
Use brake fluid conforming to DOT3 or DOT4.
The brake fluid is hygroscopic. Too much moisture
in the brake fluid will adversely affect the brake sys-
tem, reducing the brake performance.
In addition, the brake fluid reservoir is equipped
with a special cap to prevent the entrance of air,
and this cap should not be removed.CAUTIONl Take care in handling brake fluid as it is
harmful to the eyes, may irritate your
skin and also damage painted surfaces.
l Use only the specified brake fluid.
Do not mix or add different brands of
brake fluid to prevent chemical reactions.
Do not let any petroleum-based fluid
touch, mix with, or get into the brake fluid.
This will damage the seals.
l Keep the reservoir tank cap closed to pre-
vent the brake fluid from deteriorating ex-
cept maintenance.
l Clean the filler cap before removing and
close the cap securely after maintenance.
Maintenance
8-08 OKTE14E2
8Type 1 Type 2
Page 349 of 362
4
4-wheel drive operation 4-34
AAccessory (Installation) 04
Accessory socket 5-73
Active Stability & Traction Control (ASTC)
4-42
Additional equipment 8-19
Air conditioning
Automatic air conditioning 5-08
Important operation tips for the air condition-
ing 5-12
Manual air conditioning 5-03 Air purifier 5-12
Airbag 2-26
Antenna 5-51
Anti-lock brake system (ABS) 4-39
Warning lamp 4-40 Armrest (Double cab) 2-07
Ashtray 5-71
Audio
Audio system anti-theft feature 5-49
Error codes 5-43
Handling of compact discs 5-49
LW/MW/FM electronic tuning radio with CD play-
er 5-13
Steering wheel remote control switch 5-41 Automatic air conditioning 5-08
Automatic transmission Sports Mode 4A/T, 5A/
T 4-17
Fluid 8-07,9-21
Selector lever operation 4-17
Selector lever position indicator 4-18
Selector lever positions 4-18
Sports mode 4-19
Sports mode indicator 4-19 BBattery 8-10
Discharged battery (Emergency starting)
6-02
Specification 9-16 Bleeding the fuel system 6-05
Bluetooth® 2.0 interface 5-52
Bonnet 8-03
Bottle holder 5-80
Brake
Anti-lock brake 4-39
Brake assist system 4-39
Braking 4-38
Fluid 8-08,9-21
Parking brake 4-06
Parking brake lever stroke 8-16
Pedal free play 8-16
Warning lamp 3-08
C Cargo loads 4-49
Catalytic converter
8-02
Cautions on handling of 4-wheel drive vehi-
cles 4-36
Central door locks 1-07
Centre console downlight 5-76
Bulb capacity 8-24
Replacement 8-34 Centre information display 3-10
Changing a fuse 8-22
Changing gears 4-15
Check engine warning lamp 3-08
Child restraint 2-13
Child-protection rear doors 1-08
Cigarette lighter 5-72
Cleaning
Exterior of your vehicle 7-03 Genuine leather 7-02
Interior of your vehicle
7-02
Plastic, vinyl leather, etc 7-02
Sunroof 7-05
Waxing 7-04 Clock 3-19,5-74
Clutch
Fluid 8-09,9-21
Pedal free play 8-15 Coat hook 5-81
Combination headlamps and dipper switch 3-30
Convenient hook 5-80
Coolant (engine) 8-06,9-21
Cruise control 4-45
Switch 4-45 Cup holder 5-79
Curtain airbag system 2-34
D Demister (rear window) 3-39
Diesel particulate filter (DPF)
4-13
Differential oil 9-21
Digital clock 3-19,5-74
Dimensions 9-03
Dipper (High/Low beam change) 3-31
Door courtesy lamps 5-76
Replacement 8-33 Doors
Central door locks 1-07
Child-protection 1-08
Lock and unlock 1-06 Driving, alcohol and drugs 4-02
E Easy select 4WD 4-22
Economical driving
4-02
Electric window control 1-08 Alphabetical index
1OKTE14E2